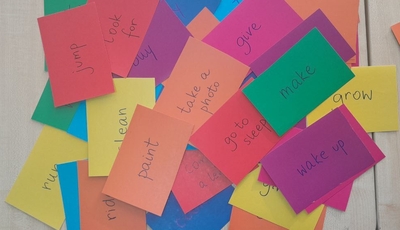
flashcards, wordcards, a page of the coursebook with all of the vocabulary to be introduced and practise
a board to display the category or a powerpoint to display them in an online less
Procedures:
Introduce and drill the vocabulary as usual, with flashcards, electronic flashcards or realia
When the kids feel comfortable enough with using and prounucing the word, move on to the second part of the presentation / controlled freer practice that this activity is
Display the question and ask the students to answer it. When we just get started with this activity or if the group is small, we do it together as a class, later on, the kids do it in pairs for a moment or two.
The whole activity is a categorising task, according to the kids’ preferences and opinions.
I started doing it with my online students and the questions were presented in the form of colourful clouds on the slides, hence the name of the activity.
All of the options that I have come up with and used with my kids include: I like / I don’t like, It’s interesting / it’s boring, I’ve got it / I haven’t got it, It’s made of metal / plastic / paper, It’s easy / it’s difficult, I always and I never, It’s big / small, Tell me more about…
Why we like it?
It is a low-key, (almost) no-prep activity.
It gives the kids an opportunity to use the new language together with the familiar structures, in a few different ways.
It is not quite creative but it is personalised because the students categorise the words according to their ideas and preferences.
The lower levels (i.e. pre-A1) can only categorise the words, the higher level kids (from A-1 upwords) can provide a simple justification for their choices.
The most productive of them is ‘Tell me about’ but it might not be feasible with all of the topics and vocabulary sets.
It is not very challenging so all the students can complete it.
31 words for December (yes, we are extending since we are learning almost until the end of the month and not until the 24th)
a noticeboard
a simple December calendar to cross things out
Procedures
As a part of our hello circle, we check the calendar and count the days since the last lesson. We have classes only twice a week so it is 2 (on Thursday) or 5 (on Tuesday) and we pick as many cards from the bag.
We read the words, the teacher writes the date on each card and the word (we are working on our literacy skills, too).
The teacher puts up all the words up on the board.
One of the students crosses out the days on the calendar.
Then we play with all the words we have so far.
Things that can be done: read all the words, mime the words for the kids to guess, play ‘What’s missing?’, read the words (if special word cards are prepared) and play riddles (It’s an object / person. It’s big / small / medium. It’s red and green. etc).
Why we like it
It is a great way to learn new vocabulary and to revise all of the words that we already know. It is not getting in the way of our regular vocabulary and topic. It is done on the side.
All the words are on display and we can see how we move through the unit and the month.
We are also learning about the calendar and the month.
We are preparing for the New Year’s Celebrations and by the time we get there – we will know all of the words.
It is a nice addition with new games, miming and, eventually, songs that are Christmas-themed.
This particular activity is very seasonal but even though we have just started, I can already see its benefits and the big picture and I really want to use the concept for some other topics. My first idea is the next seaon peak – spring and Easter. I am thinking.
Almost nothing, only a whiteboard and a marker. And, of course, a set of words that you are planning to practise. In case of all the young learners, they will probably be coming from one vocabulary set i.e. transport, pets, clothes, etc.
Procedures:
Teacher revises all of the words from the unit / set, using flashcards or the electronic flashcards.
Teacher writes only the three letters of the words, students guess the whole word. The easy version: the first three letters, in the correct order. The more challenging version: any three letters of the word in the order they appear in the word. The super difficult version: any three letters of ther words in a random order.
In the early stages of the game / unit, the teacher writes all the other letters of the word before moving on to another item.
Why we like it:
It is super easy and it requires no preparation whatsoever.
The length of the activity can be adapted to the needs of the lesson.
The level of challenge can easily be adjusted to the level of the students, the level of literacy and the level of familiarity with the particular set of words.
The game is challenging and it teaches the kids to focus on the accuracy and it helps them practise spelling accurately.
With the support of the coursebook or a set of flashcards, the students can play the game in pairs or small teams, with one student setting the task and the rest of the group guessing.
The game is fun, it is challenging but also achievable since we are working within one set of vocabulary or theme. It draws the students’ attention to spelling, all of the peculiarities of different words and their spelling.
the idea this time was taken from Global English 4, with the unit 5 whole focused on storytelling. There is an activity there with a framework to write a story: you roll the dice and choose one of the options for the time of the story, the setting, the characters and the dilemma. This grid gave me the idea for our lesson and it helped me shape the preparation stage to our writing. It can easily be replaced with a much easier vocabulary set, adapted to the level of the students. And a few die.
We started the lesson in our usual way, with hellos, our hello song and an exercise to practise past tense, our main grammar thing this month.
We revised the main parts of a story that we would use mentioned above and the dialogue and why we have it in the story (to help us express emotions in a story better)
I showed the kids the template written on the board and I read the story I wrote before the lesson using the dice and the framework from the book
We put together a few stories, using the same framework, and a variety of set-ups: everyone rolling and contributing one element at a time, everyone contributing an element each, in turns (i.e. 9 different days, 9 different locations etc), each child contributing their own element, without the support of the book etc.
Afterwards, we started to work on our own stories. I kept the coursebooks open for the kids to have some sources of support and ideas but even before I managed to finish giving the instructions, some of my kids were asking ‘Can we use our ideas, please?’
Everyone had a handout (see above) and we were going step by step, with me modelling and creating my second story on the board and making sure that everyone was on the ball as we went along.
In the end, we added the title and signed the story.
When the stories were ready, we had a reading session and all of them were read out loud. With one of my groups, I had to suggest three options: a) the story is read by the child, b) the story is read by the teacher, c) the story is read by the teacher only (for the sake of my shiest student). I introduced all the stories and we had a round of applause at the end, for everyone.
We haven’t done it yet but I want to type up and print all of the stories for the following issue of our school journal so next week I am going to ask each student to write a short description of the illustration they want the A.I. to create for their story.
Why we like it
The dice story was a perfect introduction to the lesson and an ideal idea-generator. I decided to use the coursebook as it is, in order to expose the students to the real un-graded language.
It was an easy thing to write (it was short) but it had enough for funny and entertaining stories which my kids’ work proved.
By adding two lines of dialogue to the framework in the coursebook, it became even easier and more fun to write and to read.
Initially, I planned it as a one-lesson event but seeing how much they benefited from extended practice and preparation, I extended it into two 45-minute classes.
All of the kids got really into writing their stories. One of my students literally dragged me into the classroom, from the break, as, in his opinion, I wasn’t walking fast enough and he wanted to start work as soon as possible.
All of the stories that were written are great and I am really proud of my students, but there are four or five that are really way above the average, with the funny dialogue and an unexpected ending, a really good piece of work!
I am planning to use the dice framework to prepare a similar but simpler sets for the everyday use, for us to tell little stories in the beginning of every lesson while we are still practising the past tense. I am hoping that now the kids will be able to tell these stories in pairs.
This lesson came as a surprise to me, almost, because, initially, I was not planning on including it in our curriculum. I just wanted a story lesson, around ‘Splat the Cat and the Cat in the Moon’ but as soon as we started to deal with, ideas kept popping up everywhere, sometimes because the kids made their jokes about the characters or because they didn’t understand and asked a question. Or, also, because I noticed something that I could just drag out into the spotlight…
All of that was one amazing experience and this is how, instead of one lesson, we ended up with three: the story lesson, the punctuation lesson and the speaking lesson I am describing here and the intonation lesson I would love to do a bit later.
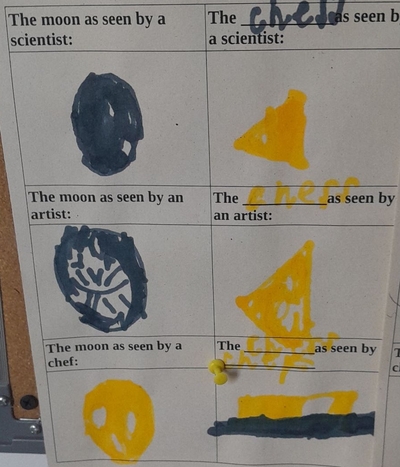
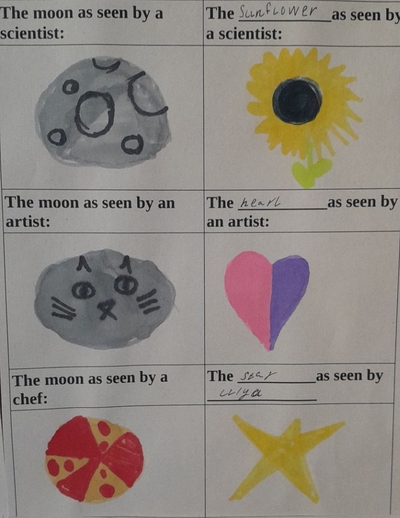
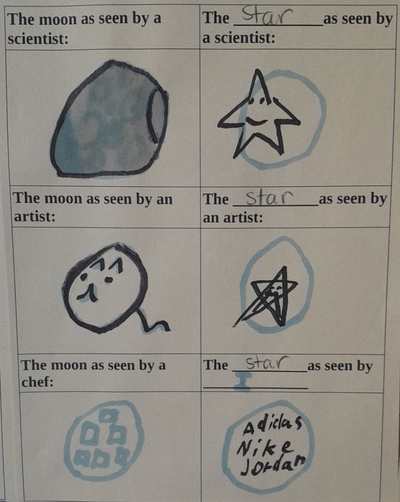
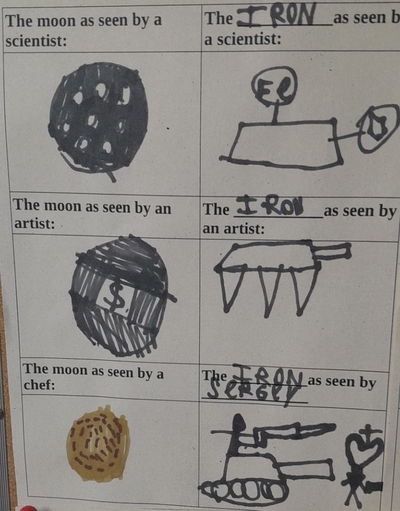
This lesson here, I owe to my amazing student, Sasha (it is always ‘a Sasha’) who, on leaving the classroom, already in the doorway, stopped, turned around and ask: ‘Why did Splat insist on seeing the cat in the moon? There ARE only craters there!’ And there, in the doorway, we got into a discussion about different points of view and how Plank looked at the moon as a scientist and Splat, he was definitely more of an artist…And at this point, right there, I knew I had to make a lesson out of it.
The activities
This lesson lasted 45 minutes and this is what we filled it up with:
we started with our regular hello routine: saying hello, singing the January song, talking about how we were and revision
I introduced the concept of the point of view with the great images from www.stockadobe.com and the kids got is straight away. From the very beginning I wanted to include the questions that we would be using throughout the lesson (‘Who is right?’ and ‘Who is wrong?’). The images are so poignant that I turned them into a poster to put up on the wall of our classroom, to remind us, for now and for always, that we have different points of view and that we all respect that.
The next stage was devoted to symbolic representation and different ways of looking at the same symbol. We covered a similar topic in our Art Explorers with some of my students in a lesson devoted to Henri Rousseau. There we did it with ‘a tiger’. In our English lesson we talked about the different ways of representing ‘the sun’, to go along the space topic of the storybook. We looked at the images (presentation, slide 4) and talked about their origin and which ones were our favourite.
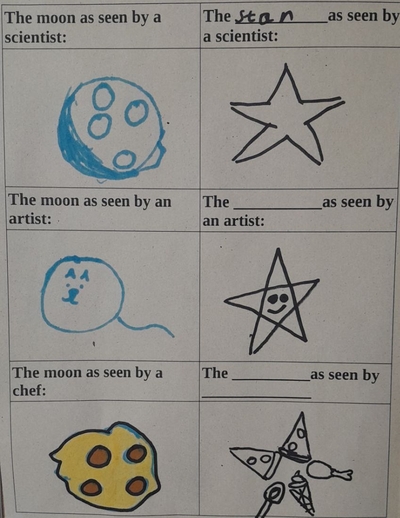
The aim of the following activity was to practise noticing two of the points of view represented in the story, this of a scientist (Plank) and this of an artist (Splat). The children looked at all of the images and they were to guess or decide which outlook they represent and whether they liked them, too (slides 7 to 13). This was also when we discussed if we are more scientists or artists in the way we see the world.
Finally, we got down to our little creative stage. It was divided two sections, the first one based on the storybook in which the children had to draw the moon as seen by the scientist, the artist and the chef (one more idea that I owe to my students, too). In the second part, the students could choose their own object and represent it in the way that a scientst would see it and an artist would. The third choice was up to them.
In the end, we looked at all the pictures and we put them up on the walls.
The teacher reflects
This was a speaking lesson and students could produce a fair amount of language, especially expressing opinion and justifying them. They have lots of great ideas.
I loved it how some of my kids went directly for one of the ways (‘I am a scientist’, ‘I am an artist’) whereas the others were absolutely decisive about not willing to choose any (‘It depends!’ or ‘Sometimes I like to be a scientist, sometimes I like to be an artist’).
I was really happy that we could do a bit of drawing. We did this lesson on the day of the big Maths test and this was perfect, to balance the serious and hard work.
I loved discovering how they chose to represent their symbols and what other creative choices they made. Some of the pictures are just amazing.
As I have already mentioned the idea of ‘a point of view’ is a very necessary in our group and I am hoping that our new poster will help us deal with different issues in our lessons.
It was our English lesson but I can definitely see how I could easily turn it into an Art lesson or just include it into any ESL / EFL course, for example with jobs, space or food.
Some of my kids needed a bit more time to focus and to make decisions about their drawings so, I think, next time I do it, I will be cutting up all of the handouts into smaller tasks and giving them out, one by one and then glueing them onto a card (or into the notebook) so that everyone does as many as possible. Especially that one of my kids wanted to do more, too and she asked for an additional handout. More flexibility!
If you ever have a chance to use these ideas, please let me know!
a set of words that you want to practise, arranged into a snake, with a head and a tail (see the photos)
a piece of paper and a pen although we started with a snake on the board
Procedures
revise all the words that you are working on, with flashcards or electronic flashcards
give out the snakes
tell the students to call out the words they find i.e. ‘I’ve got ‘kitchen’!’
as the students go through the words and circle them on their copies, make a list on the board, as a point of reference for the class
if there is time, the words on the board can be used to tell a story, to ask questions, to describe a picture (depending on the topic)
as a follow-up, the students can create their own snakes for the teacher or for their peers. They can do it in class or at home.
Why we like it
The main reason why I love this activity is that my kids love it and they really dive into it and read, read, read. It helps them work with working on the single word level and to focus on the accurate spelling.
I tend to include some distractors and Easter eggs and they love finding them, all the ‘lalala’, ‘zzz’, ‘bye’, ‘toilet’, and the other favourite words.
The list on the board is a reference points. My stronger students are not interested in them but some use it for support and that is how the activity works for the mixed ability groups, too.
All students are always fully involved in the task. What’s more, whenever I forget and a few days go by without a wordsnake, there is always someone who kindly reminds me to prepare one.
The task can be made more challenging (by connecting the words together with the first / last letter, making it longer with more words) or less challenging (fewer words, easy ‘punctuation’ words (i.e. cat) or adding pictures for each word included).
This particular task, especially when set as homework (or a self-study task) is the one that is always completed by everyone and, again, with full dedication and creativity. And it is always amazing to look at what they have created. The words are there but there are also so many ways of writing them. Checking that is pure pleasure! Check out our gallery!
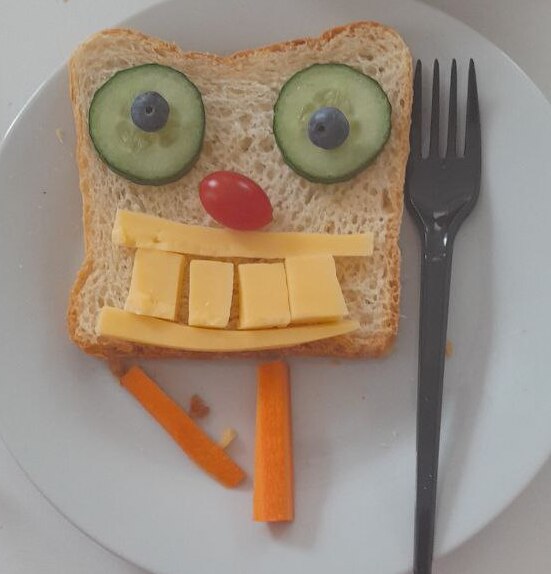
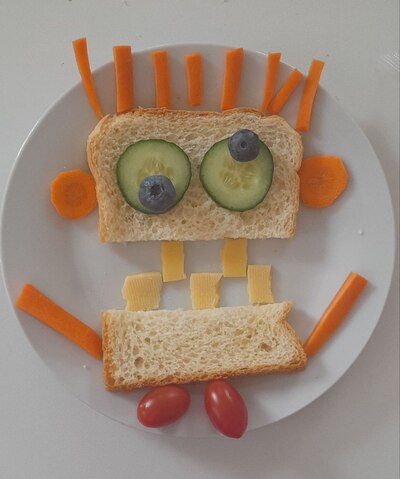
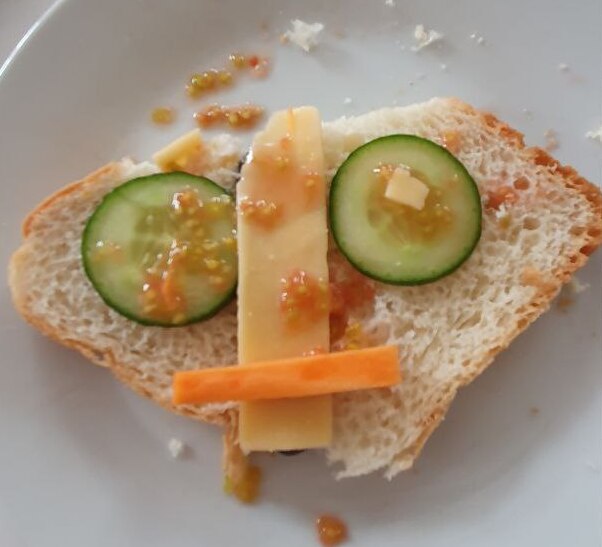
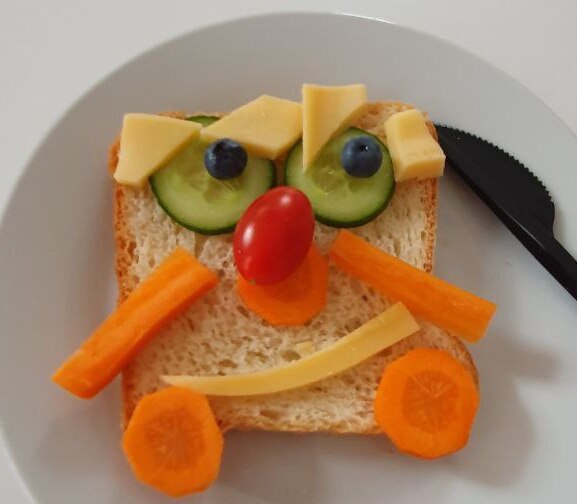
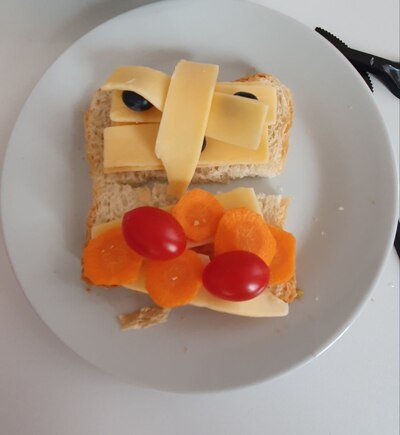
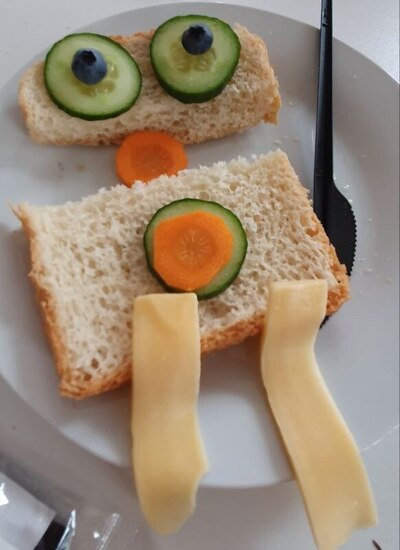
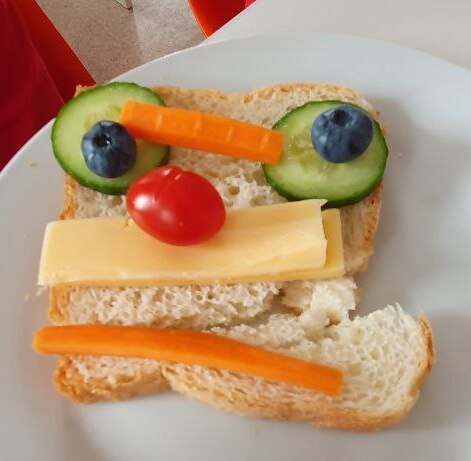
anything that you want to use to make sandwiches, we used: toast bread, blueberries, cucumbers, carrots, cherry tomatoes, cheese slices
a few pictures to get the inspiration from, for yourself and for your students. There are lots of websites with creative sandwiches for kids but I wanted something simple that we could all make and that is why I just looked for illustrations on google. If you are looking for something more intricate, you can have a look here and here.
two plates for each child and a small plastic knife
we made the sandwiches in our lunch room
Procedures
We started with the picture that I created during our previous lesson, my own vegetable print and I asked the kids to guess which vegetables I used in another lesson on the same day (here) and we connected them to the flashcards of vegetables we had on the board. Before the lesson I also put up more flashcards, of all the other items to be used in our sandwiches, and we spend some time working on those, drilling and playing a game.
Important: before the lesson, I sent the list of ingredients to my administrators to ask them to buy everything we needed and to inquire with the parents if everything was ok and to check against the allergies that our students might have.
I told the kids that we would be making sandwiches and I showed them a few different patterns but I also stressed that everyone would be making their own monsters.
We relocated to the lunchroom, washed hands and sat down. The vegetables had already been washed and cut up: cucumbers into julienne and slices, carrots into julienne and slices, cheese into slices. Cherry tomatoes and berries were only washed and dried.
I was making my own sandwich, modelling what can be done and my T.A. was bringing plates with more and more veggies. I did my best to encourage the kids to ask for certain vegetables and we did it))
At the end, we went through all of the veggies to check that everyone used everything. (“Have you got any carrots?’)
Then, we went on to eat!
Why we like it
It was the most ideal follow-up of our lesson 1 (vocabulary) and lesson 2 (making print art with vegetables) and, finally, we could eat in class.
It was a great way of practising our target vocabulary, practical, hands-on, productive because we really, really used the language.
Apart from what I planned for this lesson, namely using the functional language in the context (‘Bread, please’), we also started to sing a new version of the Broccoli Ice-cream, using the combination of the things on the table and then tasting to check what we really think. And, guess what, it turns out that carrot cheese, blueberries cheese and blueberry carrot are all yummy!
The kids worked very well together, they reacted well to changing the set-up and the type of an activity. Nobody got overwhelmed or overexcited, they were patient and waited for their turn and they used the langauge. I was really proud of them.
Last but not least, we made sandwiches (some kids more than 1) and we ate A LOT of vegetables. I was worried for a while that dry bread might not be the most popular item but I did not want to include any spreads of any kind and it turned out not to be necessary. Actually, during the previous stages of the lesson, I asked whether the kids liked all of the items we had ready and I was lucky – everyone liked everything! But, even if not, they were not required to use or to eat all of the ingredients.
As for the creative element, I was laughing a lot during this lesson because my students and their monsters were just amazing and very creative. I showed just a model but I didn’t want them to follow directly in my footsteps. We all looked at our plates and everyone, clearly, had their own idea of what the monster should look like.
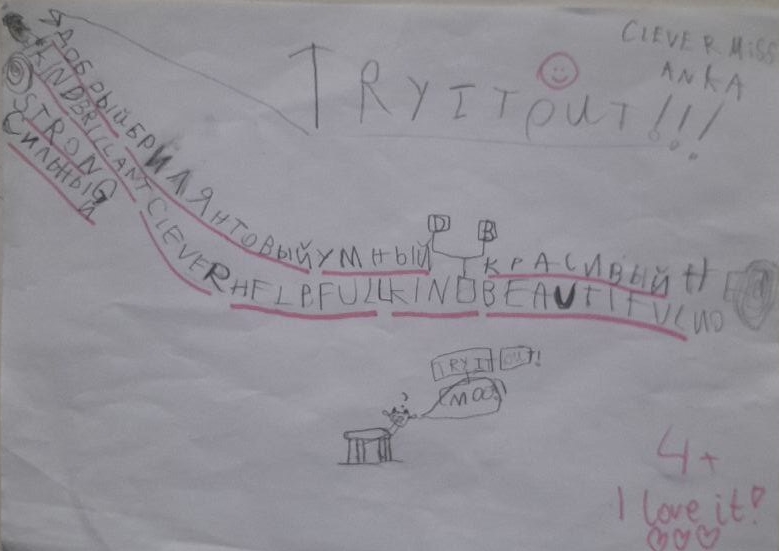
‘Students draw…’ is one of the YL-related lines that is my personal pet peeve…You can see it in coursebooks, teachers’ books, in lesson plans and on the social media. The idea is that a bunch of seven-year-olds (or younger) will have their teacher give out the pencils and they will hear their teacher say ‘draw (insert your word)’ and they will just sit down, get an idea and complete the job in five minutes without any issues and (AND) afterwards they will be ready to talk about their pictures, to present their work or do whatever goes under the productive part of the project.
What a joke! It looks good on paper and in theory and in a real classroom it is going to translate into a neverending, unproductive, very often full of blood, sweat and tears task because the little people simply do not have the drawing skills, the time management, the imagination and the self-control necessary to complete the task that the adults imagine them to do and, more often than not, they will really want to do it well because they care, they love a project and they love drawing and those zoo animals, monsters and princesses that they were told to create. Or, quite possibly, they don’t like drawing, they are into other creative areas and they will devote precisely a total of sixty seconds to that task having then announced ‘I have finished’ and already on the lookout for other things to do. While their more involved peers are still busy and far from finishing, leaving the teacher with a room full of self-induced mixed ability group.
Is there a solution to that? Yes, there is. There must be. This ‘students draw’ has been on my mind for a very long time and there are some ways of handling it, the first of them – taking the coursebook and the ideas with a pinch of salt. Or two. The second of them, working on the staging and the clever way of keeping the activity in shape and everyone on the ball.
This is one of my solutions. It has worked very well with both groups and I am already thinking how to adapt it to other topics. As soon as I do come up with something and as soon as I trial and test, I will be adding to this post. For now, only one topic: the dinosaur.
Ingredients
Paper and pencils or markers for the children
A set of cards that help to shape up the drawing process, like the one that I used in a lesson in which we created our dinosaurs.
Procedures
It is noteworthy that the lesson in which we actually draw the dinosaur was only one of the series of lessons taught over a period of three weeks and was proceeded by a few lessons in which we introduced and practised new vocabulary, did a mini-research and described the appearance of different dinosaurs. After our dinosaurs were ready, we added a fact file, did lots of quizes on dinosaurs and, eventually, had a role-play aka an interview about a dinosaur. The drawing lesson was just a part of a long chain of activities.
The teacher asks the kids to open their notebooks and get the markers or pencils ready or give out the paper for the drawing, depending on the set-up in your context.
The teacher tells the students that they are going to create a dinosaur, their own dinosaur and that they will listen to the teacher and make decisions. It might be a good idea to show the children the cut-up cards and to tell them that each card is a decision about a dinosaur.
The teacher is supposed to draw their own dinsoaur, either on a piece of paper or on the board.
The activity starts with everyone drawing a circle or an oval for the dinosaur’s body in the middle of the page.
The teacher picks up the first card (i.e. ‘draw a long neck’ OR ‘draw a short neck’), the teacher reads it out loud and makes their own decision, announces it out loud and draws the neck for the dinosaur. The teacher then checks with all the students, in turns, what choice they have made, making sure they say out loud what they have decided to do. The kids draw, the teacher monitors.
The activity goes on, with the teacher doing one more round and then the students taking over and reading and dictating for the class and the teacher.
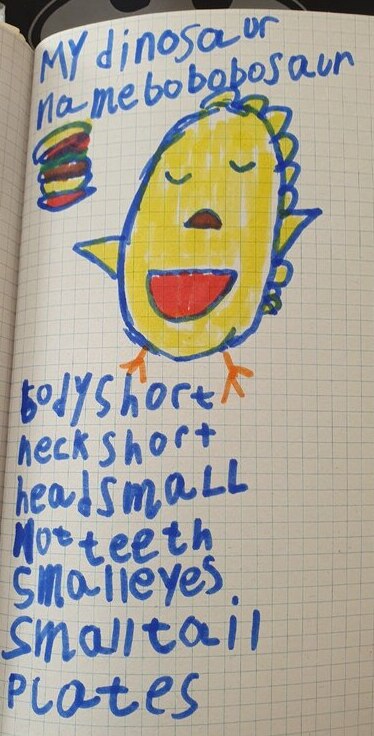
In the end, the student come up with the name for their dinosaur with the suffix -saurus (although it is, of course, not the only suffix used to created dinosaurs names).
The lesson finishes with all the students introducing their dinosaurs briefly and only in the following lessons do the students proceed with working on their dinosaurs (facts, role-playes etc).
Why we like it?
I loved how this format worked in the classroom. It was well staged and it helped me manage the children and their creativity, without losing control and without anybody finishing ahead of time or going on for too long. It was also a perfect combination of teacher-centred and of individual creative choices for every student.
I had quite a few cards to use but I was prepared to use all or not all of them, depending on how focused or interested my students would have been. In the two lessons / groups I did it with, we managed to go through all the cards (aka decisions).
The kids were prepared for the task, vocabulary-wise and we also could use it to practise it further, through reading, confirming, checking etc. The words were out there, in the air, throughout the entire lesson.
The kids absolutely loved their dinosaurs. Some of them even managed to finish their first dinoasaur, and draw another one.
It worked very well also as the preparation for the more productive part of the project, our interviews – role-plays in the following lessons.
Kids also enjoyed the fact of being responsible for making the decisions, step by step, while creating their dinosaurs.
I will definitely be applying this particular approach to our projects in the future.
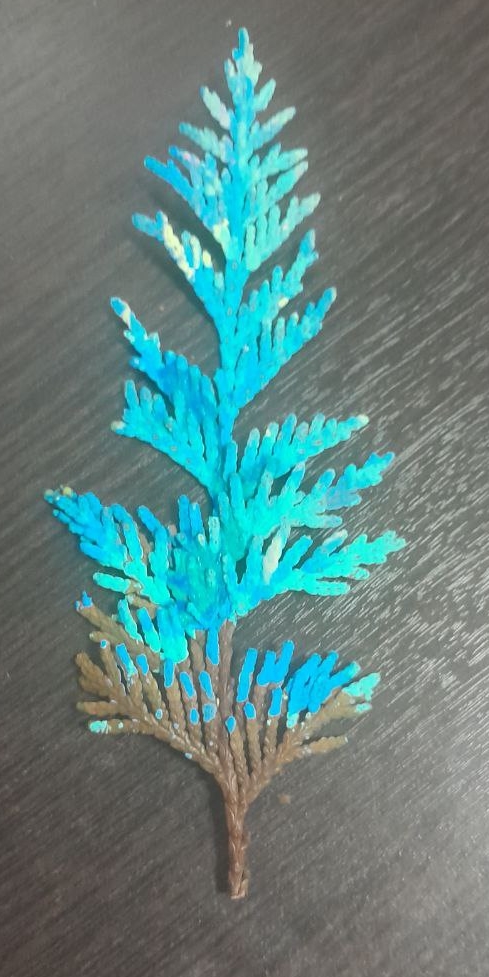
…were completely given up on in this particular lesson. I was considering looking for someone who created something that we would be creating but I quickly realised that the process will be the more important part of the lesson and, again, because of the materials and of the many stages, we will need time. I just wanted to make things out of the salty dough.
The art
While I was preparing for the lesson, I considered different scenarios, also the one in which we make our little things and leave them to dry for a week and decorating them during the following lesson. There are microwaves at the school but I did not want to use them. I wanted to keep everything as simple as possible and after experimenting at home at the weekend and testing the drying and colouring and I had a solution. I also tried to paint my dough while still wet and that went well, too.
I made the dough at the school, just before the lesson. I didn’t have any bowls there but I used one of the big plastic boxes and even though though it did get stuck to the box and dried up a bit, I washed it easily after the lesson. There are many recipes out there but I used this one here.
I prepared the working stations for my kids (a double spread of the newspaper scotched to the table) and got changed into our aprons.
I showed the children the dough, I explained the ingredients I used and I repeated my basic health and safety drill that is the title of this post. I showed them the tools that we had at our disposal (cookie cutters of random shapes and two small bottles to be used as rolling pins) and paintbrushes that were to be used in lieu of the little knives to shape up our creations.
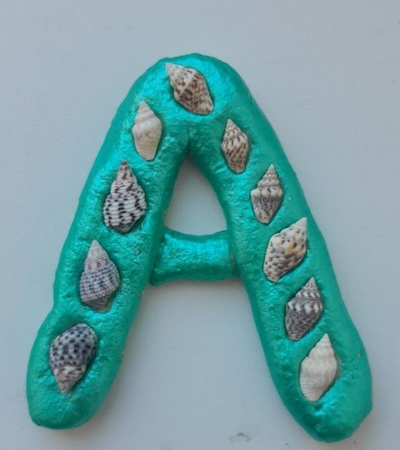
I also showed the children the photos of different things that I made at home while trialling and testing: a letter A, a snail made out of one piece of rolled string of dough, a flower made out of blobs etc. I wanted the kids to get at least a vague idea of the opportunities that the dough presented.
On the board I wrote out the main stages of the lesson and they went as follows: 1. Look (at the model), 2. Make, 3. Paint, 4. Transfer to the window sill, 5. Dry. I wanted to make sure we are all on the same page and that we all finish in time.
I told the kids that since we are experimenting with a brand new material and technique, everyone can make whatever they want. ‘Anything?’, they asked, incredulously. ‘Anything! Go on, experiment and have a go!’ And they did!
The outcomes
It is possible to go through the whole process in 45 minutes, from instructions, through creation to painting and cleaning. Some of the students did finish early but we made sure everyone waited for everyone else to finish before moving on to the following stage.
The paint was dry within minutes but the cookies (that’s what the kids started to call them) were still to fragile to be transported so they were left on the window sill until the following day, when we packed them into plastic zip lock bags.
Once the creations were ready, we transfered them onto A5 pieces of cardboard, for painting, drying and safe travelling later on.
For colouring we used acrylic paints, with a pearl shine and that made them look even prettier. I was really proud of all my students because we took all the necessary precautions and there were no splatters or spatters. Our clothes, tables and chairs were safe.
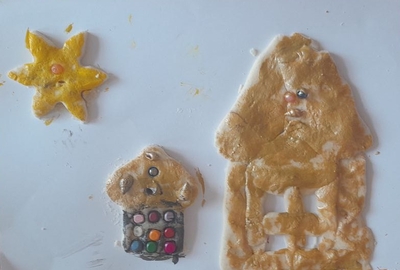
The kids’ creations simply blow my mind. As usual, my amazing artists looked, thought and then went on creating in their own style. Most of them are simple cookies, cut out with a cookie cutter and painted. Some are decorative pieces, like the three hearts made for mum. One of my students thought of making a necklace and she even made a whole for the ribbon. Some students decided to create 3-D figures of their favourite things, some of them very elaborate. And of course they snatched them even before I could take a photo…
Guess, we are definitely doing this again! I am not sure when but we definitely are! Maybe they will be Christmas decorations, maybe little pumpkins for Halloween, maybe Easter egs! The salty dough will be back!
Even more things that can be done with salt dough (updated 18 August 2024)
I happen to have a 1-1 lesson with one of my students and, knowing that he loves making and creating, I decided to spend this time with craft and salty dough. Somehow, this was a very creative lesson as we could make, try and experiment and the ideas were bouncing off, back and forth. We have tried:
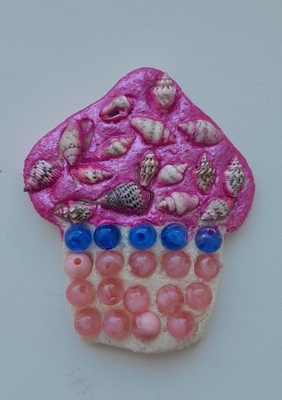
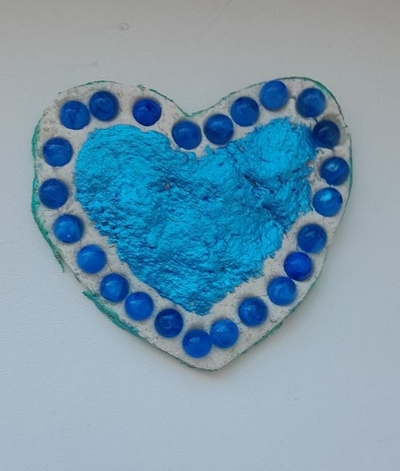
using shells and beads as decoration
applying beads onto an already painted surface (good idea!)
applying beads and shells, then painting with acrylic paint and wiping the surface gently with a wet tissue (good idea!)
constructing a piggy bank on a frame of a glass jar. Not sure what I can say about it, the shaping went well, but the piggy bank is still drying. The success of this one will be determined later)
A paintbrush, that took us all by surprise with how beautifully it caught and preserved the paint. We all kept staring at it for a few minutes, in admiration.
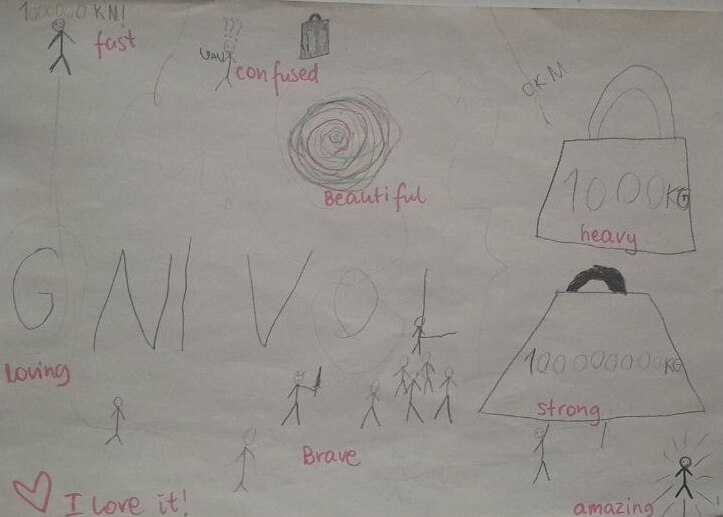
Today, I would like to share with you a project that we have been a part of for the past two months and that I am hoping will continue until the end of the academic year: our own month song.
Ingredients
a song and a melody that will be used as a model, in my case it was January Song from Sing Play Create.
a group of kids and a teacher to manage
optionally: an audio of the melody, ours was Frere Jacques, it was easy to find.
Procedures
First, a story: Our lessons in December, with my year 1 kids, started with different Christmas songs as we had already abandoned the regular Hello songs somewhere in December. When January arrived, I wanted to devote a part of the lesson to a chat about things that we do in that month. And to introduce that slot, I was looking for a song. I found it and quite easily and it was perfect – short, call and response style and with a relatively simple melody. We sang this song throughout the entire month. Then, February came and I started to look for a song that we could sing. I did not find anything that would work for us, something easy and short, without too many cultural references that are not at this point relevant. I didn’t find anything that I could use. I decided we are going to create our own.
In the first lesson of February, I explained to my students the song situation and encouraged them to think about our own song. They made a real effort and we ended up with a song in 1 a and a slightly different song in 1b. I wrote the songs on the board and we photographed the board. Every day, at the beginning of the first lesson, I would take out my phone and start singing for the kids to repeat. Some of the phrases were familiar to kids, the others I helped to translate.
We repeated the procedure in March and ended up with two verses in both groups that we sang for a week.
The next step was of course the kids’ versions. I did not prepare them for that in any way and on one of the days, I simply asked: Does anyone have an idea for a new song? And they did. Right now we do it every lesson and there are always some kids who are willing to share their ideas.
Why we love it
The song is a perfect choice for creative singing (and speaking). It has got a simple melody which we already know very well. The song follows the pattern of call – response so whatever idea the leader comes up with, the group responds, by simply repeating the line.
The lines are short, easy to create and to repeat even for beginner children. It is an advantage, too that the verses of the song follow two patters: either a simple phrase or a short sentence so pretty much anything can be used. Some of the verses we created were like that: ‘March, March’ (only two words repeated), ‘Make snowmen’ (an imperative), ‘Birds and bees are flying’ (present continuous), ‘Flowers grow’ (present simple), ‘We are very tired’ (personalised sentences with the verb to be).
Some of my kids have an idea but they don’t have the language and that works, too. They sing the first line, in Russian, and I respond with the equivalent in English. It also helps with some verses that are not appropriate but are, at the same time, a result of my students experimenting with the language. We have had a few cases of a line like that appearing as a call and me replying with ‘La la la’ or with ‘Sasha is not singing’, to signal that some things are not be accepted.
Kids love this part of the lesson and, on a typical day, we have about 4 or 5 verses, sometimes more, sometimes fewer. Some of the kids sing the verses, some prefer to say them already and it all works.
I am just overjoyed because they are producing the langauge and in this previous week, we have seen an interesting new trend or even two. Some kids (following my example) started to create songs about how they feel on the day (‘March, March. Sunny day. I am very happy. But I want to sleep’) which is their extended and musical answer to ‘How do you feel today?’. Some children sang a song about their favourite month (usually related to their birthday). We had also a few crazy versions of snow in July and another Christmas in the summer. One way or another – lots and lots of language creativity.
Another thing that makes me really happy is that this creative activity appeals not only to my stronger students but also to some of my struggling students and, in general, is great for mixed ability groups. It is easy to create your song, for example by changing one or two words in the verses that your teacher or friend sang. That’s easy to do. Plus, all students are creative, even my beginner beginners. They have an idea and they want to share and since some of the ideas are shared every day, they stay. My student Sasha came up with the idea of a sick rainbow two weeks ago and now he remembers himself and encourages us to sing ‘The rainbow is sick’. We do.
Last but not least, this is our little tradition, our routine, something that we do as a community. And that makes it precious, too!
I am quite curious what is going to happen to this project in April and in May. It is already good and exciting and worthy of sharing but who knows what else is there for us…I will definitely be writing about it in the future!