31 words for December (yes, we are extending since we are learning almost until the end of the month and not until the 24th)
a noticeboard
a simple December calendar to cross things out
Procedures
As a part of our hello circle, we check the calendar and count the days since the last lesson. We have classes only twice a week so it is 2 (on Thursday) or 5 (on Tuesday) and we pick as many cards from the bag.
We read the words, the teacher writes the date on each card and the word (we are working on our literacy skills, too).
The teacher puts up all the words up on the board.
One of the students crosses out the days on the calendar.
Then we play with all the words we have so far.
Things that can be done: read all the words, mime the words for the kids to guess, play ‘What’s missing?’, read the words (if special word cards are prepared) and play riddles (It’s an object / person. It’s big / small / medium. It’s red and green. etc).
Why we like it
It is a great way to learn new vocabulary and to revise all of the words that we already know. It is not getting in the way of our regular vocabulary and topic. It is done on the side.
All the words are on display and we can see how we move through the unit and the month.
We are also learning about the calendar and the month.
We are preparing for the New Year’s Celebrations and by the time we get there – we will know all of the words.
It is a nice addition with new games, miming and, eventually, songs that are Christmas-themed.
This particular activity is very seasonal but even though we have just started, I can already see its benefits and the big picture and I really want to use the concept for some other topics. My first idea is the next seaon peak – spring and Easter. I am thinking.
There has not been a school year in which I would not actually go to school, not since 2007, anyway but, somehow, every year is different, in its own way. This year I went back to teaching a lot of students individually, online, and then back to groups of preschoolers offline.
The classroom and the resources
Long story short: Nothing happens overnight, nothing happens in a blink.
Naturally, I hope for all of us teachers out there, that we enter the classroom in a kindergarten, in a language school, in the student’s home or in a language studio and everything is just as we imagined and the classroom is just perfect, teacher and student-friendly and we have all of the resources and organised beautifully.
In case it is not (and, most likely, it will not be so, in about 99% of cases), it will take some time to get it into shape.
During our sessions on the course I keep telling teachers that it is the most precious thing, to have this ideal pre-school classroom at the back of your head because it will help shape the real environment in which we find ourselves with our students.
This year, it has taken me about two months, to turn the classroom into a place that we all enjoy being in and which works out logistically, with our routine and with our numbers.
It is not a very big place and we have to share it with some other classes, groups and adults, but we have enough room for the small chairs and the hello circle, one big table for our writing and craft and a bit TV and room in front of it for dancing and singing. We have two small cupboards for our resources and lots and lots of walls for our posters and materials.
I have already figured out the layout of the resources and I have organised the flashcards, too. I am not using a basket this year but I have a box for all of the resources for each group where I keep all of the resources for the unit. It makes preparing for each group a bit easier without putting them all away every single day. And, at the same time, I can put them all away not to get in the way when someone else is using the classroom.
The teacher
There is only one thing here (a word from an old hand): dear teacher, be good to yourself. We want the best for our students, we work hard, we teach, we prepare, we reflect and do a better job next time. No two groups are alike and but, with a little bit of time and patience, we can get good results. Kids Can! Teachers Can!
The kids
My students are, of course, amazing. Some of them have been with the school for some time, studying with some other teachers in the past, some of them are new to the school and to learning English. The approach is just being open-minded and working, step by step, towards the routine that I would like to have.
The older group have got used to it pretty quickly and it was relatively easy to just work effectively, with an established routine.
The younger group is still work in progress because we get new students joining in. As a result, wee have been at the stage of ‘building the routine’ since September, simply because every time I think ‘oh, I think that’s that’, there is a new student and, in a way, we go back to square one.Everyone needs a fair chance and the time necessary to figure things out, to get to know the other children and to learn the ropes. It does help a lot that the ‘old’ students (aka those who have been in the group since the start of the year) are our beautiful role-models and we are catching up again.
The activities (and the pairwork)
Our hello circle is quite a long one and in every lesson we talk about all of the following:
Homework check
My name is…and I want…(kids introduce themselves and ask for something, I draw it on our mini-whiteboard)
What’s the weather like today? (asking and answering questions and then putting the relevant pictures up on the board)
Hello song
Clothes: Who’s wearing jeans?
Christmas Words Advent Calendar (only in December)
Literacy practice (only the older group)
A revision game (based on what we have covered so far, different, depending on the group)
The older group have started doing pairwork and it has worked amazingly well.
They have been in one group for two years already and they know each other very well
They have had a chance to lead certain activities
I have used the seating from the hello circle (small chairs in a circle, we only moved them a bit for the kids to face each other)
We have used an activity they already know well (a set of flashcards and a question – answer: Are you scared of…? – I’m scared / I’m not scared /I’m brave / I like..). We have done this activity a few times with the teacher leading and with a student leading for the whole group.
If you are interested in setting up pairwork with a beginner group, have a look at the earlier post here.
The other activities that have been a hit this year:
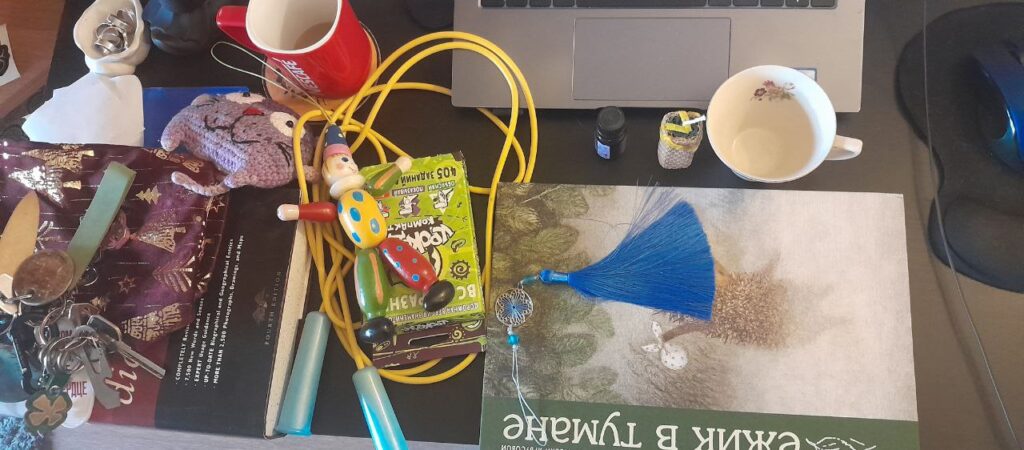
What a teacher’s table looks like after an online lesson in primary…(realia, toys and adjectives)
Instead of a preface
I am writing this post as a response to many of the enquiries that I get from the trainees of the teacher training courses that I have been running for a decade now. Of course, this question rose to popularity with the year 2020, the pandemic and the fact that we have all embraced the online world since.
I have not always been a huge fan of the online education but, like many of my colleagues, I was forced to at least try exisiting in the online classroom over the period of the lockdown in the spring – summer 2020. And, because of how the world has turned to be, since the pandemic I have been spending about one third of my teaching life one: teaching all my young learners online during the pandemic, teaching online and hybrid in the crazy 2020 – 2021 academic year, teaching adults and my teenagers online permanently and teaching pre-schoolers, the regular EFL/ ESL and teaching English through Art, too.
As a result, today, when my teacher trainees ask me about teaching children online, I say: Yes, sure, it is just one of the classrooms that I work in.
This particular post is intended to be a set of ideas and suggestions for teachers who have never worked online and who want to start. These are not all the answers, only how I would get started, with a brand new group of kids. Maybe someone will find it useful)
Before the first lesson
The most important part of the course, before it even starts, would be talking to the parents. What I would like to find out would be:
as much as possible about the children as humans: how old they are and what their interests are, how they spend their time and what they like to do
as much as possible about the children as learners: whether or not they have learnt English before or interacting with English in any capacity and whether they have had a chance to learn anything online
as much as possible about the parents’ expectations regarding learning the language
Depending on the answers to the above questions, the conversation with the parents would have take into consideration to make the lesson successful and effective:
the working space for the child. It might be obvious for the parents that the child needs a special place to sit down, i.e. a table and a chair (not the bed or the carpet in the playroom), but a chair that can be moved aside if the movement stage of the lesson comes up. This should be a place that is quiet, away from the TV or the busy living room or the kitchen where the rest of the family hangs out.
the set of resources that might be necessary. It can be a list of standard resources that you will be using in every lesson, a notebook, a set of markers or crayons and handouts, all depending on the age of the child, as well as some specific resources needed for the particular lessons.
the presence of an adult who will be helping the little student during the lesson and what kind of a support is going to be necessary. With younger children (pre-schoolers), it might be necessary for an adult to be around all the time, although it might be necessary to highlight that the children need to be developing their independence
the length of the lesson that will depend on the child’s age and the previous online learning experience. Even if the optimal length is estimated at 45 minutes, it would be recommended to start with a shorter lesson. If the kids have not studied online before, they will not have enough attention span to participate and to focus to make this lesson effective. It is better to start with 20 or 25 minutes and extend it to one academic hour over a few weeks. And, of course, explain it to the parents.
the potential resources, the most important being the potential for printing resources at home. If the parents can do that – you will be able to use a little bit more, if not – in that case the lesson will be based only on the electronic resources.
The platform
There are a lot of platforms available and, in the end, everyone chooses something that works for them. It has to be the tool that you know very well and the tool that works in the classroom. I personally like to have a platfrom that lets me share the screen and see the students faces at the same time, that is not very tricky with the sound sharing but I don’t really care about the whiteboard option or the drawing on the screen option for the kids. Just a choice and I know that some teachers use these a lot. For the older primary students studying in groups, I like to have the breakout room option for some of the activities (although, again, that is for the groups only and that is not something to do in the very beginning of the course but something to aspire to).
The resources
Please remember that I am myself a dinosaur and I have always been a lazy teacher or a minimalist teacher (save for the special occasions when I splash out). The same applies to the resources in the online lesson. During the early stages of the pandemic, there has been this panic to find and to incorporate as many platforms, games, resources in the lesson as possible. Basically, every week was THIS NEW THING that you had to learn about and to use with your students. That was overwhelming, to say the least, because the most important thing in the lesson is the teacher and the methodology and the tools, no matter how fancy, cannot replace a good structure and a plan.
For that reason, what you see below, is a very basic list, the things that I am using at the moment but that is not everything out there. That said, I am always on the lookout for the new solutions and new things to inspire me, so feel free to use these ideas and keep your eyes open for more!
the coursebook, if applicable, the paper copy for the kids
the self-made handouts that I send to students if the parents can print them
the mini-flashcards that we prepare with the students, if the parents can print them. Usually, there are four per A4 paper, the parents cut them before the lesson, the kids can colour them, I have my own set and we use them for riddles, for testing each other (T: show the card, S: say the word, then swap the roles), substitution drill with the new structures, What’s my secret word? (guessing which card from the set the T / the S is holding) etc.
online games – for the lesson and for the homework or revision.
bamboozle games, although for the younger or new students, I start with one team games (‘we are collecting the points for us’) or with severly adapted power-ups list
some of the Games to learn English. This is a good example of why it is good to continue checking and searching. I have known this resource for ages but I haven’t used it for a year or so but I visited it last week and so much has changed. There are some new games, focused on a specific structure and the past tense or the prepositions. It definitely feels like a new best friend.
traditional (and not so boring) powerpoints which is my homemade online board replacement. I used to use the professional online board but, admittedly, it became simply overwhelming. I use the powerpoints in the same way, T: moves/uncovers the item, S: say things and I like it more because I can organise them by the team, copy them for each student etc.
the realia that you have and that the kids have at home. Luckily, with the online world, we are truly blessed, practically everything that we teach in primary and pre-primary kids have at home, toys, clothes, colours, sport equipment and even the pets or the family member. They should be used in the lesson to make the langauge real. It might be a good idea to inform the parents before the lesson what will be used in class, just to make them aware that the kids might be walking around and bringing things and that it is for a reason.
the craft resources such as plasticine, coloured paper, glue, scissors, crayons or markers or whatever else you want to use. Craft online is a bit more challenging but not impossible. It might be a good idea to leave it for later in the course when you and the students know each other a bit more and when they understand how the lesson works. Again, the parents need to be notified ahead of time, to prepare the materials or even to check and to confirm that they are available. Of course, if a kid is at home, the coloured paper or the glue are lying around at home but it is always better to confirm ahead of the lesson time.
The lesson
Again, this is the lesson format that works for me and it does not really differ much from what we do in the offline classroom with my students.
Regardless of how long the whole lesson is, I divided into three sections: Revision, New Material / presentation, Practice. They are more or less even, without being to strict with the time slots.
A song to get us started, a proper Hello song or just a song that we like.
Revision: saying hello, talking how we feel, what we are wearing etc, depending on the age/ level of the child, actually revising the vocabulary, playing some familar and favourite games.
New material presentation: in the middle of the lesson, when the kids are already warmed-up but still with enough energy and focus for something new, this is when I introduce the new vocabulary or the new material and when we do some controlled practice, too.
Practice: more productive games, more freedom for the kids.
Goodbye: a new song, a video, a story, to finish on a high note.
Coda
If you are just starting in the online world, good luck to you! Remember that in many ways, this is a just a new lesson with student or a new group, doing a new thing and in our early years world, it is very rarely that things work from the word go. It is the routine, the repetition and the familiarity that make things look like we want them. Quite frequently, a new activity done for the first time is just like a preview. If something does it work, reflect on why it didn’t and then try to change some things around and do it again.
Make sure you keep in touch with your students’ parents. Feedback is always necessary but it is crucial during the early stages of the new class because apart from building the routine with the student, you are also building the trust with the parents. And it is a process.
The EFL classroom, just like the Mary Poppins’ bag, is full of the little pieces that to other people might be just random junk but to the teachers of young learners, they are the true gems and the amazing, life-saving fireworks. This post today includes only 5 of them, something old, something blue, something borrowed, something blue or, in the EFL words, something for production, something for games, something for classroom management…Because sharing is caring.
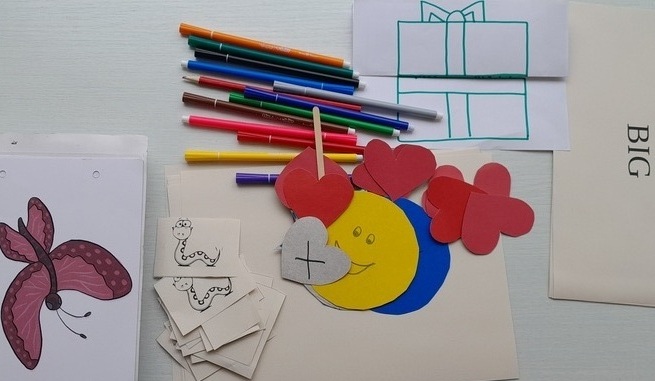
One: paper hearts
You need: a set of small colourful cardboard cards, which stand for ‘I like’ (the colour side) and ‘I don’t like’ (the side with a small cross).
You will need these to encourage the kids to start expressing opinions. The hearts are used as a symbolic representation of the structure when it is introduced, they are used in all the handouts, even with the youngest kids, but they really start working when the students can physically hold them and use them to react to express opinions by showing the appropriate side of the heart, depending on their opinion. First come the gestures and the symbols, then the language itself and then the hearts become unnecessary because the kids are ready to just talk about the things they like and those that they don’t. It works amazingly well with small groups and it works even better with the bigger groups because all the kids can talk at the same time and the teacher gets the immediate group feedback with all the hearts up into the air.
Two: Little random word cards
You need: a set of regular small cards with the key vocabulary from the unit. They can be handwritten or printed. For the younger kids these are replaced with a set of mini-flashcards, with the images and the text or only the images.
You can: use them in a variety of games to practise vocabulary such as: riddles (make a definition to guess the word), questions (ask a question with the word for your partner to answer), similar or different (taking two words at a time to look for similarities between them), categories (with students grouping the words in any way they want), random stories (telling stories with the words taken out of the pile in a random order) or testing each other (to check the meaning or spelling of certain words) or pelmanism if there are two sets of words per group or pair. Anything for more vocabulary practice and use.
Three: Faces
You need: a set of cardboard circles with emoticons for them. The disposable paper plates work amazingly well here, too.
You can use them during the hello circle to help the kids answer the question ‘How are you today?’ as they are allowed to manipulate the cards while talking to the teacher. We also use them all the time while telling stories to help illustrate all the emotions involved and while working with any visuals that accompany listening or reading activities in the coursebook. The emotion flashcards can also come in handy with different behaviour issues. Knowing the words such as ‘angry’, ‘sad’ or ‘ill’ can really come in handy in many class situations.
Four: Stars
You need: a set of cardboard stars, cut out of regular or, if you are really fancy, out of some colourful cardboard paper, and some blutack or magnets. In a super upgraded version these cardboard stars can have a piece of magnetic sheet glued to them (aka this is how we recycle the merch magnets given out at out local pizza place, cut them up and glue them to things we want to use on the board).
Why? These have become my go-to, clutching-at-straws solution to motivate my kids to speak more English in class at the point when my sweet primary kids grew up and became more talkative and they were more likely to choose their first language to chat away. The stars, given out demonstratively with an excited ‘Oh, what beautiful English!’ worked in two ways. On the one hand, they made them focused on using the target language, on the other hand, somehow, magically almost, it got them to use the target langaguage from the higher shelf. Once they got into the habit of communicating mostly in English, we could stop using the stars in every lesson.
Five: Names Cards
You need: a set of small cardboard rectangles, with each of the students’ names on them, one per card, possibly laminated, to make them year-long-lasting.
You can: use them for any pairwork or group forming activity without getting personal. The cards can be kept in a box or a bag and drawn out by the teacher to organise the kids in a fun way. Even more so, the students can be involved in the draft. This way the grouping and pairing will be the most impersonal, the most random and the most genuine ever. It might also make it easier for the students to accept the outcome, even if they end up working with the classmates whom they might not like very much. After all, it will be due to luck, good or bad, not due to some very arbitrary decision of the teacher.
Writing one of the previous posts, on creating the curriculum for pre-schoolers, and I compared the pre-school EFL on the pre-A level to an ocean. It is huge, it is surprising and it is uncharted. It is!
At the same time, while travelling across it, to the first beacons of the A1 level, you can and you will come across those buoys that help you understand that yes, you are making progress and moving forward.
Today, I would like to look at these five important posts that we arrive at in our journey across the curriculum of the VYL English learning. Disclaimer: it is a very personal list and it might be getting extended, changed or removed with time.
One: We start producing sentences
All the learning in pre-school starts with single words, our first hello (although this is a proper sentence), our first blue, green, yellow and pink and our one, two, three, four, five. When that happens, it is Christmas, Easter and birthday put together. I love the start of the course and I spend these first few weeks in awe, observing how my little students venture out into a new territory and how they learn how to navigate it and how to enjoy it. Some of them run into it and embrace it from the word go, some of them are a bit apprehensive and they slowly warm up to it. I take a lot of pleasure in helping them do it and in supporting them on the way.
However, that is just the first step, something that needs to happen and something that the course needs to move on from, to the real first aim and that is: phrases and sentences! These can be very simple and their range might remain narrow for a long time, limited to ‘it is’, ‘I like’, ‘I can’, ‘I’ve got’ but they can be introduced, developed, practised and used from early on. Among all the contributing factors there are: the teacher creating the appropriate exposure by using full sentences while introducing and drilling new vocabulary (‘It’s a dog’, instead of ‘a dog’), introducing structures, supporting the use of the structures with gestures or visuals, encouraging the kids to use full sentences, introducing and using the functional language chunks.
Sooner or later, the kids will develop the habit of using full sentences and they will be doing it more frequently, although, of course, that does not mean that they will only use full sentences because, in their real, L1 life, kids also respond in single words sometimes!
Two: We start producing langauge spontaneously
Let’s imagine this moment: you have covered a few units or modules, your little students already have some vocabulary, they feel comfortable in the classroom and they have even started to use some simple structures. It is going well. The next step might be to focus on creating conditions that would favour some spontaneous language production in order to ensure that children communicate not only with the teacher and not only when prompted by the teacher but when they have something to say and something to share.
The activities that foster this freer communication include: letting children lead activities, setting up pairwork and allowing students communicate to other students, not only the teacher, showing children that the language can be played with and creating opportunities for that with, for example changing and creating own versions of stories or songs and, in general, being creative in English, for example our own version of ‘Do you like broccoli ice-cream?’, deciding what five questions thay may want to ask starting with ‘What’s your favourite…?’ or even by giving commands to the class during the Abracadabra game (‘Abracadabra, 1, 2, 3. You are…’). One of the most powerful questions that can be used in class is ‘Who’s got an idea?’ this way inviting students to take part in shaping up the games and, effectively, the lesson.
Three: We start using a variety of communication strategies
This is the one that I was unaware of for a very very long time and only during the first term of my MA programme, while going through piles of articles and publications in search of something that I might get interested in, I found the idea of communication strategies. This is a fascinating topic anyway, for me as a teacher and for me as a speaker of foreign languages but it turned out to be even more amazing because I decided to check whether my little students use any of those or, more specifically, any more than initially claimed, namely – do the little kids do something else than just refering to their first langauage. And yes, they do!
I still need to publish the outcomes of this research in any way but here I would like to highlight only all these instances of the pre-school students trying to deal with the communication breakdowns and in the way they do it because, in my opinion, it does show that kids become language learners and langauge users, taking control and trying to deal with the situation. The most common go-to solution is falling back on their L1 but there are many many more such as approximation (using a word that is similar enough and may do the job effectively), repeating, self-correction, using gestures to clarify. According to the findings of my small scale research done as part of the MA programme mentioned above (small scale as it was), even those very young beginner students are capable of using some of those strategies, showing that they are becoming aware of the learning process and their place in it.
Among the activities that can help foster and promote the use of communication strategies, there are the use of gesture as part of instructions and new language presentation and practice (to include some alternative, easier communication channels), using riddles in class (to get the kids used to describing objects) as well as modelling repetition or self-correction, to name a few.
Four: We start reading
A large part of the story in the EFL pre-school happens without any written word, unless you count the random words of instructions in the coursebook or the words at the back of some of the flashcards or the letters in the storybooks that we do not really pay any attention to in any active way. Many of the preschool EFL students are too young to start learning to read and write in English as the instruction can start as early as 3. What is more, the curriculum in some of the countries is organised in such a way that the literacy component is purposefully excluded from pre-school and the early years of primary in order to interfere with the literacy skills development in the kids’ L1 and not to overburden the students.
However, since the EFL world encompasses many countries and many teaching contexts and formats, there are out there the pre-primary that include some literacy skills development and there are some pre-school kids who start reading and writing in English.
In the context in which I am working at the moment (pre-primary EFL, 2 academic hours per week or 2 real hours a week), we start introducing some elements of literacy in the second year of the EFL instruction and / or when the kids are older than 5. The first steps involve: introduction of the alphabet, revising the vocabulary according to the alphabet / phonics, simple blending and the CVC words as well as some elements of the sight words and creating the written English exposure in the classroom.
Five: We start learning grammar
The pre-primary EFL world is a fascinating place to be and the element of grammar (or structure) in it is one more piece of evidence.
Traditionally, the pre-primary coursebooks focus on the introduction and practice of vocabulary and not structure. On the one hand, such an approach seems to be justified – the students are very young and the explicit grammar presentations are the last thing that they need or are able to deal with. On the other hand, however, learning a language is not about reproducing lists of words, organised thematically into colours, pets and fruit and ‘structure’ must be introduced in order to enable the kids to communicate in a natural way, even if only as the beginner learners.
It does not require any serious change of materials or any extensive supplementing because even if the coursebook itself does not include any structures, these can easily be added, practised and used. Naturally, the way in this is done needs to be different from the traditional explicit grammar presentation. Other methods have to be found and I have already written about my favourite in an article for the Modern English Teacher in May 2022. The article is only available if you have a subscription but MET recorded two related videos which have been made public and can be found on youtube. Make sure you check out one of the earlier posts here.
Coda
These are my five milestones in the pre-primary EFL world and, at the same time, my top 5 favourite moments to be a part of. There are no certain times or days schedules for them, they happen when the kids are ready
So far, there are five. If you have anything to add to that list, please do so in the comments section below!
These three activities were brought about by the calendar, this title by the title of a wonderful Christmas (?) book by C.S. Lewis. The lion just found itself.
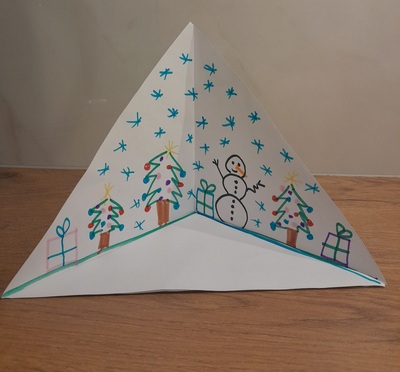
A square aka ‘The Winter Wonderland’
This is a lovely activity that was found online by one of my colleagues, Larisa. The original, created by @kardasti.saz was a lot more intricate and a lot more complex, too complex in fact for my online classes.
The activity starts with a square of regular A4 photocopying paper. It is folded diagonally, to create a triangle, twice and opened. The kids are asked to trace one of the lines, from one corner to the other. We then draw the pictures above the line: the trees, the snowman, the presents and, finally, the snowflakes. It is very important to stage the drawing carefully, element by element, modeling and pausing for the kids to follow. This way, even the younger kids will be able to create such drawings.
We trace the line along the fold, from the centre of the square to the corner, on the bottom part of the square. We cut along this line, until we reach the centre point. We put the glue on the top of one of these newly-created triangles and we put the triangles on top of each other and press.
We have done this activity online so I had to limit the materials to the simplest and basic ones but in the classroom or if the kids have it, there is more potential for the cotton snow or 3-D figures in the little yard.
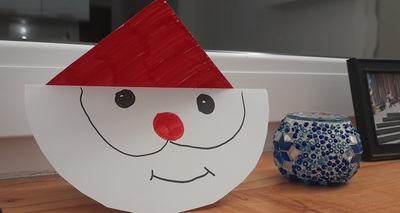
A circleaka the Rocking Santa
Circle is the best shape ever and this activity has be yet another piece of evidence to prove this. I have found it online, on the Noreva Project channel but, again, because we did it online, the instructions and procedures were simplified – only the regular A4 paper, white, which, in case of the triangle, was simply coloured red in class. The parents helped with preparing the materials (a circle and a triangle) but, again, we did everything ourselves and because we went slowly, step by step and line by line, the students could follow and create their own Santa. All the instructions are in the video.
We combined this craft with the song from Super Simple Songs, Santa, where are you? and we used to practise the prepositions (in, on, under) in a guessing game in which students hide Santa somewhere in the room and we keep guessing where it is (Is it on the table? etc).
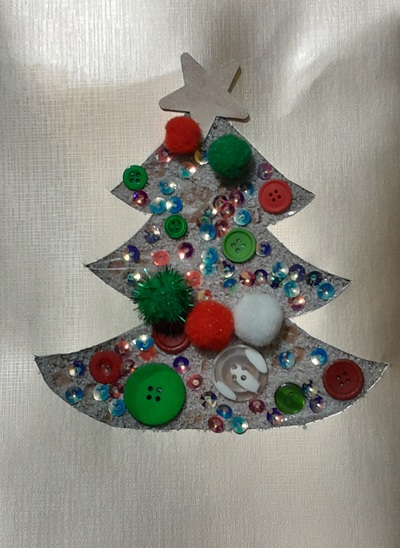
Some scotch aka the Coolest Christmas Tree There Is
This piece was a present that my niece, Mishka made for me with her mum @_mad_alen_ and I can’t repeat it enough: it is simply amazing. It would be too much to try to pull off in the online classes but it is perfectly feasible with the offline groups. I have certainly done craft that involved the same level of pre-lesson prep work.
What you need is a piece of cardboard, with the cut out shape, a few strips of scotch taped to the back of it, sticky side up and a selection of things to decorate with: sequins, buttons, pompons. I suppose there is some potential for less professional ingredients (crayons or coloured pencils shavings, sand, scraps of coloured paper) or even food (buckwheat, seeds).
The scotch here makes it a bit more manageable (no glue!) and the card can be displayed in the window to let the sun shine through it. Or simply used to check how different sources of light change the picture. And there is an opportunity (and a need) for a health and safety training on not eating craft materials and handling small objects.
Not to mention that Mishka’s Christmas Tree has been elected the Christmas Tree of the Year.
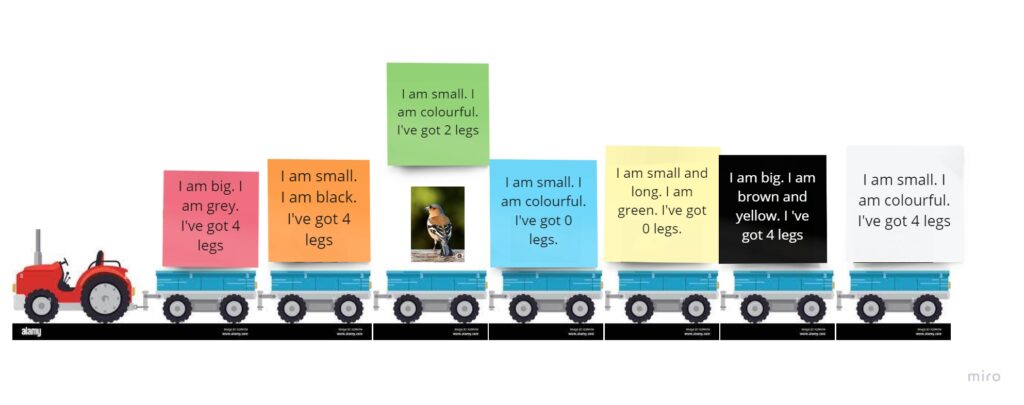
A beautiful train with carriages or a tractor with trailers, with one animal on each trailer.
A set of colourful cards, with a set of riddles following the same framework and the set of structures in each riddle.
Procedures
Students take turns to choose the colour of the card.
Teacher reads the description of the animal. Kids listen and guess the animal. Teacher uncovers the picture to check the answers.
Why we like it
First and foremost, this kind of an activity helps to develop listening skills in very young beginner students and focus as they need the information from all the sentences in order to guess the name of the animal.
At the same time, since all the riddles use the same framwork and the same structures, this game is an opportunity to practise all the key structures. The set of these will depend on what the students are familiar with and can be simplified or extended.
We use this kind of a game to prepare the students to produce the language, too and after playing the game for a few lessons in this very format, with the teacher reading and the kids guessing, we move on to the following stage with the students producing a set of sentences to describe an animal.
Last but not least, with time and with the development of the literacy skills, this kind of an activity can also help develop reading skills.
The game is pretty and colourful, made with colourful cards, beautiful visuals from google. The students are usually curious to find out which animals are hidding on the trailers. The format of the presentation can be adapted, too. In the past we played with huge present box (partially inspired by Rod Campbell’s Dear Zoo) and with houses in which the animals were hiding and the miraculously appearing thanks to the funcion of ‘bring to the front’ or ‘move to the back’ on Miro or any powerpoint.
It can be used with animals or with any other topic with the appropriate adaptation of the phrases ie toys (It is big. It is red, with the assumption that we refer to the visuals that the students are familiar with) or transport (It is big, it is fast, it is quiet) etc.
If you are interested in riddles, please have a look at this post, too, where I write more about riddles for the older and more advanced students.
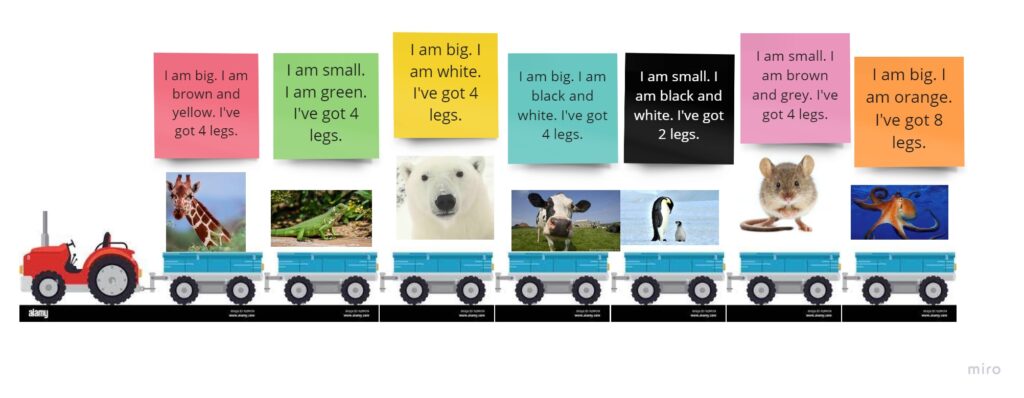
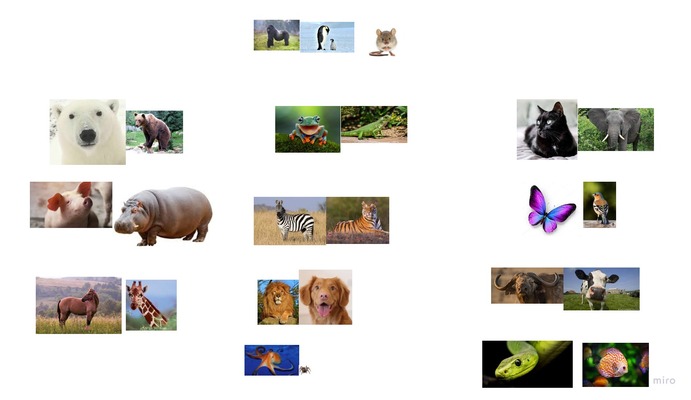
All the pairs. Somehow the penguin, the gorilla and the mouse got left out.
Ingredients
A set of pictures of animals, flashcards or on Miro. That’s it.
Procedures
Revise the vocabulary and ensure that all the cards are displayed at the same time for the kids to be aware of all the options
Model by choosing a pair of animals and putting these cards aside and justifying your choice. With my pre-primary kids, I like to use the first person statements (I’ve got 4 legs etc) as this is what we do with the younger kids (to enable the kids to talk about themselves and the animals without having to introduce the additional structures and to keep it coherent with the songs that we use ie Little bird or As quiet as a mouse). I also tend to vocalise the language ie I’ve got 4 legs (for the cat), I’ve got 4 legs (for the elephant).
Invite the kids to take turns to make their own pairs and to describe the rationale behind it.
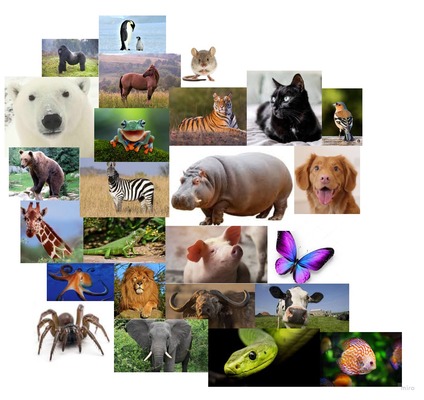
This is what our Miro board looked like before we started
Why we like it
An opportunity for the kids to use and to develop the higher order thinking skills in the EFL context
The students are in charge of what they want to talk about and what they can talk about. It is appropriate for mixed-ability groups.
Little or no preparation as the flashcards are already there, the physical cards in the offline classroom or the set of pictures on Miro which, once prepared, can be doubled easily and used only for that activity.
A great variety of structures that can be revised and some opportunity to learn the new ones as the kids might have the ideas that they cannot express in English yet and this game can be the springboard which will help to introduce these. If the teacher speaks the kids’ L1.
Lots of opportunities for adaptation and using them with different sets of words such as toys, fruit, food, transport and, naturally, the relevant structures. I like to start this game with animals because of the range of easy structures that even the very young beginner students can use in order to complete task and because of the variety of topics that can be included (the colours, the number of legs, what animals can do, what they eat, where they live etc)
The level of challege can also be easily adapted, for example, the set of cards can include only 8 items or the teacher can focus on putting the animals into pairs basen only on the colours or the size which are probably the two most achievable categories, both cognitively and linguistically.
This is a neverending activity because the cards and the animals can be grouped and re-grouped over and over again to let the students create new and less obvious links between the items. Conversly, it can be shortend as needs be.
As regards the interaction patterns, this activity can be used with groups, with kids working together, at least in the beginning, or in pairs if we have the appropriate number of sets of cards as well as with 1-1 students, both online and offline.
There is also some potential for adaptation in the area of materials. The most obvious choice are the flashcards, the mini-flashcards or the Miro board. The teacher can also create a handout with the animals pictures and/or names which the students can colour-code as they are putting them in pairs. This might be a good solution for the kids to work in pairs in the offline classroom.
Last but not least, this activity is an opportunity for the kids to develop the listening skills (as they want to find out the justification for their peers’ choices) and the speaking skills (as they want to present their own reasoning, too). I simply love to observe how my students start with the simplest and most obvious connections and how they venture out into more and more creative ones.
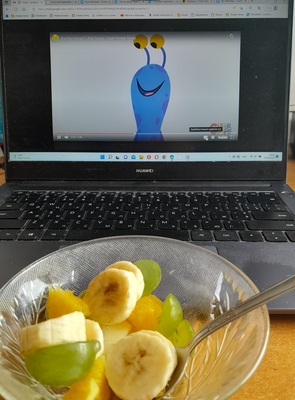
Fruit, washed and cut up into manageable chunks. The most basic set includes: apples, bananas, pears, seedless grapes, seedless oranges.
A plastic plate for each child, a plastic cup for each child, a plastic spoon and a plastic knife.
A set of tissues and a set of wet tissues.
Optional: a set of fruit flashcards and the video of the Super Simple Song ‘Are you hungry?’
Procedures
Start with presenting the idea of the activity to the parents and agreeing on the list of fruit to be used. It is absolutely crucial that the parents are aware of the procedures and the ingredients and that they approve. In my offline classes, I normally send a message to find out whether the parents approve and then I send a list of specific fruit that I would like to use. I look for seedless oranges and grapes. The list of fruit does not have to be very long. It is going to be a great lesson anyway, even if only the basic fruit are used. Although, of course, the salad will look very appealing if we include more colours and adding some citrus such as orange will be beneficial as regards the flavour, even a little bit of the lemon or orange juice will bring out the flavours of all the fruit and it will blend them nicely. But it is not obligatory. In my online classes, the parents prepare the fruit that the kids really like and it might happen that our sets will vary.
Wash the fruit and pre-cut them into pieces and chunks or ask the parents to do the same at home.
Plan where (in the school or in the classroom) you are going to set up your salad production station. Ideally, it would be done in a separate room, where everything can be prepared before the lesson and where the students can relocate half-way through the lesson. In the online classroom, the kids can relocate to the kitchen or cut things up on the table in front of the computer. In the classroom or in the kitchen, prepare the working top first: wash the tables, cover them with a plastic tablecloth.
Set aside the time for hand-washing. Line the kids up and go to the bathroom, wash the hands, dry the hands and go to the classroom.
Give out the tools while pre-teaching the names and while introducing the basic health and safety rules i.e. a plate – it stays on the table, a cup – it is in front of the cup, a knife – be careful. It is a good idea to stage the giving out of tools ie: first the plates and the cups, then the first fruit and the knives, then clean up the plates and give out the teaspoons etc.
Take out the first fruit, call out its name. Demonstrate how to cut it up, for example using the following set of instructions: 1) take a piece of apple, ‘Apple, please’ 2) put it on your plate 3) cut it up carefully 4) put the apple into the cup
Repeat with the other fruit. Throw away the plates. Give out the spoons.
Stir the fruit in the cup carefully.
Start eating.
Game 1: What’s this?: it is a fun game that involves eating and guessing which fruit we have fished out. Teacher can demonstrate how to play it: take some fruit from the cup, eat it without looking or even with the eyes closed and try to guess what it is. If modelled properly, with the teacher asking question ‘What is it?’ and trying to guess ‘It’s an apple’ etc, the kids will follow and will be playing in the same way.
Game 2: Singing and eating: Play the song and pause at every fruit and ask the kids the same question ‘Are you hungry?‘ ‘Oh, look (name the fruit in the salad). Yum, yum, yum’. The only thing to remember here is to make sure that kids finish eating before we play the song again and to continue singing.
Clean up, throw away the rubbish, clean the hands with the wet tissues.
Why we like it
It is a great and relatively simple way of making the language real and meaningful. We learn about fruit and we do something with the real fruit. With many other topics creating this connection between the classroom and the real world is a bit more complicated, fruit (and food in general) is easy. After a few basic precautions are taken, such as the allergy check, the parents permission, clean hands and a safe working environment.
It gives kids a great sense of achievement despite the fact that in the eyes of an adult that might look simplistic. One of my groups called it ‘a cooking lesson‘ and after the first salad, they kept asking for more of those.
It is an opportunity to develop social skills (we are taking turns and waiting for everyone to finish), focus (we are cutting fruit slowly and carefully), fine motor skills (we are working with a knife, we are manipulating small pieces of fruit).
It is an opportunity to eat in class and that is always fun but it is also something that we do together, as a group and, as such, it can be repeated regularly, although not necessarily with the salad every single time. It can turn into some ‘teatime‘ aka a lesson when we just have a little snack together. That name and the idea is also something that came from one of the groups.
It is not an activity for the first lessons with a group
If done properly, the lesson can lead to a lot of production. The ‘What’s this game’ was something that just happened in class, just because I really could not recognise one of the piece of fruit in my cup. I fished it out to taste it and I was simply blabbling to myself. The kids were watching and quickly followed suit. Together we turned into a real game and, since then, I played it with all my groups. The other game, based on a song, was something that we played in class for a few lessons, with our set of plastic fruit and it worked very well. The kids liked giving out fruit and pretending to munch on them. Moving onto the real fruit and the salad was a natural next step.
Let me tell you first what this post is NOT about:
It is not a post about any specific activity, resource or solution for the classroom.
It is not a report of a classroom research task or an experiment.
It is not a compendium of useful links. Or stories from a trainer’s life.
Not today. Today I want to write about the classroom magic and, in all honesty, I doubt anyone can find it of any use. Really. This is solely for my writer’s and teacher’s well-being.
The magic of Lousiana
When the magic happens OR When kids become communicators in L2
Maximising production is definitely a professional obsession.
Although a) it is probably better to call it ‘my professional interest’ and b) you have probably noticed, if you have been reading my posts (It not, you can find the chapter here). This is what I have on my mind while planning my lessons. This is what I think about while looking at the coursebooks, illustrations, stories and games. ‘How do I get my kids to speak?’
The magic of Louisiana
If you are a teacher of young children, you are a bit like a gardener.
There is a lot of digging, a lot of watering, some weeding, and, above all, lots and lots (and lots) of waiting before you get a chance to even hope about any real fruit or flowers. Or any real communication, in our case. Which does not mean that it is boring or uneventful! Quite the contrary!
It is a wonderful journey, filled with treasured moments, from the very first steps into the classroom and any signals that we have exchanged ideas and understood each other. Cautiously walking in, on day 1, a bit uncertain but also very curious what this new auntie (that’s what I have been referred to, in Russian, in Spanish and in Portugues) has to offer. Pointing at the right flashcards, nodding in lieu of a yes, lining up because the teacher asked for it, picking out for the red crayon in a colouring dication or replying ‘Hello’ to your ‘Hello’ Drilling and reciting all the colours and so is confidently shouting out ‘Cat!’ to correct the teacher when she shows you a picture of a cat but, somehow, she says ‘It’s a dog!’ (though with this special elfin smile and a spark in her eye)… All of this is priceless, amazing, magical. And necessary.
The magic of Louisiana
Then comes the plateu.
Yes, a language learning plateu. In case of the primary or the pre-primary language learners it has got nothing to do with reaching the intermediate level (quite often the level associated with the concept of plateau), quite the contrary, but, it does happen with the little kids, too (and yes, this is just the idea that I got right now and decided to use it in this post).
So, taking the level aside, what do I (very subjectively) see as the language learning plateu in early L2 learning?
kids feel confident in the classroom, with its routines and traditions, the teacher, the coursebook, the lesson and the course framework
kids feel comfortable with their peers and the bunch of kids starts resembling a group and a team
kids are curious and easily learn new words (aka single words) and they can reproduce them on teacher’s request, the action – reaction, teacher – student or teacher – students goes very smoothly
kids produce some simple sentences, depending on the curriculum and the programme
kids know and produce some phrases related to the repeated activities during the lesson
The first two points here are not directly related to the actual language production but due to the age of children, they are of the utmost importance and for that reason they have found their place here. This is the point in the course when the age-related characteristics stop being an issue and teacher and children can focus more on the language learning itself.
Finally, the learning happens, we move from unit to unit to unit. We go from unit 1 (colours), to unit 2 (school), to unit 3 (fruit), from level 1 to level 2, the kids are growing, the kids know more, they are under control. The kids are happy and the teacher is happy. The only thing missing is ‘They lived happily ever after’…
Don’t get me wrong. I am not UN-happy with the classes going beautifully well. I am not picking at the seams here. This is the state that we, as teachers, dream about. However, this is also the dangrous plateau because we may want to stay there forever. And we should not. Not moving forward equals staying in the same place equals regression. Things going well is a signal that the time has come to do something new, look for new challenges or think of ways of extending the Zone of Proximal Development.
In the very specific context of maximising language production in the VYL world it might mean helping the kids move from ‘the action – reaction’, ‘teacher – student’ and ‘teacher – students’, one word or one sentence production to the next level: a discourse (or a mini-discourse), student – student, student – teacher and spontaneous production aka I say things when I have things to say (and ‘Not because my teacher, the adult asked me’).
The magic of Louisiana
The most beautiful day is when the magic happens
There is no way of getting ready for this day, marking it in your calendar and making it your aim. It is when, all of a sudden, it happens – kids say things outside of the framework that you have prepared for the day, outside of the pattern they ‘should‘ be using according to the book. Or when they try to say things that are, clearly, out of their range (yet) but which they need to say. Sometimes it is fully expressed in L1, sometimes partially.
Examples? Yes, sure! Let’s go.
Case study #1
One of my 6 y.o. students, still in pre-school, about to go to school in a few week but have have been using the primary level books since January. She has always been a very active child and an eager students but recently, over the past few weeks, she has just skyrocketed. The magic happened!
We are studying online, she is in her natural habitat, at home where she communicates in Russian. However, during the lesson time, she started to use more English while talking to her brothers. Sometimes, it is fully in English, for example calling him from another room, to join us in a game (‘We are playing! Come!’), sometimes it is a mix of Russian and English (‘Sasha, go, do your thing!’). Sometimes, the baby brother wanders in, during our lesson and he also gets his portion of English, because I welcome him in English and his sisters babbles to him in English, too. Sometimes. We are in our little English bubble while in class and she is really making an effort to communicate in the target language then. Although, not only then, actually! I know it from her mum, that she sometimes plays with her teddies and that some English happens, then, too! Some of them must be English-speaking teddies.
I also noticed that when we play together with the older brother, she really listens to what he is saying and she picks out the useful words and then tries to use them, like, in the same lessons the phrase ‘everyday’ or ‘every day’ and, almost immediately, enjoying the variations such as ‘every minute’ and ‘every second’…
This ‘magic’ goes beyond the immersion in the context and the language creativity and experimentation. My student also started to attempt to maximise the amount of language produced.
Last week we started to practice Present Simple (Do you go swimming?) as a follow-up on the simple ‘Do you like?’ which we have known for quite some time and we were interviewing each other, not as ourselves but as the chosen characters. The main aim was to practise ‘Do you do something?’ and I did not even plan to insist on using ‘at the weekend’ or any other day of the week, leaving it for later. However, in class, my student just started to speak and it was a wonderful experience for me to see how far she would go. First, she’d say ‘do you’, then pause, choose the verb, pause again, choose the object, pause again, choose the preposition of place, pause again and, finally, add the day of the week…
Do you draw on your homework every day? Do you dance in your classes on Fridays? Do you sleep in the school?
I could not keep up with her in my note-taking, because there was so much language and, yes, because I was laughing out loud. Not only because her sentences were great but also because I realised that, this time round, I managed to notice, to seize the moment, in a way.
The magic of Louisiana
How to make sure that the magic does happen?
Let the kids lead the activities (‘Who’s the teacher?’)
Start introducing pair-work as soon as the kids might be ready
If possible, include free play slot in your lessons
Show curiosity, ask questions, even if they seem to be above the kids’ current langauge level
Model
Work with the emergent vocabulary but for that it is necessary to be able to speak or at least to understand the kids’ L1 and to provide the word they want to use, even though it is not a part of the wordlist for the level and to keep bringing it back
Be clever and welcoming when it comes to kids’ way of using L1 in class. Apart from the teacher showing respect for it (please, please, please avoid saying ‘DON’T speak L1’ or ‘NO L1’), there is a way of working it. Not all L1 appears because kids don’t want to speak English. Using L1 is one of the communication strategies and it can be a signal for the teacher as to what the kids want to talk about and what they need the vocabulary and structures for.
Be clever and welcoming when it comes to kids’ way of dealing with code-switching (aka ‘mixing’ L1 and L2). This is one of the communication strategies and it is the a step towards and an attempt at L2-only communication
Create the English language environment and provide the exposure with songs, books, games and stories.
Think of extending this exposure and taking English out of the classroom (aka get the parents, the grandparents, sisters and brothers on board!)
Continue reading this blog for more ideas:)
And wait. Stretch out and wait. Like in a song by The Smiths…The magic is bound to happen, eventually.