Storytelling for primary. Ideas for the follow-up activities.

The way that only the freezing winter sunsets can be

Storytelling and storybooks in the primary classroom

Welcome to one more of my obsessions: the story in the classroom, be it a story from the coursebook, a video, a storybook or even a thing that I invent myself, just to sell my ‘product‘. A story is not only the type of an activity that we introduce because of its many benefits or because we want to prepare our students for the YL Cambridge exams but also because the story can be a way and the means of developing the young children’s language skills, reading and writing, speaking and listening but also their grammar and vocabulary.

I have been using stories for ages and I am not exaggerating when I say that this is one of my favourite teaching tools and different storybooks characters, Marvin, Barry, Pete the Cat or Splat the Cat or Peppa, are like my best mates.

What’s new?, one could ask.

In this academic year (four months so far), I have been involved in teaching the British National Curriculum, KS 3 to my two wonderful groups who are an amazing but mixed bunch, especially when it comes to their actual English skills. One of my main aims is developing my students reading and writing skills, preferably fast (yes, yes, I know, nothing happens fast) while working with a very mixed ability group, ranging from complete beginners to A1+ children. Stories have been one of the many ways of doing and I decided to share a few examples of what we have done, hoping that they can serve as a source of inspiration, for all kinds of classes, EFL or ESL.

The general idea

The way these five stories were used in the primary classroom follow the same pattern

  • pre-book: looking at the cover of the book, reading the title, introducing the main character, asking some questions about it, trying to predict the story, introducing and practising the key vocabulary.
  • while-book: reading / watching the story, sometimes with pauses to check understanding, sometimes to involve the kids through gestures, sometimes through the phrases, if they are used repeatedly.
  • post-book: a variety of activities related to the content of the story or to the grammar or vocabulary of the week in which the story was introduced.

And this is when the post starts to make more sense, I hope, because I am going to share here five different stories and five story-related, follow-up activities that I used in the last few months.

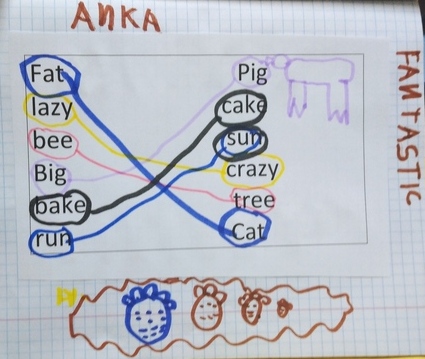
Hen’s pens and Let’s practise vocabulary!

Hen’s pens is a story, one in the series published by Usborne, a lovely resource with the Ted in a red bed, Fat Cat on a mat and Big Pig on a dig. I usually use them a bit later, with slightly more advanced students, in shared reading sessions (and there probably should be a post about that) but this time, I wanted to introduce a longer story, a video story and a rhyming story, specifically to have kids practise noticing rhymes.

In the follow-up of the story, we completed a very simple reading task, in which we put the words into pairs by colour-coding them and then using the chart to practise reading. You will have also notice a colouring page in the handout. This was an additional task for the kids, only for those who like colouring.

Pete the Cat and Let’s speak!

Pete the Cat is very famous in the EFL circles and the story about rocking in the school shoes is an absolute hit. This is my personal way of teaching Present Continuous ever since I have seen the video for the first time and this year, not quite for the first time, I used it also to introduce the school vocabulary, verbs and places.

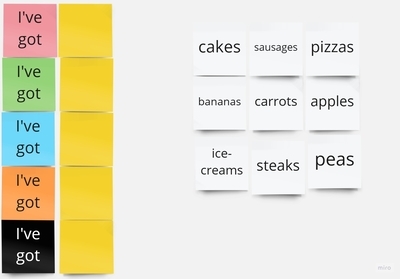
In our lesson, apart from watching, singing, miming and even re-enacting Pete’s day at school, we also followed up with a speaking activity in which the kids had to create their own sentences in the Present Continuous. They had the main verb forms, mostly taken from the story, accompanied by visuals to support speaking (in most cases, the kids were unable to read yet) and their task was to finish the sentence by drawing something. ‘I am eating…a pizza, an apple, a cookie, a banana’, according to their preferences. Later on we compared our sentences, creating our own day at school. The handout served as preparation for speaking.

Again, those children who were interested, were given a second handout to colour.

Marvin Gets Mad and Let’s practise grammar!

Marvin is, no doubt, one of my favourite characters and he’s been present in my classroom for about fifteen years now (wow!). ‘Marvin Gets Mad’ by Joseph Theobald is a great story for feelings and for learning about controlling emotions but this time round I decided to use it to reinforce the grammar behind the Present Continuous.

In the follow-up task, which was quite a stretch from the plot of the original story but it was exactly what we needed to practise the Present Continuous and to reinforce the idea of the suffix -ing. The kids had to add the suffix to all the sentences and then read them and match them to the pictures of a particular sheep.

Zog and Let’s take some notes!

Zog by Julia Donaldson was a good lesson, too. We focused on revising the body parts but we also did a lot as regards the language practice, as regards the structures we already learnt (‘I can…fly, catch a princess, breathe fire) and a few structures that were used repeatedly in the story (‘What’s the matter?’ ‘I can help you’ ‘Thank you’). While we were going through the story, the children helped me produce all the key language.

After we were done with the story itself, we ‘took notes’ about the story. All the kids got their copy of the handout and we went on through it: tracing the lines, reading the lines and completing them with our ideas. As usual, some of the lines are actually very restricted (‘Zog is a dragon’), some are more open-ended (‘He can…fly, breathe fire, catch a princess, help’), the others – even more. (‘He is…green, big, small, happy, sad, scared’). The final two lines are for tracing and for circling, depending on whether you liked the story or not. This time I included a small picture of Zog for everyone and some kids took time to colour it after they were done with writing.

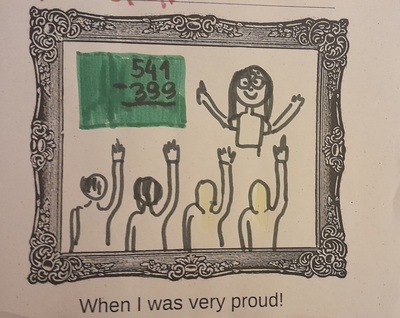
Ling and her proud memory and Let’s draw!

Ling is a girl from one of the stories in our coursebook, Global English 3, in a series on memories (a sad memory, a happy memory and a proud memory) and I actually loved teaching all three. The story was quite challenging for my kids in terms of the language and I just wanted a general understanding of the main facts. After we talked about the picture and listened to the story, I did a short Yes / No activity regarding the content. This was followed by a note-taking activity, similar to the one we did with Zog, but it was substantially shorter and more limited in terms of creativity. However, this was only because the real star of the lesson was the drawing activity.

The word ‘proud’ was a new concept to us and I really wanted to make it personal, mostly because it has a huge potential and it is a good word to have at your disposal in the classroom. With the help of my T.A. we explained what it means, we gave examples and suggested some ideas for the kids, based on our shared experiences such as preparing for the Christmas show, doing difficult exercises in class and so on. I showed my students my example (below) and I let them draw.

Admittedly, the lesson (or this project) did not involve a huge lot of language production but it was a beautiful moment, nonetheless. And a very necessary one, too! Some children knew straight away what they were proud of, some others needed to take time to come up with an idea. And they did! Even those who started their search with a desperate ‘I don’t know!’.

My example is below and showing it to my class was another special moment and, guess what, they got the idea straight away! Because when we are doing something very, very difficult in Maths and my students keep raising their hands and everyone wants to give the answer, I am very proud (based on real events:-).

Coda

These are just a few ideas of what can be done in class when a story is involved. One of many ideas!

Crumbs #75 Paul and his gran. One more way of approaching the story in the YL classroom.

Ingredients

  • One of the YLE Cambridge visuals, Movers speaking (4 pictures), Flyers writing (3 pictures) or Flyers speaking (5 pictures). In our case, this time it was Paul and his Granmother from Flyers from the sample tests booklet (volume 2 p. 96), tampered with lightly (see below)
  • A handout created to accompany the visuals, you can download it from here

Procedures

  • Prepare the visuals by covering up the numbers on the pictures and making a copy for each student, cutting these up. Make a copy of the writing handout for each student.
  • Introduce the story: without revealing too much, for examply by telling the kids that they are going to meet a boy and read a story about his day.
  • Give out the visuals, cut up, ask the kids to find out the start of the story (aka picture number 1), talk about this picture with the class. The questions to use might include: Who is it? How old is he / she? What is she / he doing?
  • Tell the kids that this is Paul and his gran (we had different interpretations here but we need grandma for the handout) and their day. Ask the kids to reorder the pictures, check and glue them in the correct order in the notebooks. They number the pictures.
  • Create the story: kids look at all the pictures, in order to be able to construct the whole story and the plot. This can be easily turned into a speaking activity: the teacher makes sentences such as: I can see a boy. Kids answer with: Picture 1, 2, 3, 4 and 5, etc. Later on, the students take over by making their own sentences. This can be done as a whole class or in pairs. This is also the time to introduce or to check that all the kids have all the key vocabulary. The kids are not telling the story yet, they are only getting ready, thinking about the characters, their actions and feelings.
  • Write the story: the teacher gives out the handwriting handout, the kids glue it in their notebooks, too. The class go together, picture by picture, they read the sentences and think of their own ways of finishing the sentences. They write the words or they ask the teacher to write the words on the board for them to copy. The teacher monitors and makes sure that everyone is going on at the same pace.
  • Read the story: the groups that I did it with were not very big, only 5 or 6 students, so we could all read our stories out loud and applaud. With the bigger groups, it might be a good idea to put the kids into pairs or smaller groups to read to each other and to applaud. Nonetheless, I still wanted to include this element, purely for the reading practice.

Why we like it

  • I am quite happy with that activity since all the materials worked well in the classroom.
  • The kids enjoyed it. Many of the ideas were the same, especially the feelings but there was also some potential for variety in kids’ answers. I accepted everything, for example ‘Parents are angry’ (picture 5) or ‘Paul is scared’ (picture 4). As we always say: ‘All ideas are good ideas’. In that sense it worked very well as ‘the first story we wrote’. I was very proud of them and they were proud of themselves, too.
  • My students are only 6 and 7 and all of them are in year 1 of primary. Their literacy levels vary and this kind of an activity gave them an opportunity to practise a variety of skills, especially their literacy skills, with more focus on reading and writing. There was enough room for creativity and enough support at the same time. Initially, I was considering including the tracing element but then I decided that it would be too much for one lesson, with five pictures and five short texts to write.
  • There is a lot of potential for adaptation: the number of pictures can be adapted, if you choose to use the Movers speaking resources or the Flyers writing resources. The number of sentences for each picture can also be adapted, extended or cut short. If there is time and if the kids are ready, they can add their own, sixth part and even to draw their own picture.
  • I made sure that everyone had the same order of the pictures for the entire story as my kids are quite young and this was the first time we worked with this kind of a materials. Because of that and because of their literacy levels, they are not yet able to work independently on such a task and I decided to keep it more T-centred and T-led this time. However, for more advanced groups (as regards literacy and independent work), there is a lot more potential. They could tell the story in their own way. If needs be, the writing handout, can also be cut up and rearranged, to match the pictures and their order.
  • One thing that I did not do was to allow creativity as regards the title of the story. We did not focus much on it, I only introduce the brief: Paul and his grandma, but there is so much potential here, especially that the kids are also supposed to learn about a structure of the story and that it includes a title. No harm done, we will be repeating this activity and next time we will write our own titles, too!

Before you go, make sure you have a look at all the other storytelling ideas, here and here.

Crumbs #55 Early readers and the sentence building blocks.

‘Pigs might fly’ from Poznan

Ingredients

  • Since I am teaching online at the moment, my main resources are digital. To create this material and this activity, I used my Miro Board although the same could be done using a regular powerpoint. In the classroom, the activity could be recreated with a set of flashcards and wordcards, on the board or on the floor.
  • Three sets of cards are necessary: the key phrase, the numbers, the objects.
Step 1

Procedures

  • We start with revising the key structures and the vocabulary. We read together all the cards.
  • We read the first sentence (I’ve got’) and add one of the food items. Once it is added, the card changes the colour to match the first one. The same activity is repeated with all the cards.
  • We read the sentences again but this time the students choose the number, the teacher add the number and changes the colour to match the colour of the sentence. The same procedure is repeated with all the cards.
  • We read all the sentences together.
  • We play in pairs and we call out the colour of the sentence for the partner to read out loud. The teacher is monitoring and helping.
Step 2

Why we like it

  • This kind of an activity is introduced in the middle of the unit when the students are more familiar with the key structure (I’ve got) and the vocabulary (food and numbers 1 – 20) and its main aims the literacy development.
  • I have only used it with 1-1 online students but there is some potential for adapting this activity for a group of even for pairs (with a multiple set of cards or colour-coded handouts).
  • The activity helps the kids deal with the written form of the vocabulary and structures and to read the words in sentences. In a way, they are also involved in writing because they put the blocks together and make decisions about the numbers, too.
  • The colours help to make the activity more fun and to help them deal with a text that for them will be long and potentially scary. The activity uses only one structure at a time which will be also an early reader-friendly approach.
  • The activity can be made more or less challenging by adding food illustrations to help the kids read, extending the number of sentences or extending the sentences ie I’ve got 4 cakes and 3 apples, etc. When the students are ready, the teacher can also introduce a variety of structures in one set i.e. I’ve got, I like, I can etc.
  • The activity is easy to prepare, it can be recycled and it can be used with a variety of structures.

Step 3

Happy teaching!

Crumbs #20 Тетрадка Love*)

Or about my favourite resource in this academic year, hands down.

Ingredients

  • A notebook for each student and a box to keep all the class notebooks. These notebooks don’t travel home, they live in the classroom.
  • Some writing materials: pencils, markers, crayons.

Why we love it

  • For all of the students in all the groups where I introduced notebooks (and that’s everybody, pre-primary, primary, juniors and teens, apart from my pre-primary level 1 and 2, who are still only 3 and 4 years old, they are going to get theirs a bit later in the year), this has become a surprisingly wonderful way to express their personality and to become even more present in the classroom. When I gave these out, many of my students of all ages were inquiring what they should write on the front page or on the cover page. I suppose it is because there might be some specific regulations at their schools regarding what needs to be and what can be written there. When I just shrugged my arms and said ‘I have no idea. It is your notebook. Write what you want‘, many of them looked at me in disbelief and then started to write some elaborate names in Russian or some made-up names and nicknames or just their names, in a variety of fonts and styles.
  • Equally, the format of the note-taking is highly personalised, too. There are certain activities that we use these notes for (see below) and sometimes they involve a structure or a format which is the same to everyone but, at the same time, the kids are in charge as regards the choice of the writing materials, colours or the ratio between text and the drawings.
  • It is the students’ personal space in the classroom, too. We share what we have written but I hardly ever look into those notes, unless they ask me to or unless they need help with some vocabulary or structures. Since this is a new project and since I am just developing it and discovering its potential and its potholes, I have just realised that I will have to include some kind of delayed error correction in the process, for instance by reading the entries and contributions to fish out some of the spelling or grammar mistakes.
  • It give the students an opportunity to write and to read more.
  • It is an opportunity to keep all the notes and all the ideas in one place and to go back to them, to review, to remember, to reminisce or to recycle.
  • Notebooks for the high level students (C1) are our way of breaking into the least favourite skills ie writing. After we have finished a receptive skill task such as exam reading and exam listening, we follow it up with a 50-word (plus) summary in the notebooks, steering away from any specific genre or format, just simple note-taking that now compliment our regular ‘What do you think?’ speaking sessions. We go back to these notes in the following lessons, to check whether our views have changed in any way, whether they have developed but also, very importantly, to edit and to improve, when possible.
  • Notebooks for juniors (B1) have been used in a variety of ways related to the vocabulary we study. First of all, they are the opportunity for the students to reflect on the vocabulary they have learnt. At the end of the unit, we look at all the phrases, structures and words and categorise them. The categorise we use change all the time and have included the following: easy words and difficult words, useful words and not-so-useful words, interesting words and not-so-interesting words and I am hoping to add more to this list. In the future I would also like the kids to use their own categories in the future. This kind of an activity also involves a discussion and sharing the rationale for our choices (and that is my favourite part of the whole activity). We use the notebooks also to work on the additional vocabulary, not included in the coursebook but still worth knowing. Sometimes we create the lists ourselves (ie while describing the objects, we also revised a list of materials) or we work on the lists that I prepare (ie a few weather idioms that we discussed while going through the topic of ‘extreme weather’). Last but not least, this is also where we take note of the emergent language, in the section at the end of the notebook called ‘Our special words’. I keep track of these on the whiteboard (the left margin) but I encourage the students to take a note of these (or some of these) in their notebooks.
  • Notebooks for primary (A2) are probably the most multi-functional among all the age groups. First of all, we use them to complete our portfolio tasks that are included in our coursebooks, one task for every two units. For these, each student gets a pre-prepared template, a notebook-page size, which they glue in and then use for whichever task we have such as the personal file (used in an interview) or the list of the adjectives to describe animals (used later in Our Big Animal Quiz) and so on. We use it also to personalise the vocabulary that we learn, for example after we have learnt the jungle vocabulary, the kids were asked to arrange all the new words in the order of their own preference, number 1 being their favourite word, number 9 being their least favourite. As with the older students, we later talked about the reasons for our arrangements. Last but not least, we use the notebooks to prepare for any student-generated games that we play. They are especially useful in all the guessing games and are much better than any small cars because the notebooks are not transparent and, because of their format, they help the kids to keep their secret words really secret. You can find out more about this game here.
  • Notebooks for pre-primary (pre-A1) is a serious step towards developing reading and writing skills. Now, I am not sure whether it is going to fit all the pre-primary classes (because some children are not ready and some programme do not even include any literacy elements) but this is what works for us. My students are 5 and 6 at this point and we have been doing a lot of literacy activities for about a year now. We started relatively early simply because the kids showed interest in the written word and I realised they were ready. We went slowly but with great results and I can safely say that now it is their favourite part of the lesson. Last year we did a lot of writing on the laminated erasable pages, with whiteboard markers, this year we moved on to notebooks. We use the notebooks to copy the words that we learn, in two or three batches, with only four or five words per lesson, not to overwhelm the kids. Kids usually choose to add little drawings to these so our notebooks are slowly becoming picture dictionaries. Our notebooks are also used in pairwork, for example in a survey on the food we like and we don’t like in which the students used a pre-prepared chart (printed, cut out and glued in by the teacher) to interview their partners and to ‘take notes’ in the form of pluses and minues. I found out that the notebooks really help to set-up and to run a pair-work activity. The notebooks are also going to help us to maintain continuity with the longer-term projects such as the reading of a phonics story such as ‘A fat cat on the mat’ by Usborne and all the related activities. They will be completed over a series of lessons but thanks to the notebooks we will be able to get back to them and to revise in a more SS-centred way. Or so I am hoping.
  • There is no other way of putting it is: it is a proper Notebook Love (or Тетрадка Love) and it is almost ridiculous that such a tiny and irrelevant thing, at RUB 40 a piece (about 50 cents) could have such an impact on our lessons with its potential for creativity, reflection, personalisation…And, mind you, it’s been only two months. Something tells me, the best is yet to come.

Happy teaching!

P.S. Of course I have forgotten to take proper photos in the classroom, of all the cool things in our notebooks. I will try to make up for it, at one point. For now, just some cool notebooks that are kicking about the house.

I did not ask them to write my name here. I feel honoured they decided to include me here))

*) Тетрадка – a dimunitive of the word тетрадь (notebook)