Crumbs #68 Stickers in the park. A great lesson out of (almost) nothing

Ingredients

  • A colouring picture ‘in the park’. Any will do but I used this particular one because it contained enough detail. Sadly, I cannot find the reference for it.
  • A set of stickers. I used animals because that is exactly what I had in my leftover box but it could be anything. We were not aiming at creating a very realistic picture, as you can see in the example.

Procedures

  • We introduced and practised the vocabulary featured in the picture. We used the wordwall for that (this one). We drilled the words, we read them, talked about the things we like and don’t like. I also decided to introduce the gestures for each of the words because I wanted to activate this part of my kids’ imagination as our following game involved miming and guessing. One of the children was sitting with their back to the screen, the group were supposed to mime something together for the student to guess. Naturally, we took turns to sit on the big chair. I was invited to particiapate, too!
  • We continued practising using the prepositions: with a song, with the YES/NO game and with out toys.
  • We sat at our tables, each with a copy of the picture and did a quick run through the picture to familiarize ourselves with all the elements (‘Can you see…?’).
  • Every child got a sheet of stickers that I had leftover from other activities, animals from different habitats that I just cut up into pieces, to match the number of children in the group.
  • The idea of the game is very simple: the leader directs the group where to put the sticker i.e. ‘Take one sticker and put it on the bench’ (in the tree, under the tree etc). Everyone listens, the teacher monitors and checks.
  • The sheets of stickers are passed on in the circle (‘New stickers, please!’) and the game continues.
  • The game is led by the teacher for the first few rounds but then the students are asked to take over and to dictate when the stickers as put.
  • The game goes on for as long as it is necessary.

Why we like it?

  • It was, eventually, a very student-centred and productive activity and we used a lot of the target language (prepositions) and in the format of the Starters YLE Speaking.
  • We had a lot of fun. It started quietly and very realistically, with animals on the grass and in the trees, but, as was to be expected, it didn’t last once someone decided to put something on the girl, on the sun, in the air etc. We laughed a lot and kids were very eager to show their pictures and to announce what they put and where.
  • Although our main aim were the prepositions, we also revised (and introduced in some cases) the names of the animals as the stickers had all the habitats and I thought it was a nice opportunity to at least try to extend our vocabulary.
  • The activity is very easy to prepare and any set of stickers can be used.
  • I was really proud of how my kids worked well as a team. Everyone played by the rules, they did not take more than one sticker, they passed on the sheets without delay, they looked at and praised their friends’ pictures.
  • I was wondering whether it can be adapted to any types of vocabulary and what I have come up with so far are the following: a picture with a few people or characters and a set of stickers to practise ‘has got’ (‘Choose something for the princess’, ‘The princess has got a cat’) or a picture with characters and practising ‘likes / doesn’t like’ (‘Choose something for the princess’, ‘The princess likes / doesn’t like apples’). I also used the similar ‘recycled stickers’ for a guessing game with older students with the places in the city. The kids had five stickers which they had to put somewhere around the city. They kept the picture secret because the speaking task was about describing the places for their partners to guess. This version could also be adapted to the picture of a house or perhaps even to the map of the world to practise the names of the countries.
  • In the picture above, you can see one of the examples, created by my student.

Happy teaching!

Crumbs #67 A puzzle! Or about spicing up a task for primary

Ingredients

  • A task that you need the kids to complete, the one that can be divided into parts, for example a grammar revision page that consists of exercises, a reading comprehension task or, as was in our case, a set of addition of two digit numbers with carry over which my kids love but which is still a bit of a challenge. I wanted something to motivate them and to reward them for their hard work.
  • A colouring picture, a copy for each child, cut up into pieces, one piece part for each part of the task.
  • A pencil, a glue stick, a paper where the puzzles will be glued in the end and perhaps markers for colouring.
  • A set of envelopes, one per each piece of the puzzle, labelled in the same way as the parts of the task and magnets to put them up on the board.

Procedures

  • Depending on the task, you need to prepare the kids for it. In our case, we revised the numbers and number bonds with the wordwall cards and we also watched a short video on adding two-digit numbers.
  • I showed the kids the handout and the letters and the corresponding envelopes on the board, each of which contained one piece of the puzzle picture. I demonstrated how after they have completed one part of the task, they are allowed to come up to the board and to take the corresponding envelope and one piece of the puzzle from it. Because of the nature of the task, we had obvious answers and I wrote them inside, too, for the kids to have something to check their answers.
  • We ran a quick session of instruction check questions such as: Can we run? (No!), Can we take the envelope to our desk? (No!), Can we take two pieces from the envelope? (No!). I accompanied these with gestures, too.
  • The we got down to work and I focused on monitoring and helping out when necessary.
  • As soon as someone was ready with all eight pieces, I started to give out the gluesticks for them to glue their pictures in the notebooks.

Why we like it

  • It was a perfect way of spicing up a very serious and complicated Maths task and of rewarding the kids for completing it.
  • The kids were very curious about the picture and it helped us make it seasonal and special. To be honest, a lot of our Maths in October has been given them Halloween label. We have counted many pumpkins, lollipops, candy, spiders, witch’s hats, cobwebs and cats. This was one more lesson in the series. Plus, it is also how we are preparing for the actual holiday next week and how are practising the vocabulary.
  • The task can be easily adapted to different tasks or subjects and, naturally, the theme of the colouring picture, can also be easily changed to match the topic of the lesson.
  • We had 8 pieces of the puzzle but this number can be extended or limited, depending on the kids and their age.
  • The task is also very good for developing fine motor skills (re-organising the puzzle pieces) and cognitive skills (putting the pieces together).
  • It was also a great activity to give the kids work individually on the same task, with turn taking, respecting the other participants, not revealing the answer and playing by the rules of the game. They could almost do it and the most challenging part turned out to be the fact that all the kids went through the task in the same order so the evelope A was in high demand, then the envelope B etc. This is something to think about in the future. I am also considering putting up different envelopes (or stations) around the classroom, on different tables or shelves.
  • The kids got really involved and they really liked the task. Some of them already asked if we are going to do it again. And yes, we will. Either in Maths or in one of the other subjects.

Happy teaching!

Crumbs #66 Shapes Project for Primary

Ingredients

  • A set of shapes of your choice, cut out of paper before the lesson
  • An A4 piece of paper with the list of figures that will be included in the activity.
  • A glue stick for every child, a pencil to take notes

Procedures

  • Naturally, this project involved some pre-lesson preparation: the handout, the glue and, most of all, all the shapes which needed to be cut up and sorted out. I used 5 separate boxes to make sure that they don’t mixed and are easy to select and to abandon.
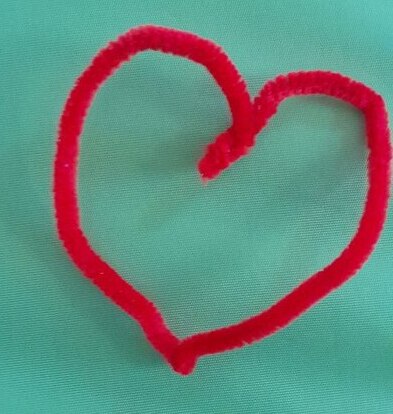
  • We had two lessons devoted to shapes and so we could do all of the following as a preparation for the project: introducing the shapes, looking for the shapes in the classroom, song Can you see a circle? from Super Simple Songs, looking at Shapes Monsters from Twinkl, to recognise and to count them, making shapes from pipe cleaners (the example of which you can see above), working on the sequence (‘circle, square, circle, square’) and, as a direct example for our creativity, looking at some transport made of shapes (also found on Twinkl).
  • The next step was a set of instructions. At the moment I work with a teacher assistant and I saw it as an opportunity to use this resource in setting up the project. I prepared my instructions to use the simplest language possible but I still asked my TA to translate sentence by sentence. The main elements were these: We are doing a project. We have five shapes (displayed on the board). You can make something for yourself. Maybe a flower, maybe a car, maybe a monster (referring to everything that we saw in class). All ideas are good ideas. You can use 10 shapes (gesture). Please sit down and think. I will call one student to come here and choose shapes. Sasha, come here, choose 10 shapes. etc.
  • Afterwards, with Sasha choosing her shapes, two students helped with giving out the handouts and the glue.
  • Everyone kept working on their shapes, I was walking among them, helping and monitoring and as soon as they were finishing, I would come up and ask them to count all the shapes they have used.
  • In the end, the kids were showing their projects to each other but it was not a formal stage of the lesson. Ideally, we should have finished with everyone showing their work and presenting ti with a simple ‘I’ve got…’ but, unfortunately, in our case, we ran out of time.

Why we like it

  • In general, it is a simple project with a lot of potential and it can be used in a variety of lessons.
  • In a Maths lesson, like ours, it is a an opportunity to see the practical use of shapes and to balance the serious studying with a more creative task. It also involves shapes recognition and counting. It was also an interesting follow-up and development on the previous lessons in yet another way: we looked at shapes, we counted shapes in shapes pictures, we looked for shapes in the classroom and we made shapes out of pipe cleaners. These last two activities were especially exciting for the kids and that was my cue for a more hands-on activities.
  • In an English lesson on shapes, this activity could also work very well, especially that there is the early literacy activity which, potentially, can be extended. The kids can be asked to copy the words from the board and, in this case, the ‘handout’ will not be necessary. The kids can also be asked to write the name of the picture they created, especially if they work within a vocabulary framework, for example toys, pets, animals or transport, although, admittedly, this would put a kind of a harness on the creative thinking here.
  • In an Art lesson, this activity can be connected with any artist who liked shapes for example Kandinsky, Malevich, Mondrian, El Lissitzky or even Picasso. Apart from the main art project, there would also be an input session devoted to the Artist of the Day. If you are looking for ideas, please have a look here, at Teaching English Through Art.
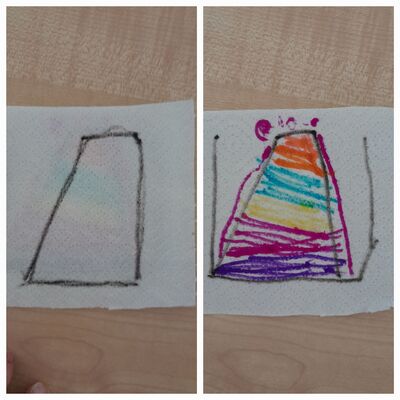
  • As a first project, this lesson was a wonder (and please forgive me blowing my own trumpet here!). The kids got the idea and they really took to it. Everyone interpreted the task in their own way and created some lovely pictures, some of which are an inspiration for me as a teacher, for example to draw the shape first and use the shapes to create a proper collage or to make a list of all the shapes necessary beforehand, in order to facilitate and to promite the Thinking Time stage of the project. Please make sure you have a look at the examples below.
  • The kids got involved in the project, even though there were a few who were slightly reluctant in the beginning. However, as soon as it became obvious that, really, all ideas are good ideas, they started to work on their projects.
  • The next time I do this project, I will make sure I prepare my own model. I was planning to do it but then the teaching day started and I simply forgot. It would have helped with the instructions and the whole project, including the counting of the numbers and the final presentation.
  • As regards the choice of the resources, it seems that it was also a good idea to go for a more exciting type of craft paper, as regards the gloss, the texture, the print or a mixture of these. It really adds up to the success of the project. It might be also a good idea to consider an A3 paper for the base, the A4 might be a bit limiting, although A3 is definitely a more tricky size to carry around, to take home or, even, to put up on the wall.
  • It really was a way for all the kids to exercise their creativity and I am very proud of my students. Some of the creations are simply brilliant and they helped me learn something new about my students. It is also a signal for me to use more of these activities.

Some noteworthy examples of creativity from my kids

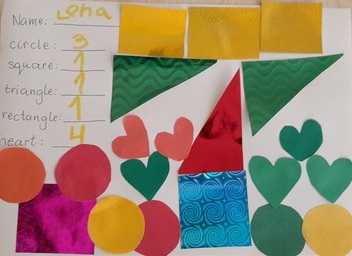
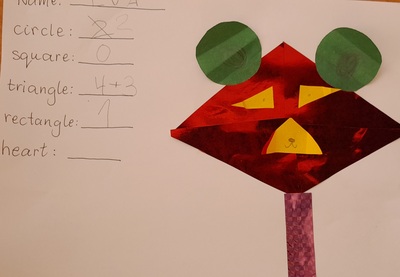
This is Lena who was the student to plan her project properly, out of her own accord. She prepared a list of ingredients necessary and, as you can see it does not quite match the number of the shapes used. We fixed it later, after the photo was taken, by writing: circles: 3 + 3 etc.

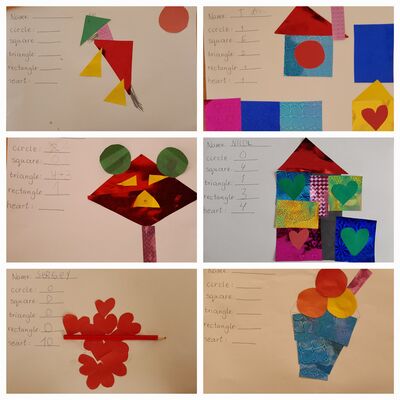
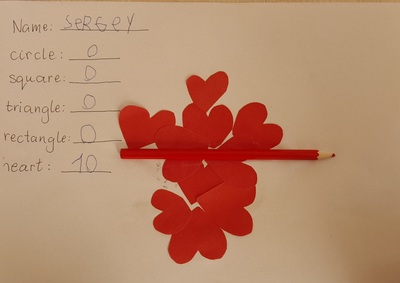
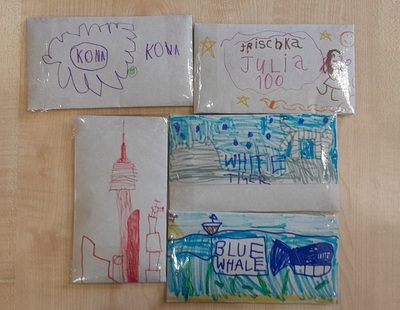
This is Sergey who decided to take a completely different route and to create a proper work of art, made of hearts only and with a red pencil which is also glued to the paper.

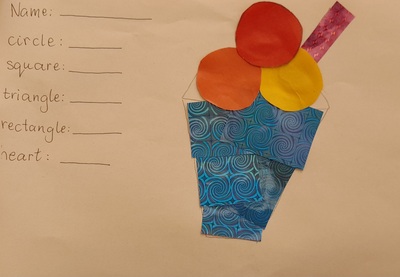
This is Sasha, who was initially very uninspired by the task as he prefers listening. However, after a while, he figured out how to combine the two. He drew an ice-cream cone and then, once it was ready, he came to choose his shapes. This is a lovely approach and I will definitely be using it in the future!

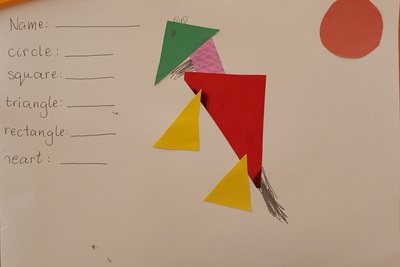
This is a beautiful example of how creative kids can get. Sasha, whose most favourite thing in the world are horses, found a way of creating a horse with the shapes we had. It shows a high level of development of symbolic representation as well as creativity. We see a horse in it hence it is a horse.

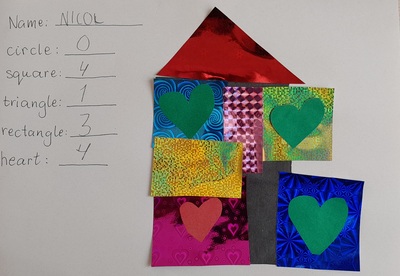
This is a picture by Nicol, quite simple one, just a house, we might say, but it is just wonderful because of the paper used and because of the consistent use of hears as windows.

And another wonderful picture, a bear, in which Sasha, decided to use a variety of techniques, including drawing and elements of origami to create a 3D eyes and muzzle for the bear.

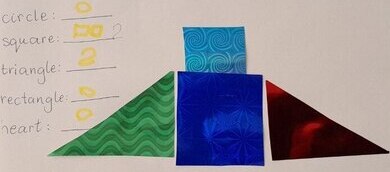
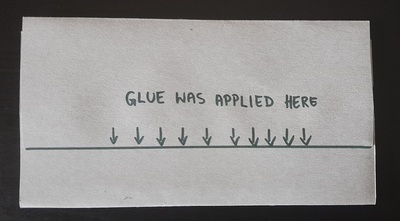
This example comes from Sasha, who decided to go for a seemingly simple design of a structure, made of only four shapes. However, it was nothing but simple! The big blue square is in fact glued expertly along three edges to create a pocket into which the small blue rectangle could be put in and taken out. Sasha was extremely proud of his example and I was proud of him.

Happy teaching!

Crumbs # 65 Monster Bookmarks

Ingredients

  • Colourful cardboard, some white paper, markers, scissors and glue
  • An idea to inspire you. I got mine from I Heart Crafty Things and if you are interested you can even find a template there for a small price although, I, personally, did not find it necessary.

Procedures

  • Before the lesson, I prepared the paper: small pieces of paper for the eyes, a large rectangle of cardboard (for example, an A4 sheet makes 2) folded in half, smaller rectangles (aka strips of paper) cut up for the nose.
  • We had two full lessons on the topic of body parts, monsters, health problems and going to the doctor. By the time we started the craft activity, the kids had already practised using the body parts in a sentence, they had described countless monsters, they had also created a monster with in a dice drawing activity.
  • I showed the children the ready product and we described it together.
  • We started with the kids choosing the colour of the big rectangle (the body of the monster) and so did I, in order to be able to demonstrate every step.
  • We cut up one of the longer edges, 5 – 10 mm, along the whole age (the hair). Afterwards, we applied the glue inside the folded rectangle and glued the two halves together.
  • We decided how many eyes we want our monsters to have. We drew these eyes, cut them out and glued them on the monster.
  • The kids chose the colour of the paper for the nose. We drew the nose on the back and we cut it out. On the back on the nose I drew three short lines at the top, to mark the place where to apply the glue. The kids do the same and we glued the nose on the monster.
  • We finished with drawing the smile and adding some decorations.
  • We finished with introducing the monster (name, age, boy / girl, what he/she likes).

Why we like it

  • This craft was a part of the lesson that in itself was very generative, productive and creative. That is why, for the main craft activity, I wanted something that the kids could use not only to produce the language but to use outside of the lesson. That is why I started to look for ideas for bookmarks.
  • When I showed my monster in the beginning of the lesson, some of my kids went ‘Oh, monsters, I don’t like monsters’ but, somehow, they all wanted to make theirs and they got really involved, boys, girls, the younger, the older. I was happy and not so surprised (because it did happen before) that they all left the classroom almost hugging their big-nosed creations. And, once out, I heard them report to the parents, in a very animated way, what it was that we did in class.
  • The craft is relatively easy, with some simple materials, especially that the cardboard can be easily replaced with the regular paper. It did involve some before-the-lesson preparations but nothing very time-consuming and, again, the templates were not necessary at all.
  • I have already started to think of adaptations and of replacing the monster with other ideas and shapes. I have not done these yet, but I am thinking a lot about elephants and, inspired by my friend’s son, LEGO people…Once they are ready, I will definitely share here:-)

Happy teaching!

Crumbs #64 ‘What time is it?’ aka Classroom management tricks for primary

Ingredients

  • A board and a marker, with two phrases written on the top: ‘What time is it?’ and ‘Time left:….min’
  • A watch for the teacher.

Procedures

  • Drill the question with all the kids (‘What time is it?’)
  • Every time you hear from the classroom the same or similar question, most probably in the kids’ L1 (‘What time is it?’, ‘When is the break?’, ‘How much time we’ve got left?’) etc, point to the question on the board and elicit it from the group or from one student and only when they do, check the time and write the number of minutes left until the end of the lesson.
  • Repeat every time someone asks the question but insist on them asking the question in English.

Why we like it?

  • First of all, this trick gives kids an opportunity to learn to control their behaviour in class. I use it with my pre-primary and primary students in a situation in which they cannot tell the time using the clock and they do not have their mobiles to do this using their digital clocks. Not to mention that at the moment we work in an unusual context and each part of the 4-academic hours-long day has a different length. If the kids understand better how much time is left or, in other words, for how many more minutes they are required to ‘work hard’, they are better prepared to manage their behaviour in the time left. Also, it is of a great psychological help to see the minutes disappear and then even if the day is long, even if the weather has an impact on the kids’ energy levels, even if the activities today are not amazingly exciting for everyone, there are fewer and fewer minutes to go through until the next break time, snack break, the walk, the playground and so on. It has been of a great help in all the summer classes.
  • The kids are likely to ask this question anyway, directing it at their teacher or their peers so giving them a chance to do it in English is an opportunity to learn and to practise some useful language in a natural context.
  • To be perfectly honest, it is a tiny little bit irritating to hear this question and to have to answer it a few times during the lesson BUT the very fact that the question is asked and the frequency with which it is asked is a great source of immediate feedback for the teacher and a signal that, perhaps, some changes need to be introduced in the original lesson plan. Maybe an activity took too long, maybe on that particular day the kids are too energetic or too sleepy for whatever is going on and they need a settler or a stirrer. Perhaps even an activity needs to be abandoned asap, for whatever the reason…Knowing is is much better than not knowing it and proceeding when your audience is not ready for it. That also means that on some days and with some activities, the kids will completely forget to ask the question and that is for the best reason of it. They will be so involved in the activities that the lesson length and the clock will not matter at all.

Happy teaching!

Crumbs #63 Musical Challenge meets Andy Warhol

Ingredients

  • A set of markers and a simple handout (eight circles and numbers)
  • A video with different music samples. I have used this one here, devoted to the unusual instruments.

Procedures

  • In our case (City Camp), the whole day was devoted to music and in the first half of the day we: learnt the names of the instruments, played different games with the vocabulary such as miming, guessing the name of the instrument by the sound and we made our own shakers. I came up with the idea for the musical challenge to follow-up on all of that.
  • First of all, we revised all the colours and we talked about the associations between colours and emotions. We used those that the kids were familiar with (happy, sad, angry, tired, sleepy, hungry, crazy, scared, energetic).
  • I showed the kids the handout, with the eight empty circles and numbers and asked ‘How is number 1?’ and the other numbers. It was clear that they had no colours and no emotions.
  • I told the kids that we would listen to music. ‘Is it a happy music?’ ‘A sad music?’ ‘Are you scared?’. I asked them to close their eyes and played the first part of the video. It is important to mention that I used my laptop here and the kids were not able to see the screen and the instrument. I did not want them to get distracted by the image and I was hoping that we would be able to focus only on the sound and the associations.
  • When the music stopped we talked about out emotions and the best colour for them. Afterwards we coloured the first face.
  • Later on, we proceeded with all the other pieces of music in the same way.
  • In the end we watched the video again, this time properly but we also paused and talked about the emotions and the colours, comparing our pictures.

Why we like it

  • This activity is a variation of the Musical Challenge that I often use with my older students. Initially, I was considering using it in its original format but later decided against it as some of the kids in the group were too young and I was worried that I would not be able to explain in English that they can draw anything they want, that they should be quick and avoid adding too much detail and that we would not really be able to talk about the results properly as the children do not really have enough langauge for that. Instead, I mixed the Musical Challenge with the Andy Warhol lesson.
  • I loved the way the activity worked. As an English teacher, I should probably start with the fact that it gave us an opportunity to produce a lot of langauge because kids started to make some comments even during the listening part and continued later, while making decisions about the colours and while presenting their smiley to the teacher and the group.
  • The same video and handout can be used with older and more advanced students because the music samples / emotions can be used in an extension acticivity i.e. group the samples/ emotions, choose your favourite, create your own instrument and play some music, choose one sample / emotion and tell a story etc.
  • It was also amazing that everyone could produce as much as they were capable of. Since it is a city camp group, we have some mix of abilities but since it is an open-ended task, kids can produce a little bit, the bare miminum (‘It is sad. It is green and yellow’) or a lot more, fully justifying their choices.
  • As an Art teacher (and yes, I dare call myself that), it was absolutely amazing to see how well kids responeded to an opportunity to look at the world from a slightly different perspective, making the connections between the colour, the music and the emotions and representing it on paper. During the entire activity, it was easy to see how the kids actually did take time to think about their impressions and how to express them best through langauge and through colour. Sometimes, they would make an immediate decision, while listening and then rethink it and change it. And the conviction with which they did it was a wonder to behold.
  • As a teacher of children, I loved this activity because it gave us all an opportunity to express our own personal views and opinions and to learn that everyone, the kids and the adults may have a completely different opinion and that there are no right or wrong answers. So at the same time, it was also a lesson on learning how to respect other people.
  • A busy/lazy teacher loves this kind of an activity because it takes about 5 minutes to prepare and to set up.
  • For us the activity was the final project but it can also be used, in a shortened version, as an introduction or a lead-in activity to any lesson related to music.

Happy teaching!

Crumbs #62 Secret words. Learning to read

@Cambridge University Press

Ingredients

  • A text written for the lower levels learners, pre-A – A1 level, preferably accompanied by some visuals. The one pictured above which was the inspiration for this kind of an activity was taken from Super Grammar 2 by Emma Szlachta, CUP, p. 38
  • A set of blue cards to cover some of the key words in the coursebook. It is much easier to manage if the text is displayed on the screen. The SECRET cards can be easily adjusted and moved around during the lesson.

Procedures

  • In the first stage, the kids look at the illustrations and describe them. If you are looking for the ideas how to use with illustrations in the EFL classroom, make sure you check out these posts, here and here. There are lots and lots of ideas. This stage will give the kids an opportunity to produce some language and also to get ready for the reading.
  • Kids read the text in silence, individually and, afterwards, in pairs, trying to guess what words are hidden under the cards. At this point all ideas are good ideas but the teacher should point out that there are some hints in the illustrations.
  • The class read out loud together, led by the teacher or the students, and each pair proposes their ideas. The teacher is revealing the real words. It is not a competitive activity so no points are awarded.
  • The following stage is the reading comprehension task, such as the one in the coursebook.
  • The follow-up productive task can be a text interpretation: the teacher covers all the secret words again. Kids work in pairs, they read a text (one text per child). In step A: they try to remember what the original words are, in step B: the kids read the text again with their own ideas for all the secret words.

Why we liked it

  • The activity is easy to prepare, especially with the use of the electronic devices.
  • The activity can be used with practically any text and it is easy to adjust the level of development by limiting or extending the number of words, by focusing on some specific words ie only colours, only verbs or only a specific grammar word ie a structure or a part of speech, depending on the level of the students.
  • This is one of the ways of breaking up the text and making it more manageable for the early readers.
  • It is also a way of making it more interesting as it changes the reading task into something resembling a guessing game.
  • It can be made productive and generative by the illustrations-based activities or by the creative reading (the final stage) which can also lead to a writing task ie describing your own room or your own dream room.

Happy teaching!

Crumbs #61 How to make a shaker

Ingredients

  • A4 pieces of cardboard, one per child. I have used just regular craft cardboard, sold in sets. I had the colourful one but I needed the back side of it, in order to decorate it so white carboard will be even better.
  • Glue, to be used before the lesson
  • Markers to decorate
  • Scotch and scissors or a very good stapler
  • Something to put inside, for example buckwheat (raw).

Procedures

  • Partially, the materials had to be prepared before the lesson. I folded and glued the A4 pieces of cardboard into envelopes a few hours before the lesson, to give them a chance to dry completely. Each cardboard sheet was folded into three and glue was applied along the shorter edge.
  • One model shaker was also prepared before the lesson and then presented in class. We learned the word and we passed it around for all the kids to touch it and to try to use it.
  • The envelopes templates were given out, we wrote our names on them and we took about 5 minutes to decorate them.
  • I set up the assembly table with all the other resources and as soon as the kids were ready, they were coming up one by one to the teacher to finish the shaker.
  • The final stages completed by the teacher went as follows: 1. close one end of the envelope with three layers of scotch. 2. fill the envelope with buckwheat, to about 1/3 of the envelope 3. fold the other edge of the envelope and close it with three layers of scotch 4. try it with the kid
  • The most important part was our attempt to use the shakers. We tried out two activities. The first one was a simple Listen and Repeat with different rhythms ‘dictated’ by the teacher and, possibly, also by the children. The other one was singing of a song that we all know very well with the instruments. We chose ‘If you happy and you know it’ by Super Simple Songs. For one song we all became an orchestra and we agreed to shake twice (after the words ‘clap your hands’ because, indeed, there are two claps) and once (on the words ‘clap your hands’ because, again, there is one clap there). The same patterned followed in the other verses, with stomping, oh no and take a nap.

Why we like it

  • First and foremost, I am excitingly happy with the design of this shaker which I came up with myself. The topic of the lesson was Music and one of the activities suggested was making some easy intruments. There are lots and lots of amazing designs that I found on Zing Instruments’ website and I want to make so many of them but, last week was very busy and I simply had no time to collect plastic bottles or to ask parents to give their kids one. I did not want to use plastic cups because I did not have the right kind of glue and I have always had some reservations about collecting toilet rolls that frequently feature in these activities. I spent the whole evening breaking my head over that dilemma, getting angry by the minute because the ideas were not coming. Until I finally gave up and went to sleep. My last conscious thought that day was the answer to my question. This design works. The materials are easy to get, the task is feasible for everyone and it has a universal appeal, too. All my kids were equally excited and involved in the task, the one aged 4 and the one aged 10.
  • I was a bit dubious about the durability of the shaker but it did last a whole full day of extensive use. We made it in the first lesson of the day but the kids were carrying around and using it throughout the entire day. I cannot guarantee, of course, how many days they would last afterwards but, even if they break later on, they can be easily fixed with a piece of scotch and some buckwheat or remade and although I do not wish it on my educational parents, the worst case scenario will not be a real disaster. The raw buckwheat can be easily cleaned up and I don’t imagine, kids would want to eat it, because it is just not tasty or pleasant to eat.
  • The cardboard envelope was very easy to decorate, easier than a roll or a plastic cup and we could use regular markers instead of all the other materials featuring on the designs I found on the website, such as the painter’s scotch, decorative scotch, permanent markers or acrylic paints. The kids could draw anything they wanted, either very simple patterns such as stars or hearts or something that was very special to them, for example a blue whale, a white tiger or a skyscraper.
  • As I have already mentioned above, the shakers became the real treasures almost instantly, to all the kids. ‘Are we going to take them home?’ was, naturally, one of the questions that every single child asked while we were producing them, just to make sure. And yes, we did take them home but the kids agreed for me to take a photo of all the beautiful shakers. Mine does not even feature in the photos, it was definitely the least interesting:-)
  • The finished product helped us in developing social skills. In the final stages of the lesson we became an orchestra and we worked on doing something together, listening to the teacher to repeat the rhythm and, even more importantly, listening to the song and shaking our shakers to the rhythm of the song. This particular group really really needed this kind of an exercise and I was very happy that we managed to become an orchestra for a few minutes. If it had been my regular, long-term group, I would produce some of these shakers to keep in the classroom and to repeat this kind of an exercise more regularly.
  • I was a little bit worried about me having to deal with sealing the envelopes but I could not delegate this task to kids as it is quite tricky, for any young learner hands. However, because there were only five children present and of different ages and of different levels of interest in drawing, it all came together. My youngest Sasha completed the task of decoration first and his shaker was the first ready. But then, having had a look at what everyone else created, he went back to his table to add some elements and afterwards he started to play with the shaker. A similar thing happened to all the other students and there was no dead time. However, if we make the shakers again, I will start playing our favourite songs during the time when we all decorate our shakers. This way the kids can start using the shakers with the music as soon as they ready. And, even if they are still working, they can still sing along.

Happy teaching!

Crumbs # 60 Going shopping

Ingredients

  • A lot of paper, in general, in the form of a shopping bag (see photos), cut-outs of food items to be used, one of each per child and a small cardboard rectangle per child for the credit card
  • Some furniture for the shop, possibly a poster to put up on the board
  • Markers and glue for the group, for colouring and decorating the shopping and the bag
  • The video to set the context. I used the cartoon from Playway to English which is available on youtube.

Procedures

  • Introduce and practise the vocabulary. I have used it with different groups, ages and topics such as: food, fruit and vegetables, toys, big numbers, with pre-schoolers and primary.
  • During the city camp, this was the final part of the day (project), in our regular classes this was usually the last lesson of the unit.
  • We started with watching the cartoon and showing the kids our ‘shop’, which is usually just a table with a chair, in front of the board which is also also as the display for all the products available.
  • I showed the kids my shopping bag and gave out the templates for them to write their names and decorate it in any way they wanted. The kids glued the sides of their bags together.
  • Afterwards, I gave out the small cardboard rectangles and we prepared our credit cards. I cut them up before the lesson and wrote ‘credit card’ on each. We looked at my credit cards and tried to make sure ours include the same information, namely the name and the number.
  • Afterwards, all the students were taking turns to come to the shop to do their shopping, to pay, They they went back to their tables to colour the cards. We repeated this stage a few times.
  • This time round, I did not include any special preparation as regards the functional language because we were only using the basic forms that we use everyday (Hello, How can I help you, I want / Please, can I have…, That will be, Thank you).

Why we like it

  • This was a lovely, communicative lesson. All my students produced a lot of langauge, both as regards the key vocabulary and the functional language. The kids were involved, they kept coming to the shop until they bought absolutely everything.
  • The best thing about this activity set up in this way is that despite very moderate resources (only paper, only black and white copies), they kids were fully engage. They took it seriously, they stood in line, they were taking time to make a real decision what to buy. They were also very serious about the payment. I did not want to include any real counting and prices but we did have the moment of the payment being completed, every time the teacher said ‘beep’. And all of it was real despite the fact that our credit cards were made of cardboard and that our terminal was simply my computer mouse. It didn’t matter. The magic did happen with some paper and the careful set up. One of my students commented ‘This is the first time I have gone shopping’. She did not talk about ‘playing shopping’, or ‘pretend play’, she used the verb ‘go shopping’ and she was really serious about it. Looking back, I actually do think that although I had done this activity before, only now, it was especially successful and I believe it was due to the introduction of the credit cards.
  • There is a lot of potential for extending the activity, with more complex structures if possible and with elements of maths if we add prices, for older kids. With some groups, I also managed to make it more SS-centred because I was involved only in the first round, for everyone to do their shopping once. In later stages, that is the kids were taking turns. Student A was the shop assistant and student B was the customer. Afterwards, student B would sit down and student A would become the customer, with student C taking over as the shop assistant.
  • A lesson of this type can also be used in a variety of lessons: with different topics (clothes, toys, food, furniture), to introduce the idea of money, to teach the kids about the value of coins and notes, although, actually, at this point, the majority of transactions are done via credit cards.

Happy teaching!

Dear Diary…My favourite activities from this year’s summer camp

Here is a most random post of a kind that I have never tried to get involved in: one long, constantly updated, written-throughout-the-entire-summer post, with all the fun things I did in class. A kind of a Summer 2023 Diary.

A little bit of a background: this summer I am teaching at a non-residential summer camp, for primary school children that has a special curriculum and a set of materials that were prepared by the educational management team at my school. Naturally, we, the teachers, are allowed to adapt and supplement these and, naturally, I am doing a lot of that. Here are my favourite bits so far.

I really like to swim

This is a small case study in the theme of ‘How to use a song effectively to teach vocabulary and to practise a grammar structure’ and I am very happy to share it here. Here is to hoping that the framework and the pattern can be adapted and re-used with other songs.

The song that we used was the amazing Milo and ‘I like you’ from Super Simple Songs. I love this song not only because of Milo but also because it includes a long beautiful list of verbs (hobbies and activities) that, as a result of the song, become a part of the kids’ vocabulary.

We started with the vocabulay introduction, with the teacher and kids miming, drilling the verbs and the structure (I like to read books) and playing Mime&Guess, with the teacher leading the game. I didn’t have flashcards to represent all the verbs that feature in the song so I prepared a set of my own mini-flashcards. Afterwards, we worked in pairs and the kids were miming the verbs for their partner to guess, each pair with their own set of cards. This way, the kids got a chance to get ready for the song itself. We listened to it and watched the video. At this point, I was singing but I didn’t push the kids to do so. I wanted them just to watch it and to enjoy it.

The following step was a proper pairwork. Each student got their copy of the handout and they were instructed to mark the activities they liked and didn’t like with pluses and minues. When this step was ready, we paired up, compared our lists and reacted (Student A: ‘I like to count stars’, Student B: ‘Me, too / I don’t’). This was something that we had already done in our lessons so it all went quite smoothly, including re-grouping. With six kids in that group, every student had a chance to talk to three different students.

At the very end of the lesson, we played the song again and, this time, I tried to encourage the kids to sing. Today, when I am writing this post, we have had only one lesson with this song and I am convinced the next time we meet in class, the response to this song will be even more active and productive.

Elephant

This is not a new idea. I have created this activity for my English and Art classes, again, with my pre-school students. However, the interaction of salt, water and paint is interesting in itself and it has a lot of potential for the older kids, as a science experiment and it was a part of a lesson with three experiments (together with the other two mentioned here, static electricity and the rainbow Skittles / M&Ms).

We went on with the drawing just like we did with the younger students, but the version for the older students included the following: learning the names of all the ingredients involved, trying to predict what we will do and what will happen (‘We will…’, ‘It will…’), describing the experiment while it was happening (Present Continous) and assessing it afterwards and grading it on a scale from 1 – 10.

Sugar Rainbow

No matter how old they are, the kids and the adults are simply in awe when they see the rainbow in a plate. Even if they have done this experiment before. Even if they are teachers. Speaking from experience here.

This is a very well-known experiment and you can find all the details here. I have used it so far in a lesson with my super advanced primary school kids to introduce and to practise the zero conditional. This time, since it is camp, we used it as a proper science experiment. The younger levels focused on the colours, the older and the more advanced ones could predict and assess and talk about the sugar dissolving fast and slow in the hot and cold water.

My little monster

I really love the folding surprise drawings and I have used them a few times in class already, although so far it has been done mostly with pre-schoolers and the follow-up activities involved a simple presentation, saying hello and a few Q&A, depending on the structure that we were practising at the time. It was an interesting experience to try to bring into the classroom with the older and the more advanced kids.

First of all, I decided to make it more creative and instead of a drawing dictation, with all the kids following the teacher and ending up with the same puppy or kitten, we all went our ways and created the monsters we wanted. One group used the collage technique using old newspapers and markers, the other opted for creating their own drawings and, indeed, in a short period of time they were actually able to draw their own beautiful monsters.

Second of all, I wanted a lot of language to come out of it. For that reason, as soon as the monsters were were, we sat in pairs and talked about them. The lower level group focused on describing the monster using the same structure (‘My monster has got…’), in a few rounds with different partners. The more advanced group had a set of questions starters (‘Has your monster got…?’, ‘Is your monster…?’, ‘Can your monster….?’ and ‘Does your monster like….?’) and they were able to keep up the conversation for a while themselves. The only requirement from the teacher, apart from the sentence starters, was to ask 20 questions.

Storybird

Storybird is a wonderful tool to develop kids’ imagination and the love for telling stories. You have to subscribe to be able to use it extensively but if you do, you get the access to a multitude of stories written by other users and their students and, even better, the access to a multitude of illustrations by budding artists which you can use in your stories. There is also an option of the trial period so you can start playing with everything that the website has to offer without investing and then you can make a decision whether you really like it or not. As for me, I haven’t even managed to go over everything that it has to offer but I am going to tell you about the one feature that I have used many times in my classes and why I love it.

We use Storybird to encourage the kids to express themselves more freely, in writing, without the hassle of actually having to write or type, during this delicate period when the students already have something to say but they do not yet have the fluency in writing, holding the pen, typing up or, in case of some my students, they do not write in English at all because they are still in pre-school. With the use of Storybird, I select the pictures and then kids talk and the teacher (yours truly here) is their secretary with quite a reasonable WPM (word per minute) numbers.

So far, I have used it in four different formats

  • The oldest learners, in a group of 1-1s: a set of thematic pictures, with the same characters, that we look at, figure out the story, order and then tell the story, slide by slide. This can be done at any point during the course.
  • Any group of learners: a set of any pictures, as the Year Book, at the end of the academic year, with the students choosing a picture to represent themselves and they can include anything they want about themselves, as they would in a year book.
  • The younger learners in a group: a set of thematic pictures for example toys or animals in which a student chooses one for themselves and then talks about it, using a set of structures, depending on their levels and skills. Students take turns to talk to the teacher and there is also a need for a task that all the kids will be doing alongside such as a colouring page or a wordsearch
  • The younger learners 1-1: a set of thematic pictures, for example toys or animals, with a student choosing 5 or 6 or how many of their favourite and they talk about every single one of them while the teacher is typing up.

Kids talk, either producing a discourse or a narrative with dialogues, the teacher types it all up, we publish it privately, we read it together, with either the students or the teacher reading the text and then, and this is definitely the best part, the book can be pdf-ed and downloaded and shared with everyone. There are even two modes for that: a simple e-book or a craft-version, for the kids to print it and assemble it into a real book which they can later read together with their parents.

If you are curious about the final product have a look at these stories we created together with my online and offline students: The Ballerina Cat and Her Friends, Our Toys and The Circus Story.

The only thing that I have a love-hate relationship with on Storybird is that since it was not created for the EFL teachers per se, it has a huge range of illustrations sets but in a rather random order. It gives me a lot of joy to be going over them and admiring the artword BUT it is time-consuming and you can use only the illustrations of one author in a book, without the options to collate different pictures. On the plus side, there are so many different styles and approaches represented that it can be used to teach Art, too. And, once you have found your favourite bits, you can reuse them with different groups.

Apparently, the best transport in the world…

The best transport in the world

This type of a speaking activity can be adapted to any set of vocabulary. We did it with transport because that was the theme of the day but I have already tried it with animals (‘The best animal in the world’), professions (‘The best job in the world’) and cities and countries (‘The best place in the world’), with different age groups and levels. This week’s camp group were kids aged 8 and 9 who are somewhere in the A1 level, mixed ability.

Before we started the game, I introduced the question (‘Which one is better?’) and a few comparatives to use while describing different means of transport (faster, slower, louder, quieter, more beautiful, more interesting, more expensive, more dangerous) and it is important to highlight that the students already knew all of these adjectives as we used them in some of the previous lessons of the course.

There is only one resource necessary and that is either a set of flashcards in a pile, a set of word cards or even a set of the electronic flashcards such as these, anything that guarantees that the words will be coming up at random.

The teacher or the students taking turns pick up two random cards and compare them, i.e. a boat a nd a bike, answering the question ‘Which one is better?’, they justify their answers and choose the one. Then we proceed to another random pair and so on, until we go through all the cards. The ‘winners’ or ‘the better ones’ in each pair are kept separately as they have qualified for round 2. The activity continues until there is one winner, the best transport in the world.

There are a few variations to the activity, for example, with bigger classes, the students can be divided into smaller groups and they can do the whole activity on their own, choosing their best trainsport. As the whole class feedback, the groups present their results or they can have the final of the finals. Another solution is diving the cards among the groups and having them run the qualifiers for the whole class debate to choose the winner. For the classes where the students don’t know each other very well or when they do not quite get on with the group, to avoid any kind of competition or peer pressure, the final stage can be replaced with choosing your Top Three, individually. Last but not least, there is the option of extending the activity into choosing the worst of the worst from among ‘the losers’. That is also a lot of fun.

Colouring dictation

I am pretty sure I have already described this activity somewhere here because I have been using it successfully for ages but this summer I am revisiting it and with a lot of joy, too.

Preparing the activity is very simple as you need only a picture to colour with a copy for each student and a few sets of pencils, crayons or markers, one per pair. As for pictures, I usually use the YLE Cambridge Starters, Movers and Flyers listening materials (without the audio) or, even better, the black and white clip art. Googling ‘toys’ or ‘zoo animals’ or ‘clothes’ will give you a nice set of pictures. If there are some more complicated and less common words, I create my own pictures, also with the black and white clip art.

The more important aspect here is the setting up of the activity as its success (maximising production) will depend on it. I start with putting the students into pairs and assigning roles (‘a teacher’ and ‘a student’). Afterwards, I give out the copy and the pencils but only to the students as they will be the ones working hard.

The next step is modelling. In an ideal world the real teacher can do it with one of the stronger students, at the board: The teacher says ‘The rocket is green’ and the student colours the rocket green, then they continue with the other toys. ‘The teacher’ is the one making all the decisions, the student is listening and colouring. That’s the ideal world. I have had classes in which it was necessary to have a round of the teacher starting the activity in all the pairs, one by one and only later monitoring. It is not the most efficient as some pairs will be just waiting (and only possibly obsesrving) but it has been the most effective way of setting it up with new groups and students who have never worked in pairs before (yes, they do exist).

The students continue speaking, listening and colouring for some time and then they swap roles. They can continue colouring the same picture or the teacher can give out another set of copies. It is important to note that not all the items have to be coloured in. The roles swap can take place after 5 minutes, for example, depending on the group and the remaining items, toys, animals or clothes, can be coloured in later on. The kids can finish the picture in any way they want, without their partner’s instructions.

The best thing about this activity is that it can be done with even the lowest levels as the structure used is pretty simple but it gives everyone a chance to practise the key vocabulary and to listen and to speak. There is another way of extending it, in the feedback stage. Since all the kids will have a different picture, with different colours, they can share what they have either in a whole class feedback (Teacher: My giraffe is green and yellow. S1: My giraffe is pink. S2: My giraffe is yellow. etc) or, with another partner after they have been regrouped. A lot of production:-))

My astronaut passport

This is the lesson that I designed while trying to come up with an activity that could become a fun project lesson, something else than just a poster or a role-play. It is not my original idea, I have come across these online but I needed something that would be feasible with a group of primary beginners.

The main idea of the project is a kind of a role-play in which one student interviews the other in the format of a test. Our days was space-themed and that is why the kids were taking a test for an astronaut, answering the questions about themselves and about their skills (‘Can you…?’) because this was our target language on the day. However, this can be adapted to many topics such as a test for a traveller / explorer, a test for an athlete, a test for a student of English and so on.

I was considering a few different set-ups for this activity but since my group was a mixed ability group, my two strongest students did a lot of interviewing, with the kids taking turns to come up to the table to answer the questions and to demonstrate their skills. In the end, they also interviewed each other. All the kids who completed the test, were getting their passports with a stamp and they could sit down to decorate and to colour them. In the end, we had a small awards ceremony, with the appropriate music and applause.

I was happy because everyone really did practise the language and the kids were very excited about completing the tests successfully. So excited, in fact, that during the follwing lessons, on seeing some templates in my hands, they would ask again and again whether we would be doing the passports again. If you are planning a similar lesson, you can find my template here.

Going shopping

There is a separate post describing this activity and the resources necessary. You can find it here.

Making instruments and making music

This activity and this lesson has also become a post. You can find it here

Monster bookmarks

Again, there is a separate post devoted to these beauties. You can find it here.

To be continued…

Happy Teaching!