Before we got to watch the video and to play the game, we went through a series of 4 lessons that were devoted to professions. During these lessons we inlcuded activities such as: introducing the vocabulary, matching the jobs with different accessories, miming the jobs, separate words and sentences in Present Continuous (‘A teacher is jumping in the toilet’), categorising the jobs and interviewing each other (‘Do you want to be a teacher?’), talking about what we want to be and don’t want to be, introducing a song, and even starting a project about one Alfonso Pomodoro (more on that later).
In order to make sure that we have some variety of resources and approaches, I also introduced a video from Steve and Maggie. I used it before because it is a nice story that includes a few jobs and some ideas why they are good or bad or easy or difficult and it can serve as a background for a whole range of activities.
This time round (and for the first time, too), I decided to use the video as a framework for a role-play. I wrote the mini-script on the board with ‘a Steve’ (‘I don’t want to be a teacher’, ‘Look, I am a doctor. I can…’ ‘I don’t want to be a doctor!’) and ‘a Maggie’ (‘OK. Abracadabra!’ and ‘5 minutes later’) and we read it together.
It was the first time we did any sort of a role-play with my students in year 1 and that is why I decided to do it as a whole class, with two students being involved at a time. I had only 5 students on the day and that is why it was possible. I modelled the game first and then the students were joining the pair of actors. Kids took out cards from the pile, at random, and acted based on that.
Each round involved two students and they had a go at three jobs with ‘Steve’ getting bored with all three jobs and deciding what he (or she) wants to be in the end. I have a mixed ability group but the stronger students could actually come up with some things that a profession can do as well as with a problem that would put them off. Some kids focused only on choosing the jobs and limiting themselves to ‘I don’t want to be a doctor. It is difficult!’
Why we like it
The game worked well. Even in its minimal version, it gave us an opportunity to practise the key phrases, ‘I want to be a teacher’ and ‘I don’t want to be a teacher’ as well as the jobs, both in speaking and reading.
The video created a great, easy-to-follow framework for our game and it was not necessary to create the context, the story did it for us.
It worked well in a mixed ability group because we could extend and minimise the amount of language
It was done as a whole class activity, with only two kids involved at a time but I am hoping that in the future we will be able to repeat it, in pairs or small teams.
It gave the kids an opportunity to be creative, not only while talking about why certains jobs and good or complicated but in choosing what they want to be in the end (‘I want to be a blogger’ or ‘I want to be a girl’ or ‘I want to be a student!’). One of my students also decided to use the card three times in three different rounds becuase ‘I want to be a judge!’.
We had fun and the element of surprise kept the kids in the audience interested. We laughed a lot!
The question appeared in one of the groups on the social media and I realised that a) I have something to share here and b) I haven’t got any posts on the movement games for the little people.
One: Abracadabra
Resources: only a magic wand. It can be made at home and producing magic wands is now a real hobby of mine. The easiest version (in the photo below) can be even made with kids, in class. Some shops sell magic wands, too but, really, kids will respond well to a simple pencil if it is accompanied by some ‘Abracadabra’
How to play: We have been using the same line for many years now, with many groups: ‘Abracadabra, 1,2,3. You are….’. The game might be introduced with the first topic that lends itself to miming, for example ‘pets’ or ‘toys’. We start with the simple phrase ‘Abracadabra, 1, 2, 3. You are a cat / a dog / a frog etc’ and I support the language with the visuals namely flashcards displayed on the board and my own examples. The gestures we use for each of the pets, toys, fruit, transport, jungle animals, fairy tale characters, jobs are not universal, they are only our creation for that particular group. Please remember that the ability to represent characters and words through gestures is not a skill that children are born with. They are developing their symbolic representation and they might need the teacher’s support in the beginning of this journey. That is why the teacher’s example is so important.
After the kids have learnt their first adjectives, these can be extended into ‘You are a happy cat’, ‘You are a sad princess’ and so on. Naturally, the game is led by the teacher in the first lessons but later on, the children are invited to lead the game and to cast some spells in the classroom. They start with the very simple and basic combinations but with time they start to be really creative, both with the langauge and with gestures. Think about all these gems from the classroom: ‘a sad pumpkin’, ‘a sleepy cat’, ‘an angry princess’…How would you mime these?
A classroom-made magic wand
Two: Musical flashcards
Resources: only one set of flashcards, I normally use the set from the coursebook, A5 size.
How to play: We stand in a circle and the cards are lying on the floor, in the centre. We move around, in a circle, just walking. The teacher sings a song and my choice is usually ‘Happy Birthday’. As soon as stop singing, everyone stops and picks up one card from the floor. Afterwards we show what we have by using the word in a sentence. The simplest version is ‘It’s a cat’ but the structures can vary and be more closely connected to the vocabulary for example: I like + food, I’ve got + toys, I am wearing + clothes and so on.
After each child produces the sentence, we put the cards back on the floor and continue the game. It works well with all the groups although with my bigger groups, I encourage the kids to speak together, in kind of a messy choir, in order to save time and not to risk any dead moment in the lesson.
This is not a competitive game, no one is sitting down or dropping out, we all play throughout the game. No points are awarded either.
A classroom-made magic wand
Three: Everybody is dancing
Resources: None:-)
How to play: We stand in the circle and the teacher is chanting or singing the phrase (the melody is made up), and everyone is performing the actions. I normally start with the easy verbs i.e. clap, march, walk, eat, drink, dance and swim but we keep adding through the entire year, more complex and more creative verbs so by the end of the first year we have lots of them at our disposal because kids learn all of them just from this simple game.
The teacher is the one to lead the game for quite a long time but the kids can be slowly involved, too by giving them a choice of two verbs, for example ‘Sasha, everyone is singing or dancing?’, Sasha: ‘Dancing’, after which the teacher is singing or chanting what Sasha has chosen. Eventually, the kids are ready to make their own decisions and to produce full sentences. And Present Continuous (because that’s what it is) will come in really handy with storytelling and picture description.
Oh, one important thing: don’t forget to add ‘sleep’, it will work wonders to calm the kids down.
A classroom-made magic wand
Four: Snake!
Resources: a long snake made of paper aka a necessary number of scrap A4 pieces of paper glued or stapled together with a head of a snake drawn on the first one and the tail of the snake drawn on the last one. I actually like to use the A4 sheet cut in half for a thinner snake and I cut out the head and the tail. Perhaps a set of flashcards in the first weeks of playing the game or with younger students.
How to play: The teacher puts the snake on the floor, the kids come to the snake one by one and stand in a line on one side of the snake. The game is intended to practise one particular group of words with some distractors included, distractors here being any other words, not in the category. For example, if the main aim is to practise colours, the basic distractor can be numbers or even kids’ names if that is the beginning of the year and the children do not really know anything else.
The teacher calls out the words, in a random order. If the students hear the target vocabulary, they have to jump over the snake (or to step over if the kids are young and not very good at controlling their gross motor skills) every time they hear the target word i.e. a colour. If they hear one of the distractors, they don’t move. In a way, actually, it is a movement variation of ‘Simon says’ only no one is dropping out.
When we start playing, we line up and I show the kids all the flashcards and we revise all the words. I also tell them that today we play with colours. Later on in the year, when the kids have more vocabulary at their disposal, the teacher can raise the level of challenge and play with two or even three categories.
The game mostly focuses on listening for the target vocabulary and discriminating it from the distractors but it can easily be turned into a productive game with one of the students standing at the head of the snake, facing the group and calling out the words. In the early stages of the unit, when the kids still might struggle with remembering all the new words, it makes sense to let them look at the cards displayed on the board or on the wall or to even hold all the flashcards and to call out the words they want to use.
I created this game for my group in Pamplona in which I had 12 little kids and no room in the classroom apart from the relatively narrow aisle in the middle of the classroom. This is how the snake game was born. We needed something thin to fit in the aisle and I chose a snake because I hate them personally and stepping over a snake is a good move, very conducive to survival. But the kids accepted it and we loved the game.
The snake itself needs to be made but it is easy to store it and to recycle it and if it gets destroyed during the game, it is also easy to fix. Or to be recreated. During one of my training sessions, one of my teachers suggested using a skipping rope and that, of course, is a solution. However, I still prefere the paper because in case of a mishap and a kid tripping over the snake, the paper seems a safe option. If it gets torn, we can fix it, no harm done. A child tripping over a skipping rope, however, might result in a child falling down. Typing that up here I realised that if the classroom has the appropriate floor, the snake can also be drawn on the floor, with chalk for example…
A classroom-made magic wand
Five:I like cats, I don’t like cats
Resources: one set of flashcards, the regular A5 set that normally come with the coursebook and two cards with symbols for I like / I don’t like, for example a heart for ‘I like’ and a crossed heart for ‘I don’t like’
How to play: Before the lesson the teacher puts up the I like / I don’t like symbols on two walls in the classroom, on the opposite ends. In the real life, these two simply stay there for the rest of the year as we use them all the time. The kids get up and stand in the middle of the room, half-way between these two signs. It is good to put there a small stool or a table with all the cards, for example all the toys, pets, colours etc.
The teacher picks out one card, for example ‘green’, calls it out and the students go either left or right, depending on whether they like it or not. The teacher points at one of the group and says: ‘Green!’ and the kids reply ‘I like green’ and ‘I don’t like green’ together with the rest of their group. Afterwards, they come back to the centre (aka the stool) and the game goes on with a different word.
This is another stirrer that gives the kids a chance to move around a bit and to produce the langauge, with the additional support since they have the flashcards to reinforce the meaning of the word and since they produce full sentences with approximately half of the group. The kids can also be invited to lead the game by choosing the words to use.
The game can be used throughout the year with almost any vocabulary and there are a few adaptations possible especially as regards the settting. If the group is big or if the kids are too energetic and too tricky to control, the same game can be played with the kids sitting on the carpet or even on their chairs. Instead of walking to the left and to the right, they can stand up and sit down or clap their hands and stomp their feet or raise one arm or two arms for ‘I like’ and ‘I don’t like’ respectively. This will make the classroom management a little bit less challenging for the teacher.
A classroom-made magic wand
Bonus activities: My favourite movement activies
Resources: the access to the internet and youtube
How to play: All of these songs here have been created specifically for the purpose of ensuring some movement in the classroom. The main aim here is not the langauge production although they do include some language but, of course, the movement is the star here.
Move by Super Simple Songs – a real hit, nothing more to say.
The Rolly Polly Roll by Super Simple Songs – another hit but only if you have a carpet because kids might actually try to roll or to crawl. You’ve been warned:-)
The Jellyfish Song by Super Simple Songs – I love it and it is quite a challenge to turn yourself into a jellyfish
Head, shoulders, knees and toes – this is the first song we sing in the classroom, mostly because kids can participate without any language production, just by doing what the teacher is doing. I like to sing this one myself, without the audio, in order to be able to control the speed and the activity. There is a version by Super Simple Songs, of course.
Shake your sillies out by Jose Paolo Liwag – I love to use this one with my older students, actually when they can appreciate the need to shake our sillies out and to clap our crazies out…
The Dance Freeze Song by Scratch Garden – the hit of this summer camp. There are some cool verbs and dance movements and we just LOVED to dance! You can also teach your kids the most important verb in the world: FREEZE.
Action Songs for kids by The Singing Walrus – one more fun song, with the basic verbs.
Make a Circle by Super Simple Song – it is a very popular song, I have seen it in many lessons that I observed but, somehow, I have never used it myself a lot.
A classroom-made magic wand
Some things to remember
Before you start any movement games, make sure that the kids are ready. Ideally, these games can be played in the part of the classroom where we have more room, only the carpet, no or fewer pieces of furniture. If that is not possible, please make sure that you create this space, with the kids’ help, possibly, to make sure that it is as safe as possible.
It is also a good idea to introduce some rules related specifically to this movement part of the lesson and these will depend on the classroom and on the group. In my classroom, we used to do all the movement games on the carpet by the window and for that reason our only rule was: We stay on the carpet, to ensure that the kids do not wander around, run around and leave the safe space.
Make sure that you move to this other place of the classroom in an organised manner. In the beginning it might be necessary to call the kids one by one, by the name to avoid a situation in which we have to control a stampede of five-year-olds there and back. With my groups (the maximum number of students in our pre-school groups is eight), we have our chant. I like to go to the carpet first and singing, call all the kids one by one (‘Sasha in the circle, Sasha in the circle’) and to wait, holding hands with all the kids, as they arrive. The child who is just joining is the one to choose the next child (‘Sasha, who’s next?’) and for the last one to join us we all call out loudly (‘Sasha, come here’) so that nobody feels unwelcome. Some kids actually love to be the last ones to join the circle because it is a lot of fun to be called by the whole group.
When the movement game is over, we go to our tables and desks, one by one or in pairs and the teacher is the one to make a decision about the order, at least in the beginning when the kids are still getting used to the new element of the routine.
Bigger groups can use the same pattern, but the kids move in groups of two or three so that the preparation for the activity does not last longer than the game itself.
One of the other things that I always do as the first activity on the carpet is to make a circle, holding hands and run a few rounds of ‘big circle’ (we stretch our circle), ‘small circle’ (we gather in the centre), a few times with these two adjectives and with the other ones, too for variation, for example a low circle (we bend), a high circle (hands up in the air, still holding hands), a wavy circle, a shaky circle and so on. It is an easy, risk-free activity, the kids love it (especially when everyone is present and we can really make a big circle) and, most importantly, after arriving one by one and being individuals, we can do something as a group, something super easy, before we get on to the more creative and productive things.
These games are not only about movement, although this is their reason for being in the classroom and in the lesson. However, as always, the main aim is language production and for that reason the students as the teacher, leading the activity have been included in all of the games presented above.
Can you hear some desperation, dear reader, in the title of this post? Rightly so. I started to write this post after one of the sessions of the summer camp that I took part in. My kids were amazing, of course, clever and eager to learn and, really, we did have a lot of fun. At the same time, looking at how they interact with each other, I could not believe my eyes and my ears. Despite the fact that many of them were already eight and nine, their social skills were on a disastrously low level. Practically anything that involved taking the other humans in the classroom into equation was a huge challenge for way too many of them. I did sigh with desperation, once and twice, and then I rolled up my sleeves and started to introduce pairwork, even though these were not my permanent students.
You may wonder why it shook me so much and why I decided to fix it. One reason is, naturally, my professional obsession with maximising production in kids and, really, I cannot imagine teaching a group of primary school children with the teacher at the centre, all the time. It is a waste of time and a waste of opportunities because kids of that age are capable of working in pairs without constant supervision. And if they do, they automatically produce more language.
However, there is more to it, of course because kids who work in pairs are more independent and more autonomous as learners and they have an opportunity to work with a variety of partners and to make friends and to bond with the group. This, in turns, is a better prognosis for the general classroom and behaviour management because you are less likely to get into trouble and to disrespect someone that you actually like and respect. If only you had a chance to get to know them and to like something about them.
Pairwork, yes or no? YES. One, big, decisive YES.
Where the angels don’t fear to tread. Pair-work in pre-school?
Yes, absolutely yes! I have been introducing pairwork in my pre-school groups first intuitively, simply because I had a very big group of children and we never got to produce any language apart from choral, whole class production and that simply was annoying for me, as the teacher. My students had a lot of potential and I did not want to waste an opportunity. Not quite knowing what to do and how to do it, I started to move towards working in pairs. It worked and by the end of the second year of pre-school, my group was ready and I was able to do what I do with my teens or adults: ‘Together, together, together’ while pointing at pairs of students. By the time we got to primary, this was a natural part of our lessons and some of the children were not even seven at this point. It is possible.
Then, naturally, I decided to do it again, with a new year 1 group, but this time, in a more conscious way, in order to be able to share it with my teachers. We started the course in September, we started to shape the group and the routine and we started to introduce pair-work. I kept my eyes open, I kept our class journal and we did it. It took 13 weeks of a course, with classes that took place only once a week. I presented the results of this research at our BKC Conference in 2020. and you can read more about it in a post here.
How to do it: The choice of the activity
The choice of the activity is one of the most important elements contributing to the success of the whole process. I got a heads-up here only because I have been teaching for many years and I had a chance to bump into one of the older coursebooks for kids which, although it had a few disadvantage and which does not even come close to the level of the currently used coursebooks for children, it did include a few ingenious solutions and, among them, the one I am going to describe below.
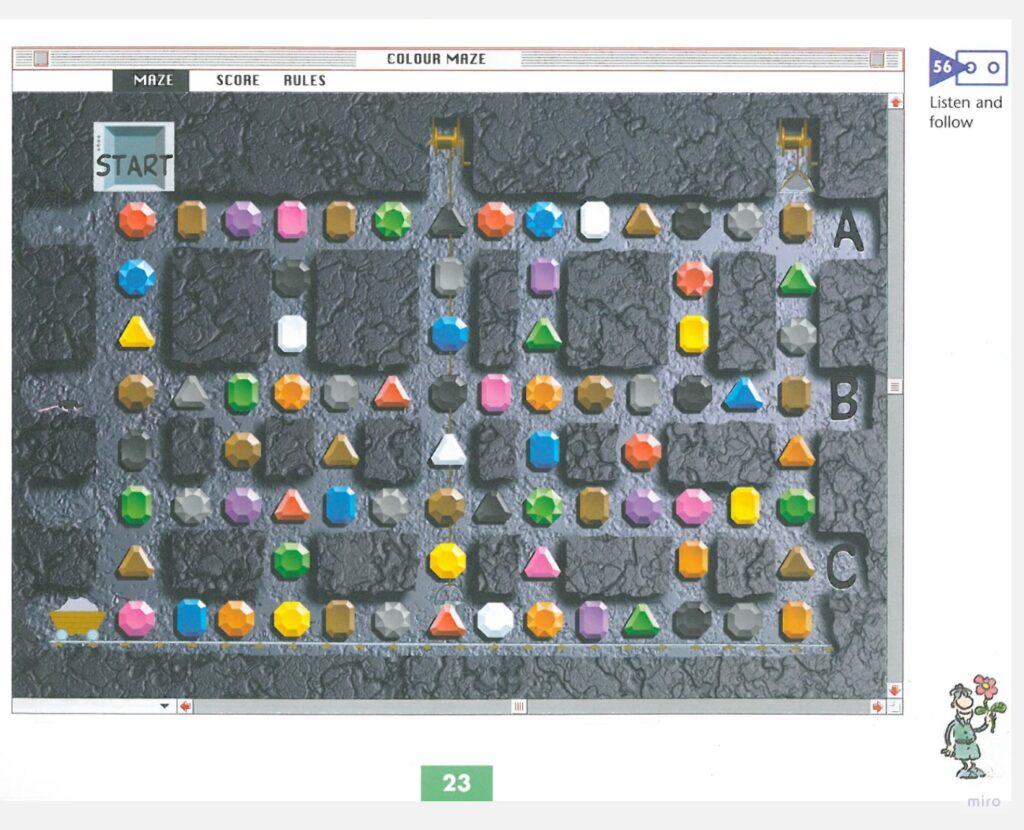
The one that featured in every unit of the coursebook was the maze the example of which you can see below. Initially, it was a simple but effective listening game, to practise the target language, especially vocabulary. Kids would listen to a robot dictating the path through the maze, for example: START: red…blue…yellow…brown…grey…etc until one of the exits, A, B or C. The words were separated by a funny sound, something that I would describe as ‘stomping by a robot, marching’ that the kids absolutely LOVED but it also gave them a great advantage of getting enough time to prepare for the following step. In every activity there were about 6 or 7 rounds of the game.
This game can be easily turned into a speaking – listening game and, eventually, into a pairwork.
It starts with the teacher NOT using the audio and dictating the route through the maze, with the kids following it and reaching the final destination. Naturally, the following step is the teacher nominating the students to decide on the following step, one word per child. This stage can go on for as long as it is necessary for the kids to become familiar with the format.
Afterwards, either still in the same unit and with the same maze or in the following unit with the new vocabulary, kids are put into small teams and they lead each other, in teams, through the maze. Eventually, they are put into pairs and they do it with only one partner, with one student speaking and the other student listening and following from the start to the exits.
In order to make it more monitorable, for the teacher and for the students and, also, to make it more achievable, we started to trace the route with coloured pencils or markers, each round with a different colour. This way, the children could always go back in case they got lost and the children can also monitor each other, the student dictating could potentially see where their friends were going.
This way, in a relatively short period of time, the kids got used to the new format, to working together, with only a partial monitoring and support from the teacher. It definitely helped that the vocabulary range in each case was quite limited, namely, only single words, from the obligatory set of words introduced and practised before. The students were not overwhelmed and could focus only on the format of the game. At the same time, however, in the later units of level 2, there were also more complex mazes, for example one in which the kids had to listen to a brief description of an animal for example: it has got stripes, it is big, it can run (zebra). Obviously, that means that the level of challenge can be raised when the children are ready for it.
Julie Ashworth and John Clarke, I Spy 1, SB, p. 23, OUP
It is very easy to recreate the idea using only the black and white clipart visuals and a grid of the required size. Here you see a maze that I created for my preschoolers (rooms).
Below you can see one more type of an activity that features almost in every unit of the coursebook and this one is specifically designed for pairwork for the young students. It was always some kind of a guessing game, with the two spies (the theme of the book, duh:-) trying to guess what the other one is thinking about. I really liked it for the visuals specifically designed for that purpose and the target langauge beautifully displayed on the page to support the students’ production. Using these was a lot of fun and it was effective but I still think that the previous one, the maze, worked better as regards the first steps in working in pairs.
Julie Ashworth and John Clarke, I Spy 1, SB, p. 45, OUP
Contributing factors
There is a whole lot of things that a teacher can do in class in order to facilitate the whole process. They can be implemented throughout the course, little by little, bit by bit.
Seating: make sure that the kids are sitting in a way that faciliates pair-work, in some sort of separation from the other pairs, for example by pairing up the tables and chairs, putting the chairs and kids facing each other.
Resources: these need to be prepared with a lot of care and attention. Apart from the example based on the activity that features in the I Spy coursebooks, described above, the teacher can also use a set of mini-flashcards, as described in my post about pair-work for preschoolers. These cards are used in a game of simple riddles but the cards themselves are small (eight or six or four that fit on an A4 piece of paper) in order for the kids to be able to manipulate them with ease. What is more, a set comprises of an envelope, too that holds all the cards. This way, there is no danger of kids dropping the cards (or if they do, these will fall back into the envelope) and the secret, very necessary in that game, is easily kept throughout the game. Even if the cards are printed on a regular photocopying paper, they are not see-through, being in the envelope.
Roles and turn-taking: Another thing is that the teacher only needs one envelope per pair. This helps a lot with assigning the role. It is crystal clear to the kids who is speaking (the child with the envelope) and who is listening (the child without the envelope). Turn-taking is also more obvious since the kids are literally passing the baton here, the envelope or whatever is the set of materials.
Signals: Introducing the pairwork is a part of the routine and, naturally, it will take some time. To facilitate it, like with the other elements of the class routine in primary and pre-primary, it would be good to include some visual representation of the pairwork, such as gestures or chants, anything that will signal to the students what is about to be the following stage of the lesson. It can be for example a simple flashcard. I love to use a flashcard with a pair of socks for the younger kids and a two pears for the older kids who can get this pronunciation joke but a picture of two kids talking will do, too. Some more modern coursebooks have started to introduce those and that is great). Another solution can be a simple chant, for example ‘Let’s play together! Let’s play in pairs! 3…2…1’. As with all the chants, this will introduce the next stage and it will give the kids a chance to get ready or maybe even to organise themselves. The same applies to the end of the pairwork stage.
Pairing-up: In the early stages, I would recommend a teacher-led pairing up. It is perfectly natural that in a group of children, there will be some students who will be better prepared to work in pairs early and some who will need to more time, even if all the students are of the same age or level. Based on the knowledge of the group and the individual children to end up with the most efficient pairing. This might be necessary to do over a few first lessons, later starting to experiment with some variations. I like to use a set of cards with all the kids’ names and we have a pairwork (or project) draft when we need it. The cards can be taken out of a box or a bag by the teacher or by students, too.
Time: Thil will of course, depend on an activity but choosing an open-ended game, without an obvious grand-finale gives the teacher more freedom and flexibility to finish the game when it is best for the class, rather than having to go until the very end when some of the kids might already be getting tired and bore and when they can start losing their focus. It might be a good idea to set a timer on the phone or to choose a song as a timing tool. It is very necessary to tell the kids how long they will play for.
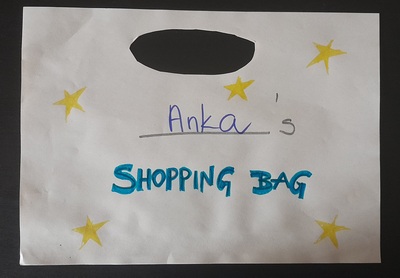
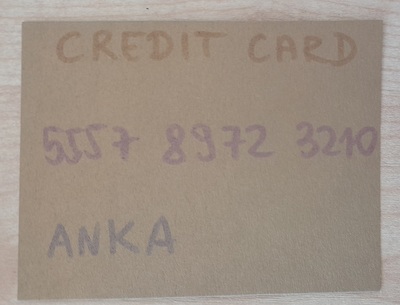
A lot of paper, in general, in the form of a shopping bag (see photos), cut-outs of food items to be used, one of each per child and a small cardboard rectangle per child for the credit card
Some furniture for the shop, possibly a poster to put up on the board
Markers and glue for the group, for colouring and decorating the shopping and the bag
The video to set the context. I used the cartoon from Playway to English which is available on youtube.
Procedures
Introduce and practise the vocabulary. I have used it with different groups, ages and topics such as: food, fruit and vegetables, toys, big numbers, with pre-schoolers and primary.
During the city camp, this was the final part of the day (project), in our regular classes this was usually the last lesson of the unit.
We started with watching the cartoon and showing the kids our ‘shop’, which is usually just a table with a chair, in front of the board which is also also as the display for all the products available.
I showed the kids my shopping bag and gave out the templates for them to write their names and decorate it in any way they wanted. The kids glued the sides of their bags together.
Afterwards, I gave out the small cardboard rectangles and we prepared our credit cards. I cut them up before the lesson and wrote ‘credit card’ on each. We looked at my credit cards and tried to make sure ours include the same information, namely the name and the number.
Afterwards, all the students were taking turns to come to the shop to do their shopping, to pay, They they went back to their tables to colour the cards. We repeated this stage a few times.
This time round, I did not include any special preparation as regards the functional language because we were only using the basic forms that we use everyday (Hello, How can I help you, I want / Please, can I have…, That will be, Thank you).
Why we like it
This was a lovely, communicative lesson. All my students produced a lot of langauge, both as regards the key vocabulary and the functional language. The kids were involved, they kept coming to the shop until they bought absolutely everything.
The best thing about this activity set up in this way is that despite very moderate resources (only paper, only black and white copies), they kids were fully engage. They took it seriously, they stood in line, they were taking time to make a real decision what to buy. They were also very serious about the payment. I did not want to include any real counting and prices but we did have the moment of the payment being completed, every time the teacher said ‘beep’. And all of it was real despite the fact that our credit cards were made of cardboard and that our terminal was simply my computer mouse. It didn’t matter. The magic did happen with some paper and the careful set up. One of my students commented ‘This is the first time I have gone shopping’. She did not talk about ‘playing shopping’, or ‘pretend play’, she used the verb ‘go shopping’ and she was really serious about it. Looking back, I actually do think that although I had done this activity before, only now, it was especially successful and I believe it was due to the introduction of the credit cards.
There is a lot ofpotential for extending the activity, with more complex structures if possible and with elements of maths if we add prices, for older kids. With some groups, I also managed to make it more SS-centred because I was involved only in the first round, for everyone to do their shopping once. In later stages, that is the kids were taking turns. Student A was the shop assistant and student B was the customer. Afterwards, student B would sit down and student A would become the customer, with student C taking over as the shop assistant.
A lesson of this type can also be used in a variety of lessons: with different topics (clothes, toys, food, furniture), to introduce the idea of money, to teach the kids about the value of coins and notes, although, actually, at this point, the majority of transactions are done via credit cards.
Any set of new vocabulary, at the stage when it is introduced or when it is practised.
A set of flashcards, electronic or paper, to support the clarification and building the connection between the word, its visual representation, its meaning and the gestures and phrases chosen to represent it
The teachers and their face, hands and voice
Procedures
The teacher introduces the vocabulary, as usual, with a set of flashcards or realia
What follows is a set of practice activities appropriate for the students’ level, age and interests
The teachers add miming but apart from gestures accompanying the key words, there are also simple phrases for each of those i.e. ‘a doctor’ represented by a flashcard, a gesture (for example, putting on the stetoscope) and a phrase (‘Open your mouth and say ‘aaaa’).
Students look, listen and say the words.
In the later stages, students also mime and produce the language for the teacher or the other students to guess.
Why we like it
First of all, this particular trick (I would not dare to use the term ‘an activity’ here) was simply a coincidence. We were practising the vocabulary in the unit of professions and, as part of the revision stage of the lesson, I was miming jobs for my student to guess, just like we had done many times before, with other sets of vocabulary. It was then that I realised that there are certain limitations and that miming some of the jobs might be confusing for the students. ‘A ballerina’, ‘a singer’, ‘a photographer’ were easy enough but I got stuck with ‘a firefighter’, ‘a doctor’ and ‘a teacher’. Until I realised that to my miming and gestures, I can add a word or two.
The main aim here is still the same – the gestures, the TPR, the miming are supposed to help the children understand the target vocabulary better and remember it better, for example, while miming the word ‘firefighter’ the teacher can pretend to be directing the hose and the stream of water at the invisible fire but, to make it more obvious and visual and rich, the teacher can also say a simple phrase, for example ‘Look! A fire!’, to illustrate the word and to create associations with it. All in all, the combination of different learning channels is beneficial for the language learning.
This added linguistic element to our TPR means an extended exposure to the target language and an opportunity for more listening practice.
The set of phrases used with the specific vocabulary should be kept the same in the beginning, not to overcomplicate and to overburden the children, but, naturally, there is a lot of potential here for a wider range of the structures later on.
Initially, it is the teacher who is going to be producing the language here, however, with time, the students can also be encouraged to take over. We have only been doing it for about two weeks at this point but I have already noticed that my students started to pick on the language and start using it. And that means a lot more potential for maximising language production.
So far we have been using this approach in two different activities: Guess my word (miming, as a revision of the target language in the beginning of the lesson) and Abracadabra (setting a word for the other students / teacher to mime, with a wider range of vocabulary).
This episode is going to be devoted to the older students, juniors, teenagers and adults and those of the higher levels, from B1 upwards.
All of these activities were inspired by the approach in the visual based speaking tasks of the Cambridge exams. I use these activities frequently at the beginning of the ‘unit’, to introduce a new theme, to ease us into it and to start with some freer speaking activity, that, really, does not have any specific linguistic requirements or a very formal framework. Not to mention that by the way, my students get an opportunity to practise and develop their exam skills, in a slightly more relaxed way.
All of these activites are deeply rooted in my professional laziness because even though I have to devote some time to the picture selection, that is, really, the only time investment beacause the task is usually a one sentence instruction and, to be perfectly honest, most of the ideas listed below were created during the lesson, as a follow-up and an extension of the regular Cambridge ‘similar or different’ task.
Usually, my greatest helper while preparing these activities is google search engine. I type in the key words and I look through the images until I find these four, six or eight that match the idea that I have in mind. They can be saved in a document or displayed on the screen (powerpoint or Miro). I save them and keep them for later because they are always recycled.
Frequently, I start the cycle with the simplest of the activities (‘Choose two to compare’) and I follow-up with a wider discussion (‘Have you ever…?’) or any other combination but, naturally, these can be used on their own. All of the activities can be done with the whole class or in pairs.
Talk about your favourite photograph: students choose the photograph that they really like, they describe it and justify their choice
Talk about your least favourite photograph: students choose the photograhp that they like the least, they describe it and explain why they don’t like it
Choose two pictures for your friend to compare: students choose two of the pictures to compare them, to look for similarities and differences, very much like in the B2 speaking part of the Cambridge exams. The fact that there are more than two pictures allows for the activity to be repeated a few times, over and over, in pairs or with different partners. The longer the activity takes, the more interesting arguments appear and the more creative the answers.
Choose two pictures for your friend: students work in pairs but in this case they choose two pictures for their partner to compare. It makes the activity more interesting as it is easier to avoid all the obvious choices and this way more interesting contributions are generated.
Have you ever done that? This is the activity in which we use all the pictures at the same time. Students ask each other the question about all pictures, one by one.
Would you like to? This is another activity that can be used with all the pictures. Students ask each other questions related to the situations in the pictures, but more focused on the future.
The comparatives: Another activity in which students discuss all the pictures, going over the list of questions and choosing the pictures that somehow stand out. The set is closely related to the theme of the photographs. For example, in a lesson devoted to health and health problems we looked at these four pictures and we answered the questions: Choose the most serious problem, the least serious problem, the most common problem, the easiest to deal with, the least unpleasant for the doctor, the least unpleasant for the patient, the most expensive to treat, the least expensive to treat, etc.
What happened before? What will happen afterwards? This is a cool actvity that I adapted from the latest editions of New Cutting Edge Advanced. Students choose their favourite pictures and discuss the before and after, almost telling a story.
Ask a question: students work in pairs, they ask their friends questions related to the pictures, they have to use different pictures and different question words and they need to a different word each time: What? Why? Who? Where? How many? How much? What kind of? When? How often?
It reminds me of: students work in pairs, they talk about all the pictures. The talk about their associations, memories or references. It can be a free activity or it can have a theme of: books, films, songs and personal memories.
Make sure you also have a look at the first two parts of this series. You can find them here and here.
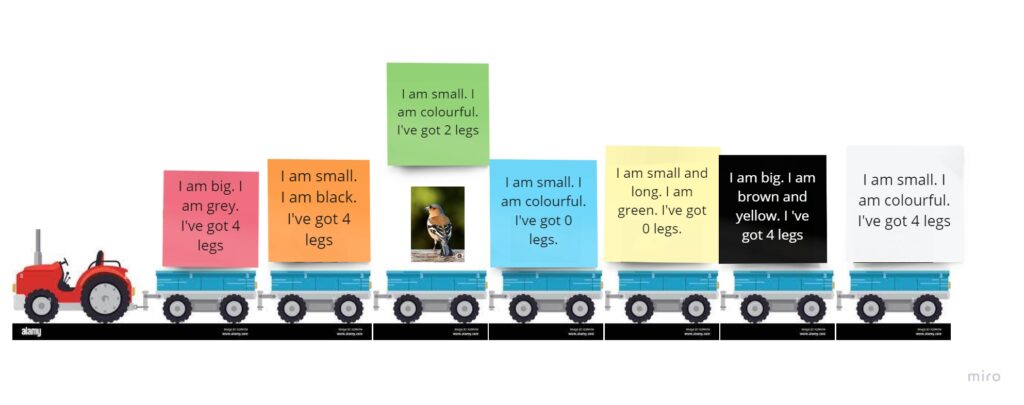
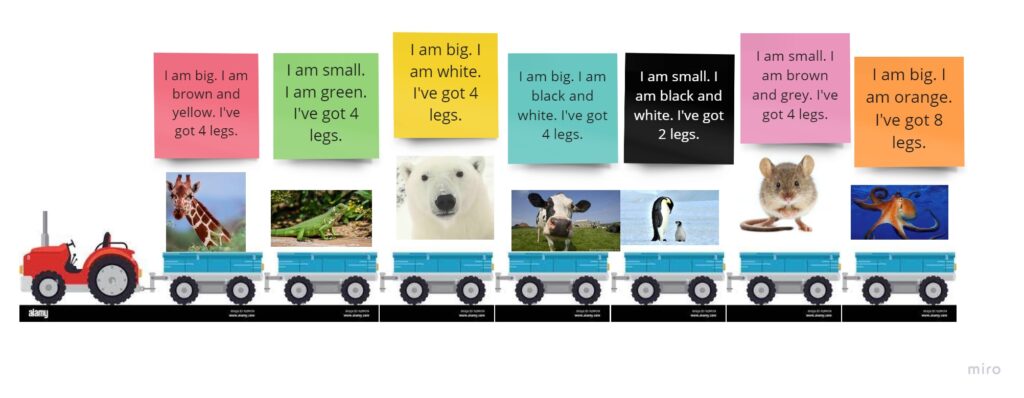
A beautiful train with carriages or a tractor with trailers, with one animal on each trailer.
A set of colourful cards, with a set of riddles following the same framework and the set of structures in each riddle.
Procedures
Students take turns to choose the colour of the card.
Teacher reads the description of the animal. Kids listen and guess the animal. Teacher uncovers the picture to check the answers.
Why we like it
First and foremost, this kind of an activity helps to develop listening skills in very young beginner students and focus as they need the information from all the sentences in order to guess the name of the animal.
At the same time, since all the riddles use the same framwork and the same structures, this game is an opportunity to practise all the key structures. The set of these will depend on what the students are familiar with and can be simplified or extended.
We use this kind of a game to prepare the students to produce the language, too and after playing the game for a few lessons in this very format, with the teacher reading and the kids guessing, we move on to the following stage with the students producing a set of sentences to describe an animal.
Last but not least, with time and with the development of the literacy skills, this kind of an activity can also help develop reading skills.
The game is pretty and colourful, made with colourful cards, beautiful visuals from google. The students are usually curious to find out which animals are hidding on the trailers. The format of the presentation can be adapted, too. In the past we played with huge present box (partially inspired by Rod Campbell’s Dear Zoo) and with houses in which the animals were hiding and the miraculously appearing thanks to the funcion of ‘bring to the front’ or ‘move to the back’ on Miro or any powerpoint.
It can be used with animals or with any other topic with the appropriate adaptation of the phrases ie toys (It is big. It is red, with the assumption that we refer to the visuals that the students are familiar with) or transport (It is big, it is fast, it is quiet) etc.
If you are interested in riddles, please have a look at this post, too, where I write more about riddles for the older and more advanced students.
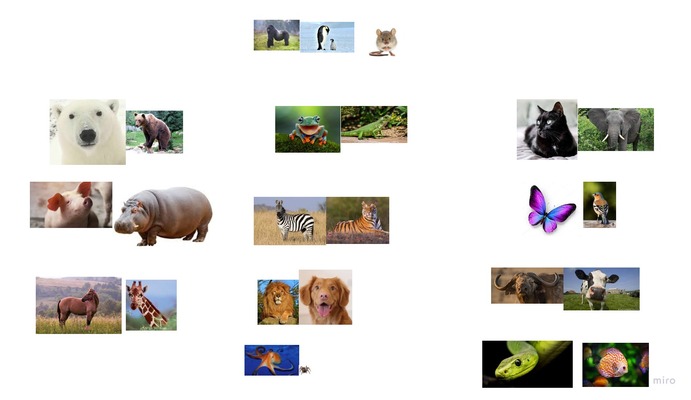
All the pairs. Somehow the penguin, the gorilla and the mouse got left out.
Ingredients
A set of pictures of animals, flashcards or on Miro. That’s it.
Procedures
Revise the vocabulary and ensure that all the cards are displayed at the same time for the kids to be aware of all the options
Model by choosing a pair of animals and putting these cards aside and justifying your choice. With my pre-primary kids, I like to use the first person statements (I’ve got 4 legs etc) as this is what we do with the younger kids (to enable the kids to talk about themselves and the animals without having to introduce the additional structures and to keep it coherent with the songs that we use ie Little bird or As quiet as a mouse). I also tend to vocalise the language ie I’ve got 4 legs (for the cat), I’ve got 4 legs (for the elephant).
Invite the kids to take turns to make their own pairs and to describe the rationale behind it.
This is what our Miro board looked like before we started
Why we like it
An opportunity for the kids to use and to develop the higher order thinking skills in the EFL context
The students are in charge of what they want to talk about and what they can talk about. It is appropriate for mixed-ability groups.
Little or no preparation as the flashcards are already there, the physical cards in the offline classroom or the set of pictures on Miro which, once prepared, can be doubled easily and used only for that activity.
A great variety of structures that can be revised and some opportunity to learn the new ones as the kids might have the ideas that they cannot express in English yet and this game can be the springboard which will help to introduce these. If the teacher speaks the kids’ L1.
Lots of opportunities for adaptation and using them with different sets of words such as toys, fruit, food, transport and, naturally, the relevant structures. I like to start this game with animals because of the range of easy structures that even the very young beginner students can use in order to complete task and because of the variety of topics that can be included (the colours, the number of legs, what animals can do, what they eat, where they live etc)
The level of challege can also be easily adapted, for example, the set of cards can include only 8 items or the teacher can focus on putting the animals into pairs basen only on the colours or the size which are probably the two most achievable categories, both cognitively and linguistically.
This is a neverending activity because the cards and the animals can be grouped and re-grouped over and over again to let the students create new and less obvious links between the items. Conversly, it can be shortend as needs be.
As regards the interaction patterns, this activity can be used with groups, with kids working together, at least in the beginning, or in pairs if we have the appropriate number of sets of cards as well as with 1-1 students, both online and offline.
There is also some potential for adaptation in the area of materials. The most obvious choice are the flashcards, the mini-flashcards or the Miro board. The teacher can also create a handout with the animals pictures and/or names which the students can colour-code as they are putting them in pairs. This might be a good solution for the kids to work in pairs in the offline classroom.
Last but not least, this activity is an opportunity for the kids to develop the listening skills (as they want to find out the justification for their peers’ choices) and the speaking skills (as they want to present their own reasoning, too). I simply love to observe how my students start with the simplest and most obvious connections and how they venture out into more and more creative ones.
Any role-play or a dialogue i.e. a transcript of any listening task which is a dialogue (i.e. Movers listening part 2, part 3), any written dialogue (i.e. Movers reading and writing part 3), any functional langauge introduced in a dialogue or a role-play
A pencil or a highlighter for each child
Procedures
Start with the main aim of the task is, ie listening in case of task 3 of Movers or reading in case of Movers, introduction of the functional language, etc. Go through all of the stages outlined in the teacher’s book or whichever ones you see fit in your teaching context.
Give out highlighters or pencils, ask the kids to open the books and look at the text again.
Introduce the concept of a banana (or whichever random word you want to use). Explain (and demonstrate!!!) that you will read the text slowly with some bananas in it and that if the students hear the word ‘banana’ they have to highlight or underline one word that comes immediately afterwards. Model with a few words.
Read the text with the bananas as the kids listen, follow and underline or highlight. The words chosen to be highlighted are the key words for each specific dialogue and their number depends on the dialogue and on the age and level of the students. With the older students and the more complex texts and language, the students can highlight two or more words that constitute a phrase or a collocation. This can be signalled with a repeated number of bananas ie banana banana for a two-piece phrase or banana banana banana for a three-piece phrase.
Ask the students to work in pairs and read the dialogue again and to use their own words and phrases instead of every banana.
Afterwards the kids can change roles and read it again or change the partners.
If the kids are ready, in the final (and optional) stage of the activity, they can close the book and role play and recreate the dialogue and the converation based on what they remember.
Why we like it
It requires no preparation, unless by preparation you mean opening the coursebook and finding the role-play or finding the teacher’s book and making copies of the transcript of any listening activity
It offers a great opportunity for the students to practise their speaking skills in an activity that is both controlled (as we have a framework) and free (as there are quite a few options to choose from)
It also offers a chance to work on the grammar accuracy and the transformation skills
It can be done online or offline
It can be done with a variety of levels. The highest level I have used it with was B1 (teens), the lowest level, so far, was A2 (primary).
So far, I have only tried it with dialogues but now, writing that post, I started to wonder about the potential of that activity for discourse building and creation. The original text could serve as a potential framework and support for the students to use. I am yet to experiment with that option.
Let me tell you first what this post is NOT about:
It is not a post about any specific activity, resource or solution for the classroom.
It is not a report of a classroom research task or an experiment.
It is not a compendium of useful links. Or stories from a trainer’s life.
Not today. Today I want to write about the classroom magic and, in all honesty, I doubt anyone can find it of any use. Really. This is solely for my writer’s and teacher’s well-being.
The magic of Lousiana
When the magic happens OR When kids become communicators in L2
Maximising production is definitely a professional obsession.
Although a) it is probably better to call it ‘my professional interest’ and b) you have probably noticed, if you have been reading my posts (It not, you can find the chapter here). This is what I have on my mind while planning my lessons. This is what I think about while looking at the coursebooks, illustrations, stories and games. ‘How do I get my kids to speak?’
The magic of Louisiana
If you are a teacher of young children, you are a bit like a gardener.
There is a lot of digging, a lot of watering, some weeding, and, above all, lots and lots (and lots) of waiting before you get a chance to even hope about any real fruit or flowers. Or any real communication, in our case. Which does not mean that it is boring or uneventful! Quite the contrary!
It is a wonderful journey, filled with treasured moments, from the very first steps into the classroom and any signals that we have exchanged ideas and understood each other. Cautiously walking in, on day 1, a bit uncertain but also very curious what this new auntie (that’s what I have been referred to, in Russian, in Spanish and in Portugues) has to offer. Pointing at the right flashcards, nodding in lieu of a yes, lining up because the teacher asked for it, picking out for the red crayon in a colouring dication or replying ‘Hello’ to your ‘Hello’ Drilling and reciting all the colours and so is confidently shouting out ‘Cat!’ to correct the teacher when she shows you a picture of a cat but, somehow, she says ‘It’s a dog!’ (though with this special elfin smile and a spark in her eye)… All of this is priceless, amazing, magical. And necessary.
The magic of Louisiana
Then comes the plateu.
Yes, a language learning plateu. In case of the primary or the pre-primary language learners it has got nothing to do with reaching the intermediate level (quite often the level associated with the concept of plateau), quite the contrary, but, it does happen with the little kids, too (and yes, this is just the idea that I got right now and decided to use it in this post).
So, taking the level aside, what do I (very subjectively) see as the language learning plateu in early L2 learning?
kids feel confident in the classroom, with its routines and traditions, the teacher, the coursebook, the lesson and the course framework
kids feel comfortable with their peers and the bunch of kids starts resembling a group and a team
kids are curious and easily learn new words (aka single words) and they can reproduce them on teacher’s request, the action – reaction, teacher – student or teacher – students goes very smoothly
kids produce some simple sentences, depending on the curriculum and the programme
kids know and produce some phrases related to the repeated activities during the lesson
The first two points here are not directly related to the actual language production but due to the age of children, they are of the utmost importance and for that reason they have found their place here. This is the point in the course when the age-related characteristics stop being an issue and teacher and children can focus more on the language learning itself.
Finally, the learning happens, we move from unit to unit to unit. We go from unit 1 (colours), to unit 2 (school), to unit 3 (fruit), from level 1 to level 2, the kids are growing, the kids know more, they are under control. The kids are happy and the teacher is happy. The only thing missing is ‘They lived happily ever after’…
Don’t get me wrong. I am not UN-happy with the classes going beautifully well. I am not picking at the seams here. This is the state that we, as teachers, dream about. However, this is also the dangrous plateau because we may want to stay there forever. And we should not. Not moving forward equals staying in the same place equals regression. Things going well is a signal that the time has come to do something new, look for new challenges or think of ways of extending the Zone of Proximal Development.
In the very specific context of maximising language production in the VYL world it might mean helping the kids move from ‘the action – reaction’, ‘teacher – student’ and ‘teacher – students’, one word or one sentence production to the next level: a discourse (or a mini-discourse), student – student, student – teacher and spontaneous production aka I say things when I have things to say (and ‘Not because my teacher, the adult asked me’).
The magic of Louisiana
The most beautiful day is when the magic happens
There is no way of getting ready for this day, marking it in your calendar and making it your aim. It is when, all of a sudden, it happens – kids say things outside of the framework that you have prepared for the day, outside of the pattern they ‘should‘ be using according to the book. Or when they try to say things that are, clearly, out of their range (yet) but which they need to say. Sometimes it is fully expressed in L1, sometimes partially.
Examples? Yes, sure! Let’s go.
Case study #1
One of my 6 y.o. students, still in pre-school, about to go to school in a few week but have have been using the primary level books since January. She has always been a very active child and an eager students but recently, over the past few weeks, she has just skyrocketed. The magic happened!
We are studying online, she is in her natural habitat, at home where she communicates in Russian. However, during the lesson time, she started to use more English while talking to her brothers. Sometimes, it is fully in English, for example calling him from another room, to join us in a game (‘We are playing! Come!’), sometimes it is a mix of Russian and English (‘Sasha, go, do your thing!’). Sometimes, the baby brother wanders in, during our lesson and he also gets his portion of English, because I welcome him in English and his sisters babbles to him in English, too. Sometimes. We are in our little English bubble while in class and she is really making an effort to communicate in the target language then. Although, not only then, actually! I know it from her mum, that she sometimes plays with her teddies and that some English happens, then, too! Some of them must be English-speaking teddies.
I also noticed that when we play together with the older brother, she really listens to what he is saying and she picks out the useful words and then tries to use them, like, in the same lessons the phrase ‘everyday’ or ‘every day’ and, almost immediately, enjoying the variations such as ‘every minute’ and ‘every second’…
This ‘magic’ goes beyond the immersion in the context and the language creativity and experimentation. My student also started to attempt to maximise the amount of language produced.
Last week we started to practice Present Simple (Do you go swimming?) as a follow-up on the simple ‘Do you like?’ which we have known for quite some time and we were interviewing each other, not as ourselves but as the chosen characters. The main aim was to practise ‘Do you do something?’ and I did not even plan to insist on using ‘at the weekend’ or any other day of the week, leaving it for later. However, in class, my student just started to speak and it was a wonderful experience for me to see how far she would go. First, she’d say ‘do you’, then pause, choose the verb, pause again, choose the object, pause again, choose the preposition of place, pause again and, finally, add the day of the week…
Do you draw on your homework every day? Do you dance in your classes on Fridays? Do you sleep in the school?
I could not keep up with her in my note-taking, because there was so much language and, yes, because I was laughing out loud. Not only because her sentences were great but also because I realised that, this time round, I managed to notice, to seize the moment, in a way.
The magic of Louisiana
How to make sure that the magic does happen?
Let the kids lead the activities (‘Who’s the teacher?’)
Start introducing pair-work as soon as the kids might be ready
If possible, include free play slot in your lessons
Show curiosity, ask questions, even if they seem to be above the kids’ current langauge level
Model
Work with the emergent vocabulary but for that it is necessary to be able to speak or at least to understand the kids’ L1 and to provide the word they want to use, even though it is not a part of the wordlist for the level and to keep bringing it back
Be clever and welcoming when it comes to kids’ way of using L1 in class. Apart from the teacher showing respect for it (please, please, please avoid saying ‘DON’T speak L1’ or ‘NO L1’), there is a way of working it. Not all L1 appears because kids don’t want to speak English. Using L1 is one of the communication strategies and it can be a signal for the teacher as to what the kids want to talk about and what they need the vocabulary and structures for.
Be clever and welcoming when it comes to kids’ way of dealing with code-switching (aka ‘mixing’ L1 and L2). This is one of the communication strategies and it is the a step towards and an attempt at L2-only communication
Create the English language environment and provide the exposure with songs, books, games and stories.
Think of extending this exposure and taking English out of the classroom (aka get the parents, the grandparents, sisters and brothers on board!)
Continue reading this blog for more ideas:)
And wait. Stretch out and wait. Like in a song by The Smiths…The magic is bound to happen, eventually.


