(Or an English teacher reflects on the academic year that has just finished.)
This is the third of the posts in the series of the Reflective Teacher that I promised myself to celebrate the end of the school year. Here you can find me reminiscing on the life of an Art teacher. Here you will find the unexpected memoirs of a Maths teacher and here (because they also secretly belong in the series) – a whole set of notes of a teacher trying to introduce law and order in Year 1.
But, first and foremost, I am a teacher of English, working hard to give the students in my classroom the tools, the imagination and the courage to speak a language. And from that point of view, this year has been a very interesting experience for an English teacher, too.
Something old…
Well, there is a lot of that!
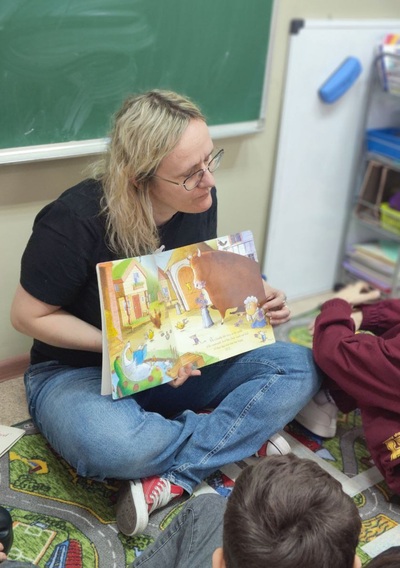
I have been teaching English to primary for many, many years now. I know how to do it and I love doing it, really. Vocabulary, grammar, communication skills, functional language, reading, writing, a is for apple (a a apple), learning how to be a student, learning how to be a member of a community, routine, pairwork, all of that, all at once. It makes your head spin, a little bit, of coure, but then, all of a sudden, it all starts coming together and it feels great.
Introducing all the letters of the alphabet, staring our handwriting booklet, phonics stage 1, stage 2, stage 3, the first song, the first test, the first spontaneous production case, the first storybook. I have jumped through all these hoops with many generations of my students and successfully so and this year we have done it together once more.
The only thing that was different was the fact that I had a lot more time in a week and we could set aside a lot more time for practice. And that, apart from English and the ESL classes, my kids were getting a lot more exposure and practice from the History lessons, from Maths, Science, PE, Art and the break times, too. Every little helps!
Something new…
Do you still remember the title of this post? If not, please scroll up to refresh. Why? Because this is the image that I have in my head when I think of English in this academic year, here goes:
a beautifully constructed framework of the CEFR, with all the levels and their detailed descriptions, skills, grammar and vocabulary, in a sequence, neat and tidy, like a set of puzzles forming one beautiful picture, now scattered on the floor, all over the place and it is not even possible to understand what it was that they showed in the first place…
That is exactly what happened this year and that is all due to the context in which I was teaching, namely my bilingual primary school, with a group of students who were in their year 1 of education but according to the curriculum and age, in their year 3 of the BNC. And who, naturally, were a very mixed bunch as regards their L2 language skills. A very mixed bunch indeed.
Because of that we made a decision to adapt the programme and the plan and divide the children into level-appropriate ESL groups so that they all could learn and take their English to another level and, alongside that, we would teach the English and develop the skills according to the BNC. All in all, it has worked well. The kids were tested throughout the year, both as regards the reading and writing skills (milestone tests) and speaking (Cambridge YLE) and they all made progress. Hooray.
However, all of that meant that I had to forget about what the basics, the CEFR. First of all, because, from the very beginning I had pre-A1, A1, A2 and A2+ and everyone in-between sitting in my classroom. Outcomes: forget about using one single set of materials.
Second of all, we were to follow the curriculum of the year 3 of the BNC and even if we made amendments (as we did), this was nothing in any way related to the CEFR, as regards the structures or the vocabulary and we had to at least make an attempt at combining the English curriculum with our ESL curriculum. Outcomes: adapt, adjust and do your job, feeling just a little bit anxious, with the safety blanket gone.
Last but not least, I had my bunch in the classroom and in the school, for many hours a day and it was my task to make the most of it and to give them a chance and the tools to communicate in English as much as possible and that means (or it might mean) not going nicely from one level of CEFR to the other. I have already written about it earlier, in my storytelling campaign posts here, and this year I definitely had a chance to research it more and to gain even more experience.
Some of the things that meant for us:
- introducing lots and lots of verbs, the everyday verbs (to talk about what we do in the classroom), the story verbs (in order to read and to tell stories), the hobby verbs (to talk about what we like to do)
- introducing lots and lots of adjectives, to describe emotions and feelings (to talk about ourselves and to talk about the emotions in stories), to describe objects (all the Maths, History, Science lessons because of the comparatives and superlatives used in all of the subjects)
- introducing structures when we needed them: Present Continuous (to describe what we are doing in the classroom, to manage the kids, to tell stories and to describe pictures), comparatives and superlatives (the BNC)
- introducing some elements of the word formation (some negative prefixes, gerund, er for jobs) because of the requirements of the BNC
- introducing the elements of the three basic tenses (the Present Simple, the Past Simple and will) to give the kids a chance to express themselves, to talk about the weekend on Monday and to talk about the things to do on holiday
- learn a huge pile of words from way beyond our A2 level and not in some topical sets but because we either needed them in our phonics practice and it was ok to learn them because they were all 7-year-old-friendly words (with such treasures as: feather, together, trophy, sloth, gate, cube, arrow, pillow among them) or because we needed them for our English, History or Science lessons.
- introduce a pile of useful phrases, way beyond our A2 level, through stories, just because we needed them in the everyday. ‘It’s impossible!’, ‘Let’s try!’, ‘You’re too loud!’, ‘Just a little bit more!’, ‘I’ve got an idea!’…
Something borrowed, something blue!
Two things that it led to is that we have actually learnt and we have made huge progress over the year, despite this being the first year of learning English for some of my kids and it meant learning some complicated vocabulary and grammar at the age of seven. The other thing it meant for me only was staying somewhat shell-shocked and puzzled at the fact that I have turned the CEFR upside down and inside out and I lived to tell the story…
I am not sure if, with this post, I really want to promote getting rid of the CEFR. Quite the contrary, I appreciate it being a part of our life, as a teacher and an assessor or an examiner. But it is not the only thing that matters and, sometimes, experimenting and playing with it or just blatantly going around it, that is the best idea EVER! Especially that the CEFR itself is one thing and the way the structures or vocabulary items are included and organised in our coursebooks, that is a completely diferent thing.
It’s been years now since I started to introduce lots of verbs, lots of adjectives and the Present Continuous in my VYL classes. This year was the first one in which I brought some elements of the Past Simple and the future will to my young beginners, just so we could talk about the everyday in a meaningful and natural way. And I am very happy with the results. Hooray to that!
Happy teaching!


