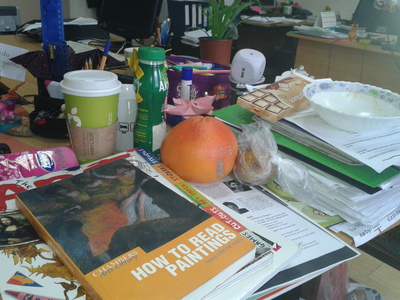
What can you see in the photograph? Oh how I wish I could hear your thoughts and all your ideas, dear reader!
It does look pretty messy, doesn’t it? This is what I call ‘real life’.
Imagine this, I have just come into the office on the day of the training (which is not quite ready yet, not this one, the week must have been a real hell so although the ideas are there, the presentation itself is NOT, not panicking yet, but the adrenaline levels are already up) and I have just taken ‘everything I need’ out of the bag: books, notes, some copies and A LOT OF FOOD (typical). I am about to start planning. Having looked at what my desk has become, I decide to take a photo of this beautiful mess that soon will (I know it now) turn into a great seminar session.
I have decided to use this photo because it is a pretty accurate visualisation of what happens on some days when I plan my classes and to follow it up with a few words on what happens next and how I get from this havoc to the end-of-the-lesson happiness.
Based on the lesson with my ‘adult’ preschoolers a week ago.
The ‘theory’*)…
Step 1: Make a decision what your main aim is. Try to verbalise it and even write it. It really does wonders for the awareness of what you, as a teacher want from the lesson.
Step 2: Make a decision what your focused task is. ‘Focused task’ is the concept that we use at my school (and have used for at least 15 years) and it refers to the main activity of the lesson in which the students get to produce the language and the activity which is the culmination of the entire lesson. All the activities in the lesson lead to it, to some extent, just like all the roads lead to Rome.
A while ago I realised that this is the approach that I am using in all my lesson planning, for all the age groups, levels, for teaching and for teacher training, too.
Step 3: Consider the materials available (mostly by looking at what the coursebook has to offer) and whether they contribute to your aims and your focused task. If not, you will need to adapt them or design new materials.
Step 4: Think of the activity that is going to be most suitable for your materials. It is like differentiating between a tool and how you are going to use it.
After all, there are plenty things that can be done with a hammer (materials), such as putting in a nail to hang a picture, breaking a window, smashing a walnut open, stirring soup (activities) and so on. Some of them are more or less appropriate, of course. The same applies to the flashcards, boardgames, handouts and what we are going to do with them.
Step 5: Take a moment and go over the activity in order to make decisions about staging. What are going to be your baby steps within the activity? whenever we do something for the first time (regardless of whether it is the first time for me or the students), I like to make an effort to actually write the main stages, even if in a very simple form, a sequence of infinitives.
Step 6: An additional step: a homework task. It might not be always possible or, rather, sometimes it might involve a lot of work as regards material design or adaptation. To put it simply, not every teacher will have enough time or energy every single time, with all the lessons taught in a week but a homework task that is an extension of exactly what happens in the lesson and creates an opportunity to continue practising the same language or structures at home, with parents.

….and the practice. Our lesson last week.
Aim: For the kids to start describing school objects and the objects in the classroom, using full sentences such as ‘It is a blue pencil’, with the focus on colours and some simple adjectives. The kids are 5 and 6 and in the beginning of their third year of EFL.
Focused task: A game in which the kids will be guessing the secret word depicted in the cards, producing full sentences instead of questions as we have done so far. The kids will be saying ‘It is a blue pencil‘, ‘It is a red pencil‘, etc until they produce an accurate description of what is shown in the picture which they cannot see.
Materials: There is nothing in the book that could help to achieve the aim. There is one practice activity but it focuses on reading and the students are only taking their first steps in the world of the early literacy. A decision is made to design the materials. Yay.
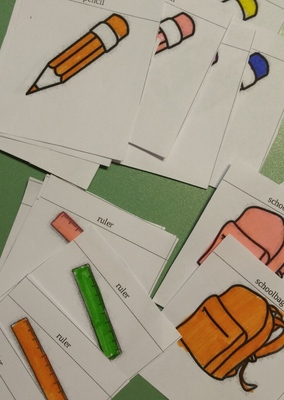
The materials are a set of cards, 7×7 cm, with clip art pictures on them, coloured-in by hand. There are three types of cards (a pencil, a schoolbag and a rules) and six variations of each, in six different colours.
The cards must have a specific size for the kids to be able to manipulate them easily. They cannot be too big (the ‘secret’ will be difficult to keep and the regular A5 flashcards might be not comfortable enough for the little hands) and not too small (as they will be too flimsy and are likely to be ‘spilled’). It might be a good idea to keep the cards in an envelope to add one more layer of guarantee that the technical bits don’t get in the way of the successful playing of the game.
There are only three types of cards in order to make it achievable, at least when the game is first introduced. Later on, when the kids feel familiar with the concept of the game, more objects or more colours can be added.
Activity: The activity itself is a simple guessing game of two stages. The teacher chooses one of the cards, keep it secret, say ‘What’s my secret?‘ Stage 1: students guess which of the three objects is depicted on the card. They say ‘It is a ruler’ and so on, until they guess.
Once they do, the teacher confirms and asks the following question ‘What colour is it?‘. Students continue guessing. They produce the sentences such as ‘It’s a blue pencil‘, ‘It’s a green pencil‘, until they guess. To help them remember the full structure, teacher counts the parts of the sentence on her finger.
Staging
- revise the vocabulary with the regular flashcards
- show the kids the game cards
- elicit the full sentences (signal withe the fingers), while flipping through the cards: ‘It is a green schoolbag’, ‘It is a yellow schoolbag’ etc.
- mix the cards, to choose one and keep it close to the chest
- say ‘What is it?‘ and peek at the cards, secretly and suggest a possible (wrong) answer.
- wait for the kids to start guessing.
- keep showing the fingers and counting parts of the sentence as the students are producing the language, developing the habit of answering in full sentences.
- confirm when the kids guess the object in the picture, praise the student who guess and all the students
- say ‘What colour is it?‘, peek at the cards, secretly and suggest a possible (wrong) answer
- wait for the kids to start guessing.
- after a round of two, the kids take over – call one of them out and ask them to sit on the teacher’s chair, choose the picture for them (to save time, especially in the first lesson) or let them choose the picture they want to play with but operating the cards yourself. The kids might be able to take over in the first lesson, they might be able to take over only in the following lesson, when the game is played for the second time.
- encourage the group to make sentences, counting on your fingers, praising the kids, encouraging them to produce full sentences.
Homework
The homework task in this lesson was a simple handout, ‘a sentence maker’ in which the students have to complete the missing parts of the sentences, either by adding the colour (by colouring the box) or the adding the school object (by drawing it). The kids choose their own words. Later on, they ‘read’ their sentences. You can find the basic handout here.
The teacher makes one copy per child and one more to demonstrate the instructions in class. When we did this kind of an activity for the first time, I added the colours myself in line 4 and 5 to make the task straightforward. In the future, they will be given more freedom when they are more familiar with the format and the idea that each part of the sentence is represented by a visual or a symbol.
Did it work? aka ‘Happiness’
You know this moment when you are teaching and you literally want to get up and pat yourself on the shoulder with ‘OMG, you rock’? because you are allowing yourself, simultaneously, to teach and be fully in the lesson but also to be evaluating this lesson as if you had been the observer in the room. And it is actually going on very well?
This was one of these lessons.
The kids loved the guessing game, especially that they were given a chance to lead. The cards and the handout did help me achieve my aims and by the end of the focused task, the kids were producing full sentences, although I had to remind them a lot to use full sentences. It was much better in the second lesson with the same game. The kids were eager to start playing the game and I only had to model once. They were ready to take over and they produced a lot of language.
If you want to read more on the subject, have a look at this post where I share how I approach the everyday lesson planning for preschoolers.
Happy teaching!
*) Inverted commas because it is not a real theory, only a set of daily procedures, verbalised.
2 thoughts on “From ‘havoc’ to ‘happiness’. Lesson planning for YL (part 2)”