Surprisingly, that is not as random a question as it might seem. Not only because we talk about the adverbs of frequency and my kids ask how often I do mine. I always say ‘Never’, just to make my kids give out the appalled ‘Oh!’ although, really, every day is a homework day because the lessons don’t plan themselves.
But there is more to that. With my older students, I do my homework regulary, especially when it is writing. My letter / story / essay not only serves as a model for my students but it also motivates them to do their homework. We frequently use my writings to learn how to structure the discourse, how to proofread and how to improve it. There is so much to it that I even ran a workshop with the same title a few years ago and, perhaps, a separate post will come out of it, in the future.
I would also like to highlight that, as a teacher, I am all for homework assignments, even with the very young learners, and I have already written about it here. Naturally, if the preschoolers can do their homework, then everyone else can, too and I have just realised that this deserves a post on homework with older learners (mental note #2).
However, today, I would like to write about something else entirely.
Let me tell you about the context
It’s been over a year since I started to work in a slightly different context, a primary school with a bilingual programme (which you can definitely tell just looking at the content here). Last year, in my year 1 group we used to give the kids the homework, once a week, Maths and phonics and we used to keep a journal with my kids, too. I shared the electronic materials with the parents, in order to enable the children to interact witht the content at home. All types of homework were optional, although, of course, I was checking everything that was handed to me and I kept a homework record, just to be able to analyse the situation and to check if there was any connection between the homework done and the progress made. Here is a spoiler: yes, there was.
This year, we decided to change that and to standardise the procedures across all subjects and both departments (English and L1). This year our final, seventh lesson, is a self-study lesson which we devote to additional work in the areas that need that most. I am not sure how the L1 programme teachers make their decisions but I decided to go for flexibility, sometimes it is English, sometimes it is Maths, depending on the day and how the day goes.
Each day we have about 20 minutes (aka one task), the kids work on their own and they are supervised by my T.A. The children work on their own, the task is a written one (at least at this point) and there is always some flexibility and differentation as, naturally, we have a mixed ability group. The task is always an extension of what we have done in class in the morning.
My T.A. always collects the papers and I check and comment on them and give them back on the following day.
What exactly do we do? (aka Examples)
Task type A: Just One More Exercise Like We Did In Class: This is probably the kind of a task that was initially intended for this kind of a lesson. I remember the debates with phrases like ‘what we don’t finish in class’, ‘what we didn’t have time for’ and ‘just some more practice’. This is absolutely very, very useful for the children (more practice!) and for the teacher (easy to prepare) but, admittedly, not the most exciting task type. As I have found out.
Task type B: Find My Mistakes: That is the type of a task that, unlike the one above, I need to write myself. It involves a task that we did in class but there are some mistakes in it. It can be a Maths task (the type we do with Petya and Alisa, our invisible students) that follows on the specific exercise that we already did together with exactly the same procedures and instructions, already completed but with mistakes. The main objective for children is to become a teacher and to check the tasks for potential mistakes. Sometimes all tasks already have a mistake (the easier option), sometimes some items are correct.
It can be an English task, too and in this case the children look for structural mistakes (punctuation or grammar) or factual mistakes, in case the task is based on a song or a story we have covered.
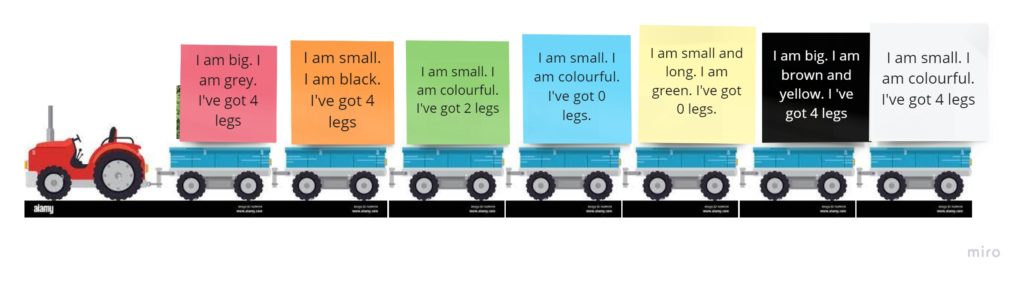
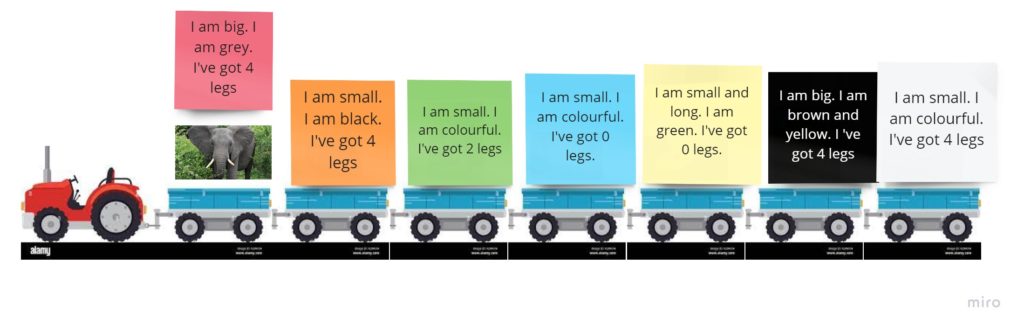
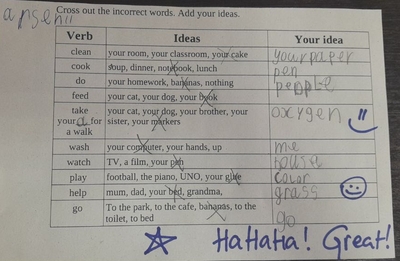
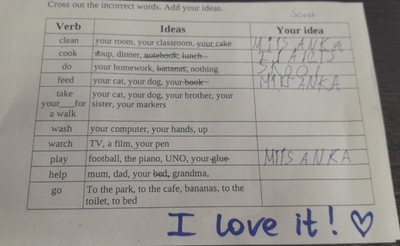
Task type C: Odd One Out or Add Yours: This task type is usually used for English and we used it a lot with vocabulary. So far it has been really handy with all the vocabulary as it allowed for differentation and open-ended exercises or verb phrases or noun phrases as we could practise simple collocations, for example: What goes with this verb: wash: your hands, your face, a book, your shoes. In this particular case, the kids had to find the odd one and, also, add their own option.
Task type D: Make a Task For Miss Anka: This is also a task that is always based on the type of a task we do in class in the morning but in this case, children have to create their own examples for me. It can be a word search or a snake (see photos), it can be their own mini-story or short sentences in English or their own text tasks or examples, for me to solve or to find mistakes. This has become the Number 1 Beloved Task, for all of us. A hit!
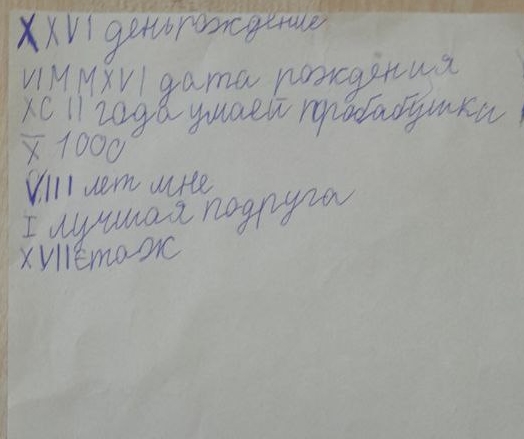
Task type E: Miscellaneous: Guess-Related: This is a mix of all tasks, another one of those that I prepare myself and very personalised. It is usually a task for English although it can be Maths, too. We did one when I wrote random sentences about my students (a set of 7 per child) with the adverbs of frequency (‘Sasha always plays computer games’) and children had to read and correct when necessary or give me points for guessing correctly how often they do things. In the Maths lesson on the Roman numerals, I had a set of numbers ‘about me’ and what they mean and the children had to decipher them and match them i.e. the number of meters I can swim = DC and so on.
Why we all just LOVE it?
First of all, I cannot repeat it enough (and in caps): WE ALL LOVE HOMEWORK. I always have, really, but now I am discovering the new levels and reasons for this love but it is also true that my kids love it, too and, when on an ocassion or two, the homework in English did not happen in lesson 7, my kids were simply disappointed. Not to mention that right now we start the day with ‘Miss Anka, did YOU do the homework?’ (or variations: ‘Miss Anka, did you see the homework?’).
Here are the reasons why I love these homework assignments:
- my students have an opportunity to do ‘something more’ in English or in Maths, which is the idea of the homework itself and the most precious benefit.
- these tasks were also an opportunity to develop my students’ reading and writing skills and, at this point in the game, these are crucial. We are past the basic phonics stage and the simple sentences stage so whatever they read and write, out of their own accord, is a reason to celebrate.
- the kids could work in a more independent format, revising everything that they have learnt in the morning, doing it again, moving it to the ‘freer practice’ level, revisiting the task and, in a way, testing themselves
- many of the tasks gave the kids an opportunity to make decisions and even to be creative and, for that reason, I love checking the homework, to see where the course of the day took them. I can tell you, easily, almost every morning, I get a hearty laughter and my comments are some variation of ‘excellent’ and ‘I love it’.
- these tasks, by design short, flexible and open-ended, are perfect for mixed-ability groups and very often the students are in charge of how much they choose to do. The instructions include the minimal number of examples or sentences they have to do (adjusted to my ‘weaker’ students) but it is great to see that hardly anyone does just that and many, if not all, complete the entire task prepared. Naturally, ‘every little helps’ and I rejoice every single example completed. This approach, however, takes the pressure off the students and is very motivating in itself.
- movitation is a huge factor here, as well, and, I’d risk saying that all of the aspects of the format and the task design contribute to it. Some of the children have to leave early (to attend to whatever errands they need to run) but they take the handouts with them and bring them the following day, although it is not obligatory.
- many of the tasks are teacher-friendly. I prepare them daily and it really does not take a lot of time. The task type A requires no preparation, apart from making copies. Task type D is even better because, usually, it requires bringing only a piece of paper for each student. Task type C is also very simple as it can be a copy of the exercise done before, only with wrong answers and that, for a high-level speaker of English and a relatively competent Maths user, also – a piece of cake. The other two, type C and E are, admittedly, a tad bit more involving, especially the highly personalised type E, but, looking back at the results and the outcome, they are just SO worth it!
Instead of the coda
I am aware of the fact that we have some advantages because of the format in which we work at my school but I decided to share these activities and the whole approach because of the benefits it has brought us and because I believe that many of these task types can be adapted to, say, a more traditional EFL classes of a language school. And bring about the same exciting outcomes.
It’s been only two months of this particular experiment so there is definitely more to come!
Here are some tasks we have done already
English: Task type C: odd one out and add yours

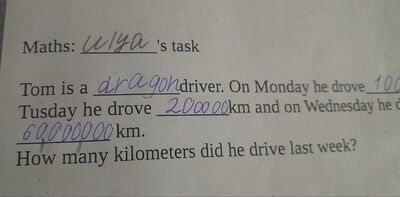
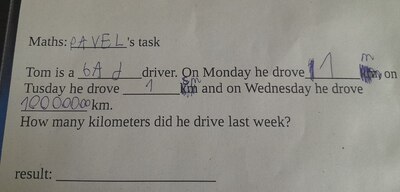
Maths: Task type D: created your own task
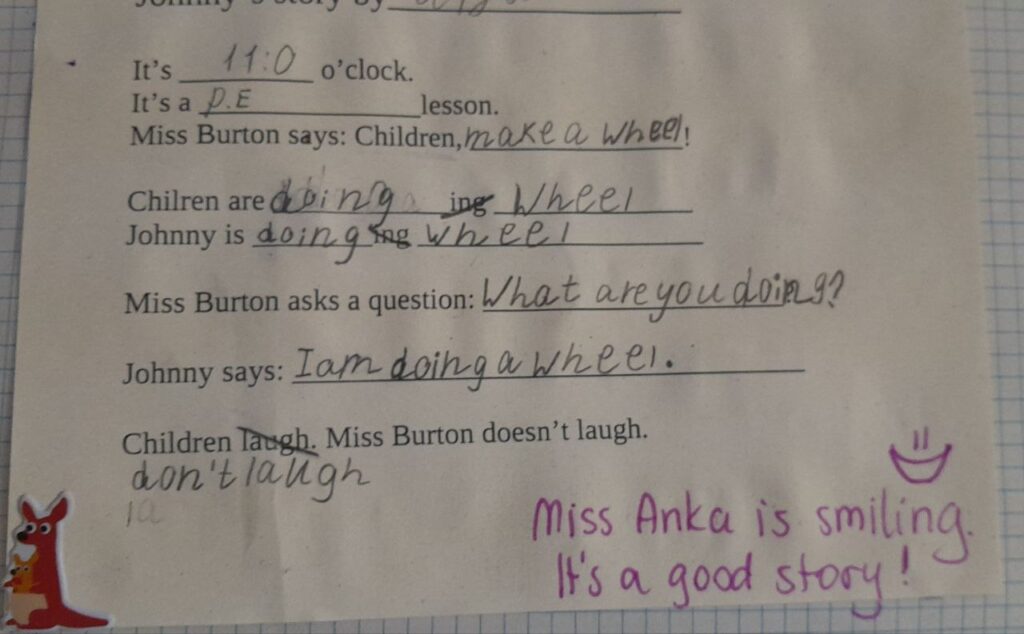
English: Task type D: write your own (based on the story we did in class)
Math: Task type E: Guess (Roman numerals and the notes my student took of her potential guesses)
Happy teaching!