Levitan and Leaves. Art in Primary

The teacher’s version

I found the photograph first but then it turned out that it is a whole post with a video tutorial, too. Have a look at the Art Projects for Kids! Which, by the way, is a cool website that I will be visiting in the future!

The language

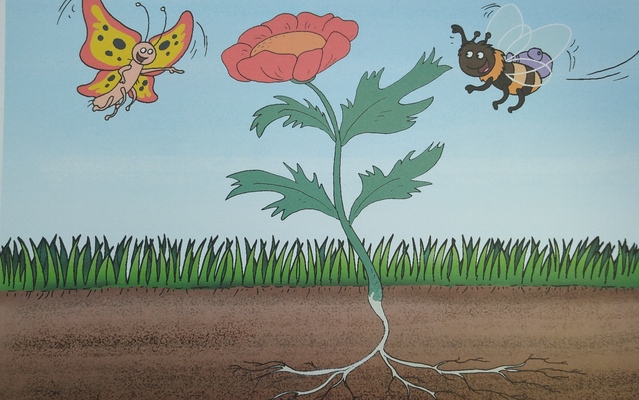
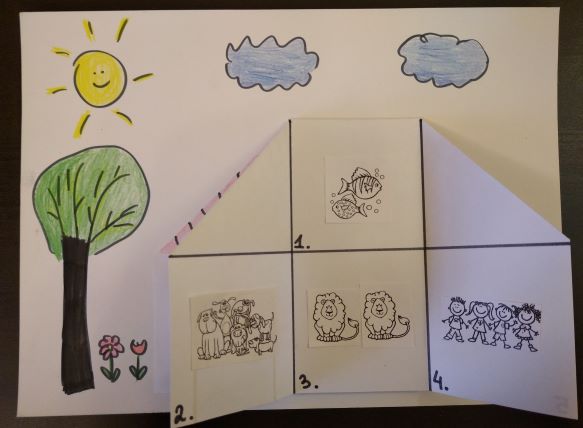
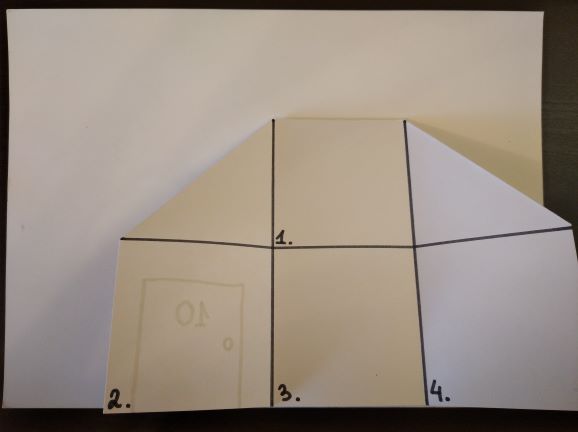
This is the second module of our course and I decided that I need to start introducing some of the natural world vocabulary, in order to be a little bit better prepared to talk about the artists to come. The first introductory set is rather modest and it includes: the sky, the grass, trees, mountains, houses, the river, flowers and leaves. We have also used this module as an opportunity to revise colours and numbers and to introduce the first two adjectives (big and small). Finally, we started to talk about what ‘I like’ and ‘I don’t like’.

The artist

Our artist of the day who introduced all of that to us was Isaac Illich Levitan, the love of my childhood and my first artist ever. The album of his works is one of the very few books that I remember from my early childhood (apart from the storybooks, of course). It was there, on the shelf and I did spend hours on the carpet, leafing through it, back and forth, making up stories taking place among the birch trees, by the river, in the forests and in some ‘Sokolniki park’ which I found out about long before I set my foot in it. This, by the way, was also one of my first encounters with the foreing languages as the book was in Russian, English, French and German and these were my first exercises in comparative linguistics. At the age of 5 and 6.

Leviatan’s was what you might call a cameo appearance because I did not want to overwhelm the kids. We looked at the four seasons, looked for the new words in the paintings (‘Can you see a house?) and talked about the colours. We also started to sing ‘What’s your favourite season?’. Not a lot, but Isaac is definitely coming back, with the arrival of the winter and then the spring and the summer. With him, there will be Vivaldi, which would have been a perfect companion but I simply forgot about his existence. I am already looking forward to our winter-themed lessons.
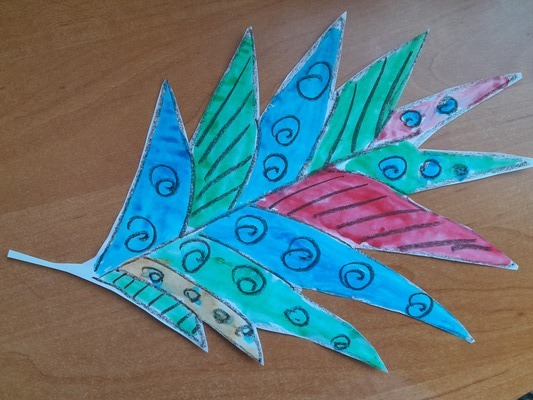
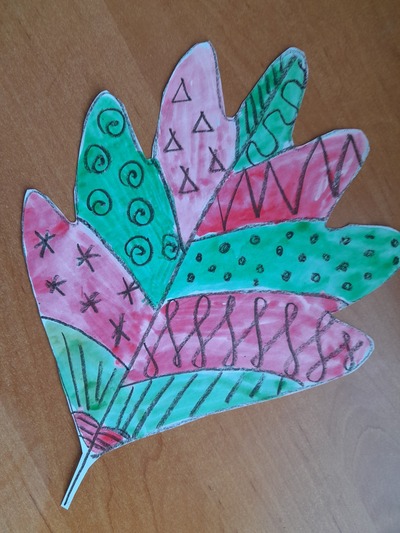
Levitan in our ‘gallery’

The craft

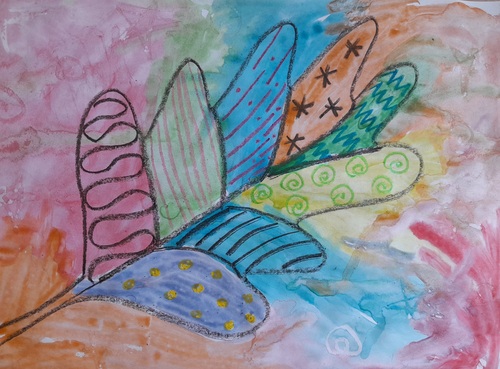
  • try to make the leaf at home to figure out how complex it might be and how much time we will require, think about the stages
  • use the leaves throughout the lesson ie while revising colours and numbers or practising ‘I like / I don’t like’
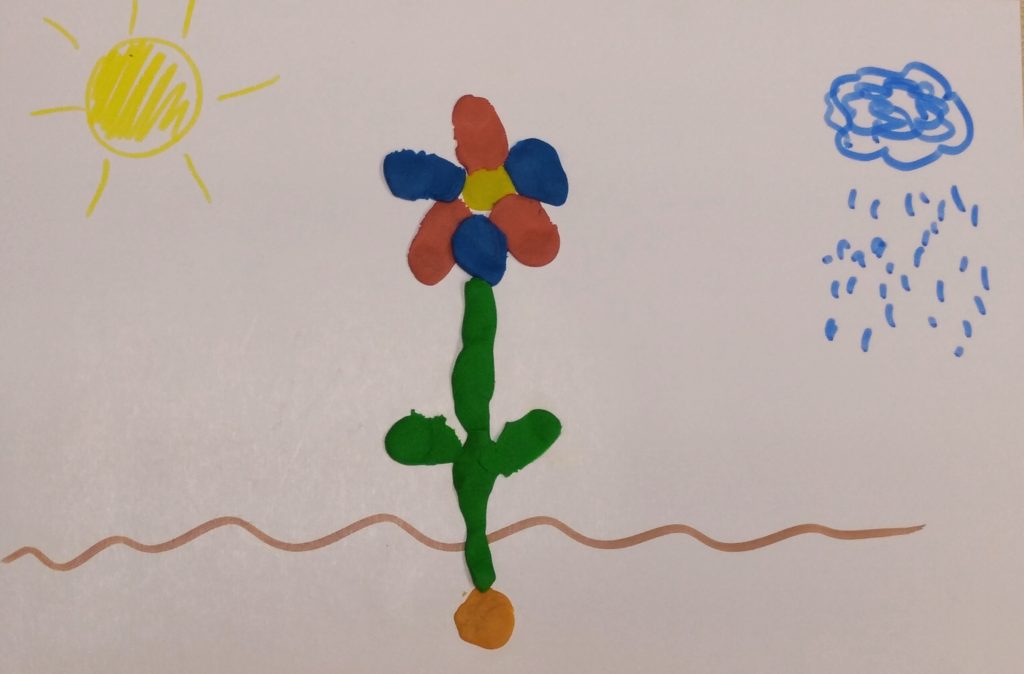
  • check that the kids have all the materials necessary: a piece of paper, crayons, watercolours and water
  • draw the outline of the leaf veins, and patterns with crayons. It is ok to use the same colour but the final product is more interesting if different colours are used. I was considering introducing different patterns to make it more structured but, in the end, decided not to. We will introduce them on some other occasion, with Kandinsky, for example. If possible, I would use special paper for watercolours but in the online world it is not quite possible. Regular photocopying paper works well, too.
  • colour the leaf with the watercolours. It might be a good idea to start with the brighter colours and, for the sake of staging, ‘dictate’ which colour to use, leaving the kids a decision which section of the leaf to colour. The lines drawn with crayons will not be covered by the paint and they will be still visible and it is not really necessary to be too careful with painting. Not staying within the lines or even letting the colours seep or even leak into each other create a much more interesting effect. I haven’t really encouraged my kids to create a very ‘messy-on-purpose’ picture (not yet, anyway) but I am very reckless with how I use my paints, to show the kids that it’s ok.
  • finish with showing the leaves, call out the colours, talk about whose leaves we like.
  • I have cut out my leaves to be able to use them more easily and I was planning on telling the parents that the kids can do it after the lesson, when the paints dry completely. If I still had my classroom, I would put them up on the window.

Happy teaching!

Crumbs #40 A fruit salad

Ingredients

  • Fruit, washed and cut up into manageable chunks. The most basic set includes: apples, bananas, pears, seedless grapes, seedless oranges.
  • A plastic plate for each child, a plastic cup for each child, a plastic spoon and a plastic knife.
  • A set of tissues and a set of wet tissues.
  • Optional: a set of fruit flashcards and the video of the Super Simple Song ‘Are you hungry?’

Procedures

  • Start with presenting the idea of the activity to the parents and agreeing on the list of fruit to be used. It is absolutely crucial that the parents are aware of the procedures and the ingredients and that they approve. In my offline classes, I normally send a message to find out whether the parents approve and then I send a list of specific fruit that I would like to use. I look for seedless oranges and grapes. The list of fruit does not have to be very long. It is going to be a great lesson anyway, even if only the basic fruit are used. Although, of course, the salad will look very appealing if we include more colours and adding some citrus such as orange will be beneficial as regards the flavour, even a little bit of the lemon or orange juice will bring out the flavours of all the fruit and it will blend them nicely. But it is not obligatory. In my online classes, the parents prepare the fruit that the kids really like and it might happen that our sets will vary.
  • Wash the fruit and pre-cut them into pieces and chunks or ask the parents to do the same at home.
  • Plan where (in the school or in the classroom) you are going to set up your salad production station. Ideally, it would be done in a separate room, where everything can be prepared before the lesson and where the students can relocate half-way through the lesson. In the online classroom, the kids can relocate to the kitchen or cut things up on the table in front of the computer. In the classroom or in the kitchen, prepare the working top first: wash the tables, cover them with a plastic tablecloth.
  • Set aside the time for hand-washing. Line the kids up and go to the bathroom, wash the hands, dry the hands and go to the classroom.
  • Give out the tools while pre-teaching the names and while introducing the basic health and safety rules i.e. a plate – it stays on the table, a cup – it is in front of the cup, a knife – be careful. It is a good idea to stage the giving out of tools ie: first the plates and the cups, then the first fruit and the knives, then clean up the plates and give out the teaspoons etc.
  • Take out the first fruit, call out its name. Demonstrate how to cut it up, for example using the following set of instructions: 1) take a piece of apple, ‘Apple, please’ 2) put it on your plate 3) cut it up carefully 4) put the apple into the cup
  • Repeat with the other fruit. Throw away the plates. Give out the spoons.
  • Stir the fruit in the cup carefully.
  • Start eating.
  • Game 1: What’s this?: it is a fun game that involves eating and guessing which fruit we have fished out. Teacher can demonstrate how to play it: take some fruit from the cup, eat it without looking or even with the eyes closed and try to guess what it is. If modelled properly, with the teacher asking question ‘What is it?’ and trying to guess ‘It’s an apple’ etc, the kids will follow and will be playing in the same way.
  • Game 2: Singing and eating: Play the song and pause at every fruit and ask the kids the same question ‘Are you hungry?‘ ‘Oh, look (name the fruit in the salad). Yum, yum, yum’. The only thing to remember here is to make sure that kids finish eating before we play the song again and to continue singing.
  • Clean up, throw away the rubbish, clean the hands with the wet tissues.

Why we like it

  • It is a great and relatively simple way of making the language real and meaningful. We learn about fruit and we do something with the real fruit. With many other topics creating this connection between the classroom and the real world is a bit more complicated, fruit (and food in general) is easy. After a few basic precautions are taken, such as the allergy check, the parents permission, clean hands and a safe working environment.
  • It gives kids a great sense of achievement despite the fact that in the eyes of an adult that might look simplistic. One of my groups called it ‘a cooking lesson‘ and after the first salad, they kept asking for more of those.
  • It is an opportunity to develop social skills (we are taking turns and waiting for everyone to finish), focus (we are cutting fruit slowly and carefully), fine motor skills (we are working with a knife, we are manipulating small pieces of fruit).
  • It is an opportunity to eat in class and that is always fun but it is also something that we do together, as a group and, as such, it can be repeated regularly, although not necessarily with the salad every single time. It can turn into some ‘teatime‘ aka a lesson when we just have a little snack together. That name and the idea is also something that came from one of the groups.
  • It is not an activity for the first lessons with a group
  • If done properly, the lesson can lead to a lot of production. The ‘What’s this game’ was something that just happened in class, just because I really could not recognise one of the piece of fruit in my cup. I fished it out to taste it and I was simply blabbling to myself. The kids were watching and quickly followed suit. Together we turned into a real game and, since then, I played it with all my groups. The other game, based on a song, was something that we played in class for a few lessons, with our set of plastic fruit and it worked very well. The kids liked giving out fruit and pretending to munch on them. Moving onto the real fruit and the salad was a natural next step.

Happy teaching!

Crumbs #31: Circle IS the best shape aka Frogs Etc

@ Magdalena

Ingredients

  • Two circles cut out of cardboard (regular photocopying paper is too thin and flimsy), with the two holes for fingers also cut out before the lesson.
  • Glue to glue these together
  • Crayons, pencils or markers to draw the appropriate body parts

Procedures

  • Show the kids the finished product, introduce the frog, chat with the kids
  • Show the kids the smaller circle, show how you decorated it.
  • Give out the pencils / markers.
  • Give out the small circles, decorate it with the kids.
  • Give out the bigger circle, decorate it, if appropriate.
  • Collect the pencils.
  • Show the kids how to glue one on top of the other. For the younger kids, it might be a good idea to draw a small cross on the top of the bigger circle, to signal where the kids should put the glue.
  • Give out the glue sticks. Kids glue their circles together.
  • Glue the additional body parts, when appropriate.
  • Collect the glue sticks.
  • Play
@ Magdalena

Why we like it

  • It is super easy! These frogs here, in the picture, were produced for a child (a huge Frog Fan), rather than with a child, and that is why I went a bit crazy with the eyes but there are the simpler versions of it)
  • These two circles can become many many things: a frog, a bear, a cat, a dog, a monkey, a rabbit or a snowman, with little adaptations.
  • The task does involve a lot of pre-cutting but the rest can be done by the kids during the lesson.
  • Once the toys are ready, they can be used to play, as any other puppets with all the structures that the kids are familiar with and with those that match the topic of the lesson, at the very least, ‘Hello’, ‘My name is’, ‘I like…and you?’ and it is always great when you can maximise production.

Happy teaching!

Crumbs # 30: Circle IS the best shape in the world aka About chicks

@ Magdalena

It was a typical day in the life of a small scale Mary Poppins. I set out for a shift at the volunteering centre and, as an experienced one, I could not imagine to go unprepared, even if minimally. I thought that, at the very least, we can do some circle magic. I could not take everything but I had a big pocket and so it got filled in with three glue sticks, an envelope full of circles, a small packet of colourful feathers (that was a nice coincidence that I had it). A4 paper and a box of markers did not fit in one hoodie pocket.

When I arrived and started the shift, it became obvious very very quickly that the place is not ready for any craft activities because, apart from one small table and a few little stools and a box of coloured pencils, there was nothing. Or, rather, there was only me and my pocket.

There is some beauty in that, really, when you get to see how your brain starts to get involved in order to think of a solution. Sure, THAT was not about sending a man to the moon or putting together a new recipe, but, still. I was building a grid for our version of hop-scotch and sorting out toys, and the brain was trying to imagine what I can make out of the contents of my pocket. A little chick, that’s what.

Ingredients

  • lots of circles, cut out before the lesson out of colour paper, regular type, cardboard might be too thick. As for the size, this time it is officially: the Size of the Bottom of a Mug, colourful, for the kids to choose from, two pieces per child
  • glue
  • something to draw (markers, pencils, crayons)
  • colourful feathers (I got them in the stationery section of a regular supermarket, you can buy them in any craft activities), but they can be replaced by strips of colorful tissue paper (also those unevenly torn), three per child, if you use the feathers or as many as you want, if you use the strips of the tissue paper

Procedure

  • ideally, for the smaller children especially, it would be a good idea to put a cross on one side of each circle, so that it is absolutely clear on which side children should put the glue
  • each child chooses two circles
  • choose the circle that will be your front, draw the eyes (two small circles in the most basic version), and a beak (a small triangle)
  • take the other circle, cover the cross side with the glue
  • place one of the feathers on the top, for the little ‘fringe’, on top of the glue, so that a part of it is on the cirlce and a part of it stands out of it
  • repeat the same with the other feathers, by putting each of them on two sides, for the wings
  • take the front circle, put it face down, cover the cross side with a lot of glue
  • place it (more or less carefully), on the top of the back circle and the feathers, press
  • use the birdies to play, the kids can use them as puppets, say hello, introduce themselves, ask how they are, and use any other structures that they already know

Why we like it

  • is very, very easy, I have done it with two-year-olds (with a tiny bit of help) and with eight-year-olds
  • there is more potential for decoration (a more complex bird’s face, legs, tail etc)
  • the main focus of this lesson (or activity) can be playing with the chicks as making them will take only a few minutes
  • despite being very easy to produce, this craft has a lovely ‘wow’ moment and it lies in the fact that such simple elements put together can gives a lovely little bird.
  • below, you can also see the ‘proper Easter, made with mum and aunt’ version, with professional wings, made of felt. They look pretty and we made them only because I found this set in a shop. Here, it might be a good idea to let the chicks spend the night in the middle of the book, to make sure that they stick properly (felt is a bit thicker and it will need more encouragement, especially if you are using just the regular glue)

Here are some other circle-based craft ideas

Here are my own Frogs Etc, my snowman, and all the circle ideas.

Here is a lovely bear craft, here a ladybird craft, and here a caterpillar, too and here, a bunch of other activities, probably too complex for the EFL classroom but definitely worth looking at.

Teaching English through Art: Andy Warhol

Dear reader! I hope you are here because you have been in search of ideas for a lesson on Art and English for primary school children. If so, you are in the right place! I would like to share with you a lesson that I taught a few months ago as a part of my Art Explorers programme. I would like to start with some blowing my own trumpet in an attempt to inspire you and to think ‘I want one of those!

It was a great lesson because…

  • our group of Art Explorers was a mixed-age, a mixed-level and a mixed-ability group, with some pre-A, some A1 and some A2 children and we were all united in art. Everyone was involved, everyone was producing as much as they could and everyone had fun.
  • the kids who took part were the members of five different groups at the school and it was the first time they had a chance to interact with each other, in English.
  • the children had a chance to revise and practise English, to find out about Andy Warhol, to talk about feelings, emotions and associations and to exercise their creativity in the craft task.
  • it worked very well as an introduction to our Art Explorers programme
  • it was relatively low-key as regards the preparation and craft materials as we used the simplest things available: a powerpoint, a handout, a few sets of vocabulary flashcards, a few sets of watercolours, paintbrushes and cups.
  • it lasted 60 minutes but it could easily be adapted to 45 or 90 minutes, depending on the needs of the group and the age of the students.

The lesson, stage by stage

Stage 1: Introduction

We said hello, introduced ourselves and we had a small ‘get to know each other’. Each pair of students got a pile of flashcards (food, toys, sports, colours, animals etc). The students were supposed to pick out one card and to ask each: Do you like…. There was a model question and answers on the board, together with ‘because’ which the older students were already familiar with in order to encourage more developed answers.

Stage 2: Colours and emotions

We revised the emotions and a set of the basic adjectives was displayed on the board as a point of reference. Afterwards, we revised the colours and I introduced the idea of associations. The key word here (‘associations’) is actually quite similar to its counterpart in the kids’ L1 but I decided to use even a simpler structure ‘Green is a happy colour because…’

The kids were put into pairs, for another speaking activity and they were comparing their own associations related to each of the colours. At this point we did not use the flashcards. Instead, eaach pair got a set of markers and they were asked to discuss all the colours in the set. Afterwards we compared our ideas.

Stage 3: The artist of the day

We moved to the TV room to meet the artist of the day. At this point I was using the powerpoint which you can find in the attachments.

First of all we looked at the photo of Andy and the kids said as much as they could, about his appearance and character. Only later did I introduce him properly, albeit briefly – as artist, from the US, a very creative person.

I showed the kids a few paintings and asked what they thought of them. They were using the simplest structures of ‘I like’ and ‘I don’t like’ and, in the case of the older and more advanced students, to provide a rationale for their views.

The Campbell soup was especially interesting. First of all, because we compared it to the local brand of ready made food that the kids could relate to and it was a huge surprise that such a usual item can become an artifact. Second of all, this particular painting was how we transitioned into the theme of the day: how the same item, represented in different colours can create different associations.

Stage: The colours and the emotions

We looked at the photograph of Marilyn Monroe and one of the most famous paintings by Andy Warhol and at the similar painting of Mickey Mouse. We worked as a group and we talked about the different emotions related to different versions of Marilyn and Mickey Mouse and how they made us feel. I wanted to keep it open class in order to give the students a chance to hear as many different versions and ideas as possible to show them that the same painting can generate a great variety of emotions.

Stage: Let’s create

I told the kids that we are going to try to express our emotions and that we are going to be like Andy Warhol. I added that to Andy, Marilyn and Mickey were important symbols because he was American and that we would use some other symbols. At this point, the kids were already shouting out the name ‘Chebourashka’:-)

We went back to the other classroom. Everyone got a handout (see below) and a pencil or a marker. First, we all decided what feelings and emotions we wanted to represent and we labelled all the sections of the handout.

Afterwards, I gave out the painting materials and we sat down to work. The kids were given time to paint and I was painting my own and monitoring and chatting to the kids and asking the follow-up questions.

Stage: Tell me about your Chebourashka

The kids worked in pairs and told their partner about their pictures and the emotions they represented and, whenver possible, provided rationale for that. In that particular lesson, we only had enough time to talk to one partner but, in theory, there is a lot more potential and it is more than recommended for the kids to swap pairs and to talk to as many peers as possible.

Stage: Goodbye

We finished the lesson with cleaning up, with a round of stickers and with a song.

@funkysocksanddragons

Materials

Story lesson ideas #1: The Little Seed

This post is a lesson I taught with a group of 4-year-olds in their first year of studying English, based on the materials from Playway to English 1, 2nd edition by Herbert Puchta and Gunter Gerngross from Cambridge University Press.

It was taken from unit 6 (The Weather) and it is called ‘The Little Seed’.

Story cards ‘The Little Seed’ Playway to English, 2nd ed by H.Puchta and G.Gerngross, CUP

Pre-Story

  1. Vocabulary revision and practice with flashcards, the weather dice, the song, the weather sounds etc. Kids sit in a circle, on little stools.
  2. New vocabulary introduction: a bee, a butterfly, a flower, a seed. We used finger puppets because these three feature in my garden finger puppet set (together with a ladybird and a caterpillar) which I once got as a present (thank you, Cheng <3). I put them on my fingers and we practised saying ‘Hello, bee!’ ‘Hello, butterfly!’ The kids got really excited so we did spend some time, playing with them, trying them on and saying ‘Hello, bee!’ ‘Hello, butterfly!’ These activities were done on the carpet, with kids sitting in a circle. I forgot to bring real seeds so this time, we skipped this stage but I am planning to include them in the follow-up lesson (see below). Of course, the same can be done with regular flashcards or handmade toy butterfly and bee.

While-Story

  1. Just look: I hold the cards and show them to the students, one by one, in silence. Kids just look. Sometimes, I draw the kids’ attention to some of the elements, by pointing at them. Sometimes, I point and say the words or encourage the kids to name things they can see but, really, that is not the priority here. I just want them to take the story in, to build it up in their heads, before we add the language layer to it.
  2. Listen: I play the audio and we listen to the story and look at the pictures. Again, I sometimes point to the key elements in each card. I also use the gestures to reinforce the ideas and concepts and to add another learning channel to the visual and the auditory. In this story we are using the following: hands together, under your cheek with the head slightly tilted (The little seed is sleeping), face up, as if enjoying the sun, with a smile and a happy sigh (It is sunny), hands moving up and down, with the fingers spread and wiggling (It is raining), hands going up and arms stretching high up for (The little seed is growing, growing, growing), pointing with one finger at the picture (Look, it’s a beautiful flower). Some of these gestures have been used so far (the weather), some are new. I don’t pre-teach them, the kids join in when they are ready.
  3. Listen and say: We retell the story together, using the cards. I lead but this time I pause frequently and elicit the words and structures that the students know or, alternatively, I produce the phrase and encourage the kids to repeat.
  4. What do you think? This is the stage for the students to personalise and to express opinion. Usually this is done through a very simple question of ‘Do you like the story?’ or ‘What’s your favourite…?’ In this particular story, we asked ‘Do you like the story?’ ‘Is it a happy story or a sad story?’ ‘Is it a beautiful flower?’
The finished product

Post-Story

  1. Look at my picture: I show the kids the final product and we try to retell the story once again, in its simplified version, this time focusing on the structures that the kids can reproduce: The little seed is sleeping. It is raining. It is sunny. The little seed is growing and growing. Look, it’s a beautiful flower.
  2. Craft: I give out the cards and we create the pictures with kids, while retelling the story. I create another picture, step by step, to model the activity for the kids. This stage took about 10 minutes. I was considering adding the butterfly and the bee but decided that it would take too much time and that is why they do not feature in the picture.
  • ‘The little seed is sleeping’, I give out a small blob of white plasticine, I stick it ‘underground’, ‘Stick and press’
  • ‘It is sunny’, I give out yellow markers. We draw the sun in one corner. We repeat the key phrase as we draw. The kids who have finished drawing can also use the gestures for ‘It is sunny’. I collect the markers.
  • ‘It is raining’, I give out blue markers. We draw the cloud and rain in the other corner. We repeat the key phrase as we draw. We use the gesture for ‘It is raining’. I collect the markers.
  • ‘The little seed is growing, growing and growing’. I give out a piece of green plasticine. We kneed it and roll it to create a string. ‘Let’s roll and make one piece of spaghetti’. We stick it to the picture, as the stem of the flower. ‘Stick and press’.
  • I give out two pieces of green plasticine, we make two blobs and attach them as leaves. ‘One leaf, two leaves’. ‘Stick and press’.
  • ‘Look, it’s a beautiful flower!’ I give out two big pieces of blue and red plasticine. ‘We need three red pieces’ ‘Let’s make the flower’ ‘Stick and press’. ‘We need three blue pieces’ ‘Let’s make the flower’ ‘Stick and press’

3. Let’s tell the story: We show the pictures and go through the story again. The kids are now better able to tell and show the story.

4. Homework: Kids listen to the audio at home with parents, while looking at the pictures in their books. They complete the task in the book by sticking stickers in the gaps.

5. Follow-up: In the following lesson, we are going to retell the story again. I am also planning to start our own classroom garden with some flowers and beans, water them and watch how they grow.

This lesson plan is, of course, one of the many many ways of using this material and teaching this lesson. Enjoy!

Some other materials, potentially interesting.

A little seed by Mabel Watts here

Growing Sunflower Time Lapse here

From a seed to a flower here – a lovely video that I used when I was teaching Maths and Science to pre-schoolers in one of the lessons devoted to plants but it can be used as a follow-up activity in the story lesson.

How plants grow – an interactive game that demonstrates how much water and warmth a plant needs to grow. On the one hand, it is kind of cool and very informative, on the other, however, I could not apply the water and warm fast enough and ended up killing the plant. It made me sad (yeah, really) so, eventually, I decided not to use it in class, either.

Happy teaching!

Crumbs# 14 The United Buddy Bears Art Project

The United Buddy Bears in Sofia AD 2011

Welcome to my favourite art project: The United Buddy Bears. I first met the bears face-to-face (almost because they are 2 meters tall so face-to-face, eye-to-eye is not so easy to do) in Sofia because we all happened to be visiting the city in spring 2011. They were an art project back then already (since 2002 actually) but after our encounter they also became an EFL Art Project.

The United Buddy Bears: Brazil

Ingredients

  • First of all, if you have never heard about the project, start with this article on wikipedia or the bears’ own website.
  • A set of photographs of some of the bears that I use in a quiz. The students are shown the photos and they are asked to look at them and guess the name of the country. Naturally, the set should include the kids motherland.
  • Depending on the age and the level, the follow-up stage might involve describing individual bears, especially the bear representing the students’ country or symbols in general, as well as talking about the bears they like or dislike.
  • The main objective of the project for the younger students (primary) is to draw their version of the bear to represent their country. First, it might be necessary to brainstorm and to introduce the vocabulary and concepts that people normally associate with the children’s country. In case of Russia, it is especially interesting as it creates an opportunity for the students to learn that they already know many of these words, for example balalaika, borscht, matryoshka and they only need to learn how to write them in the Latin alphabet. Then, the students decorate their bears using the template provided by the teacher and, eventually, present their bears to the group.
  • The older students are invited to design a bear that represents them. It can be a bear that will show their hobbies, personality, favourite sports, school subject or a band, or, really, any concept that they consider important. The sky is the limit here. The students present their bears to their friends, ideally in a mingling activity.
  • The templates can be taken from globalperspective.info, clipart-library.com or just teach the kids how to draw it.
  • In the end, all the bears are proudly presented on the walls of the school or the classroom.
  • In both cases, it might be necessary to start drawing and decorating in class, to make sure that everyone is on the task but to set the task for homework, with the presentation scheduled for the following lesson. Some students might need more time to complete their drawings or to prepare their presentation and that might help to solve this problem.
The United Buddy Bears:Poland

Why we like it

  • It works like magic. Or almost. Some of the bears are easy to interpret, some of them require a bit more of background information but this way they can serve as a springboard to learning about different countries. The set of bears used in the quiz can be easily adapted by choosing the more straightforward bears for the younger students.
  • Regardless of which project you choose, the students get a wonderful chance to personalise the content, either because they will be drawing to reflect their own interests and hobbies in the bear or because they will be creating their own version of the Russian bear. It is a very happy coincidence that the Russian bear (or the first Russian bear because later I did find some other versions) is rather ugly. As a result, all my students with whom I have ever done that project, all of them without exceptions, were deeply offended that it is supposed to represent their country and were more than eager to create their own, better and more beautiful bears. The one you can see below is the more beautiful, later version of the bear.
  • It can be adapted to different levels and age groups. I have done it with elementary primary students and with advanced teenagers.
  • It is an opportunity for the students to express themselves, to create and to produce the language.
  • It can be used to supplement the coursebooks and it can be done as a part of the extra-curricular programmes such as summer camps, CLIL etc.
The United Buddy Bears: China

Happy teaching!

The United Buddy Bears: Russia (the beautiful one) from www.buddy-baer.com

Crumbs #12 In my little house: A craft activity for one hundred occasions.

If I had to choose only one craft activity for all my classes, a proper all-rounder, for the younger and for the older, to serve a hundred purposes – that is the one!

Welcome to my little house!

First of all, I really did try hard, very hard to remember where and when I learnt how to make it and how to use it and who taught me and I can’t. I don’t know. For sure, it was Moscow, definitely my first year here but who and how? No idea. The only thing that I can do now is to say ‘Thank you!’ to this forgotten and now anonymous benefactor. I am, indeed, much obliged. Now, I am sharing.

Instructions

  • Two pieces of paper per student / house. In the samples in the photos I have used A4 but in the classroom, with my kids I tend to use both A3 and A4, depending on the main aim. If we are just glueing things, A4 works just fine. If we draw – A3 is bigger and offers more room for the kids’ drawings.
  • Fold the house. It is pretty easy and you can watch this video here, from Inner Child Fun to see how it is made. Emily is using origami paper but a regular A3 or A4 will work just fine!
  • Important: I normally do it myself, for all my students because even adults (like my trainees) might not be very good at origami-like activities and the house, although it is relatively simple, it does require some precision and if it is not applied, it is not going to look very well, unfortunately. Preschoolers will not be able to fold it and when I once tried with my primary school kids, I immediately began to regret it because some of them took the responsibility of the taks too seriously and were getting very nervous, predicting that they might not be skilled enough to manage the task. They did, in the end, with a lot of encouragement but I think it is just not worth it. We can still teach them how to do it, for them to practise and play at home but if you think of the lesson itself, the timing and the aims – just not worth it.
  • In my case, depending on the aim of the particular house (see below, there are plenty of options), I make one house myself, as a template, hand-drawn or using clip art images, and then I photocopy it to fold for each student. The advantage of it is that you can put in your house whatever you want. The basic design involves only the lines inside the house and the division into rooms, with numbers. That helps during the activities because you can ask your students ‘Go to room number 1’ and this way you make sure that everyone is on the ball and that they don’t glue pictures wherever they should not, for example, on the lines as that would get in the way of the house closing and opening.
  • Also, before the lesson, I glue the houses onto the garden page. This is especially useful in the case of the pre-primary students and in the case of those of my primary kids who have not done the activity before. Being glued on, the house is not as easy (although not impossible) to be dismantled and unfolded and it is just easier to manipulate in class.
  • I start with demonstrating my house, with all the theatre that I can muster. We look at it, we knock at the door, we open it and look inside. This can be done on the carpet or with the kids gathered around you so that everyone can see all the details.
  • I give out the houses and we start with drawing the door and writing the number (ask talking about them) and then drawing the windows (and talking about them). Make sure that all the students are more or less in the same place here. I normally only give out one colour per child (although they can ask for a different colour for the door and a different colour for the windows) or, with the older kids, with a pencil only. They will want their houses to be really pretty so erasing might be necessary and I really don’t want to waste time on colouring, this can be done at home.
  • The main task usually involves glueing things in different rooms, for example pets. For that, I prepare small pictures of all the pets, one set per child, on a tray (or whatever works as a tray) and a poster to put up, for everyone to see all the options. We start with room number 1 and I say, ‘Go to room number 1’. ‘I can see a cat (in my room number 1)’ after which I glue there the small picture of a cat. Then, the kids take turns and make similar sentences choosing their own animal from the set. They only receive a picture to glue after they make their sentences. When everyone is ready with room 1, we show our pictures, we say ‘I’m ready’ and move on to room number 2. And so on.
  • In the end, if there is time, we draw the sun, the tree and the flowers in the garden and we colour the house for homework. Also, if there are any leftover animals, these can be given out to glue at home (although, yes, that involves some more complex logistics, paperclips, small envelopes, not impossible though).
  • In the following lesson, we look at our houses and describe the rooms, the colours etc.
  • Variations: there are many of these. The house can be anything you want it to be. Here are some of my favourite ones:
  • Any set of vocabulary and almost any set of stucture, starting with ‘I can see’ and ‘I’ve got’, with some less obvious ones like the pictures of activities to practise Present Continous (‘I’m jumping in the kitchen’) or even words or word cards with the Past Tense forms which can be used later to tell stories for example ‘A strange Sunday’ (‘My brother slept in the garden’, ‘My dad danced in the kitchen’ etc)
  • Halloween or Christmas house – with the characters and symbols of each holiday
  • Rooms of the house – template is prepared with some furniture typical of each room, students can place pets in rooms (‘Where is the cat?’ ‘It is in the bedroom’) or family members (‘Where is mum?’ ‘She is in the living room’), add small objects to each room (‘Where is the lamp?’ ‘It is in the kitchen’, it is best to choose things that could be in any room such as lamps, pictures, chairs, rugs) and this version can be also further extented (‘Where is the lamp?’ ‘It is in the kitchen. It is on the cupboard’). The older kids can also draw these, making a regular or a silly house, too.
  • Secret Room – this was a follow-up activity in which I used the template which I drew with one empty box (empty, only because I could not, for the life of me, draw anything resembling a dining room). We did one of the activities mentioned above but the last room was to be drawn at home and it could be anything – a space room, a swimming pool, a library, an ocean zoom, a pirate room…
  • Where are you? – a template with the rooms, pre-prepared, each student gets a set of the leftover stickers or small cards, they put them somewhere in the house, in secret and afterwards they guess where their objects are. It can be used to practise simple prepositions and the rooms (‘Is it in the kitchen?’) or more complex ones (‘Is it in the living room?’ ‘Yes’ ‘Is it on the sofa / behind the chair?’etc)
  • Put your penguin in the living room on the sofa – a template with the rooms, pre-prepared and a set of stickers or small cards. The kids dictate to each other where to glue them, again, it can be used for simple or more complex prepositions, to get the kids ready for the Starters speaking exams. Later on, we compare our houses.

Why we love it

  • It is relatively easy to make and the kids love the fact that it is a real house.
  • It can be used with any vocabulary or structures (or almost)
  • It can be used with pre-schoolers and primary
  • It has to be prepared before the lesson for all the students but it is a good time investment
  • It is at the same time a focused task to be done in class and a homework task. The homework can involve only colouring and decorating it, talking about it in class but a writing task can easily be added for the older students (any template to be printed on the back of the garden, for example the focus can be such structures as there is, I can see, colours and furniture, my favourite room etc
  • It encourages the students to produce the langauge and it is easy to stage since you go from room to room
  • Lots of opportunities for adaptation, even if you repeat it with the same group. Every single time, it will be a different house.

Happy teaching!

Epic Fail! or We make mistakes to learn #1

Welcome to the new series on the blog.

It started with something Michael said. He is a fellow teacher and he was telling me a story of how Teacher X went to peer observe an experienced colleague, Teacher Z and how the lesson was, well, not very good, bad, horrible, ‘a disaster’…It was not a very pleasant experience for Teacher Z, of course, but a learning opportunity for Teacher X, nonetheless (and for Teacher Z, too, actually). ‘This is what I want to hear, that even with the best intentions, it can all go ‘tits up’ but nobody is prepared to say it‘.

I got inspired. I am ready to share. I don’t mind. We repeat that to our students, constantly, that mistakes are noble and that we can learn from them. If our students can, so can we, the teachers. The same principles apply.

By the way, the Epic Fail Award is actually a real concept. It is a real award given out to employees at Hill Holliday agency, since, as Robert F. Kennedy once said ‘Only those who dare to fail greatly, can ever achieve greatly’ (apparently, have a look at the whole article here)

With that in mine off we go, to the first of my personal disasters or ‘When things did not go to plan‘.

One: The (stupid) Christmas tree craft

Here it is, look!

Did you go ‘Awn’? I bet you did. I did when I saw it and so did my kids when I showed it to them, during the pre-Xmas lesson. It did take place three years ago, I think and back then I was already an experienced teacher etc.

I did a great job, preparing for the task. I did prepare all the materials; I did make the tree at home. I did think of the staging. I did plan to teach the kids the verbs we needed to make it (fold, press, pause). I did think of how old they were and I knew them, they had been my students for over two years at the time so I could imagine what they were or were not able to do. We had done plenty of craft activities, we had worked with the pipe cleaners in a few different arrangements. I did pre-cut the triangles and tied pipe cleaners (three of them joined would be necessary to cover one tree). I punched the holes at the top of each tree. I wrote the main steps.

You would have thought the conditions were perfect. Yes, yes, they were. And yet it was the biggest craft disaster known to mankind. In my kingdom.

It turned out that even with all of these preparations and the previous experience and knowledge, the task turned out to be too tricky for my students. They were involved, yes, they loved the idea but we soon discovered that if you do not press the pipe cleaner real hard, applying all the strength (that the 5 y.o. did not quite have), it starts sliding, coming off and not looking at all as this ‘Awn’ model that I had already shown and that everyone had already managed to fall in love with and to start dreaming about of taking home.

The point of no return, in other words. Stopping, pausing or aborting the task was completely out of the question at that point. We went on, with me helping to complete eight Christmas trees simultaneously, perhaps singing the song to keep everyone occupied (though, really, I cannot be sure) with me hating absolutely every second of it and swearing that this very craft will never be seen again in any of my lessons. This or any craft, actually.

Everyone survived. Apart from all the leftover trees. I binned them all. With a lot of vidictive satisfaction. The one you can see in the photograph was recreated for teacher training purposes.

Today, I think that the craft is actually child-friendly, provided that you don’t go too minimalistic and that you keep the real Christmas tree-shape. Or that you at least cut the edges of the simple triangle in a few places, on both sides, to ensure that the pipe cleaner has somewhere to get attached and to stay in one place and still look ‘Awn’.

But it is also true that with this particular craft, I did allow myself to fall far the ‘awn’ effect and its strictly decorative value. Linguistically, there would be very little for us to do with it, apart from a few verbs and a few functional language phrases that we use and practise with any craft activity. Maybe, just maybe, I should not have fallen for it and, as a language teacher, first and foremost, I should have prioritised the linguistic aim.

Well, lesson learnt, that’s for sure!

P.S. It was unpleasant but I have not given up on craft! Experiments will sometimes lead to great achievements and sometimes to disasters but the best thing is – we learn, one way or another!

P.S.S. There is more to come in this chapter! I will see you soon with more epic fails stories. If you have some that you would like to share, please, do in the comments below!

Happy teaching!

Crumbs #6 The easiest craft in the world aka Don’t you just love a circle?

Level 1 – 3 Pre-primary: In the garden

Instructions

Get the coloured paper ready. The basic photocopying paper will do but for a more sensory experience paper with different thickness, texture or surface.

Cut out a pile of colourful circles, about 3 cm in diameter but if the kids are really small it is better to make them a bit bigger, they will be easier to handle.

Prepare A4 sheets of paper on which you are going to stick things, glue sticks and markers that you can use to draw on your paper.

Choose a circle, glue it onto the paper, decorate it so that it resembles what you want it to resemble. Use simple instructions while demonstrating (‘Glue’ ‘Turn over’ ‘Stick’ ‘Draw). Give out the paper, the glue sticks and the first circle. Monitor.

Proceed with the following circles.

With the older students, it is fun to let the children decide what their circles are. And then learn the new words – whatever they draw.

Don’t forget to talk about your pictures, count all the blue circles and all the butterflies))

Level 1 Pre-Primary : Pets

Why we love it

  • It is super easy to prepare and to complete.
  • There is no set duration of the task. It can be kept very simple and short, limited to only three items or extended to six or seven, depending on the age of the students, level, motor skills development.
  • It can be easily made more or less challenging by grading the level of complexity of the drawings.
  • It can be adapted to many different topics. I have used it with the topic of shapes (focus: circle), spring (accompanied by the KidsTV123 song ‘In the garden’ https://www.youtube.com/watch?v=RCClYcU97PA) and in the beginning of the course with level 1 to practise the first colours.
  • It helps to develop cognitive skills (perception: noticing the shapes in the world around us, transforming the shapes into things we know etc)
  • If there is no time to cut out all the circles (or if the teacher has not done many craft activities and wants to start with something not as complicated), a template with circles can be used instead. In this case, the kids will only draw and colour.
Level 1: Pets, no-glue template
Assorted circle-related randomness
Assorted circle-related randomness part 2
Level 1 Pre-primary: Colours (lesson 3 of the course)
Christmas edition (the puppy is here because this is my student’s favourite thing:-)

Happy teaching!