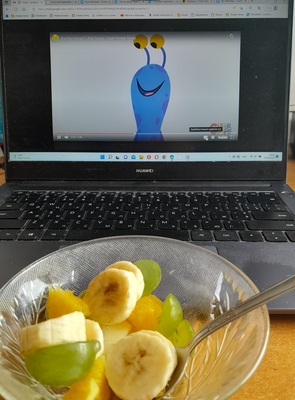
Fruit, washed and cut up into manageable chunks. The most basic set includes: apples, bananas, pears, seedless grapes, seedless oranges.
A plastic plate for each child, a plastic cup for each child, a plastic spoon and a plastic knife.
A set of tissues and a set of wet tissues.
Optional: a set of fruit flashcards and the video of the Super Simple Song ‘Are you hungry?’
Procedures
Start with presenting the idea of the activity to the parents and agreeing on the list of fruit to be used. It is absolutely crucial that the parents are aware of the procedures and the ingredients and that they approve. In my offline classes, I normally send a message to find out whether the parents approve and then I send a list of specific fruit that I would like to use. I look for seedless oranges and grapes. The list of fruit does not have to be very long. It is going to be a great lesson anyway, even if only the basic fruit are used. Although, of course, the salad will look very appealing if we include more colours and adding some citrus such as orange will be beneficial as regards the flavour, even a little bit of the lemon or orange juice will bring out the flavours of all the fruit and it will blend them nicely. But it is not obligatory. In my online classes, the parents prepare the fruit that the kids really like and it might happen that our sets will vary.
Wash the fruit and pre-cut them into pieces and chunks or ask the parents to do the same at home.
Plan where (in the school or in the classroom) you are going to set up your salad production station. Ideally, it would be done in a separate room, where everything can be prepared before the lesson and where the students can relocate half-way through the lesson. In the online classroom, the kids can relocate to the kitchen or cut things up on the table in front of the computer. In the classroom or in the kitchen, prepare the working top first: wash the tables, cover them with a plastic tablecloth.
Set aside the time for hand-washing. Line the kids up and go to the bathroom, wash the hands, dry the hands and go to the classroom.
Give out the tools while pre-teaching the names and while introducing the basic health and safety rules i.e. a plate – it stays on the table, a cup – it is in front of the cup, a knife – be careful. It is a good idea to stage the giving out of tools ie: first the plates and the cups, then the first fruit and the knives, then clean up the plates and give out the teaspoons etc.
Take out the first fruit, call out its name. Demonstrate how to cut it up, for example using the following set of instructions: 1) take a piece of apple, ‘Apple, please’ 2) put it on your plate 3) cut it up carefully 4) put the apple into the cup
Repeat with the other fruit. Throw away the plates. Give out the spoons.
Stir the fruit in the cup carefully.
Start eating.
Game 1: What’s this?: it is a fun game that involves eating and guessing which fruit we have fished out. Teacher can demonstrate how to play it: take some fruit from the cup, eat it without looking or even with the eyes closed and try to guess what it is. If modelled properly, with the teacher asking question ‘What is it?’ and trying to guess ‘It’s an apple’ etc, the kids will follow and will be playing in the same way.
Game 2: Singing and eating: Play the song and pause at every fruit and ask the kids the same question ‘Are you hungry?‘ ‘Oh, look (name the fruit in the salad). Yum, yum, yum’. The only thing to remember here is to make sure that kids finish eating before we play the song again and to continue singing.
Clean up, throw away the rubbish, clean the hands with the wet tissues.
Why we like it
It is a great and relatively simple way of making the language real and meaningful. We learn about fruit and we do something with the real fruit. With many other topics creating this connection between the classroom and the real world is a bit more complicated, fruit (and food in general) is easy. After a few basic precautions are taken, such as the allergy check, the parents permission, clean hands and a safe working environment.
It gives kids a great sense of achievement despite the fact that in the eyes of an adult that might look simplistic. One of my groups called it ‘a cooking lesson‘ and after the first salad, they kept asking for more of those.
It is an opportunity to develop social skills (we are taking turns and waiting for everyone to finish), focus (we are cutting fruit slowly and carefully), fine motor skills (we are working with a knife, we are manipulating small pieces of fruit).
It is an opportunity to eat in class and that is always fun but it is also something that we do together, as a group and, as such, it can be repeated regularly, although not necessarily with the salad every single time. It can turn into some ‘teatime‘ aka a lesson when we just have a little snack together. That name and the idea is also something that came from one of the groups.
It is not an activity for the first lessons with a group
If done properly, the lesson can lead to a lot of production. The ‘What’s this game’ was something that just happened in class, just because I really could not recognise one of the piece of fruit in my cup. I fished it out to taste it and I was simply blabbling to myself. The kids were watching and quickly followed suit. Together we turned into a real game and, since then, I played it with all my groups. The other game, based on a song, was something that we played in class for a few lessons, with our set of plastic fruit and it worked very well. The kids liked giving out fruit and pretending to munch on them. Moving onto the real fruit and the salad was a natural next step.
The aim of this post is the following: by the end of the post, the readers will be more familiar with the concept of connecting the EFL with the elements of Art Exploration and the appropriate craft activities.
As a source of potential inspiration for anyone who might want to try it.
The group
The kids for whom this course has been designed were a group of preschoolers, aged 4 – 6, who are and were part of a greater project at MAMM with Fun Art Kids and I was responsible for the English language slot. I taught them from October 2021 until February 2022 and we had lots of creative fun in English. I used to joke that these classes were the reason for me to wake up on Tuesdays.
My students were beginners and for many of them, if not for all, those sixty minutes of English were the only real exposure and the only real lesson and, despite the fact that it is not a lot of time (at all) we made progress that I was really happy with.
The format
The whole idea behind the Kids in the Avangard programme was that children should be given an opportunity to experience art and all the many ways of creative communication, through music, through dance and movement, through theatre, through visual arts and through English. The programme was run in module, each with their own theme (colour, shape, line etc) and within those modules the kids would participate in lessons that were separate entities devoted to an artist, an artistic movement etc. At the same time, kids work on a performance which takes place at the end of the ‘term’.
It was not easy to nest the English classes in that format but it was not possible. The main idea is that the English classes in which we deal with the beginner students (or a mixed ability group), it was impossible to aim for a very content-rich input and some adaptations had to be made for that. What I decided to do is to focus on giving the kids a good basis of English, including the vocabulary and structure from the pre-A level (although not necessarily not synonymous with and not in the order of the ‘typical pre-school curriculum’) and to combine it with the introduction to the world of the world Art and related craft activities. Just like in the case of all the other classes of the programme, our lessons were connected but each of them was a separate module, too.
The format of the lessons followed a typical EFL pre-school lesson with the hello circle, revision, new material introduction, movement and table time and it was supplemented with and built on songs and stories, too.
The palette of ideas
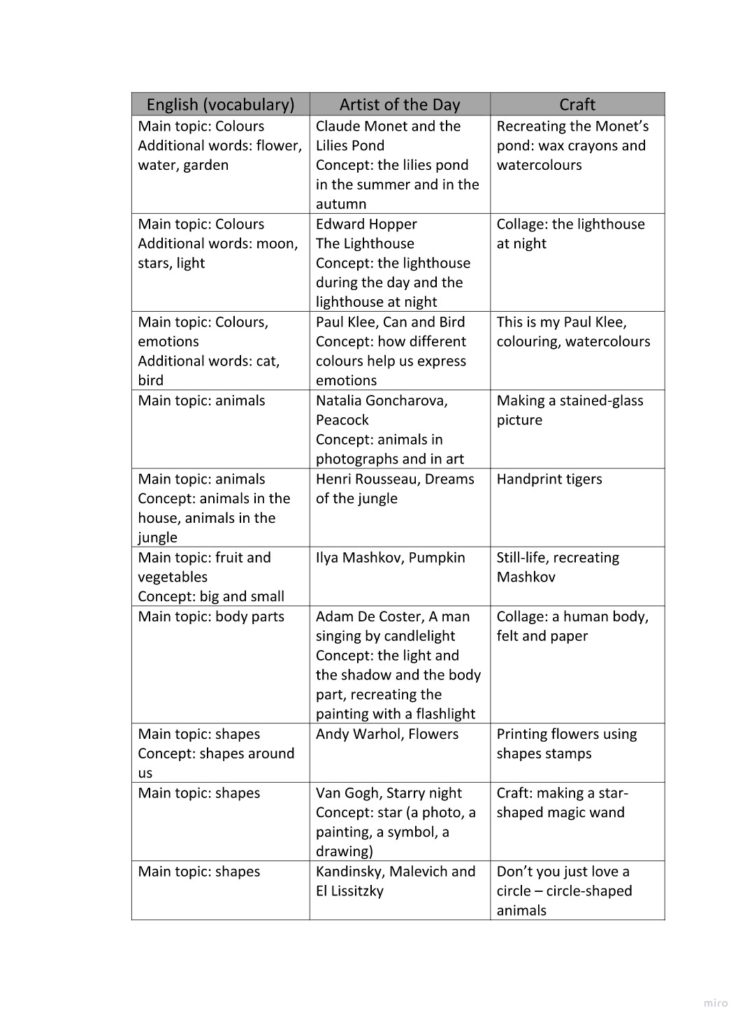
In the chart below you can see the content and the ideas for some of the lessons I ran as part of the course. In many ways it was an experiment, this whole course and, overall, it was a very successful experiment, the kind that makes you shout out ‘I want more of that!”. However, it was an experiement and, naturally, some lessons were more effective than others, and some ideas better than others.
In the chart below, I have decided to include those that I have tried and tested and loved, as those that I can strongly recommend, ready to use almost. All the misshaped ones will be worked on and developed and presented at a later date, when I have improved them a tiny little bit at least. But, in order to be honest and to share the experience as it was, I have also decided to include some of the things I have learnt by making the mistakes I did make. All of those you will find in the final section of this post aka What not to do.
Thegallery
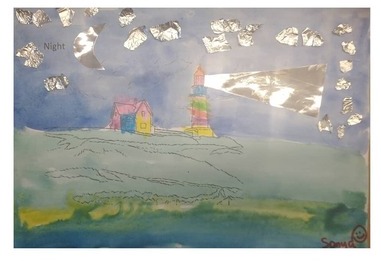
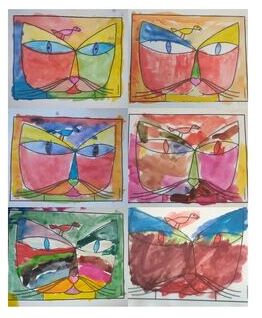
KleeGoncharovaKandinsky, Malevich, El Lissitzkyvan GoghWarhol De CosterMashkovMonet
Thenot-so-successful sideof theexperiment
The time allowances: either because it is a brand new thing for the kids (aka the entire course) or because it is a new element to the everyday class routine, the students need time to figure things out, to learn how to navigate around it and to make it familiar. Once they do, the whole programme will be a lot more effective and enjoyable. Don’t be upset if it is not an instant success.
The high expectations regarding the content and the input: the main aim of this programme is not to provide the kids with any substantial input on the artist’s life and career. Instead, they are supposed to be given an opportunity to be exposed to the world art and to interact with it.
Kids will produce the language, however, it is most likely to happen during the English language part of the lesson (introduction of the new vocabulary, practice, language games)
Each lesson has three separate objectives (language, Art and craft) and it is perfectly natural that only one of them will be given priority in a lesson and that English and the language production will not always be the main focus. If these classes are taught as a part of the general English course, then it is assumed that they will be balanced with the regular, more productive English lessons. In case of a separate course, this aspect (and potential parents’ expectations) are even easier to manage by outlining the course objectives beforehand.
Many craft activities look good on paper but they might not be easy to implement and to manage in a group of pre-schoolers. Trying, trialling and testing (aka making it first at home, before the lesson) is the best way to avoid and to get ready for at least some of the potential problems.
Time is on your side. Fnding a strong link between the three elements and preparing a coherent lesson gets easier with time. And more and more enjoyable.
There are plenty of things that can be done just with the simple resources such as markers, crayons or watercolours and paper but don’t forget that there is a lot more that can be done! Experimenting is fun!
Why?
If you are still wondering whether to start including art in your EFL lessons, please have a look at this earlier post and here you can find a great website with lots and lots ideas for art activities.
Dear reader! I hope you are here because you have been in search of ideas for a lesson on Art and English for primary school children. If so, you are in the right place! I would like to share with you a lesson that I taught a few months ago as a part of my Art Explorers programme. I would like to start with some blowing my own trumpet in an attempt to inspire you and to think ‘I want one ofthose!‘
our group of Art Explorers was a mixed-age, a mixed-level and a mixed-ability group, with some pre-A, some A1 and some A2 children and we were all united in art. Everyone was involved, everyone was producing as much as they could and everyone had fun.
the kids who took part were the members of five different groups at the school and it was the first time they had a chance to interact with each other, in English.
the children had a chance to revise and practise English, to find out about Andy Warhol, to talk about feelings, emotions and associations and to exercise their creativity in the craft task.
it worked very well as an introduction to our Art Explorers programme
it was relatively low-key as regards the preparation and craft materials as we used the simplest things available: a powerpoint, a handout, a few sets of vocabulary flashcards, a few sets of watercolours, paintbrushes and cups.
it lasted 60 minutes but it could easily be adapted to 45 or 90 minutes, depending on the needs of the group and the age of the students.
We said hello, introduced ourselves and we had a small ‘get to know each other’. Each pair of students got a pile of flashcards (food, toys, sports, colours, animals etc). The students were supposed to pick out one card and to ask each: Do you like…. There was a model question and answers on the board, together with ‘because’ which the older students were already familiar with in order to encourage more developed answers.
Stage 2: Colours and emotions
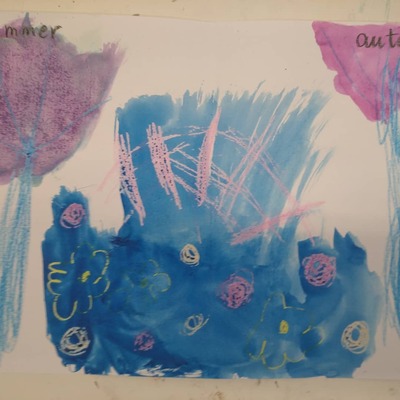
We revised the emotions and a set of the basic adjectives was displayed on the board as a point of reference. Afterwards, we revised the colours and I introduced the idea of associations. The key word here (‘associations’) is actually quite similar to its counterpart in the kids’ L1 but I decided to use even a simpler structure ‘Green is a happy colour because…’
The kids were put into pairs, for another speaking activity and they were comparing their own associations related to each of the colours. At this point we did not use the flashcards. Instead, eaach pair got a set of markers and they were asked to discuss all the colours in the set. Afterwards we compared our ideas.
Stage 3: The artist of the day
We moved to the TV room to meet the artist of the day. At this point I was using the powerpoint which you can find in the attachments.
First of all we looked at the photo of Andy and the kids said as much as they could, about his appearance and character. Only later did I introduce him properly, albeit briefly – as artist, from the US, a very creative person.
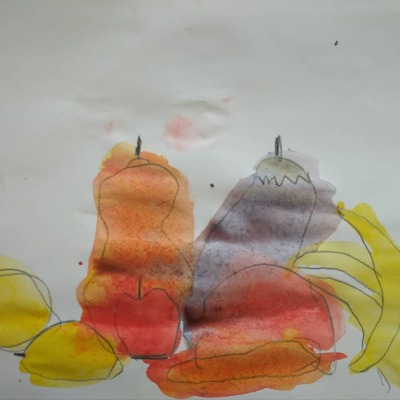
I showed the kids a few paintings and asked what they thought of them. They were using the simplest structures of ‘I like’ and ‘I don’t like’ and, in the case of the older and more advanced students, to provide a rationale for their views.
The Campbell soup was especially interesting. First of all, because we compared it to the local brand of ready made food that the kids could relate to and it was a huge surprise that such a usual item can become an artifact. Second of all, this particular painting was how we transitioned into the theme of the day: how the same item, represented in different colours can create different associations.
Stage: The colours and the emotions
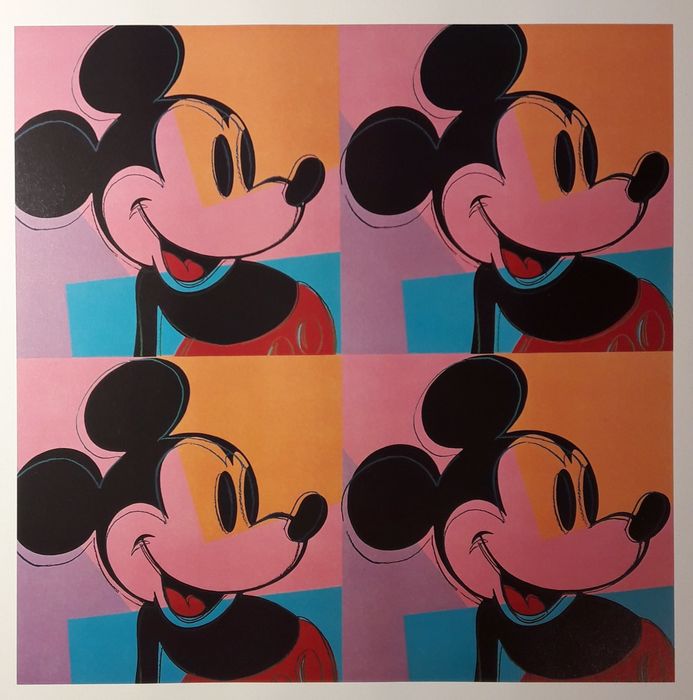
We looked at the photograph of Marilyn Monroe and one of the most famous paintings by Andy Warhol and at the similar painting of Mickey Mouse. We worked as a group and we talked about the different emotions related to different versions of Marilyn and Mickey Mouse and how they made us feel. I wanted to keep it open class in order to give the students a chance to hear as many different versions and ideas as possible to show them that the same painting can generate a great variety of emotions.
Stage: Let’s create
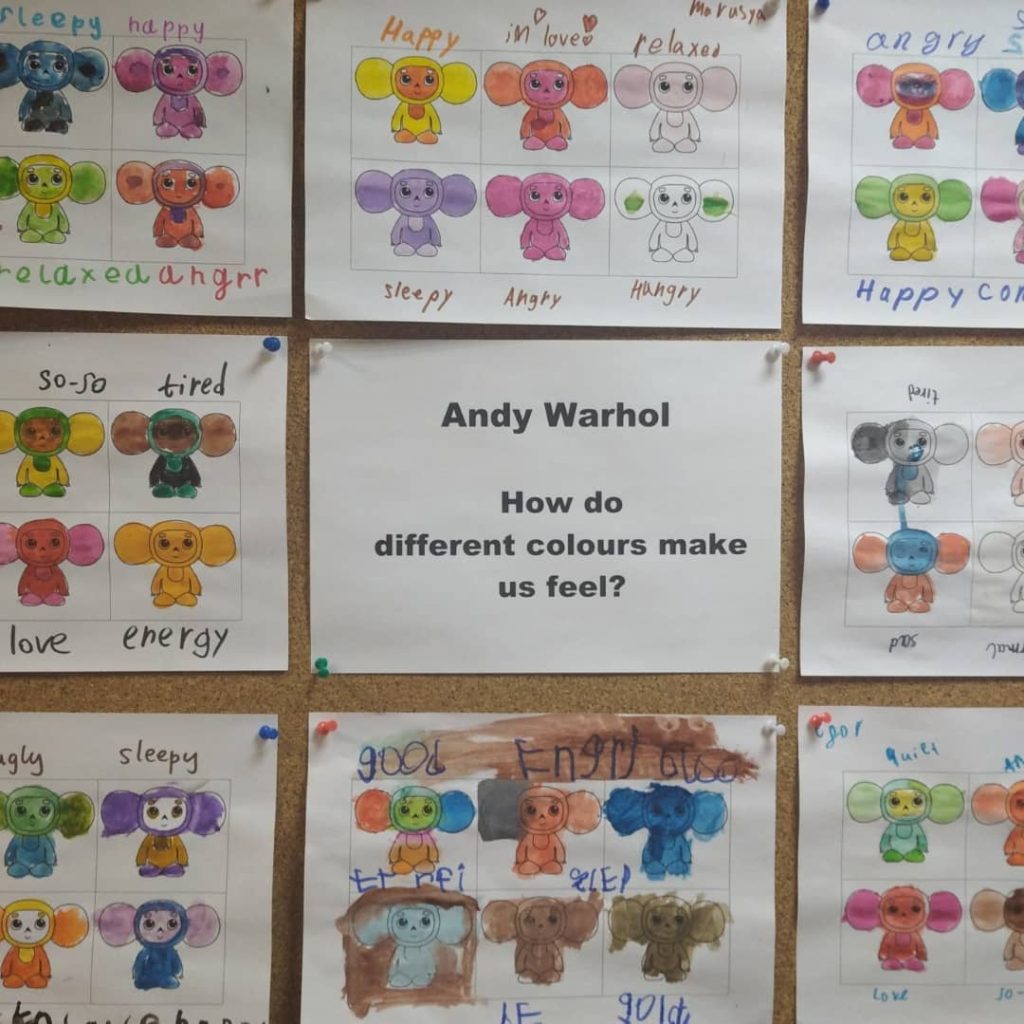
I told the kids that we are going to try to express our emotions and that we are going to be like Andy Warhol. I added that to Andy, Marilyn and Mickey were important symbols because he was American and that we would use some other symbols. At this point, the kids were already shouting out the name ‘Chebourashka’:-)
We went back to the other classroom. Everyone got a handout (see below) and a pencil or a marker. First, we all decided what feelings and emotions we wanted to represent and we labelled all the sections of the handout.
Afterwards, I gave out the painting materials and we sat down to work. The kids were given time to paint and I was painting my own and monitoring and chatting to the kids and asking the follow-up questions.
Stage: Tell me about your Chebourashka
The kids worked in pairs and told their partner about their pictures and the emotions they represented and, whenver possible, provided rationale for that. In that particular lesson, we only had enough time to talk to one partner but, in theory, there is a lot more potential and it is more than recommended for the kids to swap pairs and to talk to as many peers as possible.
Stage: Goodbye
We finished the lesson with cleaning up, with a round of stickers and with a song.
I am happy to inform you that, inspired by your article, I have decided to follow your example and to start experimenting in the area of scaffolding…
Oh, how I wish I could write a letter of that kind. Since I first read the article by Bruner, Woods and Ross on the original research and how the term ‘scaffolding’ started to mean what it does to us, teachers and educators, it has become a kind of a life mission to spread the word about it among my teachers and trainees, conference attendees and, of course, the readers of my blog. This is also the area that I choose to invesitage in my first classroom research project as part of my MA programme.
Of course, the most important things keep happening in the classroom, in the everyday when you observe and adapt your instructions, gestures, voice and actions to better suit the young or very young learners as regards demonstration, marking critical features, reduction in degrees of freedom, recruitment, direction maintenance and frustration control (the six orignal features outlined in the article).
This time, the starting point was the lazy teacher…
I started to plan the final lesson with my three pre-school groups that also happened to be our Christmas lesson. And it was out of this tiredness and the madness of the end of the year that made me wake up one day and decide: ‘I am going to repeat the lesson!’
Three lessons in a row, three different levels, three different age groups and the same lesson plan. Well, to a point, of course. We would all study the same vocabulary set and sing the same songs, but the activities would vary, depending on what the children are capable of.
Topic, vocabulary and structure
There were eight words in the set (Santa, a reindeer, a stocking, a Christmas tree, a present, a start, a snowflake, a snowman) and I wanted to combine them with the question that we all had been practising before: ‘What is it?’ ‘It’s a…’.
The level 1 kids (and the youngest group) have got as far recognising the words and pointing at the right flashcards and participating in the ‘What’s missing?’ game although most of the time they would guess the missing word in Russian and they actively produced only some of them in English, such as ‘a star’, ‘a snowman’ and Santa. We also watched the ‘Guess the word video‘ and it was a chance for us to drill the vocabulary in a different way. We also introduced ‘What do you want for Christmas‘ and it was a nice opportunity for us to revise toys which we covered in the previous unit. But only that. In the end of the lesson we also had time for storytelling and we used Rod Campbell ‘My presents’, again as a way of revising the key vocabulary.
With the level 2 kids, we did pretty much the same but the kids were able to remember and to reproduce all eight words really quickly. We played the same game (What’s missing) but they were all actively involved and producing. We watched the video and guessed the words, pretty much just the way the younger group did, although it was interesting that I did not need to encourage them to repeat the words and, as soon as the full picture and the correct answer was revealed, the kids said the word without any cues from me. It seems that due to their age and to the fact that they have been in class for longer, they are much better used to that kind of reaction to the content. We seem to have developed that habit already.
As for the song, we even managed to personalise the song and talk about whether each of the presents featuring in the song are a good idea (or not? ‘Not’, according to some students:-) and we sang a verse for each of the kids:
‘What do you want for Christmas, Christmas, Christmas? What do you want for Christmas? Santa is on his way…’
‘I want a…’
I did not use the storybook with the older children. I had planned it only for the little ones. For the older ones, we had a back-up of an episode of Christmas Peppa, but, in the end, there was no time for that.
The oldest group, level 3 kids, need only a quick revision of all the words and then we could play a variety of games. We did not even play ‘What’s missing?’ as they are too ‘adult’ and this particular game is not challeging for them anymore. Instead, we played a team game, ‘Tell me about it’, in which the players choose a box, open it and say something about the picture hidden in the box. And they collect the points.
We did use the video mentioned above but in this lesson it was not just a simple guessing game, we also managed to talk about whether each round is going to be easy or difficult and then to comment on what it really was. And, of course, the song was also personalised and followed-up by a proper chat. There was also another song, ‘Who took the cookie from the cookie jar?‘, in its life acquatic version (nothing to do with Christmas, but the kids were curious and this is the game we are playing right now). This group are already quite good at personalising songs (aka ‘The original version is good but let’s see what we can do with it and how can we make it better?’) so it was the kids to suggest that we start singing it when we pick up our surprise at the end of the lesson from the reception. If I rememeber correctly, the final version of it (as shaped up by the kids) went along the lines of: ‘Who took the surprise from the surprise jar?‘
I was teaching, having fun and keeping my eyes and ears open and trying to remember what was happening. It was already very interesting but I was really waiting for the most important part, the cherry on the cake.
The cherry on the cake
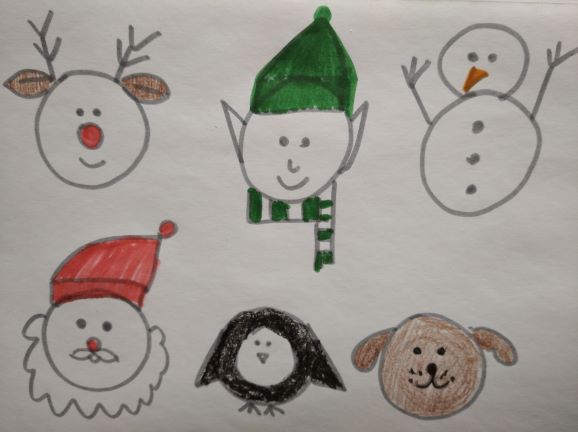
Surprisingly enough, this time round, it did take a long while to choose the craft activity but finally I settled on the snowman. I found something that I liked among the 25 Easy Snowman Crafts For Kids on countryliving.com. I planned the lesson, spent an hour cutting out the circles, the noses, the hats, the arms and the Christmas trees and orgnising the room. And then we took off.
It so does happen that although my children are divided into groups by the level and by the age, there are exceptions and special cases in all three groups.
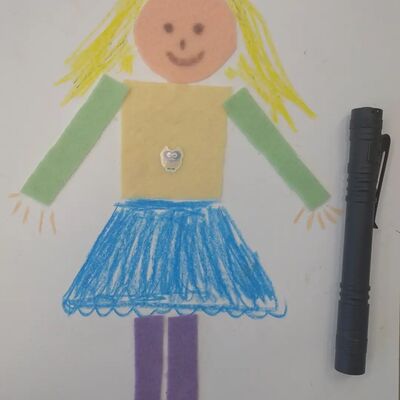
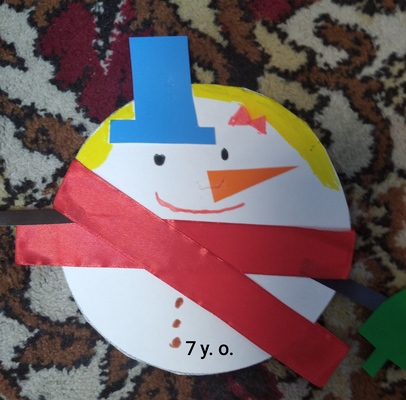
The actitivity, the materials, the staging and the instructions were exactly the same in all three groups but the outcomes (visible in the photographs below) and the scaffolding necessary (not visible in the photographs:-) heavily depended on the age of the students.
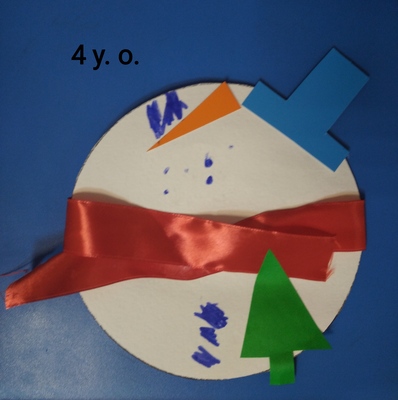
The youngest students produced these beauties:
This was interesting, especially because this lesson came first and after a very short moment, I realised that, while preparing and planning, I gauged myself for a slightly older audience and I had to adapt on the go, especially for the almost 3 y.o. girl for whom it was the trial lesson and the first 45 minutes in our classroom.
It turned out pretty quickly that it is quite a challenge to glue the ribbon, to turn the circle over and to tie it and that the orange ‘carrot’ nose is actually very small. But we managed, with the pace really, really slow and the teacher keeping an eye and demonstrating everything twice. Plus, yes, the teacher had no other choice but to help with the ribbon.
The age of the students shows most obviously in the way that all the small parts were glued and how the eyes, the smile and the buttons were drawn, with a different level of accuracy and precision. Almost where they should be:-)
And it was because it took longer to produce the snowman that I decided to skip the little sticky arms. They were too thin, too fiddly and too risky. And the snowmen still look pretty without them.
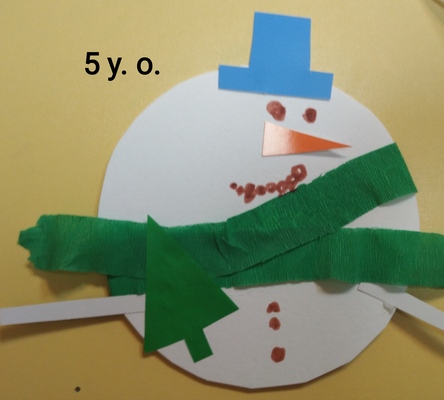
The snowman created by the 5 y.o. hands looks like that
First of all, the five-year-old snowmen did not take as much time to produce and the little fingers were much more agile and ready. As a result, the teacher did not need to help with the ribbons, the noses were handles with much more efficiency and we did have time to add the arms.
It is interesting to see that at this age, the students did observe the teacher (the mentor / the expert) to do exactly what she was doing but they were observing to figure out what had to be done and to interpret it in their own way. Some snowmen were happy but not all. Some had the scarf tied on the neck aka above the arms and the others had it more where their snowman-y waist would be. Some had the buttons and some did not. Some snowman mouths were a string of dots, some were drawn with a line. Some of the Christmas trees were glued on the snowman’s chest (like in the teacher’s model) but then again, some were holding them in their hands (although this obviously involves even a higher level of precision).
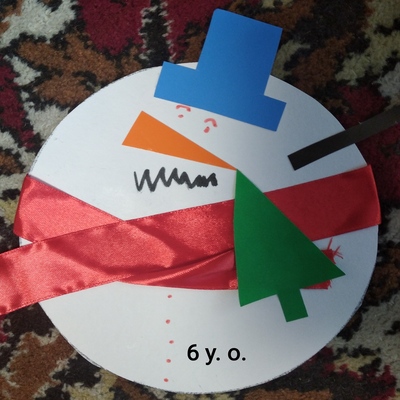
The 6 y.o. snowmen look like that:
The older snowmen are even ‘neater’ (in inverted commas here because I adore all of these snowmen, even the ones that look as if they were created by Pablo Picasso) and the evidence of precision and accuracy as well as even a more detailed and a more personalised version, which were the students’ own additions as they were not modelled by the teacher such as the eyebrows, the hat decorations (not featured in the photos) or a bigger number of buttons.
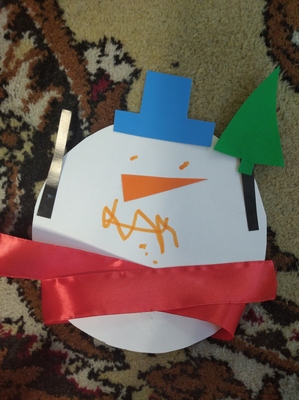
And the oldest of them all, the almost 7 y.o.
This snowman was made by our oldest student, a girl who is actually in school but who is finishing the level with us. As regards the level of English, the development of the literacy skills, she is like the other students in the group, but her motor skills are more developed and for that reason she usually is the fast-finisher. That is not an issue and while she is waiting for the group to finish, she usually continues working on her craft or handout, adding details and decorations.
This time round, she decided that her snowman is going to be a snowgirl, with her and a bow, which was her own original idea.
Reflections of a small scale Jerome Bruner…
This was an absolutely fascinating experience and I would really recommend it to teachers who work with different levels within the same age group, especially within primary and pre-primary where scaffolding seems to be one of the most important factors deciding about the task completion and success.
It can be a great source of information, about the students’ skills and abilities…
…as well as an opportunity to trial something new, be it a song, a video, a game or a craft activity and to learn more about this type of a task.
It is a chance for the teacher to practise and to develp their scaffolding brain…
…and a great opportunity for a freer practice in the area of differentiated learning, not only within the group of learners (something that happens in every class) but on the level of different age groups and levels
Like in the original experiment, the design or the choice of the task and the material is crucial but the holiday lessons, not really closely connected to the coursebook curriculum, seem to be a perfect way out.
What else? Not much? Some curiosity on the part of the teacher, some willingness to experiment and some flexibility in order to be able to adapt on the go. Plus, the eyes wide open to notice all the little changes and proceedings.
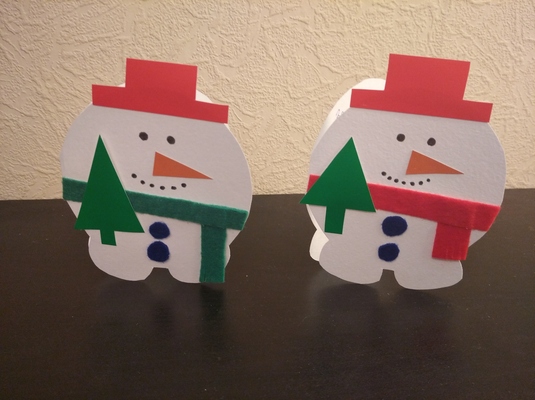
These two, in the photo below, are my own interpretation of the original craft and a more complex version of it, here in the form of a card, made by an adult (myself). Perhaps this is what I am going to make with my oldest primary group in our Christmas lesson. If we do, I will let you know how it goes. That would be, indeed, a nice follow-up and an extension of our experiments. We’ll see. In the meantime:
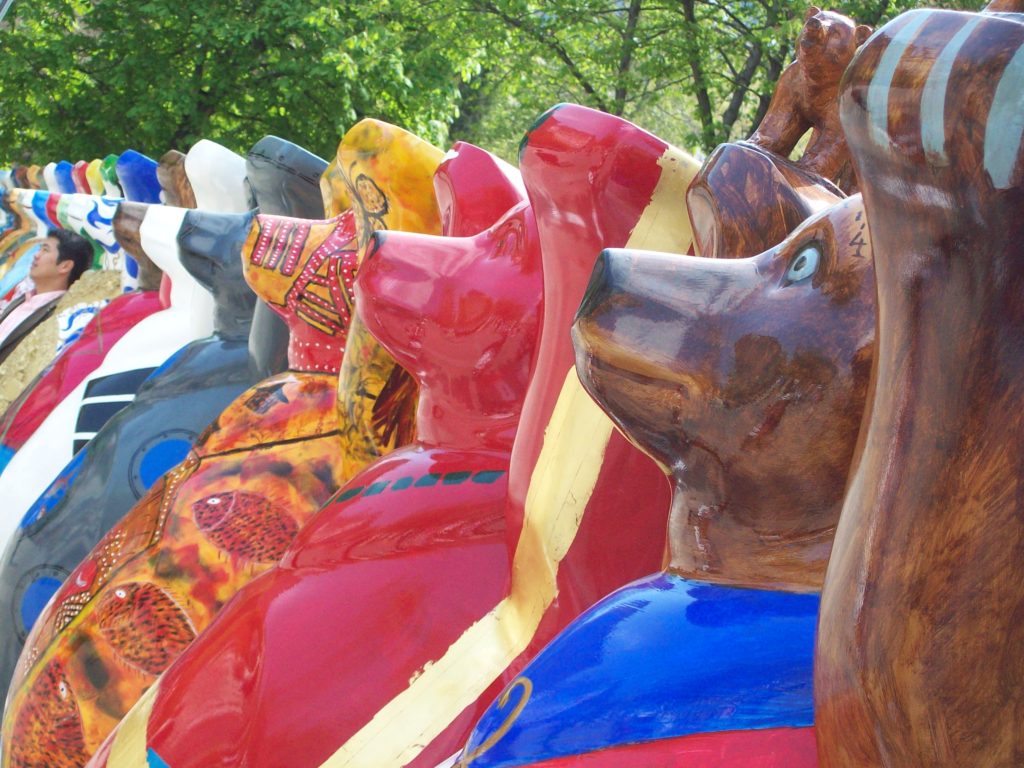
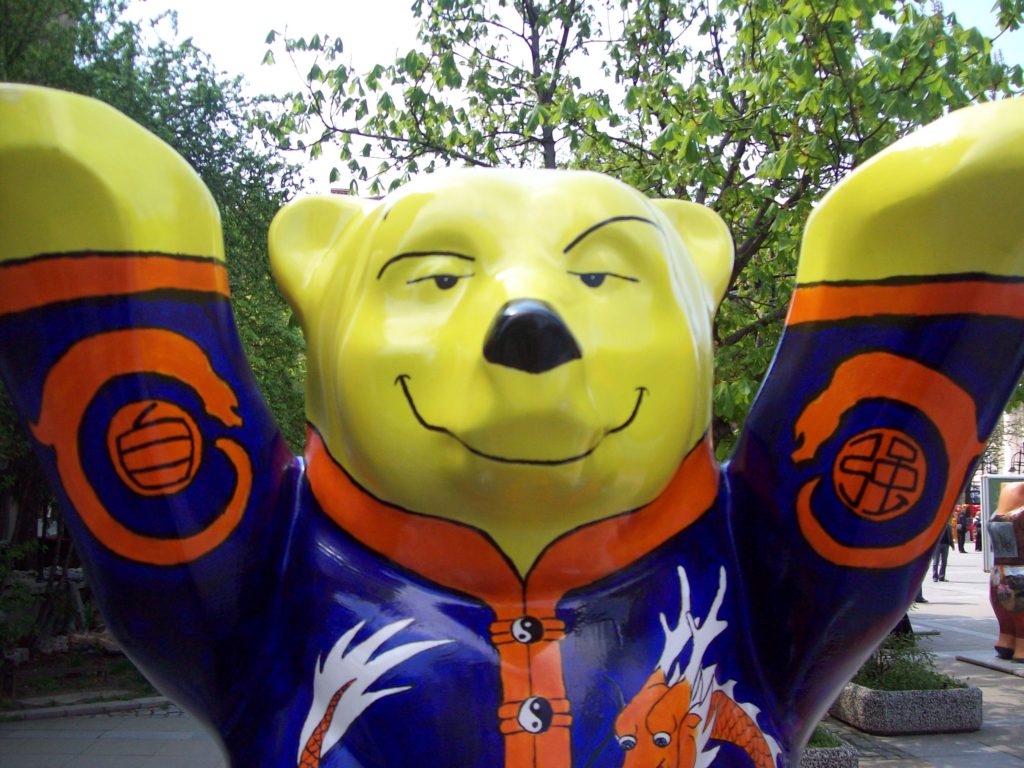
Welcome to my favourite art project: The United Buddy Bears. I first met the bears face-to-face (almost because they are 2 meters tall so face-to-face, eye-to-eye is not so easy to do) in Sofia because we all happened to be visiting the city in spring 2011. They were an art project back then already (since 2002 actually) but after our encounter they also became an EFL Art Project.
The United Buddy Bears: Brazil
Ingredients
First of all, if you have never heard about the project, start with this article on wikipedia or the bears’ own website.
A set of photographs of some of the bears that I use in a quiz. The students are shown the photos and they are asked to look at them and guess the name of the country. Naturally, the set should include the kids motherland.
Depending on the age and the level, the follow-up stage might involve describing individual bears, especially the bear representing the students’ country or symbols in general, as well as talking about the bears they like or dislike.
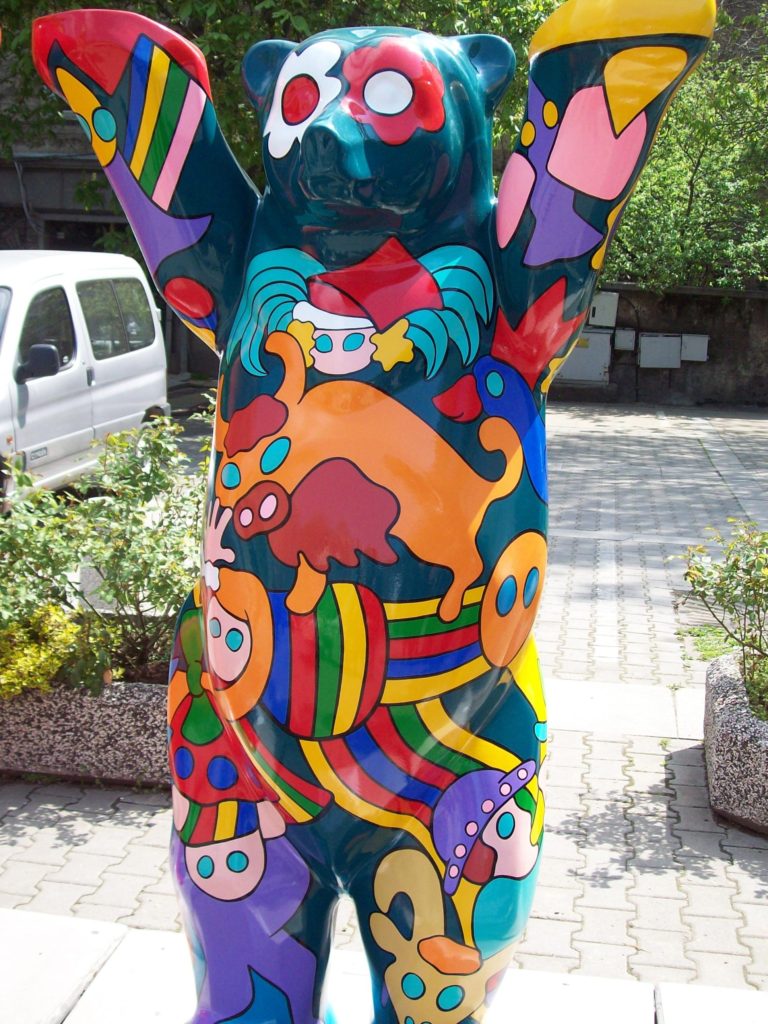
The main objective of the project for the younger students (primary) is to draw their version of the bear to represent their country. First, it might be necessary to brainstorm and to introduce the vocabulary and concepts that people normally associate with the children’s country. In case of Russia, it is especially interesting as it creates an opportunity for the students to learn that they already know many of these words, for example balalaika, borscht, matryoshka and they only need to learn how to write them in the Latin alphabet. Then, the students decorate their bears using the template provided by the teacher and, eventually, present their bears to the group.
The older students are invited todesign a bear that represents them. It can be a bear that will show their hobbies, personality, favourite sports, school subject or a band, or, really, any concept that they consider important. The sky is the limit here. The students present their bears to their friends, ideally in a mingling activity.
In the end, all the bears are proudly presented on the walls of the school or the classroom.
In both cases, it might be necessary to start drawing and decorating in class, to make sure that everyone is on the task but to set the task for homework, with the presentation scheduled for the following lesson. Some students might need more time to complete their drawings or to prepare their presentation and that might help to solve this problem.
The United Buddy Bears:Poland
Why we like it
It works like magic. Or almost. Some of the bears are easy to interpret, some of them require a bit more of background information but this way they can serve as a springboard to learning about different countries. The set of bears used in the quiz can be easily adapted by choosing the more straightforward bears for the younger students.
Regardless of which project you choose, the students get a wonderful chance to personalise the content, either because they will be drawing to reflect their own interests and hobbies in the bear or because they will be creating their own version of the Russian bear. It is a very happy coincidence that the Russian bear (or the first Russian bear because later I did find some other versions) is rather ugly. As a result, all my students with whom I have ever done that project, all of them without exceptions, were deeply offended that it is supposed to represent their country and were more than eager to create their own, better and more beautiful bears. The one you can see below is the more beautiful, later version of the bear.
It can be adapted to different levels and age groups. I have done it with elementary primary students and with advanced teenagers.
It is an opportunity for the students to express themselves, to create and to produce the language.
It can be used to supplement the coursebooks and it can be done as a part of the extra-curricular programmes such as summer camps, CLIL etc.
The United Buddy Bears: China
Happy teaching!
The United Buddy Bears: Russia (the beautiful one) from www.buddy-baer.com
If I had to choose only one craft activity for all my classes, a proper all-rounder, for the younger and for the older, to serve a hundred purposes – that is the one!
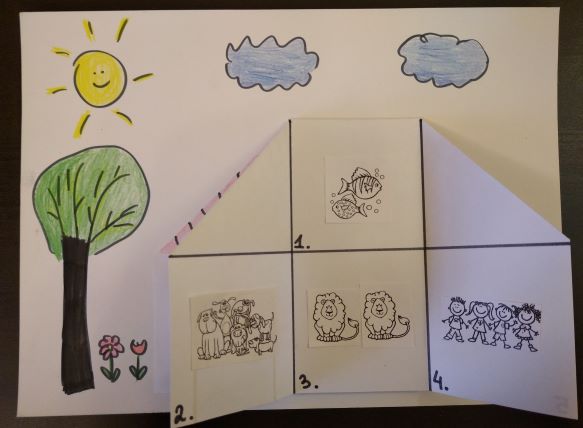
Welcome to my little house!
First of all, I really did try hard, very hard to remember where and when I learnt how to make it and how to use it and who taught me and I can’t. I don’t know. For sure, it was Moscow, definitely my first year here but who and how? No idea. The only thing that I can do now is to say ‘Thank you!’ to this forgotten and now anonymous benefactor. I am, indeed, much obliged. Now, I am sharing.
Instructions
Two pieces of paper per student / house. In the samples in the photos I have used A4 but in the classroom, with my kids I tend to use both A3 and A4, depending on the main aim. If we are just glueing things, A4 works just fine. If we draw – A3 is bigger and offers more room for the kids’ drawings.
Fold the house. It is pretty easy and you can watch this video here, from Inner Child Fun to see how it is made. Emily is using origami paper but a regular A3 or A4 will work just fine!
Important: I normally do it myself, for all my students because even adults (like my trainees) might not be very good at origami-like activities and the house, although it is relatively simple, it does require some precision and if it is not applied, it is not going to look very well, unfortunately. Preschoolers will not be able to fold it and when I once tried with my primary school kids, I immediately began to regret it because some of them took the responsibility of the taks too seriously and were getting very nervous, predicting that they might not be skilled enough to manage the task. They did, in the end, with a lot of encouragement but I think it is just not worth it. We can still teach them how to do it, for them to practise and play at home but if you think of the lesson itself, the timing and the aims – just not worth it.
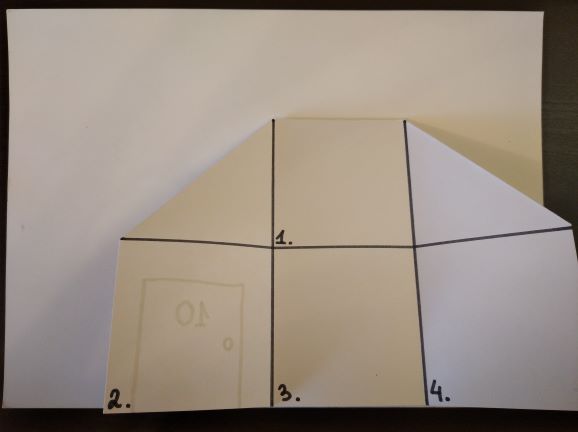
In my case, depending on the aim of the particular house (see below, there are plenty of options), I make one house myself, as a template, hand-drawn or using clip art images, and then I photocopy it to fold for each student. The advantage of it is that you can put in your house whatever you want. The basic design involves only the lines inside the house and the division into rooms, with numbers. That helps during the activities because you can ask your students ‘Go to room number 1’ and this way you make sure that everyone is on the ball and that they don’t glue pictures wherever they should not, for example, on the lines as that would get in the way of the house closing and opening.
Also, before the lesson, I glue the houses onto the garden page. This is especially useful in the case of the pre-primary students and in the case of those of my primary kids who have not done the activity before. Being glued on, the house is not as easy (although not impossible) to be dismantled and unfolded and it is just easier to manipulate in class.
I start with demonstrating my house, with all the theatre that I can muster. We look at it, we knock at the door, we open it and look inside. This can be done on the carpet or with the kids gathered around you so that everyone can see all the details.
I give out the houses and we start with drawing the door and writing the number (ask talking about them) and then drawing the windows (and talking about them). Make sure that all the students are more or less in the same place here. I normally only give out one colour per child (although they can ask for a different colour for the door and a different colour for the windows) or, with the older kids, with a pencil only. They will want their houses to be really pretty so erasing might be necessary and I really don’t want to waste time on colouring, this can be done at home.
The main task usually involves glueing things in different rooms, for example pets. For that, I prepare small pictures of all the pets, one set per child, on a tray (or whatever works as a tray) and a poster to put up, for everyone to see all the options. We start with room number 1 and I say, ‘Go to room number 1’. ‘I can see a cat (in my room number 1)’ after which I glue there the small picture of a cat. Then, the kids take turns and make similar sentences choosing their own animal from the set. They only receive a picture to glue after they make their sentences. When everyone is ready with room 1, we show our pictures, we say ‘I’m ready’ and move on to room number 2. And so on.
In the end, if there is time, we draw the sun, the tree and the flowers in the garden and we colour the house for homework. Also, if there are any leftover animals, these can be given out to glue at home (although, yes, that involves some more complex logistics, paperclips, small envelopes, not impossible though).
In the following lesson, we look at our houses and describe the rooms, the colours etc.
Variations: there are many of these. The house can be anything you want it to be. Here are some of my favourite ones:
Any set of vocabulary and almost any set of stucture, starting with ‘I can see’ and ‘I’ve got’, with some less obvious ones like the pictures of activities to practise Present Continous (‘I’m jumping in the kitchen’) or even words or word cards with the Past Tense forms which can be used later to tell stories for example ‘A strange Sunday’ (‘My brother slept in the garden’, ‘My dad danced in the kitchen’ etc)
Halloween or Christmas house – with the characters and symbols of each holiday
Rooms of the house – template is prepared with some furniture typical of each room, students can place pets in rooms (‘Where is the cat?’ ‘It is in the bedroom’) or family members (‘Where is mum?’ ‘She is in the living room’), add small objects to each room (‘Where is the lamp?’ ‘It is in the kitchen’, it is best to choose things that could be in any room such as lamps, pictures, chairs, rugs) and this version can be also further extented (‘Where is the lamp?’ ‘It is in the kitchen. It is on the cupboard’). The older kids can also draw these, making a regular or a silly house, too.
Secret Room – this was a follow-up activity in which I used the template which I drew with one empty box (empty, only because I could not, for the life of me, draw anything resembling a dining room). We did one of the activities mentioned above but the last room was to be drawn at home and it could be anything – a space room, a swimming pool, a library, an ocean zoom, a pirate room…
Where are you? – a template with the rooms, pre-prepared, each student gets a set of the leftover stickers or small cards, they put them somewhere in the house, in secret and afterwards they guess where their objects are. It can be used to practise simple prepositions and the rooms (‘Is it in the kitchen?’) or more complex ones (‘Is it in the living room?’ ‘Yes’ ‘Is it on the sofa / behind the chair?’etc)
Put your penguin in the living room on the sofa – a template with the rooms, pre-prepared and a set of stickers or small cards. The kids dictate to each other where to glue them, again, it can be used for simple or more complex prepositions, to get the kids ready for the Starters speaking exams. Later on, we compare our houses.
Why we love it
It is relatively easy to make and the kids love the fact that it is a real house.
It can be used with any vocabulary or structures (or almost)
It can be used with pre-schoolers and primary
It has to be prepared before the lesson for all the students but it is a good time investment
It is at the same time a focused task to be done in class and a homework task. The homework can involve only colouring and decorating it, talking about it in class but a writing task can easily be added for the older students (any template to be printed on the back of the garden, for example the focus can be such structures as there is, I can see, colours and furniture, my favourite room etc
It encourages the students to produce the langauge and it is easy to stage since you go from room to room
Lots of opportunities for adaptation, even if you repeat it with the same group. Every single time, it will be a different house.
It started with something Michael said. He is a fellow teacher and he was telling me a story of how Teacher X went to peer observe an experienced colleague, Teacher Z and how the lesson was, well, not very good, bad, horrible, ‘a disaster’…It was not a very pleasant experience for Teacher Z, of course, but a learning opportunity for Teacher X, nonetheless (and for Teacher Z, too, actually). ‘This is what I want to hear, that even with the best intentions, it can all go ‘tits up’ but nobody is prepared to say it‘.
I got inspired. I am ready to share. I don’t mind. We repeat that to our students, constantly, that mistakes are noble and that we can learn from them. If our students can, so can we, the teachers. The same principles apply.
By the way, the Epic Fail Award is actually a real concept. It is a real award given out to employees at Hill Holliday agency, since, as Robert F. Kennedy once said ‘Only those who dare to fail greatly, can ever achieve greatly’ (apparently, have a look at the whole article here)
With that in mine off we go, to the first of my personal disasters or ‘When things did not go to plan‘.
One: The (stupid) Christmas tree craft
Here it is, look!
Did you go ‘Awn’? I bet you did. I did when I saw it and so did my kids when I showed it to them, during the pre-Xmas lesson. It did take place three years ago, I think and back then I was already an experienced teacher etc.
I did a great job, preparing for the task. I did prepare all the materials; I did make the tree at home. I did think of the staging. I did plan to teach the kids the verbs we needed to make it (fold, press, pause). I did think of how old they were and I knew them, they had been my students for over two years at the time so I could imagine what they were or were not able to do. We had done plenty of craft activities, we had worked with the pipe cleaners in a few different arrangements. I did pre-cut the triangles and tied pipe cleaners (three of them joined would be necessary to cover one tree). I punched the holes at the top of each tree. I wrote the main steps.
You would have thought the conditions were perfect. Yes, yes, they were. And yet it was the biggest craft disaster known to mankind. In my kingdom.
It turned out that even with all of these preparations and the previous experience and knowledge, the task turned out to be too tricky for my students. They were involved, yes, they loved the idea but we soon discovered that if you do not press the pipe cleaner real hard, applying all the strength (that the 5 y.o. did not quite have), it starts sliding, coming off and not looking at all as this ‘Awn’ model that I had already shown and that everyone had already managed to fall in love with and to start dreaming about of taking home.
The point of no return, in other words. Stopping, pausing or aborting the task was completely out of the question at that point. We went on, with me helping to complete eight Christmas trees simultaneously, perhaps singing the song to keep everyone occupied (though, really, I cannot be sure) with me hating absolutely every second of it and swearing that this very craft will never be seen again in any of my lessons. This or any craft, actually.
Everyone survived. Apart from all the leftover trees. I binned them all. With a lot of vidictive satisfaction. The one you can see in the photograph was recreated for teacher training purposes.
Today, I think that the craft is actually child-friendly, provided that you don’t go too minimalistic and that you keep the real Christmas tree-shape. Or that you at least cut the edges of the simple triangle in a few places, on both sides, to ensure that the pipe cleaner has somewhere to get attached and to stay in one place and still look ‘Awn’.
But it is also true that with this particular craft, I did allow myself to fall far the ‘awn’ effect and its strictly decorative value. Linguistically, there would be very little for us to do with it, apart from a few verbs and a few functional language phrases that we use and practise with any craft activity. Maybe, just maybe, I should not have fallen for it and, as a language teacher, first and foremost, I should have prioritised the linguistic aim.
Well, lesson learnt, that’s for sure!
P.S. It was unpleasant but I have not given up on craft! Experiments will sometimes lead to great achievements and sometimes to disasters but the best thing is – we learn, one way or another!
P.S.S. There is more to come in this chapter! I will see you soon with more epic fails stories. If you have some that you would like to share, please, do in the comments below!
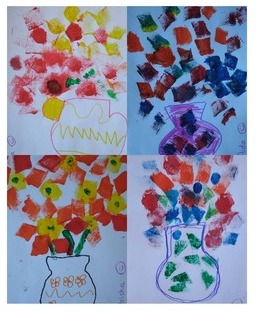
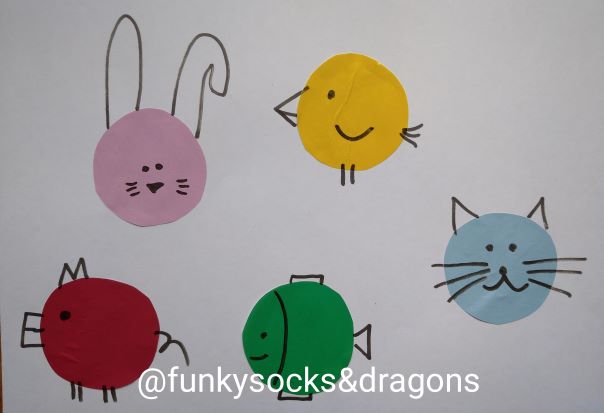
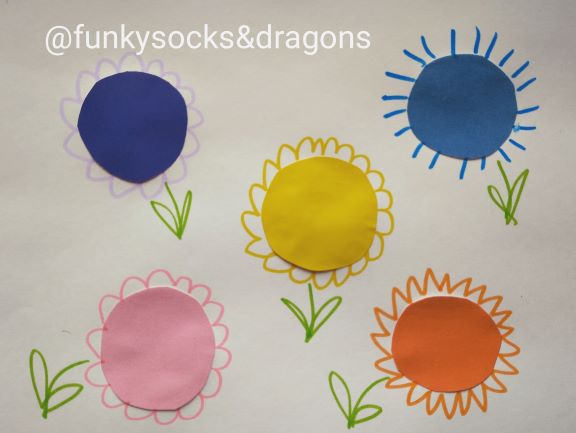
Get the coloured paper ready. The basic photocopying paper will do but for a more sensory experience paper with different thickness, texture or surface.
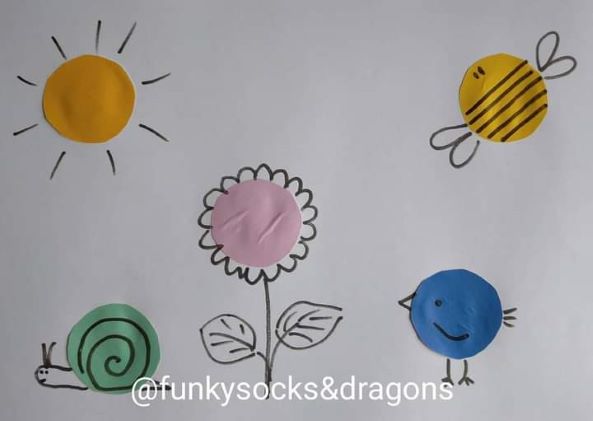
Cut out a pile of colourful circles, about 3 cm in diameter but if the kids are really small it is better to make them a bit bigger, they will be easier to handle.
Prepare A4 sheets of paper on which you are going to stick things, glue sticks and markers that you can use to draw on your paper.
Choose a circle, glue it onto the paper, decorate it so that it resembles what you want it to resemble. Use simple instructions while demonstrating (‘Glue’ ‘Turn over’ ‘Stick’ ‘Draw). Give out the paper, the glue sticks and the first circle. Monitor.
Proceed with the following circles.
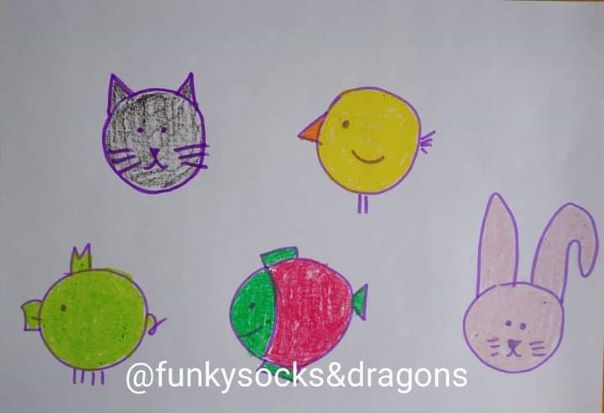
With the older students, it is fun to let the children decide what their circles are. And then learn the new words – whatever they draw.
Don’t forget to talk about your pictures, count all the blue circles and all the butterflies))
Level 1 Pre-Primary : Pets
Why we love it
It is super easy to prepare and to complete.
There is no set duration of the task. It can be kept very simple and short, limited to only three items or extended to six or seven, depending on the age of the students, level, motor skills development.
It can be easily made more or less challenging by grading the level of complexity of the drawings.
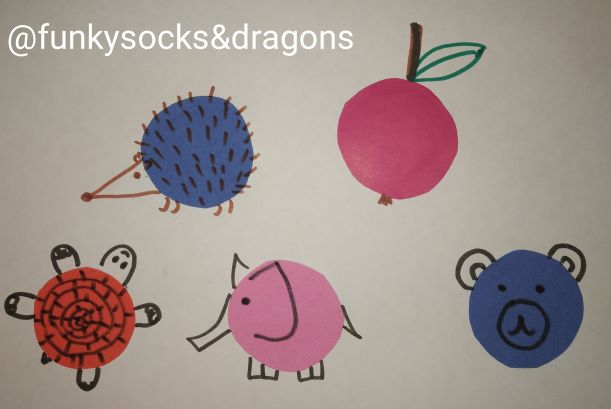
It can be adapted to many different topics. I have used it with the topic of shapes (focus: circle), spring (accompanied by the KidsTV123 song ‘In the garden’ https://www.youtube.com/watch?v=RCClYcU97PA) and in the beginning of the course with level 1 to practise the first colours.
It helps to develop cognitive skills (perception: noticing the shapes in the world around us, transforming the shapes into things we know etc)
If there is no time to cut out all the circles (or if the teacher has not done many craft activities and wants to start with something not as complicated), a template with circles can be used instead. In this case, the kids will only draw and colour.
Level 1: Pets, no-glue template
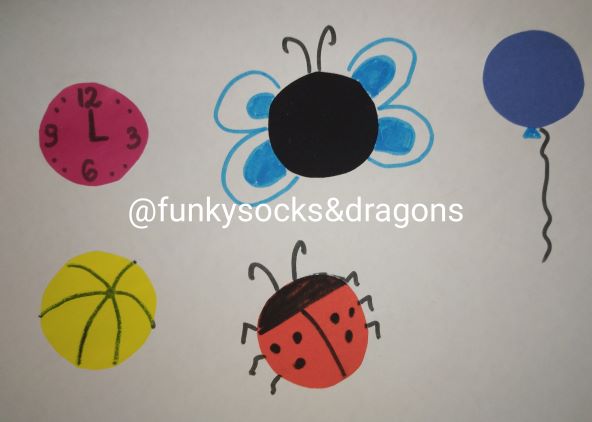
Assorted circle-related randomness
Assorted circle-related randomness part 2
Level 1 Pre-primary: Colours (lesson 3 of the course)
Christmas edition (the puppy is here because this is my student’s favourite thing:-)
A post for those who have been contemplating using craft activities in their pre-primary lessons, especially for those who have not started yet or those who have tried but have not really been quite successful with it.
First of all, let’s get started from the facts.
Fact number 1: kids love craft and no wonder they do – you get to creat; you produce something real and you can take it home. Even if your creation has a limited durability and appeal and after some time (a day in the playroom and a week on the fridge door) it gets destroyed and lands in the bin or it gets folded carefully and is stored in the ‘Ania/kindergarten’ box.
Fact number 2: teachers are a little bit more cautious with expressing their love for the craft activities. Some of them do, of course, but there are still quite a few who don’t really appreciate all the hurdles you are required to jump over in order to get to the finish line called ‘A great craft EFL lesson’. Because it can get messy, because it requires more preparation than other acitivities and because it needs to be planned properly to ensure that you don’t spend the lesson colouring and cutting and NOT using the target langauge.
Perhaps that is also the reason why even the most recent coursebooks for primary and pre-primary (which shall not be named here) do not really seem to promote craft activities as much as they should in my humble and very subjective opinion. Alas.
Why craft?
There are many great blog posts and articles on the advantages of using craft, I am not going to be attempting to reinvent the wheel here. Here are those that I have found useful. Have a look yourself.
If you are looking for a manual how to set up a craft activity and what to think about while planning it, then you should definitely start from reading the introduction to the craft chapter in Carol Read’s 500 Activities for the Primary Classroom where she outlines the principles of the MAD FOX (which, by the way can be used as a framework for all of the VYL and YL activities). Strongly recommended!
Where to find a craft activity?
Well, this is the best news ever: nowadays, finding out about available craft activities is really a piece of cake. There are plenty of websites, blogs, Instagram accounts written by and for:
The teachers of English as a foreign language
The parents of young children
The teachers of kindergarten
There are also multiple groups on facebook, vkontatke (or whatever is your local equivalent), pintrest and just the good old google or Yandex search enginge.
How to choose a craft activity for the EFL lesson?
Well, this is where the W.O.R.L.D. might come in handy. This is an acronym that I made up for myself and for one of the workshops that I was giving a few years ago. Also, because I really wanted to have an acronym:-)
Here it is!
W is for ‘WHY?‘
Probably the most important question a teacher can ask while planning a lesson with a craft activity: why am I even doing it? It is great to include craft only for the sake of ‘the variety in the classroom’, but I strongly believe that a craft activity must have a follow-up, that it cannot be an end in itself. After all, we are language teachers and not art teachers.
An ideal craft activity is only the preparation for the proper language exercise, it is our way of getting the kids interested in what we are doing and using the finished product to encourage them to engage in a language activity. If this element is missing, there should be a really good reason for including it in your lesson. Is there?
O is for ‘On their own‘
No matter how amazing an activity looks in the photograph or the video, no matter how beautiful and colourful it is, no matter how strong its ‘wow’ effect might be, there is no point of bringing it into the EFL classroom if your students cannot complete it on their own.
Perhaps, the assembling process is too long and too complex and the materials too small and too flimsy and your students will not be able to complete it all by themselves. If it is a 1-1 lesson, sure, you can help but let’s take ‘the worst case’ scenario, a lesson with a group of 8 students, each of whom gets stuck at precisely the same moment in the activity and the teacher having to help every single one of the 8 students at 17:25:04…No. Not worth it.
R is for ‘Recycle‘
It will not always be possible but in order to justify the time and work invested in preparing and carrying out a craft activity, it should be possible to recycle ‘the product’ in one of the following ways:
The same product is used throughout the course to recycle the particular vocabulary set, story or functional language phrases
The same product is used throughout the course with different vocabulary sets, for example the boardgame the children made is used to practise vegetables, then fruit, then transport
The same type of product can be made again, with different vocabulary or structures, for example mini-flashcards booklets, flapbooks, window decorations. If the format of the activity is used later on in the year, setting it up and executing it will be much easier because both the teacher and the students will be familiar with it.
L for ‘Language‘
First and foremost, we are the teachers of English and our main aim and priority should be the development of the linguistic skills in our students, regardless of how old there are. In the same vein, the main advantage of a craft activity is how it contributes to generating language.
Level A: the exposure. This is of course, always there, teachers speak, students listen. No matter what they do, they are also develop their listening skills and the ability to focus. So, technically, any craft activity will score high in that area as the teacher gives instructions and students follow them. What’s more, it is instantly obvious – the kids are leaving the room with a card, a puppet or a mask hence they have understoon the instructions. Good but not good enough.
Level B: the functional language. All craft activities have their stages, the students are encouraged to ask for the coloured pencils, glue, scissors, react to the teacher’s praise, sometimes praise their friends’ work and this is how some functional language comes into the picture and students are given an opportunity to practise it in context. Better but not good enough still.
Level C: the production. In an ideal craft activity, the making of is only the first step towards the follow-up stage in which the finished product will encourage them and will give them a chance to speak English.
D is for ‘Duration‘
Realistically speaking, how much time of the lesson time is the activity going to take, from the moment it is presented to the moment the last scraps of paper end up in the bin and the crayons, scissors and glue back in the box where they live? 5 mintes? 10 minutes? 15? 20? More than 20?
I am not going to try to discourage anyone from those longer craft activities because they need to be seen in perspective, together with all the other pieces of the puzzle, but it needs to be remembered that the longer the activity lasts, the higher the chances that kids will lose interest, that they will find alternative things to do, start chatting in their L1, get bored and tired and that, basically, it will be increasingly difficult to manage them and to get something out of the activity.
The potential time contraints apply to teachers’ too, actually. How much time and effort does the teacher want to spend on preparing the activity? Will they inolve the whole family into pre-cutting and pre-folding the night before? Will it be really worth it?
What is the ratio between the before-the-lesson preparation time, the activity-in-class time and the follow-up production stage time?
For that reason…
Cutting out a bunch of grapes that takes twenty minutes to complete: no
Making a complex puppet that takes half of your lesson so that you could use to say ‘hello, my name is Mitya’: no
A set of tiny little bits that have to be carefully glued onto the piece of paper: no
A picture to colour: no (not when it is just that ‘a picture to colour’)
Goggly eyes: no
Food craft without consulting parents first: no
Draw your…: no
Glittter: no (but that’s just me) and any ultra fancy materials that teachers would have to purchase themselves in specialised shops: also no
Anything else you would like to add? Anything that you don’t agree with? Please, let me know!
And don’t forget to pop in here to read about one ideal (and tried and tested) craft activity for the EFL preschoolers.
With this particular craft, the making of is only the introductory stage, namely the activity in which we are use the final product to generate even more language.
O is ‘On their own?’
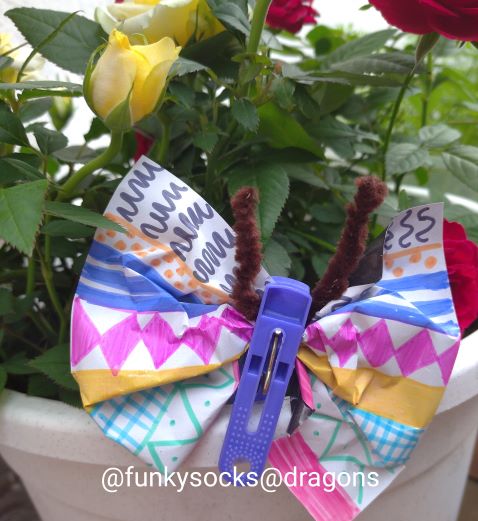
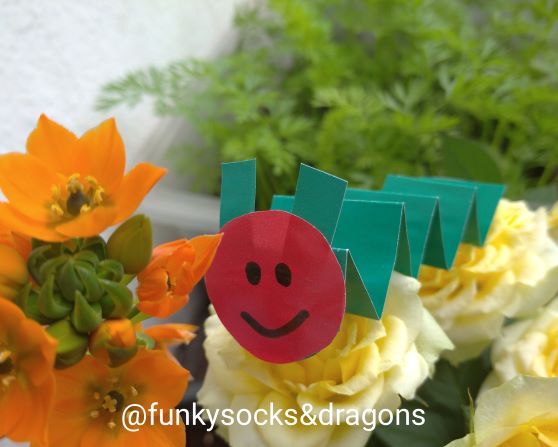
I wanted something that my little students will be able to work on and complete on their own, with as little of my involvement as possible. Partially it is connected to the fact that we are developing learner autonomy, also in the EFL classroom, partially due to the fact that with six or eight children in the group, a craft activity can quickly turn into a nightmare experience if the teacher is required to help make eight caterpillars at the same time. The caterpillar still looks very caterpillary and sweet even if the folds are not very neat or even. The butterfly can be squeezed into the peg by even very young hands without much damage to its beauty.
R for ‘Recycle’
Most caterpillars and butterflies will most likely be taken home because it is not always easy to convince the little kids to leave their precious creations behind, in the classroom, at night, all by themselves, but as long as there is at least one caterpillar and one butterfly left (teacher’s), they can be invited to participate in all the class activities over and over again, with different topics, vocabulary and structures. Not all of us have the luxury of having a teacher assistant in the classroom but the caterpillar and the butterfly can play the part – model the activity, get involved in classroom management, give instructions and so on.
L is for ‘Language‘
No matter how much fun we have making something in class, first and foremost, a craft activity is an opportunity to use the target language, either while producing something or while playing with it.
This particular buttefly and this particular caterpillar were used in different lessons. We used it to retell the story of the most renown hungry caterillar from Eric Carle’s story, we used it to talk about a lesser known caterpillar sleeping through different weather days only to wake up as a butterfly (Playway to English 1 by CUP, Activity Book, page 37) as well as six caterpillars wreaking havoc in Mr Smith’s garden (Playway to English 3 by CUP, Student’s Book, page 54 – 55). The same duo accompanied me in a few spring lessons, accompanied by the great song from Kids TV 123 ‘In the garden‘ while we were practising the structure ‘I can see’ as well as the Science lessons on the butterfly life cycle.
D is for DURATION
I have used the same craft activity with my three year-olds and with my six year-olds and with everyone in-between, with only slight adaptations. This particular caterpillar and this particular butterfly are expected to take about 7 minutes of the lesson time and are made on two separate occasions in order to facilitate staging and classroom management.
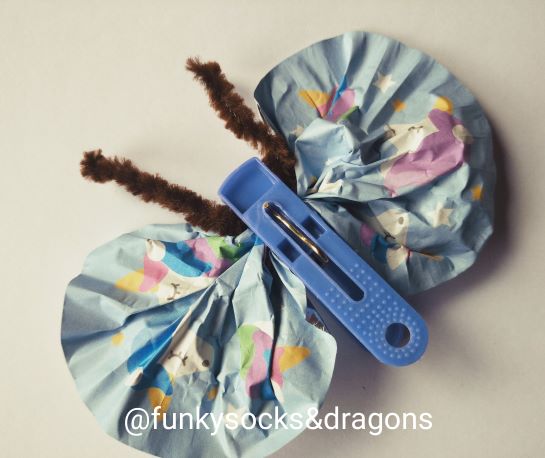
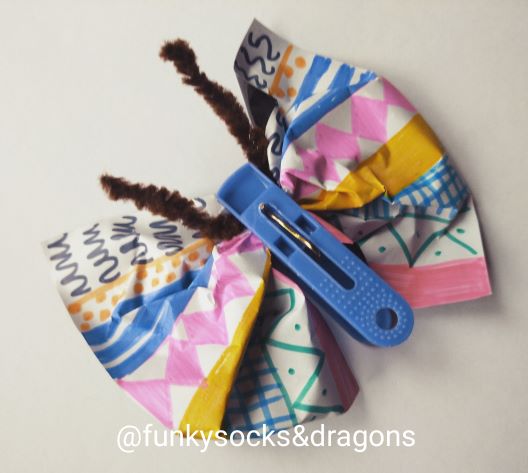
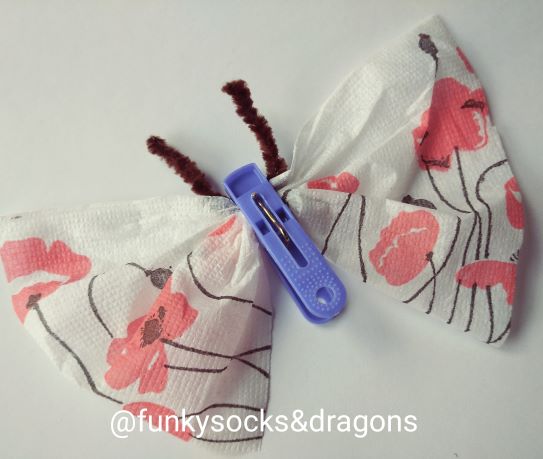
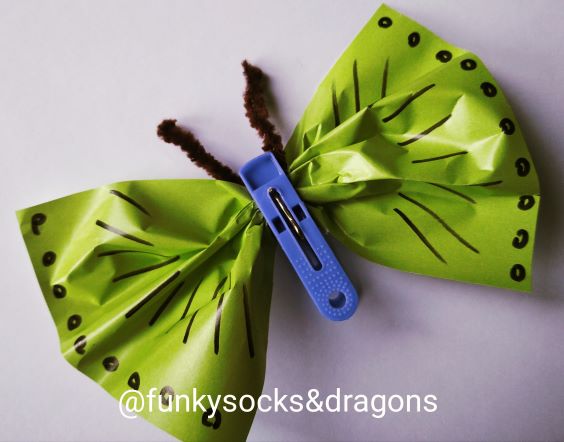
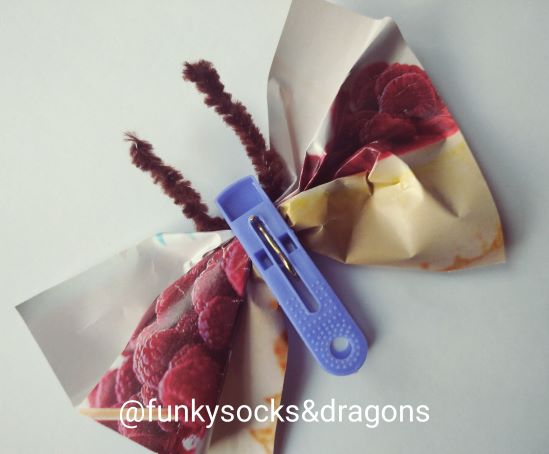
The tissue paper version is more 3-year-old friendly and it does not involve any folding or careful handling. The older kids can be prepare a more intricate butterfly, by colouring a rectangle of regular white or colourful photocopier paper, coloured paper or tissue and decorating them with leftover stickers. As for the caterpillars, they can be pre-folded for the younger children, the teacher can also draw the lines where the folds should be and glue the heads on before the lesson.
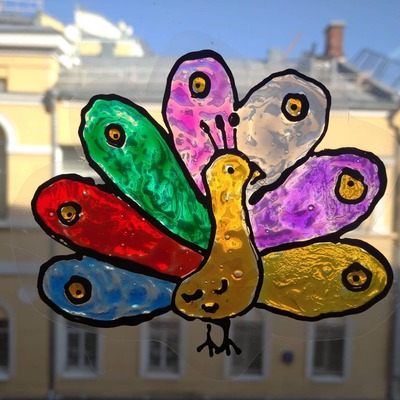
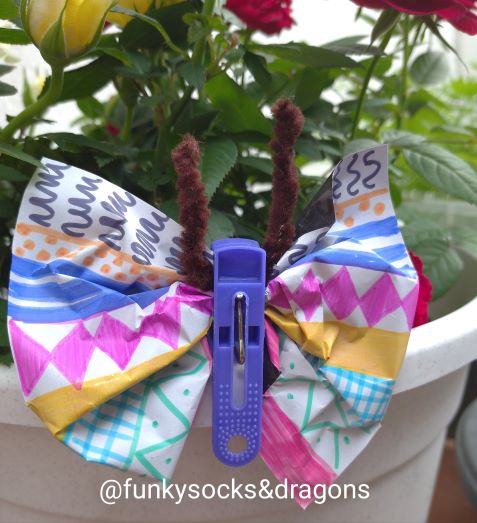
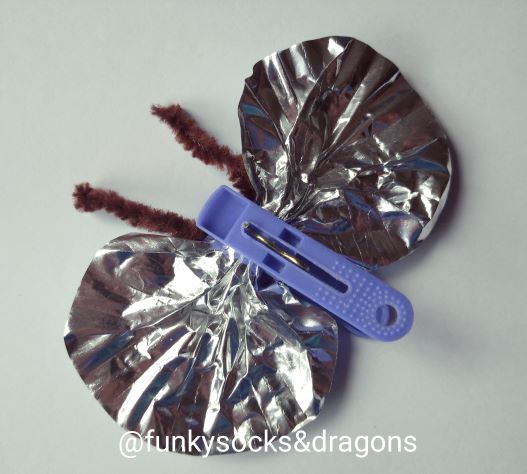
Butterflies made using a cupcake case (front and back), decorated paper, paper napkins, coloured paper, a magazine (featuring: a raspberry cheesecake:-)
Step-by-step staging
Caterpillar
Show the final product
Demonstrate how to fold it, use simple instructions (‘fold’, ‘press’)
Hand out the strips of paper
Fold the caterpillar, making another one together with the kids, step by step, pause if necessary, to let the kids catch up
Glue on the head
Draw the eyes and a smile
Butterfly
Show the final product
Give out the paper you are going to use for the wings, decorate it (markers, crayons, leftover stickers)
Make another one together with the kids
Take a peg, open it, show the kids how you squeeze the wings inside (with the wings made of paper, it will be necessary to demonstrate how to gently gather the wings in the middle and how to crumple the paper), close the peg.