Five ways of using craft in the pre-primary classroom

Before the craft.
A set of quilling paper strips

This is the second part of the Craft ABC series. You can find the first part here.

The main activity and the target language practice

This is a craft activity that features in the lesson to provide opportunities for the target langauge practice. As an example I have decided to choose our beloved jellyfish that is the first craft activity that I do with my first-year students, in one of the first weeks of the course. This is the time when we learn and practise colours with flashcards, colourful blocks and realia in general, with simple stories, videos, wordwall games and songs. A craft activity is yet another way of ‘recycling’ the target vocabulary and of giving the students an opportunity to be exposed to it and to use it.

The jellyfish is a super simple craft and even the youngest kids can draw the eyes and the smile on the head (which can be a semi-circle cut out by the teacher or a half of a paper plate) and then to attach the tentacles to the back of it. Kids are really motivated to make their own jellyfish and to drill and call out the colours and to ask for the following one, in a very simple way (‘Blue, please’). As a result, lots and lots of language is produced and everyone leaves the classroom with a creature they made herself. What’s most important, the jellyfish looks good even with the most crooked smile and the most inexpertly glued tentacles. And even if there are only three or four colours used, with the youngest kids.

The follow-up of a story or a song

Craft in this case is an opportunity to reinforce the ideas, concepts, vocabulary and structures introduced in a song or in a story. Or, to put it differently, a story or a song is not introduced only as a starter or a side dish but it becomes the topic for the entire lesson.

The three examples in the photos come from the lessons taught based on the Playway to English 1 by Cambridge University Press. The first one is a flower we made together while retelling the story from unit 7 (The Little Seed which you can also find here) and although we were not able to use all the original story lines, the kids could use the basic ones such as It’s sunny, It’s raining. The little seed is sleeping (at the beginning), The flower is growing (while making the stem) and so on.

The second example is everyone’s favourite Very Hungry Caterpillar which is a storybook we use in year, to accompany either unit 7 (Weather / Spring) or unit 9 (Food). You can find more information on this version of the caterpillar here.

Last, but definitely not least, is a simple craft that was a follow-up of the amazing Super Simple Song called ‘Are you hungry?‘ and it can be used either with the topic of fruit (Playway to English 1, unit 3) as it goes nicely with the theme of the song of monsters sharing fruit with their hungry friends or, in a wider context, with food in general (Playway to English, unit 9). The craft activity becomes the more palpable and 2-D version of a song and it can be used in a mini-role play, sung or spoken, depending on what the kids are ready for.

Props preparation

This type of a craft activity does not have a lot of potential as regards maximising production although the kids are quite likely to use some functional language, the staples of craft (Are you ready? Let’s sit down, Blue, please etc). This type of a craft activity is also quite short, compared with the ones mentioned so far but that is exactly the point. The craft activity is only a prelude. Everything important is to happen later with the finished product used as a tool.

The best example here will be our magic wand. It is simple and easy to make and can be used as a part of a shapes lesson (though, really, there is only one shape involved). The abracadabra TPR activity (Abracadabra, 123, you are…) is a game we play from the very beginning of the course. When the kids are ready to take over, we make a wand for each other and use it in a game and at this point, the kids get to lead the game for real, waving their own, freshly-produced wands and we all mime whatever there is to mime. The langauge is produced and lots of it (Abracadabra, 123, you are…swimming, dancing, flying…OR you are a cat, a happy cat, a hungry dinosaur…) but it is not directly related to the making of the wand.

A part of a Science, Maths or Art lesson

Craft can be also a part of a CLIL lesson or a Maths, Science or Art lesson, depending on whether we are dealing with the EFL or the ESL or bilingual programmes. In this case, the craft activity will create an opportunity for the students to put into practice or to reinforce the real knowledge or skills they have acquired in class, making it more practical, kinesthetic and hands-on.

Below, three examples of such craft activities.

The first one is a Maths lesson in which we were learning about and practising measuring. Apart from working with the rulers and measuring tapes and checking how long our cars, teddy bears, desks, noses and fingers were, the kids also got a simple handout with a section of a certain length and it was their task to measure the strips of paper with rulers, cut of the appropriate piece and glue it underneath.

The second one is one of the lessons devoted to animal habitats which we studied in our Science class. Apart from categorising animals and talking about the habitat, we also did a craft activity in which we created the habitat (here the polar region made of a sheet of blue paper, waves drawn, ice made of cotton pats and the animals glued on). After a series of lessons we had a set of habitats.

The third piece here is one of the activities we made as part of the Kids in the Avangard. In this lesson Paul Klee was our artist of the day and we created our own version of his Cat and Bird.

The non-linguistic aims

Sometimes craft activities have a non-linguistic main aims. Because of their obvious relevance to kids’ lives and the excitement that they generate, they can be used to help kids develop as humans and this can be the reason for their inclusion in a language lesson.

The first activity here is one of my favourite craft activities ever. It can be used in many different thematic lessons but its main advantage is that because, due to its design, it requires a detailed micro-staging and, on the one hand, it can help kids work on their ability to focus and to follow teacher’s instructions in order to be able to turn their circles into cats, dogs, frogs and bees. On the other hand (and it has worked absolutely every single time), it brings an immense sense of achievement and confidence in kids’ own skills since a random circle can become so many things.

The other activity presented here is an example of a festive craft that finds its place in the classroom as part of the seasonal celebrations. Despite the fact that sometimes this vocabulary will be used in class only in a year, when the holiday comes up again, it connects the lesson to the celebrations at home and in kindergarten and it is the easiest way of bringing these festivities into the EFL classroom.

The final activity, our solar system was a wonderful activity that we all enjoyed and one that helped us produce lots and lots of language. However, believe it or not, that was not the reason why we did it. This was our first real whole class project because the kids got an opportunity to work on something together, sharing resources and sharing the space and we produced one huge poster that nobody would be taking home in the end.

Happy teaching!

Craft is…what the VYL world is all about

Just one of the shots taken in the middle of a working day, before a craft lesson…

Craft has been present in my classroom life for as long as I can remember. Looking back, I can see all the pieces I made with my superstars in Moscow over the last thirteen years, the robots we constructed at the summer camp in Tuscany in 2009, some 3-D houses we made with my Navarran babies in 2008, or the magazines I put together with my cousin, my first student ever, somewhere in 2000…What’s more, craft has been present in my life since my own primary school. I loved the Art lessons, I loved the Craft lessons. I even loved the Technology classes, although craft then involved: weaving a mini rug, building a birdfeeder and making a chair for a doll.

You could say that the foundations for my future career have been built pretty early and that I have had a lot of opportunities to perfect my fine motor skills and to fall in love with craft (truly, madly, deeply). No wonder that I would try to smuggle it into my lessons.

It was only a week ago, actually, while preparing yet another session for a teacher training course, that I saw craft with a fresh pair of eyes and I saw it for what it really is: the VYL world (or the pre-school world) in a nutshell, everything that is beautiful about it, everything that can be enjoyable about it and, inevitably, everything that can go wrong with it, too.

The simple truth is that: kids love craft

Craft lessons and craft activities are these parts of the lesson when kids can do something for real, not the coursebooks, not the handouts or worksheets, not the time when you need to stay focused but the creative, the beautiful, the fun part. And, one more important factor – something that is different every single time!

If you add to it the variety of materials that are included, the variety of techniques and that, more often than not, you end up with a real product, a book, a house, a puppet or a collage, which you have created yourself and which you are allowed to take home, it is not a surprise that kids love it.

Ah, we haven’t done anything for such a long time‘ was something that I heard one of my students mumble to herself when she saw me reach out for the coursebook as soon as we sat down at the tables. As a teacher, I was taken aback. Because we did DO things! We sang songs, we read stories, played with flashcards and we did have good lessons. In my student’s eyes, however, all that meant nothing at all, because, indeed, somehow a long time had passed since the previous craft lesson and that, at least for this one student, was the real thing, the something!

If you want to read more on why kids need craft activities, have a look here.

The simple truth is: many teachers don’t like craft

  • A craft lesson takes a long time to prepare.
  • It is messy, both during the preparation stage (see the photo above) and during the lesson.
  • The teachers might not have a full access to all the resources necessary, even the simple ones so they end up buying these themselves
  • Classroom management is a bit more tricky in the craft lessons, as there are more elements to manage and the kids might get too excited.
  • If not planned properly, craft lessons can turn into a mayhem, with kids not producing the target language or even not completing the task.
  • Craft activites are not very well taken care of in the mainstream coursebooks and in the teachers books and so there is no resource to learn from.
  • If the craft activity has not been chosen properly and if it is too complex for the students or if it is not planned properly, students might struggle with completing it or they might destroy in and in such a case there might be tears of a child in despair or tears of a disappointed child.

Craft is what the VYL world is about

Teaching pre-schoolers, compared with the other age groups, will require more of your time in the preparation stage and it will be more demanding as regards the class time. It might require you to include the things that teachers, as adults, have no interest in and which they will still include because that is what can be beneficial and effective with students of that age. In the same vein, some things will have to be excluded even if teachers love them, also because of the age of the students, they will simply not work.

There is only one thing to be done…

…and that is: careful planning and Carol Read’s MADFOX (Management, Appropriacy, Design, Flexibility, Outcomes, Excitement) which you can read about in the ‘500 Activities for the Primary Classroom‘. It is a wonderful tool that will help prepare for a craft activity in the EFL or ESL lesson, primary and pre-primary. Actually, this framework will work well with any type of an activity or a set of materials, stories, songs and games.

One of my earlier posts (and my first acronym W.O.R.L.D🙂 might also come in handy while choosing a craft activity for the pre-primary EFL /ESL lesson.

The most important thing to remember everything gets better with time. The lesson planning become easier and less time-consuming. The kids know the teacher, the lesson format and their peers better and that is an important factor contributing to the success of the activities and, last but not least, if you decide to reuse a particular type of a craft activity for the second or third time, the students will also be able to deal with it better as they will have done it before.

There is hope))

This post is only the first part of the Craft ABC series. You can find the second part here. Don’t forget to also have a look at all the posts in the craft section on this blog.

Happy teaching!

Crumbs #12 In my little house: A craft activity for one hundred occasions.

If I had to choose only one craft activity for all my classes, a proper all-rounder, for the younger and for the older, to serve a hundred purposes – that is the one!

Welcome to my little house!

First of all, I really did try hard, very hard to remember where and when I learnt how to make it and how to use it and who taught me and I can’t. I don’t know. For sure, it was Moscow, definitely my first year here but who and how? No idea. The only thing that I can do now is to say ‘Thank you!’ to this forgotten and now anonymous benefactor. I am, indeed, much obliged. Now, I am sharing.

Instructions

  • Two pieces of paper per student / house. In the samples in the photos I have used A4 but in the classroom, with my kids I tend to use both A3 and A4, depending on the main aim. If we are just glueing things, A4 works just fine. If we draw – A3 is bigger and offers more room for the kids’ drawings.
  • Fold the house. It is pretty easy and you can watch this video here, from Inner Child Fun to see how it is made. Emily is using origami paper but a regular A3 or A4 will work just fine!
  • Important: I normally do it myself, for all my students because even adults (like my trainees) might not be very good at origami-like activities and the house, although it is relatively simple, it does require some precision and if it is not applied, it is not going to look very well, unfortunately. Preschoolers will not be able to fold it and when I once tried with my primary school kids, I immediately began to regret it because some of them took the responsibility of the taks too seriously and were getting very nervous, predicting that they might not be skilled enough to manage the task. They did, in the end, with a lot of encouragement but I think it is just not worth it. We can still teach them how to do it, for them to practise and play at home but if you think of the lesson itself, the timing and the aims – just not worth it.
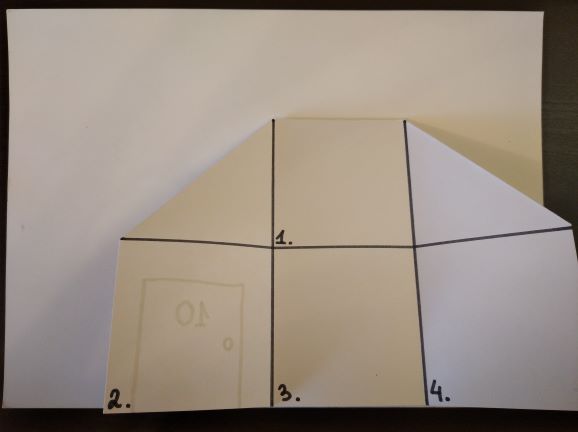
  • In my case, depending on the aim of the particular house (see below, there are plenty of options), I make one house myself, as a template, hand-drawn or using clip art images, and then I photocopy it to fold for each student. The advantage of it is that you can put in your house whatever you want. The basic design involves only the lines inside the house and the division into rooms, with numbers. That helps during the activities because you can ask your students ‘Go to room number 1’ and this way you make sure that everyone is on the ball and that they don’t glue pictures wherever they should not, for example, on the lines as that would get in the way of the house closing and opening.
  • Also, before the lesson, I glue the houses onto the garden page. This is especially useful in the case of the pre-primary students and in the case of those of my primary kids who have not done the activity before. Being glued on, the house is not as easy (although not impossible) to be dismantled and unfolded and it is just easier to manipulate in class.
  • I start with demonstrating my house, with all the theatre that I can muster. We look at it, we knock at the door, we open it and look inside. This can be done on the carpet or with the kids gathered around you so that everyone can see all the details.
  • I give out the houses and we start with drawing the door and writing the number (ask talking about them) and then drawing the windows (and talking about them). Make sure that all the students are more or less in the same place here. I normally only give out one colour per child (although they can ask for a different colour for the door and a different colour for the windows) or, with the older kids, with a pencil only. They will want their houses to be really pretty so erasing might be necessary and I really don’t want to waste time on colouring, this can be done at home.
  • The main task usually involves glueing things in different rooms, for example pets. For that, I prepare small pictures of all the pets, one set per child, on a tray (or whatever works as a tray) and a poster to put up, for everyone to see all the options. We start with room number 1 and I say, ‘Go to room number 1’. ‘I can see a cat (in my room number 1)’ after which I glue there the small picture of a cat. Then, the kids take turns and make similar sentences choosing their own animal from the set. They only receive a picture to glue after they make their sentences. When everyone is ready with room 1, we show our pictures, we say ‘I’m ready’ and move on to room number 2. And so on.
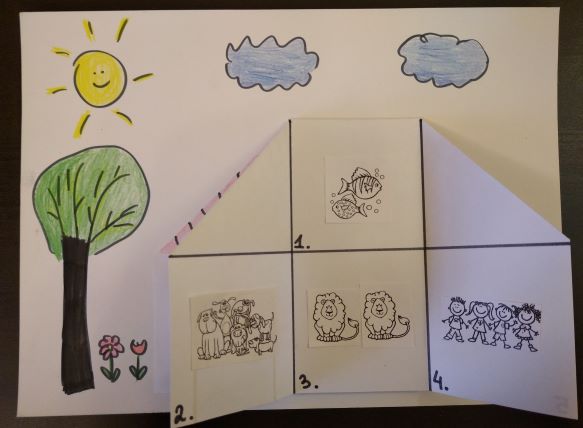
  • In the end, if there is time, we draw the sun, the tree and the flowers in the garden and we colour the house for homework. Also, if there are any leftover animals, these can be given out to glue at home (although, yes, that involves some more complex logistics, paperclips, small envelopes, not impossible though).
  • In the following lesson, we look at our houses and describe the rooms, the colours etc.
  • Variations: there are many of these. The house can be anything you want it to be. Here are some of my favourite ones:
  • Any set of vocabulary and almost any set of stucture, starting with ‘I can see’ and ‘I’ve got’, with some less obvious ones like the pictures of activities to practise Present Continous (‘I’m jumping in the kitchen’) or even words or word cards with the Past Tense forms which can be used later to tell stories for example ‘A strange Sunday’ (‘My brother slept in the garden’, ‘My dad danced in the kitchen’ etc)
  • Halloween or Christmas house – with the characters and symbols of each holiday
  • International House (accidental) – each room is a country represented by its flag and some symbole, these are drawn or glued, for older children
  • Rooms of the house – template is prepared with some furniture typical of each room, students can place pets in rooms (‘Where is the cat?’ ‘It is in the bedroom’) or family members (‘Where is mum?’ ‘She is in the living room’), add small objects to each room (‘Where is the lamp?’ ‘It is in the kitchen’, it is best to choose things that could be in any room such as lamps, pictures, chairs, rugs) and this version can be also further extented (‘Where is the lamp?’ ‘It is in the kitchen. It is on the cupboard’). The older kids can also draw these, making a regular or a silly house, too.
  • Secret Room – this was a follow-up activity in which I used the template which I drew with one empty box (empty, only because I could not, for the life of me, draw anything resembling a dining room). We did one of the activities mentioned above but the last room was to be drawn at home and it could be anything – a space room, a swimming pool, a library, an ocean zoom, a pirate room…
  • Where are you? – a template with the rooms, pre-prepared, each student gets a set of the leftover stickers or small cards, they put them somewhere in the house, in secret and afterwards they guess where their objects are. It can be used to practise simple prepositions and the rooms (‘Is it in the kitchen?’) or more complex ones (‘Is it in the living room?’ ‘Yes’ ‘Is it on the sofa / behind the chair?’etc)
  • Put your penguin in the living room on the sofa – a template with the rooms, pre-prepared and a set of stickers or small cards. The kids dictate to each other where to glue them, again, it can be used for simple or more complex prepositions, to get the kids ready for the Starters speaking exams. Later on, we compare our houses.

Why we love it

  • It is relatively easy to make and the kids love the fact that it is a real house.
  • It can be used with any vocabulary or structures (or almost)
  • It can be used with pre-schoolers and primary
  • It has to be prepared before the lesson for all the students but it is a good time investment
  • It is at the same time a focused task to be done in class and a homework task. The homework can involve only colouring and decorating it, talking about it in class but a writing task can easily be added for the older students (any template to be printed on the back of the garden, for example the focus can be such structures as there is, I can see, colours and furniture, my favourite room etc
  • It encourages the students to produce the langauge and it is easy to stage since you go from room to room
  • Lots of opportunities for adaptation, even if you repeat it with the same group. Every single time, it will be a different house.

Happy teaching!