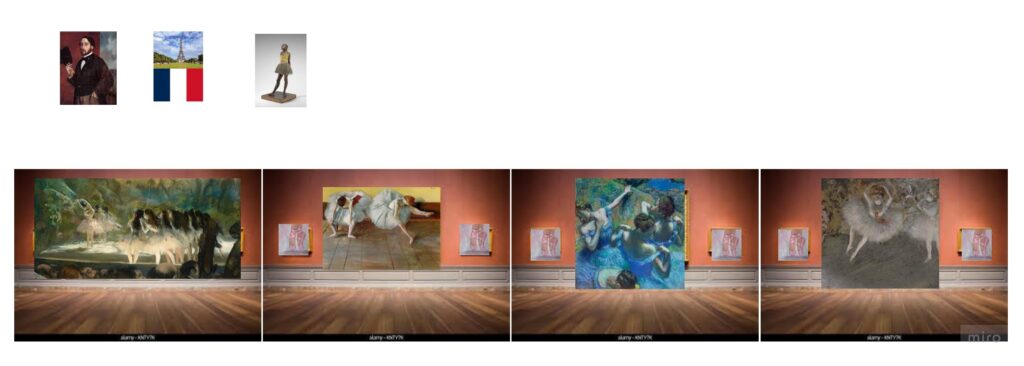
The artist of the day
Edgar Degas is a perfect example of a love – hate relationship with Art. I adore his ballerinas, the beauty caught in a frame, the purposeful randomness of different set-up that make it often look like the candid camera photos, caught in the act, almost random, immortalised forever. But, at the same time, Edgar is the artist that I would never want to meet in person or talk to because of his beliefs and views.
But, it so happened that we are still doing body parts with my kids and I have only girls in the group and I really wanted to make ballerinas and so, reluctantly though it was, I chose Degas to be the artist of the day.
As usual, we introduced him by name, by country and by his favourite thing (ballerinas!!!). We looked at the paintings and talking about the colours and the actions and then, we made our own ballerinas.
The language
- We are still practising expressing opinion using ‘I like’ and ‘I don’t like’, we include it in every lesson and at this point we are (almost) at the point when the kids talk spontaneously about the different things we are looking at
- We are still practising describing monsters using the sentences such as ‘my monster has got two eyes’ as well as ‘my monster is green and yellow’, ‘my monster is happy’ and ‘I like it / I don’t like it’. Apart from the regular revision and drilling, we used the monsters from one of the wordwall sets, such as this one here. I was simply over the moon to see that at this point (and it was our lesson #3 with this topic), the kids were just producing a sequence of two or three sentences. It needs to be mentioned that we still sing the song about the teddy bear and it helps us to produce, too as the key structure ‘my teddy bear has got one nose’ can be easily transformed into a sentence about the monsters or ballerinas and that definitely helped, too.
The craft
- The final version of the craft is a combination of two ballerinas that I have found online, one of them from Kidspot, the other from Creative Child. Since my students are still very young and our lessons are online, I needed something that we would all be able to do without my direct assitance
- As usual, I sent the information to parents with the list of all the necessary items: two sheets of white paper, safety scissors, glue and markers or crayons.
- In class, we checked that everyone had all the materials (‘Have you got the paper? Show me, please’ etc).
- I showed the students what we are going to need: a rectangle (for the body), a circle (for the head) and a square (for the skirt).
- We prepared our shapes together: I showed the students how to cut off the rectangle (the shorter side of an A4 piece of paper, approximately 4 cm wide) and I waited for them to cut off theirs. I cut out a circle for the head and I cut of a square, too. We put the scissors away.
- I did not give the students (or the parents) any details regarding the dimensions of all the shapes because, in a way, it does not really matter and we could manage with the wider or thinner rectangles or the smaller squares or circles. Whatever was too big, got trimmed later on. However, I knew that my girls would be able to handle that. With some of my other students or with much younger children, I would consider asking parents to cut out the shapes for us, before the lesson.
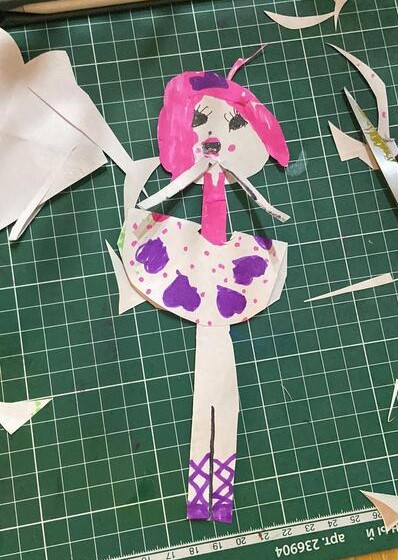
- We proceeded to making the ballerina and here are the exact instructions. As usual, I was making my own doll and demonstrating, waiting for all the girls to catch up on with us.
- Step 1: take the rectangle, fold it into half, lengthways (‘It’s a book’, said one of my kids, and a book it was, although it had a slightly weird size) and we spread some glue inside of it, to glue both sides together, in order to make it thicker.
- Step 2: draw the lines at the bottom and the top of of the rectangle, to make the cutting a bit easier and to ensure that the kids don’t cut it into halves.
- Step 3: cut along the line at the bottom of the rectangle, say ‘My ballerina has got two legs’
- Step 4: cut along the line at the top of the rectangle, fold them to the sides, say ‘My ballerina has got two arms’
- Step 5: glue the circle on, draw the eyes, the nose, the hair, we were drawing and talking about it ‘My ballerina has got…’
- Step 6: fold the square into a triangle and cut the patterns, in a way in which we make paper snowflakes. Decorate the skirt with markers.
- Step 7: cut off the top of the square/triangle in order to be able to put the skirt on. Put it on the doll and glue it at the top (and at the back) in order to make sure that it does not fall off.
- Step 8: add all the other details: draw the hands, shoes, top of the dress etc.
- Initially, I had the idea of practising some Present Continous with our ballerinas but in this particular lesson we only managed to start using it and the kids were not ready. Instead, we introduced them and sang the goodbye song together.
Some final notes
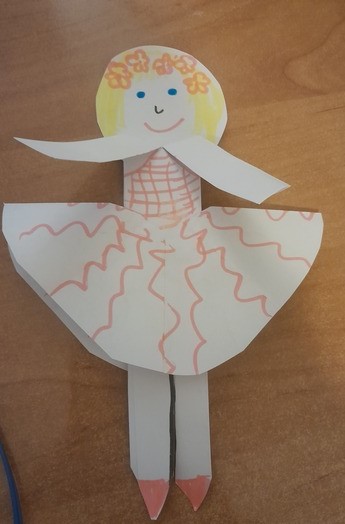
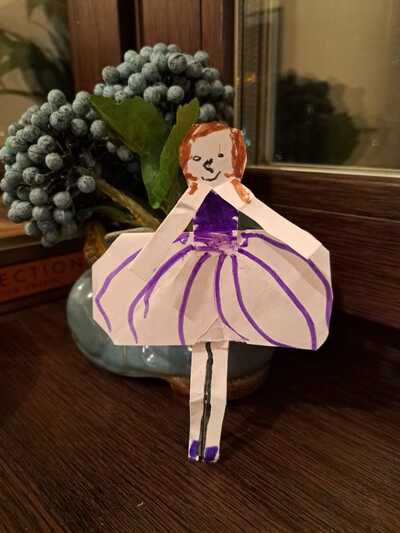
- As I have mentioned before, the ballerina does not require any careful or detailed actions and even a messy cutting or measuring do not get in the way of finishing the task, if the kids are old enough. The most challenging part was the skirt as it involves preparing the snowflake and cutting off the tip in order to put the skirt on but once the kids were shown the final product (a circle with a slit), they were able to find their own solutions. Some of the skirts were not circles, some of them were not the most regular squares, some of them had not the prettiest slits but they could all be put on and, when, decorated, they all just look beautiful.
- With the younger students, I would ask the parents to prepare the shapes and to cut the slit for the skirt, too.
- I have also seen ballerinas that are even easier to make as the snowflake skirt could just be replaced with tissue paper or strips of paper glued on, or, if you have them, cupcake paper liners folded in half. This would also make this craft easier to make.
- I loved the fact that when I first introduced my ballerina, the kids were slightly taken aback (and, fair enough, it is not the most graceful thing in the world, my ballerina) but as we proceeded through the craft, they grew fonder and fonder of their creations. They came up with many ideas of personalising them and of adding more detail ie a separate piece of paper for the hair. Not to mention that their dolls are simply amazing.
- Another beautiful that happend during this lesson was the fact that the girls remembered the acrobats that we did in a Chagal and Circus lesson in December 2021. An eternity ago and yet, they did remember!

Happy teaching!