Epic Fail! or We make mistakes to learn #1

Welcome to the new series on the blog.

It started with something Michael said. He is a fellow teacher and he was telling me a story of how Teacher X went to peer observe an experienced colleague, Teacher Z and how the lesson was, well, not very good, bad, horrible, ‘a disaster’…It was not a very pleasant experience for Teacher Z, of course, but a learning opportunity for Teacher X, nonetheless (and for Teacher Z, too, actually). ‘This is what I want to hear, that even with the best intentions, it can all go ‘tits up’ but nobody is prepared to say it‘.

I got inspired. I am ready to share. I don’t mind. We repeat that to our students, constantly, that mistakes are noble and that we can learn from them. If our students can, so can we, the teachers. The same principles apply.

By the way, the Epic Fail Award is actually a real concept. It is a real award given out to employees at Hill Holliday agency, since, as Robert F. Kennedy once said ‘Only those who dare to fail greatly, can ever achieve greatly’ (apparently, have a look at the whole article here)

With that in mine off we go, to the first of my personal disasters or ‘When things did not go to plan‘.

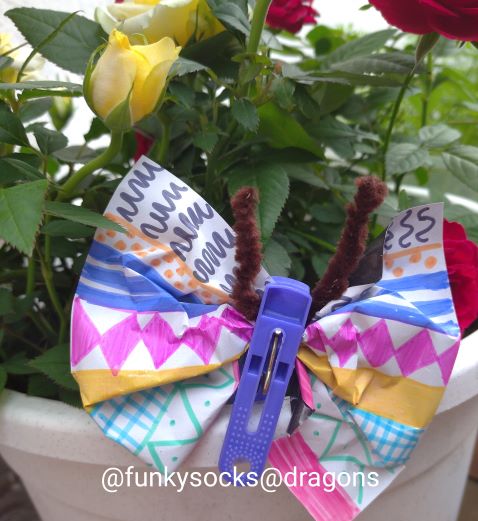
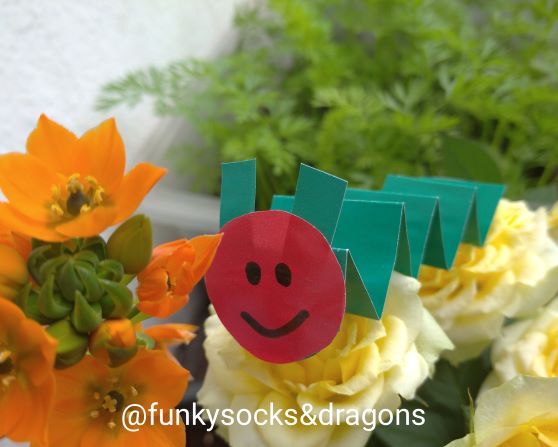
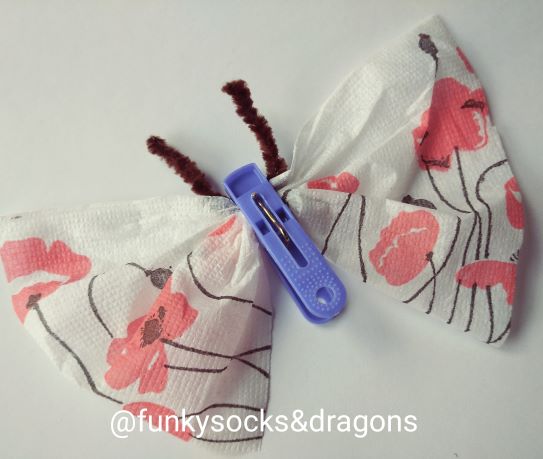
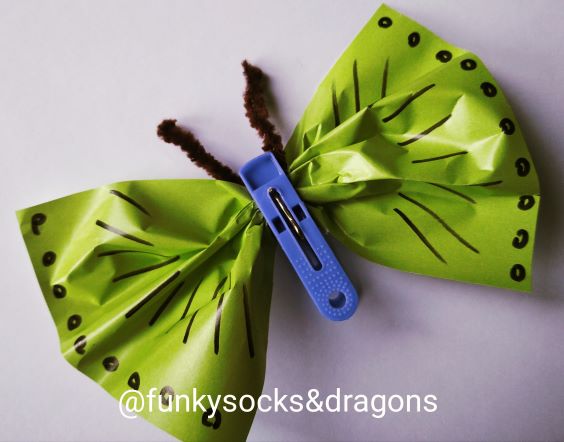
One: The (stupid) Christmas tree craft

Here it is, look!

Did you go ‘Awn’? I bet you did. I did when I saw it and so did my kids when I showed it to them, during the pre-Xmas lesson. It did take place three years ago, I think and back then I was already an experienced teacher etc.

I did a great job, preparing for the task. I did prepare all the materials; I did make the tree at home. I did think of the staging. I did plan to teach the kids the verbs we needed to make it (fold, press, pause). I did think of how old they were and I knew them, they had been my students for over two years at the time so I could imagine what they were or were not able to do. We had done plenty of craft activities, we had worked with the pipe cleaners in a few different arrangements. I did pre-cut the triangles and tied pipe cleaners (three of them joined would be necessary to cover one tree). I punched the holes at the top of each tree. I wrote the main steps.

You would have thought the conditions were perfect. Yes, yes, they were. And yet it was the biggest craft disaster known to mankind. In my kingdom.

It turned out that even with all of these preparations and the previous experience and knowledge, the task turned out to be too tricky for my students. They were involved, yes, they loved the idea but we soon discovered that if you do not press the pipe cleaner real hard, applying all the strength (that the 5 y.o. did not quite have), it starts sliding, coming off and not looking at all as this ‘Awn’ model that I had already shown and that everyone had already managed to fall in love with and to start dreaming about of taking home.

The point of no return, in other words. Stopping, pausing or aborting the task was completely out of the question at that point. We went on, with me helping to complete eight Christmas trees simultaneously, perhaps singing the song to keep everyone occupied (though, really, I cannot be sure) with me hating absolutely every second of it and swearing that this very craft will never be seen again in any of my lessons. This or any craft, actually.

Everyone survived. Apart from all the leftover trees. I binned them all. With a lot of vidictive satisfaction. The one you can see in the photograph was recreated for teacher training purposes.

Today, I think that the craft is actually child-friendly, provided that you don’t go too minimalistic and that you keep the real Christmas tree-shape. Or that you at least cut the edges of the simple triangle in a few places, on both sides, to ensure that the pipe cleaner has somewhere to get attached and to stay in one place and still look ‘Awn’.

But it is also true that with this particular craft, I did allow myself to fall far the ‘awn’ effect and its strictly decorative value. Linguistically, there would be very little for us to do with it, apart from a few verbs and a few functional language phrases that we use and practise with any craft activity. Maybe, just maybe, I should not have fallen for it and, as a language teacher, first and foremost, I should have prioritised the linguistic aim.

Well, lesson learnt, that’s for sure!

P.S. It was unpleasant but I have not given up on craft! Experiments will sometimes lead to great achievements and sometimes to disasters but the best thing is – we learn, one way or another!

P.S.S. There is more to come in this chapter! I will see you soon with more epic fails stories. If you have some that you would like to share, please, do in the comments below!

Happy teaching!

Crumbs #6 The easiest craft in the world aka Don’t you just love a circle?

Level 1 – 3 Pre-primary: In the garden

Instructions

Get the coloured paper ready. The basic photocopying paper will do but for a more sensory experience paper with different thickness, texture or surface.

Cut out a pile of colourful circles, about 3 cm in diameter but if the kids are really small it is better to make them a bit bigger, they will be easier to handle.

Prepare A4 sheets of paper on which you are going to stick things, glue sticks and markers that you can use to draw on your paper.

Choose a circle, glue it onto the paper, decorate it so that it resembles what you want it to resemble. Use simple instructions while demonstrating (‘Glue’ ‘Turn over’ ‘Stick’ ‘Draw). Give out the paper, the glue sticks and the first circle. Monitor.

Proceed with the following circles.

With the older students, it is fun to let the children decide what their circles are. And then learn the new words – whatever they draw.

Don’t forget to talk about your pictures, count all the blue circles and all the butterflies))

Level 1 Pre-Primary : Pets

Why we love it

  • It is super easy to prepare and to complete.
  • There is no set duration of the task. It can be kept very simple and short, limited to only three items or extended to six or seven, depending on the age of the students, level, motor skills development.
  • It can be easily made more or less challenging by grading the level of complexity of the drawings.
  • It can be adapted to many different topics. I have used it with the topic of shapes (focus: circle), spring (accompanied by the KidsTV123 song ‘In the garden’ https://www.youtube.com/watch?v=RCClYcU97PA) and in the beginning of the course with level 1 to practise the first colours.
  • It helps to develop cognitive skills (perception: noticing the shapes in the world around us, transforming the shapes into things we know etc)
  • If there is no time to cut out all the circles (or if the teacher has not done many craft activities and wants to start with something not as complicated), a template with circles can be used instead. In this case, the kids will only draw and colour.
Level 1: Pets, no-glue template
Assorted circle-related randomness
Assorted circle-related randomness part 2
Level 1 Pre-primary: Colours (lesson 3 of the course)
Christmas edition (the puppy is here because this is my student’s favourite thing:-)

Happy teaching!

The W.O.R.L.D. or What is an ideal craft activity for the EFL classroom?

A post for those who have been contemplating using craft activities in their pre-primary lessons, especially for those who have not started yet or those who have tried but have not really been quite successful with it.

First of all, let’s get started from the facts.

Fact number 1: kids love craft and no wonder they do – you get to creat; you produce something real and you can take it home. Even if your creation has a limited durability and appeal and after some time (a day in the playroom and a week on the fridge door) it gets destroyed and lands in the bin or it gets folded carefully and is stored in the ‘Ania/kindergarten’ box.

Fact number 2: teachers are a little bit more cautious with expressing their love for the craft activities. Some of them do, of course, but there are still quite a few who don’t really appreciate all the hurdles you are required to jump over in order to get to the finish line called ‘A great craft EFL lesson’. Because it can get messy, because it requires more preparation than other acitivities and because it needs to be planned properly to ensure that you don’t spend the lesson colouring and cutting and NOT using the target langauge.

Perhaps that is also the reason why even the most recent coursebooks for primary and pre-primary (which shall not be named here) do not really seem to promote craft activities as much as they should in my humble and very subjective opinion. Alas.

Why craft?

There are many great blog posts and articles on the advantages of using craft, I am not going to be attempting to reinvent the wheel here. Here are those that I have found useful. Have a look yourself.

  1. Kids and Arts and Crafts https://www.teachingenglish.org.uk/article/kids-arts-crafts
  2. Arts and Crafts with Young Learners https://www.teachingenglish.org.uk/article/arts-crafts-young-learners
  3. Using Arts and Crafts to teaching languages to young children https://www.teatimemonkeys.com/using-arts-and-crafts-to-teach-languages-to-young-children/
  4. Adding Language to Crafts https://www.englishclub.com/efl/tefl-articles/adding-language-to-crafts/
  5. R. Bastianoni, The Linguistic Benefits of Using Crafts in TEYL http://www.teyl.org/article16.html

Planning a lesson with a craft activity

If you are looking for a manual how to set up a craft activity and what to think about while planning it, then you should definitely start from reading the introduction to the craft chapter in Carol Read’s 500 Activities for the Primary Classroom where she outlines the principles of the MAD FOX (which, by the way can be used as a framework for all of the VYL and YL activities). Strongly recommended!

Where to find a craft activity?

Well, this is the best news ever: nowadays, finding out about available craft activities is really a piece of cake. There are plenty of websites, blogs, Instagram accounts written by and for:

  • The teachers of English as a foreign language
  • The parents of young children
  • The teachers of kindergarten

There are also multiple groups on facebook, vkontatke (or whatever is your local equivalent), pintrest and just the good old google or Yandex search enginge.

How to choose a craft activity for the EFL lesson?

Well, this is where the W.O.R.L.D. might come in handy. This is an acronym that I made up for myself and for one of the workshops that I was giving a few years ago. Also, because I really wanted to have an acronym:-)

Here it is!

W is for ‘WHY?

Probably the most important question a teacher can ask while planning a lesson with a craft activity: why am I even doing it? It is great to include craft only for the sake of ‘the variety in the classroom’, but I strongly believe that a craft activity must have a follow-up, that it cannot be an end in itself. After all, we are language teachers and not art teachers.

An ideal craft activity is only the preparation for the proper language exercise, it is our way of getting the kids interested in what we are doing and using the finished product to encourage them to engage in a language activity. If this element is missing, there should be a really good reason for including it in your lesson. Is there?

O is for ‘On their own

No matter how amazing an activity looks in the photograph or the video, no matter how beautiful and colourful it is, no matter how strong its ‘wow’ effect might be, there is no point of bringing it into the EFL classroom if your students cannot complete it on their own.

Perhaps, the assembling process is too long and too complex and the materials too small and too flimsy and your students will not be able to complete it all by themselves. If it is a 1-1 lesson, sure, you can help but let’s take ‘the worst case’ scenario, a lesson with a group of 8 students, each of whom gets stuck at precisely the same moment in the activity and the teacher having to help every single one of the 8 students at 17:25:04…No. Not worth it.

R is for ‘Recycle

It will not always be possible but in order to justify the time and work invested in preparing and carrying out a craft activity, it should be possible to recycle ‘the product’ in one of the following ways:

  • The same product is used throughout the course to recycle the particular vocabulary set, story or functional language phrases
  • The same product is used throughout the course with different vocabulary sets, for example the boardgame the children made is used to practise vegetables, then fruit, then transport
  • The same type of product can be made again, with different vocabulary or structures, for example mini-flashcards booklets, flapbooks, window decorations. If the format of the activity is used later on in the year, setting it up and executing it will be much easier because both the teacher and the students will be familiar with it.

L for ‘Language

First and foremost, we are the teachers of English and our main aim and priority should be the development of the linguistic skills in our students, regardless of how old there are. In the same vein, the main advantage of a craft activity is how it contributes to generating language.

Level A: the exposure. This is of course, always there, teachers speak, students listen. No matter what they do, they are also develop their listening skills and the ability to focus. So, technically, any craft activity will score high in that area as the teacher gives instructions and students follow them. What’s more, it is instantly obvious – the kids are leaving the room with a card, a puppet or a mask hence they have understoon the instructions. Good but not good enough.

Level B: the functional language. All craft activities have their stages, the students are encouraged to ask for the coloured pencils, glue, scissors, react to the teacher’s praise, sometimes praise their friends’ work and this is how some functional language comes into the picture and students are given an opportunity to practise it in context. Better but not good enough still.

Level C: the production. In an ideal craft activity, the making of is only the first step towards the follow-up stage in which the finished product will encourage them and will give them a chance to speak English.

D is for ‘Duration

Realistically speaking, how much time of the lesson time is the activity going to take, from the moment it is presented to the moment the last scraps of paper end up in the bin and the crayons, scissors and glue back in the box where they live? 5 mintes? 10 minutes? 15? 20? More than 20?

I am not going to try to discourage anyone from those longer craft activities because they need to be seen in perspective, together with all the other pieces of the puzzle, but it needs to be remembered that the longer the activity lasts, the higher the chances that kids will lose interest, that they will find alternative things to do, start chatting in their L1, get bored and tired and that, basically, it will be increasingly difficult to manage them and to get something out of the activity.

The potential time contraints apply to teachers’ too, actually. How much time and effort does the teacher want to spend on preparing the activity? Will they inolve the whole family into pre-cutting and pre-folding the night before? Will it be really worth it?

What is the ratio between the before-the-lesson preparation time, the activity-in-class time and the follow-up production stage time?

For that reason

  • Cutting out a bunch of grapes that takes twenty minutes to complete: no
  • Making a complex puppet that takes half of your lesson so that you could use to say ‘hello, my name is Mitya’: no
  • A set of tiny little bits that have to be carefully glued onto the piece of paper: no
  • A picture to colour: no (not when it is just that ‘a picture to colour’)
  • Goggly eyes: no
  • Food craft without consulting parents first: no
  • Draw your…: no
  • Glittter: no (but that’s just me) and any ultra fancy materials that teachers would have to purchase themselves in specialised shops: also no

Anything else you would like to add? Anything that you don’t agree with? Please, let me know!

And don’t forget to pop in here to read about one ideal (and tried and tested) craft activity for the EFL preschoolers.

About a caterpillar, sometimes hungry, sometimes not. An ideal EFL craft activity?

Despite the fact that there are piles and piles of amazingly beautiful craft ideas for the caterpillar – butterfly lessons, such as https://www.k4craft.com/paper-caterpillar-craft-for-kids/, https://www.firstpalette.com/craft/cupcake-liner-butterflies.html or https://www.craftymorning.com/cupcake-liner-clothespin-butterfly-craft/, I have decided to design my own in order to comply with W.O.R.L.D principles aka my own acronym for craft activities (you can find it here)

W is for ‘Why?’

With this particular craft, the making of is only the introductory stage, namely the activity in which we are use the final product to generate even more language.

O is ‘On their own?’

I wanted something that my little students will be able to work on and complete on their own, with as little of my involvement as possible. Partially it is connected to the fact that we are developing learner autonomy, also in the EFL classroom, partially due to the fact that with six or eight children in the group, a craft activity can quickly turn into a nightmare experience if the teacher is required to help make eight caterpillars at the same time. The caterpillar still looks very caterpillary and sweet even if the folds are not very neat or even. The butterfly can be squeezed into the peg by even very young hands without much damage to its beauty.


R for ‘Recycle’

Most caterpillars and butterflies will most likely be taken home because it is not always easy to convince the little kids to leave their precious creations behind, in the classroom, at night, all by themselves, but as long as there is at least one caterpillar and one butterfly left (teacher’s), they can be invited to participate in all the class activities over and over again, with different topics, vocabulary and structures. Not all of us have the luxury of having a teacher assistant in the classroom but the caterpillar and the butterfly can play the part – model the activity, get involved in classroom management, give instructions and so on.

L is for ‘Language

No matter how much fun we have making something in class, first and foremost, a craft activity is an opportunity to use the target language, either while producing something or while playing with it.

This particular buttefly and this particular caterpillar were used in different lessons. We used it to retell the story of the most renown hungry caterillar from Eric Carle’s story, we used it to talk about a lesser known caterpillar sleeping through different weather days only to wake up as a butterfly (Playway to English 1 by CUP, Activity Book, page 37) as well as six caterpillars wreaking havoc in Mr Smith’s garden (Playway to English 3 by CUP, Student’s Book, page 54 – 55). The same duo accompanied me in a few spring lessons, accompanied by the great song from Kids TV 123 ‘In the garden‘ while we were practising the structure ‘I can see’ as well as the Science lessons on the butterfly life cycle.

D is for DURATION

I have used the same craft activity with my three year-olds and with my six year-olds and with everyone in-between, with only slight adaptations. This particular caterpillar and this particular butterfly are expected to take about 7 minutes of the lesson time and are made on two separate occasions in order to facilitate staging and classroom management.

The tissue paper version is more 3-year-old friendly and it does not involve any folding or careful handling. The older kids can be prepare a more intricate butterfly, by colouring a rectangle of regular white or colourful photocopier paper, coloured paper or tissue and decorating them with leftover stickers. As for the caterpillars, they can be pre-folded for the younger children, the teacher can also draw the lines where the folds should be and glue the heads on before the lesson.

Step-by-step staging

Caterpillar

  • Show the final product
  • Demonstrate how to fold it, use simple instructions (‘fold’, ‘press’)
  • Hand out the strips of paper
  • Fold the caterpillar, making another one together with the kids, step by step, pause if necessary, to let the kids catch up
  • Glue on the head
  • Draw the eyes and a smile

Butterfly

  • Show the final product
  • Give out the paper you are going to use for the wings, decorate it (markers, crayons, leftover stickers)
  • Make another one together with the kids
  • Take a peg, open it, show the kids how you squeeze the wings inside (with the wings made of paper, it will be necessary to demonstrate how to gently gather the wings in the middle and how to crumple the paper), close the peg.
  • Give out the pieces of pipe cleaners
  • Bend them in half
  • Open the peg, put the antennas in

Happy teaching!

Playdough in the classroom. 5 ideas.

Little people get bored quickly and when they do, they start for looking alternative ways of getting occupied. The thing is, teachers get bored, too and this is when they start looking for alternative ways of getting entertained. Today, five ideas with plasticine. Very much adaptable.

Idea number 1: Fruit salad.

Pick up a paper of plastic plate (paper plates are better because it is easier to label them with kids’ names. If you are using plastic plates, it is necessary to use permanent markers) and show the kids.

Pick up a piece of yellow plasticine, knead it and roll it. Shape it up as a banana. Show it to kids, ask ‘What’s this?’, elicit the answer. Ask all the kids to repeat ‘It’s a banana’. Put it on the plate.

Wait for the kids to ask ‘Yellow, please’, take a piece for yourself, repeat the whole procedure from the very beginning. Knead and roll together, shape it as a banana.

Continue with other fruit. You can include as many as you have time for.

If the kids are young, it might be easier to make 2D fruit, rather than 3D. In that case, put the banana on the plate and press it.

Idea number 2: Rainbow

Get the plasticine ready. Since you are going to use the specific seven colours and only these, you can get all the pieces ready, one of each colour per student. It will make the lesson go more smoothly.

It might be a good idea to prepare a handout for each student, a very simple one – a piece of cardboard with the smallest arch, in pencil. The rainbow is quite easy but, still, some students might struggle. Once the first one is ready, all the other ones will be built on it and it will be easy.

Show the first colour, ask the kids to name it. Pick up a piece, show how to roll it with the palm of your hand and when it is ready, pick it up to show everyone and then put it on the arch on the handout and press so that it sticks. Pick it up to show all the students.

Give out the pieces of paper and pieces of the first colour. Take one for yourself, too. Roll the first piece together and repeat all the steps together.

Continue with all the colours until the rainbows are ready. Don’t forget to sing the rainbow song when you finish.

Idea number 3: I have a pet!

This activity is an example of ‘colouring with plasticine’. I used it in a lesson on pets but of course it can be almost any topic.

Prepare a set of pictures to colour (black and white clip art😊) and make sure you choose them carefully. They have to be small enough (or else children will need a long time to complete the task) but at the same time not too detailed (or they will be extremely challenging to do). Make a few copies of each so that the children have a choice. You can also let the students decide before the lesson and prepare a copy of their chosen pet.

Pick up a piece of plasticine and practise the key verbs for the lesson (knead, press, smear). Ideally, the kids would also practise on a piece of paper before they start colouring their pet.

Pick up your pet. Choose a piece of plasticine, knead a bit, press to paper and smear it, covering the chosen area. Show the kids. Pick up another piece and go on with colouring your picture.

The kids choose their pet and ask you for the colours they need. This is the main communicative aim (Can I have blue, please? Here you are. Thank you).

Kids show their finished pet and introduce them to the group (This is my pet. It is a cat. His/her name is Misha).

This particular activity was a part of the pets unit and in this particular lesson, we watch Peppa episode so we finished with me giving out medals for the best cat, the best fish, the best lion etc. The kids glued them to their posters.

Idea number 4: I can write!

When students are beginning to learn about the letters and beginning to write, it is a good idea to let them experiment with many different alternative ways of writing and different materials. Plasticine is one of them and even the younger students can participate and enjoy ‘writing’ with it.

Decide which letter you are going to write. Write a big one on the board and practise writing the letter in the air and on the table. It might be a good idea to start with the easier letters such as c, o, b, i.

Get the kids’ attention, pick up a piece of plasticine and say ‘Let’s roll’ (sometimes we joke that we are making spaghetti) and show the kids how to do it with the palm of your hand. When the piece is ready, form the letter on the paper and press. Show the kids the final product.

Let the kids choose the colour they want to work with. Repeat the stages (Let’s roll, Let’s make a letter, Press).

The advantage of this activity is that you can make one, three or ten letters during the same letter, depending on how fast the children are able to work.

Idea number 5: How many?

Prepare the handout (a piece of cardboard, divided into sections, each section with a number, 1 – 5 or 1 – 10, depending on the topic and the level).

Show one copy to your students and read all the numbers out loud.

Choose one of the numbers, choose one of the colours. Tear off small pieces of plasticine and attach them, one by one to the handout, in the section with the number, counting out loud.

Give out the handouts, one per child, ask them to find the number and point at it. Give out the pieces of the colour you have used. Monitor and count out loud with everyone as kids are tearing off small pieces and attaching them to the handout in the appropriate section. Collect all the remaining plasticine.

If possible, ask one of the students to choose the number and the colour. Make sure everyone has a piece of plasticine, get the kids ready. Start to tear off and count out loudly and attach the pieces of plasticine to the handout.

Continue with all the numbers.

And all the useful tips…

  • Make sure that you are using plasticine of a good quality.  It doesn’t have to be the most expensive thing available on the market but also not the cheapest one as this tends to flake and stick to hands and tables and that’s very frustrating for the little ones.
  • I am not a fan of using all the fancy colours like golden, silver and all the fluorescent greens and yellows. The kids are drawn to them but there is something in the colouring affects that quality of the clay. But it is up to you.
  • Make sure you get the plasticine ready before you give it out. Even some of the older kids might struggle with kneading it and softening it before it is pliable enough to play with. Sometimes you might have to kneed it yourself before the lesson but most of the time it is enough to leave it for a moment in the sun or near the radiator.
  • Give out small (A5) pieces of cardboard to roll the plasticine on but the younger kids can roll it directly on the table. This way they won’t have to deal with holding the piece of cardboard and the table is big and stable. All the leftovers that get stuck to the table can be picked up with bigger pieces of plasticine.
  • It might be easier to work on cardboard, rather then on regular paper. It is more durable and easier to ‘draw’ on. It holds plasticine better, too.
  • Get a packet of wet tissues and keep it in the classroom. Making a train and going to the bathroom to wash the hands at the end of the lesson is always a good idea but some kids might not like the feeling and will be impatient to clean their hands as soon as possible. Wet tissues will come in very handy here!
  • As with all the craft activities – do it at home first, before you take it to the classroom.

P.S. A box of playdough costs about a dollar…