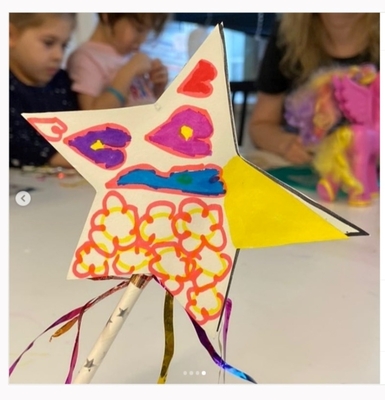
‘Anka, what about the pirates?’ was the thing I heard on Tuesday. The sentence was uttered in the middle of the lesson, in absolutely no relation to anything that happened, apart from the fact that the theme of the unit is the sailors, the mysteries of the sea, The Mary Celeste and I may have, at one point, mentioned pirates in passing. They did notice (of course), they did remember (naturally) and they waited for the best moment to use it against me. Obviously.
The funniest thing about it was the tone of voice that my kids used in that kind of situations and it is probably one of the things that I should add to the list of all the outcomes and consequences of working with a group for a prolonged period of time (you can find the post here). This tone of voice is a wonderful mix of a gentle scorn, a genuine inquiry, an honest plead and a teeny tiny layer of sarcasm. My kids are so good at it that they can squeeze it all in one word. Sometimes they just say ‘Anka‘ and it says it all…
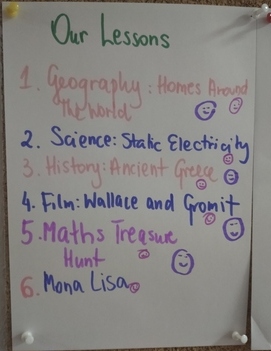
Anyway, we did the Pirate Lesson, all the details and materials below. Enjoy!
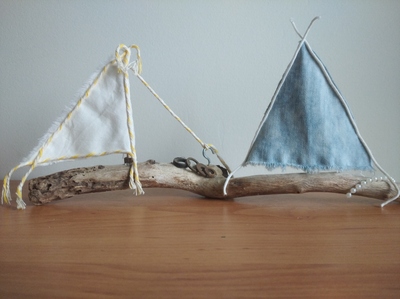
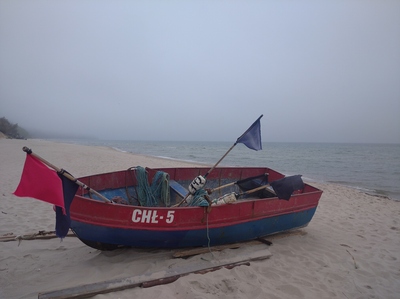
The lovely boats I found in my hotel. A potential idea for a craft activity…
Ingredients
Limited: we are online
Coursebook material: Superminds 5, CUP, Puchta and Gerngross, unit 9
The level: A2 (we are finishing), the group: 7 kids, the age: 7 – 10 y.o.
A pirate’s flag. Anka’s version
Procedures
First of all, the kids have to remind you that there was a time when you might have mentioned that a pirate lesson might, potentially, happen at one point. After which you forgot (after all, it is May, the end of the school year) and after which they remind you and you are crazy enough to make a huge effort to make time for the planning of such a lesson). But it is worth it)
There were no preparations for the students, this lesson came as a bit of a surprise. I was considering to ask the parents to let the kids dress up for that but then decided not to. I thought that we would make things up as we move on. We did.
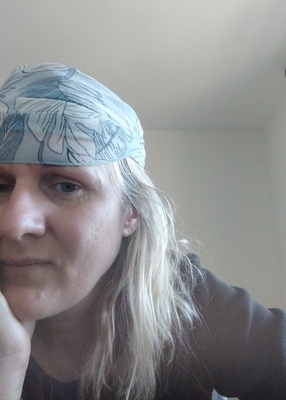
I prepared my own headscarf, my ‘parrot’ and, again, I was considering preparing an eye patch but since I was not at home but in the middle of the forest and the craft resources and materials were scarce, I gave up on it, too)
I prepared the powerpoint (which I hope you can access) but this is something that I create for every lesson anyway.
A pirate’s parrot. Anka’s version
Why we liked it
From the teacher’s perspective, it was a rather successful merge of a thematic lesson and the coursebook material and I am quite happy with how it went. We managed to include lots of what we were supposed to cover anyway such as the Present Perfect practice and the skills development but it turned out that it was possible to present it to the kids within a theme that was interesting.
The kids liked it because it was something different to a regular lesson, we did a lot of pirate things (the name, the flag, the treasure hunt and the stories), we could play a bit and we really did have fun.
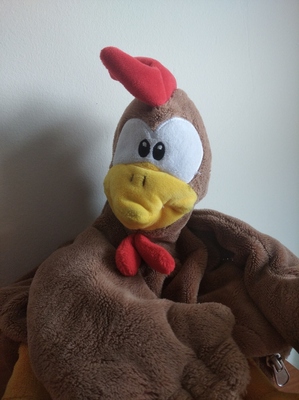
I came dressed up, with a headscarf on and I introduced my parrot, Angelina (who in her real life is a hen and has been my class puppet for a few years now but who got to perform the role of the pirate’s parrot). True, every time I said ‘my parrot’, my kids would correct me (‘Anka, it’s a hen’) but by the end of the lesson one of my other kids introduced his real hamster (and the love of his life at this point) as the parrot and yet another one gave this role to his rucksack (which should also be written like that: Rucksack, since he featured in our stories in the past with his own adventures). One of my girls put on a scarf, too and one of the boys switched off the camera in the middle of the lesson, to come back a few minutes later, this time wearing his mum’s scarf on his head and a paper eye-patch on a string…One of my students’ younger sister joined us half-way through the lesson and asked for her own pirate name, too.
The kids were really active during the role-play between the captain and the cabin boy. They even did remember to play with the intonation with the ‘But what?’ question from the captain. I was moving in-between the breakout rooms and laughing, basically. One of my students could not open the wordwall games so we agreed that he could come up with his own ideas (and these were brilliant) and some other kids started to add their own questions, leaving the wordwall behind.
We used the Weird Echo game again, this was the second time and it went very well. You can find its description in a separate post.
I wish we had more time for the storytelling of how we met the sea creatures. If I had a chance to teach this lesson again, I would have planned it as a homework task or we would have continued in the following lesson. We might still do it, actually. There are still a few lessons left until the end of the academic year. If we do, you can definitely expect the follow-up post here!
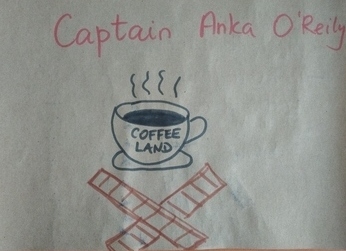
I personally loved my pirate name, Captain Anka O’Reily and I think the kids liked theirs, too. Whenever I made a mistake of addressing the students (or myself) using their ‘regular’ names, I was kindly reminded that that’s not how we do it. We also had a giggle because the O’Reily family was well-represented on our ship, since two of my students also celebrate their birthdays in November. The pirates on the board of our Superminds 5 ship were as follows: Captain Anka O’Reily, Captain Alejandro O’Malley, Bubbles Dasha O’Reily, Skipper Tonya O’Reilly, Hamster Jack Sparrow, Charming Timour Bailey, Skipper Eva Bailey and, for a part of the lesson, Ship-mate Ulya Jones.
I was really happy when I found the bamboozle game. I think it is a perfect example how a relatively simple game can be adapted and used in order to give the lesson this special flavour that we want. The students did not really learn any new words as those that popped up in the game were already familiar to them and, I suppose, you could say that we got a great opportunity to practice the long /ɑːr/ sound but that was not quite my main aim here. For a few minutes there we were loud and giggly but we were talking like pirates and it was a perfect finishing touch to this lesson.
The one disadvantage? Well, I am thinking of the coming-up lesson on Tuesday and the first thought that appears in my head is: ‘What, a normal lesson? BOOOORING’ so, I am afraid, I will have to come up with something…
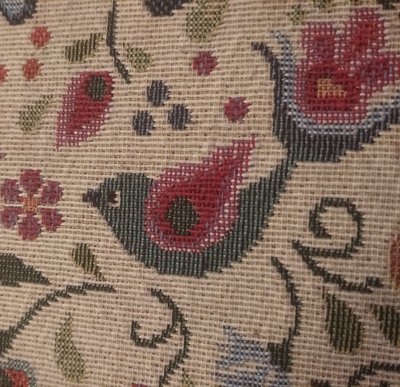
A beautiful bird from the folk embroidery patterns, traditional in the area of Kashuby (the north of Poland)
Ingredients
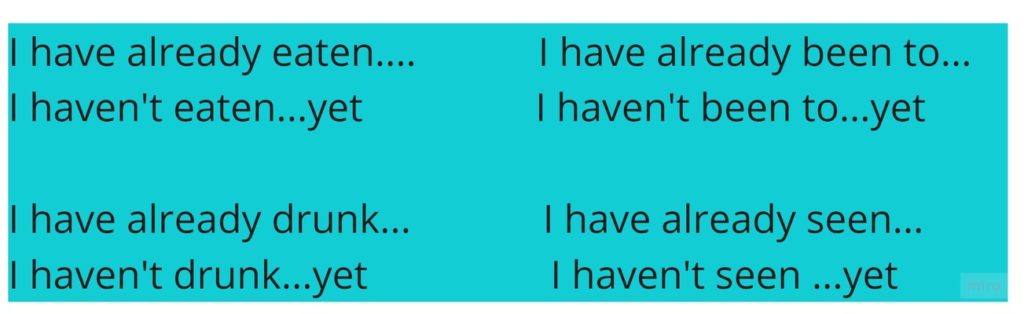
A grammar structure, for us it was the Present Perfect sentences with yet and answers with already and yet. If you are interested in the lessons that it was used, you can find out more here. I will present it based on this particular structure, but, naturally, the game can be used with a variety of structures, too.
A group of kids
The whiteboard where to present the pattern and the options, the online whiteboard or just a slide in your presentation.
Procedure
Introduce the structure in anyway you find appropriate. This time I actually used the coursebook materials (Superminds 5, CUP, Puchta and Gerngross) and the idea of the uncle sailor who has visited some countries and who has not visited some other ones, not yet anyway. And it must have been this activity that inspired me to come up with the game)
There is a set of pictures of all the flags in the coursebook and we used these flags in a simple controlled, drill-like activity: the teacher calls out the name of one of the countries, the kids (and the teacher) react by producing true sentences about themselves, based on whether they have visited these countries or not yet. The slide for this activity looked more or less like that:
After a few rounds, the kids take over and call out the countries from the list. After a few more rounds, they are allowed to call out the countries not included in the coursebook as well as any other places, countries, cities and famous places ie Germany, Dubai, Saint Petersburg, the Tretyakov Gallery etc.
In the following lesson, we went one step further. And then more. After we checked the homework, I showed another slide, with four variations of things we have already eated, drunk, seen and the places we have been to that day. The slide looked more or less like that:
First, the teacher models the activity, with each of the versions, for example a banana, coffee, the bathroom, my friend and the students react, producing the relevant sentences. After that, the students take over and lead the activity.
All the other versions which may appear ie written a test are allowed.
Why we like it
The game is an opportunity to practise the target langauge in a controlled way with some (albeit not a lot) freer practice and some personalisation.
It is also an opportunity to drill the structure, to perfect the intonation and the sentence stress. It can be done chorally (the kids produce all the sentences together which is less risky and much safer, especially for the shy students) or taking turns. In real life, the activity was a mixture of both and I simply let it be, although, of course, the teacher can insist on either choral or individual production.
Very little preparation, if any. In the first part of the task, we were able to use the coursebook materials, the visuals (the flags) and the model sentences which were already on the page. The second part required the model sentences on display, at least in the beginning. This was the first time we played this game. I suppose these will be less necessary in the future.
There is a lot of potential for students’ involvement: first of all, they are personalising, sharing some details from their life. But of course, there is more to that – the students are also invited to lead the game and to suggest topics, places, food, things they are interested in. This also helps to make the activity memorable.
We did it as a whole class but it can be done in small groups or teams, too.
I created it for the lesson on the Present Perfect but I believe that it can be used with the other structures, with slight adaptations ie the Present Simple and the adverbs of frequency (T: watch the news, SS: I never watch the news, I always watch the news), the Past Simple structures (T: go to school, SS: I went to school, I didn’t go to school), or the adjectives to express opinions (T: Maths, SS: Maths is easy, Maths is difficult) etc.
My students are kids but I can see a lot of potential for this game with my adult beginners group, too.
The name! Of course I like it because I came up with it but I think it does reflect the principles of the game and it is its brief description: you echo but you adapt, too)
This post, like many others, starts in the classroom…
The thought falls on my head out of nowhere.
We are playing the game with the first conditional. There are only four of them, on the day, in-between the holidays, so we don’t even bother to go into the breakout rooms, we are playing together. It is not even a real game, either. Someone starts a sentence, someone else, called out, thinks of an ending, action – reaction, a situation – consequences. And they are just producing. Coming up with great ideas, some of the sentences just down to earth and realistic, some of them, as we call them, ‘creative’, just for laughs. And so we laugh out loud. A trainer in me suddenly realises that the lesson plan (if there had been a formal lesson plan) should include not only the traditional elements, like the staging and ‘the teacher will’ and ‘the students will’. The trainer in me realised that it might be worth considering to include a laughing fit and the necessary calming down part in the timing, in the assumptions and the potential problems and solutions…We laugh a lot with my kids.
Unavoidably, I realise, I get those constant flashbacks, those mini-trips into the past and I am looking at my students, today already 10 and 9 (or 8 and 7, still, some of them) and I remember how we walked into the classroom together, for the first time, me on my toes, all eyes, all ears, and them cautiously taking every step and every action. I do remember how we learned to say ‘Hello’ for the first time with some of them and how we first said that we don’t like broccoli ice-cream (except for Nadia, my little rebel). How I used to need lots of miming and scaffolding and modelling, with every single activity and how they’d start with single words, then move to phrases and to sentences.
And I, who was present, 99% of the time, over those seven years, I cannot believe my own eyes and my own ears now, how they throw the language at me, storytelling, or using the Present Perfect in free speech. Or the first conditional.
What does it mean for a teacher to continue for an extended period of time? What does it mean for the business? How does the methodology change? Does it change at all? What do the parents think? And, last but not least, perhaps it would be better to change the teacher once in a while?
This post will be very personal. This post will be very emotional. But I would like to look at it from the other points of view, too, thinking like a trainer, thinking like a methodology expert and, also, inevitably, thinking like a teacher and like a human, too.
In order to make it a bit more objective and more like a research, I asked my teacher friends for help. This post was written with the help, support and contributions from my amazing colleagues: Ekaterina Balaganskaya, Nadezhda Bukina, Marina Borisova and Tatiana Kistanova. Thank you!!!
Are you still up for such an adventure? Follow me.
Over to…ateacher trainer
You know your students very well, in every aspect, including the interests, their motivation, the family situation, the strengths, the areas that need improvement, the interaction patterns that they favour, their best friends in and outside of the group, their favourite activities and games, their role in the group. This helps a lot with lesson planning, shaping up and choosing the activities and, later on, in class, with managing the activities, the lesson time and the interaction patterns.
Giving instructions is much easier, after a while. The students know you very well, too, that they are almost able to read your mind and to react to any, even those less formal hints and clues. Quite likely before you give them.
You need to be creative because after a while, your students might get bored with the activities you usually use. This might not sound like something positive because it means that you are at risk of running out of anything that you normally keep up your sleeve in terms of games, classroom management techniques or ways of checking homework, for example, but I would like to see it a more positive light. Working with a long-term group can be a wonderful catalyst for your creativity and, as a result, there are more new games, classroom management techniques and ways of checking homework!!!
It is perfectly natural that with any new group, a teacher strives to build up the comfort zone in order to ensure the conditions for the effective teaching and learning. However, once that comfort zone is created (and after a few years with a group it is likely to be a very stable comfort zone, a very cozy and safe ZPD, hello Leo Vygotsky), the teacher can start dreaming of venturing out and trying out new things on a much more advanced level. Not only a new game to practise vocabulary but a new approach that you may have heard about such as introducing a new approach to storytelling after you have found out about PEPELT, setting up journals with your students, just because you read that one research article or just taking your lifelong passion for teaching English through another level. Or, actually, you might even want to start a blog at one point. An experimenter is, I believe, one of the most important teacher roles!
Teaching long-term, you are moving on, together with your students and that means changing and adapting the approaches and techqniues to match them to needs of the kids who are growing up. With time, kids are becoming more mature and more capable of producing the language and dealing with more and more complex tasks. They say that a rolling stone gathers no moss and the same can be said about teachers who are growing and developing with their students. Sure, some of that can be achieved within one year, but there is definitely a lot more potential for the changes and the evolutions if the learning process takes a bit longer than just one season.
My colleagues also mentioned the impact on the learning process and the very shaping of the curriculum as it was adapted to the particular needs of the students. Instead of just following the book (or the curriculum whichever form it came in), as might be the case with a less involved teacher (although, of course, I am not implying that working with a group for a season only equals lower quality service), with a longer term group a teacher is able to introduce a circular / spiral curriculum, introduced to the world by Bruner and to me be Ekaterina, with the teacher returning and revising the crucial elements of the language, regardless of what the coursebook or the pacing schedule says. For example, working on the past simple (served in manageable chunks) from the beginning of the year instead of waiting until April when that topic appears in the book. This was Ekaterina’s example and I realised that we have been doing the same with my kids, simply because I wanted us to have the language (or some bites of it) for us to be able to talk about the weekend and the holidays and the day at school. Tatiana also mentioned it as one of the key benefits as knowing the group helps the teacher set the pace that will be most appropriate for this particular bunch of children.
Over to… a manager
Students staying for a few years are basically yourreturning customers, your loyal customers and your dream come true. As they would be in any other area. They come back, month after month and year after year and they make the world go round, basically.
What’s more, these students are also likely to bring in other students, their friends, brothers, sisters, cousins or even parents, to join your groups or the other groups at the school. Since there has been a positive experience in the family, so to speak, these are also likely to stay.
The fact that you have worked out the patterns and the procedures of managing the finances, the group, the assessment or the festivities, will mean that these will be easier to implement.
This will be a huge advantage, should there be any changes to adapt to, even those unexpected and unplanned, as in case of the pandemic. Perhaps that was not the case in all the countries and with all the groups and students but, in my experience, many of those that went online, smoothly, were the long-term students and groups and they basically trusted their teacher to transfer online or, later on, to study in the hybrid classroom.
That also means that a strong bond and trust will be built and the parents will be more likely to accept any changes or even any complications such as the need to move online, the need to change the timetable, the need to make up for the class or to run the lesson online, or even, to have a cover class.
Staying with ‘the old’ teacher might also be easier for the parents which was a very important point made by Ekaterina. Parents are busy, they might not be able to devote a huge amount of time to looking for a new teacher, a new school or a new group and they might also worry that their child would not fit in the new set-up. Some parents fear that due to the previous negative experience, either with the school, the group or even the teacher’s professional competence. Staying is easier.
Over to… a teacher
The first one to mention here will be the enormous sense of achievement that a teacher can get from working with a group for an extended period of time and the opportunity to observe and to assess the same students, not only from September to May, from the beginning to the end of the level but over the years, from pre-A to A2 or even further.
Teaching a group over any longer period of time provides the teacher with plenty of opporunities and a lot of data for formative assessment, as pointed out by Ekaterina. It will apply to all the language skills as well as vocabulary and grammar, accuracy and fluency. Let’s take the past simple as an example. There will be the series of lessons devoted to the topic, a series of lessons per level or coursebook even, and the students might do well in these lessons. However, it will be up to the teacher to track whether and how accurately the students use it to describe the past events in free speech, recalling the events of the day at school or retelling a story. The aims of these two activities are not the freer grammar practice per se but, for example, settling in and checking understanding after a reading skills development stage. It might (and it will!) take a considerable period of time for the students to finally assimilate the structure and to start using it freely and correctly. I have also noticed in my teaching that with time I tend to prioritise formative assessment over summative assessment but this is a new discovery and I need some time to think about it before I write about. A new post? Who knows)
Creating a positive atmosphe in the classroom, creating the environment that will be beneficial for learning, learning about your students and their needs is something that we, as teachers, do regardless, but there is something special in the connection that you build with a group over the years. You accompany them in their lives outside of the classroom, all the good marks and bad marks, all the competitions, holidays and birthdays. You get to meet their parents, grandparents, brothers and sisters and all the pets. You take part in the important family events, such as the births of baby brothers and sisters or even those more traumatic events like an illness or a death of a family member and, whether you want it or not, you bond. To an outsider it might sound strange but there must be a reason why so many teachers refer to their students as ‘my children‘ or, sometimes, when in a non-teaching environment, ‘my educational children’.
Then, there is the pride in all their achievements and progress that they are making. Going back and reminiscing about all the milestones, all the firsts is a truly wonderful journey for a teacher to take: the first lesson ever, the first time we made full sentences, the first time we started to create in English, the first letters scribbled, the first story we did and the first time they asked to be allowed to take over the story reading, the first test, the first real grammar lesson, the first ‘OMG, I cannot stop them from chattering away‘ day or every time they took an exam, Starters, Movers, Flyers, KET, PET, FCE or, finally, also, CAE.
Over to…a human
‘If you meet with the same people twice a week for 8 – 10 years, you can’t help loving them‘ (Marina)
‘It’s a joy to see them grow, to see the progress and the results. Develop relationships and see them enter a new age group‘ (Nadezhda)
‘The best thing about it was that I knew them and they knew me, the rapport was strong‘ (Tatiana)
‘When I was moving a country, they were devastated. Luckily, we could continue our lessons online‘ (Ekaterina)
The group is a community. Ekaterina mentioned that the kids in the group she has been teaching for seven years became friends outside the group and that they all meet offline when that is possible, even go out for pizza or to a museum. Even when those outside events are not possible, the group can celebrate together either because they get a Christmas-themed lesson or because they all bring snack and have a little party at the end of the lesson. Even if it is an online lesson.
It is interesting that the personal preferences work both ways and that the resistance to change the teacher might come from the students, too, as you will see in the stories for teachers that I share in the paragraph below and that, as Marina highlighted, the fact that some students stay with you (and, of course, not all of them will) is based also on their personal preferences and attachement to the teacher. Staying for longer may be seen as a result not some intertia, the inability or laziness to find a new teacher, but, simply, a conscious decision on the part of the parents and the students.
Or on the part of the teacher, too. As pointed out by Tatiana, it might be related to the teacher’s own personality, if the long-term connections are important for them, as humans. Or, it might be the impact of the context in which they are working as the changes, imposed or not, are more likely to take place in different educational institutions whereas the teachers who work freelance would probably be in favour of keeping the students, unless, of course, it is impossible due to any external circumstances.
As for me, personally, well, I love what I do. Yes, there are sometimes duties, tasks or even groups that I am not entirely wildly excited about but, overall, I enter the classroom, online or offline, with joy and looking forward to the lesson. And one of the reasons for that are my students and, especially, my educational children aka my adorable monsters. It is thanks to them that I have blossomed as a creator, as a teacher and as a trainer. It is thanks to them that I was able to cope with the strains of the lockdown and it is thanks to them that ‘I am stillstanding‘, as Elton John might put it, when the world is what it is right now.
At the beginning of the pandemic, when we were about to transition online and change our EFL lives forever, I remember how I felt about the big unknown and how, pretty quickly, it became apparent, that no matter what (really, no matter what) we are what we are, a small (and a bit loud) community and that we had had enough experience of each other worked out and accumulated and that we can take it elsewhere. I remember one morning, just before the lessons were about to start (the first real lesson, not the free online trial and getting to know each other with zoom) how I felt the panic creep over. But I also remember the thought: ‘Hold on, they are my kids. That’s is. We will just do it, under slightly different circumstances‘. And, guess what? We did.
A change would do you good?The other side of the coin
Because, of course, there is one! Changing the teacher might be beneficial! On the one hand, as Nadezhda mentioned, the teachers themselves might feel the impact of the long-term interaction, some form of material fatigue, and in such a case a change is more than welcome. In such cases a change of a teacher might be the solution. A new teacher means new methods, new approaches, a different sense of humour…
Sometimes this ‘tiredness’ and the call for a change may come from the fact that students are growing and transitioning into another age group and the students might welcome a more official confirmation or recognition of that process. Perhaps, the change of a teacher might do the job here. If, for example, it is Mr Alexander is the teenage groups’ teacher then him taking over the group from taught so far by Miss Carolina is going to be some form of a rite of passage.
However, it needs to be mentioned, it is not as straightforward as it might seem. First and foremost, the students may not want to change the teacher at all and, in such cases, it is enough to tweak the format or the routine a bit. Then it might be that the outside circumstances change and they sort the problem out. Ekaterina shared her story of one of her groups with whom she started to consider the possible change of a teacher as the kids’ growing up and changing into teenagers resulted in some discipline issues and, as a result, the lessons not being as effective as they previously had been. However, here, the problem sorted itself out – due to the pandemic the class was transferred online and it turned out that the physical separatation (or the space and the own territory that the students gained) was the only thing that the group needed. They still continue with Ekaterina as their teacher.
This brought my own group to mind. The kids were still in pre-school, year 3, when we were asked to give our cosy kiddies classroom to a younger group. We moved and the most surprising thing was that it turned out to be an important stepping stone for the students. ‘We are real students now!’, they kept repeating and back then I was just listening to them and giggling inside that the big desks and big chairs can make anyone so excited. Today, when I look back at it, it seems to be this perfect moment in the life of a group when a change was needed. And it did take place, although, yes, without changing the teacher.
The most important thing to consider here is how thestudents can benefit from the new circumstances. Marina brought it up, too and, Ekaterina gave a perfect example from the British schools. In the schools her children attend, there is an obligatory change of a teacher every year, with Miss Elena only teaching the 4th-grades, Mr Peter only working with the 6th graders and so on. The system was introduced in the school to ensure fairness. This way, all the children get a change to work with all the teachers throughout their school life and the is no chance that, due to some ‘preferences’, class 4A only gets ‘the best teachers’. Not to mention that this must contribute a lot to bonding and building of the community as little Pasha will know all the teachers personally and all the teachers, after a while, will have had Pasha in their classrooms.
The end is the beginning is the end…
The most interesting thing is that, from among the teachers who waved back at me and wanted to chat about the long-term teaching of a group, there was nobody who would be a strong proponent of the Change the Teacher Every Year approach. Can it be considered a sign? I have no idea but, if, by any chance, there is anyone among my readers who has had an experience with it, please, pretty please, get in touch, I would love to talk to you!
There is nothing like a good metaphor and I use it a lot in the classroom, to give feedback to my students (‘Your essay is a bit like a skeleton, all the good bones but no muscles at all’), to explain grammar (‘Reported speech is basically telling stories’) or to manage the behaviour of my younger students (‘This desk, Sasha, is like your island and these other desks are other island. We don’t travel there. Never ever ever!’).
I also started to use metaphors in teacher training and, of course, you can read about it here and here and this is how this post started, too.
I asked my trainees ones how they would describe a lesson in terms of a metaphor and I found out that a lesson is a lot like: playing football, playing a game of snakes and ladders, a journey, a frame…I am getting goosebumps now because I know that there WILL BE a separate post about that, soon.
A lesson is like a story
Oh yes, it is! In a good story you absolutely need a good opening line (this is how I choose my books, yes. Because if the author did not bother to make an effort to say hello properly, why would we even be talking, eh?), a set of interesting characters, some adventures, some challenges and achievements, a climax and the ending.
In terms of a lesson, these would stand for a warmer activity (a good opening line), the community of the teacher and the students (yes, we are the characters), some engaging activities (our adventures), some new things, some learning and development (or the challenges and the achievements), one amazing focused task because all the roads lead to Rome (and this is our methodological climax) and….a good cool-down activity aka the ending.
We absolutely need the ending!
First and foremost, a lesson needs an official round-up, the final touch, the coda, the summary of everything that has happened during the lesson. Since one does not walk into the classroom and start the lesson without saying ‘Hello’, nor does one leave without saying ‘Goodbye’, there should be the first real activity of the lesson and the last real activity, too.
What’s more, a good ending of a lesson is also an introduction to the following one. If the lesson finishes on a high note, the students will leave the room looking forward to coming back next time.
Move! By Super Simple Songs! If you haven’t used it before, find it asap!
# 1 Finishing with a song
An easy and no-prep resource, especially with the younger students. A song is a signal for the students that we are finishing but it can be also a signal for the parents waiting in the hallway. It can be the same good-bye song in every lesson but it can be a song that the students choose to finish the lesson with. This is an especially useful trick with the older and more advanced children, who might eventually get bored with the same song. With one of my online students we had a tradition of choosing one of her favourite songs, in Russian, to listen to and to dance, after the offcial lesson time, just as this thing that we did together (and I had a longer break in-between classes and I could spare a few minutes). One of my trainees, Nathalie (lots of virtual hugs here), also built in a dance into her class routine. At the end of the lesson, the kids would choose one of the Super Simple Songs, for example, get up, find a place in the middle of the classroom and just dance and sing, together with the teacher and then go home.
I have yet to start experimenting with songs with my older students.
# 2 Finishing with a story
Admittedly, that is a part of the routine that is something of a staple food in my pre-school and primary school EFL lessons. Stories, both storybooks or videos, can be used either to revise the key language or to introduce and practise the new language, not quite related to the topic of the lesson. From the point of the view of the lesson, the story is a part of the ritual and something that helps to build the class community.
In the classroom, we clean up after the focused task, set homework and go back to the carpet (preschoolers) or to our hello circle (primary), we choose a story and read or watch it and talk about it. Then, the only thing left is the goodbye-song. And stickers).
This is, probably, one of my favourite ways of finishing a lesson, because we get a chance to settle, to bond, to practise the language and to express opinion, all in one. I am wondering whether and how my older students could benefit from these, too. Something to experiment with in the next academic year, perhaps?
This is the feedback the kids left after the first week of the summer camp activities
#3 Finishing with afeedback session
There are many ways of organising a feedback session after the lesson, depending on the aim of the feedback session.
Self-reflection when the teacher is simply irrelevant (in a way). The main aim is to give the students an opportunity to look back at the lesson and to consider the learning process. In this case, the students work in pairs or small groups and share their views, answering a set of questions, such as: What did you like? What was the most difficult / interesting / boring / the easiest part of the lesson?
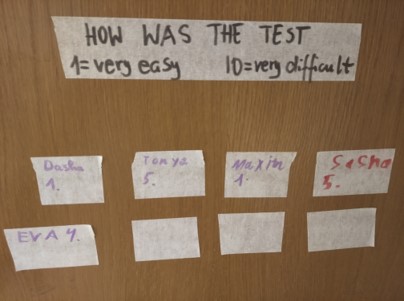
Feedback for the teacher: students can leave their comments on the board or on the wall (or the door!) if the feedback is to be anonymous or they take part in a discussion in small groups or as a whole class.
It is up to the teacher to decide how frequently any kind of feedback can be carried out: once a week, once a month, after each test or after any lesson with a new element in it such as a new activity or a new game.
This is our feedback after one of the tests
# 4 Finishing with a self-reflection task
This activity is an extension of the previous point but it focuses more specifically on the content and, even more specifically, on the vocabulary. My students (primary and teens) had their notebooks which we used for taking notes and for the self-reflection tasks, too.
At the end of the vocabulary lesson, the kids take their notebooks and look back at the lesson and categorise the words according to a number of the following categories: the difficult words, the easy words, the useful words, the words that look strange, the words that sound strange, the words that may not be very useful…
They can either create their own lists by copying the items from the board or the coursebook and by categorising or colour-coding them. A short speaking activity would follow in which the students explain their choices to their partners in pairs or small teams.
# 5A revision task
That is another set of tasks that we sometimes use also based on the key vocabulary in each particular lesson and it has got a lot to do with everything that is written on the board already such as the new language or the emergent langauge. The main aim here is to give the students one more opportunity to use the target language. Since these games have no definite ending, their length can be adapted to the amount time left in the lesson.
The students work in pairs and can play one of the following games:
Definitions: student A calls out the word / phrase, student B: provides a definition and an example, then they change, the teacher helps out only when necessary (aka the word has already been forgotten)
Synonyms and antonyms: student A calls out the word / phrase, student B: provides a synonym or an antonym
Questions: student A chooses a word / a phrase and asks student B a question that includes that word / phrase. Then they swap roles.
A story: students work in pairs, they take turns and tell a story, using different words / phrases from the board
Pairs: students take turns and they try to find connections between different items on the board, based on meaning, pronunciation, grammatical category or associations
Sometimes we also play the memory game with the whole class: the students take turns to close their eyes, the teacher erases one or two items, the students open their eyes and try to recall the words that have disappeared as well as all the other words and phrases from the previous rounds. The class listen and help out with definitions and associations. The bonus? The board gets cleaned))
# 6 Finishing with an introduction to the following lesson
This approach to the finishing the lesson was the result of the reality of the teaching life. No matter how well you plan your lessons and how many optional activities you have up your sleeve, it might still happen that everything has been done and there is still some time left but not enough time for the teacher to properly spread the wings, be it in a game or in any other fully-fledged task.
In such a case, it might be a good idea to introduce the topic of the following lesson, without properly setting the context (no, time, remember?) for example by:
introducing the title of the reading, the topic, for example through a game of hangman and a discussion about the students’ expectations and prediction
talking about the visuals that accompany the following topic, without going into any details
three questions to help the students relate to the following topic for example: What do you think about…? Have you ever…? Do young people in your country often…?
This will create a link between the lessons and it can be further extended by a homework along the lines of: ‘Find out more about…’. All of these can be easily adapted to almost any topic.
# 7 Finishing with a game
The games chosen to finish the lesson with should be fun (the students are already tired and less able to focus), fast (if there is a lot of time left, perhaps it should be devoted to something else) and offering some flexibility to the teacher (aka games with no definite end or result that can be stopped or paused at any given point).
We like to play:
Categories aka STOP: students work in pairs or small teams, they write one word in each category beginning with a specific letter, afterwards the teacher awards the points.
The Game of 5: each team or pair prepares a list of 5 in their category (a separate and unique one) such as 5 irregular verbs, 5 cities in Europe, 5 farm animals etc. Afterwards, the teams have a minute to guess all the words their partners have come up with. They can get 50 points in each round, 10 points for every word they manage to guess with the team setting the task getting 10 points for every word their partners did not manage to guess.
One-Minute Game: this a game that requires a set of flashcards (very easy to prepare) or a set of word cards (prepared by the teacher throughout the year, can be easily recycled). Students work in small teams as they take turns to explain as many words out of the set (definitions, associations or miming) to their team within one minute. I am pretty sure that this was loosely based on some kind of a game show but I have no idea which one. Oups.
In order to better manage the game and time in class, we started to play these with the same teams over a series of lessons, pausing when it is time to go home and recommencing in the following lesson.
The stained glass project: in the making
Bonus: An Art Project
‘Anka, what’s this?’ the kids asked when entering the classroom and noticing a few boxes of the stainglass paints.
‘These are special paints. We used them to make these special pictures with the little kids.’
‘Anka!’ they said, in that very special tone of voice that my kids have mastered, the voice reserved for these particular occasions, to compain, to chide and to express disappointment. ‘The little kids? And what about us?’
So I had to think of a way of including this particular project in our classes. Making stained glass pictures is one of the coolest activities ever but it takes time as the various layers need to get dry before you apply the following ones and there is virtually no chance of completing a task in one lesson. Not to mention that it is a perfect decorative kind of a craft and trying to adapt it in order to maximise production would be simply counterproductive.
Instead, I wrote to the parents and I explained that, instead of a game, at the end of the lesson, for the next few lessons, we would be preparing our own stained glass pictures. The kids chose a template or designed their own pictures, they drew the outlines, they coloured them in and, as soon as they were ready, they took them home to cut out and to display them. All in all, it took about 5 minutes over a series of four lessons.
The Chameleon Day!
Bonus: The Chameleon Day akaGoogleSearch
Choosing virtual stickers is not a new idea and thanks to Miro we have lots and lots of fun and we can keep track of all of our stickers throughout the entire year, if necessary. Here you can read how we deal with that with my primary students.
Further reading
The 9 Best Ways to Finish EFL Lessons from the ELT Guide
15 Awesome Wrap-up Activities For Students from Class Craft
Happy teaching!
*) This material was collected and put together for the online training session organised by National Geographic Learning for Russia in October 2021 where I had the privilege of sharing the zoom stage with Dr Joan Kang Sheen and Tatiana Fenstein.
One of the students chooses the theme of the day i.e. The Chameloeon Day (not a real holiday, although it could be. There are plenty of ideas to find here.
The kids take turns to choose their favourite variation, as featured in the picture above: the cake chamelon, the black chameleon, the artistic chameleon, the Christmas chameleon, the cute chameleon, the police chameleon, the robot chameleon and the lamp chameleon.
The teacher opens the google search and keys in the requested phrase. The student who suggested the specific variation chooses their favourite picture (i.e. line one, number 2).
The teacher copies and pastes the chosen picture, then pdfs the whole collage as soon as it is ready. The collage is then sent out to parents via Whatsapp.
(!!!!!) For the purpose of protecting the kids from the inappropriate images that google might display, especially when the unusual combinations are made, I key in the requested phrase first and only then share the screen with the kids as some of the images might be too scary, explicit or simply not always appropriate for all ages.
Why we like it
It is fun.
The kids love it. They ask about the stickers (we don’t always use them in every lesson) and they remind me to send them to the parents in the end.
It is a great way of finishing a lesson.
It is a great way of building a community, especially if you keep your stickers throughout the year. With my group, we still have some of the stickers we found during the first stages of the pandemic in spring 2020 and we had a lot of fun finding them, looking through them and remembering whose they were and why.
It gives us a chance to practise some of the computer language in contex (go / scroll down, go / scroll up, stop, I’d like …)
It offers some opportunity to practise describing objects in a detailed way (it is the big one, the small, the one with the green nose etc), especially the adjectives.
We can create, express ourselves and express opinion on what other people choose.
My advertising people tell me that this is something that you do while researching and brainstorming new ideas, too, in order to ensure that yours is, indeed, a fresh solution that no one has ever thought of. So, in a way, my kids are also getting ready for the market research, too!
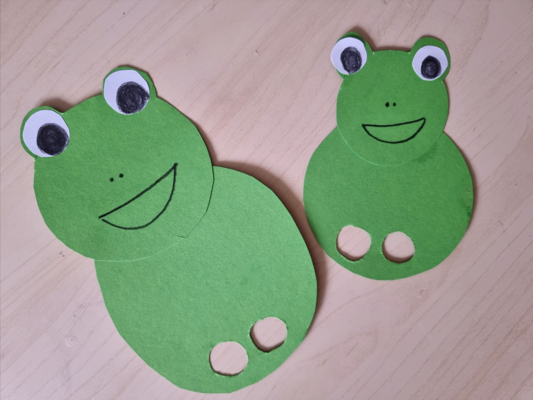
Two circles cut out of cardboard (regular photocopying paper is too thin and flimsy), with the two holes for fingers also cut out before the lesson.
Glue to glue these together
Crayons, pencils or markers to draw the appropriate body parts
Procedures
Show the kids the finished product, introduce the frog, chat with the kids
Show the kids the smaller circle, show how you decorated it.
Give out the pencils / markers.
Give out the small circles, decorate it with the kids.
Give out the bigger circle, decorate it, if appropriate.
Collect the pencils.
Show the kids how to glue one on top of the other. For the younger kids, it might be a good idea to draw a small cross on the top of the bigger circle, to signal where the kids should put the glue.
Give out the glue sticks. Kids glue their circles together.
Glue the additional body parts, when appropriate.
Collect the glue sticks.
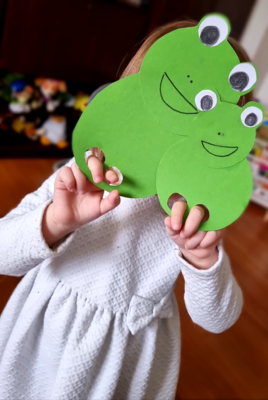
Play
@ Magdalena
Why we like it
It is super easy! These frogs here, in the picture, were produced for a child (a huge Frog Fan), rather than with a child, and that is why I went a bit crazy with the eyes but there are the simpler versions of it)
These two circles can become many many things: a frog, a bear, a cat, a dog, a monkey, a rabbit or a snowman, with little adaptations.
The task does involve a lot of pre-cutting but the rest can be done by the kids during the lesson.
Once the toys are ready, they can be used to play, as any other puppets with all the structures that the kids are familiar with and with those that match the topic of the lesson, at the very least, ‘Hello’, ‘My name is’, ‘I like…and you?’ and it is always great when you can maximise production.
The funny thing is that I cannot remember when I discovered that the painter’s tape existed. Maybe it was Vita, my friend and my colleague who first brought it to school…
What I know is that for the past four years I have always had a roll of two at home and a roll or two at school. Because, right now, there is no classroom without the painter’s tape.
Every single time we do anything in the hallway, any kind of a treasure hunt, any jigsaw puzzle, anything which involves things being put up on the walls, the painters’ tape enters the picture. I prefer it to blutack because I don’t mind just throwing it out (instead of peeling it off carefully from every single scrap of paper) and, even more importantly, my students don’t feel tempted to nick the tiny little bits of the precious resource.
My primary students who are learning to read and write know this resource very very well. We use the tape to write instructions for different activities, especially if they needed to be displayed around the school and all our lessons would start with a fun activity with the little chairs – some of them would have the bits of the tape with funny words on them, for example choosing the place to sit (‘I am sitting on the Happy Octopus’), making sentences with the key word written on the chair (‘dancing’ – ‘Today I am a dancing hippo’) or even writing and creating random combinations of words.
Apart from that, pieces of the tape can be left on each table, one per student. They can be used in any kind of surveys (‘Which game would you like to play?’, ‘What was the most difficult part of the lesson?’) but I also noticed that the students liked to write on them, just to express themselves, to scribble while they were listening or to just to somehow personalise the table where they were sitting.
The tape can also be used to help group and pair the students. There should be a piece of tape on every desk and on these the teacher write the names of different superheroes (a very broad term in my lessons, it can include both Batman and Cheburashka, Harry Potter and Aleksander Sergeevich Pushkin, Lionel Messi and Santa). On entering the classroom at the beginning of the lesson, the students pick out one of the cards with the same name from the teacher and this is how they find out where they are sitting on the day. The same cards can be used later on to mix the students, with the teacher (or one of the students) picking out two cards to decide that in the following activity Superman will be working with Harry Potter and Robinson Cruzoe with Superman etc.
AND, though there are no photos, the painter’s tape was THE LINE on the carpet that helped my little babies sit in a safe and appropriate distance from the big TV on the floor.
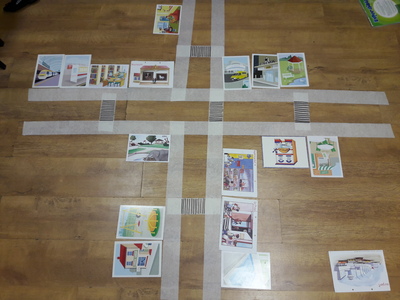
Last but not least, we have used it to create a city plan on the floor which we later filled in with flashcards and we used to move around. It is a rather limited use, but, oh what an amazing lesson.
The door
The door is the most underestimated and underloved part of the classroom. And how undeservedly so! Even if you have only the most standard door (not those double door straight from a castle), that is a good two square meters of a notice board, ready to use! It would be recommended to check the material, the surface and the ‘stickability’ and to test different adhesive materials that will not destroy the door itself but there is scotch, there is the painter’s scotch and there is blutack to name at least a few that could be used here.
In my classrooms we have used the door in the following way: putting up the huge posters to use instead of the numbers (The Caterpillar Classroom, The Baby Shark Classroom, The Cookie Monster Classroom), putting up the homework poster (‘Did you do your homework?), putting up the washing line with all the clothes to use during (‘Today I am wearing…’), putting up the classroom rules posters, the library reviews poster (for the kids to leave the reviews after they have read something), the test feedback poster (‘How difficult was the test? 10 – very difficult, 1 – not difficult at all) and any class surveys completed on the way out, the sight words reading practice on the way in, displaying the alphabet poster when we were just starting to read, displaying any of the work that the students produced (when the walls were already taken) and, last but not least, or quite the contrary: the first ever: The Door of Doom aka the poster we created with my FCE students by adding bits and pieces to the poster throughout the course. These bits and pieces were all the things we struggled with: the mean phrasal verbs, the less common suffixes, the collocations that we would always make a mistake with and so on.
Next time you are in the classroom, have a look at the door and at this whole unused space…And what you could do with it. Once you start, you will never stop.
Counting sticks
This entry is perhaps not such a great surprise. After all, all the little people (and their teachers and parents) are very familiar with these colourful plastic sticks. Everything else aside, this should be one reason to be including them in our EFL lessons.
We use them mostly to count, of course, the kids pick two or three or twenty and this helps to make such an abstact idea as numbers a little bit more visual (because three items lying on the table, three sticks, three fingers or three dots on the dice are a better representation of the secret that this symbol ‘3’ stands for) and kinesthetic when we let the kids manipulate the sticks. Luckily, the sticks are cheap and easy to get so having lots and lots of them, enough for everyone, is not a difficult aim to meet.
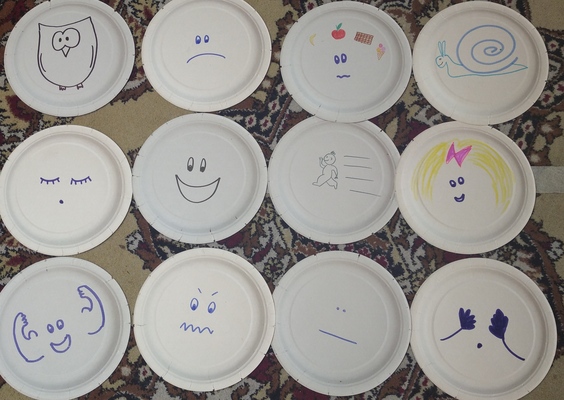
One of my favourite games to play (perhaps because it is a perfect solution for a lazy teacher) is using these together with the paper plates with numbers. The kids look at the number, count the sticks and add or take them away, in order to make sure that the number matches the number of sticks. Which is also the beginnig of adding and substracting.
By the way, flashcards will do here, too, but the plates have the advantage of having the rim and the sticks do not slide off and you can easily just pile them up on top of each other, put them aside and sort them out after the lesson.
With my ‘adult‘ pre-primary kids, we have used these same counting sticks to help children manage a pair-work activity, to add a visual and kinesthetic element to the verbal exchange. We were practising different varieties of ‘What’s your favourite…’. The kids were sitting in pairs, on the floor, around a set of flashcards that would symbolise the themes (an apple for ‘What’s your favourite fruit?’, a teddy for ‘What’s your favourite toy?’ and so on) and one student in each pair would get a set of five sticks. They were supposed to ask their partner five questions of their choice (we had ten categories) and while doing that, they were supposed to put the stick away, on the relevant card. We used a similiar tool when they were interviewing their partners about things they like (‘Do you like…’ + any words of the kids’ choice) and I guess it can be adopted to pretty much any structure.
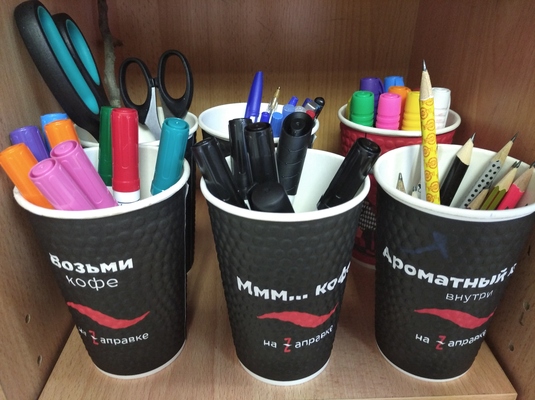
Plastic cups
Or any other recycled cups (like those in the photo) which are easily available. They are my favourite resource to sort out materials (pencils, pens, bits and pieces for a craft activity, especially the leftovers, which I hide in the cupboard for later). They also help to organise materials which I give out to the kids, for example we have a set of boxes with crayons organised by the colour, for some, more teacher-centred activities, as here the teacher is the one in charge AND a set of cups organised in sets, one full set per student, which we use in all the SS-centred activities in which the students make decisions which colour to use.
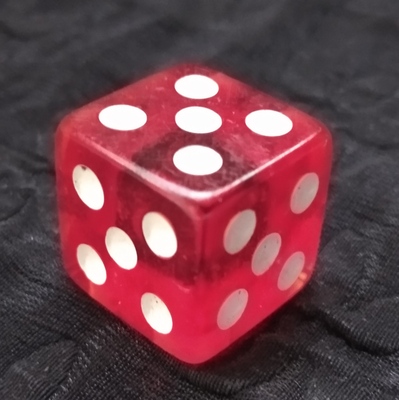
With my older students, I use the plastic cups whenever we use dice in class (and that is OFTEN). The dice given to students (kids and teens) ‘just like that’ have the most amazing ability to fall off the tables about once per minute. Plus they make LOTS and LOTS of noise and if you have a group of then and five dice are rattling and rattling…Well, you can imagine. If you put each dice into a plastic cup, you can still shake it and get a number and everything is more manageable. I think I saw it first in Nataliya T’s class and here are my thankyous for this idea!
Paper plates
Oh the paper plates! They are of course used at parties and in craft lessons to make clocks, spinners, plates for all the ‘fruit salad’ craft activities, snowmen, frogs, chicks, rabbits and what not…But there is so much more!
For me it was this one day when I got an idea for a great lesson for which I really needed the number flashcards. These, however, were left behind in the office, so getting them for the lesson that was the first lesson of the day, early in the morning was out of the question. I rushed to the school cupboard in the house, to go over all the treasures there, with the idea of something that could help me replace the flashcards and there they were – a set of colourful cardboard plates from my local supermarket (which I must have bought for some class party earlier). Creating the flashcards took three minutes and a permanent market and it turned out that these particular plates (many of which I bought later on in the same supermarket) were perfect for it: big, durable, colourful but not too colourful since there was a thick colourful rim but the centre was just white and empty aka perfect for writing!
We normally use the number plates like any other flascards, first and foremost but the different shape adds to the variety and makes the topic of numbers a bit more fun. We also use them together with the counting sticks (see above) or with any other bits. We used the numbers 1 – 12 to create a huge clock on the floor and we played some movement games with it.
The plates became the canvas that helped me create my amazing emotions and adjectives cards (sorry about blowing my own trumpet here but there is a lot of love here) which we have been using for more than two years now.
Not to mention that the plates can be a very useful tool to organise all the bits and pieces while getting ready for a craft activity, hats for the snowman on one plate, scarves for the snowman on another, and they all can be stuck on top of each other. And, as you know, every little helps to make the teacher’s life a bit easier.
What are the unsung heroes of your classroom? Please share!
None, almost. In some cases, it might be necessary to write some of the ideas on the board, to serve as an inspiration. See procedures
Procedures
Students work in pairs. They share their ideas. If there is time, the students can change partners and repeat the activity. To round up, students share some of the information they have found out about.
This stage is always present, in each lesson, and it takes about 10 minutes. We keep the same variant for about a month and then we choose a new one.
All the variants (so far)
Verbs: the teacher writes on the board all the basic verbs in the past tense: I went to, I saw, I ate, I drank, I talked to…about…, I watched, I played, I bought, I wrote, I didn’t…The kids choose 5 and they build simple sentences about their day, week or weekend. I like to start it with my students even before we officially cover the Past Tense (as soon as they are ready to differentiate between the present / the past form of the verbs) and it really does help the kids to practise and to remember the verb forms.
Did you go…: a variation of the activity described above. The teacher puts the question form and the short answers on the board. The kids work in pairs and ask each other questions. The student who provides answers uses ‘I did’ and ‘I didn’t’ but they are also requested to give a brief explanation (because…)
Tell meabout your day: the teacher writes the name of the activity and a list of topics which can be also elicited from the students. The regular set might include: the weather, the school, the teachers, my best friend, lunch, getting around, marks, tests, pets, brothers and sisters, homework etc. The students work in pairs and they have to choose three topics to talk about. They take turns to share stories about their day and they follow-up each story with a question.
The B-words: this one is a slight variation of the above, only here the teacher writes a selection of words starting with a certain letter as the list for the students to choose from and to be inspired by. Some of the words might be completely random but they also encourage the kids to produce the language. Later on, the students can choose the letter of the day and then can also help make the list of the words, too.
This is how I felt today: in this variation the teacher puts up the words to describe emotions and feelings. The list can be a simple one (happy, sad, angry, sleepy, hungry, tired, bored) and then it can be extended to include more interesting ones, too (confused, excited, chatty, exhausted). Again, the students choose 3 or 5 of them to describe their day.
Superheroes: this time the list on the board is made of names of superheroes, famous people as well as characters from books and films, for example Superman, Spiderman, Wonder Woman, Chebourashka, Winnie-the-Pooh, Santa etc. The students are supposed to think of their day from the point of view of these characters and describe it talking about how they felt. ‘I felt like Superman because I got three good marks today’*)
The superlatives: the teacher writes on the board a list of superlatives (the best, the worst, the funniest, the tasties, the most difficult, the easiest). The students choose 3 or 5 of them and use them to describe their day, for example: The best thing was that I had only three lessons etc.
Why we like it
A stage of that kind is absolutely necessary as the time for the students to settle in
This is also when they learn how to communicate without any preparation and outside of any set-up frameworks since each day might be different and each day may involve a different set of verbs and nouns
At the same time, it is an opportunity to practice the past tenses or the perfect tenses as for many of the students, many events repeat themselves (going to school, writing tests, having a good day or a bad day etc)
It is a fantasic opportunity for the group to bond, to share the great things that happened during the day or to vent about all the disasters that they had to deal with, the tests, the teachers, the piles of homework
To be continued. Soon. We are quite likely to get very bored with what we are doing at the moment…
Happy teaching!
*) My favourite so far! It is amazing how my students come up with their own metaphors and associations, both the teenage group and the kids. Here are a few quotes: ‘I felt like Chebourashka because I was a bit confused’, ‘I feel like Robinson Cruzoe because I am locked up at home now’, ‘I feel like Masha from Masha and Medved because I am a bit crazy today’, ‘I felt like Santa because it was my friend’s birthday and I had a present for him’, ‘I feel like Superman because I did all my homework really fast’…
Congratulations FunkySocks&Dragons! It looks like we have just got the longest blog post title in the history of this blog…
It was inspired by a wonderful song from Dream English Kids, a great tool to teach and to practise the Present Continous and the rooms in the house. If you don’t know it yet, please look it up asap. It is also based on the talk I gave at the TeachyForum in March 2022.
All the ideas that you see below come from my classrooms and represent the tricks and the techniques that I have developed or I have been using with my more numerous pre-school groups. Perhaps it is worth mentioning that I have not really had a chance to work with very very big groups. The biggest number that I have had in the pre-school classroom on permanent basis was 12 and I know that there are colleagues out there who teach more.
As usual, these are the things that have worked for me and I hope that you find some of it useful, too.
#1 Building the routine
This is one of the key words in the the VYL world and today we are lucky to have the access to quite a few different ideas for different classroom routines, either from the coursebooks authors who make an effort to even prepare the classroom routine chants and songs or from the teachers who share their ideas on the social media or their blogs. Lots of sources of inspiration!
But the most important thing as regards the routine for the bigger groups is the time investment. Some of us might be lucky to get only the little angels in their groups, some of us might have to deal with the ‘regular’ children who sometimes behave, who sometimes want to discover the world and to experiemtn, sometimes are up to no good at all…These children (regardless of whether there are three or ten) will need the time to get used to the lesson format, to the teacher and to the rules we want to implement.
When I started or took over those big groups (a situation even more complicated probably, since you have to ‘re-start’ the group), I would go step by step, aiming at getting a perfect hello circle first, just the way I would want it. Then, once this one done, I would work on improving the revision stage. Then and only when I already was at two stages of the lesson under control, I would move to the following one, working at one stage at a time, until I was finally happy with the entire lesson.
Nothing happens overnight. Be patient! Be good to yourself, too, dear teacher!
#2 Adapting the routine
The routine is never for ever and for always. Children get used to the lesson procedures and activities and they might need be in need of something new. Children get bored with what they know and they might be in need of something new. Children grow and develop their social, cognitive, motor and linguistic skills and they might be in need fo something new.
These changes may involve the physical rearrangements of the room (and related to that changes in the routine) or changing the rhythm of the lesson by splitting up the music and movement stage and replacing it with songs used throughout the entire lesson, as punctuation marks or introducing a whole new stage to the lesson in order to be able to secure a short 1-1 chat with all the students in a large group. Which I described here in more detail.
#3 Rewards’ chart
Yes, I would like to recommend using a rewards’ chart, despite the fact that some educators are against the idea. I don’t use it with all my groups, sometimes it is not necessary at all, but with those of the groups and children that need that, for me a rewards’ chart is a temporary solution and a tool of establishing the routine and visualising the kids’ behaviour. As soon as the target audience ie the kids are familiar with the rules and the routines, the chart is slowly abolished.
And yes, I have already written about it in this post here.
#4 Lesson planning aka balance
Lesson planning for a group of pre-schoolers is not necessarily the easiest thing to do. There are quite a few factors that have to be introduced and that have to be introduced in the appropriate ration. Some of these include
new material and revised material, vocabulary and structures
familiar (aka ‘safe’) and unfamiliar (aka ‘intriguing’) elements in order to ensure that the students are engaged but not bored.
skills, mostly listening and speaking but also reading and writing, when appropriate
settlers and stirrers
a variety of materials or, in other words, not only flashcards.
a variety of interaction patterns, not only individual work and not only whole class because all the children waiting for their turn, especially in large group, will find themselves alternative activities if there are too many T-S activities. If, on the other hand, the lesson is based on the whole class activities, the teacher is at risk of losing the contact with the individual students in the group.
games and ‘paper’ (aka hard work). Personally, I am of the opinion that one paper per lesson is just what is necessary. One page in the coursebook OR one handout OR one craft. No more. During the covid year when we were studying online, I gave up on paper completely. The children had their coursebooks but we used this material only for homework. The lesson time was devoted to interaction.
#5 Kids’ involvement
There are so many things that children can do in class and so many things that children will love to do in class because they want to be involved and they want to be a part of the classroom routine. This will help to make them more engaged and connected to the English bubble.
Kids can help with handing out and collecting materials and resources, choosing songs, games and songs, choosing the next student to take part, checking the register, cleaning the board, watering the plants etc etc. Even if in the beginning of the course, the kids are only separate individuals who don’t know anyone else and who perhaps do not feel like interacting with anyone else, this will be changing throughout the year. There is a lot that the teacher can do to help speed it up.
A community, be it a community made of three members or ten or twelve, will be much easier to manage than a group of individuals.
#6 Who’s the teacher?
To be honest, in my books, the main reason for inviting children to take part in taking control of the lesson is the fact that is maximising production. It is also one of the steps towards pair-work. However, there are other benefits, too. Children become more responsible for the lesson, they become more independent and they learn how to be in control. That, in itself, will have a positive impact on the classroom management and children’s behaviour. But there is more, too!
In a way, children become the teacher assistants, too, and that means that while they are leading the activity itself, the teacher can devote more (or all) of his or her attention to managing of the group and their behaviour.
#7 Pairwork
It is absolutely possible! Yes, yes, yes! I have done it and not once! I have also done it and kept and eye on how I was doing it in order to share it with my fellow teachers. You can read about it here in more detail. I will only say this: it did help me to deal with big groups and to create opportunities for all of my students to produce the language. With careful staging, with a mixed-ability goup and a mixed-age group it took thirteen lessons, from our first ‘Hello’ ever until the lesson when we played in pairs, in English.
#8Staging
Staging is a topic that deserves its own post and I will eventually get down to typing it up. In the meantime, only a few words here.
Staging is important. Children being only 3 or 4 or 5 need the external help from the teacher in order to complete the tasks successfully. The first step is the successful choice of an activity.
The second step is how it is going to be done in class, what has to be done before the lesson, how the kids are sitting, what are the main mini-stages, what are going to be the teacher’s instructions and the way of modelling the teacher chooses and so on…It all matters and if it is not taken care of and planned carefull, the activity is likely to end up being a disaster, especially if it is a craft activity and especially if the group is big and the teacher cannot physically help with cutting, colouring, glueing and assembling…
Songs are great and there are at least sixty reasons to use a song in the VYL classroom. Here it is important to highlight the huge potential they have as regards building a community, forming the everyday class routine and uniting the kids to balance the tasks they complete individually. And, as an easy stirrer. In that sense, these are especially imporatant and useufl with the bigger groups.
#10 Storytelling
In the same way as the songs are a stirrer easily included in the lesson, stories (storybooks, story boards, videos or stories told) are easy settlers. There are of course many more reasons to use these in class (I have found fifty so far) but, again, from the point of view of a teacher of a big pre-school groups, they also help build a community. They are also a great tool that can be effective with a group of one, three or twelve as all the children can participate in it simultaneously, if the activity is set up properly (some ideas of how it can be done can be found here).
Anything else? Please add your ideas in the comments!
Happy teaching!
Some other posts that you may found useful are here:
The aim of this post is the following: by the end of the post, the readers will be more familiar with the concept of connecting the EFL with the elements of Art Exploration and the appropriate craft activities.
As a source of potential inspiration for anyone who might want to try it.
The group
The kids for whom this course has been designed were a group of preschoolers, aged 4 – 6, who are and were part of a greater project at MAMM with Fun Art Kids and I was responsible for the English language slot. I taught them from October 2021 until February 2022 and we had lots of creative fun in English. I used to joke that these classes were the reason for me to wake up on Tuesdays.
My students were beginners and for many of them, if not for all, those sixty minutes of English were the only real exposure and the only real lesson and, despite the fact that it is not a lot of time (at all) we made progress that I was really happy with.
The format
The whole idea behind the Kids in the Avangard programme was that children should be given an opportunity to experience art and all the many ways of creative communication, through music, through dance and movement, through theatre, through visual arts and through English. The programme was run in module, each with their own theme (colour, shape, line etc) and within those modules the kids would participate in lessons that were separate entities devoted to an artist, an artistic movement etc. At the same time, kids work on a performance which takes place at the end of the ‘term’.
It was not easy to nest the English classes in that format but it was not possible. The main idea is that the English classes in which we deal with the beginner students (or a mixed ability group), it was impossible to aim for a very content-rich input and some adaptations had to be made for that. What I decided to do is to focus on giving the kids a good basis of English, including the vocabulary and structure from the pre-A level (although not necessarily not synonymous with and not in the order of the ‘typical pre-school curriculum’) and to combine it with the introduction to the world of the world Art and related craft activities. Just like in the case of all the other classes of the programme, our lessons were connected but each of them was a separate module, too.
The format of the lessons followed a typical EFL pre-school lesson with the hello circle, revision, new material introduction, movement and table time and it was supplemented with and built on songs and stories, too.
The palette of ideas
In the chart below you can see the content and the ideas for some of the lessons I ran as part of the course. In many ways it was an experiment, this whole course and, overall, it was a very successful experiment, the kind that makes you shout out ‘I want more of that!”. However, it was an experiement and, naturally, some lessons were more effective than others, and some ideas better than others.
In the chart below, I have decided to include those that I have tried and tested and loved, as those that I can strongly recommend, ready to use almost. All the misshaped ones will be worked on and developed and presented at a later date, when I have improved them a tiny little bit at least. But, in order to be honest and to share the experience as it was, I have also decided to include some of the things I have learnt by making the mistakes I did make. All of those you will find in the final section of this post aka What not to do.
Thegallery
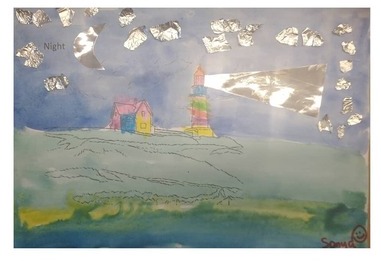
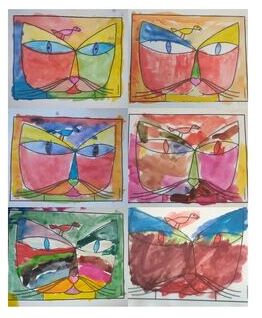
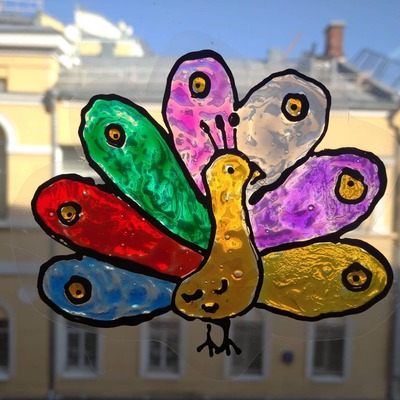
KleeGoncharovaKandinsky, Malevich, El Lissitzkyvan GoghWarhol De CosterMashkovMonet
Thenot-so-successful sideof theexperiment
The time allowances: either because it is a brand new thing for the kids (aka the entire course) or because it is a new element to the everyday class routine, the students need time to figure things out, to learn how to navigate around it and to make it familiar. Once they do, the whole programme will be a lot more effective and enjoyable. Don’t be upset if it is not an instant success.
The high expectations regarding the content and the input: the main aim of this programme is not to provide the kids with any substantial input on the artist’s life and career. Instead, they are supposed to be given an opportunity to be exposed to the world art and to interact with it.
Kids will produce the language, however, it is most likely to happen during the English language part of the lesson (introduction of the new vocabulary, practice, language games)
Each lesson has three separate objectives (language, Art and craft) and it is perfectly natural that only one of them will be given priority in a lesson and that English and the language production will not always be the main focus. If these classes are taught as a part of the general English course, then it is assumed that they will be balanced with the regular, more productive English lessons. In case of a separate course, this aspect (and potential parents’ expectations) are even easier to manage by outlining the course objectives beforehand.
Many craft activities look good on paper but they might not be easy to implement and to manage in a group of pre-schoolers. Trying, trialling and testing (aka making it first at home, before the lesson) is the best way to avoid and to get ready for at least some of the potential problems.
Time is on your side. Fnding a strong link between the three elements and preparing a coherent lesson gets easier with time. And more and more enjoyable.
There are plenty of things that can be done just with the simple resources such as markers, crayons or watercolours and paper but don’t forget that there is a lot more that can be done! Experimenting is fun!
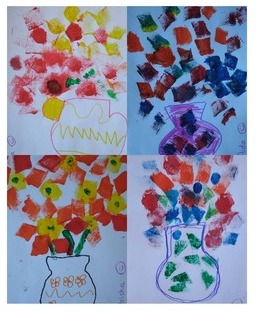
Why?
If you are still wondering whether to start including art in your EFL lessons, please have a look at this earlier post and here you can find a great website with lots and lots ideas for art activities.