Case B: Just a regular classroom
The EFL settings, a private language school, a regular classroom adapted to the needs of a group of pre-school children. There are usually big tables and chairs or the foldable desks and materials such as posters that are not necessarily child-friendly.
Advantages
- The classroom is quite likely to be big and that means that the adult furniture ( frequently the foldable tables) can be moved around to create the space for the hello circle, the kids tables, the story corner etc.
- Using the big chairs and tables can be an advantage, actually, as the children are sitting far apart and they are not invading each other’s space which might happen when you use a small table. Plus, sitting at the big table is a clear sign that the serious work is about to begin.
- You can involve the kids in arranging the classroom, that will make them feel responsible for it and it will help the teacher, too.
- The children might feel ‘honoured’ to be studying in an adult classroom as this way they will become ‘real students’, especially if they are already 5 or 6 and start dreaming of starting school.
Disadvantages
- The likelihood of sharp corners and not very child-friendly items is much higher.
- The teacher has to unfold the VYL kingdom before each lesson and fold it back at the end of the lesson because there might be older children or adults coming. And all of that eats up the teacher’s precious break time.
- The board might be too high up and the only person who can reach it is the teacher (but it is not the worst thing in the world, you can put up things in places where the kids cannot reach them)
Solutions
- Have a look at the classroom before the lesson and figure out how you can make it fit your aims and ideas. Talk to the admin of the school (and the other teacher using the room) and request permission to move the things around and to rearrange things. It is always worth checking the other rooms in the school. Perhaps one of them is more suited to the needs of the little children and perhaps swapping rooms or furniture is possible. It is always worth asking.
- Make sure that the classroom is safe. Look out for the sockets, sharp edges, anything that is not stable or sticking out. There are easy ways of making the place child-proof ie moving out the furniture, swapping the classroom, getting the socket plugs etc.
- Decide where you want to start the lesson. I am a huge fan of lining up outside of the classroom but it might not be always possible.
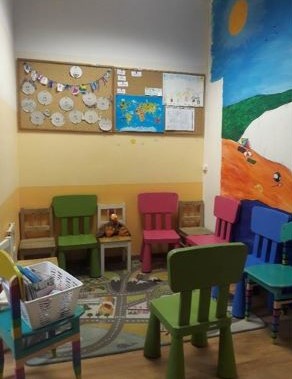
- The photo that you can see as the cover photo above is our hello circle that I created in one of the corners of our very adult classroom. In a regular lesson with my pre-schoolers, we would spend here about half or even two-thirds of our lesson. A regular lesson started here with a hello circle, songs, revision and the new langauge introduction. Later on, we would move to the big tables for the more serious work with the coursebook and handouts and we would go back to the small circle for the final game, story and song. This lasted a good few years, even after we moved to the primary and we stopped here only when my students, already A2 and as ‘mature’ as 8 and 9 y.o.
- Think of the routine that you are planning to have and build it with your specific classroom in mind. Decide where you are going to do the hello circle, where you are going to have your storytelling, where you are going to sit during the focused task. After you have built it, stick to your routine.
- Assign a corner or the area for the movement games. Perhaps the classroom is big enough and one of the corners can be kept empty. Perhaps it is not very big and you will have to move the small stools or the carpet out of the way to make room for the movement games.
- The same applies to the storytelling corner. If the classroom allows for that, it would be great to have the space dedicated only to the storytelling activities. Ideally, that would be a carpet for the kids to sit on and a chair for the teacher, to sit slightly above the students’ level. If there is no carpet, the kids can also sit on cushions or on small mats or even the foam puzzle pieces which are easily stored and can be dealt with by the children themselves. Having said that, I have also been teaching in the classrooms where the only option was for us to be either sitting straight on the floor, under the board or sitting on the big chairs in a semi-circle around the teacher.
- As regards the focused task, it is normally done at the big desks / foldable tables or at a small table that the teacher puts out in the centre. The small table means that we have all the students around us but it is not going to work for groups bigger than six. Everthing becomes very crowded all of a sudden, as soon as the sixth student comes. Using two small tables mean more work and time invested in setting them up and if they are round tables the teacher spends the entire focused task looking to the left and to the right, back and forth. With larger groups, it is almost better to use the adult seats.
- Think how you are going to store your resources and your materials. Sometimes scissors and crayons will have to be shared with the other teachers at the school (and hence stored in the teacher’s room), sometimes you will be able to keep them in your classroom. Think of a safe space that is not within the children’s reach ie the higher shelves of the cupboard, a locked-up cupboard etc.
- Decide where you are going to keep your things and resources for the lesson such as crayons or markers, handouts, flashcards for the lesson. Please use the same place and make sure you establish with the children that they are not allowed to touch anything that is on the table. It might help to keep everything in a box (as it can be easily lifted to keep it away from the children), it is easy to store and it makes cleaning easy. What is more, if you keep all your resources in one container, you gain a lot of flexibility as all your toys are there, in case you need to change your lesson plan. I have had groups with whom I had to keep all my resources in my rucksack, zipped shut in the begining of the course.
- Decide where you are going to put all the kids’ stuff such as their bags and books (which you are not going to use at all times during the lesson and for that reason it is better to keep them in a special place ie on the window-sill, on a special table etc) or even the kids’ jackets and boots. Sometimes it is possible to hang them outside, sometimes they will be hanging in the corner of the classroom. Make sure you keep your activities away from that corner
- It is good to have at least one noticeboard where you can display your students’ work. It can be a noticeboard in the classroom but it can be a noticeboard in the hallway, too. I have had classrooms in which the door was the only available space and we used to put up pictures there using blutack.
- Try to make the classroom child-friendly. Perhaps it is possible to decorate one of the corners of the room with the colourful kids’ posters or to decorate the windows with snowflakes or colourful leaves in winter and in autumn. Even if there is cupboard or boxes with toys, by bringing just one puppet, your class assistant, you can create great atmosphere in the room and make a huge difference. If there are more toys, it is a good idea to have a container for them, a basket or a box, in order to be able to keep them stored (and out of sight) when you don’t need them.
Here you can find the other two posts in this mini-series: on the classroom that is used only by the VYL students and their teachers and about the classrooms in kindergartens. This last post also includes some bibliography, if you would like to read more.
Happy teaching!
1 thought on “A VYL classroom. Part 2: Just a regular classroom”