Crumbs #34 The Weird Echo game

A beautiful bird from the folk embroidery patterns, traditional in the area of Kashuby (the north of Poland)

Ingredients

  • A grammar structure, for us it was the Present Perfect sentences with yet and answers with already and yet. If you are interested in the lessons that it was used, you can find out more here. I will present it based on this particular structure, but, naturally, the game can be used with a variety of structures, too.
  • A group of kids
  • The whiteboard where to present the pattern and the options, the online whiteboard or just a slide in your presentation.

Procedure

  • Introduce the structure in anyway you find appropriate. This time I actually used the coursebook materials (Superminds 5, CUP, Puchta and Gerngross) and the idea of the uncle sailor who has visited some countries and who has not visited some other ones, not yet anyway. And it must have been this activity that inspired me to come up with the game)
  • There is a set of pictures of all the flags in the coursebook and we used these flags in a simple controlled, drill-like activity: the teacher calls out the name of one of the countries, the kids (and the teacher) react by producing true sentences about themselves, based on whether they have visited these countries or not yet. The slide for this activity looked more or less like that:
  • After a few rounds, the kids take over and call out the countries from the list. After a few more rounds, they are allowed to call out the countries not included in the coursebook as well as any other places, countries, cities and famous places ie Germany, Dubai, Saint Petersburg, the Tretyakov Gallery etc.
  • In the following lesson, we went one step further. And then more. After we checked the homework, I showed another slide, with four variations of things we have already eated, drunk, seen and the places we have been to that day. The slide looked more or less like that:
  • First, the teacher models the activity, with each of the versions, for example a banana, coffee, the bathroom, my friend and the students react, producing the relevant sentences. After that, the students take over and lead the activity.
  • All the other versions which may appear ie written a test are allowed.

Why we like it

  • The game is an opportunity to practise the target langauge in a controlled way with some (albeit not a lot) freer practice and some personalisation.
  • It is also an opportunity to drill the structure, to perfect the intonation and the sentence stress. It can be done chorally (the kids produce all the sentences together which is less risky and much safer, especially for the shy students) or taking turns. In real life, the activity was a mixture of both and I simply let it be, although, of course, the teacher can insist on either choral or individual production.
  • Very little preparation, if any. In the first part of the task, we were able to use the coursebook materials, the visuals (the flags) and the model sentences which were already on the page. The second part required the model sentences on display, at least in the beginning. This was the first time we played this game. I suppose these will be less necessary in the future.
  • There is a lot of potential for students’ involvement: first of all, they are personalising, sharing some details from their life. But of course, there is more to that – the students are also invited to lead the game and to suggest topics, places, food, things they are interested in. This also helps to make the activity memorable.
  • We did it as a whole class but it can be done in small groups or teams, too.
  • I created it for the lesson on the Present Perfect but I believe that it can be used with the other structures, with slight adaptations ie the Present Simple and the adverbs of frequency (T: watch the news, SS: I never watch the news, I always watch the news), the Past Simple structures (T: go to school, SS: I went to school, I didn’t go to school), or the adjectives to express opinions (T: Maths, SS: Maths is easy, Maths is difficult) etc.
  • My students are kids but I can see a lot of potential for this game with my adult beginners group, too.
  • The name! Of course I like it because I came up with it but I think it does reflect the principles of the game and it is its brief description: you echo but you adapt, too)

Happy teaching!

All you need is…a picture. Vol. 2

This is still one of the top 5 among the most popular posts on this blog. But it was written about a year and a half ago. It looks like the high time for part 2. Here it is.

There is only one picture

A to Z picture: teacher writes the alphabet on the board, students work in pairs or in teams, they talk about the picture by naming the word or words beginning with each letter of the alpahbet. Younger (or lower level) kids can use only single words, older students (or higher levels) can produce relevant sentences. Thank you, Polina Smirnova, for this activity.

Dice points: kids work in pairs. They describe the elements of the picture (ie one person, animal, element of their choice or assigned by their partner (Tell me about this…). They use the structures and vocabulary that they are familiar with, depending on the level. After each round, they roll the dice to find out how many points they get. They take a note of the points and add them up at the end of the game.

I spy with my little eye: teacher demonstrates the game by describing one of the elements of the picture ‘I spy with my little eye something big and red’. It works even with the youngest children as they are not even required to name the item in the picture, they only need to point at it. When the kids are ready, they take turns to describe something to the rest of the group or to their partner. The language can be made more complex by focusing on prepositions, adding more adjectives or details. It is a great speaking and listening activity.

Yes or No? Teacher makes sentences about the picture, children listen to check if these are correct. If they are, they confirm ‘Yes’ or ‘Yes, that’s true’. If they are not, they say ‘No’ or ‘No, it is not true’ and they correct the sentence. Afterwards, they can take turns and talk about the picture for the group or their team to listen. Again, this is one of the activities that I use with my pre-schoolers and it is lovely to see how they move on from one-word utterances (correcting only the key item) to full sentences. The complexity of these sentences or their number can be adjusted to the level and age of the students.

Travelling sentences: It is a version of the Yes or No activity. The teacher displays the picture for all the students to see and gives out small cards, one per student. Each student writes a true or false sentence about the picture, the teacher can support this with providing sentence starters. When the kids are ready, the sentences start travelling, with each student passing their sentence to the student on the left or on the right. They read the sentence on the card, say if it is true or false (and correct it) and the game goes on. This stage can be done in pairs or in groups of three.

Travelling questions: the teacher prepares a set of questions about a picture. These can be reused in many different lessons so it might be a good idea to laminate them. Students work in pairs or in groups of three. Each pair picks out one of the questions, they look at the picture, read out a question and answer it. The teacher monitors and when the time is up, the students exchange the questions by passing their question to the group on the left and they continue the game. The set of questions might include: Where are the people? What are they doing? What clothes are they wearing? How are they feeling? What’s the weather like? Can you see any animals? Do you like this picture? What’s your favourite thing about this picture? What’s your least favourite thing about this picture? Is there anything strange about this picture? If it happens, that the question is not relevant to a specific illustration, this particular question can be left out or the teacher can introduce a way for the students to get out of the situation, for example: ‘I don’t know’ or ‘I don’t know. Maybe…’

Picture boardgame: It is a version of the Travelling Questions and it was created based on the same principle: there is a set of topics, themes and items that are involved in most of the illustrations that kids can talk about. The board, such as this one here (created with toolsforeducators.com) can be reused with pretty much any visual. The students play in pairs, move their checkers on the board and describe the picture according to the suggestions from the board.

Draw the picture: this is an activity that I used to use a lot with the first years of primary in order to practise reading and, obviously, with students who like drawing. We use a set of specifically prepared cards on worwall, like this one here. We get the pencils and the paper ready and I set the first card ready (‘We are in the park’). Afterwards, we read the cards, one by one, in any order (if something does not match, I skip the card to get back to it later), the students take turns to read the sentence and we all draw a picture according to these instructions. At the end, we compare our pictures and talk about some potential differences. It is a good activity to practise simple words, prepositions, colours and verbs.

Half the picture: Students work in pairs. Each pair receives only a half (or rather a part of the picture, depending on the particular photograph or illustration). First, they describe together what they can see and, as the second step, they try to guess and predict what can be seen in the part which they cannot see. Ideally, all the kids should be working with the same visual and then, in the feedback stage, the class share and compare their ideas before the teacher reveals the missing part of the picture. The materials can be easily created by cropping visuals but it is even easier with the electronic resources when a part of the photograph (or parts) can be easily covered and uncovered on the screen.

There are two pictures (or more)

Compare these two: students compare two pictures, they talk about the similarities and differences, very much like in the PET exam or like in the FCE exam, if there is a follow-up question, only without the time limits and without any B1 or B2+ language expectations as this activity can be done also with A2 or even A1 students.

Compare the two boardgame: there is a selection of pictures from the same topic ie school, sport, hobbies. They are numbered and displayed on the screen or on the page. Students play the boardgame and whenever it is their turn, they choose two of the pictures and compare them briefly. The pictures can be used many times in different combinations and students speak for about a minute.

Choose two to compare: students are given a set of picturse, for example 4. They are asked to choose any two to compare them and to explain why they have chosen these two pictures. The most interesting part of this activity is the follow up question which can be one or more of the following: Which one is your favourite? Which one is your least favourite? Which one is the happiest / saddest / funniest / most challenging / most unpleasant / strangest? Is there a picture that nobody has chosen to discuss? Why do you think you’ve never chosen this one?

Tell me about this picture: this game requires a set of pictures whose theme and level of complexity can be easily adjusted to the age and level of students. We normally use the wordwall which we play on the big screen. The kids play in teams and they take turns to open one of the boxes. They take a minute to talk about the picture they find there and they get the number of points for that. The teacher keeps track of that and announces the winner in the end. This game can be played with the lower level kids, like this one here, with pre-primary students on the topic of animals (here we play the group vs the teacher), with the level 1 primary school students on the topic of rooms, the level 5 primary school students on the topic of souvenirs (What is it? Who would like this present?) or even with B1 teenagers on the topic of travelling (What’s this place? What can be easy or difficult about travelling to this place?)

Two versions: this one is a bit more complex in terms of preparation as it involves some searching and researching. The idea behind this picture is to compare and contrast two interpretations of the same topic. Our photographs usually focus on the photographs and it would be the teacher’s job to find the other matching (or ‘matching’) item for example a painting, a sketch, a cartoon, a poster, an advertisement, a wordcloud and so on. The students discuss the visuals, compare them and choose the visual which they prefer and which better illustrates the idea.

Happy teaching!

From ‘havoc’ to ‘happiness’. Lesson planning for YL (part 2)

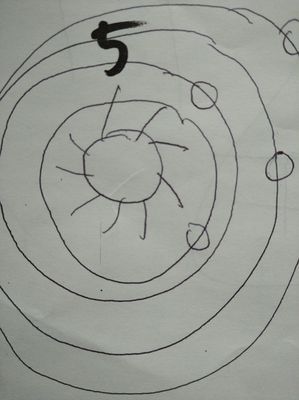
What can you see in the photograph? Oh how I wish I could hear your thoughts and all your ideas, dear reader!

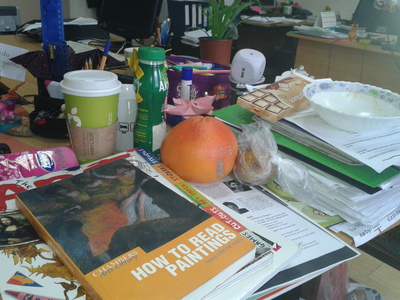
It does look pretty messy, doesn’t it? This is what I call ‘real life’.

Imagine this, I have just come into the office on the day of the training (which is not quite ready yet, not this one, the week must have been a real hell so although the ideas are there, the presentation itself is NOT, not panicking yet, but the adrenaline levels are already up) and I have just taken ‘everything I need’ out of the bag: books, notes, some copies and A LOT OF FOOD (typical). I am about to start planning. Having looked at what my desk has become, I decide to take a photo of this beautiful mess that soon will (I know it now) turn into a great seminar session.

I have decided to use this photo because it is a pretty accurate visualisation of what happens on some days when I plan my classes and to follow it up with a few words on what happens next and how I get from this havoc to the end-of-the-lesson happiness.

Based on the lesson with my ‘adult’ preschoolers a week ago.

The ‘theory’*)

Step 1: Make a decision what your main aim is. Try to verbalise it and even write it. It really does wonders for the awareness of what you, as a teacher want from the lesson.

Step 2: Make a decision what your focused task is. ‘Focused task’ is the concept that we use at my school (and have used for at least 15 years) and it refers to the main activity of the lesson in which the students get to produce the language and the activity which is the culmination of the entire lesson. All the activities in the lesson lead to it, to some extent, just like all the roads lead to Rome.

A while ago I realised that this is the approach that I am using in all my lesson planning, for all the age groups, levels, for teaching and for teacher training, too.

Step 3: Consider the materials available (mostly by looking at what the coursebook has to offer) and whether they contribute to your aims and your focused task. If not, you will need to adapt them or design new materials.

Step 4: Think of the activity that is going to be most suitable for your materials. It is like differentiating between a tool and how you are going to use it.

After all, there are plenty things that can be done with a hammer (materials), such as putting in a nail to hang a picture, breaking a window, smashing a walnut open, stirring soup (activities) and so on. Some of them are more or less appropriate, of course. The same applies to the flashcards, boardgames, handouts and what we are going to do with them.

Step 5: Take a moment and go over the activity in order to make decisions about staging. What are going to be your baby steps within the activity? whenever we do something for the first time (regardless of whether it is the first time for me or the students), I like to make an effort to actually write the main stages, even if in a very simple form, a sequence of infinitives.

Step 6: An additional step: a homework task. It might not be always possible or, rather, sometimes it might involve a lot of work as regards material design or adaptation. To put it simply, not every teacher will have enough time or energy every single time, with all the lessons taught in a week but a homework task that is an extension of exactly what happens in the lesson and creates an opportunity to continue practising the same language or structures at home, with parents.

….and the practice. Our lesson last week.

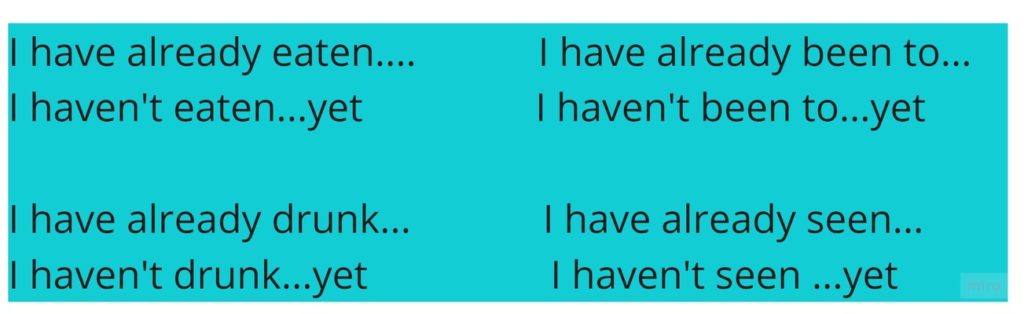
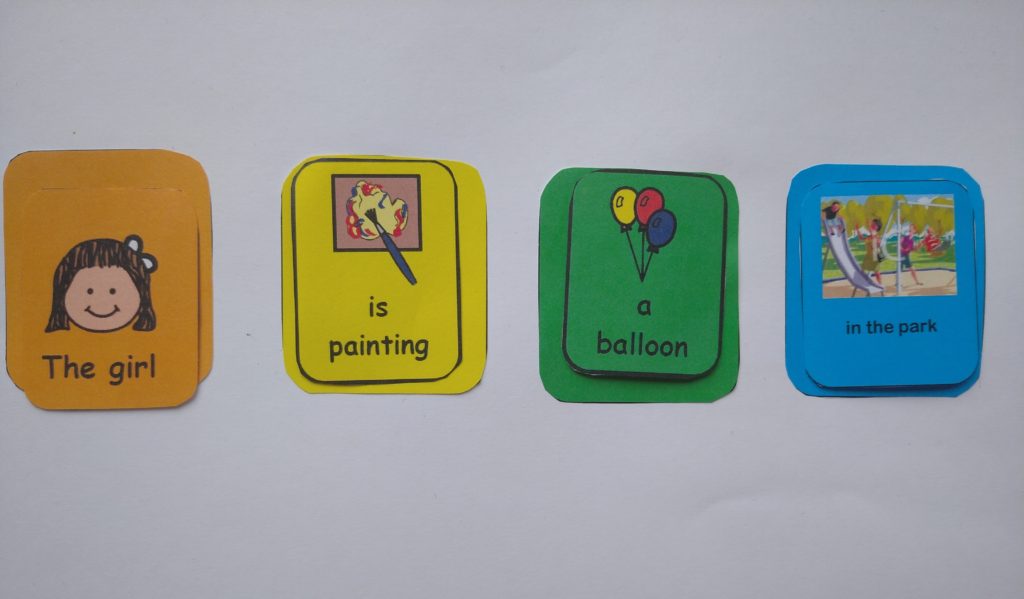
Aim: For the kids to start describing school objects and the objects in the classroom, using full sentences such as ‘It is a blue pencil’, with the focus on colours and some simple adjectives. The kids are 5 and 6 and in the beginning of their third year of EFL.

Focused task: A game in which the kids will be guessing the secret word depicted in the cards, producing full sentences instead of questions as we have done so far. The kids will be saying ‘It is a blue pencil‘, ‘It is a red pencil‘, etc until they produce an accurate description of what is shown in the picture which they cannot see.

Materials: There is nothing in the book that could help to achieve the aim. There is one practice activity but it focuses on reading and the students are only taking their first steps in the world of the early literacy. A decision is made to design the materials. Yay.

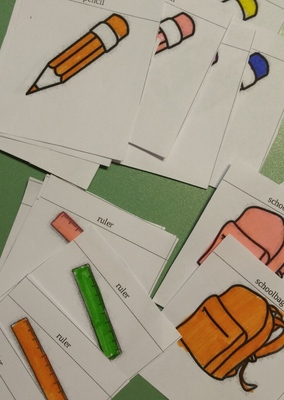
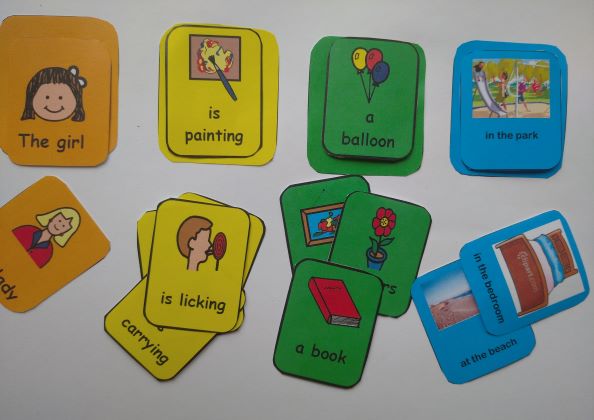
The materials are a set of cards, 7×7 cm, with clip art pictures on them, coloured-in by hand. There are three types of cards (a pencil, a schoolbag and a rules) and six variations of each, in six different colours.

The cards must have a specific size for the kids to be able to manipulate them easily. They cannot be too big (the ‘secret’ will be difficult to keep and the regular A5 flashcards might be not comfortable enough for the little hands) and not too small (as they will be too flimsy and are likely to be ‘spilled’). It might be a good idea to keep the cards in an envelope to add one more layer of guarantee that the technical bits don’t get in the way of the successful playing of the game.

There are only three types of cards in order to make it achievable, at least when the game is first introduced. Later on, when the kids feel familiar with the concept of the game, more objects or more colours can be added.

Activity: The activity itself is a simple guessing game of two stages. The teacher chooses one of the cards, keep it secret, say ‘What’s my secret?‘ Stage 1: students guess which of the three objects is depicted on the card. They say ‘It is a ruler’ and so on, until they guess.

Once they do, the teacher confirms and asks the following question ‘What colour is it?‘. Students continue guessing. They produce the sentences such as ‘It’s a blue pencil‘, ‘It’s a green pencil‘, until they guess. To help them remember the full structure, teacher counts the parts of the sentence on her finger.

Staging

  • revise the vocabulary with the regular flashcards
  • show the kids the game cards
  • elicit the full sentences (signal withe the fingers), while flipping through the cards: ‘It is a green schoolbag’, ‘It is a yellow schoolbag’ etc.
  • mix the cards, to choose one and keep it close to the chest
  • say ‘What is it?‘ and peek at the cards, secretly and suggest a possible (wrong) answer.
  • wait for the kids to start guessing.
  • keep showing the fingers and counting parts of the sentence as the students are producing the language, developing the habit of answering in full sentences.
  • confirm when the kids guess the object in the picture, praise the student who guess and all the students
  • say ‘What colour is it?‘, peek at the cards, secretly and suggest a possible (wrong) answer
  • wait for the kids to start guessing.
  • after a round of two, the kids take over – call one of them out and ask them to sit on the teacher’s chair, choose the picture for them (to save time, especially in the first lesson) or let them choose the picture they want to play with but operating the cards yourself. The kids might be able to take over in the first lesson, they might be able to take over only in the following lesson, when the game is played for the second time.
  • encourage the group to make sentences, counting on your fingers, praising the kids, encouraging them to produce full sentences.

Homework

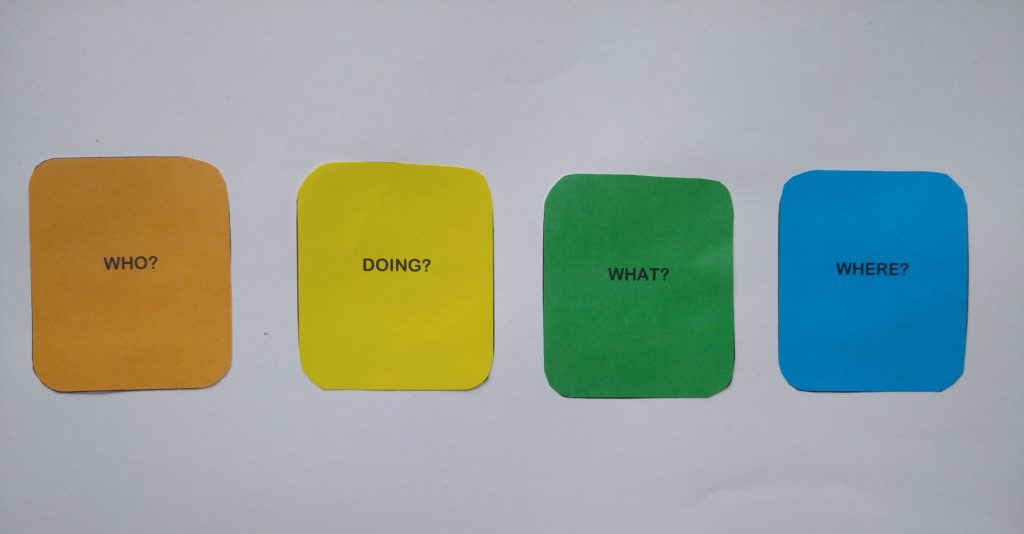
The homework task in this lesson was a simple handout, ‘a sentence maker’ in which the students have to complete the missing parts of the sentences, either by adding the colour (by colouring the box) or the adding the school object (by drawing it). The kids choose their own words. Later on, they ‘read’ their sentences. You can find the basic handout here.

The teacher makes one copy per child and one more to demonstrate the instructions in class. When we did this kind of an activity for the first time, I added the colours myself in line 4 and 5 to make the task straightforward. In the future, they will be given more freedom when they are more familiar with the format and the idea that each part of the sentence is represented by a visual or a symbol.

Did it work? aka ‘Happiness’

You know this moment when you are teaching and you literally want to get up and pat yourself on the shoulder with ‘OMG, you rock’? because you are allowing yourself, simultaneously, to teach and be fully in the lesson but also to be evaluating this lesson as if you had been the observer in the room. And it is actually going on very well?

This was one of these lessons.

The kids loved the guessing game, especially that they were given a chance to lead. The cards and the handout did help me achieve my aims and by the end of the focused task, the kids were producing full sentences, although I had to remind them a lot to use full sentences. It was much better in the second lesson with the same game. The kids were eager to start playing the game and I only had to model once. They were ready to take over and they produced a lot of language.

If you want to read more on the subject, have a look at this post where I share how I approach the everyday lesson planning for preschoolers.

Happy teaching!

*) Inverted commas because it is not a real theory, only a set of daily procedures, verbalised.

Crumbs#16 The Musical Challenge!

The first challenge ever (primary, A1)

Today about an activity that requires almost no preparation and is a nice break from the coursebook and from the everyday. Plus – you can draw. Ready? Let’s start the Musical Challenge!

Ingredients

  • A piece of paper, some drawing tool and a few tracks.
  • The choice of the tracks will depend on the teacher but it is good to include a variety of genres, songs or music with different tempo and instruments. I like to pick songs with a long intro and in a language that the students do not speak, not to let them be influenced by the lyrics.
  • Tell the students that you are going to play a short piece of music and they have to draw what they are thinking about when they hear this music. Highlight that all ideas are good ideas. Give the students an opportunity to include words, for example is some concept are difficult to draw.
  • Model, with a sample track.
  • Play about 30 – 60 seconds of a track and give the students up to a minute to finish drawing after the track stops. However, this is a fast-paced activity and its main aim is to provide material for speaking, not the drawing itself. Some students might want to make their drawings too pretty and too detailed and that will take time.
  • Put the students in pairs, let them discuss the songs. If possible, it might be a good idea to play the track they are discussing in the background to create the appropriate atmosphere.
  • Remember to put the questions / structures you want the students to answer / to use on the board. It will help them produce and stay on the ball.
  • Final feeback can include choosing the favourite and least favourite song.

Why we like it

  • It is very easy for the teacher to set up. It is enough to play the audio from the phone or even from youtube, pratically no preparation is necessary. It is possible to prepare a grid with numbers but it is much easier to give out an A4 or an A5 piece of paper that the students are asked to fold into halves until you get eight or six boxes. It works well, too. Because of that, it can easily become your go-to last minute, no-prep activity that can be added to any lesson.
  • It works well with different ages, not only with higher-level students, although, obiously, they will be able to produce more langauge and to discuss their own associations, metaphors, using more advanced language such as modal verbs for deduction. At the same time, even the younger and lower level students can describe their illustrations using simpler structures (I can see, he is wearing, he is happy) and to express their views (I like this song, I don’t like this song because…). The youngest students that I have done this activity with were about eight years old and studying in the A1 level.
  • The teacher has a lot of flexibility, this activity can be stopped whenever it is necessary, after four, five or eight tracks. The activity does not really have an end so it does not matter when it is stopped, for example when the students are not quite interested.
  • It can be further extended into a homework task. The students can be asked to choose a song, prepare their drawing at home and then play the song for everyone in class and either draw or just talk about their associations before presenting their original picture. If the songs are played in other than L1 or English (or if the beginning of the song does not include any text), the discussion can go in the direction of the story that the song is telling, based on the title, the summary or the single quotes.
  • It gives the students a chance to express themselves through drawing. We do a lot of that with the younger students but as we go, higher (level) and older (age), drawing and colours do disappear from our lessons, sadly. It is good to bring these moments back. They students do enjoy these.
  • It is a fascinating opportunity to see how music can be seen by a group of people and how different these associations can be.
  • It is highly personalised and open-ended, all ideas are good ideas
  • As a result, that kind of an activity generates a lot language.

The last time we did it a few week ago, we used the following tracks (we also read a text in our coursebook on music and fashion in the last 70 years, this is how all of the songs appeared here and how I listened to Ed Sheeran for the first time in my life:). Now, have a look at the pictures illustrating this post and have fun guessing which song inspired them. The Joni Mitchell, River

The Rolling Stones, Gimmie Shelter

The Clash, Should I stay or should I go

Ed Sheeran, Perfect

Backstreet Boys, Tell me why

Buddy Holly, Everyday

P.S. My kids loved the Clash and the Stones! Not all is lost)))

Happy teaching!

We want more. We ALWAYS want more! Maximising language production

Here is my favourite character who would be a perfect amabassador for ‘We want more‘, my professional obsession (you might have noticed:-) and some of my favourite solutions for the classroom.

Trick number 1: The language

Regardless of what coursebook is used or what curriculum is followed, there are certain language items that can be included even in the pre-primary programme that will enable children to communicate and produce more language.

Some of these language items include:

  • descriptive adjectives, such as big – small, long – short, happy – sad, beautiful – ugly, serious – funny, old – new, etc. Introducing them in opposites will make it easier for the students to understand and to remember
  • simple linkers, introduced gradually, starting with ‘and’ (‘blue and green’, ‘cats and dogs’, ‘I like bananas and apples’), then moving on to ‘because’ ( starting with ‘I am happy because it is sunny’) and perhaps even ‘but’ (‘I like dancing but I don’t like dancing with a bear’, like in the song from Super Simple Songs).
  • introduce Present Continuous, because it will be easy to play with it in all the miming games and it will come in very handy while describing pictures and telling stories.
  • talking about other people. Personalisation is very important while learning language, not only with the little ones, but it is also a good idea to start introducing other people and the language we need to talk about them such as ‘she/he is / has got / can / likes’

Trick number 2: The freedom of speech

This freedom of speech has got very little with the civil rights. It is all about the degree of freedom that the students are given or, in other words, about the scaffolding and the support that are slowly removed in order not to limit the students and to enable them to choose what they want to talk about.

One way of doing it is shifting from closed yes/no questions towards more open-ended questions. ‘What do you like to eat?’ is more likely to generate more language that only ‘Do you like bananas?’ which will lead to one-word answers or maybe even only gestures. ‘Tell me about‘ will be a lot more generative.

Using this approach while working with illustrations, pictures or any kind of visuals will give students the opportunity to choose for themselves what to talk about. And it is quite likely that they will pick the topics (elements or aspects of the picture) that they are either more interested in, have more knowledge of or are better prepared to discuss. In any case, more language is likely to be generated.

Examples or real activities? Here you are:

Pairs is a speaking activity that uses a simple material of a set of pictures. The students put them in pairs, in any way they want. They also have to justify their choice. In case of the younger learners, this principle can be the colour (‘Panda and zebra. They are black and white’) but kids can also choose any other reason for that, like ‘Zebra and horse, they have 4 legs’ or ‘Bear and deer. They live in the forest’.

This activity can be also used with the older students who are given a list of words and have to put them in pairs, according the knowledge and the language they have.

Below you can see the end of the game with my pre-primary student. It started off slowly, with simple sentences about the colours that the animals have in common but as the activity progressed, the categories changed, too and we have here an example of animals that have a long tail (a lizard and a monkey), animals that live in the forest (a bear, a fox and a deer) or animals that like meat (a tiger and a lion).

This is the final product of our Pairs activity, using the visuals on Miro

Tell me about is another activity that uses a visual, for example a set of pictures with animals or a picture scene. Students choose an element for their peers to describe, for example Tell me about this boy’ and it is easy to imagine the variety of responses that these can generate. Students can choose to talk they boy’s clothes, feelings or actions.

Trick number 3: The appropriate activities and materials

Our students do what we want them to do. It is assumed so, precisely because we are teachers and they are students. The roles have been assigned once and for all. The question to ask yourself, though, is Would they really want to do it, if they had a choice? Is there anything in the task itself that would encourage them to? Or not.

Certainly, it does not meant that all those less-exciting-but-crucial activities will be renounced forever, because even though they are not always fun from the point of view of our students, they might still be necessary and useful, but it is an interesting aspect to start taking into consideration while lesson planning.

Here a few activities that use that principle

Yes or no? This is an activity that also uses visuals as the basis. In the first stages of the activity, the teacher describes the picture using very simple structure ‘I can see’ when some of the sentences are true and some are false. Students listen to the sentences and correct the sentences. In case of the pre-primary students, this is likely to be one-word production but with time, they are learning to respond in full sentences. Later on, when the students are familiar with the format of the activity, they are invited to take a leading role in the activity, also producing true or false sentences about the picture for the teacher and their peers to correct.

Kids love the game because they can correct the teacher’s mistake and they are allowed to create their own un-true sentences about the pictures and to try to trick the teacher. I have used it both with primary and pre-primary students. The younger kids, naturally, needed more time to adjust and to start producing full sentences, in the beginning they would only provide the key information, for example the colour or the number of objects but, eventually, they were comfortable enough with producing full sentences. At approximately the same time, they were ready to lead the game, too. The older, primary students could make this transition within a lesson.

This is how we were telling our own version of ‘Pete the Cat. I’m rocking in my school shoes’ using the visuals on Miro

Storytelling for pre-primary is based on picture description. Here, the easily available materials might involve the stories from the coursebooks for pre-primary, retelling together any other story used in class or even any of the materials in the YLE Starters materials. In this case storytelling is scaled down to simple picture description, in the appropriate sequence.

Storytelling for primary can also use the visuals but it can be more challenging with the use of storydice or a storytelling treasure hunt (see here)

The lion and the kitten is a simple boardgame that has been very helpful in encouraging the students to produce the language. It was created and used with the online 1-1 pre-primary students. The game does not use a dice. Instead the students can choose the box where they want to go next and in each round, they have to talk about one of the pictures hidden under the yellow, orange and blue diamonds. In the beginning the sentences are very simple and focus on simple vocabulary (‘It’s mommy‘), later on these can be exchanged for a more detailed description (‘Mommy is happy‘ or ‘Mommy is dancing‘) and even further extended with the use of ‘because’ (‘Mommy is dancing because she is happy’) or in any other way that is within the children’s linguistic ability.

This game gives children a lot of freedom and almost a guaranteed victory. The cards can be changed easily, especially in the online format, and even if not, new sentences can be made every time the game is played. With a group of children, a dice would probably have to be used.

This is the board for our boardgame, also created using the visuals available on Miro.

Are you in the park? is a simple guessing game turned into a role-play. Each student has a city plan (since this was the language that we were working at the time) and three stickers which they glue somewhere ‘in the city’. They keep their picture secret and they try to guess where their partner is at the time.

Student A: Are you at the bank / park / market?

Student B: Yes, I am / No, I am not.

After a while, they can ask for help.

Student A: Please help me.

Student B: I can see…I can hear…I can smell….

Student A: You are…

Initially, the stickers were introduce only to prevent the kids from ‘cheating’ but they absolutely loved having random leftover stickers all over the place. In the first lesson we play, it was pirates, in the second one, it was farm. They laughed a lot about having little pigs and chicks all over their cities. The other incentive was the opportunity to imagine and to describe the places from the angle of what they saw, heard and smelled in different places in the city. The kids had the full control over the game and they were making the decision themselves when to move to the second stage.

For some more tricks, please see my other posts: the discourse clock, pairwork for preschoolers or using ambiguity to get the students to talk.

Happy teaching!

Colourful Semantics in EFL?

Have you got something that you could file under ‘professional interests‘ (or, more to the point in some cases, ‘professional obsessions’)? Mine is language production.

That is why I am always on the lookout for new ideas on how to trick my students into producing more and more. And more. Some of these ideas can be found on this blog, in the posts on the discourse clock, pairwork for pre-schoolers, using songs or cognitive skills-based activities to develop speaking. Today – a new post in the series.

It was probably one of those free-falling searches on Instagram, with no rhyme and reason, that got me to Saffira Mattfield’s (@onlinespeechie) Instagram post on Colourful Semantics. A very special moment, like when you stumble upon a proper toolbox with the screwdrivers and bolts and saws and monkey wrenches…Or, when in the supermarket, you wander into the baking aisle and, all of a sudden, all the professional decorations and ingredients right within your arm’s reach…This amazing and a very powerful feeling of: ‘I could do so much with it!’

Colourful Semantics

The approach was created in the 90s by a UK-based speech therapist Alison Bryan in order to help children develop their speaking skills especially as regards the use of full sentences, storytelling and so on.

The main idea behind colourful semantics is the colour-coding of parts of speech and the parts of the sentence and developing the habit of including all the necessary ‘ingredients’ in the simpler or more complex sentences. This is done with the use of the cards, like those in the photograph below. Subject (who?) is orange, verb (what doing) – yellow, object (what?) – green and, location (where?) – blue.

Colourful Semantics cards from @onlinespeechie Saffira Mattfield

Children start with building simple sentences by using only two cards, for example ‘The girl’ (an orange card) and ‘is painting’ (a yellow card) and putting them next to each other on the template. Later on they move to constructing sentences made of three elements, for example ‘The girl’ (an orange card), ‘is painting’ (a yellow card) and ‘a balloon’ (a green card) or even four, by adding the blue card with the location, for example ‘in the park’. They not only learn to remember to include all the elements but they can also manipulate them physically. The sentence itself becomes less abstract since it all its key elements are represented visually.

If you are interested in all the details, please have a look at the bibliography.

Colourful Semantics in EFL? Yes, please!

Colourful semantics perfectly resonates with everything that I have been doing in my lessons. Grammar structures and the format of the sentence are an abstract concept, beyond the grasp of pre-schoolers especially those who live in their own country, surrounded mostly by their mother tongue and not exposed to a sufficient amount of the target language. By using some kind of a visual representation of the parts of speech or the parts of the sentence, we make it more accessible to them and we enable production.

This visual representation can be realised through:

  • using gestures such as ‘pointing at yourself and sliding the hand along your body to draw attention to your clothes’ for ‘I am wearing’
  • using symbols such as ‘a heart’ for ‘I like’ and ‘a crossed heart’ for ‘I don’t like’
  • using flashcards such as ‘big’ and ‘cat’ to elicit a chunk ‘a big cat’

And…colours!

While making the sentences, students will be required to use all the required colours, ‘to tick all the boxes’, this way building a full sentence or a phrase. Of course, they might require more support from the teacher who will have to ensure that they did not skip any of the elements, but, the hope is that with time, including all the elements will become a habit.

Colourful semantics in the EFL classroom: how to get started

Step one: very easy

Get in touch with Saffira (@onlinespeechie) in order to get your own set of the ready-made cards. It is a perfect way of familiarising yourself with the colourful semantics in practice and to understand how it can be adapted to our EFL context. Although, of course, these cards can be used in the EFL classroom as they are, depending on the level of your students.

Step two: adapting the idea to your groups’ needs

The materials presented below were used with a group of the second level of four- and five-year-olds. Since they were still learning online, they were not using any real cards but only the visuals created with the Miro board. The unit was built around the topic of the house and included some furniture vocabulary, the prepositional phrases ‘the cat is on the sofa’ and some of the Present Continuous based on a story as well as a song.

The boards were used to practise these phrases were used later in the unit, when the student had become familiar with all the basic components. The main structure ‘The mice are having fun’ was introduced through a song. The first time the cards were used, the teacher was a very active participant, taking turns with all the kids to make sentences. In the following lessons, the teacher only modelled the activity and was responsible for moving the pictures around in accordance with the sentences the kids were producing.

The first set was designed to support the production of the sentences with the preposition ‘on’ which were later practised in a freer practise activity (‘My room’) whereas the second one focused on Present Continuous which was later reinforced in a storybook activity.

For the time being, a decision was made not to adapt the original colour-coding system and instead, a set of colours was assigned freely to each structure, to help the children associate them with each particular components of different structures, rather than with the whole system.

Reflection time

I have just started experimenting with this approach in my classes but the first steps in the world of Colourful Semantics have been more than exciting. This is definitely not the end of that adventure. Right now I am working on a set of cards that I could share with the parents of my students so that they could be printed, cut up and used at home.

Want to find out more? Start here:

Bryan, A. (1997) Colourful Semantics: thematic role therapy. In Chiat, S., Law, J. and Marshall, J. (Eds) Language Disorders in Children and Adults: Psycholinguistic approaches to therapy. London

Bolderson et al in (2011) Colourful Semantics: A Clinical Investigation. Child Language Teaching and Therapy October 2011 vol. 27 no. 3 344-353

Saffira Mattfiled @onlinespeechie

Colourful Semantics from London Speech Therapy