All you need is… a picture. Vol. 3

This episode is going to be devoted to the older students, juniors, teenagers and adults and those of the higher levels, from B1 upwards.

All of these activities were inspired by the approach in the visual based speaking tasks of the Cambridge exams. I use these activities frequently at the beginning of the ‘unit’, to introduce a new theme, to ease us into it and to start with some freer speaking activity, that, really, does not have any specific linguistic requirements or a very formal framework. Not to mention that by the way, my students get an opportunity to practise and develop their exam skills, in a slightly more relaxed way.

All of these activites are deeply rooted in my professional laziness because even though I have to devote some time to the picture selection, that is, really, the only time investment beacause the task is usually a one sentence instruction and, to be perfectly honest, most of the ideas listed below were created during the lesson, as a follow-up and an extension of the regular Cambridge ‘similar or different’ task.

Usually, my greatest helper while preparing these activities is google search engine. I type in the key words and I look through the images until I find these four, six or eight that match the idea that I have in mind. They can be saved in a document or displayed on the screen (powerpoint or Miro). I save them and keep them for later because they are always recycled.

Frequently, I start the cycle with the simplest of the activities (‘Choose two to compare’) and I follow-up with a wider discussion (‘Have you ever…?’) or any other combination but, naturally, these can be used on their own. All of the activities can be done with the whole class or in pairs.

  • Talk about your favourite photograph: students choose the photograph that they really like, they describe it and justify their choice
  • Talk about your least favourite photograph: students choose the photograhp that they like the least, they describe it and explain why they don’t like it
  • Choose two pictures for your friend to compare: students choose two of the pictures to compare them, to look for similarities and differences, very much like in the B2 speaking part of the Cambridge exams. The fact that there are more than two pictures allows for the activity to be repeated a few times, over and over, in pairs or with different partners. The longer the activity takes, the more interesting arguments appear and the more creative the answers.
  • Choose two pictures for your friend: students work in pairs but in this case they choose two pictures for their partner to compare. It makes the activity more interesting as it is easier to avoid all the obvious choices and this way more interesting contributions are generated.
  • Have you ever done that? This is the activity in which we use all the pictures at the same time. Students ask each other the question about all pictures, one by one.
  • Would you like to? This is another activity that can be used with all the pictures. Students ask each other questions related to the situations in the pictures, but more focused on the future.
  • The comparatives: Another activity in which students discuss all the pictures, going over the list of questions and choosing the pictures that somehow stand out. The set is closely related to the theme of the photographs. For example, in a lesson devoted to health and health problems we looked at these four pictures and we answered the questions: Choose the most serious problem, the least serious problem, the most common problem, the easiest to deal with, the least unpleasant for the doctor, the least unpleasant for the patient, the most expensive to treat, the least expensive to treat, etc.
  • What happened before? What will happen afterwards? This is a cool actvity that I adapted from the latest editions of New Cutting Edge Advanced. Students choose their favourite pictures and discuss the before and after, almost telling a story.
  • Ask a question: students work in pairs, they ask their friends questions related to the pictures, they have to use different pictures and different question words and they need to a different word each time: What? Why? Who? Where? How many? How much? What kind of? When? How often?
  • It reminds me of: students work in pairs, they talk about all the pictures. The talk about their associations, memories or references. It can be a free activity or it can have a theme of: books, films, songs and personal memories.

Make sure you also have a look at the first two parts of this series. You can find them here and here.

Happy teaching!

Crumbs # 50 Vyacheslav or about getting ready to tell a story

Ingredients

  • a group of A2 or A2+ kids preparing for the Cambridge Flyers or the Cambridge KET exam
  • a set of the storytelling pictures from the exam writing materials
  • a piece of paper and a pen

Procedure

  • The teacher displays the visuals on the screen and tells the kids that they will be used to tell a story.
  • The teacher asks the kids to look at the visuals and decide what their character is going to be called. Everyone writes the name down on their piece of paper.
  • The teacher tells the kids to write down ten numbers, 1 – 10, and, when everyone is ready, to write ten things that they can see in all the pictures. These can be only nouns or a selection of nouns, verbs, adjectives etc.
  • The teacher asks the kids to decide what kind of a story they are going to tell: a happy story, a sad story or a scary story. Everyone decides and draws a relevant smiley at the bottom of their list.
  • The teacher divides the kids into pairs and sends them into breakout rooms to tell their stories. They have to use the name, all ten words and they have to make sure that their story has the mood they have chosen for it.
  • Back in the common room, the kids give the group a summary of their story (‘It is a story about a boy who…’)

Why we like it

  • The main aim for me in this particular lesson was to show the kids that even such uninspiring illustrations as the ones we used (and sadly, they were really boring this time) can be a start of a fun storytelling activity and that the final product’s quality depends only on the writers that is us.
  • We are preparing for a progress test and a mock test and I am hoping that an activity of that kind will get the students ready for the independent work during the test itself. Looking at the visuals and making the list helped the students think of the words that they see and it helped to assure that they will be closer to getting to the required wordcount (35 words). If they have ten on their list already 30% of the way there. It also gave them the time necessary to really look at the pictures and to start thinking of what might be happening.
  • From the word ‘Go’ the stories became personalised because the character got a name and became six different boys instantly, Fred, Bob, Tom and Vyacheslav among them. (‘Anka, but why Vyacheslav?‘ ‘I am not sure. I looked at him and I just thought he looks like a Vyacheslav‘).
  • Deciding how the story will end in the beginning also helped to shape it. It was the first time we did it and for that reason I only offered three options: a happy story, a sad story and a scary story but that list can be easily extended. We shared how we were planning to tell the story before we went into the breakout rooms and among our six stories there were three happy stories, one sad story, one scary story (mine) and one ‘ill story’ because one of my students decided that his character is going to catch a cold in the end. Anyway, from the very beginning the kids knew where they were taking their Fred and their Bob. They also knew that their partner’s story will be a bit different so, hopefully, they were more interested in listening to it. There was some variety in the group so I could put them up in a pair whose angle was different.
  • It can be easily done in the classroom but it works amazingly well in the online classes and this is how it came to be. I wanted to avoid sharing the visuals and wasting time on opening them.
  • It is easy and it can be a speaking activity in its own right or it can work as a story-writing preparation task as it was in our case. Consequently, a set of three pictures can be used (Flyers and KET writing tasks) or a set of five pictures (Flyers speaking tasks).
  • As a potential follow-up, the kids can write the story for homework.
  • Next time (and there will defnitely be another round of this activity), I am going to add a more communicative element that will give them a proper listening task and that will give them an opportunity to interact with their partner’s story such as retelling the story they have heard in the breakout rooms, creating a title for their partner’s story or continuing it (‘The next day…’). I know that choosing the best story is sometimes suggested with this kind of an activity but, to be honest, I am not a fan. Not everything needs to be a competition.

I am a lazy teacher and why you should be, too!

Two weeks ago I was invited to present at the monthly meeting of the Teacher – Mentor Learning Community which was founded by Anna Kashcheeva who, over the years, has been my fellow teacher, ADOS, trainer, my trainee and my trainer and supervisor. Oh, what a lovely list))

I prepared a session on laziness, one of my professional passions. The session went well, the audience were amazing and I got a lot of positive feedback. We were not recording but the presentation was followed up by a post on the community’s blog and you can find it here. Once you get there, don’t forget to have a look at all the other posts and materials.

Happy teaching!

Crumbs #39 A lazy role-play

Ingredients

  • Any role-play or a dialogue i.e. a transcript of any listening task which is a dialogue (i.e. Movers listening part 2, part 3), any written dialogue (i.e. Movers reading and writing part 3), any functional langauge introduced in a dialogue or a role-play
  • A pencil or a highlighter for each child

Procedures

  • Start with the main aim of the task is, ie listening in case of task 3 of Movers or reading in case of Movers, introduction of the functional language, etc. Go through all of the stages outlined in the teacher’s book or whichever ones you see fit in your teaching context.
  • Give out highlighters or pencils, ask the kids to open the books and look at the text again.
  • Introduce the concept of a banana (or whichever random word you want to use). Explain (and demonstrate!!!) that you will read the text slowly with some bananas in it and that if the students hear the word ‘banana’ they have to highlight or underline one word that comes immediately afterwards. Model with a few words.
  • Read the text with the bananas as the kids listen, follow and underline or highlight. The words chosen to be highlighted are the key words for each specific dialogue and their number depends on the dialogue and on the age and level of the students. With the older students and the more complex texts and language, the students can highlight two or more words that constitute a phrase or a collocation. This can be signalled with a repeated number of bananas ie banana banana for a two-piece phrase or banana banana banana for a three-piece phrase.
  • Ask the students to work in pairs and read the dialogue again and to use their own words and phrases instead of every banana.
  • Afterwards the kids can change roles and read it again or change the partners.
  • If the kids are ready, in the final (and optional) stage of the activity, they can close the book and role play and recreate the dialogue and the converation based on what they remember.

Why we like it

  • It requires no preparation, unless by preparation you mean opening the coursebook and finding the role-play or finding the teacher’s book and making copies of the transcript of any listening activity
  • It offers a great opportunity for the students to practise their speaking skills in an activity that is both controlled (as we have a framework) and free (as there are quite a few options to choose from)
  • It also offers a chance to work on the grammar accuracy and the transformation skills
  • It can be done online or offline
  • It can be done with a variety of levels. The highest level I have used it with was B1 (teens), the lowest level, so far, was A2 (primary).
  • So far, I have only tried it with dialogues but now, writing that post, I started to wonder about the potential of that activity for discourse building and creation. The original text could serve as a potential framework and support for the students to use. I am yet to experiment with that option.

Happy teaching!

Crumbs #38 A – Z Game

Ingredients

  • A piece of paper and something to write with
  • All the letters of the alphabet written in one or two columns, with some space to write, next to each letter

Procedures

  • The teacher divides the students into pairs or teams and gives out the paper with the letters of the alphabet or asks the kids to write these down.
  • Step 1: The teacher announces the topic i.e. Clothes and asks the kids write one word (or phrase) for each letter of the alphabet or, more realistically, for as many letters as they can. The teacher gives an example. Ideally, the teacher creates her/his own list in order to have a set of words to model the other stages of the activity.
  • The teacher sets the time limit (i.e. 5 minutes for the younger kids and 3 minutes for the older kids). It might be a good idea to use a song instead and after the song finishes, the activity does, too.
  • The kids work in teams and make a list of the words within the vocabulary set. After the time is up, the teacher stops the game.
  • Step 2: The kids exchange the lists and count the words or phrases which their friends have managed to write within the set time limit. The teacher writes the results for each team on the board.
  • Step 3: The teams read the words on the lists and choose: the most interesting word, the most unusual word, the funniest word, three words you also have, three words you don’t have, any word you don’t understand or remember etc. The teams work in pairs and find out why their partners put these words on the list. If possible, the kids exchange the lists with another team and repeat the procedure once or twice.

Why we like it

  • For the students it is a great opportunity to revise and recycle vocabulary. All the beginner levels aside, even when the main lesson aim is to introduce and to practise new vocabulary, chances are the kids have already learnt, heard, used or seen some of the words. After all, the vocabulary sets are repeated and extended from level to level, not to mention that most kids have more than one source of English in their lives: the state school, the language school, a private teacher, brothers, sisters, parents, videos on youtube, cartoons, stories, computer games online…This game is one of the easy ways of revising all this vocabulary to prepare for ‘something new’
  • For all the reasons mentioned above, it is an absolute necessity for the teacher to find out how much the kids already know as regards a certain area in order to do a very focused (if a very contained) needs’ analysis and to adjust the volume, the level and the intensity of the new material presentation later in the lesson
  • It is very easy and requires no preparation whatsoever.
  • It helps to improve the students’ self-confidence because it gives them an opportunity to see how much they know already.
  • It can be used with any set of vocabulary, either thematic (i.e. clothes, food, animals) or content-related (i.e. the words necessary to describe a picture, the words used in a certain text or a listening task, a video)
  • The final task can be easily adapted i.e. choose 5 words to describe yourself, choose 5 words to use in a story or in a dialogue, choose 5 and describe them for your partners to guess, use a dictionary to find the words or structures for the missing letters, compare the lists with your friends to find the words or the structures for the missing letters, use the words to describe a photograph, use the words to talk about your day today etc.

Happy teaching!

Crumbs #37 We are going to the beach! A summer lesson for pre-schoolers

Ingredients and procedures

  • Few. Depending on what you can find at home
  • The lesson plan with all the ideas can be found here

Why we like it

  • Little preparation, only a few items of realia
  • A great lesson for the summer months
  • Works well with big groups
  • Lots of movement, the whole lesson is based on gesture
  • Lots of potential for production, especially if this lesson could be developed into a series of lessons
  • A fun lesson, we really went to the beach

Here you can read a bit more about the background of this lesson: How do you know that you are an experienced teacher...

And here: Big Thanks to Ola for letting me scavenge her house in search of realia aka resources)

Crumbs #34 The Weird Echo game

A beautiful bird from the folk embroidery patterns, traditional in the area of Kashuby (the north of Poland)

Ingredients

  • A grammar structure, for us it was the Present Perfect sentences with yet and answers with already and yet. If you are interested in the lessons that it was used, you can find out more here. I will present it based on this particular structure, but, naturally, the game can be used with a variety of structures, too.
  • A group of kids
  • The whiteboard where to present the pattern and the options, the online whiteboard or just a slide in your presentation.

Procedure

  • Introduce the structure in anyway you find appropriate. This time I actually used the coursebook materials (Superminds 5, CUP, Puchta and Gerngross) and the idea of the uncle sailor who has visited some countries and who has not visited some other ones, not yet anyway. And it must have been this activity that inspired me to come up with the game)
  • There is a set of pictures of all the flags in the coursebook and we used these flags in a simple controlled, drill-like activity: the teacher calls out the name of one of the countries, the kids (and the teacher) react by producing true sentences about themselves, based on whether they have visited these countries or not yet. The slide for this activity looked more or less like that:
  • After a few rounds, the kids take over and call out the countries from the list. After a few more rounds, they are allowed to call out the countries not included in the coursebook as well as any other places, countries, cities and famous places ie Germany, Dubai, Saint Petersburg, the Tretyakov Gallery etc.
  • In the following lesson, we went one step further. And then more. After we checked the homework, I showed another slide, with four variations of things we have already eated, drunk, seen and the places we have been to that day. The slide looked more or less like that:
  • First, the teacher models the activity, with each of the versions, for example a banana, coffee, the bathroom, my friend and the students react, producing the relevant sentences. After that, the students take over and lead the activity.
  • All the other versions which may appear ie written a test are allowed.

Why we like it

  • The game is an opportunity to practise the target langauge in a controlled way with some (albeit not a lot) freer practice and some personalisation.
  • It is also an opportunity to drill the structure, to perfect the intonation and the sentence stress. It can be done chorally (the kids produce all the sentences together which is less risky and much safer, especially for the shy students) or taking turns. In real life, the activity was a mixture of both and I simply let it be, although, of course, the teacher can insist on either choral or individual production.
  • Very little preparation, if any. In the first part of the task, we were able to use the coursebook materials, the visuals (the flags) and the model sentences which were already on the page. The second part required the model sentences on display, at least in the beginning. This was the first time we played this game. I suppose these will be less necessary in the future.
  • There is a lot of potential for students’ involvement: first of all, they are personalising, sharing some details from their life. But of course, there is more to that – the students are also invited to lead the game and to suggest topics, places, food, things they are interested in. This also helps to make the activity memorable.
  • We did it as a whole class but it can be done in small groups or teams, too.
  • I created it for the lesson on the Present Perfect but I believe that it can be used with the other structures, with slight adaptations ie the Present Simple and the adverbs of frequency (T: watch the news, SS: I never watch the news, I always watch the news), the Past Simple structures (T: go to school, SS: I went to school, I didn’t go to school), or the adjectives to express opinions (T: Maths, SS: Maths is easy, Maths is difficult) etc.
  • My students are kids but I can see a lot of potential for this game with my adult beginners group, too.
  • The name! Of course I like it because I came up with it but I think it does reflect the principles of the game and it is its brief description: you echo but you adapt, too)

Happy teaching!

The Unsung Heroes of the YL classroom

Masking tape aka Painter’s tape

The funny thing is that I cannot remember when I discovered that the painter’s tape existed. Maybe it was Vita, my friend and my colleague who first brought it to school…

What I know is that for the past four years I have always had a roll of two at home and a roll or two at school. Because, right now, there is no classroom without the painter’s tape.

Every single time we do anything in the hallway, any kind of a treasure hunt, any jigsaw puzzle, anything which involves things being put up on the walls, the painters’ tape enters the picture. I prefer it to blutack because I don’t mind just throwing it out (instead of peeling it off carefully from every single scrap of paper) and, even more importantly, my students don’t feel tempted to nick the tiny little bits of the precious resource.

My primary students who are learning to read and write know this resource very very well. We use the tape to write instructions for different activities, especially if they needed to be displayed around the school and all our lessons would start with a fun activity with the little chairs – some of them would have the bits of the tape with funny words on them, for example choosing the place to sit (‘I am sitting on the Happy Octopus’), making sentences with the key word written on the chair (‘dancing’ – ‘Today I am a dancing hippo’) or even writing and creating random combinations of words.

Apart from that, pieces of the tape can be left on each table, one per student. They can be used in any kind of surveys (‘Which game would you like to play?’, ‘What was the most difficult part of the lesson?’) but I also noticed that the students liked to write on them, just to express themselves, to scribble while they were listening or to just to somehow personalise the table where they were sitting.

The tape can also be used to help group and pair the students. There should be a piece of tape on every desk and on these the teacher write the names of different superheroes (a very broad term in my lessons, it can include both Batman and Cheburashka, Harry Potter and Aleksander Sergeevich Pushkin, Lionel Messi and Santa). On entering the classroom at the beginning of the lesson, the students pick out one of the cards with the same name from the teacher and this is how they find out where they are sitting on the day. The same cards can be used later on to mix the students, with the teacher (or one of the students) picking out two cards to decide that in the following activity Superman will be working with Harry Potter and Robinson Cruzoe with Superman etc.

AND, though there are no photos, the painter’s tape was THE LINE on the carpet that helped my little babies sit in a safe and appropriate distance from the big TV on the floor.

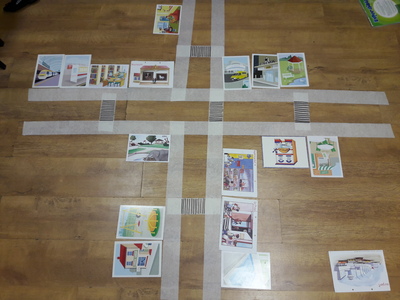
Last but not least, we have used it to create a city plan on the floor which we later filled in with flashcards and we used to move around. It is a rather limited use, but, oh what an amazing lesson.

The door

The door is the most underestimated and underloved part of the classroom. And how undeservedly so! Even if you have only the most standard door (not those double door straight from a castle), that is a good two square meters of a notice board, ready to use! It would be recommended to check the material, the surface and the ‘stickability’ and to test different adhesive materials that will not destroy the door itself but there is scotch, there is the painter’s scotch and there is blutack to name at least a few that could be used here.

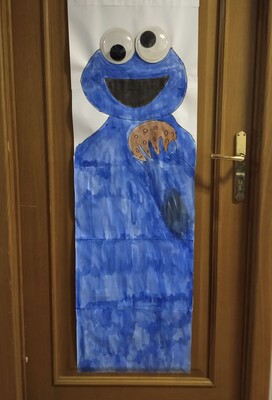
In my classrooms we have used the door in the following way: putting up the huge posters to use instead of the numbers (The Caterpillar Classroom, The Baby Shark Classroom, The Cookie Monster Classroom), putting up the homework poster (‘Did you do your homework?), putting up the washing line with all the clothes to use during (‘Today I am wearing…’), putting up the classroom rules posters, the library reviews poster (for the kids to leave the reviews after they have read something), the test feedback poster (‘How difficult was the test? 10 – very difficult, 1 – not difficult at all) and any class surveys completed on the way out, the sight words reading practice on the way in, displaying the alphabet poster when we were just starting to read, displaying any of the work that the students produced (when the walls were already taken) and, last but not least, or quite the contrary: the first ever: The Door of Doom aka the poster we created with my FCE students by adding bits and pieces to the poster throughout the course. These bits and pieces were all the things we struggled with: the mean phrasal verbs, the less common suffixes, the collocations that we would always make a mistake with and so on.

Next time you are in the classroom, have a look at the door and at this whole unused space…And what you could do with it. Once you start, you will never stop.

Counting sticks

This entry is perhaps not such a great surprise. After all, all the little people (and their teachers and parents) are very familiar with these colourful plastic sticks. Everything else aside, this should be one reason to be including them in our EFL lessons.

We use them mostly to count, of course, the kids pick two or three or twenty and this helps to make such an abstact idea as numbers a little bit more visual (because three items lying on the table, three sticks, three fingers or three dots on the dice are a better representation of the secret that this symbol ‘3’ stands for) and kinesthetic when we let the kids manipulate the sticks. Luckily, the sticks are cheap and easy to get so having lots and lots of them, enough for everyone, is not a difficult aim to meet.

One of my favourite games to play (perhaps because it is a perfect solution for a lazy teacher) is using these together with the paper plates with numbers. The kids look at the number, count the sticks and add or take them away, in order to make sure that the number matches the number of sticks. Which is also the beginnig of adding and substracting.

By the way, flashcards will do here, too, but the plates have the advantage of having the rim and the sticks do not slide off and you can easily just pile them up on top of each other, put them aside and sort them out after the lesson.

With my ‘adult‘ pre-primary kids, we have used these same counting sticks to help children manage a pair-work activity, to add a visual and kinesthetic element to the verbal exchange. We were practising different varieties of ‘What’s your favourite…’. The kids were sitting in pairs, on the floor, around a set of flashcards that would symbolise the themes (an apple for ‘What’s your favourite fruit?’, a teddy for ‘What’s your favourite toy?’ and so on) and one student in each pair would get a set of five sticks. They were supposed to ask their partner five questions of their choice (we had ten categories) and while doing that, they were supposed to put the stick away, on the relevant card. We used a similiar tool when they were interviewing their partners about things they like (‘Do you like…’ + any words of the kids’ choice) and I guess it can be adopted to pretty much any structure.
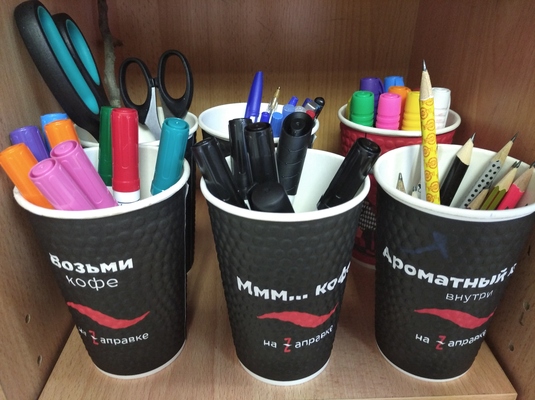
Plastic cups

Or any other recycled cups (like those in the photo) which are easily available. They are my favourite resource to sort out materials (pencils, pens, bits and pieces for a craft activity, especially the leftovers, which I hide in the cupboard for later). They also help to organise materials which I give out to the kids, for example we have a set of boxes with crayons organised by the colour, for some, more teacher-centred activities, as here the teacher is the one in charge AND a set of cups organised in sets, one full set per student, which we use in all the SS-centred activities in which the students make decisions which colour to use.

With my older students, I use the plastic cups whenever we use dice in class (and that is OFTEN). The dice given to students (kids and teens) ‘just like that’ have the most amazing ability to fall off the tables about once per minute. Plus they make LOTS and LOTS of noise and if you have a group of then and five dice are rattling and rattling…Well, you can imagine. If you put each dice into a plastic cup, you can still shake it and get a number and everything is more manageable. I think I saw it first in Nataliya T’s class and here are my thankyous for this idea!
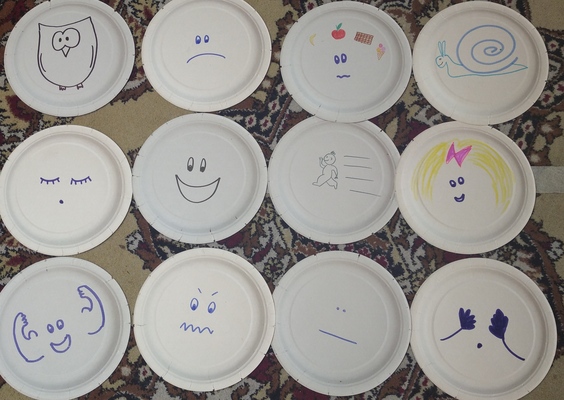
Paper plates

Oh the paper plates! They are of course used at parties and in craft lessons to make clocks, spinners, plates for all the ‘fruit salad’ craft activities, snowmen, frogs, chicks, rabbits and what not…But there is so much more!

For me it was this one day when I got an idea for a great lesson for which I really needed the number flashcards. These, however, were left behind in the office, so getting them for the lesson that was the first lesson of the day, early in the morning was out of the question. I rushed to the school cupboard in the house, to go over all the treasures there, with the idea of something that could help me replace the flashcards and there they were – a set of colourful cardboard plates from my local supermarket (which I must have bought for some class party earlier). Creating the flashcards took three minutes and a permanent market and it turned out that these particular plates (many of which I bought later on in the same supermarket) were perfect for it: big, durable, colourful but not too colourful since there was a thick colourful rim but the centre was just white and empty aka perfect for writing!

We normally use the number plates like any other flascards, first and foremost but the different shape adds to the variety and makes the topic of numbers a bit more fun. We also use them together with the counting sticks (see above) or with any other bits. We used the numbers 1 – 12 to create a huge clock on the floor and we played some movement games with it.

The plates became the canvas that helped me create my amazing emotions and adjectives cards (sorry about blowing my own trumpet here but there is a lot of love here) which we have been using for more than two years now.

Not to mention that the plates can be a very useful tool to organise all the bits and pieces while getting ready for a craft activity, hats for the snowman on one plate, scarves for the snowman on another, and they all can be stuck on top of each other. And, as you know, every little helps to make the teacher’s life a bit easier.

What are the unsung heroes of your classroom? Please share!

Happy teaching!

Crumbs #29 How do you feel today? The alternatives

From the series: The Beautiful Life

Ingredients

  • None, almost. In some cases, it might be necessary to write some of the ideas on the board, to serve as an inspiration. See procedures

Procedures

  • Students work in pairs. They share their ideas. If there is time, the students can change partners and repeat the activity. To round up, students share some of the information they have found out about.
  • This stage is always present, in each lesson, and it takes about 10 minutes. We keep the same variant for about a month and then we choose a new one.

All the variants (so far)

  • Verbs: the teacher writes on the board all the basic verbs in the past tense: I went to, I saw, I ate, I drank, I talked to…about…, I watched, I played, I bought, I wrote, I didn’t…The kids choose 5 and they build simple sentences about their day, week or weekend. I like to start it with my students even before we officially cover the Past Tense (as soon as they are ready to differentiate between the present / the past form of the verbs) and it really does help the kids to practise and to remember the verb forms.
  • Did you go…: a variation of the activity described above. The teacher puts the question form and the short answers on the board. The kids work in pairs and ask each other questions. The student who provides answers uses ‘I did’ and ‘I didn’t’ but they are also requested to give a brief explanation (because…)
  • Tell me about your day: the teacher writes the name of the activity and a list of topics which can be also elicited from the students. The regular set might include: the weather, the school, the teachers, my best friend, lunch, getting around, marks, tests, pets, brothers and sisters, homework etc. The students work in pairs and they have to choose three topics to talk about. They take turns to share stories about their day and they follow-up each story with a question.
  • The B-words: this one is a slight variation of the above, only here the teacher writes a selection of words starting with a certain letter as the list for the students to choose from and to be inspired by. Some of the words might be completely random but they also encourage the kids to produce the language. Later on, the students can choose the letter of the day and then can also help make the list of the words, too.
  • This is how I felt today: in this variation the teacher puts up the words to describe emotions and feelings. The list can be a simple one (happy, sad, angry, sleepy, hungry, tired, bored) and then it can be extended to include more interesting ones, too (confused, excited, chatty, exhausted). Again, the students choose 3 or 5 of them to describe their day.
  • Superheroes: this time the list on the board is made of names of superheroes, famous people as well as characters from books and films, for example Superman, Spiderman, Wonder Woman, Chebourashka, Winnie-the-Pooh, Santa etc. The students are supposed to think of their day from the point of view of these characters and describe it talking about how they felt. ‘I felt like Superman because I got three good marks today’*)
  • The superlatives: the teacher writes on the board a list of superlatives (the best, the worst, the funniest, the tasties, the most difficult, the easiest). The students choose 3 or 5 of them and use them to describe their day, for example: The best thing was that I had only three lessons etc.

Why we like it

  • A stage of that kind is absolutely necessary as the time for the students to settle in
  • This is also when they learn how to communicate without any preparation and outside of any set-up frameworks since each day might be different and each day may involve a different set of verbs and nouns
  • At the same time, it is an opportunity to practice the past tenses or the perfect tenses as for many of the students, many events repeat themselves (going to school, writing tests, having a good day or a bad day etc)
  • It is a fantasic opportunity for the group to bond, to share the great things that happened during the day or to vent about all the disasters that they had to deal with, the tests, the teachers, the piles of homework

To be continued. Soon. We are quite likely to get very bored with what we are doing at the moment…

Happy teaching!

*) My favourite so far! It is amazing how my students come up with their own metaphors and associations, both the teenage group and the kids. Here are a few quotes: ‘I felt like Chebourashka because I was a bit confused’, ‘I feel like Robinson Cruzoe because I am locked up at home now’, ‘I feel like Masha from Masha and Medved because I am a bit crazy today’, ‘I felt like Santa because it was my friend’s birthday and I had a present for him’, ‘I feel like Superman because I did all my homework really fast’…

All you need is…a picture. Vol. 2

This is still one of the top 5 among the most popular posts on this blog. But it was written about a year and a half ago. It looks like the high time for part 2. Here it is.

There is only one picture

A to Z picture: teacher writes the alphabet on the board, students work in pairs or in teams, they talk about the picture by naming the word or words beginning with each letter of the alpahbet. Younger (or lower level) kids can use only single words, older students (or higher levels) can produce relevant sentences. Thank you, Polina Smirnova, for this activity.

Dice points: kids work in pairs. They describe the elements of the picture (ie one person, animal, element of their choice or assigned by their partner (Tell me about this…). They use the structures and vocabulary that they are familiar with, depending on the level. After each round, they roll the dice to find out how many points they get. They take a note of the points and add them up at the end of the game.

I spy with my little eye: teacher demonstrates the game by describing one of the elements of the picture ‘I spy with my little eye something big and red’. It works even with the youngest children as they are not even required to name the item in the picture, they only need to point at it. When the kids are ready, they take turns to describe something to the rest of the group or to their partner. The language can be made more complex by focusing on prepositions, adding more adjectives or details. It is a great speaking and listening activity.

Yes or No? Teacher makes sentences about the picture, children listen to check if these are correct. If they are, they confirm ‘Yes’ or ‘Yes, that’s true’. If they are not, they say ‘No’ or ‘No, it is not true’ and they correct the sentence. Afterwards, they can take turns and talk about the picture for the group or their team to listen. Again, this is one of the activities that I use with my pre-schoolers and it is lovely to see how they move on from one-word utterances (correcting only the key item) to full sentences. The complexity of these sentences or their number can be adjusted to the level and age of the students.

Travelling sentences: It is a version of the Yes or No activity. The teacher displays the picture for all the students to see and gives out small cards, one per student. Each student writes a true or false sentence about the picture, the teacher can support this with providing sentence starters. When the kids are ready, the sentences start travelling, with each student passing their sentence to the student on the left or on the right. They read the sentence on the card, say if it is true or false (and correct it) and the game goes on. This stage can be done in pairs or in groups of three.

Travelling questions: the teacher prepares a set of questions about a picture. These can be reused in many different lessons so it might be a good idea to laminate them. Students work in pairs or in groups of three. Each pair picks out one of the questions, they look at the picture, read out a question and answer it. The teacher monitors and when the time is up, the students exchange the questions by passing their question to the group on the left and they continue the game. The set of questions might include: Where are the people? What are they doing? What clothes are they wearing? How are they feeling? What’s the weather like? Can you see any animals? Do you like this picture? What’s your favourite thing about this picture? What’s your least favourite thing about this picture? Is there anything strange about this picture? If it happens, that the question is not relevant to a specific illustration, this particular question can be left out or the teacher can introduce a way for the students to get out of the situation, for example: ‘I don’t know’ or ‘I don’t know. Maybe…’

Picture boardgame: It is a version of the Travelling Questions and it was created based on the same principle: there is a set of topics, themes and items that are involved in most of the illustrations that kids can talk about. The board, such as this one here (created with toolsforeducators.com) can be reused with pretty much any visual. The students play in pairs, move their checkers on the board and describe the picture according to the suggestions from the board.

Draw the picture: this is an activity that I used to use a lot with the first years of primary in order to practise reading and, obviously, with students who like drawing. We use a set of specifically prepared cards on worwall, like this one here. We get the pencils and the paper ready and I set the first card ready (‘We are in the park’). Afterwards, we read the cards, one by one, in any order (if something does not match, I skip the card to get back to it later), the students take turns to read the sentence and we all draw a picture according to these instructions. At the end, we compare our pictures and talk about some potential differences. It is a good activity to practise simple words, prepositions, colours and verbs.

Half the picture: Students work in pairs. Each pair receives only a half (or rather a part of the picture, depending on the particular photograph or illustration). First, they describe together what they can see and, as the second step, they try to guess and predict what can be seen in the part which they cannot see. Ideally, all the kids should be working with the same visual and then, in the feedback stage, the class share and compare their ideas before the teacher reveals the missing part of the picture. The materials can be easily created by cropping visuals but it is even easier with the electronic resources when a part of the photograph (or parts) can be easily covered and uncovered on the screen.

There are two pictures (or more)

Compare these two: students compare two pictures, they talk about the similarities and differences, very much like in the PET exam or like in the FCE exam, if there is a follow-up question, only without the time limits and without any B1 or B2+ language expectations as this activity can be done also with A2 or even A1 students.

Compare the two boardgame: there is a selection of pictures from the same topic ie school, sport, hobbies. They are numbered and displayed on the screen or on the page. Students play the boardgame and whenever it is their turn, they choose two of the pictures and compare them briefly. The pictures can be used many times in different combinations and students speak for about a minute.

Choose two to compare: students are given a set of picturse, for example 4. They are asked to choose any two to compare them and to explain why they have chosen these two pictures. The most interesting part of this activity is the follow up question which can be one or more of the following: Which one is your favourite? Which one is your least favourite? Which one is the happiest / saddest / funniest / most challenging / most unpleasant / strangest? Is there a picture that nobody has chosen to discuss? Why do you think you’ve never chosen this one?

Tell me about this picture: this game requires a set of pictures whose theme and level of complexity can be easily adjusted to the age and level of students. We normally use the wordwall which we play on the big screen. The kids play in teams and they take turns to open one of the boxes. They take a minute to talk about the picture they find there and they get the number of points for that. The teacher keeps track of that and announces the winner in the end. This game can be played with the lower level kids, like this one here, with pre-primary students on the topic of animals (here we play the group vs the teacher), with the level 1 primary school students on the topic of rooms, the level 5 primary school students on the topic of souvenirs (What is it? Who would like this present?) or even with B1 teenagers on the topic of travelling (What’s this place? What can be easy or difficult about travelling to this place?)

Two versions: this one is a bit more complex in terms of preparation as it involves some searching and researching. The idea behind this picture is to compare and contrast two interpretations of the same topic. Our photographs usually focus on the photographs and it would be the teacher’s job to find the other matching (or ‘matching’) item for example a painting, a sketch, a cartoon, a poster, an advertisement, a wordcloud and so on. The students discuss the visuals, compare them and choose the visual which they prefer and which better illustrates the idea.

Happy teaching!