January is our month of colours, chosen this way to balance up the monochromatic landscape outside the window. At the moment, due to the combination of various factors, calendards and timetables, I get to teach every lesson first with my older group and then to repeat it and to re-do it with the younger kids. This, in itself, is a fascinating set-up for experiments and reflection. The activity with the objects in unusual colours was created for my little ones but it was such a success that I decided to do it again with my older group, too. It was a success and my older and more advanced children were even more involved and more capable of taking part in a discussion and expressing their views on pink teddy bears, brown unicorns and pink chocolate. This was the main language activity in this lesson. The older group were using a wider range of structures, including ‘I really like’, ‘I really don’t like’, ‘I love’ and ‘I hate’ and they could explain why they felt this way.
Because of that I am going to repeat it, once more, with a different set of images in this coming week.
This week, we invited not one but two artists to lead us through the world of colour and this decision was made specifically with the art project I planned for us for the day and that, in turn, was the result of these creators’ artistic decisions.
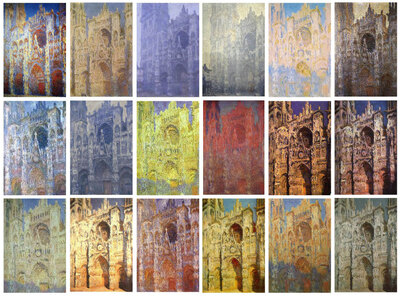
My main idea was to show the students how the same object can be painted with different colours and how the selection of the colours can affect our perception of the painting and our emotions. Or, in other words, why would an artist choose specific colours to paint.
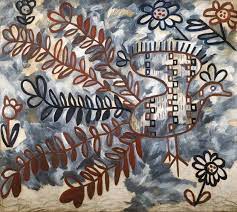
Our first artist of the day was Claude Monet and his cathedral, the other Natalia Goncharova and her peacock, or rather, two peacocks because Natalia Sergeevna created more than one and that was exactly what we needed. We looked at the two peacocks and answered a few questions: ‘What colours can you see?’, ‘Do you like this peacock? Why?’, ‘How does it make you feel?’, ‘Why did she choose such colours?’, ‘Which one do you like more?’. We compared the paintings with the photos of the cathedral and of the bird.
In general, the colourful peacock was a favourite although some of my students mentioned that there are too many colours and they are too loud. The black-and-brown peacock was noone’s favourite as very thin, very sad and a bit scary.
We needed these artists also because their colour decisions were rooted in two different sources – the sun itself and the artist’s conscious decision and it is the second approach that we were getting ready to use in our art.
https://arthive.com/ https://arthive.com/
The art
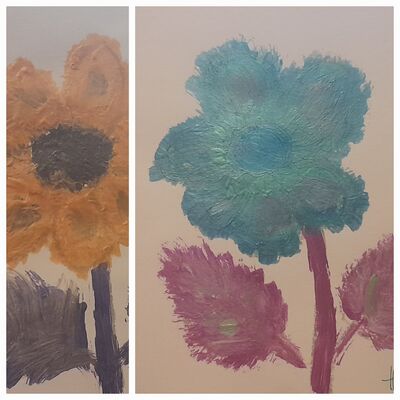
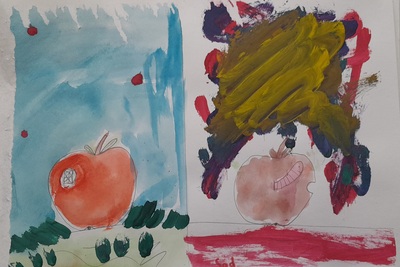
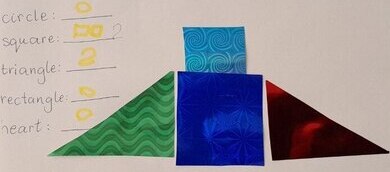
The task was very simple and it came as a natural follow-up of the activities in the first half of the lesson: choose a simple object and paint it twice, using a different set of colours to represent two different ideas or emotions.
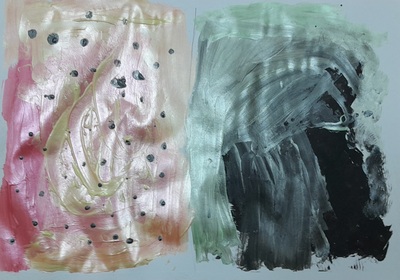
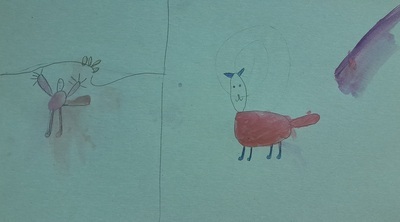
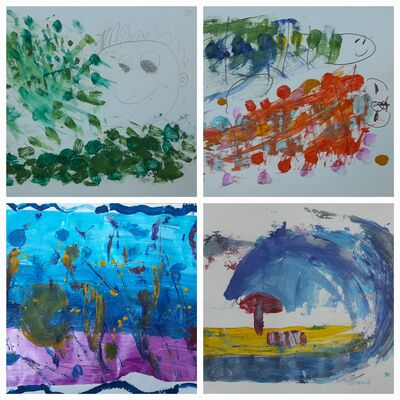
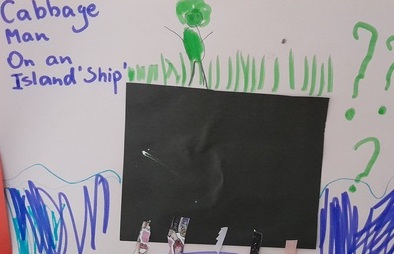
To demonstrate how it can be done, in an even more direct and straightforward way, I showed the students the pictures that I created – a flower that I decided to paint using my happy colours, such as pink, green and blue and to paint the same flower using the colours that make me angry (orange, purple and yellow). You can see it above. Below – everything that my students created last Wednesday.
Before we started, we also brought back our earlier project, namely Andy Warhol and Chebourashka that I wrote about here. The previous activity had a character in it and it was, perhaps, easier to associated it with a set of emotions whereas this time round I wanted everyone to be a little bit more open-minded and, at the same time, to focus on the emotions and colours, rather than on looking at the world through the character. However, I did not limit them in any choice and, as a result, some of them decided to choose two different items to paint or to even give up on the shapes and focus entirely on the colours.
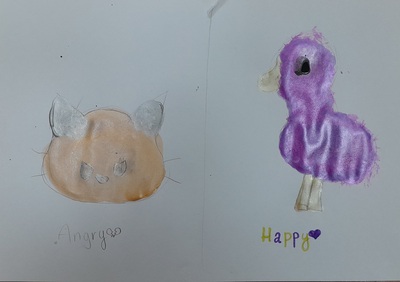
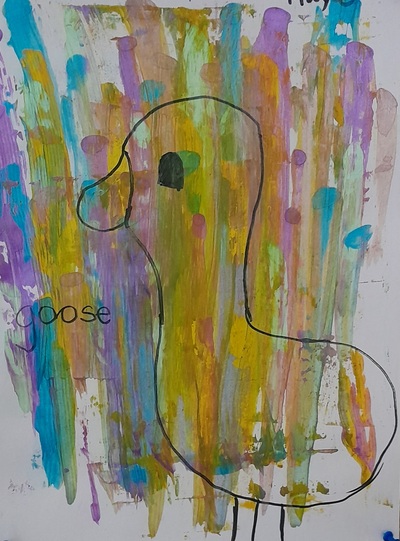
It is exciting to see that they paired up their beloved shapes and characters with the colours they love and, in the same vein, they made a decision to combine their less preferred colours with the characters they just don’t like. It seems your beloved goose could just not be painted in the colours you have a strong dislike for.
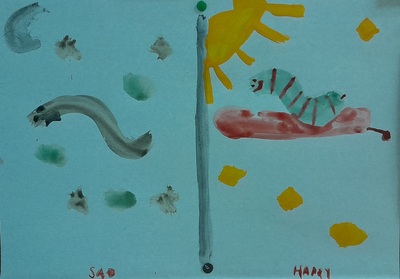
The kids made conscious decisions regarding the colours and while they were painting, we were discussing their choices and, in the end, the final outcome, too. And it was a real discussion, to a large extent in L2, in some cases also in L1.
This last piece here is special in many ways because we had a new student join our group and try his hand at creativity for the first time. He got the idea and the was happy to experiment with the colours and images and it turns out that his favourite combination is a cat in pink because this is his favourite colour and because ‘Boys like pink, too!’. He is one of the epitome of the cool kid and the would be alpha male in our class so I was surprised and in awe that he dived in and took to everything that we do in our classes. And, even more so, he enjoyed it.
This time, the whole lesson planning process started with my decision to spend the whole month of January doing fun things with the colour and it was an absolute necessity to start with Vasilyi Kandinsky. This particular lesson did not follow the traditional routine and the painting that is usually the centre piece of the lesson, this time made only a cameo appearance that illustrated what our artist liked to create.
The language
We started in a very relaxed way and in the first lesson we talked about our favourite colours. We also learned some more advanced colours names.
I wanted to get the kids to associate colours with emotions, feelings and music, just like Kandinsky did, and that is why our next stage involved watching a video with the unusual instruments and deciding how we would present each instrument and its sound with a colour. After each short clip, we paused the video and shared our views. Only then did I introduce the artist of the day.
With the youngest group we focused on the basic colours which we revised using two of my favourite songs: What’s your favourite colour? – with looking for colours around us and with My yellow car – with pausing and guessing what product is going to be bought.
Afterwards, to get the kids ready for the alternative approach to colours we looked at the set of cards which I prepared, the everyday objects in unusual colours. I asked the kids to look and to say what they think of the idea, using a simple ‘I like it / I don’t like it’. It was a lot of fun!
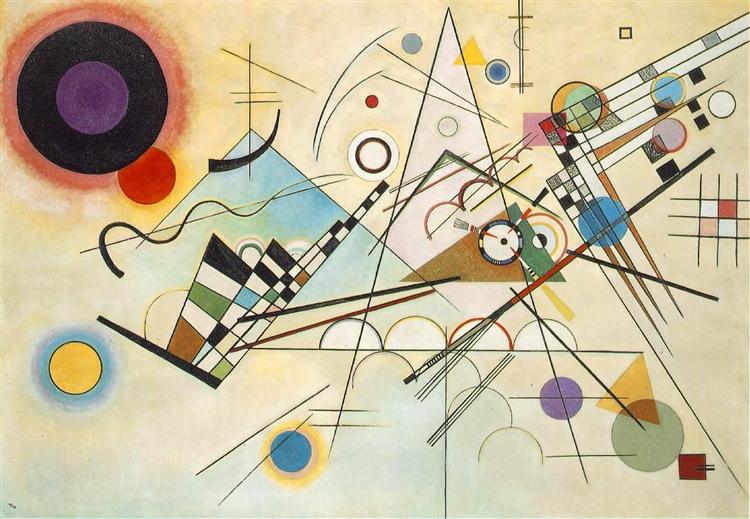
Kandinsky, Composition VIII
The artist
The reason for that was the fact that Vasilyi Kandinsky spent a large part of his creative life not only using colours but also trying to understand them (‘Effect of Colour’). After we shared our ideas about different pieces of music, we watched a clip of the video ‘What’s the Sound of Colour‘ to check whether we agree with his interpretation. Sometimes we did and sometimes we didn’t.
As a follow-up to that we looked at Kandinsky most famous creation, Composition VIII, but only to have something to represent him with. We did not analyse the painting apart from the title because the name went nicely with the idea of colours and music.
Our lesson with the little kids was so packed with activities that I had to skip the artist stage, in order to make sure that we had enough time for our creativity. Nonetheless, it all worked very well!
The art
I did not want to create anything in the style of Kandinsky not to steer away from the colour itself. For that reason I chose spread painting – it has the colour at its centre, it is not very challenging and it can be done with a variety of different paints.
Before the lesson, I prepared the paints (acrylic and gouache), the pieces of thick cardboard (photocopying paper box cut up into bits) and the paper. I used the thicker paper sheets used for watercolours to ensure that the paper holds up the amount of paint and water and I decided to go for the A3 size, to give the children more flexibility with the spreading movement and the feel of being real artists who work on bigger sheets.
In this kind of a lesson, it was absolutely necessary to demonstrate the technique and in order to do that, I put my paper on the floor, made a decision about the colours that I wanted to use, put a few blobs of different colours and then showed the students some basic movements to spread the paint on the paper (straight, wavy, circular, semi-circular). Apart from that, I also had a few pictures of my own, prepared before the lesson, with different movements, sets of colours and, in some cases, the additional drawings with a marker. These already had titles, too.
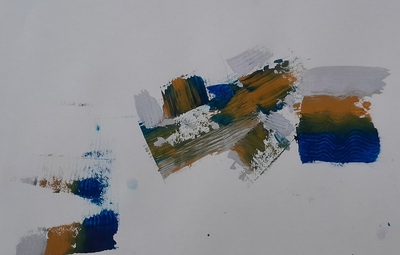
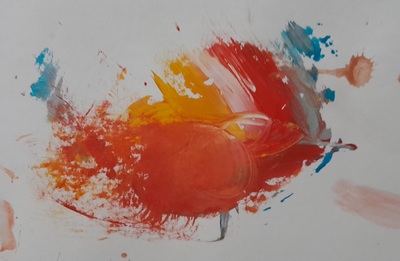
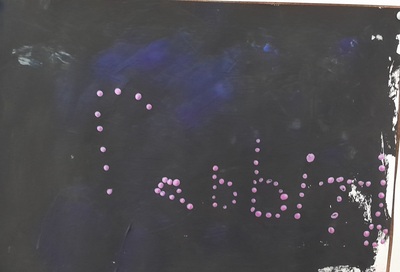
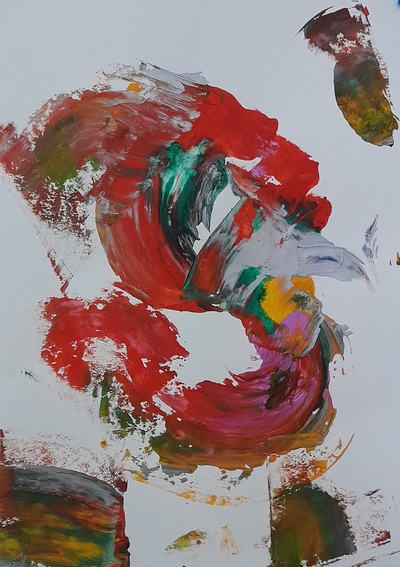
Afterwards, we just went on to create. The most important decision to make was the colour selection and we discussed that while I was walking around the room and monitoring. It was great to see how these decisions were made and how the kids were becoming more confident with the movement and the technique. In the gallery below you can what they produced and how their favourite things are reflected in their creations i.e. ‘the rabbit’ created by a fan of rabbits and Malevich or ‘the goose’ that features in many of our lessons because a goose is my student’s spirit animal. I am also extremely proud of the blue – mustard – silver creation which is the title photo because it was a first for one of my students who so far had been only sitting and participating in our debates. He finally felt curious and ready to get his hands dirty and with what result! I just love the combination of colours here.
Initially, I wanted everyone to name their paintings but then I gave up that. After all, this was our first approach at the abstract art and I just wanted them to enjoy the process without pushing them too much. Our paintings are now on display and we can always get back to them and give them their titles later on, when we are more comfortable with the non-figurative art.
It was a great lesson! Next week I am going to get to repeat it with my younger kids and then, there is the rest of January to celebrate colour!
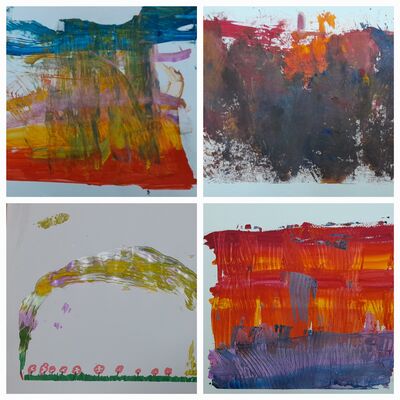
Here are some of the pictures that my little students created! It was one joy of a lesson, with my students discovering the world of the modern art and the brand new technique, experimenting with it and being proud of their creations. Amazingly enough, they really took to looking for ideas in their paintings and trying to name them. This was just precious.
One of the YLE Cambridge visuals, Movers speaking (4 pictures), Flyers writing (3 pictures) or Flyers speaking (5 pictures). In our case, this time it was Paul and his Granmother from Flyers from the sample tests booklet (volume 2 p. 96), tampered with lightly (see below)
A handout created to accompany the visuals, you can download it from here
Procedures
Prepare the visuals by covering up the numbers on the pictures and making a copy for each student, cutting these up. Make a copy of the writing handout for each student.
Introduce the story: without revealing too much, for examply by telling the kids that they are going to meet a boy and read a story about his day.
Give out the visuals, cut up, ask the kids to find out the start of the story (aka picture number 1), talk about this picture with the class. The questions to use might include: Who is it? How old is he / she? What is she / he doing?
Tell the kids that this is Paul and his gran (we had different interpretations here but we need grandma for the handout) and their day. Ask the kids to reorder the pictures, check and glue them in the correct order in the notebooks. They number the pictures.
Create the story: kids look at all the pictures, in order to be able to construct the whole story and the plot. This can be easily turned into a speaking activity: the teacher makes sentences such as: I can see a boy. Kids answer with: Picture 1, 2, 3, 4 and 5, etc. Later on, the students take over by making their own sentences. This can be done as a whole class or in pairs. This is also the time to introduce or to check that all the kids have all the key vocabulary. The kids are not telling the story yet, they are only getting ready, thinking about the characters, their actions and feelings.
Write the story: the teacher gives out the handwriting handout, the kids glue it in their notebooks, too. The class go together, picture by picture, they read the sentences and think of their own ways of finishing the sentences. They write the words or they ask the teacher to write the words on the board for them to copy. The teacher monitors and makes sure that everyone is going on at the same pace.
Read the story: the groups that I did it with were not very big, only 5 or 6 students, so we could all read our stories out loud and applaud. With the bigger groups, it might be a good idea to put the kids into pairs or smaller groups to read to each other and to applaud. Nonetheless, I still wanted to include this element, purely for the reading practice.
Why we like it
I am quite happy with that activity since all the materials worked well in the classroom.
The kids enjoyed it. Many of the ideas were the same, especially the feelings but there was also some potential for variety in kids’ answers. I accepted everything, for example ‘Parents are angry’ (picture 5) or ‘Paul is scared’ (picture 4). As we always say: ‘All ideas are good ideas’. In that sense it worked very well as ‘the first story we wrote’. I was very proud of them and they were proud of themselves, too.
My students are only 6 and 7 and all of them are in year 1 of primary. Their literacy levels vary and this kind of an activity gave them an opportunity to practise a variety of skills, especially their literacy skills, with more focus on reading and writing. There was enough room for creativity and enough support at the same time. Initially, I was considering including the tracing element but then I decided that it would be too much for one lesson, with five pictures and five short texts to write.
There is a lot of potential for adaptation: the number of pictures can be adapted, if you choose to use the Movers speaking resources or the Flyers writing resources. The number of sentences for each picture can also be adapted, extended or cut short. If there is time and if the kids are ready, they can add their own, sixth part and even to draw their own picture.
I made sure that everyone had the same order of the pictures for the entire story as my kids are quite young and this was the first time we worked with this kind of a materials. Because of that and because of their literacy levels, they are not yet able to work independently on such a task and I decided to keep it more T-centred and T-led this time. However, for more advanced groups (as regards literacy and independent work), there is a lot more potential. They could tell the story in their own way. If needs be, the writing handout, can also be cut up and rearranged, to match the pictures and their order.
One thing that I did not do was to allow creativity as regards the title of the story. We did not focus much on it, I only introduce the brief: Paul and his grandma, but there is so much potential here, especially that the kids are also supposed to learn about a structure of the story and that it includes a title. No harm done, we will be repeating this activity and next time we will write our own titles, too!
Before you go, make sure you have a look at all the other storytelling ideas, here and here.
A3 paper, glue and scissors and a stack of newspapers and journals (gardening, furniture, fashion, kids, music, animals)
music, for atmoshpere
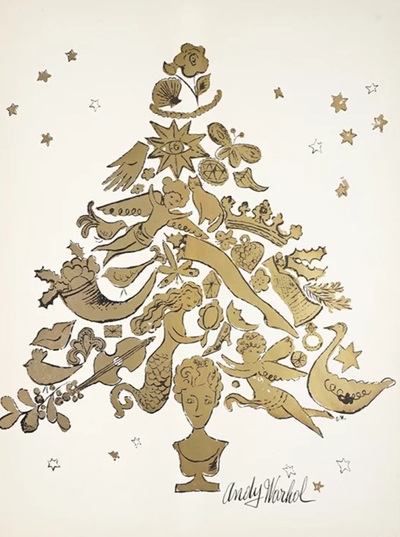
Andy Warhol’s Christmas Tree
Procedures
This lesson in this format was done with my older primary students whose language is on the level of A2 – B1.
We started with bringing up Andy Warhol whom we got to know in September (more about this lesson here). As always, it was a pleasure to find out that our Andy Warhol Chebourashka was a very memorable lesson. My students did rememember! We talked about Andy again and especially about his love for Christmas (I do recommend reading about it here).
We looked at the Christmas tree he designed and at the technique (collage).
Afterwards, I showed all the materials and I started to make my own collage to demonstrate the technique.
We looked at the journals and newspapers, leafing through to find the theme. I suggested a few (a colour, an object, a topic) and just allowed the kids to think about it.
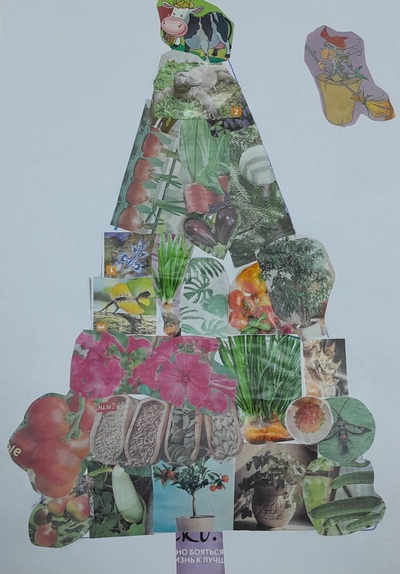
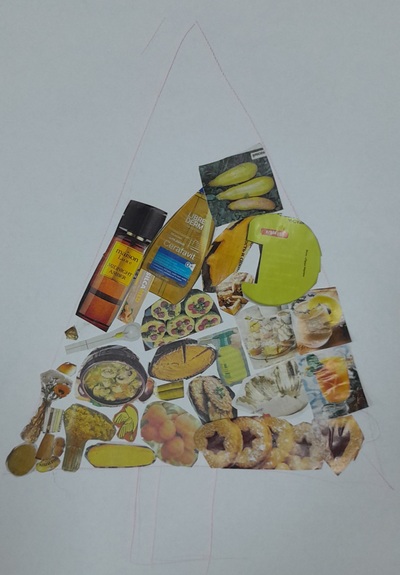
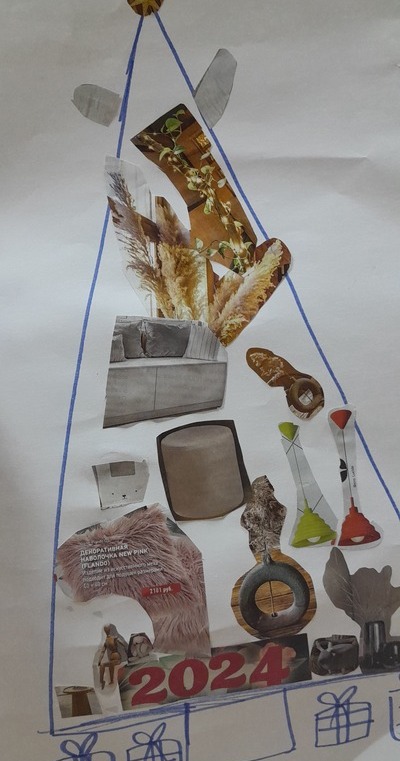
All this time I was making my own: I drew a big triangle and started glueing the pieces to match my theme (Nature).
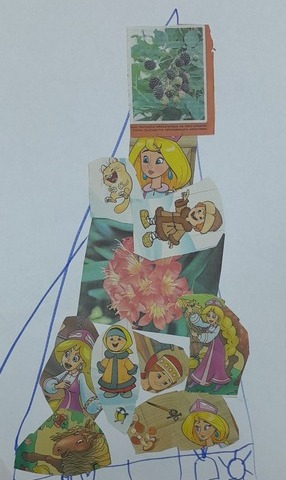
Kids were working, cutting out their pieces and composing their collages. They were also looking for pieces for their friends. All this time we were having an open class dicussion about different artistic decisions and the bits and pieces that match or do not match the individual collages.
In the end, we briefly demonstrated all the trees, together with the title.
In order to create a more festive atmosphere, I put on some non-invasive instrumental music, Christmas-themed.
Nature (by the teacher)
Why we like it
The collage was a success. The students got really involved perhaps because the activity gave them an opportunity to be creative without requiring any real artistic skills, drawing, sketching or painting which sometimes can be a challenge.
It took a while for the students to choose the theme but it is perfectly natural because they needed time to leaf through, to see what is available and to make up their mind and to select something. But I was really happy because it was clear and obvious that they really did make a decision and focused on the colour, one specific item or a general idea to represent. What’s more, I could see that the kids themselves were happy and proud of their choices especially when their pieces were completed.
The task became a collaborative one although only by accident. Once it became obvious what everyone was working on, we all started to suggest and to offer pieces that we found in the journals that we were looking for. ‘I’ve got a yellow sofa here. Do you want it?’, ‘There is a princess here. Does anyone need it?’ and so on. It started with the teacher but the kids picked up on it. It is definitely something that I will be introducing purposefully the next time we do a collage.
We used the A3 paper but the A4 sheets are also an option and the trees will be easier to fill in as the smaller the paper, the fewer the elements.
We started with drawing the triangle on the A3 paper and went on to fill it in with the items. Two of my students did not have enough time (and the chosen elements) to complete the tree in one lesson. We are going to finish next week, we have this opportunity. However, that made me think that it might be a good idea to choose a topic, cut out all the elements and them compile them into a tree, making a conscious decision regarding the size of the tree and opting for a smaller version if time or resources are limited.
I presented the idea of a combined technique: a collage and drawing, to fill up the space with own drawings, if needs be, but, in the end, not one of my students decided to use this option this time.
The decision to put the background music on was a good one, too. It helped to create the atmosphere and, after a while, kids asked for the permission to put on their favourite songs which was granted and we ended up working and singing together.
As regards the language production, a lot was going on because we were chatting throughout the lesson but I have to be honest about one thing – my older group are already a high level, some of them very close to fully communicative in English and even bilingual. That is why I didn’t need to do much to encourage production in the way an EFL teacher would. They wanted to talk and we did, in English. However, there are other options for the lower level and the EFL/ ESL students. I am still to try these in class but off the top of my head, I would go for:presenting the collage with the title, calling out the names of all the elements of the tree (or as many as possible), choosing the character who might like this kind of a tree. I am quite likely to teach the same lesson on Monday next week and, if I do, I will be updating the post soon.
We did it in our Art classes but it might be a fun activity for a regular VYL or YL class, perhaps even with teenagers.
Here are some of the Christmas trees my students created:
Yellow. Still in progress. DragonsAround the houseBeauty
Paper kitchen towels, cut up into rectangles. It might be a good idea to test and trial, always, but especially here, not all the kitchen towels have the appropriate density. They cannot be too thin or too thick, for the kids to be able to draw with markers and for the water to wet them fast and efficiently enough.
Markers. I am using the thick ones but their tip is not to thick. Roller pens might be too thin.
Some water. In order to be able to use it in the classroom, we used a big plastic box. Ours is not very deep and it does not have to be. At home kids can use the washbasin, the sink or even the soup plate.
Procedures
This was one of the three experiments I planned for our Science lesson devoted to water.
Apart from everything else that we did on the day (which you can read about in an earlier post here), this part of the experiment was called the Surprise Experiment. We started with looking at the materials which I demonstrated and we watched a short but very informative video from the Messy Little Monster that I found on youtube.
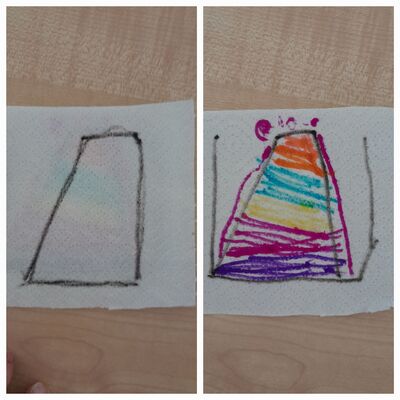
While in our lab (aka the dining room), I showed the kids the box filled with water and, together, we looked at the pictures I prepared and tried to guess what we might see once they land in the water. These included: Hello – kids! (the visible part – the part that appeared while in the water), a simple sun – a smiling, yellow sun, my name is – miss Anka, you are – fantastic.
Then we were dropping cards into the water one by one and checking the full picture.
Afterwards we went back into the classroom and started to create our own pictures. I showed the kids two cards and drew one picture with everyone looking, as a model. It was absolutely important that they understand that page 1 is only a part of the picture and that page 2 is going to be more detailed. While we were working on the pictures, we developed a few useful techniques: checking the design against the light, drawing with the picture on the window pane, tracing the lines twice or three times (on page 1) to ensure that they seep through onto the page 2, to facilitate making sure that the pictures match. I was also showing the kids’ ideas to the room as soon as I spotted something interesting, for example the use of the words, the use of the colours or the elements.
We established in the beginning that in class we are only going to watch a few examples and create our own, to take home and to surprise the parents.
After the lesson, I sent a message to the parents in the messenger to tell them about the surprise coming from school and how they can use it, where they can pour water etc.
Why we like it
Apart from the fact that this activity was a great puzzle piece in the lesson and on the Blue / Water day, I loved the fact how it worked.
The activity itself is very simple and requires only the minimal resources.
All the kids, our preschoolers and primary students, could create it, with varying degrees of detail and complexity. It worked very well with a mixed ability group. Although, of course, I can be further adapted with the teacher starting the activity i.e. drawing circles on both pages or other shapes to which the kids could only add the detail on page 2.
It gave everyone an opportunity to design something and I was really impressed that they got the idea of how this simple toy works and what is required to make it. To be honest, I was truly impressed with the kids took to it and how creative they became in the process. The first designs were very simple, a circle that turns into a smiley and so on but, as the time went on, their creativity was simply snowballing and more and more amazing ideas started to pop up, also because everyone was observing everyone else and sharing ideas. The mountain that turns into a volcano (in the photo), a girl that turns into a princess, cards to say hello to mum, dad, grandma, the house that gets all its details…It was amazing and I am just sorry I did not take more photos. And I did not take more photos because I was busy cutting up more and more pieces of the paper towels. I planned to give everyone three bits for three mini-projects but I underestimated my kids, their creativity and the speed with which they started to draw.
I was also very happy with my being clever and announcing that all the kids’ experiments will be carried out at home only. Doing it in class could become very messy, especially with the big groups because the pictures need to be taken out of the water as the colours start to run, they get the water dirty. Taking the pictures out means that there are wet balls of paper around…I decided that the kids would enjoy it a lot more at home, especially that they could also take pleasure in showing off what they have learnt at school.
The langauge production was a bit limited but, to be fair, for us, it was spread throughout the day. We talked about the pictures while they were being designed and there was a lot of focus on instruction and the functional langauge. There was also some opportunity for the language of prediction / guessing and I would definitely like to explore it more in the future.
This experiment can be a part of a lesson on the colour blue, on the topic of water or perhaps also in a lesson on conditional and the langauge of prediction with the older kids. It can be also a very simple craft activity with all age groups.
Malevich was the hero of the first October lesson but somehow, it landed in the wrong order on the blog. This whole month we are learning about shapes and you can read about some of the ideas for these here. Thanks to Super Simple Songs we have two cool songs about shapes, this one and this one, and they can easily be turned into a game as we go on singing and looking for shapes around the classroom, on the walls, in the alphabet and on our clothes. I don’t.
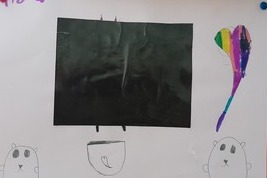
Some animals admiring the black square
The artist
There could be only one painter to be invited to this particular lesson, of course, Kasimir Malevich and the Black Square. We started with introducing him and we looked a few of his paintings. I rarely include a lot o detail from the artist’s biography but here it might be quite interesting to see how his creativity went from ‘just realistic paintings’, through many intermediary stages, casting off realism and colours, to the Square.
Because at the time, we also had the mixed age groups and levels group, we could discuss symbol in general and what symbols exist in our everyday life for example the symbols that are logos of different brands or the symbols that we have in the streets or in the public transportation. This is how we arrived at the square that could be a symbol, too. We also looked at some of the parodies of Malevich.
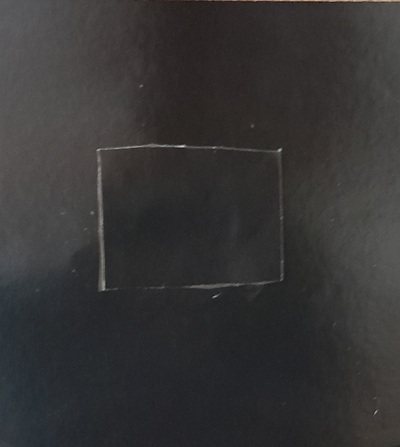
Black on black by one of my students
The art
The preparations for this lesson were quite limited: markers, glue and scissors and a lot of coloured paper. I had white and coloured paper for the background and some bigger and smaller black squares for the main protagonist.
I showed the students my example and the kids were asked to pick a square and the colour of the background. Then, they went on to glue, to cut and to create.
I was monitoring and discussing the choices. I also helped them translate the titles for their creations.
As can be seen, not everyone was very concerned about the perfection of their squares. It is my fault because I gave them relatively big squares and rectangles for them to make their own decisions regarding size. Some of the kids decided to glue them as they were. It is ok. i don’t think Malevich would have minded.
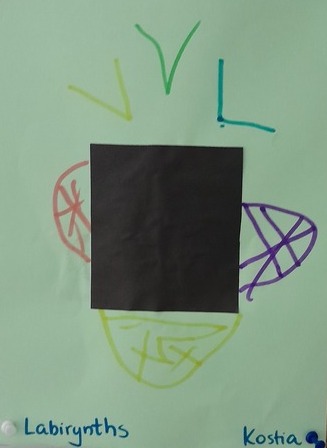
I loved the creative process and I was so proud of them for having created all these lovely pieces. The Camera by Nikita is just briliant and it was actually a 2D creation. The Labirynths by Kostia are out of this world and, although I don’t understand them, there is some link to some computer game. Apparently. One of my students, Sasha, kept walking around the room and trying out the square against different background and, surprise, surprise, she ended up choosing the black one, taking Malevich one step further. With the older students we also had a great discussion in which we shared why we like the square so much. ‘It is like the silence in a picture’, was one of the lines in that conversation.
A set of shapes of your choice, cut out of paper before the lesson
An A4 piece of paper with the list of figures that will be included in the activity.
A glue stick for every child, a pencil to take notes
Procedures
Naturally, this project involved some pre-lesson preparation: the handout, the glue and, most of all, all the shapes which needed to be cut up and sorted out. I used 5 separate boxes to make sure that they don’t mixed and are easy to select and to abandon.
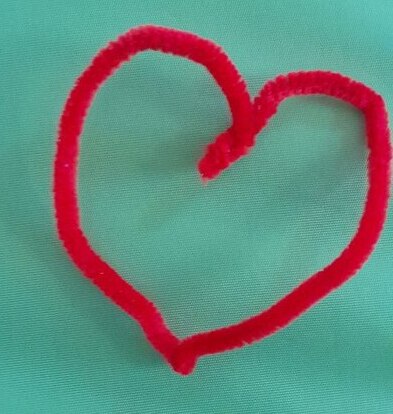
We had two lessons devoted to shapes and so we could do all of the following as a preparation for the project: introducing the shapes, looking for the shapes in the classroom, song Can you see a circle? from Super Simple Songs, looking at Shapes Monsters from Twinkl, to recognise and to count them, making shapes from pipe cleaners (the example of which you can see above), working on the sequence (‘circle, square, circle, square’) and, as a direct example for our creativity, looking at some transport made of shapes (also found on Twinkl).
The next step was a set of instructions. At the moment I work with a teacher assistant and I saw it as an opportunity to use this resource in setting up the project. I prepared my instructions to use the simplest language possible but I still asked my TA to translate sentence by sentence. The main elements were these: We are doing a project. We have five shapes (displayed on the board). You can make something for yourself. Maybe a flower, maybe a car, maybe a monster (referring to everything that we saw in class). All ideas are good ideas. You can use 10 shapes (gesture). Please sit down and think. I will call one student to come here and choose shapes. Sasha, come here, choose 10 shapes. etc.
Afterwards, with Sasha choosing her shapes, two students helped with giving out the handouts and the glue.
Everyone kept working on their shapes, I was walking among them, helping and monitoring and as soon as they were finishing, I would come up and ask them to count all the shapes they have used.
In the end, the kids were showing their projects to each other but it was not a formal stage of the lesson. Ideally, we should have finished with everyone showing their work and presenting ti with a simple ‘I’ve got…’ but, unfortunately, in our case, we ran out of time.
Why we like it
In general, it is a simple project with a lot of potential and it can be used in a variety of lessons.
In a Maths lesson, like ours, it is a an opportunity to see the practical use of shapes and to balance the serious studying with a more creative task. It also involves shapes recognition and counting. It was also an interesting follow-up and development on the previous lessons in yet another way: we looked at shapes, we counted shapes in shapes pictures, we looked for shapes in the classroom and we made shapes out of pipe cleaners. These last two activities were especially exciting for the kids and that was my cue for a more hands-on activities.
In an English lesson on shapes, this activity could also work very well, especially that there is the early literacy activity which, potentially, can be extended. The kids can be asked to copy the words from the board and, in this case, the ‘handout’ will not be necessary. The kids can also be asked to write the name of the picture they created, especially if they work within a vocabulary framework, for example toys, pets, animals or transport, although, admittedly, this would put a kind of a harness on the creative thinking here.
In an Art lesson, this activity can be connected with any artist who liked shapes for example Kandinsky, Malevich, Mondrian, El Lissitzky or even Picasso. Apart from the main art project, there would also be an input session devoted to the Artist of the Day. If you are looking for ideas, please have a look here, at Teaching English Through Art.
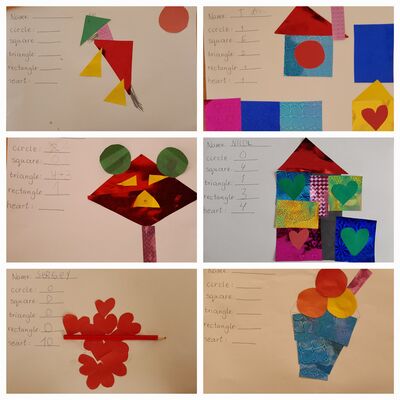
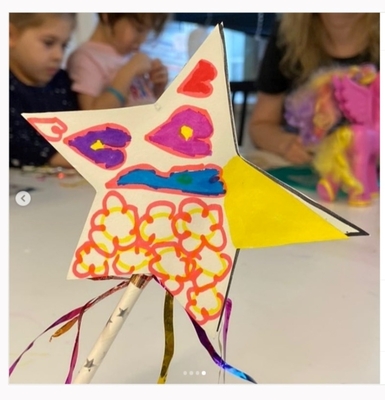
As a first project, this lesson was a wonder (and please forgive me blowing my own trumpet here!). The kids got the idea and they really took to it. Everyone interpreted the task in their own way and created some lovely pictures, some of which are an inspiration for me as a teacher, for example to draw the shape first and use the shapes to create a proper collage or to make a list of all the shapes necessary beforehand, in order to facilitate and to promite the Thinking Time stage of the project. Please make sure you have a look at the examples below.
The kids got involved in the project, even though there were a few who were slightly reluctant in the beginning. However, as soon as it became obvious that, really, all ideas are good ideas, they started to work on their projects.
The next time I do this project, I will make sure I prepare my own model. I was planning to do it but then the teaching day started and I simply forgot. It would have helped with the instructions and the whole project, including the counting of the numbers and the final presentation.
As regards the choice of the resources, it seems that it was also a good idea to go for a more exciting type of craft paper, as regards the gloss, the texture, the print or a mixture of these. It really adds up to the success of the project. It might be also a good idea to consider an A3 paper for the base, the A4 might be a bit limiting, although A3 is definitely a more tricky size to carry around, to take home or, even, to put up on the wall.
It really was a way for all the kids to exercise their creativity and I am very proud of my students. Some of the creations are simply brilliant and they helped me learn something new about my students. It is also a signal for me to use more of these activities.
Some noteworthy examples of creativity from my kids
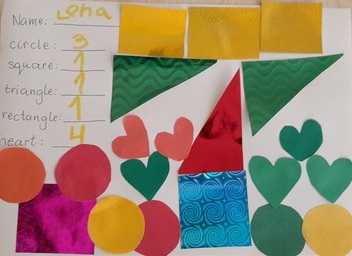
This is Lena who was the student to plan her project properly, out of her own accord. She prepared a list of ingredients necessary and, as you can see it does not quite match the number of the shapes used. We fixed it later, after the photo was taken, by writing: circles: 3 + 3 etc.
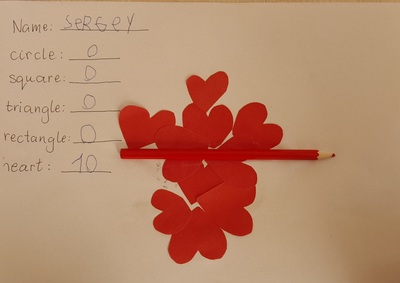
This is Sergey who decided to take a completely different route and to create a proper work of art, made of hearts only and with a red pencil which is also glued to the paper.
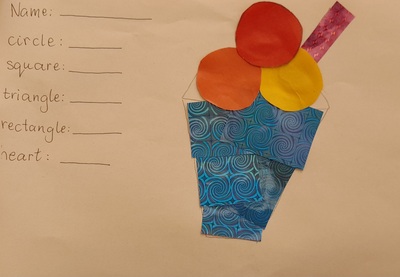
This is Sasha, who was initially very uninspired by the task as he prefers listening. However, after a while, he figured out how to combine the two. He drew an ice-cream cone and then, once it was ready, he came to choose his shapes. This is a lovely approach and I will definitely be using it in the future!
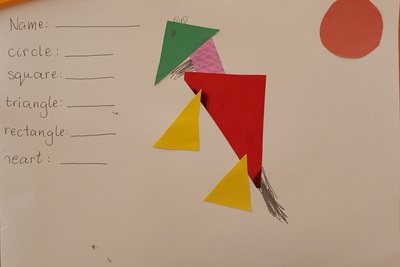
This is a beautiful example of how creative kids can get. Sasha, whose most favourite thing in the world are horses, found a way of creating a horse with the shapes we had. It shows a high level of development of symbolic representation as well as creativity. We see a horse in it hence it is a horse.
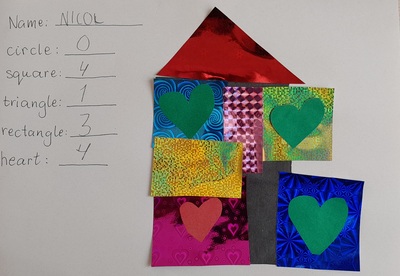
This is a picture by Nicol, quite simple one, just a house, we might say, but it is just wonderful because of the paper used and because of the consistent use of hears as windows.
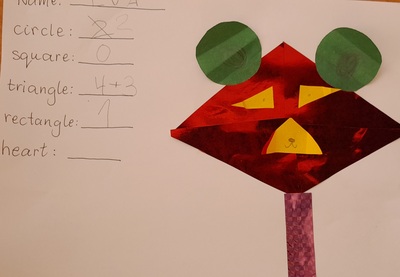
And another wonderful picture, a bear, in which Sasha, decided to use a variety of techniques, including drawing and elements of origami to create a 3D eyes and muzzle for the bear.
This example comes from Sasha, who decided to go for a seemingly simple design of a structure, made of only four shapes. However, it was nothing but simple! The big blue square is in fact glued expertly along three edges to create a pocket into which the small blue rectangle could be put in and taken out. Sasha was extremely proud of his example and I was proud of him.
The question appeared in one of the groups on the social media and I realised that a) I have something to share here and b) I haven’t got any posts on the movement games for the little people.
One: Abracadabra
Resources: only a magic wand. It can be made at home and producing magic wands is now a real hobby of mine. The easiest version (in the photo below) can be even made with kids, in class. Some shops sell magic wands, too but, really, kids will respond well to a simple pencil if it is accompanied by some ‘Abracadabra’
How to play: We have been using the same line for many years now, with many groups: ‘Abracadabra, 1,2,3. You are….’. The game might be introduced with the first topic that lends itself to miming, for example ‘pets’ or ‘toys’. We start with the simple phrase ‘Abracadabra, 1, 2, 3. You are a cat / a dog / a frog etc’ and I support the language with the visuals namely flashcards displayed on the board and my own examples. The gestures we use for each of the pets, toys, fruit, transport, jungle animals, fairy tale characters, jobs are not universal, they are only our creation for that particular group. Please remember that the ability to represent characters and words through gestures is not a skill that children are born with. They are developing their symbolic representation and they might need the teacher’s support in the beginning of this journey. That is why the teacher’s example is so important.
After the kids have learnt their first adjectives, these can be extended into ‘You are a happy cat’, ‘You are a sad princess’ and so on. Naturally, the game is led by the teacher in the first lessons but later on, the children are invited to lead the game and to cast some spells in the classroom. They start with the very simple and basic combinations but with time they start to be really creative, both with the langauge and with gestures. Think about all these gems from the classroom: ‘a sad pumpkin’, ‘a sleepy cat’, ‘an angry princess’…How would you mime these?
A classroom-made magic wand
Two: Musical flashcards
Resources: only one set of flashcards, I normally use the set from the coursebook, A5 size.
How to play: We stand in a circle and the cards are lying on the floor, in the centre. We move around, in a circle, just walking. The teacher sings a song and my choice is usually ‘Happy Birthday’. As soon as stop singing, everyone stops and picks up one card from the floor. Afterwards we show what we have by using the word in a sentence. The simplest version is ‘It’s a cat’ but the structures can vary and be more closely connected to the vocabulary for example: I like + food, I’ve got + toys, I am wearing + clothes and so on.
After each child produces the sentence, we put the cards back on the floor and continue the game. It works well with all the groups although with my bigger groups, I encourage the kids to speak together, in kind of a messy choir, in order to save time and not to risk any dead moment in the lesson.
This is not a competitive game, no one is sitting down or dropping out, we all play throughout the game. No points are awarded either.
A classroom-made magic wand
Three: Everybody is dancing
Resources: None:-)
How to play: We stand in the circle and the teacher is chanting or singing the phrase (the melody is made up), and everyone is performing the actions. I normally start with the easy verbs i.e. clap, march, walk, eat, drink, dance and swim but we keep adding through the entire year, more complex and more creative verbs so by the end of the first year we have lots of them at our disposal because kids learn all of them just from this simple game.
The teacher is the one to lead the game for quite a long time but the kids can be slowly involved, too by giving them a choice of two verbs, for example ‘Sasha, everyone is singing or dancing?’, Sasha: ‘Dancing’, after which the teacher is singing or chanting what Sasha has chosen. Eventually, the kids are ready to make their own decisions and to produce full sentences. And Present Continuous (because that’s what it is) will come in really handy with storytelling and picture description.
Oh, one important thing: don’t forget to add ‘sleep’, it will work wonders to calm the kids down.
A classroom-made magic wand
Four: Snake!
Resources: a long snake made of paper aka a necessary number of scrap A4 pieces of paper glued or stapled together with a head of a snake drawn on the first one and the tail of the snake drawn on the last one. I actually like to use the A4 sheet cut in half for a thinner snake and I cut out the head and the tail. Perhaps a set of flashcards in the first weeks of playing the game or with younger students.
How to play: The teacher puts the snake on the floor, the kids come to the snake one by one and stand in a line on one side of the snake. The game is intended to practise one particular group of words with some distractors included, distractors here being any other words, not in the category. For example, if the main aim is to practise colours, the basic distractor can be numbers or even kids’ names if that is the beginning of the year and the children do not really know anything else.
The teacher calls out the words, in a random order. If the students hear the target vocabulary, they have to jump over the snake (or to step over if the kids are young and not very good at controlling their gross motor skills) every time they hear the target word i.e. a colour. If they hear one of the distractors, they don’t move. In a way, actually, it is a movement variation of ‘Simon says’ only no one is dropping out.
When we start playing, we line up and I show the kids all the flashcards and we revise all the words. I also tell them that today we play with colours. Later on in the year, when the kids have more vocabulary at their disposal, the teacher can raise the level of challenge and play with two or even three categories.
The game mostly focuses on listening for the target vocabulary and discriminating it from the distractors but it can easily be turned into a productive game with one of the students standing at the head of the snake, facing the group and calling out the words. In the early stages of the unit, when the kids still might struggle with remembering all the new words, it makes sense to let them look at the cards displayed on the board or on the wall or to even hold all the flashcards and to call out the words they want to use.
I created this game for my group in Pamplona in which I had 12 little kids and no room in the classroom apart from the relatively narrow aisle in the middle of the classroom. This is how the snake game was born. We needed something thin to fit in the aisle and I chose a snake because I hate them personally and stepping over a snake is a good move, very conducive to survival. But the kids accepted it and we loved the game.
The snake itself needs to be made but it is easy to store it and to recycle it and if it gets destroyed during the game, it is also easy to fix. Or to be recreated. During one of my training sessions, one of my teachers suggested using a skipping rope and that, of course, is a solution. However, I still prefere the paper because in case of a mishap and a kid tripping over the snake, the paper seems a safe option. If it gets torn, we can fix it, no harm done. A child tripping over a skipping rope, however, might result in a child falling down. Typing that up here I realised that if the classroom has the appropriate floor, the snake can also be drawn on the floor, with chalk for example…
A classroom-made magic wand
Five:I like cats, I don’t like cats
Resources: one set of flashcards, the regular A5 set that normally come with the coursebook and two cards with symbols for I like / I don’t like, for example a heart for ‘I like’ and a crossed heart for ‘I don’t like’
How to play: Before the lesson the teacher puts up the I like / I don’t like symbols on two walls in the classroom, on the opposite ends. In the real life, these two simply stay there for the rest of the year as we use them all the time. The kids get up and stand in the middle of the room, half-way between these two signs. It is good to put there a small stool or a table with all the cards, for example all the toys, pets, colours etc.
The teacher picks out one card, for example ‘green’, calls it out and the students go either left or right, depending on whether they like it or not. The teacher points at one of the group and says: ‘Green!’ and the kids reply ‘I like green’ and ‘I don’t like green’ together with the rest of their group. Afterwards, they come back to the centre (aka the stool) and the game goes on with a different word.
This is another stirrer that gives the kids a chance to move around a bit and to produce the langauge, with the additional support since they have the flashcards to reinforce the meaning of the word and since they produce full sentences with approximately half of the group. The kids can also be invited to lead the game by choosing the words to use.
The game can be used throughout the year with almost any vocabulary and there are a few adaptations possible especially as regards the settting. If the group is big or if the kids are too energetic and too tricky to control, the same game can be played with the kids sitting on the carpet or even on their chairs. Instead of walking to the left and to the right, they can stand up and sit down or clap their hands and stomp their feet or raise one arm or two arms for ‘I like’ and ‘I don’t like’ respectively. This will make the classroom management a little bit less challenging for the teacher.
A classroom-made magic wand
Bonus activities: My favourite movement activies
Resources: the access to the internet and youtube
How to play: All of these songs here have been created specifically for the purpose of ensuring some movement in the classroom. The main aim here is not the langauge production although they do include some language but, of course, the movement is the star here.
Move by Super Simple Songs – a real hit, nothing more to say.
The Rolly Polly Roll by Super Simple Songs – another hit but only if you have a carpet because kids might actually try to roll or to crawl. You’ve been warned:-)
The Jellyfish Song by Super Simple Songs – I love it and it is quite a challenge to turn yourself into a jellyfish
Head, shoulders, knees and toes – this is the first song we sing in the classroom, mostly because kids can participate without any language production, just by doing what the teacher is doing. I like to sing this one myself, without the audio, in order to be able to control the speed and the activity. There is a version by Super Simple Songs, of course.
Shake your sillies out by Jose Paolo Liwag – I love to use this one with my older students, actually when they can appreciate the need to shake our sillies out and to clap our crazies out…
The Dance Freeze Song by Scratch Garden – the hit of this summer camp. There are some cool verbs and dance movements and we just LOVED to dance! You can also teach your kids the most important verb in the world: FREEZE.
Action Songs for kids by The Singing Walrus – one more fun song, with the basic verbs.
Make a Circle by Super Simple Song – it is a very popular song, I have seen it in many lessons that I observed but, somehow, I have never used it myself a lot.
A classroom-made magic wand
Some things to remember
Before you start any movement games, make sure that the kids are ready. Ideally, these games can be played in the part of the classroom where we have more room, only the carpet, no or fewer pieces of furniture. If that is not possible, please make sure that you create this space, with the kids’ help, possibly, to make sure that it is as safe as possible.
It is also a good idea to introduce some rules related specifically to this movement part of the lesson and these will depend on the classroom and on the group. In my classroom, we used to do all the movement games on the carpet by the window and for that reason our only rule was: We stay on the carpet, to ensure that the kids do not wander around, run around and leave the safe space.
Make sure that you move to this other place of the classroom in an organised manner. In the beginning it might be necessary to call the kids one by one, by the name to avoid a situation in which we have to control a stampede of five-year-olds there and back. With my groups (the maximum number of students in our pre-school groups is eight), we have our chant. I like to go to the carpet first and singing, call all the kids one by one (‘Sasha in the circle, Sasha in the circle’) and to wait, holding hands with all the kids, as they arrive. The child who is just joining is the one to choose the next child (‘Sasha, who’s next?’) and for the last one to join us we all call out loudly (‘Sasha, come here’) so that nobody feels unwelcome. Some kids actually love to be the last ones to join the circle because it is a lot of fun to be called by the whole group.
When the movement game is over, we go to our tables and desks, one by one or in pairs and the teacher is the one to make a decision about the order, at least in the beginning when the kids are still getting used to the new element of the routine.
Bigger groups can use the same pattern, but the kids move in groups of two or three so that the preparation for the activity does not last longer than the game itself.
One of the other things that I always do as the first activity on the carpet is to make a circle, holding hands and run a few rounds of ‘big circle’ (we stretch our circle), ‘small circle’ (we gather in the centre), a few times with these two adjectives and with the other ones, too for variation, for example a low circle (we bend), a high circle (hands up in the air, still holding hands), a wavy circle, a shaky circle and so on. It is an easy, risk-free activity, the kids love it (especially when everyone is present and we can really make a big circle) and, most importantly, after arriving one by one and being individuals, we can do something as a group, something super easy, before we get on to the more creative and productive things.
These games are not only about movement, although this is their reason for being in the classroom and in the lesson. However, as always, the main aim is language production and for that reason the students as the teacher, leading the activity have been included in all of the games presented above.
Colourful cardboard, some white paper, markers, scissors and glue
An idea to inspire you. I got mine from I Heart Crafty Things and if you are interested you can even find a template there for a small price although, I, personally, did not find it necessary.
Procedures
Before the lesson, I prepared the paper: small pieces of paper for the eyes, a large rectangle of cardboard (for example, an A4 sheet makes 2) folded in half, smaller rectangles (aka strips of paper) cut up for the nose.
We had two full lessons on the topic of body parts, monsters, health problems and going to the doctor. By the time we started the craft activity, the kids had already practised using the body parts in a sentence, they had described countless monsters, they had also created a monster with in a dice drawing activity.
I showed the children the ready product and we described it together.
We started with the kids choosing the colour of the big rectangle (the body of the monster) and so did I, in order to be able to demonstrate every step.
We cut up one of the longer edges, 5 – 10 mm, along the whole age (the hair). Afterwards, we applied the glue inside the folded rectangle and glued the two halves together.
We decided how many eyes we want our monsters to have. We drew these eyes, cut them out and glued them on the monster.
The kids chose the colour of the paper for the nose. We drew the nose on the back and we cut it out. On the back on the nose I drew three short lines at the top, to mark the place where to apply the glue. The kids do the same and we glued the nose on the monster.
We finished with drawing the smile and adding some decorations.
We finished with introducing the monster (name, age, boy / girl, what he/she likes).
Why we like it
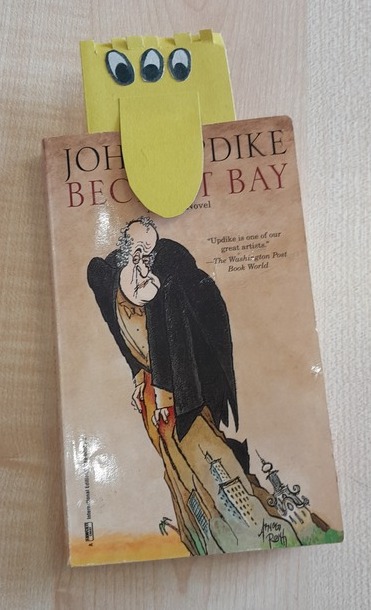
This craft was a part of the lesson that in itself was very generative, productive and creative. That is why, for the main craft activity, I wanted something that the kids could use not only to produce the language but to use outside of the lesson. That is why I started to look for ideas for bookmarks.
When I showed my monster in the beginning of the lesson, some of my kids went ‘Oh, monsters, I don’t like monsters’ but, somehow, they all wanted to make theirs and they got really involved, boys, girls, the younger, the older. I was happy and not so surprised (because it did happen before) that they all left the classroom almost hugging their big-nosed creations. And, once out, I heard them report to the parents, in a very animated way, what it was that we did in class.
The craft is relatively easy, with some simple materials, especially that the cardboard can be easily replaced with the regular paper. It did involve some before-the-lesson preparations but nothing very time-consuming and, again, the templates were not necessary at all.
I have already started to think of adaptations and of replacing the monster with other ideas and shapes. I have not done these yet, but I am thinking a lot about elephants and, inspired by my friend’s son, LEGO people…Once they are ready, I will definitely share here:-)
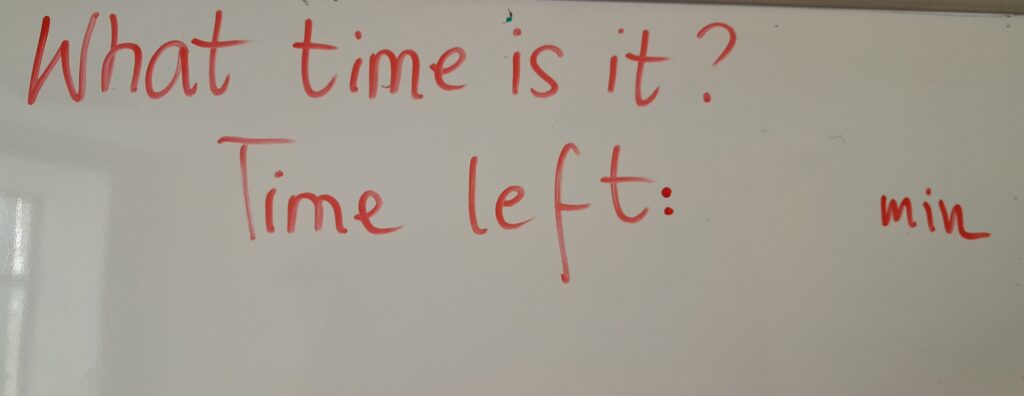
A board and a marker, with two phrases written on the top: ‘What time is it?’ and ‘Time left:….min’
A watch for the teacher.
Procedures
Drill the question with all the kids (‘What time is it?’)
Every time you hear from the classroom the same or similar question, most probably in the kids’ L1 (‘What time is it?’, ‘When is the break?’, ‘How much time we’ve got left?’) etc, point to the question on the board and elicit it from the group or from one student and only when they do, check the time and write the number of minutes left until the end of the lesson.
Repeat every time someone asks the question but insist on them asking the question in English.
Why we like it?
First of all, this trick gives kids an opportunity to learn to control their behaviour in class. I use it with my pre-primary and primary students in a situation in which they cannot tell the time using the clock and they do not have their mobiles to do this using their digital clocks. Not to mention that at the moment we work in an unusual context and each part of the 4-academic hours-long day has a different length. If the kids understand better how much time is left or, in other words, for how many more minutes they are required to ‘work hard’, they are better prepared to manage their behaviour in the time left. Also, it is of a great psychological help to see the minutes disappear and then even if the day is long, even if the weather has an impact on the kids’ energy levels, even if the activities today are not amazingly exciting for everyone, there are fewer and fewer minutes to go through until the next break time, snack break, the walk, the playground and so on. It has been of a great help in all the summer classes.
The kids are likely to ask this question anyway, directing it at their teacher or their peers so giving them a chance to do it in English is an opportunity to learn and to practise some useful language in a natural context.
To be perfectly honest, it is a tiny little bit irritating to hear this question and to have to answer it a few times during the lesson BUT the very fact that the question is asked and the frequency with which it is asked is a great source of immediate feedback for the teacher and a signal that, perhaps, some changes need to be introduced in the original lesson plan. Maybe an activity took too long, maybe on that particular day the kids are too energetic or too sleepy for whatever is going on and they need a settler or a stirrer. Perhaps even an activity needs to be abandoned asap, for whatever the reason…Knowing is is much better than not knowing it and proceeding when your audience is not ready for it. That also means that on some days and with some activities, the kids will completely forget to ask the question and that is for the best reason of it. They will be so involved in the activities that the lesson length and the clock will not matter at all.