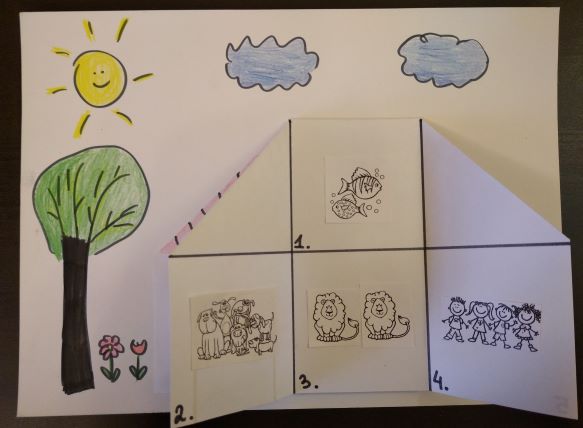
If I had to choose only one craft activity for all my classes, a proper all-rounder, for the younger and for the older, to serve a hundred purposes – that is the one!
Welcome to my little house!
First of all, I really did try hard, very hard to remember where and when I learnt how to make it and how to use it and who taught me and I can’t. I don’t know. For sure, it was Moscow, definitely my first year here but who and how? No idea. The only thing that I can do now is to say ‘Thank you!’ to this forgotten and now anonymous benefactor. I am, indeed, much obliged. Now, I am sharing.
Instructions
- Two pieces of paper per student / house. In the samples in the photos I have used A4 but in the classroom, with my kids I tend to use both A3 and A4, depending on the main aim. If we are just glueing things, A4 works just fine. If we draw – A3 is bigger and offers more room for the kids’ drawings.
- Fold the house. It is pretty easy and you can watch this video here, from Inner Child Fun to see how it is made. Emily is using origami paper but a regular A3 or A4 will work just fine!
- Important: I normally do it myself, for all my students because even adults (like my trainees) might not be very good at origami-like activities and the house, although it is relatively simple, it does require some precision and if it is not applied, it is not going to look very well, unfortunately. Preschoolers will not be able to fold it and when I once tried with my primary school kids, I immediately began to regret it because some of them took the responsibility of the taks too seriously and were getting very nervous, predicting that they might not be skilled enough to manage the task. They did, in the end, with a lot of encouragement but I think it is just not worth it. We can still teach them how to do it, for them to practise and play at home but if you think of the lesson itself, the timing and the aims – just not worth it.

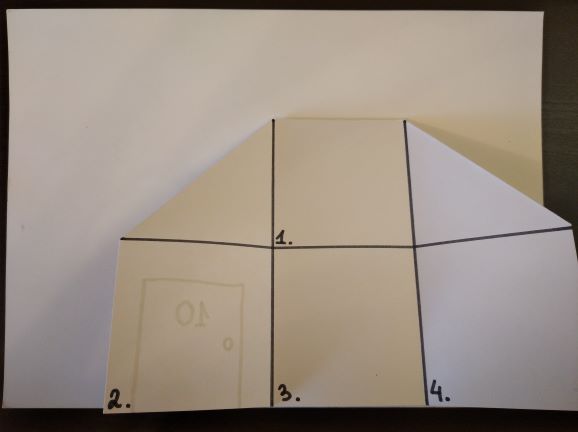
- In my case, depending on the aim of the particular house (see below, there are plenty of options), I make one house myself, as a template, hand-drawn or using clip art images, and then I photocopy it to fold for each student. The advantage of it is that you can put in your house whatever you want. The basic design involves only the lines inside the house and the division into rooms, with numbers. That helps during the activities because you can ask your students ‘Go to room number 1’ and this way you make sure that everyone is on the ball and that they don’t glue pictures wherever they should not, for example, on the lines as that would get in the way of the house closing and opening.
- Also, before the lesson, I glue the houses onto the garden page. This is especially useful in the case of the pre-primary students and in the case of those of my primary kids who have not done the activity before. Being glued on, the house is not as easy (although not impossible) to be dismantled and unfolded and it is just easier to manipulate in class.
- I start with demonstrating my house, with all the theatre that I can muster. We look at it, we knock at the door, we open it and look inside. This can be done on the carpet or with the kids gathered around you so that everyone can see all the details.
- I give out the houses and we start with drawing the door and writing the number (ask talking about them) and then drawing the windows (and talking about them). Make sure that all the students are more or less in the same place here. I normally only give out one colour per child (although they can ask for a different colour for the door and a different colour for the windows) or, with the older kids, with a pencil only. They will want their houses to be really pretty so erasing might be necessary and I really don’t want to waste time on colouring, this can be done at home.
- The main task usually involves glueing things in different rooms, for example pets. For that, I prepare small pictures of all the pets, one set per child, on a tray (or whatever works as a tray) and a poster to put up, for everyone to see all the options. We start with room number 1 and I say, ‘Go to room number 1’. ‘I can see a cat (in my room number 1)’ after which I glue there the small picture of a cat. Then, the kids take turns and make similar sentences choosing their own animal from the set. They only receive a picture to glue after they make their sentences. When everyone is ready with room 1, we show our pictures, we say ‘I’m ready’ and move on to room number 2. And so on.

- In the end, if there is time, we draw the sun, the tree and the flowers in the garden and we colour the house for homework. Also, if there are any leftover animals, these can be given out to glue at home (although, yes, that involves some more complex logistics, paperclips, small envelopes, not impossible though).

- In the following lesson, we look at our houses and describe the rooms, the colours etc.
- Variations: there are many of these. The house can be anything you want it to be. Here are some of my favourite ones:
- Any set of vocabulary and almost any set of stucture, starting with ‘I can see’ and ‘I’ve got’, with some less obvious ones like the pictures of activities to practise Present Continous (‘I’m jumping in the kitchen’) or even words or word cards with the Past Tense forms which can be used later to tell stories for example ‘A strange Sunday’ (‘My brother slept in the garden’, ‘My dad danced in the kitchen’ etc)
- Halloween or Christmas house – with the characters and symbols of each holiday
- International House (accidental) – each room is a country represented by its flag and some symbole, these are drawn or glued, for older children
- Rooms of the house – template is prepared with some furniture typical of each room, students can place pets in rooms (‘Where is the cat?’ ‘It is in the bedroom’) or family members (‘Where is mum?’ ‘She is in the living room’), add small objects to each room (‘Where is the lamp?’ ‘It is in the kitchen’, it is best to choose things that could be in any room such as lamps, pictures, chairs, rugs) and this version can be also further extented (‘Where is the lamp?’ ‘It is in the kitchen. It is on the cupboard’). The older kids can also draw these, making a regular or a silly house, too.
- Secret Room – this was a follow-up activity in which I used the template which I drew with one empty box (empty, only because I could not, for the life of me, draw anything resembling a dining room). We did one of the activities mentioned above but the last room was to be drawn at home and it could be anything – a space room, a swimming pool, a library, an ocean zoom, a pirate room…
- Where are you? – a template with the rooms, pre-prepared, each student gets a set of the leftover stickers or small cards, they put them somewhere in the house, in secret and afterwards they guess where their objects are. It can be used to practise simple prepositions and the rooms (‘Is it in the kitchen?’) or more complex ones (‘Is it in the living room?’ ‘Yes’ ‘Is it on the sofa / behind the chair?’etc)
- Put your penguin in the living room on the sofa – a template with the rooms, pre-prepared and a set of stickers or small cards. The kids dictate to each other where to glue them, again, it can be used for simple or more complex prepositions, to get the kids ready for the Starters speaking exams. Later on, we compare our houses.
Why we love it
- It is relatively easy to make and the kids love the fact that it is a real house.
- It can be used with any vocabulary or structures (or almost)
- It can be used with pre-schoolers and primary
- It has to be prepared before the lesson for all the students but it is a good time investment
- It is at the same time a focused task to be done in class and a homework task. The homework can involve only colouring and decorating it, talking about it in class but a writing task can easily be added for the older students (any template to be printed on the back of the garden, for example the focus can be such structures as there is, I can see, colours and furniture, my favourite room etc
- It encourages the students to produce the langauge and it is easy to stage since you go from room to room
- Lots of opportunities for adaptation, even if you repeat it with the same group. Every single time, it will be a different house.
Happy teaching!
1 thought on “Crumbs #12 In my little house: A craft activity for one hundred occasions.”