Any set of new vocabulary, at the stage when it is introduced or when it is practised.
A set of flashcards, electronic or paper, to support the clarification and building the connection between the word, its visual representation, its meaning and the gestures and phrases chosen to represent it
The teachers and their face, hands and voice
Procedures
The teacher introduces the vocabulary, as usual, with a set of flashcards or realia
What follows is a set of practice activities appropriate for the students’ level, age and interests
The teachers add miming but apart from gestures accompanying the key words, there are also simple phrases for each of those i.e. ‘a doctor’ represented by a flashcard, a gesture (for example, putting on the stetoscope) and a phrase (‘Open your mouth and say ‘aaaa’).
Students look, listen and say the words.
In the later stages, students also mime and produce the language for the teacher or the other students to guess.
Why we like it
First of all, this particular trick (I would not dare to use the term ‘an activity’ here) was simply a coincidence. We were practising the vocabulary in the unit of professions and, as part of the revision stage of the lesson, I was miming jobs for my student to guess, just like we had done many times before, with other sets of vocabulary. It was then that I realised that there are certain limitations and that miming some of the jobs might be confusing for the students. ‘A ballerina’, ‘a singer’, ‘a photographer’ were easy enough but I got stuck with ‘a firefighter’, ‘a doctor’ and ‘a teacher’. Until I realised that to my miming and gestures, I can add a word or two.
The main aim here is still the same – the gestures, the TPR, the miming are supposed to help the children understand the target vocabulary better and remember it better, for example, while miming the word ‘firefighter’ the teacher can pretend to be directing the hose and the stream of water at the invisible fire but, to make it more obvious and visual and rich, the teacher can also say a simple phrase, for example ‘Look! A fire!’, to illustrate the word and to create associations with it. All in all, the combination of different learning channels is beneficial for the language learning.
This added linguistic element to our TPR means an extended exposure to the target language and an opportunity for more listening practice.
The set of phrases used with the specific vocabulary should be kept the same in the beginning, not to overcomplicate and to overburden the children, but, naturally, there is a lot of potential here for a wider range of the structures later on.
Initially, it is the teacher who is going to be producing the language here, however, with time, the students can also be encouraged to take over. We have only been doing it for about two weeks at this point but I have already noticed that my students started to pick on the language and start using it. And that means a lot more potential for maximising language production.
So far we have been using this approach in two different activities: Guess my word (miming, as a revision of the target language in the beginning of the lesson) and Abracadabra (setting a word for the other students / teacher to mime, with a wider range of vocabulary).
This episode is going to be devoted to the older students, juniors, teenagers and adults and those of the higher levels, from B1 upwards.
All of these activities were inspired by the approach in the visual based speaking tasks of the Cambridge exams. I use these activities frequently at the beginning of the ‘unit’, to introduce a new theme, to ease us into it and to start with some freer speaking activity, that, really, does not have any specific linguistic requirements or a very formal framework. Not to mention that by the way, my students get an opportunity to practise and develop their exam skills, in a slightly more relaxed way.
All of these activites are deeply rooted in my professional laziness because even though I have to devote some time to the picture selection, that is, really, the only time investment beacause the task is usually a one sentence instruction and, to be perfectly honest, most of the ideas listed below were created during the lesson, as a follow-up and an extension of the regular Cambridge ‘similar or different’ task.
Usually, my greatest helper while preparing these activities is google search engine. I type in the key words and I look through the images until I find these four, six or eight that match the idea that I have in mind. They can be saved in a document or displayed on the screen (powerpoint or Miro). I save them and keep them for later because they are always recycled.
Frequently, I start the cycle with the simplest of the activities (‘Choose two to compare’) and I follow-up with a wider discussion (‘Have you ever…?’) or any other combination but, naturally, these can be used on their own. All of the activities can be done with the whole class or in pairs.
Talk about your favourite photograph: students choose the photograph that they really like, they describe it and justify their choice
Talk about your least favourite photograph: students choose the photograhp that they like the least, they describe it and explain why they don’t like it
Choose two pictures for your friend to compare: students choose two of the pictures to compare them, to look for similarities and differences, very much like in the B2 speaking part of the Cambridge exams. The fact that there are more than two pictures allows for the activity to be repeated a few times, over and over, in pairs or with different partners. The longer the activity takes, the more interesting arguments appear and the more creative the answers.
Choose two pictures for your friend: students work in pairs but in this case they choose two pictures for their partner to compare. It makes the activity more interesting as it is easier to avoid all the obvious choices and this way more interesting contributions are generated.
Have you ever done that? This is the activity in which we use all the pictures at the same time. Students ask each other the question about all pictures, one by one.
Would you like to? This is another activity that can be used with all the pictures. Students ask each other questions related to the situations in the pictures, but more focused on the future.
The comparatives: Another activity in which students discuss all the pictures, going over the list of questions and choosing the pictures that somehow stand out. The set is closely related to the theme of the photographs. For example, in a lesson devoted to health and health problems we looked at these four pictures and we answered the questions: Choose the most serious problem, the least serious problem, the most common problem, the easiest to deal with, the least unpleasant for the doctor, the least unpleasant for the patient, the most expensive to treat, the least expensive to treat, etc.
What happened before? What will happen afterwards? This is a cool actvity that I adapted from the latest editions of New Cutting Edge Advanced. Students choose their favourite pictures and discuss the before and after, almost telling a story.
Ask a question: students work in pairs, they ask their friends questions related to the pictures, they have to use different pictures and different question words and they need to a different word each time: What? Why? Who? Where? How many? How much? What kind of? When? How often?
It reminds me of: students work in pairs, they talk about all the pictures. The talk about their associations, memories or references. It can be a free activity or it can have a theme of: books, films, songs and personal memories.
Make sure you also have a look at the first two parts of this series. You can find them here and here.
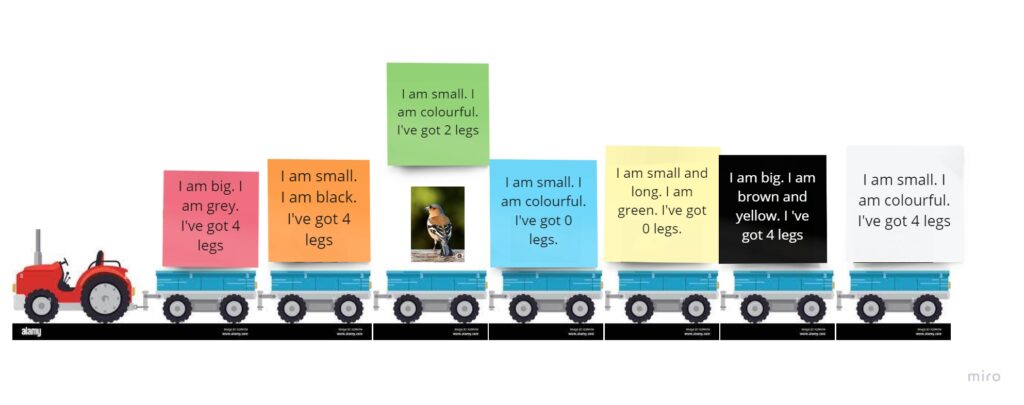
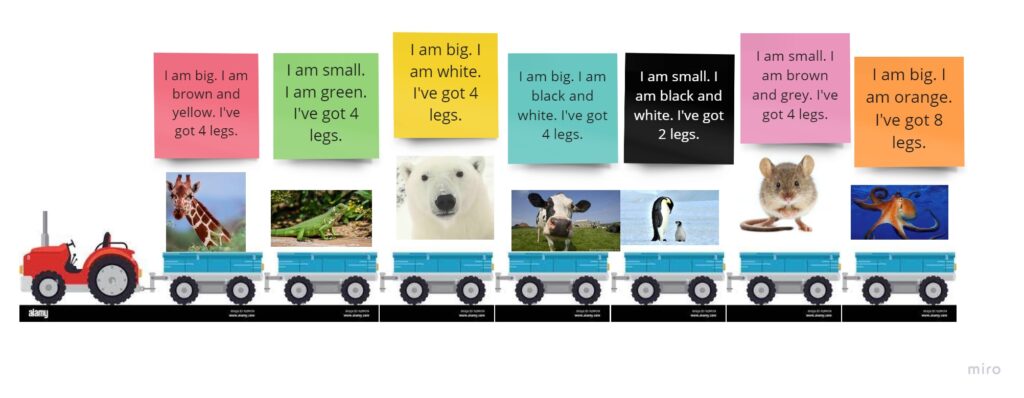
A beautiful train with carriages or a tractor with trailers, with one animal on each trailer.
A set of colourful cards, with a set of riddles following the same framework and the set of structures in each riddle.
Procedures
Students take turns to choose the colour of the card.
Teacher reads the description of the animal. Kids listen and guess the animal. Teacher uncovers the picture to check the answers.
Why we like it
First and foremost, this kind of an activity helps to develop listening skills in very young beginner students and focus as they need the information from all the sentences in order to guess the name of the animal.
At the same time, since all the riddles use the same framwork and the same structures, this game is an opportunity to practise all the key structures. The set of these will depend on what the students are familiar with and can be simplified or extended.
We use this kind of a game to prepare the students to produce the language, too and after playing the game for a few lessons in this very format, with the teacher reading and the kids guessing, we move on to the following stage with the students producing a set of sentences to describe an animal.
Last but not least, with time and with the development of the literacy skills, this kind of an activity can also help develop reading skills.
The game is pretty and colourful, made with colourful cards, beautiful visuals from google. The students are usually curious to find out which animals are hidding on the trailers. The format of the presentation can be adapted, too. In the past we played with huge present box (partially inspired by Rod Campbell’s Dear Zoo) and with houses in which the animals were hiding and the miraculously appearing thanks to the funcion of ‘bring to the front’ or ‘move to the back’ on Miro or any powerpoint.
It can be used with animals or with any other topic with the appropriate adaptation of the phrases ie toys (It is big. It is red, with the assumption that we refer to the visuals that the students are familiar with) or transport (It is big, it is fast, it is quiet) etc.
If you are interested in riddles, please have a look at this post, too, where I write more about riddles for the older and more advanced students.
Any role-play or a dialogue i.e. a transcript of any listening task which is a dialogue (i.e. Movers listening part 2, part 3), any written dialogue (i.e. Movers reading and writing part 3), any functional langauge introduced in a dialogue or a role-play
A pencil or a highlighter for each child
Procedures
Start with the main aim of the task is, ie listening in case of task 3 of Movers or reading in case of Movers, introduction of the functional language, etc. Go through all of the stages outlined in the teacher’s book or whichever ones you see fit in your teaching context.
Give out highlighters or pencils, ask the kids to open the books and look at the text again.
Introduce the concept of a banana (or whichever random word you want to use). Explain (and demonstrate!!!) that you will read the text slowly with some bananas in it and that if the students hear the word ‘banana’ they have to highlight or underline one word that comes immediately afterwards. Model with a few words.
Read the text with the bananas as the kids listen, follow and underline or highlight. The words chosen to be highlighted are the key words for each specific dialogue and their number depends on the dialogue and on the age and level of the students. With the older students and the more complex texts and language, the students can highlight two or more words that constitute a phrase or a collocation. This can be signalled with a repeated number of bananas ie banana banana for a two-piece phrase or banana banana banana for a three-piece phrase.
Ask the students to work in pairs and read the dialogue again and to use their own words and phrases instead of every banana.
Afterwards the kids can change roles and read it again or change the partners.
If the kids are ready, in the final (and optional) stage of the activity, they can close the book and role play and recreate the dialogue and the converation based on what they remember.
Why we like it
It requires no preparation, unless by preparation you mean opening the coursebook and finding the role-play or finding the teacher’s book and making copies of the transcript of any listening activity
It offers a great opportunity for the students to practise their speaking skills in an activity that is both controlled (as we have a framework) and free (as there are quite a few options to choose from)
It also offers a chance to work on the grammar accuracy and the transformation skills
It can be done online or offline
It can be done with a variety of levels. The highest level I have used it with was B1 (teens), the lowest level, so far, was A2 (primary).
So far, I have only tried it with dialogues but now, writing that post, I started to wonder about the potential of that activity for discourse building and creation. The original text could serve as a potential framework and support for the students to use. I am yet to experiment with that option.
Let me tell you first what this post is NOT about:
It is not a post about any specific activity, resource or solution for the classroom.
It is not a report of a classroom research task or an experiment.
It is not a compendium of useful links. Or stories from a trainer’s life.
Not today. Today I want to write about the classroom magic and, in all honesty, I doubt anyone can find it of any use. Really. This is solely for my writer’s and teacher’s well-being.
The magic of Lousiana
When the magic happens OR When kids become communicators in L2
Maximising production is definitely a professional obsession.
Although a) it is probably better to call it ‘my professional interest’ and b) you have probably noticed, if you have been reading my posts (It not, you can find the chapter here). This is what I have on my mind while planning my lessons. This is what I think about while looking at the coursebooks, illustrations, stories and games. ‘How do I get my kids to speak?’
The magic of Louisiana
If you are a teacher of young children, you are a bit like a gardener.
There is a lot of digging, a lot of watering, some weeding, and, above all, lots and lots (and lots) of waiting before you get a chance to even hope about any real fruit or flowers. Or any real communication, in our case. Which does not mean that it is boring or uneventful! Quite the contrary!
It is a wonderful journey, filled with treasured moments, from the very first steps into the classroom and any signals that we have exchanged ideas and understood each other. Cautiously walking in, on day 1, a bit uncertain but also very curious what this new auntie (that’s what I have been referred to, in Russian, in Spanish and in Portugues) has to offer. Pointing at the right flashcards, nodding in lieu of a yes, lining up because the teacher asked for it, picking out for the red crayon in a colouring dication or replying ‘Hello’ to your ‘Hello’ Drilling and reciting all the colours and so is confidently shouting out ‘Cat!’ to correct the teacher when she shows you a picture of a cat but, somehow, she says ‘It’s a dog!’ (though with this special elfin smile and a spark in her eye)… All of this is priceless, amazing, magical. And necessary.
The magic of Louisiana
Then comes the plateu.
Yes, a language learning plateu. In case of the primary or the pre-primary language learners it has got nothing to do with reaching the intermediate level (quite often the level associated with the concept of plateau), quite the contrary, but, it does happen with the little kids, too (and yes, this is just the idea that I got right now and decided to use it in this post).
So, taking the level aside, what do I (very subjectively) see as the language learning plateu in early L2 learning?
kids feel confident in the classroom, with its routines and traditions, the teacher, the coursebook, the lesson and the course framework
kids feel comfortable with their peers and the bunch of kids starts resembling a group and a team
kids are curious and easily learn new words (aka single words) and they can reproduce them on teacher’s request, the action – reaction, teacher – student or teacher – students goes very smoothly
kids produce some simple sentences, depending on the curriculum and the programme
kids know and produce some phrases related to the repeated activities during the lesson
The first two points here are not directly related to the actual language production but due to the age of children, they are of the utmost importance and for that reason they have found their place here. This is the point in the course when the age-related characteristics stop being an issue and teacher and children can focus more on the language learning itself.
Finally, the learning happens, we move from unit to unit to unit. We go from unit 1 (colours), to unit 2 (school), to unit 3 (fruit), from level 1 to level 2, the kids are growing, the kids know more, they are under control. The kids are happy and the teacher is happy. The only thing missing is ‘They lived happily ever after’…
Don’t get me wrong. I am not UN-happy with the classes going beautifully well. I am not picking at the seams here. This is the state that we, as teachers, dream about. However, this is also the dangrous plateau because we may want to stay there forever. And we should not. Not moving forward equals staying in the same place equals regression. Things going well is a signal that the time has come to do something new, look for new challenges or think of ways of extending the Zone of Proximal Development.
In the very specific context of maximising language production in the VYL world it might mean helping the kids move from ‘the action – reaction’, ‘teacher – student’ and ‘teacher – students’, one word or one sentence production to the next level: a discourse (or a mini-discourse), student – student, student – teacher and spontaneous production aka I say things when I have things to say (and ‘Not because my teacher, the adult asked me’).
The magic of Louisiana
The most beautiful day is when the magic happens
There is no way of getting ready for this day, marking it in your calendar and making it your aim. It is when, all of a sudden, it happens – kids say things outside of the framework that you have prepared for the day, outside of the pattern they ‘should‘ be using according to the book. Or when they try to say things that are, clearly, out of their range (yet) but which they need to say. Sometimes it is fully expressed in L1, sometimes partially.
Examples? Yes, sure! Let’s go.
Case study #1
One of my 6 y.o. students, still in pre-school, about to go to school in a few week but have have been using the primary level books since January. She has always been a very active child and an eager students but recently, over the past few weeks, she has just skyrocketed. The magic happened!
We are studying online, she is in her natural habitat, at home where she communicates in Russian. However, during the lesson time, she started to use more English while talking to her brothers. Sometimes, it is fully in English, for example calling him from another room, to join us in a game (‘We are playing! Come!’), sometimes it is a mix of Russian and English (‘Sasha, go, do your thing!’). Sometimes, the baby brother wanders in, during our lesson and he also gets his portion of English, because I welcome him in English and his sisters babbles to him in English, too. Sometimes. We are in our little English bubble while in class and she is really making an effort to communicate in the target language then. Although, not only then, actually! I know it from her mum, that she sometimes plays with her teddies and that some English happens, then, too! Some of them must be English-speaking teddies.
I also noticed that when we play together with the older brother, she really listens to what he is saying and she picks out the useful words and then tries to use them, like, in the same lessons the phrase ‘everyday’ or ‘every day’ and, almost immediately, enjoying the variations such as ‘every minute’ and ‘every second’…
This ‘magic’ goes beyond the immersion in the context and the language creativity and experimentation. My student also started to attempt to maximise the amount of language produced.
Last week we started to practice Present Simple (Do you go swimming?) as a follow-up on the simple ‘Do you like?’ which we have known for quite some time and we were interviewing each other, not as ourselves but as the chosen characters. The main aim was to practise ‘Do you do something?’ and I did not even plan to insist on using ‘at the weekend’ or any other day of the week, leaving it for later. However, in class, my student just started to speak and it was a wonderful experience for me to see how far she would go. First, she’d say ‘do you’, then pause, choose the verb, pause again, choose the object, pause again, choose the preposition of place, pause again and, finally, add the day of the week…
Do you draw on your homework every day? Do you dance in your classes on Fridays? Do you sleep in the school?
I could not keep up with her in my note-taking, because there was so much language and, yes, because I was laughing out loud. Not only because her sentences were great but also because I realised that, this time round, I managed to notice, to seize the moment, in a way.
The magic of Louisiana
How to make sure that the magic does happen?
Let the kids lead the activities (‘Who’s the teacher?’)
Start introducing pair-work as soon as the kids might be ready
If possible, include free play slot in your lessons
Show curiosity, ask questions, even if they seem to be above the kids’ current langauge level
Model
Work with the emergent vocabulary but for that it is necessary to be able to speak or at least to understand the kids’ L1 and to provide the word they want to use, even though it is not a part of the wordlist for the level and to keep bringing it back
Be clever and welcoming when it comes to kids’ way of using L1 in class. Apart from the teacher showing respect for it (please, please, please avoid saying ‘DON’T speak L1’ or ‘NO L1’), there is a way of working it. Not all L1 appears because kids don’t want to speak English. Using L1 is one of the communication strategies and it can be a signal for the teacher as to what the kids want to talk about and what they need the vocabulary and structures for.
Be clever and welcoming when it comes to kids’ way of dealing with code-switching (aka ‘mixing’ L1 and L2). This is one of the communication strategies and it is the a step towards and an attempt at L2-only communication
Create the English language environment and provide the exposure with songs, books, games and stories.
Think of extending this exposure and taking English out of the classroom (aka get the parents, the grandparents, sisters and brothers on board!)
Continue reading this blog for more ideas:)
And wait. Stretch out and wait. Like in a song by The Smiths…The magic is bound to happen, eventually.
Since we are going through the quieter period of the year, there is more time for looking back and for reflection and this is how the idea for this mini-series of post came from. Just because we started to use those and each of these phrases or words was like a key that opened many, many doors in our communication and not only.
The one thing to teach your kids is ‘because‘…
…and the whole thing can* start in primary, and maybe even in pre-school. It is a powerful world that invites the kids to build a simple discourse and to go beyond one sentence or simple sentence production, even in the most everyday situations.
We start with extentending the answer to ‘How do you feel today?‘ which is a part of our class routine and the question which I ask and which the kids ask in every single lesson. As soon as they have a good number of adjectives to use in response (you can read about it here), I try to encourage them to elaborate on their answers, both modeling (I’m happy because it is sunny) and by inviting them to continue. ‘I’m happy.‘ ‘Because...’
Of course, the sentences the kids produce are quite simple, very simple, in fact, and sometimes partially in their L1 but with time, they are becoming more familiar with it and they are improving and, as a result, are able to say more and more and more. In English. Not to mention that as we go through the course, there are more and more situations in which we need because, for example to explain why we like Friday and not Monday, why we didn’t do the homework, why the kids in the pictures look happy or sad or why they did something in the story.
The same can be done with pre-schoolers, with certain adjustments to their age and the number of years that they have been studying. Thinking about my groups in the previous academic year, with the level 1 and the level 2 groups I was more focused on the full sentence production and it was too early to introduce any linkers. The level 3 children, however, were ready the unit ‘I’m scared’ (Playway to English, CUP) was a perfect opportunity to talk about the things we are scared of and to explain why. Or, more frequently, the things we are not scared of. ‘I am not scared of spiders. I like spiders because they are beautiful.’ and so on.
I often tell my students (especially those new ones, and yes, also the adult ones recently) that I will always want to know ‘Why?’ and that even if I forget to ask, they should always imagine this word written all across my forehead and answer it anyway. To help the kids in the everyday lesson and to make it easier on myself, I used the idea I got from Herbert Puchta, only mine was not any error correction technique and it stayed displayed proudly on the wall for a good few years. In the beginning, I really had to do a lot of pointing and waving at the word, later, the habit was developed and the kids (yes, as early as in year 1 of primary!) started to use the word without any reminders whatsoever. They were producing the language and lots of it!
My two favourite because-related moments from the classroom have been those:
when we talk about things, someone is telling us how they are and I, somehow, forget to ask ‘Why?‘ or I am just too slow with it, there is always a voice (or two or three) taking over and kindly suggesting ‘Because…‘, with this perfect rise in the intonation, the voice trailing off in an invitation to continue. I wonder where they got that from!
when we talk about pictures or we retell the story or we describe something that happened at school on the day and, by accident, I want to take over and move on and, in response, I get my own because back, in an interjection, and again, with the intonation perfectly matching the purpose (‘I have NOT finished yet‘) and I am thinking to myself: ‘Oh dear, I cannot shut them up!’ which is, by far, my favourite teacher’s complaint.
*) ‘Can’ or ‘must’?:-))
The one thing to teach your kids is…’I think’.
Initially, I wanted to have a pretty post, ‘one phrase per age group’ but I realised that I simply cannot NOT mention ‘I think’ and the impact it had on my primary school students.
Unlike the previous item, here I cannot even remember how it came about and how I first introduced it. It has always been in the air. I know that I use it a lot to slow the kids down and to signal to them not to rush through tasks (i.e. ‘Think and write’) or to encourage them when they are struggling (i.e. ‘Think about it’ when I know that they do know it and it is only necessary to rack through their brains). We had used it a lot in different stories (‘Elmer was thinking and thinking and then he had an idea!’) and a while ago we also introduced ‘Thinking time’ as an official preparation stage for projects and role-plays. Thinking has been with us, only it is not quite clear for how long.
For the reason, when we got to practise expressing the opinion in winter last year (around the middle of A1 / Movers), I did not even bother to check the meaning of it and the question ‘What do you think about it?’ and the answer ‘I think it is interesting / boring / exciting etc’, the adjectives were the main aim and the focus. For me, at least.
What my students took out of this lesson for the rest of the course (and life!) was the little ‘I think’, which is essentially only an introduction and which is slightly unnecessary even. An opinion can surely be expressed without it. ‘Maths is easy‘ expresses the same view as ‘I think Maths is easy.’ Or so one would think.
I noticed, in the lesson in which we used it consciously for the first time and in the lessons afterwards, last year and this year, that my students began to start adding ‘I think‘ everywhere. ‘I think it is beautiful’, ‘I think it is easy‘, ‘I think he is sad‘, ‘I think it is a cat’ ‘And I think it is a dog‘ and so on. ‘I think’ gave them an opportunity to personalise the message, to signal the autonomy of that message (since by making it subjective you kind of accept that other people will have or may have a different view) and, I suppose, by doing so, it made the message more adult and more serious. And they simply and visibly adored it. Maybe because they were only 7 or 8 or 9 at the time.
As I said, I don’t quite remember the start of that adventure and I am not quite sure when the good time to introduce really is. What I know, though, is that the next time I am starting the group, ‘I think’ will be on the list of things to think about.
The one thing to teach your teens is…’What do you think about it?’
There are many phrases that were shortlisted for this paragraph because of the difference they made to the way my teens interacted with the world in the English lesson, ‘I agree‘ and ‘I don’tagree‘ or ‘On the one hand…on the other hand‘ among them but the real deal-breaker was ‘What do you think about?‘
This phrase, especially with a special stress on ‘you’ (‘What do you think about it?’) has become the wonderful phrase that helped my teens really get engaged and communicate in a really interactive way, not only expressing their opinion, agreeing and disagreeing but also to boomerang the conversation properly by involving the other participant or participants. I mean, truth be told, I know that they did it mostly to avoid making too much effort and producing extensively and this line has become a fantastic and polite tool which they used to dodge the ball. Of course, they produced, too but I just had a lot of fun observing how by trying to be super clever they were involved in a conversation that would give them some high marks during the speaking part of the FCE exam.
The one thing to teach your adults is…’it depends‘.
Especially if your adults are shy, not naturally very talkative and a messy A2 level. Especially if they have already experienced some failures and disappoinment while learning Engllish and when they current progress is closely related to the promotion at work. Or the lack of. Especially if, due to all the factors mentioned above, they reply with single words (the teacher sighs) or when they just say, in their L1: ‘I don’t know what to say’ (the teacher sighs again).
‘It depends’ came to us by accident. It was not a part of any text, a listening task or a functional language phrases lesson. It was a part of the emergent lesson but because I take notes of that and send these back to the students, it stayed with us. And what joy!
I can say with all the confidence that my students, in this one (1) group have wholeheartedly adopted the phrase and made it theirs. First of all, it is this gold key that opens the discourse. You cannot just answer with ‘It depends’ and stop there. You have to continue and explain at least the two different ways at looking at the issue. Especially if your teacher is raising her eyebrows and nodding encouragingly. What’s more, I have noticed that they like using it consciously as a natural time-bying tool that gives them the benefit of a few precious seconds to come up with an idea and a way of formulating it in English. Oh, what a find, this phrase!
The one thing to teach your teachers to use and to remember about is…’but’
This one is here as a joke only. I don’t need to teach my teachers any English, of course, but, as a trainer, this is the one word that I would like them to remember to use whenever they consider the theory of child development and the methodology of working with young learners. Or even while going through the teacher’s book and adapting the activities. This little but powerful word is everything you need to be equipped with to ensure that they always keep thinking of all the exceptions to all the rules and that the most important point of reference are the people in the classroom, not some non-existent ideal students or typical five-year-olds and all the other YL cliches.
Set-up: a set of small chairs in a circle, in one super cozy corner of the classroom. This is where always start the lesson before we move to the serious part of the classroom and the lesson, with big tables, big chairs and coursebooks.
Time: 5 – 10 minutes in the beginning of each lesson
Materials: Angelina, dice and any visuals, especially flashcards, EFL posters (and at the school we do have a big and the most random collection of these from long-forgotten publishers and coursebooks), Starters, Movers and Flyers wordlist picturebooks which you can be easily downloaded (although we are lucky to have a few paper copies, too) and sometimes a whiteboard or a set of mini-whiteboards
Interaction patterns: all the new activities are first tried and tested with the whole group, to support production and to make sure that all students feel comfortable to be creative and to share their ideas. Later on, we split and continue in pairs or in teams.
Here a confession: ideally, of course, all of the interaction should be taking place in pairs to ensure that everyone has a go and produces as much language as possible but it is not what we always do. I have noticed that first of all, the children really do enjoy the whole group discussion, when everyone can contribute and when we do something together. I cannot quite describe it but it is almost palpable, this ‘team spirit’ and it does have a positive impact on them and on the atmosphere in the group. Plus, they are always curious about everyone else’s creative (aka crazy) ideas so they pause to eavesdrop, especially when there are giggles coming up from different parts of the circle. Because of that, we do both, a lot of whole class and a lot of pairwork.
Some of the activities to use in the Speaking Circle:
Tell me about that boy: the kids choose a person, an animal, a character or an object in the picture. The kids choose themselves what they want to conversation to be about and what information to include. The basic information usually includes emotions, clothes, activities or location.
Yes or no: the kids use the picture as the basis to make true or false sentences about the picture. The other students listen and correct the sentences when necessary.
Riddles: the kids describe something in the picture (the colour, the size, the location and the activities) for the others to guess
Which one is better?: the kids draw two cards out of the pile (animals, gadgets, food or anything else that we are studying) and they choose which one is better.
It’s a pair: the kids look for associations among different objects, people, animals in the set and they have to explain why they have put them together
Silly pictures: the kids talk about different silly things they see in the pictures
Silly stories: the kids come up with a character and they take turns in coming up with the adventures based on the set of verbs and / or other words that the teacher prepares in advance (displayed on the whiteboard or on the mini-whiteboards).
Angelina: the kids chat with the class puppet, ask and answer questions (pre-primary groups)
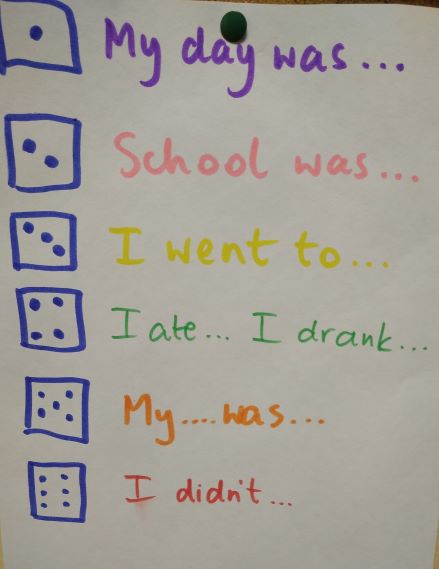
Hello dice: a new variation of the hello circle that can be introduced long before the kids actually study the Past Simple. They roll the dice, once, in turns and talk about their day, starting with the key phrase and we try to encourage including justification (‘School was easy because I have only 4 lessons on Tuesday’) or evaluation (‘I ate soup and it was very yummy’) etc. Sometimes we also play with the imaginary dice which basically means that everyone can choose what they want to talk about. Somehow, then number 6 is the most common choice. Perhaps because it is most generative of all of them and it is fun to say that ‘I didn’t go to Mars’, ‘I didn’t eat a fox’, ‘I didn’t dance in the park’ and what not. Not to mention that they just LOVE rolling the imaginary dice.
I kept it colour-coded to help them navigate among the verbs in the early days of this game.
Why we like it
The kids love it
They are very creative, they have great ideas and they want to share them
By being creative, they also develop their creativity, there are new ideas, new approaches and even more fun
Endless opportunities for revising without focusing too much on any specific vocabulary or structures.
Some potential for accidental learning and emerging vocabulary (although to make it work properly, I should start keeping track of it)
The activities do provide lots of opportunities for spontaneous (or almost spontaneous) language production where the only scaffolding devices are just the resources prepared by the teacher for the day and the langauge that the kids have at their disposal and, in many ways, we are just having a chat, despite being only A1 level.
Really, the part of the lesson that I really look forward to, every Tuesday and every Thursday.
www.seanparks.net, also reproduced by allisonfors.com and aulap.org
Can you see what I see? Are you thinking what I am thinking?
This adventure started like many others, really, with google and one of those straightforwardly mindless searches and a hope that the engine can actually pleasantly surprise you once more. this time it was ‘silly pictures for kids, clip art’ or something similar.
When I came up, I tried to take in all the absurdities all at once but at the same time, my teaching brain was firing at me with the many ideas of how I could use it in class. If I had been an ancient Greek philospher, most likely, I would be running around shouting ‘Eureka’ but since I am only a humble teacher, the only reaction was a rather excited mumble ‘THIS is going to be SO good!’
Now, this Crumbs post is going to be slightly different. We are still in the middle of winter holidays so there hasn’t been a chance to properly trial and test it with mu kids. but I am going to share it anyway, now, and the real classroom experience is going to be added in a week.
Here are the activities I am planning for next week
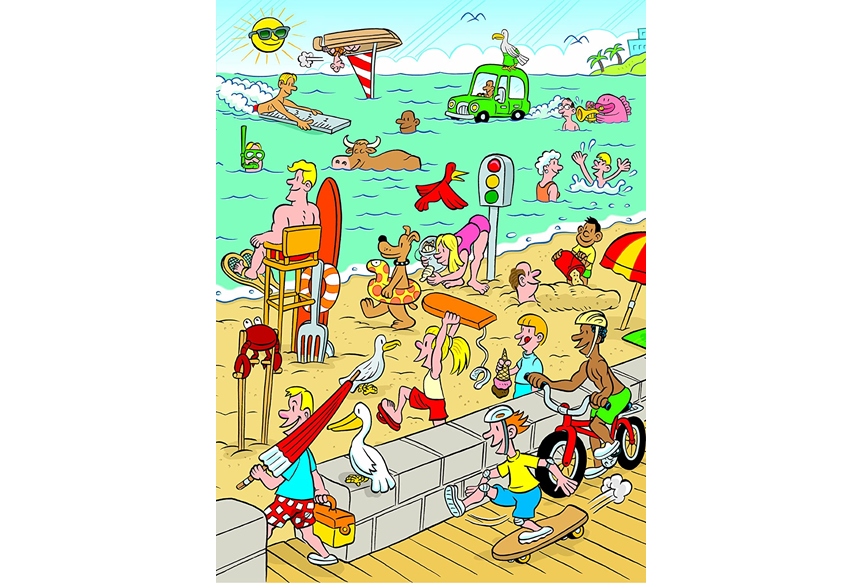
Preschoolers: Yes and No.
With my second year preschoolers, we are going to use the winter scene as this one is most relevant due to the what’s happening in the world outside of our windows and because the vocabulary and structures that we are already familiar and this picture has a chance of being most productive.
Yes and No is a game that my kids are familiar with. The teacher makes a sentence about the picture, which can be true or false and the kids have to react to it and correct it, using either a full sentence or only a phrase, depending on their abilities.
For example:
T: I can see a girl. She is sliding on a doughnut.
SS or S 1: Yes / Yes, it’s true.
T: I can see a girl. She is wearing one yellow hat.
SS or S: No. She is wearing 5 hats.
https://www.pinterest.ru/pin/96686723224800785/
Primary: Can you see something really silly?
Step 1: Prediction
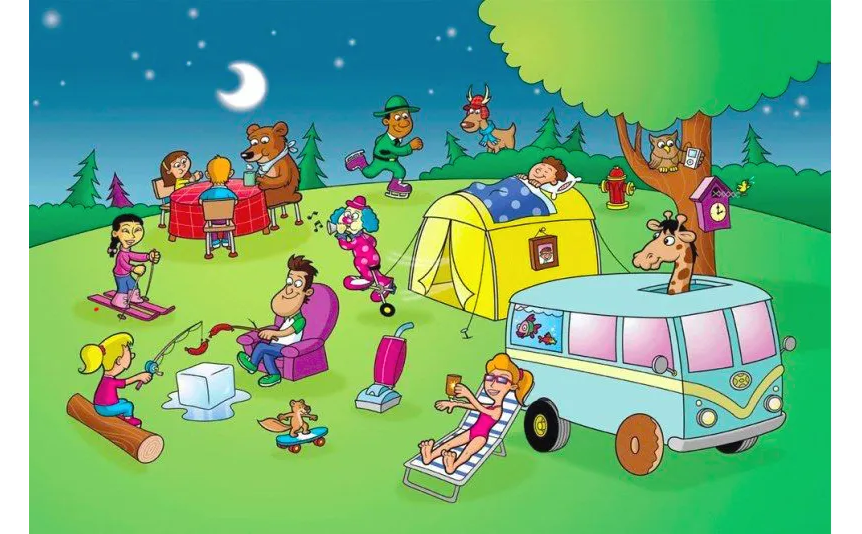
T tells the kids that they are going to see a picture of a campsite. T asks the whole class to guess what might be in the picture. To make it even more dramatic, T can ask the kids to close their eyes, imagine that they are in the forest and say what is happening. T may preteach some of the campsite-related words that kids might not be familiar with yet.
Step 2: Silly campsite
T tells the students that the campsite that they are going to see is a little silly. Kids work in pairs. T gives out a copy of the picture per pair. Kids circle and describe all the silly things they can see.
Step 3: What’s the silliest thing in the picture?
To round up, each student chooses one thing in the picture that they think is the silliest one.
www.seanparks.net, also reproduced by allisonfors.com and aulap.org
Primary: Silly pictures reading practice
This one was inspired by an activity I found on aulapt.org and, automatically, I wanted to have my own with sentences about the scene.
Primary: Tell me about this boy…Because
All these silly picture scenes are going to be the main character in our free speaking activities that has become a regular feature in our lessons recently.
One of the easiest activities to apply here is ‘Tell me about this boy‘. In the beginning, the teacher is leading the activity, chosing the people, animals or objects to describe and the students, in turns, decide what information they want to share. Now we have reached the stage when the kids are comfortable enough with working in pairs and taking turns in choosing the parts of the illustration for their partners and describing what was selected for them.
Now, with this new resources and all the absurdity, I would like to go in the direction of looking for rationale for their actions. We will try to play ‘Because‘. It might not always be easy but since the students are in charge of their discourse (well, ok, their mini-discourse), they can focus on how the people are feeling, what they like or don’t like or what they did before that might have had an impact on their non-standard behaviour now. Especially that we have just started talking about the past, using was/were and the affirmative forms of the regular and irregular verbs so that might be just a perfect opportunity to practise these.
Stage 1: Extended modelling
T: Tell me about this animal.
S1: It is a bull. It is swimming.
T: Because he likes water.
T: Tell me about this man.
S2: He is sitting. He’s got a big fork.
T: Because he is very hungry.
Stage 2: Because
Since this is a new kind of an activity and it might quite challenging to find the rationale for all the actions, we will play it together, to ensure a good brainstorming session. Kids will be choosing what they want to talk about and the whole class will try to say what everyone is doing and why.
In the worst case scenario, we might resort to our ‘Because because’ answer which they sometimes use or we might just go for a simple ‘Because it’s fun’.
This ia brand new adventure for us. I will be back in a few weeks to let you know whether it was a story of success or yet another epic fail story to post on this blog, too.
If you are interested in our free speaking practice circle, have a look at this post and if you would like to know more about what EFL teachers can learn from speech therapists – here is another post to check out!
If you are looking for more ideas on using pictures in speaking activities, here are two posts from the series of ‘All you need is…a picture’ and, its Volume 2 (because activities are accumulating:-)
PS A word of confession: it was very difficult to resource these illustrations. They have been posted, reposted and shared a million times, sometimes losing the artist on the way. I did my best!