Teaching English Through Art: Upgrading Picasso

The artist

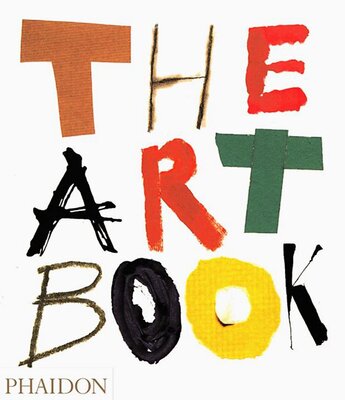
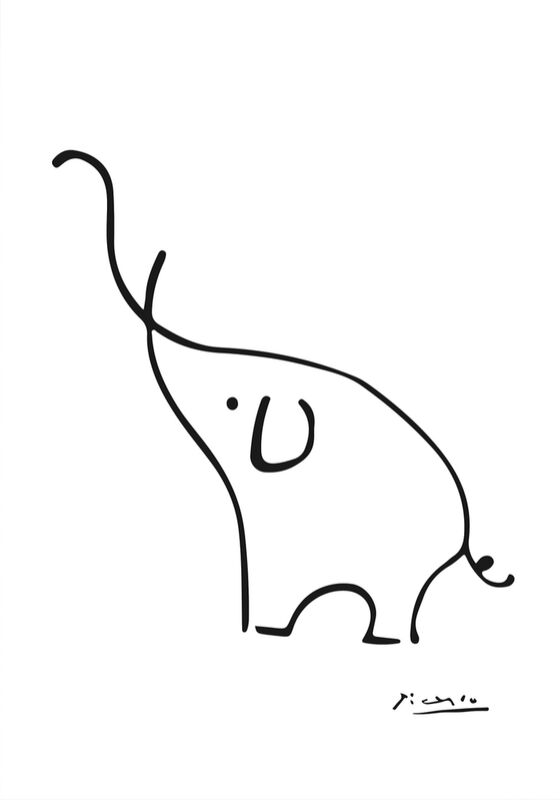
This is not Pablo Picasso’s first appearance in our lesson because last week, in our unit on animals, we looked at elephants by different artists and among them was also the most amazing and the most beautiful elephant by Pablo Picasso (see below). Even then I knew that it would not be the last we see of it.

I was planning to introduce Pablo Picasso in our traditional way, with the country and his favourite things (faces, shapes and line drawings) and I have prepared our gallery for it, but, as it sometimes happens, there was no time for that in the lesson. We are going to catch up on that next time, in our final lesson in this academic year.

In this lesson, we only looked at different one line animals created by Picasso and we tried to guess which ones they are using this set of visuals on wordwall.

The language

This lesson was a part of our Animals unit and the langauge that we have been working on and this was one more chance for us to use and to practise the following langauge: names of animals, categorising animals (big and small, I like and I don’t like) and, most importantly, talking about what animals and what we can do, using I can and I can’t and a series of verbs. We have based it on the song from Super Simple Songs, Little Bird, and we have been working on extending the list of verbs beyond the song.

We have already been playing with the spinner, asking the question: ‘Can you jump?’ and doing the actions to prove that, yes, we can but not as much language came out of it, even though it has been one of our favourite activities recently. This Monday, however, we started to adapt the song and sing it for all the kids, one by one (‘Sasha, Sasha, can you clap?’) and, finally, the langauge came out it. The girls were either singing or singing-reciting their answers, in full sentences. Hooray! Hooray! Hooray!

The art

In the last few lessons, we have done a lot of work with paper, scissors and glue, creating various toys. It was fun and lots of it but, at the same time, I was getting ready to introduce a new technique in our lessons. That is how the idea of upgrading Picasso came about.

I have looked through all the amazing line drawings that Picasso created and I was experimenting with the animals that we could all draw in class, online. Unfortunately, that meant that I had to give up on the chameleon (although that would have been the animal to upgrade with colours!) but I will leave it for another occasion. The flamingo and the horse were the other ones that I was considering but decided against, in the end, because they would be a bit too complicated for the younger students.

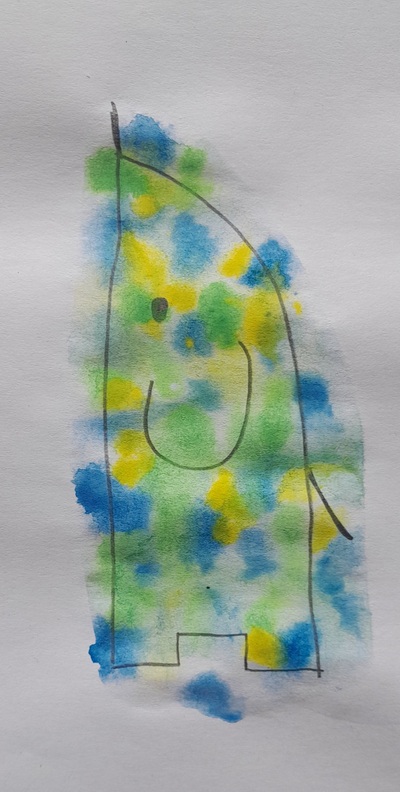
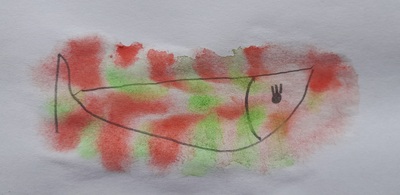
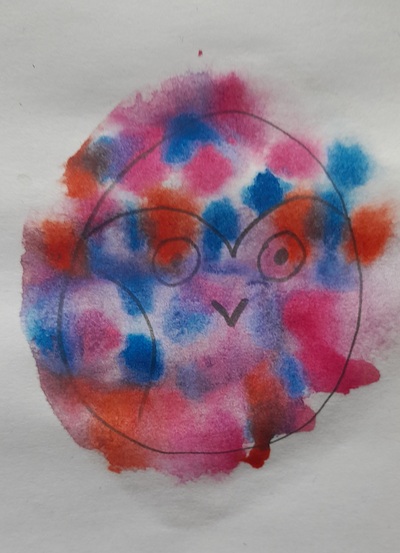
Eventually, I have chosen the elephant, the fish and the owl because they are simple and they represent three different actions and animals from the song which was also used during the craft activity. The verses of the song helped us to punctuate the activity as we sang it at the end of every stage of the craft, that is, after we completed the fish, after the completed the elephant and after we completed the elephant.

Before the lesson I experimented with the technique and checked with the parents that all the resources were available at home. In class, we went through all the resources, showing them to the camera, as usual: an A4 piece of paper, a pencil, paintbrushes, watercolours and two pots with water, one with the regular water and one with the water with salt.

First we drew the fish, step by step. I was drawaing one element, the kids followed and I waited for them to finish. This was not our first drawing dictation so the kids are now very good at following, showing the piece of paper to the camera after each step. Normally, I hold the piece of paper on a clipboard and I show it to the camera. This time, however, I decided to hold the camera over the paper because of the watercolours and I did it consistently throughout the activity. We drew three animals, one by one and put the pencils away.

The idea for upgrading Picasso I got from this great video on youtube. First, we prepared the based and covered the drawing of the owl with the water mixed with salt. The we put it away and started to apply the paints, first one colour, then the other. It is necessary to take some paint with the paintbrush and delicately touch the paper. The colour should spill and seep into the paper beautiful, opening like a flower. It has to be done slowly and carefully in order to be able to observe how that happens. After the first colour is applied in such a way, we repeat with the other or with the others, depending on what the kids choose.

In the end of the stage, I announced ‘I am ready. My owl is blue, red and pink’ and elicited the same from the kids. Afterwards, we sang the verse for the owl. This gave the kids a little bit more time to complete their birds.

Later on, we moved on the the other two animals and repeated the steps. I told the parents to leave the animals somewhere to let them dry completely.

My students were really involved and they had a lot of fun. One of them even used the animals to play a game with her dad and grandma (‘What animal is it? Can you guess?’). They drew their own Picasso animals themselves and they upgraded them beautifully. I was a very proud teacher that day!

And the most amazing of one line drawings and the most amazing of elephants that actually made me fall in love with Picasso…

Happy teaching!

Crumbs #47 Our Weather Book

Ingredients

  • 6 pieces of paper, A5-size aka 3 pages of A4 cut into halves.
  • glue
  • drawing materials: crayons, markers, felt tip pens, coloured pencils

Procedures

  • Introduce and practise the weather vocabulary as usual. This is not our first year of English so we have been using the extended set of words and phrases. Over the series of lessons we have been describing the weather, miming riddles (and yes, I have come up with the gestures for ‘it’s foggy’ and ‘it’s cloudy’, it is not impossible:-) and we have also watched an episode of Peppa Pig, George catches a cold, because it gives us an opportunity to practise the weather, the clothes, some Present Continous and the feelings. Here you can find the set of wordwall cards that we use for the retelling exercises. As you can see, the weather topic became the opportunity to introduce and to revise a whole range of vocabulary sets and structures and it will be reflected in the Weather Book. We are also using the songs and here are our three favourite ones: How is the weather?, What’s your favourite season? and Put on your shoes.
  • First it is necessary to make the book itself. We study online so I asked the parents to prepare the materials before the lesson (six pages, glue, markers), in the offline classroom there is the option of making the book first or the teacher preparing the booklets before the lesson, depending on the age of the students.
  • Making the booklet in class is easy if you follow these few steps: check that everyone has all the necessary materials (‘Have you got the glue? Show me!’), counting all the pieces of paper together etc. Then we draw the line alongside the edge of the paper, page by page and putting the ready pages away. These lines will be help the kids to apply the glue and stick the papers together. The teacher needs to model all the stages and it is absolutely necessary to wait up for the kids, to make sure that everyone is on the same page (no pun intended:-). Afterwards, the teacher shows how to apply the glue (‘Put some glue on the line’) and how to add another page on top, repeating until all pages are glued together into a book (‘Look, we’ve got a book!’)
  • Kids, together with the teacher, number the pages. The numbers will help the teacher and the kids to navigate the booklet throughout the activity. We also write our names on the front page.
  • The next step is to start filling the booklet, one topic per lesson. When we are ready, we put the books away until the next lesson. Once there is something in the book, we start the activity with talking about what we already have got.
  • The topics that we have included so far include: the weather, the emotions (‘It is sunny, I am happy’), the clothes (‘It is sunny, I am wearing a dress’). In the future, I would like to add to it some basic accessories (‘It is sunny, I’ve got my sunglasses’) and some basic Present Continous (‘It is sunny, I am riding a bike’).

Why we like it?

  • There is a lot of potential for craft as the book activity can be extended over a series of lessons.
  • The book also allows for personalising the topic of the weather by associating it with emotions, clothes etc.
  • And, last but not least, it gives us a lot of opportunities for producing the language and, since a large part of the content is revised and repeated over and over again, the kids become a lot more confident at producing it and becoming creative with it, too. After a few lessons, we started to make up silly sentences not matching the weather for the other student(s) to correct the information that they have already heard and have become familiar with.
  • It can be used with a variety of topics, not only the weather, for example food (with pages devoted to fruit, vegetables, drinks, lunch and desserts) or animals (with pages devoted to big and small animals, animals which can fly, swim, run etc) although so far, I have been using the weather book only as a long-term project, with my 1-1 online student. We made the food book with my online group, as a one-off project. It was also a success.
  • There is more flexibility as regards the format, too. We made the booklets and starting filling them in in the same lesson because my kids were ready but it is also possible to divide it into two stages: lesson 1: making the book, lesson 2: start filling it in.
  • The same can be done with all the other lessons. The weather words and the emotions are quite easy to write and adding these in is feasible enough, one lesson (or a ten-minute slot) is going to be enough. The clothes or the accessories might take longer and it can be divided into two lessons to avoid the risk of the activity taking too long and the kids getting bored.

Happy teaching!

Teaching English Through Art: Why you might want to start

An introduction to an introduction

Teaching English through has been something that I have been playing with for quite some time now and it started in the most selfish of ways, namely, I simply wanted to bring my favourite things to class. You know, have these beautiful Georgia O’Keeffee’s skyscrapers hanging by the whiteboard or practising prepositions of place not with the description of the classroom but of everyone and everything in one of the Chagall’s villages. My favourite things, nothing else.

I wanted and I did. Only once I started (and once I started to read about it, to research it, to experiment with the younger and the older, and to read even more and to reflect), I realised that there is a lot more to it, for me and for my students.

Somehow, once you start, it is difficult to stop because new ideas and new projects emerge and there is a lot to write about. This is not my first blog post about combining Art and EFL so if you interested, please have a look here (How to see a city through Art), here (How to hear Stravinsky, although the format can be adapted to any piece of music) and here (How to read storybook illustrations, a lesson not for kids) or here (if you are interested in using realistic and not realistic visuals with children).

With this post, I have decided to take a more organised approach to teaching English through Art, going a little back to the basics, to tell you why you might even want to think about it.

A bit about me and my background

My name is Anka, I am a teacher of English as a foreign language but I am also interested in Art. My first degree is in History and as a part of that adventure many years ago I did have a privilege in taking two terms of History of Art with one of the most amazing teachers ever but I still consider myself only ‘a human interested in the visual arts’, not a professional.

First and foremost I am a teacher of a foreign language and the main aim is always teaching them vocabulary and grammar, the four language skills development and, sometimes, exam preparation. However, I do believe, that there is always room for a bit of Art, here and there, smuggled, hidden and used to develop the language skills.

At the moment, I am taking part in three different projects which, to some extent, involve Art Etc.

  • my regular classes at BKC IH Moscow, classes which have a clear focus, a curriculum, a coursebook in which I use Art Etc to supplement what we do, for variation
  • my Art Explorers lessons, a bonus, free-of-charge once a month class for the students of our branch, a project that we are launching only this month
  • Kids in the Avant-Garde, a cooperation between BKC IH Moscow, Fun Art Kids and the Multimedia Art Museum in Moscow, which gives the kids a chance to express themselves creatively in a variety of ways.

In the long-run, I would like to share here some ideas and activities which we used in all of these projects, but before we get there, here are some of the reasons why including Art in the EFL lessons is a good idea. Let’s go.

The alphabet book based on the animals from the paintings at the Tretyakov Gallery

Teaching English Through Art: all the reasons why you should at least consider it (in a rather random order)

  • Paintings used in regular EFL lessons as flashcards to introduce or to practise the language are a wonderful tool and a source of variety, to compliment the drawings, cartoons, illustrations and photographs. They will be especially appropriate while teaching animals, clothes, transport, activities, food, the city or the natural world.
  • Using painting also means exposing children to different styles in Art will help develop their visual literacy skills, even without any special lessons on the theory or the artists’ biographies.
  • Teaching English through Art with younger children, preschoolers or primary, usually involves some creative activity. This gives the children an opportunity to interact and to experiment with a variety of artistic materials such as paints, watercolours, crayons, fingerpaints and techqniues, for example collage, prints, scratch art and so on.
  • Kids, of the age, are learning to make decisions, choosing their own composition, lines and colours, not only attempting to become a five or a fourteen-year-old Walhor, Mashkov, Goncharova or Rousseau but personalising it and owning it every step of the way.
  • Since this creative activity is only an add-on in the regular English classes, it might help children discover a talent and interest in the artistic world, something that might not become obvious otherwise.
  • Just like any content-and-language-integrated lessons (CLIL), also the Art lessons give the students an opportunity to use the language to access other subjects and areas of knowledge and, especially in the case of the older learners, to see the real purpose of learning a foreign language
  • Interacting with the world art can be a springboard to discussions which generally generate a lot of language for the students, in relation with their level of English. Since ‘all ideas are good ideas’ (one of the mottos of our classes) and since all interpretations are welcome, students feel free to express themselves and to share what they think.
  • Art lessons especially lend themselves to learning and practising the language of expressing and asking for opinion, agreeing and disagreeing, talking about associations, possibilities and hypothesis.
  • Somehow (and this bit is really beyond me) during the Art lessons students, juniors and teens alike, are more likely to use the beautiful English. All of a sudden they realise that there are other adjectives than ‘beautiful’, ‘nice’ or ‘interesting’ and so the language they produce is of a much higher quality than what they normally during the conversations about the everyday topics.
  • Art can supplement lessons on practically any topic and they will help to ensure that the curriculum and the programme is diverse and engaging.

All of these are simply my reflections based on what I have observed in class. The real research will follow.

If you are interested you can continue reading here:

7 Amazing Benefits of Art for Kids That You Might Not Know Of from the artfulparent.com

Art Techniques For Children nurturestore.co.uk

Teaching English Through Art from Jorge Sette

Art in the classroom, blog from the British Council

English Through Art by Peter Grundy, Hania Bociek, Kevin Parker

Bonus titles: lots and lots of resource books – in the photos accompanying this post.

There is more to come!

Happy Teaching!