Ingredients
- A4 pieces of cardboard, one per child. I have used just regular craft cardboard, sold in sets. I had the colourful one but I needed the back side of it, in order to decorate it so white carboard will be even better.
- Glue, to be used before the lesson
- Markers to decorate
- Scotch and scissors or a very good stapler
- Something to put inside, for example buckwheat (raw).
Procedures
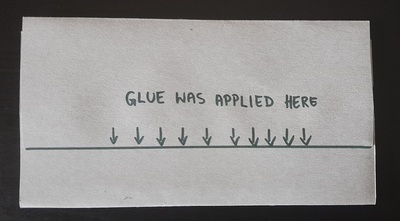
- Partially, the materials had to be prepared before the lesson. I folded and glued the A4 pieces of cardboard into envelopes a few hours before the lesson, to give them a chance to dry completely. Each cardboard sheet was folded into three and glue was applied along the shorter edge.
- One model shaker was also prepared before the lesson and then presented in class. We learned the word and we passed it around for all the kids to touch it and to try to use it.
- The envelopes templates were given out, we wrote our names on them and we took about 5 minutes to decorate them.
- I set up the assembly table with all the other resources and as soon as the kids were ready, they were coming up one by one to the teacher to finish the shaker.
- The final stages completed by the teacher went as follows: 1. close one end of the envelope with three layers of scotch. 2. fill the envelope with buckwheat, to about 1/3 of the envelope 3. fold the other edge of the envelope and close it with three layers of scotch 4. try it with the kid
- The most important part was our attempt to use the shakers. We tried out two activities. The first one was a simple Listen and Repeat with different rhythms ‘dictated’ by the teacher and, possibly, also by the children. The other one was singing of a song that we all know very well with the instruments. We chose ‘If you happy and you know it’ by Super Simple Songs. For one song we all became an orchestra and we agreed to shake twice (after the words ‘clap your hands’ because, indeed, there are two claps) and once (on the words ‘clap your hands’ because, again, there is one clap there). The same patterned followed in the other verses, with stomping, oh no and take a nap.
Why we like it
- First and foremost, I am excitingly happy with the design of this shaker which I came up with myself. The topic of the lesson was Music and one of the activities suggested was making some easy intruments. There are lots and lots of amazing designs that I found on Zing Instruments’ website and I want to make so many of them but, last week was very busy and I simply had no time to collect plastic bottles or to ask parents to give their kids one. I did not want to use plastic cups because I did not have the right kind of glue and I have always had some reservations about collecting toilet rolls that frequently feature in these activities. I spent the whole evening breaking my head over that dilemma, getting angry by the minute because the ideas were not coming. Until I finally gave up and went to sleep. My last conscious thought that day was the answer to my question. This design works. The materials are easy to get, the task is feasible for everyone and it has a universal appeal, too. All my kids were equally excited and involved in the task, the one aged 4 and the one aged 10.
- I was a bit dubious about the durability of the shaker but it did last a whole full day of extensive use. We made it in the first lesson of the day but the kids were carrying around and using it throughout the entire day. I cannot guarantee, of course, how many days they would last afterwards but, even if they break later on, they can be easily fixed with a piece of scotch and some buckwheat or remade and although I do not wish it on my educational parents, the worst case scenario will not be a real disaster. The raw buckwheat can be easily cleaned up and I don’t imagine, kids would want to eat it, because it is just not tasty or pleasant to eat.
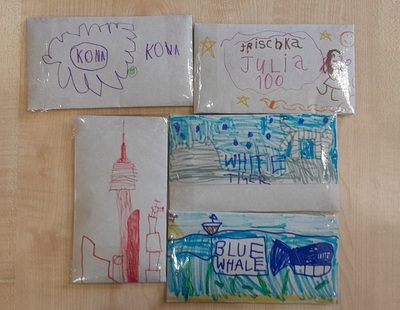
- The cardboard envelope was very easy to decorate, easier than a roll or a plastic cup and we could use regular markers instead of all the other materials featuring on the designs I found on the website, such as the painter’s scotch, decorative scotch, permanent markers or acrylic paints. The kids could draw anything they wanted, either very simple patterns such as stars or hearts or something that was very special to them, for example a blue whale, a white tiger or a skyscraper.
- As I have already mentioned above, the shakers became the real treasures almost instantly, to all the kids. ‘Are we going to take them home?’ was, naturally, one of the questions that every single child asked while we were producing them, just to make sure. And yes, we did take them home but the kids agreed for me to take a photo of all the beautiful shakers. Mine does not even feature in the photos, it was definitely the least interesting:-)
- The finished product helped us in developing social skills. In the final stages of the lesson we became an orchestra and we worked on doing something together, listening to the teacher to repeat the rhythm and, even more importantly, listening to the song and shaking our shakers to the rhythm of the song. This particular group really really needed this kind of an exercise and I was very happy that we managed to become an orchestra for a few minutes. If it had been my regular, long-term group, I would produce some of these shakers to keep in the classroom and to repeat this kind of an exercise more regularly.
- I was a little bit worried about me having to deal with sealing the envelopes but I could not delegate this task to kids as it is quite tricky, for any young learner hands. However, because there were only five children present and of different ages and of different levels of interest in drawing, it all came together. My youngest Sasha completed the task of decoration first and his shaker was the first ready. But then, having had a look at what everyone else created, he went back to his table to add some elements and afterwards he started to play with the shaker. A similar thing happened to all the other students and there was no dead time. However, if we make the shakers again, I will start playing our favourite songs during the time when we all decorate our shakers. This way the kids can start using the shakers with the music as soon as they ready. And, even if they are still working, they can still sing along.
Happy teaching!