None, almost. In some cases, it might be necessary to write some of the ideas on the board, to serve as an inspiration. See procedures
Procedures
Students work in pairs. They share their ideas. If there is time, the students can change partners and repeat the activity. To round up, students share some of the information they have found out about.
This stage is always present, in each lesson, and it takes about 10 minutes. We keep the same variant for about a month and then we choose a new one.
All the variants (so far)
Verbs: the teacher writes on the board all the basic verbs in the past tense: I went to, I saw, I ate, I drank, I talked to…about…, I watched, I played, I bought, I wrote, I didn’t…The kids choose 5 and they build simple sentences about their day, week or weekend. I like to start it with my students even before we officially cover the Past Tense (as soon as they are ready to differentiate between the present / the past form of the verbs) and it really does help the kids to practise and to remember the verb forms.
Did you go…: a variation of the activity described above. The teacher puts the question form and the short answers on the board. The kids work in pairs and ask each other questions. The student who provides answers uses ‘I did’ and ‘I didn’t’ but they are also requested to give a brief explanation (because…)
Tell meabout your day: the teacher writes the name of the activity and a list of topics which can be also elicited from the students. The regular set might include: the weather, the school, the teachers, my best friend, lunch, getting around, marks, tests, pets, brothers and sisters, homework etc. The students work in pairs and they have to choose three topics to talk about. They take turns to share stories about their day and they follow-up each story with a question.
The B-words: this one is a slight variation of the above, only here the teacher writes a selection of words starting with a certain letter as the list for the students to choose from and to be inspired by. Some of the words might be completely random but they also encourage the kids to produce the language. Later on, the students can choose the letter of the day and then can also help make the list of the words, too.
This is how I felt today: in this variation the teacher puts up the words to describe emotions and feelings. The list can be a simple one (happy, sad, angry, sleepy, hungry, tired, bored) and then it can be extended to include more interesting ones, too (confused, excited, chatty, exhausted). Again, the students choose 3 or 5 of them to describe their day.
Superheroes: this time the list on the board is made of names of superheroes, famous people as well as characters from books and films, for example Superman, Spiderman, Wonder Woman, Chebourashka, Winnie-the-Pooh, Santa etc. The students are supposed to think of their day from the point of view of these characters and describe it talking about how they felt. ‘I felt like Superman because I got three good marks today’*)
The superlatives: the teacher writes on the board a list of superlatives (the best, the worst, the funniest, the tasties, the most difficult, the easiest). The students choose 3 or 5 of them and use them to describe their day, for example: The best thing was that I had only three lessons etc.
Why we like it
A stage of that kind is absolutely necessary as the time for the students to settle in
This is also when they learn how to communicate without any preparation and outside of any set-up frameworks since each day might be different and each day may involve a different set of verbs and nouns
At the same time, it is an opportunity to practice the past tenses or the perfect tenses as for many of the students, many events repeat themselves (going to school, writing tests, having a good day or a bad day etc)
It is a fantasic opportunity for the group to bond, to share the great things that happened during the day or to vent about all the disasters that they had to deal with, the tests, the teachers, the piles of homework
To be continued. Soon. We are quite likely to get very bored with what we are doing at the moment…
Happy teaching!
*) My favourite so far! It is amazing how my students come up with their own metaphors and associations, both the teenage group and the kids. Here are a few quotes: ‘I felt like Chebourashka because I was a bit confused’, ‘I feel like Robinson Cruzoe because I am locked up at home now’, ‘I feel like Masha from Masha and Medved because I am a bit crazy today’, ‘I felt like Santa because it was my friend’s birthday and I had a present for him’, ‘I feel like Superman because I did all my homework really fast’…
Congratulations FunkySocks&Dragons! It looks like we have just got the longest blog post title in the history of this blog…
It was inspired by a wonderful song from Dream English Kids, a great tool to teach and to practise the Present Continous and the rooms in the house. If you don’t know it yet, please look it up asap. It is also based on the talk I gave at the TeachyForum in March 2022.
All the ideas that you see below come from my classrooms and represent the tricks and the techniques that I have developed or I have been using with my more numerous pre-school groups. Perhaps it is worth mentioning that I have not really had a chance to work with very very big groups. The biggest number that I have had in the pre-school classroom on permanent basis was 12 and I know that there are colleagues out there who teach more.
As usual, these are the things that have worked for me and I hope that you find some of it useful, too.
#1 Building the routine
This is one of the key words in the the VYL world and today we are lucky to have the access to quite a few different ideas for different classroom routines, either from the coursebooks authors who make an effort to even prepare the classroom routine chants and songs or from the teachers who share their ideas on the social media or their blogs. Lots of sources of inspiration!
But the most important thing as regards the routine for the bigger groups is the time investment. Some of us might be lucky to get only the little angels in their groups, some of us might have to deal with the ‘regular’ children who sometimes behave, who sometimes want to discover the world and to experiemtn, sometimes are up to no good at all…These children (regardless of whether there are three or ten) will need the time to get used to the lesson format, to the teacher and to the rules we want to implement.
When I started or took over those big groups (a situation even more complicated probably, since you have to ‘re-start’ the group), I would go step by step, aiming at getting a perfect hello circle first, just the way I would want it. Then, once this one done, I would work on improving the revision stage. Then and only when I already was at two stages of the lesson under control, I would move to the following one, working at one stage at a time, until I was finally happy with the entire lesson.
Nothing happens overnight. Be patient! Be good to yourself, too, dear teacher!
#2 Adapting the routine
The routine is never for ever and for always. Children get used to the lesson procedures and activities and they might need be in need of something new. Children get bored with what they know and they might be in need of something new. Children grow and develop their social, cognitive, motor and linguistic skills and they might be in need fo something new.
These changes may involve the physical rearrangements of the room (and related to that changes in the routine) or changing the rhythm of the lesson by splitting up the music and movement stage and replacing it with songs used throughout the entire lesson, as punctuation marks or introducing a whole new stage to the lesson in order to be able to secure a short 1-1 chat with all the students in a large group. Which I described here in more detail.
#3 Rewards’ chart
Yes, I would like to recommend using a rewards’ chart, despite the fact that some educators are against the idea. I don’t use it with all my groups, sometimes it is not necessary at all, but with those of the groups and children that need that, for me a rewards’ chart is a temporary solution and a tool of establishing the routine and visualising the kids’ behaviour. As soon as the target audience ie the kids are familiar with the rules and the routines, the chart is slowly abolished.
And yes, I have already written about it in this post here.
#4 Lesson planning aka balance
Lesson planning for a group of pre-schoolers is not necessarily the easiest thing to do. There are quite a few factors that have to be introduced and that have to be introduced in the appropriate ration. Some of these include
new material and revised material, vocabulary and structures
familiar (aka ‘safe’) and unfamiliar (aka ‘intriguing’) elements in order to ensure that the students are engaged but not bored.
skills, mostly listening and speaking but also reading and writing, when appropriate
settlers and stirrers
a variety of materials or, in other words, not only flashcards.
a variety of interaction patterns, not only individual work and not only whole class because all the children waiting for their turn, especially in large group, will find themselves alternative activities if there are too many T-S activities. If, on the other hand, the lesson is based on the whole class activities, the teacher is at risk of losing the contact with the individual students in the group.
games and ‘paper’ (aka hard work). Personally, I am of the opinion that one paper per lesson is just what is necessary. One page in the coursebook OR one handout OR one craft. No more. During the covid year when we were studying online, I gave up on paper completely. The children had their coursebooks but we used this material only for homework. The lesson time was devoted to interaction.
#5 Kids’ involvement
There are so many things that children can do in class and so many things that children will love to do in class because they want to be involved and they want to be a part of the classroom routine. This will help to make them more engaged and connected to the English bubble.
Kids can help with handing out and collecting materials and resources, choosing songs, games and songs, choosing the next student to take part, checking the register, cleaning the board, watering the plants etc etc. Even if in the beginning of the course, the kids are only separate individuals who don’t know anyone else and who perhaps do not feel like interacting with anyone else, this will be changing throughout the year. There is a lot that the teacher can do to help speed it up.
A community, be it a community made of three members or ten or twelve, will be much easier to manage than a group of individuals.
#6 Who’s the teacher?
To be honest, in my books, the main reason for inviting children to take part in taking control of the lesson is the fact that is maximising production. It is also one of the steps towards pair-work. However, there are other benefits, too. Children become more responsible for the lesson, they become more independent and they learn how to be in control. That, in itself, will have a positive impact on the classroom management and children’s behaviour. But there is more, too!
In a way, children become the teacher assistants, too, and that means that while they are leading the activity itself, the teacher can devote more (or all) of his or her attention to managing of the group and their behaviour.
#7 Pairwork
It is absolutely possible! Yes, yes, yes! I have done it and not once! I have also done it and kept and eye on how I was doing it in order to share it with my fellow teachers. You can read about it here in more detail. I will only say this: it did help me to deal with big groups and to create opportunities for all of my students to produce the language. With careful staging, with a mixed-ability goup and a mixed-age group it took thirteen lessons, from our first ‘Hello’ ever until the lesson when we played in pairs, in English.
#8Staging
Staging is a topic that deserves its own post and I will eventually get down to typing it up. In the meantime, only a few words here.
Staging is important. Children being only 3 or 4 or 5 need the external help from the teacher in order to complete the tasks successfully. The first step is the successful choice of an activity.
The second step is how it is going to be done in class, what has to be done before the lesson, how the kids are sitting, what are the main mini-stages, what are going to be the teacher’s instructions and the way of modelling the teacher chooses and so on…It all matters and if it is not taken care of and planned carefull, the activity is likely to end up being a disaster, especially if it is a craft activity and especially if the group is big and the teacher cannot physically help with cutting, colouring, glueing and assembling…
Songs are great and there are at least sixty reasons to use a song in the VYL classroom. Here it is important to highlight the huge potential they have as regards building a community, forming the everyday class routine and uniting the kids to balance the tasks they complete individually. And, as an easy stirrer. In that sense, these are especially imporatant and useufl with the bigger groups.
#10 Storytelling
In the same way as the songs are a stirrer easily included in the lesson, stories (storybooks, story boards, videos or stories told) are easy settlers. There are of course many more reasons to use these in class (I have found fifty so far) but, again, from the point of view of a teacher of a big pre-school groups, they also help build a community. They are also a great tool that can be effective with a group of one, three or twelve as all the children can participate in it simultaneously, if the activity is set up properly (some ideas of how it can be done can be found here).
Anything else? Please add your ideas in the comments!
Happy teaching!
Some other posts that you may found useful are here:
The aim of this post is the following: by the end of the post, the readers will be more familiar with the concept of connecting the EFL with the elements of Art Exploration and the appropriate craft activities.
As a source of potential inspiration for anyone who might want to try it.
The group
The kids for whom this course has been designed were a group of preschoolers, aged 4 – 6, who are and were part of a greater project at MAMM with Fun Art Kids and I was responsible for the English language slot. I taught them from October 2021 until February 2022 and we had lots of creative fun in English. I used to joke that these classes were the reason for me to wake up on Tuesdays.
My students were beginners and for many of them, if not for all, those sixty minutes of English were the only real exposure and the only real lesson and, despite the fact that it is not a lot of time (at all) we made progress that I was really happy with.
The format
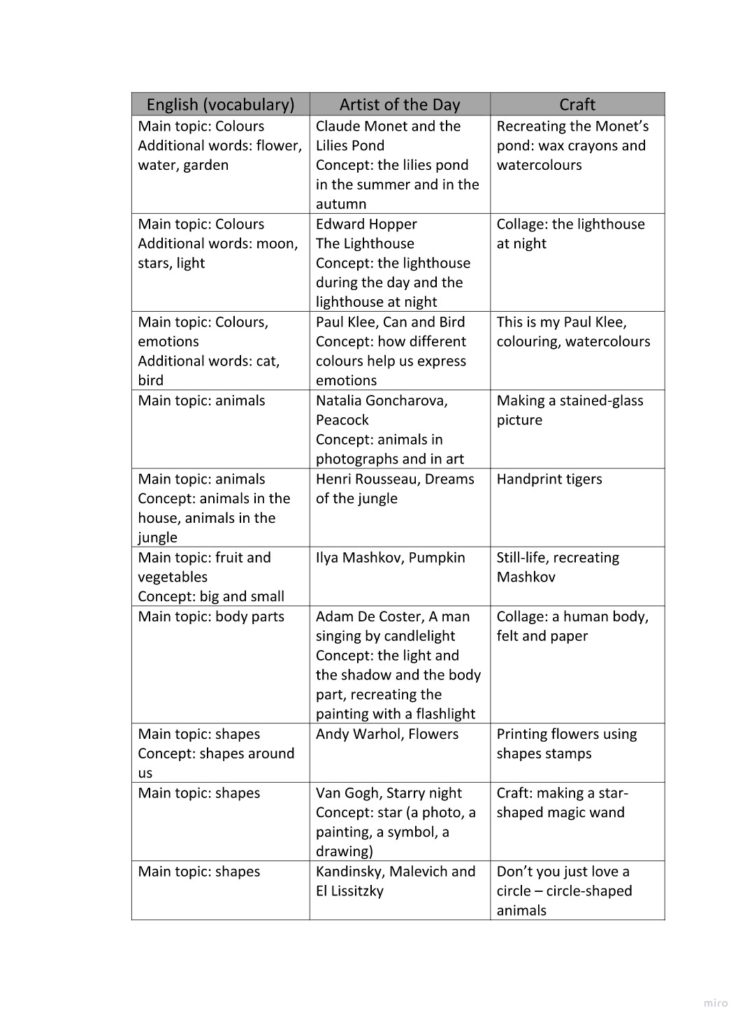
The whole idea behind the Kids in the Avangard programme was that children should be given an opportunity to experience art and all the many ways of creative communication, through music, through dance and movement, through theatre, through visual arts and through English. The programme was run in module, each with their own theme (colour, shape, line etc) and within those modules the kids would participate in lessons that were separate entities devoted to an artist, an artistic movement etc. At the same time, kids work on a performance which takes place at the end of the ‘term’.
It was not easy to nest the English classes in that format but it was not possible. The main idea is that the English classes in which we deal with the beginner students (or a mixed ability group), it was impossible to aim for a very content-rich input and some adaptations had to be made for that. What I decided to do is to focus on giving the kids a good basis of English, including the vocabulary and structure from the pre-A level (although not necessarily not synonymous with and not in the order of the ‘typical pre-school curriculum’) and to combine it with the introduction to the world of the world Art and related craft activities. Just like in the case of all the other classes of the programme, our lessons were connected but each of them was a separate module, too.
The format of the lessons followed a typical EFL pre-school lesson with the hello circle, revision, new material introduction, movement and table time and it was supplemented with and built on songs and stories, too.
The palette of ideas
In the chart below you can see the content and the ideas for some of the lessons I ran as part of the course. In many ways it was an experiment, this whole course and, overall, it was a very successful experiment, the kind that makes you shout out ‘I want more of that!”. However, it was an experiement and, naturally, some lessons were more effective than others, and some ideas better than others.
In the chart below, I have decided to include those that I have tried and tested and loved, as those that I can strongly recommend, ready to use almost. All the misshaped ones will be worked on and developed and presented at a later date, when I have improved them a tiny little bit at least. But, in order to be honest and to share the experience as it was, I have also decided to include some of the things I have learnt by making the mistakes I did make. All of those you will find in the final section of this post aka What not to do.
Thegallery
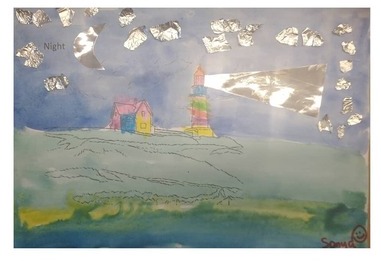
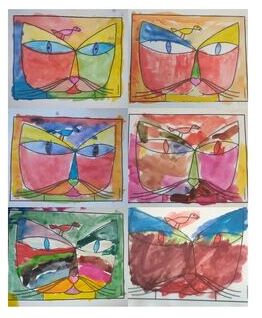
KleeGoncharovaKandinsky, Malevich, El Lissitzkyvan GoghWarhol De CosterMashkovMonet
Thenot-so-successful sideof theexperiment
The time allowances: either because it is a brand new thing for the kids (aka the entire course) or because it is a new element to the everyday class routine, the students need time to figure things out, to learn how to navigate around it and to make it familiar. Once they do, the whole programme will be a lot more effective and enjoyable. Don’t be upset if it is not an instant success.
The high expectations regarding the content and the input: the main aim of this programme is not to provide the kids with any substantial input on the artist’s life and career. Instead, they are supposed to be given an opportunity to be exposed to the world art and to interact with it.
Kids will produce the language, however, it is most likely to happen during the English language part of the lesson (introduction of the new vocabulary, practice, language games)
Each lesson has three separate objectives (language, Art and craft) and it is perfectly natural that only one of them will be given priority in a lesson and that English and the language production will not always be the main focus. If these classes are taught as a part of the general English course, then it is assumed that they will be balanced with the regular, more productive English lessons. In case of a separate course, this aspect (and potential parents’ expectations) are even easier to manage by outlining the course objectives beforehand.
Many craft activities look good on paper but they might not be easy to implement and to manage in a group of pre-schoolers. Trying, trialling and testing (aka making it first at home, before the lesson) is the best way to avoid and to get ready for at least some of the potential problems.
Time is on your side. Fnding a strong link between the three elements and preparing a coherent lesson gets easier with time. And more and more enjoyable.
There are plenty of things that can be done just with the simple resources such as markers, crayons or watercolours and paper but don’t forget that there is a lot more that can be done! Experimenting is fun!
Why?
If you are still wondering whether to start including art in your EFL lessons, please have a look at this earlier post and here you can find a great website with lots and lots ideas for art activities.
It is not a lesson plan in a traditional meaning of the word, that is, a set of notes, more or less formal, that a teacher writes in order to prepare the activities for the lesson. It is a list of stages of the lesson, displayed on the board, written both for the teacher and for the students.
The photo that you can see above as the illustration to this post is my primary students’ take on the said plan, prepared for me one of these days, before the lesson. With a clear signal as regards the activities that they would really (really) be involved in. No homework whatsoever, no grammar, either, three games and a party…I have absolutely NO idea what this mysterious ’33’ was supposed to be…
Why do we need it?
For the teacher, it is a lesson in a nutshell, always there, always on display, a clear presentation of all the main stages of the lesson.
For the students, it is a lesson in a nutshell, always there, an overview of what to expect on the day. It serves as a classroom management tool as it helps the kids get a better idea of the lesson. This is how we keep track of the lesson proceedings as we go through it. This is how you can reward the students if you include a story or a game in it. Naturally, the game (at number 9) can happen ONLY if we go through numbers 1 through to 8 first.
The lesson plan also contains some opportunities as regards the students’ taking control of the lesson as they can be involved in erasing the stages that have been completed, after having confirmed that with the teacher, and, in some cases and to some extent, also the opportunity to choose the order of activities, when and if that is appropriate.
In case of the longer lessons, those that last two or even three academic hours, it is a great tool that helps the students manage their time, attention and focus throughout the lesson, the number of activities, the break and so on.
How to do it?
There are always ten points, regardless of how long the lesson is and #1 is almost always ‘Hello. Homework’ and #10 is almost always ‘Bye-bye. Homework’. Anything that I plan for the lesson has to fit in, in the remaining eight numbers.
This has got a lot to do with the fact that I personally like the ten sections in a lesson (and 10 is better than 12 and definitely better than 11) but it also helps the kids see the lesson as a whole, divided into the same number of sections, every single day. It also gives me an incentive to pack the lesson nicely into ten sections and, in turn, that means that they all might have a different length. It is never ‘the lesson time divided by ten’. Sometimes, half-way through the lesson we might be done only at number 2, sometimes we go through numbers 1 – 8 very quickly and what is left is only number 9 – a whole project planned for sixty minutes, for example.
As soon as we are done with a stage, we erase it off the board, moving towards number ten as the lesson progresses. Sometimes I do it, sometimes the students help. I noticed that they are paying attention, reminding me to erase a stage, checking whether we have already finished it or not yet, making sure that I have included the break or the game or the homework.
With my older kids, I try to be tricky and the names for the stages are very rarely revealing or direct. The only thing that I am always open about is the grammar introduction and practice and it normally features on the plan as: ‘Grrrr’. Everything else is as vague and random as possible. Another trick that helps the kids to manage the time and the attention. With the older students who take part in the decision making process as regards ‘What’s next?’ (or with the younger ones, when they are invited to choose), the students have to ask about the stages that interest them most and then make a decision.
Who is it for?
I use the plan for most of my classes, including the teacher training sessions for my teachers. With pres-schoolers, we use only elements of it and most of the time it is limited to annoucing ‘a surprise’ which, with time, began to translate ‘anything new’, ‘anything special’, ‘anything out of the ordinary’ and the kids were asking how many of these surprises I had, whether they were big or small and so on. I
I also try to get my youngest students ready for managing the time of the lesson by introducing stages for parts of the lesson. These of course have to be worded in a very careful way, using only the simple and familiar words and I always count the number of these stages on my fingers. This comes in handy at the end of the lesson, when the kids are already a bit more tired and less focused or, also, during the more complex craft activities. For example, at the end of the lesson, I can say: ‘We need to do ‘story’ (the thumb), ‘game’ (the index finger), ‘the homework’ (the middle finger), ‘Bye-bye song’ (the ring finger) and ‘stickers’ (the pinky). Then, we also check how many of these five we have got left. This really helps the kids to focus, even the youngest ones.
With my primary students, as soon as the kids are able to read, I start putting the plan on the board. I do it before the lesson and we read it together. Again, since they are only learning to manage the written word, I put only single words or even symbols. These may become more complex as the kids grow older.
The off-site EFL classes, with the teachers arriving to the kindergarten and teaching their lessons there are quite common.
Advantages
The environment is by default child-friendly and safe
There are carpets, small tables, small tables or chairs boards and posters are hung on the level of the children
There are plenty of posters, toys, craft and stationery products that are child-friendly (ie crayons or safety scissors), books
Children feel comfortable in the place, they know where to find the toilet, the spare shoe, their shelves
Children already know their classmates
There will be plenty of people who already know the children from the day activities and it will be a great advantage as the EFL teachers can use them as the source of information or even ideas.
Disadvantages
Children are made to study English in a classroom that might be used for some other purposes, they might feel lost or confused when the room that they normally associate with playing will be the classroom in which they need to do some serious ‘studying’
There might be too many distractors such as toys
There might be some rules, routines and procedures in the institution that will also have to be taken into consideration, it is best to find out what these are and to try to combine them with the rules and procedures of the English lessons
Children might struggle with transitioning between the regular kindergarten activities and the English lessons, provisions must be made for that, for example special routines
Any kindergarten activities will have an impact on the flow of the English classes. There might be some specific holidays or trips that might influence the timetable or the curriculum but it is also quite likely that all the children might be tired or, on the contrary, excited on some days, due to the course of the day activities. They might also bring in their emotions and even animosities from the kindergarten.
Solutions
Where to look for ideas for the classroom
Have a look at the classroom before the lesson and figure out how you can make it fityour aims and ideas, adapt when necessary and talk to the directors or supervisors to find out as much as possible about the institution and their procedures. If you are planning to introduce some changes, first and foremost focus on explaining the rationale for them. They might not be quite clear to people who are not language teachers but when you provide a rationale, they might be willing to take your suggestions into consideration. Involve your supervisor if you have one.
Make the necessary decisions regarding the course such as the coursebooks, photocopying, homework and contacting the parents. These are not quite related to the classroom itself but a lot will be influenced here by the procedures and policies of the kindergarten and they might be different for one kindergarten to the other.
Decide where you are going to start the lesson. Ideally, it should take place in a circle, on the carpet but there are other options, too: at the door, in a circle standing. Even if it is a classroom with small desks, there will be some space in-between the board and the first rows or at the back, behind the last row.
Decide where in the classroom you are going to have the storytelling corner, the movement corner and where you are going to sit to work with the coursebooks or handouts.
Build up your routine and stick to it.
Remove the distractors if possible or as many of them as possible.
Find out which of the kindergarten resources you are allowed to use.
Decide where you are going to keep your things and resources such as crayons or markers for the lesson, handouts, flashcards for the lesson. Please use the same place and make sure you establish with the children that they are not allowed to touch anything that is on the table. It might help to keep everything in a box (as it can be easily lifted to keep it away from the children), it is easy to store and it makes cleaning easy. What is more, if you keep all your resources in one container, you gain a lot of flexibility as all your toys are there, in case you need to change your lesson plan. I have had groups with whom I had to keep all my resources in my rucksack, zipped shut in the begining of the course.
Talk to the kindergarten’s stuff and ask them to find a place for you to store your resources in-between the lesson. Otherwise you will have to carry all your resources with you all the time.
It is a good idea to talk to the kindergarten’s admin to find out whether and where you can put the students’ work on display. There might be some room in the classroom or in the hallway and it is quite likely that the administration will like the idea of assigning a noticeboard for you and the English classes work. They will also benefit from promoting the classes to the parents whom the teacher most likely is not going to meet in person.
Where to find more ideas?
Sandie Mourao and Gail Ellis ,Teaching English to Pre-primary Children, Delta Publishing
Vanessa Reilly and Sheila Ward, Very young learners, OUP
Herbert Puchta and a big group, there is a semi-circle of small chairs but the room is big enough for the kids to be able to stand up and play some movement games without actually moving too much around the room
A realistic preschool classroom, not quite EFL pre-school but real life.
And another one from PreKPages a great channel on youtube where you can find lots and lots of ideas for working with preschoolers.
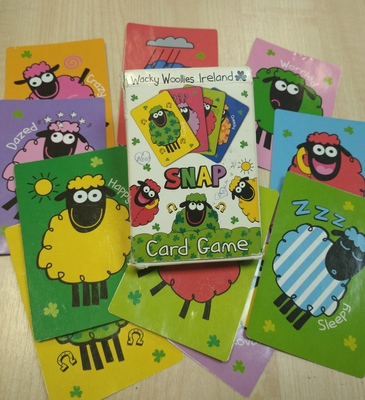
I have a small problem: my brain does not like dealing with written instructions and, really, any instructions whatsoever. I cannot make myself. What that means for my life is that I use devices instead of reading the manuals, I prefer to watch cooking videos rather than reading any recipes (and, indeed, no matter how exciting the food, if the instructions for cooking are longer than four or five lines, I immediately lose interest). In my teaching life, that means never reading any teachers’ books (if I can help it and most of the time I can). If I find an activity that I like, in a resource pack, for example, and I cannot figure out how to use it only from the game itself, well, I just never use it at all.
Or I make up my own rules. That’s exactly what happened with this game.
It actually makes me giggle. I have had this game for about three years (a lovely present from Chee-Way) and it was only this week that I noticed the name of the game. Apparently, it is called Snap. Oh, well.
This morning I was finally inspired enough to google how to play it and I found it easily enough, only to find out that I had never played it the right way. Oh, well.
Actually, I had some suspicious that what we were playing was inspired by another game, that I once heard about but when I bothered to find out, it turned out this morning that I couldn’t have been more wrong. Oh, well.
The Sheep Game (as we know it)
There are 12 different emotions / feelings / adjectives in the set. We started to play with those that the kids knew already and, then, we kept adding one or two with every next game. At this point, they know all of the adjectives and we play with the whole set.
There are 4 cards of each adjective but in any real game, we use only two of each. One is displayed on the floor in the middle of the circle. The other one we deal among the teams. Usually each team ends up with four cards.
The students keep their cards secret from the other teams.
We sit in a circle, students ask the questions to the team sitting on their left or on their right but the questions are always travelling in one direction.
The main question is ‘Are you happy / sad / angry?’
If the team have this one particular card, they have to answer ‘Yes, I am’ or ‘Yes, we are’ and give away the card.
If the team don’t have this particular card, they have to say ‘No, I am not’ or ‘No, we are not’ and then it is their turn to ask the team on their left / right.
The game can be played for a certain number of rounds or until one of the teams loses all their cards. Then the winner is announced and that is the team has the biggest number of the initial set left.
It is a great game to practise the key vocabulary, in a sentence and although the students play in teams, they can win the game only when they pay attention throughout the entire game, listening to all the teams and keeping track of all the cards (or words) that were mentioned and lost, too.
Variations
Blue, please – one of the first games that I normally play with my primary students, in the first weeks of the course, as soon as we feel comfortable with the basic colours or numbers, we play with flashcards that we usually hide inside of the book, to make sure that the cards remain a secret. As soon as the kids progress, we replace the simple ‘please’ with a full question ‘Can I have blue, please?‘ and we play it this way with any set of vocabulary
Do you like… – another variation of the game that we play with the beginner primary students, we normally switch into that version when we start the topic of food and drink. If the students / teams have this particular flashcard in their set, they have to answer ‘Yes,I do‘ and they have to give the card away. If not, they answer ‘No, I don’t‘ and they continue playing.
What’s the matter with your…– a version that we played with my teens while working on the health / medical vocabulary which turned this game into a mini dialogue with different yes and no answers (yes = I need to have it / them checked, no = nothing I am fine) or Excuse me, where is the check-in gate? while we were working on the travelling / airport vocabulary (yes = it is next to…, no = sorry, I don’t know).
Any other set: the vocabulary set + the structure that would be used with this set
Whole class vs groups of three? With the younger kids we normally play whole class, in small pairs because it helps them learn the rules of the game much faster and because the game is easy to set up and you need no other materials apart from the set of flashcards normally used in class. With the older students, I use words on small cards and we normally play it with the whole class only in the beginning, later on they play in groups of three.
And the winner is… Well, there are at least two options here. For a very long time we played it in such a way that the winner was the team who had the biggest number of cards left at the end. Until my kids suggested that perhaps the winner should be the team who managed to get rid of their cards first and we played it this way, too. On the one hand, it makes the game less competitive and it is not a real shame to be ‘losing’ a card but we have had a situation when a team avoided asking the right question not to help their opponents win…I suppose the game can be played as normal and it can be decided only in the end who the winner is (all the cards lost vs all the cards saved) but we haven’t really tried it in the classroom. Not yet anyway.
Leftovers. We normally deal out all the cards available but keeping a few cards away and keeping them secret adds up to the challenge. These leftovers are going to be automatically the incorrect questions and the players will have to figure out first which ones these are and secondly, which ones not to ask anymore.
This is how I daydream it: my primary kids go on to take their Starters (this is an old daydream, this year they will be taking Flyers), they are describing the pictures or telling the story. The examiner asks ‘How is this boy?’ and my kids answer ‘He is confused.’ and the examiner cannot believe her/his ears but she/he is, actually, impressed.
‘Confused’ is one of the many adjectives that my primary kids have learnt thanks to the sheep game that we’ve been playing for a few years now. We started with the normal adjectives, happy, sad, angry, sleepy but the kids noticed that I’ve been hiding some cards and they got curious. And because they were curious, they started to ask questions. Since the cards were wonderfully happy and funny, and since, together with some clarification from me, they did illustrated the concept very well (after all, they were created for children), we started using the ‘confused’ card (and with them ‘chatty’, ‘in love’, ‘crazy’).
That, in hindsight, was an excellent idea because this turned out to be a very useful words because I happen to be confused and my kids happen to be confused, too. Not to mention all the characters from all the stories. ‘Confused’ might be from the B1/B2 shelf, but, we found it very very useful, at the age of seven, in something that was the pre-A1 level.
‘OK’, ‘ill’, ‘in love’, ‘creative’
The coursebook and the curriculum
A disclaimer first: my comments in this section are based only on a very un-thorough looking through the coursebooks for pre-schoolers, only a quick glance at the contents page and the units. I acknowledge that fact that I might have missed something and that a proper research might be necessary and, for that reason, I will refrain from quoting any titles here. However, having flipped through five recently published coursebooks for pre-primary learners, I did not find much as regards adjectives, apart from colours (all), some of the weather words (depending on the title) and some random happy, sad and hungry (also depending on the title). With one honourable exception that introduces quite a few emotions as well as some other opposites, either through stories or through CLIL projects. Overall, however – not good at all.
I also had a look at the primary books and here the situation is admittedly better because all of the modern publications tend to align their content with the YLE Cambridge wordlist and that, in turn, means about 50 adjectives on the pre-A1 level, including colours and possessive adjectives.
As it happens, my school is now getting ready for the YLE mock exams and I am putting together a set of materials for our teachers and kids and that made me look at the said wordlist with a great more deal of scrutiny. Starters kids (pre-A1) are supposed to know about 50 adjectives, Movers kids (A1) – additional 50 adjectives and Flyers kids (A2) – 70 more adjectives on top of that. I am aware of the fact that these lists were not created on a whim, quite the contrary – they are a result of a large-scale research and the effort of a huge team of people. But there are all these questions there, too. Why do the pre-A1 kids need to know the adjectives such as ‘double’ or ‘correct’ and ‘right’ (as correct) and ‘its’ (also an adjective) and some other ones, although not adjectives (‘coconut’, ‘pineapple’, ‘flat’ and ‘apartment’ or ‘lime’)? Why would these be more important, useful and appropriate for primary school children than ‘hot’, ‘cold’, ‘easy’, ‘difficult’ or ‘loud’ and ‘quiet’, which are only introduced at the A1 level?
I do not have the answers but I have been introducing them (or some of them) much earlier than that. And effectively so. If you are interested why and how, please continue reading.
‘crazy’
Emotions and feelings
‘Sasha, how do feel today?‘ is one of the questions that we ask in every lesson. Why? Well, I guess, first and foremost it is for socialising. This is the question that we ask when we meet someone, just to make a conversation, at least with adults.
Since our students are children, however, there is a lot more to that. Children are growing, developing their social skills and learning about a variety of emotions available and, even more importantly, learning how to deal with these emotions and learning how to recognise these emotions in others. That is why giving them tools to do that, in their L1 and, naturally, in their L2, is absolutely crucial.
Ideally, all the Sashas in the world would walk into the classroom being happy, totally over the moon, brimming with joy and ready to conquer the world with us in the next 45 minutes. But it is not possible for every Sasha to be happy every day and, as a teacher, I want to know how they really are and during the hello circle I am, literally, all ears because if Sasha is sad or sleepy or hungry, or, sometimes, angry, I would like to know that. Not only to show empathy but also to look at the lesson and what I have prepared for today from the group’s and the individuals’ point of view. Maybe a bunch of sleepy children will not be able to deal very well with the story? Maybe it will be necessary to keep an eye on Sasha and accept that today she might not be able to focus as well as usually because she is feeling a bit under the weather. Maybe it is a good idea to start with this silly game of ours (although I did promise myself to ‘never ever’) because it might distract and cheer up this little human who walks in and announces ‘I am very, very, very angry.’
Having this range of emotions vocabulary is also very handy when it comes to behaviour management, even if in the simplest of terms.
Situation type #1: an unpleasant situation: someone draws on someone else’s paper, someone takes someone else’s toy /book / marker without asking, someone jumps the queue, no casualties, only a lot of unhappiness in the room and one person is on the verge of tears. ‘Look. Sasha is very sad now‘. Naturally, it might not be the case of ‘one size only’, one solution for all occasions but it is a good start.
Situation type #2: a 5 y.o. confrontation: both parties did have a disagreement, both parties are not very happy and, definitely, way too upset to just get over it and get involved in the lesson activities. ‘Sasha, are you angry?’ ‘Yes!’ ‘It’s ok.’ Again, some cases are more complex than that, but in many situations the very fact of calling the spade a spade and showing that it is natural to feel angry (and, by default, giving the human some time out to accept and recover) is the best solution. It applies also to all the negative emtions, as long as no comes to any harm.
To be perfectly honest, sometimes (only sometimes!) it feels like this brief and contained reaction, limited by the fact that extreme language grading is necessary, is the best solution. Anything to avoid a long lecture from the adult on ‘The negative impact and the long-term consequences of….’ that children sometimes receive from their teachers, baby-sitters, nannies, parents, grandparents…
‘ill’
Riddles
This is, by far, one of our favourite games: making riddles. The game is introduced in its simplest from, with a set of flashcards and with the students guessing the secret word which the teacher or one of the children keep close to their chest. That’s just the beginning, however, once the kids are comfortable and familiar with the format, a set of simple adjectives are added, first the colours (based on the visuals in the flashcards) and big / small. Then, depending on the topic, we introduce and play with the relevant adjectives, for example fast / slow / big / small / loud / quiet while talking about transport, big / small / friendly / dangerous while talking about animals, hot and cold while talking about food and big / small / soft / hard / light / heavy while talking about the everyday objects and so on.
The kids can either use the adjectives of their choice and affirmative sentences (It’s big, it is yellow) or they can react to teacher’s or kids’ questions (Is it big or small?).
A variation of this activity is also I spy with my little eye adopted (and limited) to the set of vocabulary that the students are familiar with, played with a set of flashcards or a poster.
Expressing opinion…
…or, rather, justifying your opinion, something that can become a part of pretty much every unit and every set of words. Not only does it create an opportunity to personalise the vocabulary by dividing it into the things we like and the things we don’t like but also to give more detail and to build a small discourse (I like it. It is beautiful) or even first complex sentences (I like it because it is beautiful).
Naturally, that will require a different set of adjectives but beautiful, ugly, easy difficult, interesting and boring to be the concepts that preschool children understand, even though the flashards and visuals will be based on some symbols.
Storytelling
Our storytelling has reached some new amazing levels since we started working extensively on adjectives, both with primary and pre-primary students. You can read more about in an earlier post on the Storytelling Campaign here and here.
‘confused’
In my classroom
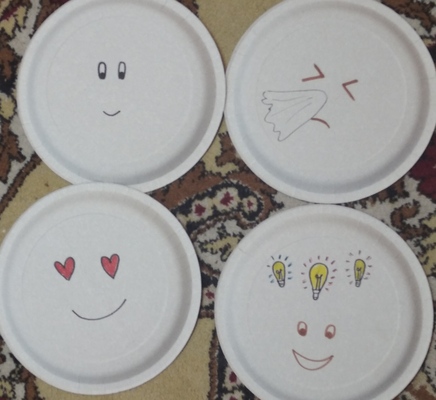
In this academic year, I am working with three pre-school groups, level 1, level 2 and level 3 and I am happy to say that even my youngest level 1 students are familiar with the set of 12 different adjectives that you can see in the first photograph plus a few more that we have learnt through songs. Level 2 group have got the basic set, quantifiers ‘very’ and ‘a little’ and a few more adjectives lined up. Level 3 group have got a nice set to describe food, transport and animals (including ‘scary‘) and they have already started working on extanding that range.
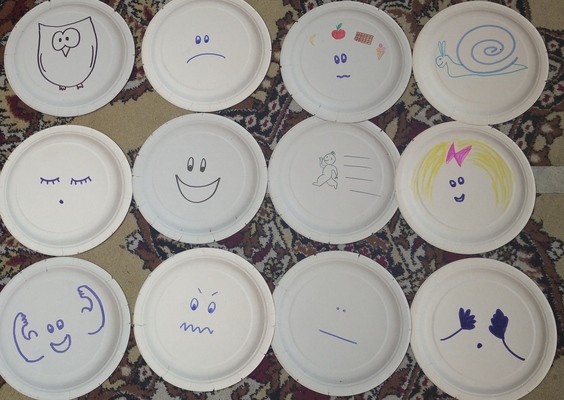
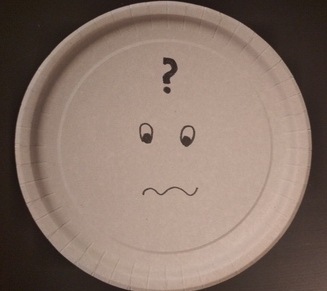
The photographs that were chosen to illustrate this post all come from the set that I have created for my pre-school group.
I have decided to use paper plates because they are durable, easy to stock and they have a shape of a circle aka they are a face. In the classroom, we put them in neat rows on the carpet, in the middle of the circle, to support production. My younger students like to pick up those that are relevant and hide behind them, showing how they really feel. This makes this part of the lesson a bit more kinesthetic.
I have drawn all of them myself but before making the decision on how to represent each adjective, I like to look at different emoticons to get inspired and to find something that meets two criteria a) I can draw it and b) my students will be able to associate it with a specific concept.
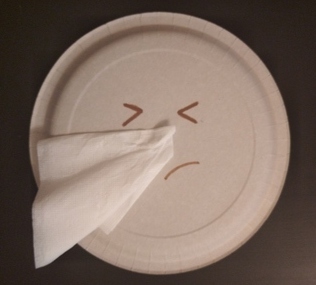
In some cases, the symbol was pretty easy for students to decode (for example: an owl = clever), in some others, I had to follow up with a brief clarification (for example: lightbulbs = ideas = creative). After the first lesson, I decided to upgrade the ill flashcard by adding a real tissue for the poor sneezing person.
There is another thing that I am considering at the moment. With my preschool students we start with the adjectives that help us describe how we feel and it must have been out of sheer linguistic greed that I decided to add those adjectives that describe personal characteristics rather than emotions such as ‘strong’, ‘beautiful’ or ‘clever’. Although, to be honest, we adults know very well that there are days when we feel particularly beautiful or not and the kids responded well to it. At the moment, I am considering different ways of organising all the adjectives that we already know and building up on that, in each category.
These are not all the activities that you can do with a video, these might not be the best activities for your groups. These are just some approaches that we like. Maybe you will find them useful.
Prediction
Procedure: The teacher introduces the topic of the video and gives the students a set of key words that appear in the video. The students discuss why these words might appear in the video and why they might be important. After a whole class feedback, the class watch the video to check whether they predictions were correct. As a follow-up, the students discuss the most (or the least) surprising / unusual / weird facts they have found out about.
Example: We used this video to accompany a reading on extreme adventures and survival in which making a snow cave helped the people survive. We watched a real tutorial on making a snow cave and the key words we started with were: a candle, the letter T, the stick, a saw, the flat ceiling.
Back to the board
Procedure: The teacher divides the group into pairs, one student in each pair sits facing the TV, the other one sits with their back to the screen. the teacher plays the video, students work in pairs and they retell each other what is happening on the screen. Depending on the video, the students can watch the video with the sound on or with the sound muted. After a while, the students change seats and continue watching. Finally, they talk together and answer some questions related to the video. Usually it is a mix of questions, some of which check comprehension and some which help the students see the big picture or express opinion.
Example: We did this kind of an activity while discussing sports and unusual sports. The students watched the muted video on extreme extreme ironing, in two halves, about 60 seconds each and afterwards answered the following questions: What do you think is the name of this sport? How do you think Phil Shaw came up with the idea? What can be easy and difficult about this sport? Would you like to try? Which was the strangest place in which this sport was done? In the end, we watched it together, with the sound on and we compared ideas.
Pause and talk
Procedure: This is a great activity for the videos that consist of short blocks or include a set of examples of a certain item. The teacher writes the key question on the board, usually only one, and plays the video. The students watch a short clip. The teacher pauses the video and students discuss what they have just seen by answering the question. The biggest advantage of this approach is that the teacher is in charge as regards the duration, the activity can be stopped after only three items or the video can be played until the very end. As a follow-up, the students choose their favourite / their least favourite item and justify their choices. As in all of the other activities, there is also an option of the students changing partners and sharing their ideas with someone else in the group.
Example: While discussing food, we watched the video about school lunches around the world, we watched it bit by bit (after each item) and the students had to answer the following question ‘Would you like to try it? Why?’. Actually, this particular lesson included the video because we followed up with a video on American kids trying Russian food and we paused right after the food was introduced and we try to predict if the kids are going to like it or not.
Read my lips
Procedure: It is used with the video with a very clear narrative that can be interpreted without the audio version as the students watch it muted. The teacher can start with the title of the film and ask the students to predict what they think it is about. Afterwards, the students watch the film and try to figure out what is happening, who the characters are, how they are feeling. The teacher can ask them to take notes while they are watching. Afterwards, students compare their notes in pairs or in groups of three. The teacher can also ask them about the main events or to try to connect the clip to the title of the film. Afterwards, the students watch the video again and as a group discuss their guesses. The teacher clarifies the main points, without going into too many details. The final activity is predicting what happens next.
Example: One of my top ten for this kind of an approach is a video like this excerpt from Big Fish, or actually a set of clips from the same film, for example this one here or this one here. In this one case, we did not really talk about the title of the film. After watching the film, the students were discussing what they saw but I also asked them to think about the following questions: Who was the big man? Why did he look scruffy? Why did the boy throw a stone at him? Why did the boy reach out a hand and closed the eyes? Why did they shake hands in the end?
After we finished watching and discussing, we also looked at the quote from the clip ‘You are a big man. You should be in a big city.’ and we talked about what it might mean and whether it is true.
Categorise
Procedure: The students are given a list of all the items that are shown in the video ie some extreme sports, some unusual holiday destinations, exotic animals etc. The students watch the video and they take notes about all the items, ie putting (+) and (-) next to those that they like or grading them from 1 – 5, depending on how interesting they are. After watching the video, they make their own list, organising all the items from the most to the least interesting one or dividing them into categories (like – don’t like, useful – not useful, interesting – boring) and so on. They work in pairs or small teams and compare and explain their decisions.
Example: This video was used in a lesson on technology as it presents the list of 10 Coolest Gadges. Some of the gadgets in the video have unusual names so we started with looking at these, trying to figure out what these might be. We actually divided the video into two and we discussed the first five gadgets and then, after the second half, the other five and then all ten, to round up. The students were choosing the most interesting gadgets that they might want to buy and those that they would not really even consider. In the end, we choose the most and the least popular gadget as a group.
None of the videos I use as examples were graded or created with the EFL /ESL learners so they can be considered authentic materials. I found all of them on youtube while looking for videos that would match the topic we were working on. I did not introduce any vocabulary, focusing rather on listening (or watching) for gist and general understanding, rather than on any specific details. Unless, of course, the students had any questions.
If you want to find out more about using authentic materials, have a look at some of the many resources online such as these post here: how to choose and adapt them, here from the Britsh Council, and here.
I have also found out a few posts on using video in class. If you are interested, you can find them here and here and this one here, although it has a wider scope and does not really focus on videos in the EFL/ESL classroom.
I am happy to inform you that, inspired by your article, I have decided to follow your example and to start experimenting in the area of scaffolding…
Oh, how I wish I could write a letter of that kind. Since I first read the article by Bruner, Woods and Ross on the original research and how the term ‘scaffolding’ started to mean what it does to us, teachers and educators, it has become a kind of a life mission to spread the word about it among my teachers and trainees, conference attendees and, of course, the readers of my blog. This is also the area that I choose to invesitage in my first classroom research project as part of my MA programme.
Of course, the most important things keep happening in the classroom, in the everyday when you observe and adapt your instructions, gestures, voice and actions to better suit the young or very young learners as regards demonstration, marking critical features, reduction in degrees of freedom, recruitment, direction maintenance and frustration control (the six orignal features outlined in the article).
This time, the starting point was the lazy teacher…
I started to plan the final lesson with my three pre-school groups that also happened to be our Christmas lesson. And it was out of this tiredness and the madness of the end of the year that made me wake up one day and decide: ‘I am going to repeat the lesson!’
Three lessons in a row, three different levels, three different age groups and the same lesson plan. Well, to a point, of course. We would all study the same vocabulary set and sing the same songs, but the activities would vary, depending on what the children are capable of.
Topic, vocabulary and structure
There were eight words in the set (Santa, a reindeer, a stocking, a Christmas tree, a present, a start, a snowflake, a snowman) and I wanted to combine them with the question that we all had been practising before: ‘What is it?’ ‘It’s a…’.
The level 1 kids (and the youngest group) have got as far recognising the words and pointing at the right flashcards and participating in the ‘What’s missing?’ game although most of the time they would guess the missing word in Russian and they actively produced only some of them in English, such as ‘a star’, ‘a snowman’ and Santa. We also watched the ‘Guess the word video‘ and it was a chance for us to drill the vocabulary in a different way. We also introduced ‘What do you want for Christmas‘ and it was a nice opportunity for us to revise toys which we covered in the previous unit. But only that. In the end of the lesson we also had time for storytelling and we used Rod Campbell ‘My presents’, again as a way of revising the key vocabulary.
With the level 2 kids, we did pretty much the same but the kids were able to remember and to reproduce all eight words really quickly. We played the same game (What’s missing) but they were all actively involved and producing. We watched the video and guessed the words, pretty much just the way the younger group did, although it was interesting that I did not need to encourage them to repeat the words and, as soon as the full picture and the correct answer was revealed, the kids said the word without any cues from me. It seems that due to their age and to the fact that they have been in class for longer, they are much better used to that kind of reaction to the content. We seem to have developed that habit already.
As for the song, we even managed to personalise the song and talk about whether each of the presents featuring in the song are a good idea (or not? ‘Not’, according to some students:-) and we sang a verse for each of the kids:
‘What do you want for Christmas, Christmas, Christmas? What do you want for Christmas? Santa is on his way…’
‘I want a…’
I did not use the storybook with the older children. I had planned it only for the little ones. For the older ones, we had a back-up of an episode of Christmas Peppa, but, in the end, there was no time for that.
The oldest group, level 3 kids, need only a quick revision of all the words and then we could play a variety of games. We did not even play ‘What’s missing?’ as they are too ‘adult’ and this particular game is not challeging for them anymore. Instead, we played a team game, ‘Tell me about it’, in which the players choose a box, open it and say something about the picture hidden in the box. And they collect the points.
We did use the video mentioned above but in this lesson it was not just a simple guessing game, we also managed to talk about whether each round is going to be easy or difficult and then to comment on what it really was. And, of course, the song was also personalised and followed-up by a proper chat. There was also another song, ‘Who took the cookie from the cookie jar?‘, in its life acquatic version (nothing to do with Christmas, but the kids were curious and this is the game we are playing right now). This group are already quite good at personalising songs (aka ‘The original version is good but let’s see what we can do with it and how can we make it better?’) so it was the kids to suggest that we start singing it when we pick up our surprise at the end of the lesson from the reception. If I rememeber correctly, the final version of it (as shaped up by the kids) went along the lines of: ‘Who took the surprise from the surprise jar?‘
I was teaching, having fun and keeping my eyes and ears open and trying to remember what was happening. It was already very interesting but I was really waiting for the most important part, the cherry on the cake.
The cherry on the cake
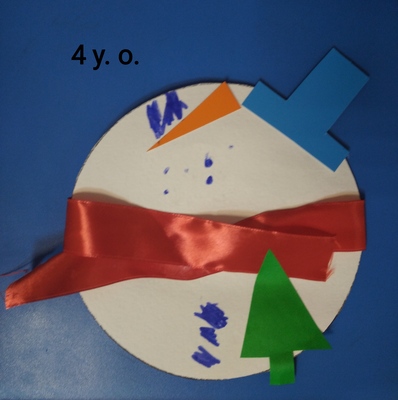
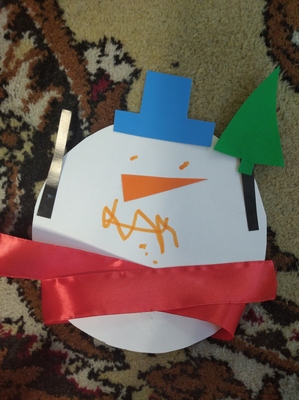
Surprisingly enough, this time round, it did take a long while to choose the craft activity but finally I settled on the snowman. I found something that I liked among the 25 Easy Snowman Crafts For Kids on countryliving.com. I planned the lesson, spent an hour cutting out the circles, the noses, the hats, the arms and the Christmas trees and orgnising the room. And then we took off.
It so does happen that although my children are divided into groups by the level and by the age, there are exceptions and special cases in all three groups.
The actitivity, the materials, the staging and the instructions were exactly the same in all three groups but the outcomes (visible in the photographs below) and the scaffolding necessary (not visible in the photographs:-) heavily depended on the age of the students.
The youngest students produced these beauties:
This was interesting, especially because this lesson came first and after a very short moment, I realised that, while preparing and planning, I gauged myself for a slightly older audience and I had to adapt on the go, especially for the almost 3 y.o. girl for whom it was the trial lesson and the first 45 minutes in our classroom.
It turned out pretty quickly that it is quite a challenge to glue the ribbon, to turn the circle over and to tie it and that the orange ‘carrot’ nose is actually very small. But we managed, with the pace really, really slow and the teacher keeping an eye and demonstrating everything twice. Plus, yes, the teacher had no other choice but to help with the ribbon.
The age of the students shows most obviously in the way that all the small parts were glued and how the eyes, the smile and the buttons were drawn, with a different level of accuracy and precision. Almost where they should be:-)
And it was because it took longer to produce the snowman that I decided to skip the little sticky arms. They were too thin, too fiddly and too risky. And the snowmen still look pretty without them.
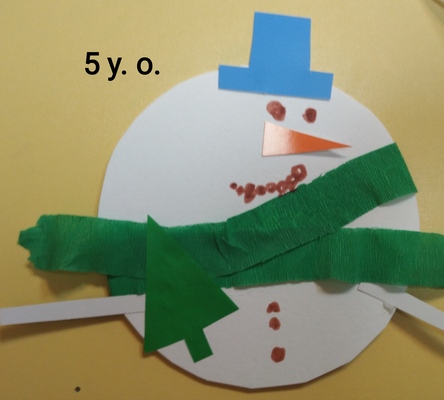
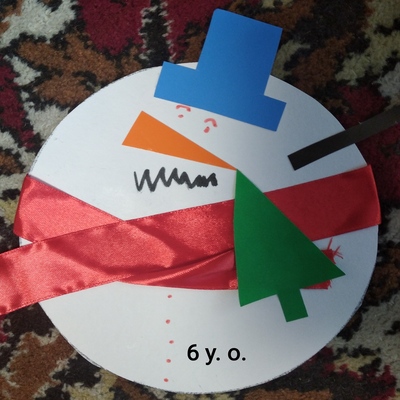
The snowman created by the 5 y.o. hands looks like that
First of all, the five-year-old snowmen did not take as much time to produce and the little fingers were much more agile and ready. As a result, the teacher did not need to help with the ribbons, the noses were handles with much more efficiency and we did have time to add the arms.
It is interesting to see that at this age, the students did observe the teacher (the mentor / the expert) to do exactly what she was doing but they were observing to figure out what had to be done and to interpret it in their own way. Some snowmen were happy but not all. Some had the scarf tied on the neck aka above the arms and the others had it more where their snowman-y waist would be. Some had the buttons and some did not. Some snowman mouths were a string of dots, some were drawn with a line. Some of the Christmas trees were glued on the snowman’s chest (like in the teacher’s model) but then again, some were holding them in their hands (although this obviously involves even a higher level of precision).
The 6 y.o. snowmen look like that:
The older snowmen are even ‘neater’ (in inverted commas here because I adore all of these snowmen, even the ones that look as if they were created by Pablo Picasso) and the evidence of precision and accuracy as well as even a more detailed and a more personalised version, which were the students’ own additions as they were not modelled by the teacher such as the eyebrows, the hat decorations (not featured in the photos) or a bigger number of buttons.
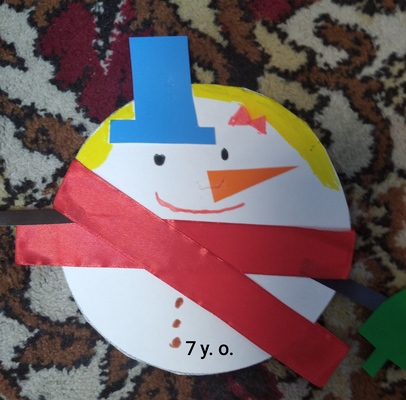
And the oldest of them all, the almost 7 y.o.
This snowman was made by our oldest student, a girl who is actually in school but who is finishing the level with us. As regards the level of English, the development of the literacy skills, she is like the other students in the group, but her motor skills are more developed and for that reason she usually is the fast-finisher. That is not an issue and while she is waiting for the group to finish, she usually continues working on her craft or handout, adding details and decorations.
This time round, she decided that her snowman is going to be a snowgirl, with her and a bow, which was her own original idea.
Reflections of a small scale Jerome Bruner…
This was an absolutely fascinating experience and I would really recommend it to teachers who work with different levels within the same age group, especially within primary and pre-primary where scaffolding seems to be one of the most important factors deciding about the task completion and success.
It can be a great source of information, about the students’ skills and abilities…
…as well as an opportunity to trial something new, be it a song, a video, a game or a craft activity and to learn more about this type of a task.
It is a chance for the teacher to practise and to develp their scaffolding brain…
…and a great opportunity for a freer practice in the area of differentiated learning, not only within the group of learners (something that happens in every class) but on the level of different age groups and levels
Like in the original experiment, the design or the choice of the task and the material is crucial but the holiday lessons, not really closely connected to the coursebook curriculum, seem to be a perfect way out.
What else? Not much? Some curiosity on the part of the teacher, some willingness to experiment and some flexibility in order to be able to adapt on the go. Plus, the eyes wide open to notice all the little changes and proceedings.
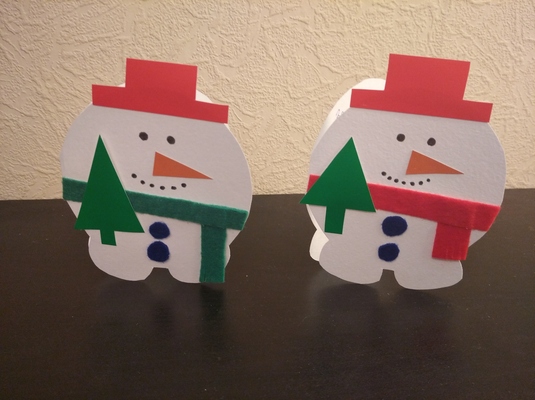
These two, in the photo below, are my own interpretation of the original craft and a more complex version of it, here in the form of a card, made by an adult (myself). Perhaps this is what I am going to make with my oldest primary group in our Christmas lesson. If we do, I will let you know how it goes. That would be, indeed, a nice follow-up and an extension of our experiments. We’ll see. In the meantime:
When you suddenly notice how the everyday is beautiful. The metro station Universitet
Ingredients
A group of teenagers or pre-teens
Paper and pen
The theme of the story. We are preparing for the Cambridge exams and so we used pictures and the exam format of the story writing in KET (three pictures) and the exam format of the story writing in PET (the opening or the final sentence).
Procedures
We start with some warming-up activities and they depend mostly on the coursebook and the curriculum but they all they have one thing in common – they help the kids get ready and get in the mode for the proper writing task.
Some of the potential exercises include: talking about the story, generating vocabulary to support the weaker students or less creative students, see the post here (especially Sstep 2: Two crazy words) or the following two
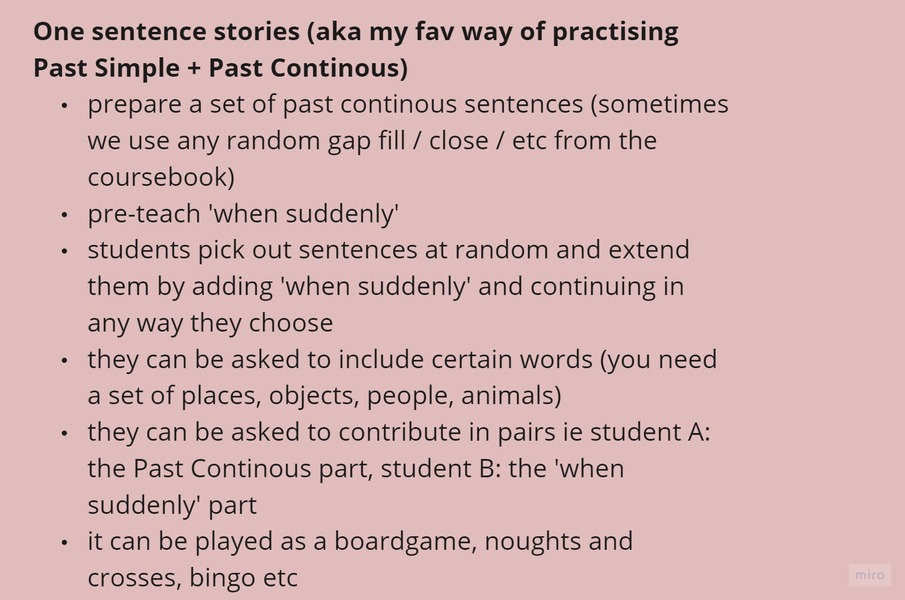
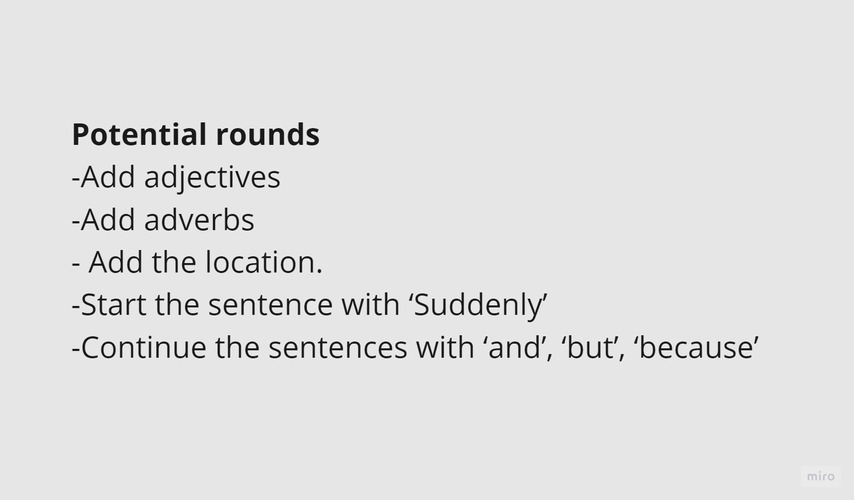
One-line stories
Make it better: students start with a set of simple sentences and work in pairs or individually, trying to develop it in a few rounds. The students can either work on the same handout using a set of colourful pens (a different colour for each round) or a few copies of the same handout. It can be followed up with a reading session and choosing the most interesting sentences of all but it is not quite necessary to include one more competitive element. The number of rounds can be limited or extended, depending on the age and level of the students.
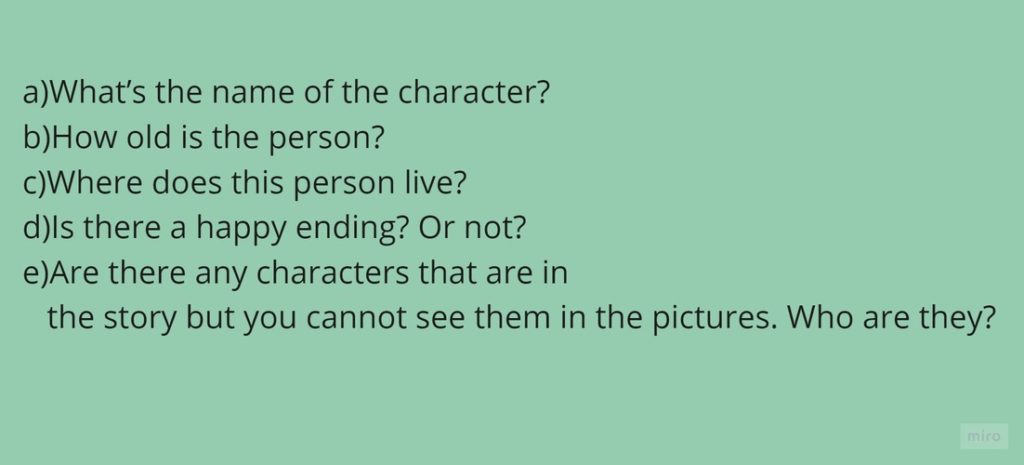
We include ‘The Thinking Time‘ to give the students a chance to imagine their story and make the necessary decisions. These are the questions which they might be asked to consider:
Everyone can choose their own pen name, too.
I make it more formal by announing that we are going to choose the best story and that I am going to ask my colleagues to help me.
The students start writing, the teacher monitors and I help out with vocabulary when necessary.
There is not one time slot or the number of words required. We are practising in the exam format but without too many limitations at this point.
Afterwards, we type the stories up and share them with our BKC teachers who vote for the one they like best. I don’t correct any mistakes at this point.
I prepare diplomas of participation for all the students and one more for the winner and there is a reward (food as this is the one hobby that we all share, me and the students). We have a ceremony that involves a speech from the teacher, applause for everyone and for the winner and eating because they all share the reward. Our winner is the master of ceremonies of the day.
The final stage is the error correction. In the original handwritten copies I underline a few mistakes that the kids correct later on. So far, these have been mostly in the area of spelling, tenses or the general style.
Why we like
The students get really involved in the writing process and looking at how they write away, it is really difficult to believe that teenagers don’t like writing, that they are not motivated or that they are not creative at all.
If carefully scaffolded, it is an activity that all the students can complete and it is very mixed-ability-groups-friendly. Since there is not word limit, everyone writes as much as they can and want. The last time we did it, using the PET format with 100 words as the limit, I received entries of about 70 words but also entries of 400 words.
It is an amazing opportunity for the students to express themselves. They can choose the storyline, the genre and the style. This year they produced a horror story, a love story, a post-modernist short story and a diary entry, among others. We have been working together for at least two years (and for about six with some of them) and yet, I was still surprised that they can write like that. Because they can and they are amazing kids although this is not some kind of a writing-obsessed and literature-obsessed group (unlike their teacher) but a bunch of typical teenagers: always tired, always under-slept, who’d always choose ‘no homework’ over ‘homework, please’ and ‘no test’ over ‘test, please’ and so on. And yet.
This time round I have decided to include the most beautiful comment that each story got from the readers and, in a way, it started to resemble the categories that we have at different film festivals, although, to be fair, they can be quite random as they are generated by the readers, such as ‘your dreams will come true award’, ‘I can’t believe a child has written it’ or ‘A kind heart’. And my students really liked it and were touched by that.
P.S. I would love to share these stories here but some of my students keep them secret even from their parents. Their stories and their copyrights. So be it.