This post here is my response to the challenge set by my teacher-friend Michael. Challenge accepted. Let’s go, 5 steps.
Lesson aim
The first-est step. Always.
The session devoted to lesson planning on our YL course is called ‘What do you want teacher?’ and that is for a reason. Making a decision why we enter the room and what we want to achieve by the end of the lesson is key. Is the vocabulary the focus or is it a grammar point? Or any of the skills? What is the context? Do you want to focus on the language or the most important thing on the day is the work we put in developing social skills or building the routine? It might be something suggested by the book or chosen by the school curriculum but not always. And even it is, there is always room for adjustments and adaptation. At the end of the day, there is the teacher and there are the students in the classroom that matters most. The programme and the coursebooks are to be adapted.
After the aim is selected, there are more follow-up decisions to make, namely the selection of the focused task (aka the main productive activity) of the lesson?
That’s it, done. The main thing is done and it probably took about 5 minutes. The next step will be looking for things that will help make it happen.
Books basics
The coursebook and whatever it contains is already partially included in the previous step. Most of the time, this is what we use, for convenience and just because we can. The coursebook is not the enemy of course and there is a lot of useful material. Though, not all of it.
I presume the main activity has already been chosen and the next decision is regarding all the other exercises, activities, audio and visuals that are there (and in the workbook and teacher resource packs) that either match or don’t our aim and our focused task, or, in other words, our A or the lesson and our Z.
The most important thing to remember and the thing that is on constant repeat during our sessions and in my conversations with teachers is: the book is not there for us to follow to the letter and to cover and to include all the exercises.
Things you can repeat
In every lesson for YL there are certain elements that we can and that we should repeat because they help us construct the framework and the routine. They include either the elements of the routine: the hello song, the how do you feel today, the rules revision, the homework check, the goodbye as well the elements that are short-temporarily fixed: the songs we are singing in September, the games we are playing in the unit of toys, the story we are reading in the chapter on the jungle animals. All of these will feature in the lesson over a month. It is good to included them in the plan, keeping them on the side, in order to be able to use them.
The missing bits
Having got that far in the lesson planning, it might be the time to figure out how much time we have already taken out of the lesson time and how much time we already have left. Then, look at all the activities there are in the coursebook, all ready and waiting to be used, and, only if necessary, to replace them with some other activities, from another sources or self-designed.
Most of the time, the coursebook will do the job just fine.
Something for the balance (bits)
What I like to do at the very end, when the lesson is already ready, to have a quick look at everything, to check it for the contents and for the balance and variety
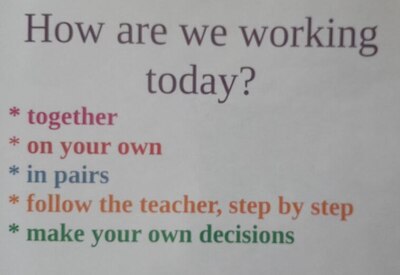
- the ratio of interaction patterns
- the ratio of different activities: songs, stories, creative and hard work
- the ratio of new and familiar
- the ratio of settlers and stirrers
And, when something is off, I fix it. Done!
Instead of a coda
Here are a few words of wisdom from a grandma teacher and trainer / mentor / observer:
- we want good lessons to be our everyday but that does not mean that every single lesson needs to be an Oscar-worthy (or a Nobel prize-worthy) unit at the cost of the teacher’s sleep, peace of mind, family life or salary. Yes, I sometimes invest a little bit more into my teaching, in terms of planning, resources and time but, after all these years of experience, I also have lessons that are ‘just regular, no fireworks’.
- we sometimes plan lessons and as soon as we get to school, out of the blue, we come up with something entirely different and it is the best lesson ever. Yes, that happens, but (here comes a very subjective line), it is the result of all the brainstorming and thinking that has already taken place. Otherwise, it wouldn’t have happened.
- designing your own activites does not have to take ages and it does even require a teacher to be super creative. I personally find it much easier to prepare something for my lesson from scratch, rather than spend hours of looking through materials and resources to match the needs of my group and then, on having found it, still waste time on adapting it to what we (my kids, my course and our lesson) really need (here you can find some of the posts on material design).
- our coursebooks have a lot of different resources and pictures among them which can be used in a million different ways with very little effort. A picture is an actitivity and you can read about it here, here and here.
- in general, being a lazy teacher has a lot of benefits. You can read about it here.
- here you can find another post about the everyday lesson planning
Happy teaching!