This was our final October Art Explorers lesson. I was preparing for using Paul Klee’s The Bird and the Cat because the painting does include two hearts as well as other shapes, a perfect final lesson. However, in the middle of the preparations and my trying squeeze everything in one academic hour, I decided to go easy on all of us, myself and the kids. I changed the concept entirely and chose to focus on the technique, for the first time ever in my Art Teacher history.
Ingredients
- A pile of cards, A5, enough for everyone to try a few techniques.
- Pencils, crayons, watercolours, salt, tissues, hand sanitizer, a paper clip.
- For the older learners: a heart as a symbol in brands.
- Videos for the teacher to learn about different watercolour techniques. I have taken my ideas from these: here, here, here and here. Thank you)))
Procedures
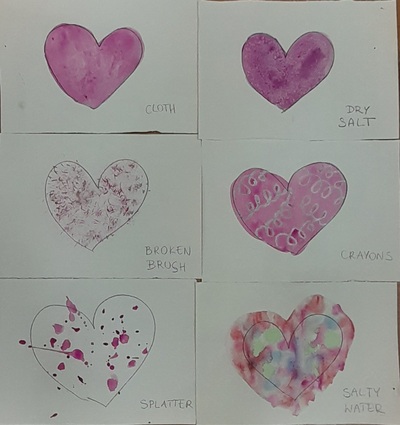
- First of all, I watched all the videos to learn about different techniques and to choose those that will be feasible in the classroom with my kids. The next step was creating my own hearts, a whole set, with different techqniues before the lesson time, in order to be able to show the students the final product. I kept to the same colour for the kids to be able to see the different effect and the impact on the texture and not to be distracted by the colours.
- We started the lesson in our usual way, with the hello song, taking the roll call, singing the song about the shapes and looking for the shapes around us. With the older students we also did the heart in brands quiz.
- Afterwards, we looked at all the techniques to try in all my samples. While we were doing it, I was also demonstrating the most important tools ie the cloth, the plastic, the salt, the paper clip (for scratching).
- Then we just started to create. All the kids would take the cards, draw the heart and then try the new technique. We would look at the final product, talk about it a bit and move on to the following technique.

Why we like it?
- It was a lesson like one big experiment, in which we were moving, from one stage to the other, with a lot of curiosity and excitement.
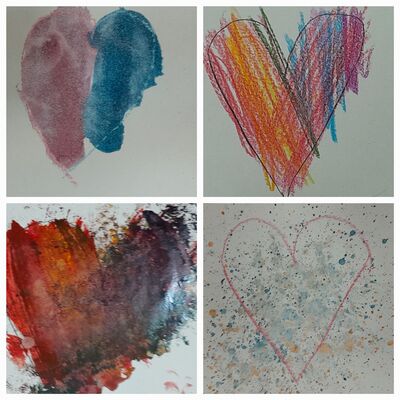
- This time we have done the following: salt on the finished picture, salty water as the base, scratching the surface with a paperclip, drawing the patterns with wax crayons and painting over, finishing the picture with a cloth, splattered paint, the broken brush (aka printing with a split brush). I also had the plastic bag for the final touches and the alcohol prepared (aka the hand sanitizer) but we did not have time to use it in the end.
- I have to admit, it was not the most productive lesson that I have ever taught but it was an wonderful opportunity for all of us to do something different.
- I was very happy to see how the kids were allowing themselves to try something else, something new. At first, they were just following my instructions closely, using the same tools and the same techniques and then they were leaving all that behind and taking one more step further, with a particular technique or with a mixture of different techniques. At this point, we were all looking with curiosity at the outcomes. It was a very beautiful moment.
- If this is an option, I would like to recommend looking at the final product on the following day (or in the following lesson). The drying time really does make an impact and the creative lesson might be followed up by gallery walk, expressing opinion and choosing the most interesting heart and technique.
- This activity would be a perfect Valentine’s Day celebration in Art Explorers and I was almost sorry that I used it in October. I might be coming back, actually, with more techqniues!
Happy teaching!