There is nothing like a good metaphor and I use it a lot in the classroom, to give feedback to my students (‘Your essay is a bit like a skeleton, all the good bones but no muscles at all’), to explain grammar (‘Reported speech is basically telling stories’) or to manage the behaviour of my younger students (‘This desk, Sasha, is like your island and these other desks are other island. We don’t travel there. Never ever ever!’).
I also started to use metaphors in teacher training and, of course, you can read about it here and here and this is how this post started, too.
I asked my trainees ones how they would describe a lesson in terms of a metaphor and I found out that a lesson is a lot like: playing football, playing a game of snakes and ladders, a journey, a frame…I am getting goosebumps now because I know that there WILL BE a separate post about that, soon.
A lesson is like a story
Oh yes, it is! In a good story you absolutely need a good opening line (this is how I choose my books, yes. Because if the author did not bother to make an effort to say hello properly, why would we even be talking, eh?), a set of interesting characters, some adventures, some challenges and achievements, a climax and the ending.
In terms of a lesson, these would stand for a warmer activity (a good opening line), the community of the teacher and the students (yes, we are the characters), some engaging activities (our adventures), some new things, some learning and development (or the challenges and the achievements), one amazing focused task because all the roads lead to Rome (and this is our methodological climax) and….a good cool-down activity aka the ending.
We absolutely need the ending!
First and foremost, a lesson needs an official round-up, the final touch, the coda, the summary of everything that has happened during the lesson. Since one does not walk into the classroom and start the lesson without saying ‘Hello’, nor does one leave without saying ‘Goodbye’, there should be the first real activity of the lesson and the last real activity, too.
What’s more, a good ending of a lesson is also an introduction to the following one. If the lesson finishes on a high note, the students will leave the room looking forward to coming back next time.
Move! By Super Simple Songs! If you haven’t used it before, find it asap!
# 1 Finishing with a song
An easy and no-prep resource, especially with the younger students. A song is a signal for the students that we are finishing but it can be also a signal for the parents waiting in the hallway. It can be the same good-bye song in every lesson but it can be a song that the students choose to finish the lesson with. This is an especially useful trick with the older and more advanced children, who might eventually get bored with the same song. With one of my online students we had a tradition of choosing one of her favourite songs, in Russian, to listen to and to dance, after the offcial lesson time, just as this thing that we did together (and I had a longer break in-between classes and I could spare a few minutes). One of my trainees, Nathalie (lots of virtual hugs here), also built in a dance into her class routine. At the end of the lesson, the kids would choose one of the Super Simple Songs, for example, get up, find a place in the middle of the classroom and just dance and sing, together with the teacher and then go home.
I have yet to start experimenting with songs with my older students.
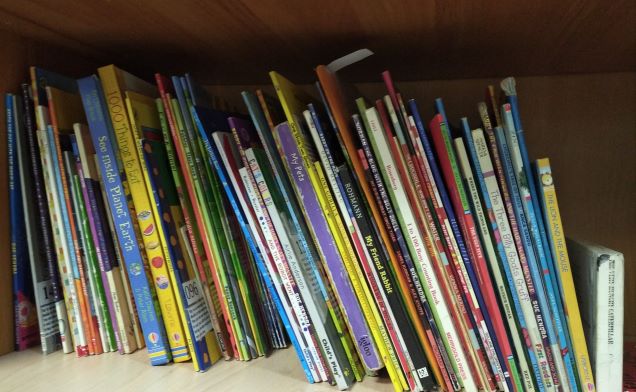
# 2 Finishing with a story
Admittedly, that is a part of the routine that is something of a staple food in my pre-school and primary school EFL lessons. Stories, both storybooks or videos, can be used either to revise the key language or to introduce and practise the new language, not quite related to the topic of the lesson. From the point of the view of the lesson, the story is a part of the ritual and something that helps to build the class community.
In the classroom, we clean up after the focused task, set homework and go back to the carpet (preschoolers) or to our hello circle (primary), we choose a story and read or watch it and talk about it. Then, the only thing left is the goodbye-song. And stickers).
This is, probably, one of my favourite ways of finishing a lesson, because we get a chance to settle, to bond, to practise the language and to express opinion, all in one. I am wondering whether and how my older students could benefit from these, too. Something to experiment with in the next academic year, perhaps?
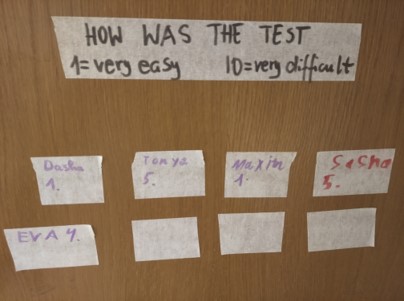
This is the feedback the kids left after the first week of the summer camp activities
#3 Finishing with afeedback session
There are many ways of organising a feedback session after the lesson, depending on the aim of the feedback session.
Self-reflection when the teacher is simply irrelevant (in a way). The main aim is to give the students an opportunity to look back at the lesson and to consider the learning process. In this case, the students work in pairs or small groups and share their views, answering a set of questions, such as: What did you like? What was the most difficult / interesting / boring / the easiest part of the lesson?
Feedback for the teacher: students can leave their comments on the board or on the wall (or the door!) if the feedback is to be anonymous or they take part in a discussion in small groups or as a whole class.
It is up to the teacher to decide how frequently any kind of feedback can be carried out: once a week, once a month, after each test or after any lesson with a new element in it such as a new activity or a new game.
This is our feedback after one of the tests
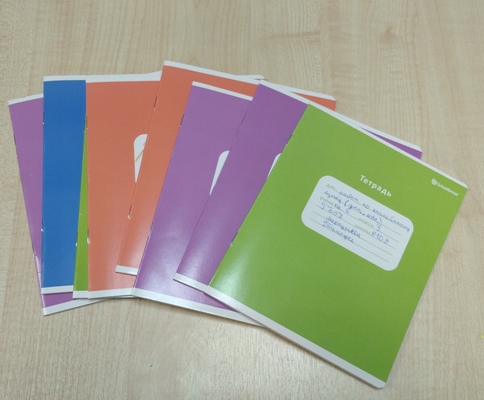
# 4 Finishing with a self-reflection task
This activity is an extension of the previous point but it focuses more specifically on the content and, even more specifically, on the vocabulary. My students (primary and teens) had their notebooks which we used for taking notes and for the self-reflection tasks, too.
At the end of the vocabulary lesson, the kids take their notebooks and look back at the lesson and categorise the words according to a number of the following categories: the difficult words, the easy words, the useful words, the words that look strange, the words that sound strange, the words that may not be very useful…
They can either create their own lists by copying the items from the board or the coursebook and by categorising or colour-coding them. A short speaking activity would follow in which the students explain their choices to their partners in pairs or small teams.
# 5A revision task
That is another set of tasks that we sometimes use also based on the key vocabulary in each particular lesson and it has got a lot to do with everything that is written on the board already such as the new language or the emergent langauge. The main aim here is to give the students one more opportunity to use the target language. Since these games have no definite ending, their length can be adapted to the amount time left in the lesson.
The students work in pairs and can play one of the following games:
Definitions: student A calls out the word / phrase, student B: provides a definition and an example, then they change, the teacher helps out only when necessary (aka the word has already been forgotten)
Synonyms and antonyms: student A calls out the word / phrase, student B: provides a synonym or an antonym
Questions: student A chooses a word / a phrase and asks student B a question that includes that word / phrase. Then they swap roles.
A story: students work in pairs, they take turns and tell a story, using different words / phrases from the board
Pairs: students take turns and they try to find connections between different items on the board, based on meaning, pronunciation, grammatical category or associations
Sometimes we also play the memory game with the whole class: the students take turns to close their eyes, the teacher erases one or two items, the students open their eyes and try to recall the words that have disappeared as well as all the other words and phrases from the previous rounds. The class listen and help out with definitions and associations. The bonus? The board gets cleaned))
# 6 Finishing with an introduction to the following lesson
This approach to the finishing the lesson was the result of the reality of the teaching life. No matter how well you plan your lessons and how many optional activities you have up your sleeve, it might still happen that everything has been done and there is still some time left but not enough time for the teacher to properly spread the wings, be it in a game or in any other fully-fledged task.
In such a case, it might be a good idea to introduce the topic of the following lesson, without properly setting the context (no, time, remember?) for example by:
introducing the title of the reading, the topic, for example through a game of hangman and a discussion about the students’ expectations and prediction
talking about the visuals that accompany the following topic, without going into any details
three questions to help the students relate to the following topic for example: What do you think about…? Have you ever…? Do young people in your country often…?
This will create a link between the lessons and it can be further extended by a homework along the lines of: ‘Find out more about…’. All of these can be easily adapted to almost any topic.
# 7 Finishing with a game
The games chosen to finish the lesson with should be fun (the students are already tired and less able to focus), fast (if there is a lot of time left, perhaps it should be devoted to something else) and offering some flexibility to the teacher (aka games with no definite end or result that can be stopped or paused at any given point).
We like to play:
Categories aka STOP: students work in pairs or small teams, they write one word in each category beginning with a specific letter, afterwards the teacher awards the points.
The Game of 5: each team or pair prepares a list of 5 in their category (a separate and unique one) such as 5 irregular verbs, 5 cities in Europe, 5 farm animals etc. Afterwards, the teams have a minute to guess all the words their partners have come up with. They can get 50 points in each round, 10 points for every word they manage to guess with the team setting the task getting 10 points for every word their partners did not manage to guess.
One-Minute Game: this a game that requires a set of flashcards (very easy to prepare) or a set of word cards (prepared by the teacher throughout the year, can be easily recycled). Students work in small teams as they take turns to explain as many words out of the set (definitions, associations or miming) to their team within one minute. I am pretty sure that this was loosely based on some kind of a game show but I have no idea which one. Oups.
In order to better manage the game and time in class, we started to play these with the same teams over a series of lessons, pausing when it is time to go home and recommencing in the following lesson.
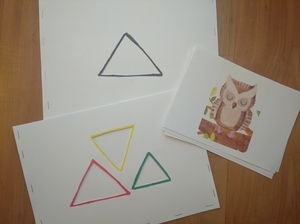
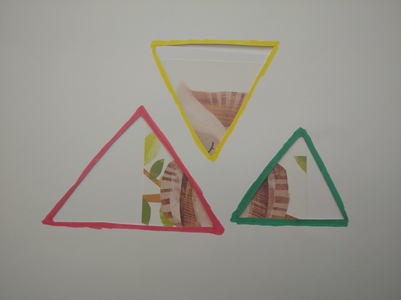
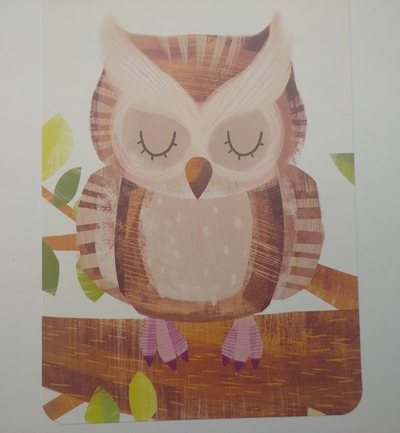
The stained glass project: in the making
Bonus: An Art Project
‘Anka, what’s this?’ the kids asked when entering the classroom and noticing a few boxes of the stainglass paints.
‘These are special paints. We used them to make these special pictures with the little kids.’
‘Anka!’ they said, in that very special tone of voice that my kids have mastered, the voice reserved for these particular occasions, to compain, to chide and to express disappointment. ‘The little kids? And what about us?’
So I had to think of a way of including this particular project in our classes. Making stained glass pictures is one of the coolest activities ever but it takes time as the various layers need to get dry before you apply the following ones and there is virtually no chance of completing a task in one lesson. Not to mention that it is a perfect decorative kind of a craft and trying to adapt it in order to maximise production would be simply counterproductive.
Instead, I wrote to the parents and I explained that, instead of a game, at the end of the lesson, for the next few lessons, we would be preparing our own stained glass pictures. The kids chose a template or designed their own pictures, they drew the outlines, they coloured them in and, as soon as they were ready, they took them home to cut out and to display them. All in all, it took about 5 minutes over a series of four lessons.
The Chameleon Day!
Bonus: The Chameleon Day akaGoogleSearch
Choosing virtual stickers is not a new idea and thanks to Miro we have lots and lots of fun and we can keep track of all of our stickers throughout the entire year, if necessary. Here you can read how we deal with that with my primary students.
Further reading
The 9 Best Ways to Finish EFL Lessons from the ELT Guide
15 Awesome Wrap-up Activities For Students from Class Craft
Happy teaching!
*) This material was collected and put together for the online training session organised by National Geographic Learning for Russia in October 2021 where I had the privilege of sharing the zoom stage with Dr Joan Kang Sheen and Tatiana Fenstein.
One of the students chooses the theme of the day i.e. The Chameloeon Day (not a real holiday, although it could be. There are plenty of ideas to find here.
The kids take turns to choose their favourite variation, as featured in the picture above: the cake chamelon, the black chameleon, the artistic chameleon, the Christmas chameleon, the cute chameleon, the police chameleon, the robot chameleon and the lamp chameleon.
The teacher opens the google search and keys in the requested phrase. The student who suggested the specific variation chooses their favourite picture (i.e. line one, number 2).
The teacher copies and pastes the chosen picture, then pdfs the whole collage as soon as it is ready. The collage is then sent out to parents via Whatsapp.
(!!!!!) For the purpose of protecting the kids from the inappropriate images that google might display, especially when the unusual combinations are made, I key in the requested phrase first and only then share the screen with the kids as some of the images might be too scary, explicit or simply not always appropriate for all ages.
Why we like it
It is fun.
The kids love it. They ask about the stickers (we don’t always use them in every lesson) and they remind me to send them to the parents in the end.
It is a great way of finishing a lesson.
It is a great way of building a community, especially if you keep your stickers throughout the year. With my group, we still have some of the stickers we found during the first stages of the pandemic in spring 2020 and we had a lot of fun finding them, looking through them and remembering whose they were and why.
It gives us a chance to practise some of the computer language in contex (go / scroll down, go / scroll up, stop, I’d like …)
It offers some opportunity to practise describing objects in a detailed way (it is the big one, the small, the one with the green nose etc), especially the adjectives.
We can create, express ourselves and express opinion on what other people choose.
My advertising people tell me that this is something that you do while researching and brainstorming new ideas, too, in order to ensure that yours is, indeed, a fresh solution that no one has ever thought of. So, in a way, my kids are also getting ready for the market research, too!
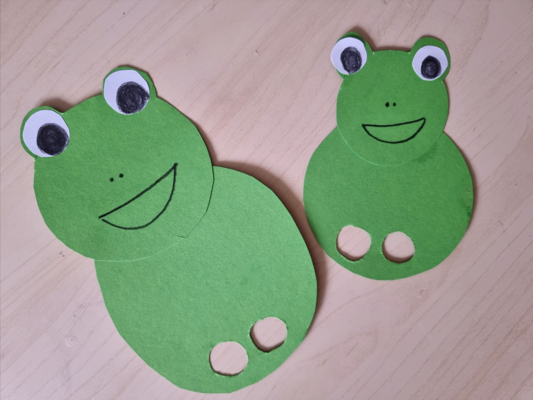
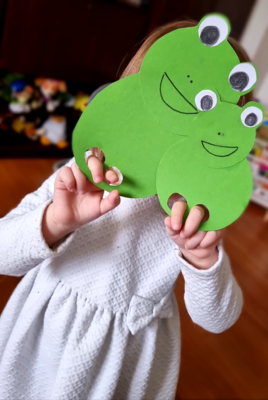
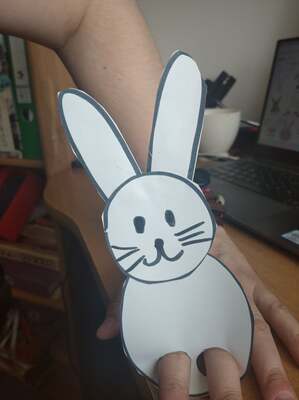
Two circles cut out of cardboard (regular photocopying paper is too thin and flimsy), with the two holes for fingers also cut out before the lesson.
Glue to glue these together
Crayons, pencils or markers to draw the appropriate body parts
Procedures
Show the kids the finished product, introduce the frog, chat with the kids
Show the kids the smaller circle, show how you decorated it.
Give out the pencils / markers.
Give out the small circles, decorate it with the kids.
Give out the bigger circle, decorate it, if appropriate.
Collect the pencils.
Show the kids how to glue one on top of the other. For the younger kids, it might be a good idea to draw a small cross on the top of the bigger circle, to signal where the kids should put the glue.
Give out the glue sticks. Kids glue their circles together.
Glue the additional body parts, when appropriate.
Collect the glue sticks.
Play
@ Magdalena
Why we like it
It is super easy! These frogs here, in the picture, were produced for a child (a huge Frog Fan), rather than with a child, and that is why I went a bit crazy with the eyes but there are the simpler versions of it)
These two circles can become many many things: a frog, a bear, a cat, a dog, a monkey, a rabbit or a snowman, with little adaptations.
The task does involve a lot of pre-cutting but the rest can be done by the kids during the lesson.
Once the toys are ready, they can be used to play, as any other puppets with all the structures that the kids are familiar with and with those that match the topic of the lesson, at the very least, ‘Hello’, ‘My name is’, ‘I like…and you?’ and it is always great when you can maximise production.
None, almost. In some cases, it might be necessary to write some of the ideas on the board, to serve as an inspiration. See procedures
Procedures
Students work in pairs. They share their ideas. If there is time, the students can change partners and repeat the activity. To round up, students share some of the information they have found out about.
This stage is always present, in each lesson, and it takes about 10 minutes. We keep the same variant for about a month and then we choose a new one.
All the variants (so far)
Verbs: the teacher writes on the board all the basic verbs in the past tense: I went to, I saw, I ate, I drank, I talked to…about…, I watched, I played, I bought, I wrote, I didn’t…The kids choose 5 and they build simple sentences about their day, week or weekend. I like to start it with my students even before we officially cover the Past Tense (as soon as they are ready to differentiate between the present / the past form of the verbs) and it really does help the kids to practise and to remember the verb forms.
Did you go…: a variation of the activity described above. The teacher puts the question form and the short answers on the board. The kids work in pairs and ask each other questions. The student who provides answers uses ‘I did’ and ‘I didn’t’ but they are also requested to give a brief explanation (because…)
Tell meabout your day: the teacher writes the name of the activity and a list of topics which can be also elicited from the students. The regular set might include: the weather, the school, the teachers, my best friend, lunch, getting around, marks, tests, pets, brothers and sisters, homework etc. The students work in pairs and they have to choose three topics to talk about. They take turns to share stories about their day and they follow-up each story with a question.
The B-words: this one is a slight variation of the above, only here the teacher writes a selection of words starting with a certain letter as the list for the students to choose from and to be inspired by. Some of the words might be completely random but they also encourage the kids to produce the language. Later on, the students can choose the letter of the day and then can also help make the list of the words, too.
This is how I felt today: in this variation the teacher puts up the words to describe emotions and feelings. The list can be a simple one (happy, sad, angry, sleepy, hungry, tired, bored) and then it can be extended to include more interesting ones, too (confused, excited, chatty, exhausted). Again, the students choose 3 or 5 of them to describe their day.
Superheroes: this time the list on the board is made of names of superheroes, famous people as well as characters from books and films, for example Superman, Spiderman, Wonder Woman, Chebourashka, Winnie-the-Pooh, Santa etc. The students are supposed to think of their day from the point of view of these characters and describe it talking about how they felt. ‘I felt like Superman because I got three good marks today’*)
The superlatives: the teacher writes on the board a list of superlatives (the best, the worst, the funniest, the tasties, the most difficult, the easiest). The students choose 3 or 5 of them and use them to describe their day, for example: The best thing was that I had only three lessons etc.
Why we like it
A stage of that kind is absolutely necessary as the time for the students to settle in
This is also when they learn how to communicate without any preparation and outside of any set-up frameworks since each day might be different and each day may involve a different set of verbs and nouns
At the same time, it is an opportunity to practice the past tenses or the perfect tenses as for many of the students, many events repeat themselves (going to school, writing tests, having a good day or a bad day etc)
It is a fantasic opportunity for the group to bond, to share the great things that happened during the day or to vent about all the disasters that they had to deal with, the tests, the teachers, the piles of homework
To be continued. Soon. We are quite likely to get very bored with what we are doing at the moment…
Happy teaching!
*) My favourite so far! It is amazing how my students come up with their own metaphors and associations, both the teenage group and the kids. Here are a few quotes: ‘I felt like Chebourashka because I was a bit confused’, ‘I feel like Robinson Cruzoe because I am locked up at home now’, ‘I feel like Masha from Masha and Medved because I am a bit crazy today’, ‘I felt like Santa because it was my friend’s birthday and I had a present for him’, ‘I feel like Superman because I did all my homework really fast’…
Flashcards created with the illustrations from Bystry Maluszek @Zielona Sowa Publishing House
Ingredients
a set of flashcards
two pieces of cardboard stapled together on three sides
shapes cut out on the front page (cut out before stapling)
Procedures
hide the flashcards inside
show the students only a part of the card on the top, through the cut-outs, ask the kids ‘What is it?’
take out the card and proceed with the rest of them
hide the flashcards inside
show the students only a part of the card on the top, through the cut-outs, ask the kids ‘What is it?’
take out the card and proceed with the rest of them
Why welike it
this is a variation of the Through the Keyhole activity that I once saw in the I Spy coursebook. However, this original version included an A4 sheet of paper with a keyhole that the teacher needed to cut out and then move the card over the flashcard. I found this tool a very interesting one but, at the same time, a bit awkward to use as the teacher needed two hands to manipulate the cards, there was a chance that the children could still see bits of the card apart from the keyhole bit and the activity involved a lot of picking up and putting down the cards. All in all, too clumsy to handle.
to make a funky envelope you need only simple materials (A4 cardboard or simple photocopying A4 paper although it will not be as durable, white, colourful or recycled), a pair of scissors and a stapler or glue. As soon as one envelope gets destroyed, you can easily replace it with a new one.
you can have one simple cut-out shape or a selection of different shapes all over the envelope.
all the flashcards fit in nicely inside, the teacher can manipulate them more easily. I sometimes turn the envelope over, to change the cards inside and to add to the whole ritual.
I normally use when the kids are already familiar with the images on the flashcards not to make the task too challenging, in lesson two or three of the unit. However, there were also cases when I used the envelope to introduce a brand new topic and to raise the level of challenge.
I have a small problem: my brain does not like dealing with written instructions and, really, any instructions whatsoever. I cannot make myself. What that means for my life is that I use devices instead of reading the manuals, I prefer to watch cooking videos rather than reading any recipes (and, indeed, no matter how exciting the food, if the instructions for cooking are longer than four or five lines, I immediately lose interest). In my teaching life, that means never reading any teachers’ books (if I can help it and most of the time I can). If I find an activity that I like, in a resource pack, for example, and I cannot figure out how to use it only from the game itself, well, I just never use it at all.
Or I make up my own rules. That’s exactly what happened with this game.
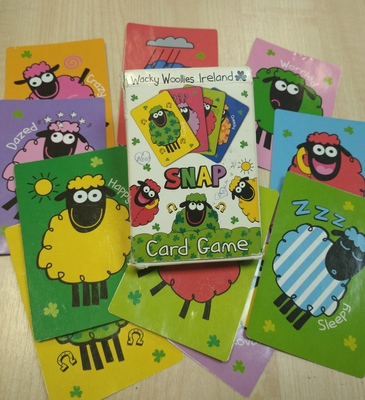
It actually makes me giggle. I have had this game for about three years (a lovely present from Chee-Way) and it was only this week that I noticed the name of the game. Apparently, it is called Snap. Oh, well.
This morning I was finally inspired enough to google how to play it and I found it easily enough, only to find out that I had never played it the right way. Oh, well.
Actually, I had some suspicious that what we were playing was inspired by another game, that I once heard about but when I bothered to find out, it turned out this morning that I couldn’t have been more wrong. Oh, well.
The Sheep Game (as we know it)
There are 12 different emotions / feelings / adjectives in the set. We started to play with those that the kids knew already and, then, we kept adding one or two with every next game. At this point, they know all of the adjectives and we play with the whole set.
There are 4 cards of each adjective but in any real game, we use only two of each. One is displayed on the floor in the middle of the circle. The other one we deal among the teams. Usually each team ends up with four cards.
The students keep their cards secret from the other teams.
We sit in a circle, students ask the questions to the team sitting on their left or on their right but the questions are always travelling in one direction.
The main question is ‘Are you happy / sad / angry?’
If the team have this one particular card, they have to answer ‘Yes, I am’ or ‘Yes, we are’ and give away the card.
If the team don’t have this particular card, they have to say ‘No, I am not’ or ‘No, we are not’ and then it is their turn to ask the team on their left / right.
The game can be played for a certain number of rounds or until one of the teams loses all their cards. Then the winner is announced and that is the team has the biggest number of the initial set left.
It is a great game to practise the key vocabulary, in a sentence and although the students play in teams, they can win the game only when they pay attention throughout the entire game, listening to all the teams and keeping track of all the cards (or words) that were mentioned and lost, too.
Variations
Blue, please – one of the first games that I normally play with my primary students, in the first weeks of the course, as soon as we feel comfortable with the basic colours or numbers, we play with flashcards that we usually hide inside of the book, to make sure that the cards remain a secret. As soon as the kids progress, we replace the simple ‘please’ with a full question ‘Can I have blue, please?‘ and we play it this way with any set of vocabulary
Do you like… – another variation of the game that we play with the beginner primary students, we normally switch into that version when we start the topic of food and drink. If the students / teams have this particular flashcard in their set, they have to answer ‘Yes,I do‘ and they have to give the card away. If not, they answer ‘No, I don’t‘ and they continue playing.
What’s the matter with your…– a version that we played with my teens while working on the health / medical vocabulary which turned this game into a mini dialogue with different yes and no answers (yes = I need to have it / them checked, no = nothing I am fine) or Excuse me, where is the check-in gate? while we were working on the travelling / airport vocabulary (yes = it is next to…, no = sorry, I don’t know).
Any other set: the vocabulary set + the structure that would be used with this set
Whole class vs groups of three? With the younger kids we normally play whole class, in small pairs because it helps them learn the rules of the game much faster and because the game is easy to set up and you need no other materials apart from the set of flashcards normally used in class. With the older students, I use words on small cards and we normally play it with the whole class only in the beginning, later on they play in groups of three.
And the winner is… Well, there are at least two options here. For a very long time we played it in such a way that the winner was the team who had the biggest number of cards left at the end. Until my kids suggested that perhaps the winner should be the team who managed to get rid of their cards first and we played it this way, too. On the one hand, it makes the game less competitive and it is not a real shame to be ‘losing’ a card but we have had a situation when a team avoided asking the right question not to help their opponents win…I suppose the game can be played as normal and it can be decided only in the end who the winner is (all the cards lost vs all the cards saved) but we haven’t really tried it in the classroom. Not yet anyway.
Leftovers. We normally deal out all the cards available but keeping a few cards away and keeping them secret adds up to the challenge. These leftovers are going to be automatically the incorrect questions and the players will have to figure out first which ones these are and secondly, which ones not to ask anymore.
This is how I daydream it: my primary kids go on to take their Starters (this is an old daydream, this year they will be taking Flyers), they are describing the pictures or telling the story. The examiner asks ‘How is this boy?’ and my kids answer ‘He is confused.’ and the examiner cannot believe her/his ears but she/he is, actually, impressed.
‘Confused’ is one of the many adjectives that my primary kids have learnt thanks to the sheep game that we’ve been playing for a few years now. We started with the normal adjectives, happy, sad, angry, sleepy but the kids noticed that I’ve been hiding some cards and they got curious. And because they were curious, they started to ask questions. Since the cards were wonderfully happy and funny, and since, together with some clarification from me, they did illustrated the concept very well (after all, they were created for children), we started using the ‘confused’ card (and with them ‘chatty’, ‘in love’, ‘crazy’).
That, in hindsight, was an excellent idea because this turned out to be a very useful words because I happen to be confused and my kids happen to be confused, too. Not to mention all the characters from all the stories. ‘Confused’ might be from the B1/B2 shelf, but, we found it very very useful, at the age of seven, in something that was the pre-A1 level.
‘OK’, ‘ill’, ‘in love’, ‘creative’
The coursebook and the curriculum
A disclaimer first: my comments in this section are based only on a very un-thorough looking through the coursebooks for pre-schoolers, only a quick glance at the contents page and the units. I acknowledge that fact that I might have missed something and that a proper research might be necessary and, for that reason, I will refrain from quoting any titles here. However, having flipped through five recently published coursebooks for pre-primary learners, I did not find much as regards adjectives, apart from colours (all), some of the weather words (depending on the title) and some random happy, sad and hungry (also depending on the title). With one honourable exception that introduces quite a few emotions as well as some other opposites, either through stories or through CLIL projects. Overall, however – not good at all.
I also had a look at the primary books and here the situation is admittedly better because all of the modern publications tend to align their content with the YLE Cambridge wordlist and that, in turn, means about 50 adjectives on the pre-A1 level, including colours and possessive adjectives.
As it happens, my school is now getting ready for the YLE mock exams and I am putting together a set of materials for our teachers and kids and that made me look at the said wordlist with a great more deal of scrutiny. Starters kids (pre-A1) are supposed to know about 50 adjectives, Movers kids (A1) – additional 50 adjectives and Flyers kids (A2) – 70 more adjectives on top of that. I am aware of the fact that these lists were not created on a whim, quite the contrary – they are a result of a large-scale research and the effort of a huge team of people. But there are all these questions there, too. Why do the pre-A1 kids need to know the adjectives such as ‘double’ or ‘correct’ and ‘right’ (as correct) and ‘its’ (also an adjective) and some other ones, although not adjectives (‘coconut’, ‘pineapple’, ‘flat’ and ‘apartment’ or ‘lime’)? Why would these be more important, useful and appropriate for primary school children than ‘hot’, ‘cold’, ‘easy’, ‘difficult’ or ‘loud’ and ‘quiet’, which are only introduced at the A1 level?
I do not have the answers but I have been introducing them (or some of them) much earlier than that. And effectively so. If you are interested why and how, please continue reading.
‘crazy’
Emotions and feelings
‘Sasha, how do feel today?‘ is one of the questions that we ask in every lesson. Why? Well, I guess, first and foremost it is for socialising. This is the question that we ask when we meet someone, just to make a conversation, at least with adults.
Since our students are children, however, there is a lot more to that. Children are growing, developing their social skills and learning about a variety of emotions available and, even more importantly, learning how to deal with these emotions and learning how to recognise these emotions in others. That is why giving them tools to do that, in their L1 and, naturally, in their L2, is absolutely crucial.
Ideally, all the Sashas in the world would walk into the classroom being happy, totally over the moon, brimming with joy and ready to conquer the world with us in the next 45 minutes. But it is not possible for every Sasha to be happy every day and, as a teacher, I want to know how they really are and during the hello circle I am, literally, all ears because if Sasha is sad or sleepy or hungry, or, sometimes, angry, I would like to know that. Not only to show empathy but also to look at the lesson and what I have prepared for today from the group’s and the individuals’ point of view. Maybe a bunch of sleepy children will not be able to deal very well with the story? Maybe it will be necessary to keep an eye on Sasha and accept that today she might not be able to focus as well as usually because she is feeling a bit under the weather. Maybe it is a good idea to start with this silly game of ours (although I did promise myself to ‘never ever’) because it might distract and cheer up this little human who walks in and announces ‘I am very, very, very angry.’
Having this range of emotions vocabulary is also very handy when it comes to behaviour management, even if in the simplest of terms.
Situation type #1: an unpleasant situation: someone draws on someone else’s paper, someone takes someone else’s toy /book / marker without asking, someone jumps the queue, no casualties, only a lot of unhappiness in the room and one person is on the verge of tears. ‘Look. Sasha is very sad now‘. Naturally, it might not be the case of ‘one size only’, one solution for all occasions but it is a good start.
Situation type #2: a 5 y.o. confrontation: both parties did have a disagreement, both parties are not very happy and, definitely, way too upset to just get over it and get involved in the lesson activities. ‘Sasha, are you angry?’ ‘Yes!’ ‘It’s ok.’ Again, some cases are more complex than that, but in many situations the very fact of calling the spade a spade and showing that it is natural to feel angry (and, by default, giving the human some time out to accept and recover) is the best solution. It applies also to all the negative emtions, as long as no comes to any harm.
To be perfectly honest, sometimes (only sometimes!) it feels like this brief and contained reaction, limited by the fact that extreme language grading is necessary, is the best solution. Anything to avoid a long lecture from the adult on ‘The negative impact and the long-term consequences of….’ that children sometimes receive from their teachers, baby-sitters, nannies, parents, grandparents…
‘ill’
Riddles
This is, by far, one of our favourite games: making riddles. The game is introduced in its simplest from, with a set of flashcards and with the students guessing the secret word which the teacher or one of the children keep close to their chest. That’s just the beginning, however, once the kids are comfortable and familiar with the format, a set of simple adjectives are added, first the colours (based on the visuals in the flashcards) and big / small. Then, depending on the topic, we introduce and play with the relevant adjectives, for example fast / slow / big / small / loud / quiet while talking about transport, big / small / friendly / dangerous while talking about animals, hot and cold while talking about food and big / small / soft / hard / light / heavy while talking about the everyday objects and so on.
The kids can either use the adjectives of their choice and affirmative sentences (It’s big, it is yellow) or they can react to teacher’s or kids’ questions (Is it big or small?).
A variation of this activity is also I spy with my little eye adopted (and limited) to the set of vocabulary that the students are familiar with, played with a set of flashcards or a poster.
Expressing opinion…
…or, rather, justifying your opinion, something that can become a part of pretty much every unit and every set of words. Not only does it create an opportunity to personalise the vocabulary by dividing it into the things we like and the things we don’t like but also to give more detail and to build a small discourse (I like it. It is beautiful) or even first complex sentences (I like it because it is beautiful).
Naturally, that will require a different set of adjectives but beautiful, ugly, easy difficult, interesting and boring to be the concepts that preschool children understand, even though the flashards and visuals will be based on some symbols.
Storytelling
Our storytelling has reached some new amazing levels since we started working extensively on adjectives, both with primary and pre-primary students. You can read more about in an earlier post on the Storytelling Campaign here and here.
‘confused’
In my classroom
In this academic year, I am working with three pre-school groups, level 1, level 2 and level 3 and I am happy to say that even my youngest level 1 students are familiar with the set of 12 different adjectives that you can see in the first photograph plus a few more that we have learnt through songs. Level 2 group have got the basic set, quantifiers ‘very’ and ‘a little’ and a few more adjectives lined up. Level 3 group have got a nice set to describe food, transport and animals (including ‘scary‘) and they have already started working on extanding that range.
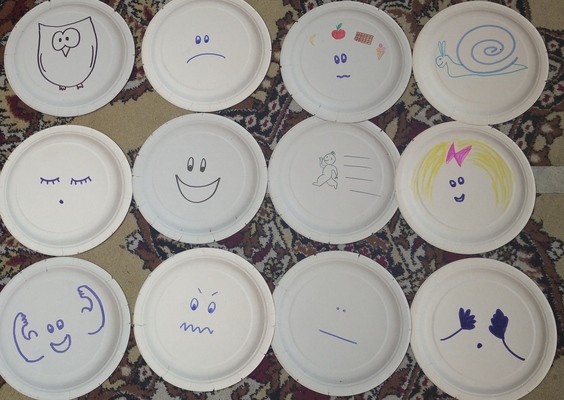
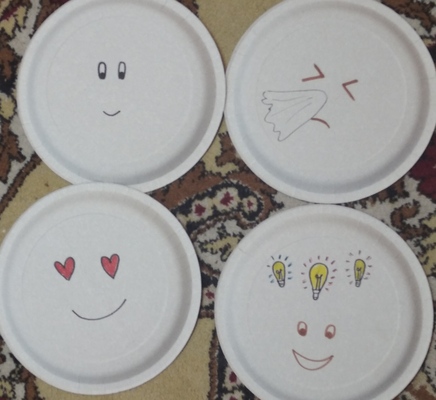
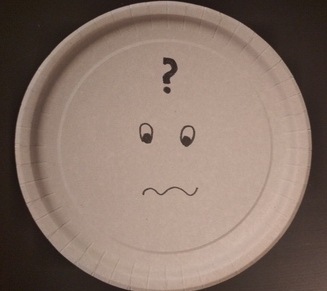
The photographs that were chosen to illustrate this post all come from the set that I have created for my pre-school group.
I have decided to use paper plates because they are durable, easy to stock and they have a shape of a circle aka they are a face. In the classroom, we put them in neat rows on the carpet, in the middle of the circle, to support production. My younger students like to pick up those that are relevant and hide behind them, showing how they really feel. This makes this part of the lesson a bit more kinesthetic.
I have drawn all of them myself but before making the decision on how to represent each adjective, I like to look at different emoticons to get inspired and to find something that meets two criteria a) I can draw it and b) my students will be able to associate it with a specific concept.
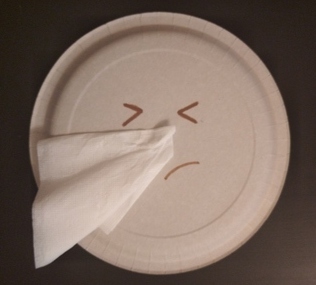
In some cases, the symbol was pretty easy for students to decode (for example: an owl = clever), in some others, I had to follow up with a brief clarification (for example: lightbulbs = ideas = creative). After the first lesson, I decided to upgrade the ill flashcard by adding a real tissue for the poor sneezing person.
There is another thing that I am considering at the moment. With my preschool students we start with the adjectives that help us describe how we feel and it must have been out of sheer linguistic greed that I decided to add those adjectives that describe personal characteristics rather than emotions such as ‘strong’, ‘beautiful’ or ‘clever’. Although, to be honest, we adults know very well that there are days when we feel particularly beautiful or not and the kids responded well to it. At the moment, I am considering different ways of organising all the adjectives that we already know and building up on that, in each category.
These are not all the activities that you can do with a video, these might not be the best activities for your groups. These are just some approaches that we like. Maybe you will find them useful.
Prediction
Procedure: The teacher introduces the topic of the video and gives the students a set of key words that appear in the video. The students discuss why these words might appear in the video and why they might be important. After a whole class feedback, the class watch the video to check whether they predictions were correct. As a follow-up, the students discuss the most (or the least) surprising / unusual / weird facts they have found out about.
Example: We used this video to accompany a reading on extreme adventures and survival in which making a snow cave helped the people survive. We watched a real tutorial on making a snow cave and the key words we started with were: a candle, the letter T, the stick, a saw, the flat ceiling.
Back to the board
Procedure: The teacher divides the group into pairs, one student in each pair sits facing the TV, the other one sits with their back to the screen. the teacher plays the video, students work in pairs and they retell each other what is happening on the screen. Depending on the video, the students can watch the video with the sound on or with the sound muted. After a while, the students change seats and continue watching. Finally, they talk together and answer some questions related to the video. Usually it is a mix of questions, some of which check comprehension and some which help the students see the big picture or express opinion.
Example: We did this kind of an activity while discussing sports and unusual sports. The students watched the muted video on extreme extreme ironing, in two halves, about 60 seconds each and afterwards answered the following questions: What do you think is the name of this sport? How do you think Phil Shaw came up with the idea? What can be easy and difficult about this sport? Would you like to try? Which was the strangest place in which this sport was done? In the end, we watched it together, with the sound on and we compared ideas.
Pause and talk
Procedure: This is a great activity for the videos that consist of short blocks or include a set of examples of a certain item. The teacher writes the key question on the board, usually only one, and plays the video. The students watch a short clip. The teacher pauses the video and students discuss what they have just seen by answering the question. The biggest advantage of this approach is that the teacher is in charge as regards the duration, the activity can be stopped after only three items or the video can be played until the very end. As a follow-up, the students choose their favourite / their least favourite item and justify their choices. As in all of the other activities, there is also an option of the students changing partners and sharing their ideas with someone else in the group.
Example: While discussing food, we watched the video about school lunches around the world, we watched it bit by bit (after each item) and the students had to answer the following question ‘Would you like to try it? Why?’. Actually, this particular lesson included the video because we followed up with a video on American kids trying Russian food and we paused right after the food was introduced and we try to predict if the kids are going to like it or not.
Read my lips
Procedure: It is used with the video with a very clear narrative that can be interpreted without the audio version as the students watch it muted. The teacher can start with the title of the film and ask the students to predict what they think it is about. Afterwards, the students watch the film and try to figure out what is happening, who the characters are, how they are feeling. The teacher can ask them to take notes while they are watching. Afterwards, students compare their notes in pairs or in groups of three. The teacher can also ask them about the main events or to try to connect the clip to the title of the film. Afterwards, the students watch the video again and as a group discuss their guesses. The teacher clarifies the main points, without going into too many details. The final activity is predicting what happens next.
Example: One of my top ten for this kind of an approach is a video like this excerpt from Big Fish, or actually a set of clips from the same film, for example this one here or this one here. In this one case, we did not really talk about the title of the film. After watching the film, the students were discussing what they saw but I also asked them to think about the following questions: Who was the big man? Why did he look scruffy? Why did the boy throw a stone at him? Why did the boy reach out a hand and closed the eyes? Why did they shake hands in the end?
After we finished watching and discussing, we also looked at the quote from the clip ‘You are a big man. You should be in a big city.’ and we talked about what it might mean and whether it is true.
Categorise
Procedure: The students are given a list of all the items that are shown in the video ie some extreme sports, some unusual holiday destinations, exotic animals etc. The students watch the video and they take notes about all the items, ie putting (+) and (-) next to those that they like or grading them from 1 – 5, depending on how interesting they are. After watching the video, they make their own list, organising all the items from the most to the least interesting one or dividing them into categories (like – don’t like, useful – not useful, interesting – boring) and so on. They work in pairs or small teams and compare and explain their decisions.
Example: This video was used in a lesson on technology as it presents the list of 10 Coolest Gadges. Some of the gadgets in the video have unusual names so we started with looking at these, trying to figure out what these might be. We actually divided the video into two and we discussed the first five gadgets and then, after the second half, the other five and then all ten, to round up. The students were choosing the most interesting gadgets that they might want to buy and those that they would not really even consider. In the end, we choose the most and the least popular gadget as a group.
None of the videos I use as examples were graded or created with the EFL /ESL learners so they can be considered authentic materials. I found all of them on youtube while looking for videos that would match the topic we were working on. I did not introduce any vocabulary, focusing rather on listening (or watching) for gist and general understanding, rather than on any specific details. Unless, of course, the students had any questions.
If you want to find out more about using authentic materials, have a look at some of the many resources online such as these post here: how to choose and adapt them, here from the Britsh Council, and here.
I have also found out a few posts on using video in class. If you are interested, you can find them here and here and this one here, although it has a wider scope and does not really focus on videos in the EFL/ESL classroom.
I am happy to inform you that, inspired by your article, I have decided to follow your example and to start experimenting in the area of scaffolding…
Oh, how I wish I could write a letter of that kind. Since I first read the article by Bruner, Woods and Ross on the original research and how the term ‘scaffolding’ started to mean what it does to us, teachers and educators, it has become a kind of a life mission to spread the word about it among my teachers and trainees, conference attendees and, of course, the readers of my blog. This is also the area that I choose to invesitage in my first classroom research project as part of my MA programme.
Of course, the most important things keep happening in the classroom, in the everyday when you observe and adapt your instructions, gestures, voice and actions to better suit the young or very young learners as regards demonstration, marking critical features, reduction in degrees of freedom, recruitment, direction maintenance and frustration control (the six orignal features outlined in the article).
This time, the starting point was the lazy teacher…
I started to plan the final lesson with my three pre-school groups that also happened to be our Christmas lesson. And it was out of this tiredness and the madness of the end of the year that made me wake up one day and decide: ‘I am going to repeat the lesson!’
Three lessons in a row, three different levels, three different age groups and the same lesson plan. Well, to a point, of course. We would all study the same vocabulary set and sing the same songs, but the activities would vary, depending on what the children are capable of.
Topic, vocabulary and structure
There were eight words in the set (Santa, a reindeer, a stocking, a Christmas tree, a present, a start, a snowflake, a snowman) and I wanted to combine them with the question that we all had been practising before: ‘What is it?’ ‘It’s a…’.
The level 1 kids (and the youngest group) have got as far recognising the words and pointing at the right flashcards and participating in the ‘What’s missing?’ game although most of the time they would guess the missing word in Russian and they actively produced only some of them in English, such as ‘a star’, ‘a snowman’ and Santa. We also watched the ‘Guess the word video‘ and it was a chance for us to drill the vocabulary in a different way. We also introduced ‘What do you want for Christmas‘ and it was a nice opportunity for us to revise toys which we covered in the previous unit. But only that. In the end of the lesson we also had time for storytelling and we used Rod Campbell ‘My presents’, again as a way of revising the key vocabulary.
With the level 2 kids, we did pretty much the same but the kids were able to remember and to reproduce all eight words really quickly. We played the same game (What’s missing) but they were all actively involved and producing. We watched the video and guessed the words, pretty much just the way the younger group did, although it was interesting that I did not need to encourage them to repeat the words and, as soon as the full picture and the correct answer was revealed, the kids said the word without any cues from me. It seems that due to their age and to the fact that they have been in class for longer, they are much better used to that kind of reaction to the content. We seem to have developed that habit already.
As for the song, we even managed to personalise the song and talk about whether each of the presents featuring in the song are a good idea (or not? ‘Not’, according to some students:-) and we sang a verse for each of the kids:
‘What do you want for Christmas, Christmas, Christmas? What do you want for Christmas? Santa is on his way…’
‘I want a…’
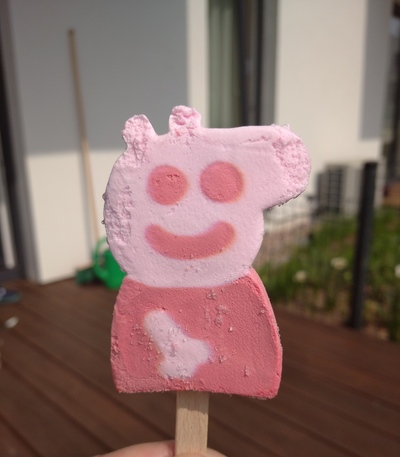
I did not use the storybook with the older children. I had planned it only for the little ones. For the older ones, we had a back-up of an episode of Christmas Peppa, but, in the end, there was no time for that.
The oldest group, level 3 kids, need only a quick revision of all the words and then we could play a variety of games. We did not even play ‘What’s missing?’ as they are too ‘adult’ and this particular game is not challeging for them anymore. Instead, we played a team game, ‘Tell me about it’, in which the players choose a box, open it and say something about the picture hidden in the box. And they collect the points.
We did use the video mentioned above but in this lesson it was not just a simple guessing game, we also managed to talk about whether each round is going to be easy or difficult and then to comment on what it really was. And, of course, the song was also personalised and followed-up by a proper chat. There was also another song, ‘Who took the cookie from the cookie jar?‘, in its life acquatic version (nothing to do with Christmas, but the kids were curious and this is the game we are playing right now). This group are already quite good at personalising songs (aka ‘The original version is good but let’s see what we can do with it and how can we make it better?’) so it was the kids to suggest that we start singing it when we pick up our surprise at the end of the lesson from the reception. If I rememeber correctly, the final version of it (as shaped up by the kids) went along the lines of: ‘Who took the surprise from the surprise jar?‘
I was teaching, having fun and keeping my eyes and ears open and trying to remember what was happening. It was already very interesting but I was really waiting for the most important part, the cherry on the cake.
The cherry on the cake
Surprisingly enough, this time round, it did take a long while to choose the craft activity but finally I settled on the snowman. I found something that I liked among the 25 Easy Snowman Crafts For Kids on countryliving.com. I planned the lesson, spent an hour cutting out the circles, the noses, the hats, the arms and the Christmas trees and orgnising the room. And then we took off.
It so does happen that although my children are divided into groups by the level and by the age, there are exceptions and special cases in all three groups.
The actitivity, the materials, the staging and the instructions were exactly the same in all three groups but the outcomes (visible in the photographs below) and the scaffolding necessary (not visible in the photographs:-) heavily depended on the age of the students.
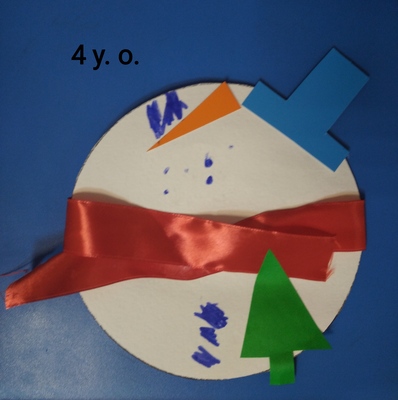
The youngest students produced these beauties:
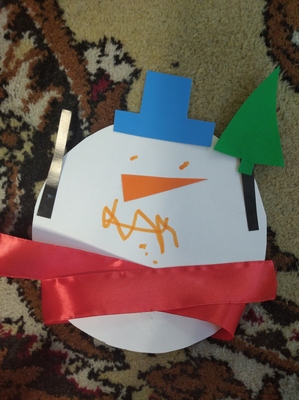
This was interesting, especially because this lesson came first and after a very short moment, I realised that, while preparing and planning, I gauged myself for a slightly older audience and I had to adapt on the go, especially for the almost 3 y.o. girl for whom it was the trial lesson and the first 45 minutes in our classroom.
It turned out pretty quickly that it is quite a challenge to glue the ribbon, to turn the circle over and to tie it and that the orange ‘carrot’ nose is actually very small. But we managed, with the pace really, really slow and the teacher keeping an eye and demonstrating everything twice. Plus, yes, the teacher had no other choice but to help with the ribbon.
The age of the students shows most obviously in the way that all the small parts were glued and how the eyes, the smile and the buttons were drawn, with a different level of accuracy and precision. Almost where they should be:-)
And it was because it took longer to produce the snowman that I decided to skip the little sticky arms. They were too thin, too fiddly and too risky. And the snowmen still look pretty without them.
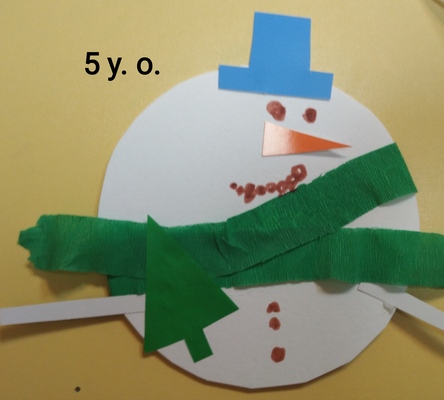
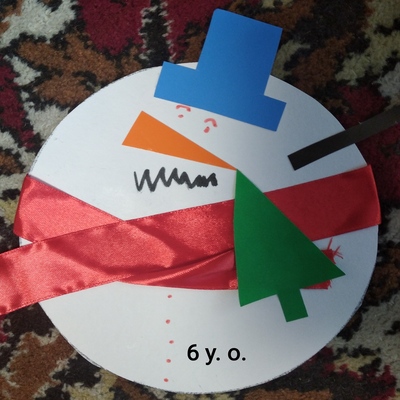
The snowman created by the 5 y.o. hands looks like that
First of all, the five-year-old snowmen did not take as much time to produce and the little fingers were much more agile and ready. As a result, the teacher did not need to help with the ribbons, the noses were handles with much more efficiency and we did have time to add the arms.
It is interesting to see that at this age, the students did observe the teacher (the mentor / the expert) to do exactly what she was doing but they were observing to figure out what had to be done and to interpret it in their own way. Some snowmen were happy but not all. Some had the scarf tied on the neck aka above the arms and the others had it more where their snowman-y waist would be. Some had the buttons and some did not. Some snowman mouths were a string of dots, some were drawn with a line. Some of the Christmas trees were glued on the snowman’s chest (like in the teacher’s model) but then again, some were holding them in their hands (although this obviously involves even a higher level of precision).
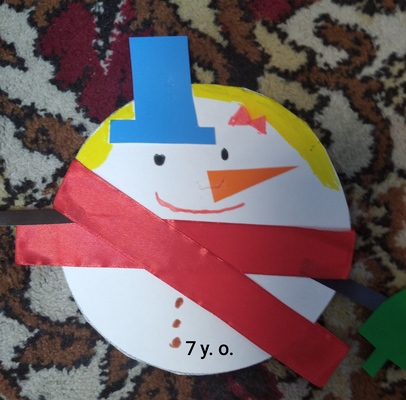
The 6 y.o. snowmen look like that:
The older snowmen are even ‘neater’ (in inverted commas here because I adore all of these snowmen, even the ones that look as if they were created by Pablo Picasso) and the evidence of precision and accuracy as well as even a more detailed and a more personalised version, which were the students’ own additions as they were not modelled by the teacher such as the eyebrows, the hat decorations (not featured in the photos) or a bigger number of buttons.
And the oldest of them all, the almost 7 y.o.
This snowman was made by our oldest student, a girl who is actually in school but who is finishing the level with us. As regards the level of English, the development of the literacy skills, she is like the other students in the group, but her motor skills are more developed and for that reason she usually is the fast-finisher. That is not an issue and while she is waiting for the group to finish, she usually continues working on her craft or handout, adding details and decorations.
This time round, she decided that her snowman is going to be a snowgirl, with her and a bow, which was her own original idea.
Reflections of a small scale Jerome Bruner…
This was an absolutely fascinating experience and I would really recommend it to teachers who work with different levels within the same age group, especially within primary and pre-primary where scaffolding seems to be one of the most important factors deciding about the task completion and success.
It can be a great source of information, about the students’ skills and abilities…
…as well as an opportunity to trial something new, be it a song, a video, a game or a craft activity and to learn more about this type of a task.
It is a chance for the teacher to practise and to develp their scaffolding brain…
…and a great opportunity for a freer practice in the area of differentiated learning, not only within the group of learners (something that happens in every class) but on the level of different age groups and levels
Like in the original experiment, the design or the choice of the task and the material is crucial but the holiday lessons, not really closely connected to the coursebook curriculum, seem to be a perfect way out.
What else? Not much? Some curiosity on the part of the teacher, some willingness to experiment and some flexibility in order to be able to adapt on the go. Plus, the eyes wide open to notice all the little changes and proceedings.
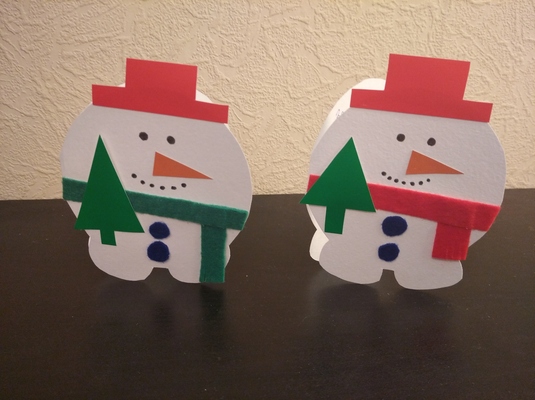
These two, in the photo below, are my own interpretation of the original craft and a more complex version of it, here in the form of a card, made by an adult (myself). Perhaps this is what I am going to make with my oldest primary group in our Christmas lesson. If we do, I will let you know how it goes. That would be, indeed, a nice follow-up and an extension of our experiments. We’ll see. In the meantime: