The one phrase to teach your students. From the series: We Want More!

Since we are going through the quieter period of the year, there is more time for looking back and for reflection and this is how the idea for this mini-series of post came from. Just because we started to use those and each of these phrases or words was like a key that opened many, many doors in our communication and not only.

The one thing to teach your kids is ‘because‘…

…and the whole thing can* start in primary, and maybe even in pre-school. It is a powerful world that invites the kids to build a simple discourse and to go beyond one sentence or simple sentence production, even in the most everyday situations.

We start with extentending the answer to ‘How do you feel today?‘ which is a part of our class routine and the question which I ask and which the kids ask in every single lesson. As soon as they have a good number of adjectives to use in response (you can read about it here), I try to encourage them to elaborate on their answers, both modeling (I’m happy because it is sunny) and by inviting them to continue. ‘I’m happy.‘ ‘Because...’

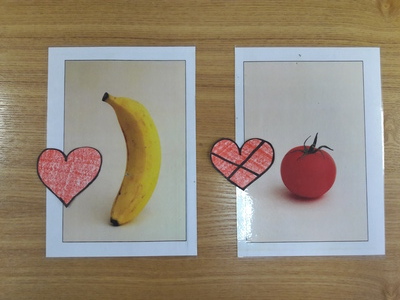
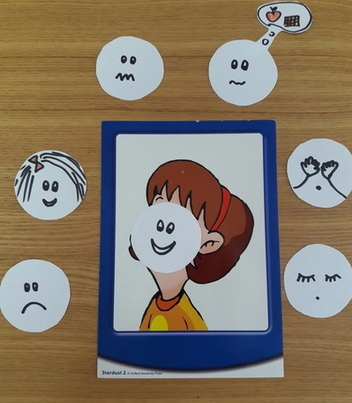
Of course, the sentences the kids produce are quite simple, very simple, in fact, and sometimes partially in their L1 but with time, they are becoming more familiar with it and they are improving and, as a result, are able to say more and more and more. In English. Not to mention that as we go through the course, there are more and more situations in which we need because, for example to explain why we like Friday and not Monday, why we didn’t do the homework, why the kids in the pictures look happy or sad or why they did something in the story.

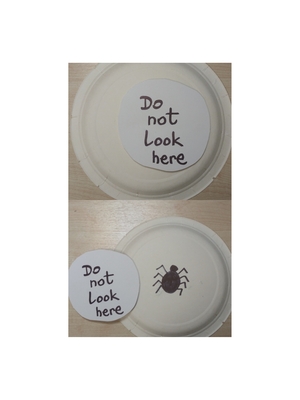
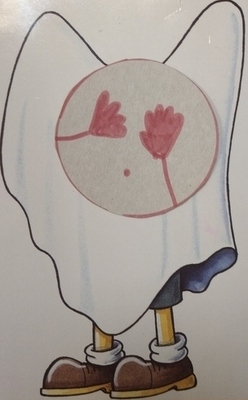
The same can be done with pre-schoolers, with certain adjustments to their age and the number of years that they have been studying. Thinking about my groups in the previous academic year, with the level 1 and the level 2 groups I was more focused on the full sentence production and it was too early to introduce any linkers. The level 3 children, however, were ready the unit ‘I’m scared’ (Playway to English, CUP) was a perfect opportunity to talk about the things we are scared of and to explain why. Or, more frequently, the things we are not scared of. ‘I am not scared of spiders. I like spiders because they are beautiful.’ and so on.

I often tell my students (especially those new ones, and yes, also the adult ones recently) that I will always want to know ‘Why?’ and that even if I forget to ask, they should always imagine this word written all across my forehead and answer it anyway. To help the kids in the everyday lesson and to make it easier on myself, I used the idea I got from Herbert Puchta, only mine was not any error correction technique and it stayed displayed proudly on the wall for a good few years. In the beginning, I really had to do a lot of pointing and waving at the word, later, the habit was developed and the kids (yes, as early as in year 1 of primary!) started to use the word without any reminders whatsoever. They were producing the language and lots of it!

My two favourite because-related moments from the classroom have been those:

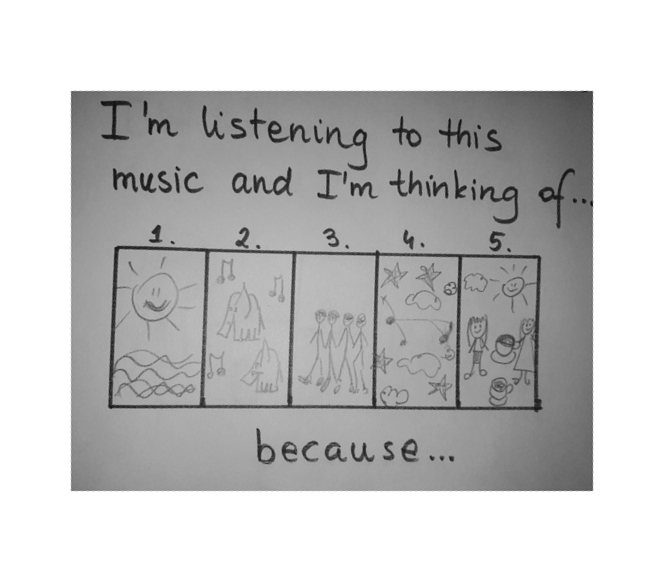
  • when we talk about things, someone is telling us how they are and I, somehow, forget to ask ‘Why?‘ or I am just too slow with it, there is always a voice (or two or three) taking over and kindly suggesting ‘Because…‘, with this perfect rise in the intonation, the voice trailing off in an invitation to continue. I wonder where they got that from!
  • when we talk about pictures or we retell the story or we describe something that happened at school on the day and, by accident, I want to take over and move on and, in response, I get my own because back, in an interjection, and again, with the intonation perfectly matching the purpose (‘I have NOT finished yet‘) and I am thinking to myself: ‘Oh dear, I cannot shut them up!’ which is, by far, my favourite teacher’s complaint.

*) ‘Can’ or ‘must’?:-))

The one thing to teach your kids is…’I think’.

Initially, I wanted to have a pretty post, ‘one phrase per age group’ but I realised that I simply cannot NOT mention ‘I think’ and the impact it had on my primary school students.

Unlike the previous item, here I cannot even remember how it came about and how I first introduced it. It has always been in the air. I know that I use it a lot to slow the kids down and to signal to them not to rush through tasks (i.e. ‘Think and write’) or to encourage them when they are struggling (i.e. ‘Think about it’ when I know that they do know it and it is only necessary to rack through their brains). We had used it a lot in different stories (‘Elmer was thinking and thinking and then he had an idea!’) and a while ago we also introduced ‘Thinking time’ as an official preparation stage for projects and role-plays. Thinking has been with us, only it is not quite clear for how long.

For the reason, when we got to practise expressing the opinion in winter last year (around the middle of A1 / Movers), I did not even bother to check the meaning of it and the question ‘What do you think about it?’ and the answer ‘I think it is interesting / boring / exciting etc’, the adjectives were the main aim and the focus. For me, at least.

What my students took out of this lesson for the rest of the course (and life!) was the little ‘I think’, which is essentially only an introduction and which is slightly unnecessary even. An opinion can surely be expressed without it. ‘Maths is easy‘ expresses the same view as ‘I think Maths is easy.’ Or so one would think.

I noticed, in the lesson in which we used it consciously for the first time and in the lessons afterwards, last year and this year, that my students began to start adding ‘I think‘ everywhere. ‘I think it is beautiful’, ‘I think it is easy‘, ‘I think he is sad‘, ‘I think it is a cat’And I think it is a dog‘ and so on. ‘I think’ gave them an opportunity to personalise the message, to signal the autonomy of that message (since by making it subjective you kind of accept that other people will have or may have a different view) and, I suppose, by doing so, it made the message more adult and more serious. And they simply and visibly adored it. Maybe because they were only 7 or 8 or 9 at the time.

As I said, I don’t quite remember the start of that adventure and I am not quite sure when the good time to introduce really is. What I know, though, is that the next time I am starting the group, ‘I think’ will be on the list of things to think about.

The one thing to teach your teens is…’What do you think about it?’

There are many phrases that were shortlisted for this paragraph because of the difference they made to the way my teens interacted with the world in the English lesson, ‘I agree‘ and ‘I don’t agree‘ or ‘On the one hand…on the other hand‘ among them but the real deal-breaker was ‘What do you think about?

This phrase, especially with a special stress on ‘you’ (‘What do you think about it?’) has become the wonderful phrase that helped my teens really get engaged and communicate in a really interactive way, not only expressing their opinion, agreeing and disagreeing but also to boomerang the conversation properly by involving the other participant or participants. I mean, truth be told, I know that they did it mostly to avoid making too much effort and producing extensively and this line has become a fantastic and polite tool which they used to dodge the ball. Of course, they produced, too but I just had a lot of fun observing how by trying to be super clever they were involved in a conversation that would give them some high marks during the speaking part of the FCE exam.

The one thing to teach your adults is…’it depends‘.

Especially if your adults are shy, not naturally very talkative and a messy A2 level. Especially if they have already experienced some failures and disappoinment while learning Engllish and when they current progress is closely related to the promotion at work. Or the lack of. Especially if, due to all the factors mentioned above, they reply with single words (the teacher sighs) or when they just say, in their L1: ‘I don’t know what to say’ (the teacher sighs again).

‘It depends’ came to us by accident. It was not a part of any text, a listening task or a functional language phrases lesson. It was a part of the emergent lesson but because I take notes of that and send these back to the students, it stayed with us. And what joy!

I can say with all the confidence that my students, in this one (1) group have wholeheartedly adopted the phrase and made it theirs. First of all, it is this gold key that opens the discourse. You cannot just answer with ‘It depends’ and stop there. You have to continue and explain at least the two different ways at looking at the issue. Especially if your teacher is raising her eyebrows and nodding encouragingly. What’s more, I have noticed that they like using it consciously as a natural time-bying tool that gives them the benefit of a few precious seconds to come up with an idea and a way of formulating it in English. Oh, what a find, this phrase!

The one thing to teach your teachers to use and to remember about is…’but’

This one is here as a joke only. I don’t need to teach my teachers any English, of course, but, as a trainer, this is the one word that I would like them to remember to use whenever they consider the theory of child development and the methodology of working with young learners. Or even while going through the teacher’s book and adapting the activities. This little but powerful word is everything you need to be equipped with to ensure that they always keep thinking of all the exceptions to all the rules and that the most important point of reference are the people in the classroom, not some non-existent ideal students or typical five-year-olds and all the other YL cliches.

Happy teaching!

What an old dog learnt… A YL teacher goes back into the adult classroom

Me and one of my best friends, Roman B. No old dogs in this photo. Only the amazing ones (The photo: courtesy of Yulia. The doggo: courtesy of Jill)

Back to the future

It just happened: a dedicated YL teacher (and a teacher who spent the last ten years doing her best to stay away from teaching adults (minus the trainees!) all of a sudden found herself in the classroom with some serious corportate clinets and their Business English, General English, English for Finance and Banking, A2 – C1. Full time.

It has to be said out loud: that was not a direction that this teacher dreamed of or the developement that the teacher planned or solicited but, at the same time, there is absolutely no need to wring hands or shed tears over such a giggle of the Fate. After all, the teacher is an experienced one, with an oh-dear number of years in the classroom (and different types of classrooms, everywhere) so the teacher will be just fine. After all, teaching is teachings, the students are great, the fun is being had. All the details are here just to set the context.

The old dog aka the adult classroom through a YL teacher

This particular started with a most random thing. I don’t even remember what we were doing and with whom, but, suddenly, I caught myself thinking ‘Blin, even my kids can do THAT‘. There was no anger in it or desperation, only curiosity and bemusement. I started to analyse the details and bits and pieces of this THAT and the reasons for that. It started with a sigh but it got interesting very quickly.

Here is a new post and an attempt at looking at the adult EFL learners through the eyes spoilt by her young students.

One. Inhibitions

This is something that is almost non-existant in the YL classroom. Minus all these cases in which the kid have had a negative first experience with English, at school, with the tutors or parents or when they are naturally introvert and shy and they simply need more time to settle in the group and to feel comfortable enough to talk. Most commonly, the kids enter the room, eyes wide-open, ready to discover and to enjoy the world of the English language.

Then, there are adults, a completely different picture. Naturally, there are quite a few factors that can contribute such as a lower level, a long break in learning or using the language, some negative previous learning experience or studying in one group with colleagues from the same company or being a low-level speaker of English when you are already a top manager.

The result? Silence in the classroom.

I guess that is the silence that is the time they need to think about their answer, to choose the words, to gather the courage to let them out and, naturally, they get it. They do have the right to the freedom of silence. For me, the teacher, it is also an interesting exercise in patience. I realised that I have been spoilt with hands shooting up into the air and the opinions voiced almost instantly. Here, I am getting used to breathing more and waiting for the students to be ready.

I am beginning to think that building up the students’ confidence suddenly gets the priority among the lesson and the course aims as regards the adult learners of English. Everything else, the vocabulary, the structures and the skills development will follow. Hopefully.

Two. Teacher-oriented communication

On the one hand, the YL classes are definitely more teacher-centred than the adult classes. That is, to some extent, fully justified. Students, especially the younger ones, are in need of the teacher and the adult as the lesson leader. But only to some extent. I strongly believe that this should be one of the main aims of the course to create the conditions in which the students will be learning to interact with the teacher BUT also giving them a chance to learn to interact with each other. After all, whatever happens in the classroom is only a warm-up, only the preparation, only the training before the real life interaction. In which, most likely, the teacher is not going to take part. For that reason, the students should be given the tools and opportunities to talk to each other, to lead the activities, to take part in pair-work. There is no need to wait with it until they turn ten or fifteen. Some elements of that can be introduced even much earlier and pair-work is feasible in pre-school.

Somehow, it is not a given with the older students. Adults, either because they are more inhibited or because they see it as a sign of respect towards the teacher, they hold back, they wait, for the teacher to call their name out or for the teacher to at least signal that it is their turn to speak. I have realised that sometimes I have to specifically highlight that I am stepping out of the conversation, that the students, in pairs or as a whole group, have to take responsiblity for the interaction and that I will not be encouraging, keeping it up and, of course, leading it. We have been studying together for about three months now and I can already see some improvement in that area. Hooray to that!

Three. Communication strategies

Communication strategies is one of my true professional passions and that is why it was chosen for my first research within the MA programme. Inspired by Haenni Hoti, Heinzman and Mueller (2003) (or, rather ‘taken aback by the comments of’) that claimed that young learners use a very limited range of communication strategies, basically limiting those to translation and code-switching (aka using a combination of L1 and L2), based on the gut feeling from the classroom, I decided to check it out. And, to prove them wrong. Hopefully.

Although my research was a very small scale and low-key and by a beginner researcher, I found out enough evidence to get me even more interested in the topic. My little students proved to be already effective communicators who work hard and who have a good range of different techniques to get the message across such as all-purpose words, approximation, direct appeal for help, indirect appeal for help, self-repair, other-repair and mime. The range was much wider. Translation and code-switching were used, too, and they were the most frequent ones, however, they were not the only ones.

Then, there are the adults and guess what, these adults, ‘Come as you are’, before I get to work on them, they know only one communication strategy and that is ‘translation’. falling back into their L1, straightaway, whenever something is unclear, unknown and uncertain. I am not even sure why it is assumed that the learners (let alone the young ones) will use these strategies of their accord. I haven’t researched that properly, yet, but perhaps it has got nothing to do with the age of the student or, rather, not only with the age of the student, and more with the learning experience and the opportunities to be acquainted with and to develop these strategies.

The adult students (my adult students) struggled in that area and if they didn’t know, they would immediately switch to L1 and they would expect an answer. Working around that by delaying the translation, encouraging them to try something else or, also, providing both, the L2 only and the translation was quite a challenge and I know that some of them were surprised that I don’t just provide the required service aka translation, that I am trying something else. They had it written all over the face. I can’t say my job is done here, far from it but we are working on it. And it is a bit better now.

Four. Sharing ideas

Teacher beliefs are a slippery topic and most of the time we don’t even think about them. It was only last year (and somewhere by the end of it) when I realised why I am a teacher and what I want from my lessons.

Everything happened thanks to one Sasha who joined our group and who, despite the eight months spent with the rest of the team, in a very welcoming and friendly environment, despite the fact that she got on with everyone, Sasha still would keep quiet in class unless I asked her a question and unless I called out her name. I had never even thought about it and only then did I understand that I want to create such an atmosphere in the lesson in which my students feel free to talk because they have something to share with the rest of the group, not because they have to, not because the teacher made them, not because the teacher asked the question or because the teacher is testing them. They talk because they have something to say. And I want them to feel that they can. This is something that we have been working on from the very beginning.

It was one more thing that was ‘not so obvious’ for my adult students. They stalled. They do, still, sometimes. Again, it might be due to a whole range of factors, the natural shyness, the lack of confidence, the level of English, the relations in the workplace, if they come from the same company, or even the natural politeness. It is not a given that everyone will be speaking during the lesson time because speaking and developing the communicative skills is the reason why we come to class.

Five. All ideas are good ideas.

That is a sad fact: adulthood and reality kills creativity and imagination. Long gone are the days of fairy tales and fantasy travels with Frodo or magical battles with Harry. Well, in most cases. For that reason, if the question is about playing football and the student does not play football, the rest, dramatically, is silence…With kids silence never ever happens, and that is especially amazing, because, more often than not, we do things that have nothing or very little to do with the real life. All these menus for the monster cafe, all these school trips around the world, or to the moon or, our life as pirates…Silence is a rare event. Thank heavens.

This post is not to be read as a huge, one thousand word, complaint about my adult students. It is certainly not. I am doing a good job, I like them and we are making progress. I am just positively amazed that with my young learners, we have done SO MUCH (and to be honest, so much we have done by accident, unwillingly, joyfully, just for laughs) to enable the kids and to ensure that they are effective communicators.

I would like to think that my kids are not in danger of being scared to scared, inhibited, with a strong affective factor. This ship has sailed.

This line, so frequently used in my kids classes, started to appear in my adult classes.

See this is basically what happens when you send a YL teacher into the adult classroom. There is a lot of dedication, professionalism and lots of good lessons are happening. But the teacher has a one track mind and everything is somehow YL-related:-)

Bibliography

A. Haenni Hoti, S. Heinzmann and S. Mueller (2003), I can help you? Assessing speaking skills and interaction strategies of young learners, In: M. Nikolov (ed), The Age Factor and and Early Language Learning, De Grutyer.

Happy teaching!

Crumbs #34 The Weird Echo game

A beautiful bird from the folk embroidery patterns, traditional in the area of Kashuby (the north of Poland)

Ingredients

  • A grammar structure, for us it was the Present Perfect sentences with yet and answers with already and yet. If you are interested in the lessons that it was used, you can find out more here. I will present it based on this particular structure, but, naturally, the game can be used with a variety of structures, too.
  • A group of kids
  • The whiteboard where to present the pattern and the options, the online whiteboard or just a slide in your presentation.

Procedure

  • Introduce the structure in anyway you find appropriate. This time I actually used the coursebook materials (Superminds 5, CUP, Puchta and Gerngross) and the idea of the uncle sailor who has visited some countries and who has not visited some other ones, not yet anyway. And it must have been this activity that inspired me to come up with the game)
  • There is a set of pictures of all the flags in the coursebook and we used these flags in a simple controlled, drill-like activity: the teacher calls out the name of one of the countries, the kids (and the teacher) react by producing true sentences about themselves, based on whether they have visited these countries or not yet. The slide for this activity looked more or less like that:
  • After a few rounds, the kids take over and call out the countries from the list. After a few more rounds, they are allowed to call out the countries not included in the coursebook as well as any other places, countries, cities and famous places ie Germany, Dubai, Saint Petersburg, the Tretyakov Gallery etc.
  • In the following lesson, we went one step further. And then more. After we checked the homework, I showed another slide, with four variations of things we have already eated, drunk, seen and the places we have been to that day. The slide looked more or less like that:
  • First, the teacher models the activity, with each of the versions, for example a banana, coffee, the bathroom, my friend and the students react, producing the relevant sentences. After that, the students take over and lead the activity.
  • All the other versions which may appear ie written a test are allowed.

Why we like it

  • The game is an opportunity to practise the target langauge in a controlled way with some (albeit not a lot) freer practice and some personalisation.
  • It is also an opportunity to drill the structure, to perfect the intonation and the sentence stress. It can be done chorally (the kids produce all the sentences together which is less risky and much safer, especially for the shy students) or taking turns. In real life, the activity was a mixture of both and I simply let it be, although, of course, the teacher can insist on either choral or individual production.
  • Very little preparation, if any. In the first part of the task, we were able to use the coursebook materials, the visuals (the flags) and the model sentences which were already on the page. The second part required the model sentences on display, at least in the beginning. This was the first time we played this game. I suppose these will be less necessary in the future.
  • There is a lot of potential for students’ involvement: first of all, they are personalising, sharing some details from their life. But of course, there is more to that – the students are also invited to lead the game and to suggest topics, places, food, things they are interested in. This also helps to make the activity memorable.
  • We did it as a whole class but it can be done in small groups or teams, too.
  • I created it for the lesson on the Present Perfect but I believe that it can be used with the other structures, with slight adaptations ie the Present Simple and the adverbs of frequency (T: watch the news, SS: I never watch the news, I always watch the news), the Past Simple structures (T: go to school, SS: I went to school, I didn’t go to school), or the adjectives to express opinions (T: Maths, SS: Maths is easy, Maths is difficult) etc.
  • My students are kids but I can see a lot of potential for this game with my adult beginners group, too.
  • The name! Of course I like it because I came up with it but I think it does reflect the principles of the game and it is its brief description: you echo but you adapt, too)

Happy teaching!

Crumbs #27: A project I can be proud of

Ingredients

  • A3 paper
  • a yellow square aka the city centre for each pair
  • pencils, rulers, crayons, markers
  • a very detailed plan and careful staging (see below)
  • post-it notes (two different colours)
  • the materials to set the context based on the material from Superminds 5 by Herbert Puchta and Gunter Gerngross from CUP

Procedures

  • The introduction to the project was based on the material in the coursebook.
  • Afterwards we made a list of places in the city (I was taking notes on the board). Then, the kids were chatting in pairs, creating questions for each other: Which one is more important in a city, X or Y? Why? This was a fun activity, the kids were coming up with sometimes impossible pairs and providing justification for their choices.
  • I divided the kids into pairs and explained that we were going to design a good city. Each pair got a set of questions about their city and they were to discuss these with their partner. The handout was cut up into three pieces and they were given out, bit by bit (or rather, that was the plan. In the end, I only gave out the first part, the other phrases and questions were simply written on the board for everyone to see). I was only monitoring and asking follow-up questions. We did not have a whole class feedback.
  • I gave out the A3 sheets and the yellow square. I explained that it is the city centre and I asked the students to decide where it is in their town and to glue it on. I did it on my model. I drew the map legend box and I drew two items on my plan. Afterwards, I gave out materials and the students started to work.
  • The negotiation language and the steps (stage 2 of the handout) was displayed on the board. I planned it differently but, in the end, I decided not to give this part of the handout out. There was no room for it on the tables anyway.
  • The kids were working on the project for about 10 – 15 minutes, until the end of the lesson.
  • At the beginning of the following lesson, the kids sat down with the same partner and each pair got a set of post-it notes, pink to write what they like about the city and green to write about the things that the city should have. We circulated the projects, kids worked in pairs, looked at the plans, talked and made their notes on the post-it notes, discussed what they liked about each city. They also made suggestions and all their ideas were written down on the post-it notes which they attached to the plans. Each pair had a chance to talk about all of the other posters.
  • In the end, the posters returned to their owners and the designers had a few minutes to look through the comments.
  • In the very last stage, each pair of designers was asked to provide feedback on the feedback they received. They did that by answering the following questions: Which are the favourite places in your city? What should your city have? Do you agree? Why? This was the only part of the project that was done in front of the whole group.
  • In the end, the posters were displayed on the walls.

Why we like it

  • I personally really liked this project because it was a diversion from a traditional approach to a project in which the students work in pairs or teams to produce something and then present it to the rest of the class and in which a creative stage is followed by a productive stage. I have decided to give up on this format almost entirely and, instead, to minimise the creative stage and to maximise the production without limiting it to the post-project phase.
  • Throughout the entire project, the kids produced lots and lots of language, they were making suggestions, expressing views and commenting on the other students’ suggestions. There were at least three layers of material created by the students, in one format or another.
  • In hindsight, I do believe that there were even more opportunities for the further extension of the project by comparing the real cities the kids know and whether they would be a good place to live, by making suggestions how the city they live in can be made better or by ‘visiting’ one of the other cities and writing letters or postcards from their visit…
  • I was glad that I decided to keep the creative part of the project, even if in a limited format. They students really did enjoy designing their cities, drawing and colouring, even though in my eyes (a boring teacher here) they should be the first to go as not very generative.
  • It looks like my kids also enjoyed the project. They were asking after the lesson whether I would put the posters up (I did!) and, a few days later, whether we are going to have any more project lessons (we will!)

Happy teaching!

For the love of…the adjective

Our basic set of adjectives

Once upon a time…

This is how I daydream it: my primary kids go on to take their Starters (this is an old daydream, this year they will be taking Flyers), they are describing the pictures or telling the story. The examiner asks ‘How is this boy?’ and my kids answer ‘He is confused.’ and the examiner cannot believe her/his ears but she/he is, actually, impressed.

‘Confused’ is one of the many adjectives that my primary kids have learnt thanks to the sheep game that we’ve been playing for a few years now. We started with the normal adjectives, happy, sad, angry, sleepy but the kids noticed that I’ve been hiding some cards and they got curious. And because they were curious, they started to ask questions. Since the cards were wonderfully happy and funny, and since, together with some clarification from me, they did illustrated the concept very well (after all, they were created for children), we started using the ‘confused’ card (and with them ‘chatty’, ‘in love’, ‘crazy’).

That, in hindsight, was an excellent idea because this turned out to be a very useful words because I happen to be confused and my kids happen to be confused, too. Not to mention all the characters from all the stories. ‘Confused’ might be from the B1/B2 shelf, but, we found it very very useful, at the age of seven, in something that was the pre-A1 level.

‘OK’, ‘ill’, ‘in love’, ‘creative’

The coursebook and the curriculum

A disclaimer first: my comments in this section are based only on a very un-thorough looking through the coursebooks for pre-schoolers, only a quick glance at the contents page and the units. I acknowledge that fact that I might have missed something and that a proper research might be necessary and, for that reason, I will refrain from quoting any titles here. However, having flipped through five recently published coursebooks for pre-primary learners, I did not find much as regards adjectives, apart from colours (all), some of the weather words (depending on the title) and some random happy, sad and hungry (also depending on the title). With one honourable exception that introduces quite a few emotions as well as some other opposites, either through stories or through CLIL projects. Overall, however – not good at all.

I also had a look at the primary books and here the situation is admittedly better because all of the modern publications tend to align their content with the YLE Cambridge wordlist and that, in turn, means about 50 adjectives on the pre-A1 level, including colours and possessive adjectives.

As it happens, my school is now getting ready for the YLE mock exams and I am putting together a set of materials for our teachers and kids and that made me look at the said wordlist with a great more deal of scrutiny. Starters kids (pre-A1) are supposed to know about 50 adjectives, Movers kids (A1) – additional 50 adjectives and Flyers kids (A2) – 70 more adjectives on top of that. I am aware of the fact that these lists were not created on a whim, quite the contrary – they are a result of a large-scale research and the effort of a huge team of people. But there are all these questions there, too. Why do the pre-A1 kids need to know the adjectives such as ‘double’ or ‘correct’ and ‘right’ (as correct) and ‘its’ (also an adjective) and some other ones, although not adjectives (‘coconut’, ‘pineapple’, ‘flat’ and ‘apartment’ or ‘lime’)? Why would these be more important, useful and appropriate for primary school children than ‘hot’, ‘cold’, ‘easy’, ‘difficult’ or ‘loud’ and ‘quiet’, which are only introduced at the A1 level?

I do not have the answers but I have been introducing them (or some of them) much earlier than that. And effectively so. If you are interested why and how, please continue reading.

‘crazy’

Emotions and feelings

‘Sasha, how do feel today?‘ is one of the questions that we ask in every lesson. Why? Well, I guess, first and foremost it is for socialising. This is the question that we ask when we meet someone, just to make a conversation, at least with adults.

Since our students are children, however, there is a lot more to that. Children are growing, developing their social skills and learning about a variety of emotions available and, even more importantly, learning how to deal with these emotions and learning how to recognise these emotions in others. That is why giving them tools to do that, in their L1 and, naturally, in their L2, is absolutely crucial.

Ideally, all the Sashas in the world would walk into the classroom being happy, totally over the moon, brimming with joy and ready to conquer the world with us in the next 45 minutes. But it is not possible for every Sasha to be happy every day and, as a teacher, I want to know how they really are and during the hello circle I am, literally, all ears because if Sasha is sad or sleepy or hungry, or, sometimes, angry, I would like to know that. Not only to show empathy but also to look at the lesson and what I have prepared for today from the group’s and the individuals’ point of view. Maybe a bunch of sleepy children will not be able to deal very well with the story? Maybe it will be necessary to keep an eye on Sasha and accept that today she might not be able to focus as well as usually because she is feeling a bit under the weather. Maybe it is a good idea to start with this silly game of ours (although I did promise myself to ‘never ever’) because it might distract and cheer up this little human who walks in and announces ‘I am very, very, very angry.’

Having this range of emotions vocabulary is also very handy when it comes to behaviour management, even if in the simplest of terms.

Situation type #1: an unpleasant situation: someone draws on someone else’s paper, someone takes someone else’s toy /book / marker without asking, someone jumps the queue, no casualties, only a lot of unhappiness in the room and one person is on the verge of tears. ‘Look. Sasha is very sad now‘. Naturally, it might not be the case of ‘one size only’, one solution for all occasions but it is a good start.

Situation type #2: a 5 y.o. confrontation: both parties did have a disagreement, both parties are not very happy and, definitely, way too upset to just get over it and get involved in the lesson activities. ‘Sasha, are you angry?’ ‘Yes!’ ‘It’s ok.’ Again, some cases are more complex than that, but in many situations the very fact of calling the spade a spade and showing that it is natural to feel angry (and, by default, giving the human some time out to accept and recover) is the best solution. It applies also to all the negative emtions, as long as no comes to any harm.

To be perfectly honest, sometimes (only sometimes!) it feels like this brief and contained reaction, limited by the fact that extreme language grading is necessary, is the best solution. Anything to avoid a long lecture from the adult on ‘The negative impact and the long-term consequences of….’ that children sometimes receive from their teachers, baby-sitters, nannies, parents, grandparents…

‘ill’

Riddles

This is, by far, one of our favourite games: making riddles. The game is introduced in its simplest from, with a set of flashcards and with the students guessing the secret word which the teacher or one of the children keep close to their chest. That’s just the beginning, however, once the kids are comfortable and familiar with the format, a set of simple adjectives are added, first the colours (based on the visuals in the flashcards) and big / small. Then, depending on the topic, we introduce and play with the relevant adjectives, for example fast / slow / big / small / loud / quiet while talking about transport, big / small / friendly / dangerous while talking about animals, hot and cold while talking about food and big / small / soft / hard / light / heavy while talking about the everyday objects and so on.

The kids can either use the adjectives of their choice and affirmative sentences (It’s big, it is yellow) or they can react to teacher’s or kids’ questions (Is it big or small?).

A variation of this activity is also I spy with my little eye adopted (and limited) to the set of vocabulary that the students are familiar with, played with a set of flashcards or a poster.

Expressing opinion

…or, rather, justifying your opinion, something that can become a part of pretty much every unit and every set of words. Not only does it create an opportunity to personalise the vocabulary by dividing it into the things we like and the things we don’t like but also to give more detail and to build a small discourse (I like it. It is beautiful) or even first complex sentences (I like it because it is beautiful).

Naturally, that will require a different set of adjectives but beautiful, ugly, easy difficult, interesting and boring to be the concepts that preschool children understand, even though the flashards and visuals will be based on some symbols.

Storytelling

Our storytelling has reached some new amazing levels since we started working extensively on adjectives, both with primary and pre-primary students. You can read more about in an earlier post on the Storytelling Campaign here and here.

‘confused’

In my classroom

In this academic year, I am working with three pre-school groups, level 1, level 2 and level 3 and I am happy to say that even my youngest level 1 students are familiar with the set of 12 different adjectives that you can see in the first photograph plus a few more that we have learnt through songs. Level 2 group have got the basic set, quantifiers ‘very’ and ‘a little’ and a few more adjectives lined up. Level 3 group have got a nice set to describe food, transport and animals (including ‘scary‘) and they have already started working on extanding that range.

The photographs that were chosen to illustrate this post all come from the set that I have created for my pre-school group.

I have decided to use paper plates because they are durable, easy to stock and they have a shape of a circle aka they are a face. In the classroom, we put them in neat rows on the carpet, in the middle of the circle, to support production. My younger students like to pick up those that are relevant and hide behind them, showing how they really feel. This makes this part of the lesson a bit more kinesthetic.

I have drawn all of them myself but before making the decision on how to represent each adjective, I like to look at different emoticons to get inspired and to find something that meets two criteria a) I can draw it and b) my students will be able to associate it with a specific concept.

In some cases, the symbol was pretty easy for students to decode (for example: an owl = clever), in some others, I had to follow up with a brief clarification (for example: lightbulbs = ideas = creative). After the first lesson, I decided to upgrade the ill flashcard by adding a real tissue for the poor sneezing person.

There is another thing that I am considering at the moment. With my preschool students we start with the adjectives that help us describe how we feel and it must have been out of sheer linguistic greed that I decided to add those adjectives that describe personal characteristics rather than emotions such as ‘strong’, ‘beautiful’ or ‘clever’. Although, to be honest, we adults know very well that there are days when we feel particularly beautiful or not and the kids responded well to it. At the moment, I am considering different ways of organising all the adjectives that we already know and building up on that, in each category.

Basically, the best is yet to come.

Where to find the adjectives?

Happy teaching!

Crumbs #21 ‘Write 5 words’ aka a vocabulary game for lazy teachers

Here is a pumpkin flower: simple and unexpectedly beautiful, just like this game.

Ingredients

  • A piece of paper and something to write with
  • For younger students – somewhere to keep the paper safe and secret i.e. inside a coursebook
  • Imagination
  • The whiteboard to put the target language on

Procedures

  • Kids work individually, keeping their cards secret from their friends but if the game is played for the first time, they can work in pairs, this will be their natural support and the source of creativity because two heads are better than one.
  • Teacher ask the students to write numbers from 1 to 5, in a column. When they are ready, teacher asks the kids to write 5 words, one at number 1, one at number 2, etc. Teacher monitors and prepares her/his own set to use in modelling. It might be also a good idea to write a few examples on the board although these are just for modelling and they will not be used in the real game. The target structures should also be displayed on the board.
  • Teacher demonstrates how to play the game – she / he describes the first word on her / his list for the whole class to guess. It might be necessary to play a few rounds with the whole class, with the teacher leading the game or with one of the strongest students leading the game.
  • The game can be played until all the words are described and guess OR for as long as there is time.
  • Important: It is absolutely necessary to carefully combine the vocabulary and the target structure to make sure that the set is used naturally and that it matches the context, too. Some of the examples of the activities we used below
  • Places in the city (ie bank, post office, school) + I can see…I can hear…I can smell…Where am I?
  • Professions + I am going to work, I am going to do…Who am I?
  • Animals + It is big / small, It can run / fly / swim, It has got…
  • Body parts + I need it / them when I write, swim, play
  • Objects + passive voice ie It is made of…, It is used for…
  • Personal characteristics + Present Simple, 3rd singular, This person always does something, This person never does something

Why we like it

  • The biggest advantage of the game is that it can be adapted to almost any set of vocabulary and any structure.
  • It can be used with the lower-level and the higher-level groups, with the younger and the older students.
  • The game requires no preparation for the teacher and it is SS-generated which means that it is personalised and motivating for the kids to play.
  • It is a perfect controlled practice activity as the kids are using the target langauge and the target vocabulary.
  • It is a guessing game and because of that it is both achievable and challenging.
  • With the younger kids we play the game of 5, with the older ones we usually prepare 10 words.

Happy teaching!

Children as symbols users and the EFL world.

‘Symbolic representation – making something stand for something else’*

Symbolic representation, its importance and development in children are a truly fascinating topic and one of the crucial ones to anyone who works with the little children.

Tina Bruce’s definition of symbolic representation has become the title for this paragraph and that means that absolutely anything can become a symbol of something else and being able to read these symbols is an important step in child development.

Symbols are everyone around us. Some of them are universally recognised such as mathematical symbols, musical notation or the letters of the alphabet, some are personal. While growing up, children are learning to differentiate between the symbol and the real object, they learn to recognise, learn and, eventually, to create symbols.

Examples? Imagine a cat, a black beautiful and soft murmuring creature. Now, imagine a flashcard of a cat. Obviously, as adults we have no problems differentiating between these two and understanding that the flashcard, no matter how realistic, is not a cat and that it only represents it. We can even take one step further and look at ‘CAT’ written on the board also understand that it is not the cat itself, only its symbol. Or that when we move one of our hands in the air (with the fingers spread apart and crooked a bit), while saying ‘meow’, we also want it to represent a cat. Although we are not the cat ourselves. One more step would be going in the direction of what the cat or the black cat itself might represent…

It is basically the development of abstract thinking. Why does it matter to us, the teachers of English? Well, there are a few reasons and a few immediate uses in the classroom.

Flashcards…

This is probably the easiest to highlight and, at the same time, the most obvious way in which the symbolic representation and its development influences our daily life in the classroom.

Flashcards are the staple resource of a VYL and YL teacher. We can bring toys into the classroom or plastic fruit to introduce and practice vocabulary with them but it is not possible with all the topics. Sadly, we can never have a real elephant or a real princess in the classroom, sadly, and for that reason we have flashcards. They help us work with the language as they are not only easy (or relatively easy) to obtain but they also help use the language and the variety of channels: visual (as they are colourful and pretty), kinesthetic (because we can manipulate them) and auditory (with the language produced by the teacher and the students).

However, there is the question of what exactly we want from the flashcards. They should be colourful and durable and visually appealing but they should also clearly convey the concept, not to confuse the children. The situation is much better nowadays, the materials that we work with are of a much better quality but you can still find a few ‘gems’ that should have never seen the daylight. I am collecting those and perhaps I am going to share with you my most precious finds (or rather ‘finds’).

It is a fascinating thing to be producing the flashcards to represent a less obvious concepts for example adjectives.

These first two are very straightforward, a frown is easily associated with ‘I’m sad’ or ‘sad’ and thinking of food with ‘I’m hungry’ or ‘hungry’.

The other two were a bit more challenging but I did assume that an owl is considered to be a very wise animal and it is often used in such a way. That is why we have also adopted it in our class. The other was even more challenging but I assumed that kids (or not only kids) often cover their eyes when they are scared and don’t want to look at what frightens them (although they sometimes peek through the fingers nonetheless:-). This is how we have ended up with these two symbols for ‘I’m clever’ and ‘I’m scared’ (or ‘clever’ and ‘scared’).

But things got really interesting and challenging recently. I needed a flashcard for ‘It’s scary’ (or ‘scary’) because we are in the unit of pets and animals and we learn to describe them, including what they like to eat, what they can do and what we think of them.

I already had a flashcards for ‘I’m scared’. For a moment I was considering using an image of a monster but those nice ones were sweet and funny and those that were really scary and illustrating the concept well, they were just too scary, even for me. In the end, I decided to go for a spider (as most kids don’t like them and I hate them so my reaction to them is always very real) but I covered it with a flap. My reasoning was that if something is scary, we don’t really want to look at it. So far it works well. And my kids love to pull off the flap while telling me that it is NOT scary.

Gestures

The gesture is king! By adding gestures while teaching kids vocabulary or structures, we multiply the number of channels through which the kids are operating (visual – with flashcards, auditory – the words spoken and kinesthetic – through gestures) and we help them remember and recall the language with more ease.

It does not really matter if we use gestures (or symbols) that are universally recognised. It is an advantage if we can, of course, but I doubt that any culture has a gesture ready for the vocabulary that you are studying at the moment, for example ‘It is snowing’, ‘it is windy’ or ‘a clown’, ‘a doctor’, ‘a princess’. It does not really matter, though. The English classroom is a sort of a bubble, a mini-universe where its own rules apply. It is almost natural that this world will have its own set of symbols or gestures.

I have already committed a separate post on different ways of using it with preschoolers learning English as a foreign language. You can find it here.

Vocabulary and structure or How to teach grammar to preschoolers

Symbols and their application can be especially useful while teaching grammar to preschoolers. First of all, taking the students out of the one word production world and into the phrase- and the sentence- or perhaps even the discourse-level is a challenge all by itself. Our EFL students have a limited class time (unlike the bilingual or the ESL children) and a limited exposure outside of the classroom. Second of all, pre-schoolers are indeed very young and their cognitive skills and the ability to deal with abstract concepts (such as grammar) are limited. Last but definitely not least, they are pre-literate in English and the structure cannot be just presented to them using the written word. Primary children, who learn grammar but depend heavily on the context (which is an advantage and a source of support), still receive the basic form of the target langauge on the board or in the coursebook for example ‘I like…’ which helps them remember the key structure and which supports production.

For that reason some other solutions have to be found and, at least, for me and my students relying on symbolic representation has been a life saver.

It started with a heart, you could say. I needed a symbol to stand for ‘I like’ and ‘I don’t like’ and at first I went for something resembling a face of a child that might be saying ‘Yummy’ but when I brought them to school, my students looked and said ‘happy’. Not good at all. The distance between the symbol and the real thing was too long and our new symbol resembled another symbol too closely. This is how we ended up with a heart – a coloured-in heart and a crossed heart to stand for ‘I like’ and ‘I don’t like’ respectively.

We use them together with the food, pets or colours flashcards and they simply work wonders. Both main components of the sentence are represented here visually, it is easier to remember them, to produce and reproduce them and they can be manipulated physically, too, as each of the students can have their own heart, double-sided. The heart can be put on the flashcard face up or face down depending on how the kids feel about it. It can be also held up, show the other students ‘the right side’.

It is amazing to see how quickly students accept this particular symbol and how effectively they use it. It is even more amazing to witness how they try to adapt it to the situation to make sure that they express their opinion and that this opinion is also reflected in how the symbol is used. In one of my groups we were using it with more complex food items and one of students said that she didn’t know whether she liked steak or not because shed had never tried. After a brief moment of hesitation, she decided to hold the little cardboard heart side-ways (or edge-ways) so that it expresses neither ‘I like’ or ‘I don’t like’.

Another way of applying symbolic representation are the mini-emotion flashcards which we use to describe the feelings of others. These are quite small, small enough to fit on the character or family flashcards and to make it for almost ‘real’ experience when ‘mum’ looks really happy or sleepy or hungry.

These mini-cards can be used in phrases ‘a happy princess’ or in sentences ‘The princess is happy’ and the position of the card will reflect the change in the phrase ie if the card is on the left of the flashcards it reflects the position of both words in the phrase in which the adjective comes first. If the mini-card is on the flashcard (for the purpose of realism and fun) or on the right we produce a full sentence in which the noun comes first, followed by the verb ‘is’ (the only part that needs to be remembered and which can be represented by a gesture) and by the emotion.

Unfortunately, it is not always easy to find a suitable visual symbol for each structure we teach but it does not necessarily have to be a picture, gestures will work equally well. For example for ‘I’m wearing’ I motion my hand from my neck down to point at the clothes and for ‘I can see’ I tap my finger twice on my chest (for ‘I’ and ‘can’) and then point at my eyes ‘(‘see’).

I think it can be safely said that I am (slowly?) adding symbols to my collection. Plus, it is fun to make the ghost scared, for once and this lesson always puts me in a better mood.

And then there are letters, too!

Letters and alphabets or any writing systems are a fascinating set of symbols and, eventually, children get to know them, in their L1 and in English, too. When they are ready. This is an adventure that deserves its own post (or, indeed, a series of posts), soon, especially that when we take the first steps in the world of the written word, it is with a background in another alphabet and another set of symbols, some of which are the same, some of which are different and some of which are false friends because they look the same but they represent different sounds.

Developing literacy skills is as much a challenge as it is fun. Especially that children as young as four and five comment on the fact the English ‘Pp’ looks exactly like the Russian ‘Rr’ and that ‘Ww’ turned upside down turns into ‘Mm’ (well, at least the capital one). Or that ‘Xx’ is a Russian ‘Hh’ or ‘A cross, Anka! It looks like a cross!

More on that later.

Kids grow up…

Of course the use of the symbol in the EFL classroom is not limited to pre-school, only later on the symbol is not an essential component (at least in my head) but a pleasant supplement that makes things fun, colourful and a bit easier. Examples? The ghost in the cover photo which we use with my primary kids to stand for the silent letters that started to appear everywhere in our A1 materials or the gestures that we used while learning and practising some basic adverbs of frequence: always (5 fingers – 5 days a week), usually, sometimes and never.

Happy teaching!

*****

If you are interested, make sure you have a look at these:

Symbolic Understanding in Infants and Young Children, a lecture by Dr Judy DeLoache (2013)

Symbolic Understanding in Infants and Young Children, a lecture by Dr Stephanie Carlson (2013)

Tina Bruce (2005) Early Childhood Education, pp 105 – 125

The stages of symbolic development, in a nutshell.

From ‘havoc’ to ‘happiness’. Lesson planning for YL (part 2)

What can you see in the photograph? Oh how I wish I could hear your thoughts and all your ideas, dear reader!

It does look pretty messy, doesn’t it? This is what I call ‘real life’.

Imagine this, I have just come into the office on the day of the training (which is not quite ready yet, not this one, the week must have been a real hell so although the ideas are there, the presentation itself is NOT, not panicking yet, but the adrenaline levels are already up) and I have just taken ‘everything I need’ out of the bag: books, notes, some copies and A LOT OF FOOD (typical). I am about to start planning. Having looked at what my desk has become, I decide to take a photo of this beautiful mess that soon will (I know it now) turn into a great seminar session.

I have decided to use this photo because it is a pretty accurate visualisation of what happens on some days when I plan my classes and to follow it up with a few words on what happens next and how I get from this havoc to the end-of-the-lesson happiness.

Based on the lesson with my ‘adult’ preschoolers a week ago.

The ‘theory’*)

Step 1: Make a decision what your main aim is. Try to verbalise it and even write it. It really does wonders for the awareness of what you, as a teacher want from the lesson.

Step 2: Make a decision what your focused task is. ‘Focused task’ is the concept that we use at my school (and have used for at least 15 years) and it refers to the main activity of the lesson in which the students get to produce the language and the activity which is the culmination of the entire lesson. All the activities in the lesson lead to it, to some extent, just like all the roads lead to Rome.

A while ago I realised that this is the approach that I am using in all my lesson planning, for all the age groups, levels, for teaching and for teacher training, too.

Step 3: Consider the materials available (mostly by looking at what the coursebook has to offer) and whether they contribute to your aims and your focused task. If not, you will need to adapt them or design new materials.

Step 4: Think of the activity that is going to be most suitable for your materials. It is like differentiating between a tool and how you are going to use it.

After all, there are plenty things that can be done with a hammer (materials), such as putting in a nail to hang a picture, breaking a window, smashing a walnut open, stirring soup (activities) and so on. Some of them are more or less appropriate, of course. The same applies to the flashcards, boardgames, handouts and what we are going to do with them.

Step 5: Take a moment and go over the activity in order to make decisions about staging. What are going to be your baby steps within the activity? whenever we do something for the first time (regardless of whether it is the first time for me or the students), I like to make an effort to actually write the main stages, even if in a very simple form, a sequence of infinitives.

Step 6: An additional step: a homework task. It might not be always possible or, rather, sometimes it might involve a lot of work as regards material design or adaptation. To put it simply, not every teacher will have enough time or energy every single time, with all the lessons taught in a week but a homework task that is an extension of exactly what happens in the lesson and creates an opportunity to continue practising the same language or structures at home, with parents.

….and the practice. Our lesson last week.

Aim: For the kids to start describing school objects and the objects in the classroom, using full sentences such as ‘It is a blue pencil’, with the focus on colours and some simple adjectives. The kids are 5 and 6 and in the beginning of their third year of EFL.

Focused task: A game in which the kids will be guessing the secret word depicted in the cards, producing full sentences instead of questions as we have done so far. The kids will be saying ‘It is a blue pencil‘, ‘It is a red pencil‘, etc until they produce an accurate description of what is shown in the picture which they cannot see.

Materials: There is nothing in the book that could help to achieve the aim. There is one practice activity but it focuses on reading and the students are only taking their first steps in the world of the early literacy. A decision is made to design the materials. Yay.

The materials are a set of cards, 7×7 cm, with clip art pictures on them, coloured-in by hand. There are three types of cards (a pencil, a schoolbag and a rules) and six variations of each, in six different colours.

The cards must have a specific size for the kids to be able to manipulate them easily. They cannot be too big (the ‘secret’ will be difficult to keep and the regular A5 flashcards might be not comfortable enough for the little hands) and not too small (as they will be too flimsy and are likely to be ‘spilled’). It might be a good idea to keep the cards in an envelope to add one more layer of guarantee that the technical bits don’t get in the way of the successful playing of the game.

There are only three types of cards in order to make it achievable, at least when the game is first introduced. Later on, when the kids feel familiar with the concept of the game, more objects or more colours can be added.

Activity: The activity itself is a simple guessing game of two stages. The teacher chooses one of the cards, keep it secret, say ‘What’s my secret?‘ Stage 1: students guess which of the three objects is depicted on the card. They say ‘It is a ruler’ and so on, until they guess.

Once they do, the teacher confirms and asks the following question ‘What colour is it?‘. Students continue guessing. They produce the sentences such as ‘It’s a blue pencil‘, ‘It’s a green pencil‘, until they guess. To help them remember the full structure, teacher counts the parts of the sentence on her finger.

Staging

  • revise the vocabulary with the regular flashcards
  • show the kids the game cards
  • elicit the full sentences (signal withe the fingers), while flipping through the cards: ‘It is a green schoolbag’, ‘It is a yellow schoolbag’ etc.
  • mix the cards, to choose one and keep it close to the chest
  • say ‘What is it?‘ and peek at the cards, secretly and suggest a possible (wrong) answer.
  • wait for the kids to start guessing.
  • keep showing the fingers and counting parts of the sentence as the students are producing the language, developing the habit of answering in full sentences.
  • confirm when the kids guess the object in the picture, praise the student who guess and all the students
  • say ‘What colour is it?‘, peek at the cards, secretly and suggest a possible (wrong) answer
  • wait for the kids to start guessing.
  • after a round of two, the kids take over – call one of them out and ask them to sit on the teacher’s chair, choose the picture for them (to save time, especially in the first lesson) or let them choose the picture they want to play with but operating the cards yourself. The kids might be able to take over in the first lesson, they might be able to take over only in the following lesson, when the game is played for the second time.
  • encourage the group to make sentences, counting on your fingers, praising the kids, encouraging them to produce full sentences.

Homework

The homework task in this lesson was a simple handout, ‘a sentence maker’ in which the students have to complete the missing parts of the sentences, either by adding the colour (by colouring the box) or the adding the school object (by drawing it). The kids choose their own words. Later on, they ‘read’ their sentences. You can find the basic handout here.

The teacher makes one copy per child and one more to demonstrate the instructions in class. When we did this kind of an activity for the first time, I added the colours myself in line 4 and 5 to make the task straightforward. In the future, they will be given more freedom when they are more familiar with the format and the idea that each part of the sentence is represented by a visual or a symbol.

Did it work? aka ‘Happiness’

You know this moment when you are teaching and you literally want to get up and pat yourself on the shoulder with ‘OMG, you rock’? because you are allowing yourself, simultaneously, to teach and be fully in the lesson but also to be evaluating this lesson as if you had been the observer in the room. And it is actually going on very well?

This was one of these lessons.

The kids loved the guessing game, especially that they were given a chance to lead. The cards and the handout did help me achieve my aims and by the end of the focused task, the kids were producing full sentences, although I had to remind them a lot to use full sentences. It was much better in the second lesson with the same game. The kids were eager to start playing the game and I only had to model once. They were ready to take over and they produced a lot of language.

If you want to read more on the subject, have a look at this post where I share how I approach the everyday lesson planning for preschoolers.

Happy teaching!

*) Inverted commas because it is not a real theory, only a set of daily procedures, verbalised.

Crumbs#16 The Musical Challenge!

The first challenge ever (primary, A1)

Today about an activity that requires almost no preparation and is a nice break from the coursebook and from the everyday. Plus – you can draw. Ready? Let’s start the Musical Challenge!

Ingredients

  • A piece of paper, some drawing tool and a few tracks.
  • The choice of the tracks will depend on the teacher but it is good to include a variety of genres, songs or music with different tempo and instruments. I like to pick songs with a long intro and in a language that the students do not speak, not to let them be influenced by the lyrics.
  • Tell the students that you are going to play a short piece of music and they have to draw what they are thinking about when they hear this music. Highlight that all ideas are good ideas. Give the students an opportunity to include words, for example is some concept are difficult to draw.
  • Model, with a sample track.
  • Play about 30 – 60 seconds of a track and give the students up to a minute to finish drawing after the track stops. However, this is a fast-paced activity and its main aim is to provide material for speaking, not the drawing itself. Some students might want to make their drawings too pretty and too detailed and that will take time.
  • Put the students in pairs, let them discuss the songs. If possible, it might be a good idea to play the track they are discussing in the background to create the appropriate atmosphere.
  • Remember to put the questions / structures you want the students to answer / to use on the board. It will help them produce and stay on the ball.
  • Final feeback can include choosing the favourite and least favourite song.

Why we like it

  • It is very easy for the teacher to set up. It is enough to play the audio from the phone or even from youtube, pratically no preparation is necessary. It is possible to prepare a grid with numbers but it is much easier to give out an A4 or an A5 piece of paper that the students are asked to fold into halves until you get eight or six boxes. It works well, too. Because of that, it can easily become your go-to last minute, no-prep activity that can be added to any lesson.
  • It works well with different ages, not only with higher-level students, although, obiously, they will be able to produce more langauge and to discuss their own associations, metaphors, using more advanced language such as modal verbs for deduction. At the same time, even the younger and lower level students can describe their illustrations using simpler structures (I can see, he is wearing, he is happy) and to express their views (I like this song, I don’t like this song because…). The youngest students that I have done this activity with were about eight years old and studying in the A1 level.
  • The teacher has a lot of flexibility, this activity can be stopped whenever it is necessary, after four, five or eight tracks. The activity does not really have an end so it does not matter when it is stopped, for example when the students are not quite interested.
  • It can be further extended into a homework task. The students can be asked to choose a song, prepare their drawing at home and then play the song for everyone in class and either draw or just talk about their associations before presenting their original picture. If the songs are played in other than L1 or English (or if the beginning of the song does not include any text), the discussion can go in the direction of the story that the song is telling, based on the title, the summary or the single quotes.
  • It gives the students a chance to express themselves through drawing. We do a lot of that with the younger students but as we go, higher (level) and older (age), drawing and colours do disappear from our lessons, sadly. It is good to bring these moments back. They students do enjoy these.
  • It is a fascinating opportunity to see how music can be seen by a group of people and how different these associations can be.
  • It is highly personalised and open-ended, all ideas are good ideas
  • As a result, that kind of an activity generates a lot language.

The last time we did it a few week ago, we used the following tracks (we also read a text in our coursebook on music and fashion in the last 70 years, this is how all of the songs appeared here and how I listened to Ed Sheeran for the first time in my life:). Now, have a look at the pictures illustrating this post and have fun guessing which song inspired them. The Joni Mitchell, River

The Rolling Stones, Gimmie Shelter

The Clash, Should I stay or should I go

Ed Sheeran, Perfect

Backstreet Boys, Tell me why

Buddy Holly, Everyday

P.S. My kids loved the Clash and the Stones! Not all is lost)))

Happy teaching!

Crumbs #11: Speaking Circle (aka My favourite part of the lesson)

Set-up: a set of small chairs in a circle, in one super cozy corner of the classroom. This is where always start the lesson before we move to the serious part of the classroom and the lesson, with big tables, big chairs and coursebooks.

Time: 5 – 10 minutes in the beginning of each lesson

Materials: Angelina, dice and any visuals, especially flashcards, EFL posters (and at the school we do have a big and the most random collection of these from long-forgotten publishers and coursebooks), Starters, Movers and Flyers wordlist picturebooks which you can be easily downloaded (although we are lucky to have a few paper copies, too) and sometimes a whiteboard or a set of mini-whiteboards

Interaction patterns: all the new activities are first tried and tested with the whole group, to support production and to make sure that all students feel comfortable to be creative and to share their ideas. Later on, we split and continue in pairs or in teams.

Here a confession: ideally, of course, all of the interaction should be taking place in pairs to ensure that everyone has a go and produces as much language as possible but it is not what we always do. I have noticed that first of all, the children really do enjoy the whole group discussion, when everyone can contribute and when we do something together. I cannot quite describe it but it is almost palpable, this ‘team spirit’ and it does have a positive impact on them and on the atmosphere in the group. Plus, they are always curious about everyone else’s creative (aka crazy) ideas so they pause to eavesdrop, especially when there are giggles coming up from different parts of the circle. Because of that, we do both, a lot of whole class and a lot of pairwork.

Some of the activities to use in the Speaking Circle:

  • Tell me about that boy: the kids choose a person, an animal, a character or an object in the picture. The kids choose themselves what they want to conversation to be about and what information to include. The basic information usually includes emotions, clothes, activities or location.
  • Yes or no: the kids use the picture as the basis to make true or false sentences about the picture. The other students listen and correct the sentences when necessary.
  • Riddles: the kids describe something in the picture (the colour, the size, the location and the activities) for the others to guess
  • Which one is better?: the kids draw two cards out of the pile (animals, gadgets, food or anything else that we are studying) and they choose which one is better.
  • It’s a pair: the kids look for associations among different objects, people, animals in the set and they have to explain why they have put them together
  • Silly pictures: the kids talk about different silly things they see in the pictures
  • Silly stories: the kids come up with a character and they take turns in coming up with the adventures based on the set of verbs and / or other words that the teacher prepares in advance (displayed on the whiteboard or on the mini-whiteboards).
  • Angelina: the kids chat with the class puppet, ask and answer questions (pre-primary groups)
  • Hello dice: a new variation of the hello circle that can be introduced long before the kids actually study the Past Simple. They roll the dice, once, in turns and talk about their day, starting with the key phrase and we try to encourage including justification (‘School was easy because I have only 4 lessons on Tuesday’) or evaluation (‘I ate soup and it was very yummy’) etc. Sometimes we also play with the imaginary dice which basically means that everyone can choose what they want to talk about. Somehow, then number 6 is the most common choice. Perhaps because it is most generative of all of them and it is fun to say that ‘I didn’t go to Mars’, ‘I didn’t eat a fox’, ‘I didn’t dance in the park’ and what not. Not to mention that they just LOVE rolling the imaginary dice.
I kept it colour-coded to help them navigate among the verbs in the early days of this game.

Why we like it

  • The kids love it
  • They are very creative, they have great ideas and they want to share them
  • By being creative, they also develop their creativity, there are new ideas, new approaches and even more fun
  • Endless opportunities for revising without focusing too much on any specific vocabulary or structures.
  • Some potential for accidental learning and emerging vocabulary (although to make it work properly, I should start keeping track of it)
  • The activities do provide lots of opportunities for spontaneous (or almost spontaneous) language production where the only scaffolding devices are just the resources prepared by the teacher for the day and the langauge that the kids have at their disposal and, in many ways, we are just having a chat, despite being only A1 level.
  • Really, the part of the lesson that I really look forward to, every Tuesday and every Thursday.

Happy teaching!