This is the second part of the post. The first episode can be found here.
A huge part of the everyday inspiration are …
…my students. There is reading, there is research, there is the continual professional development, webinars and conferences presentations and the conversations in the teacher’s room, all of it very useful. The real source of power and of inspiration is the classroom and the kids in it.
If they are not an easy group, that makes you start planning with a sigh and enter the lesson with taking a deep breath (or a prayer), you will be looking for solutions for your problem and sometimes you will end up successfully reinventing the wheel and taking the game to the next level. They might also be a teacher’s dream and, because of that, you really want to go ‘bigger, better, faster, more!‘ and you create, re-create, experiment and, again, become some EFL Gagarin.
I don’t remember the names of all the kids (and all the adults) that I have thought over the years but the thought that there have been at least two thousand of them in Poland, Italy, Spain, the UK, Brasil and Russia does put a big smile on my face. I would like to think that all of them did learn something with me but I know that I have learnt a lot with them and because of them. My state school kids, my summer schools students, my IELTS students and my Business English engineers, all of my pre-schoolers and all of my teachers in training.
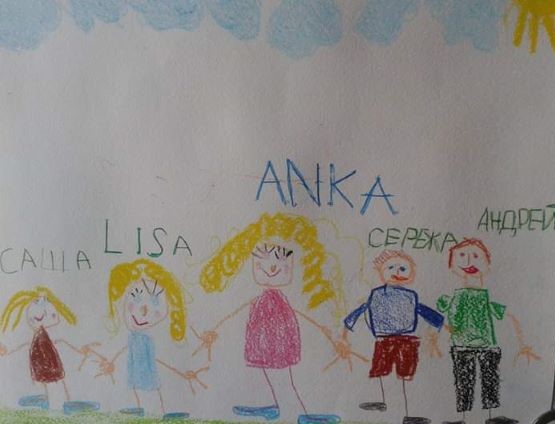
Why? Because sometimes, when I ask for feedback and I ask ‘Did you like the lesson? Why?’, I get back real treasures, such as ‘Yes, because I am not scared anymore’ from one of my teens (there must be a post on that story) or ‘Yes, потому что тут Анка’ from my primary. (Yes, because of Anka).
That is more than enough to motivate me to make an effort next time but I usually say is ‘Great students make great teachers’. I really do believe it.

The everyday support aka ‘On the wall in the office’
It might make me look like my teenage version of me, with a bedroom wall all covered in posters. Thankfully, the pop music posters (Europe and Limalh, my dear Lord) gave way to Hieronymus Bosch, the photos of Land’s End and the map of the UK. The huge Trainspotting poster was added a bit later. The thing is, I do like to have something to look at, ‘My favourite things’, in one interpretation or the other. This is how these five end up on the way, all my private superheroes, the source of inspiration.
Batman, the only real superhero here. He is my favourite one because he is ‘only’ a human, without any accidents and mutations, he saves the world only because he’s got access to lots of resources. I mean, he is ridiculously rich but still – a human with appropriate tools. A role model number 1.
General Kutuzov, a field marshal of the Russian Empire and the hero of the Battle of Borodino. During all the teacher training courses and projects that require lots of multi-tasking (which I hate to bits), I do find myself staring at the picture of Mikhail Illiaryonovich, thinking of the troops management, provisions management, morale management and whatever else general was obliged to take care of. Simultaneously.
Leo Semyonovich Vygostky or, simply, Leo. I cannot think of any one that had a bigger impact on what I think about teaching and education. The more I read about him, starting from comments and references in other sources, to articles by Vygotsky scholars and followers, and to Leo’s own papers which I am still going through, the more I agree. Reading and repeating ‘Yes, absolutely!’ or ‘I could not agree more!’. Literally. Because of the conviction that every can, with appropriate support, because of the role of the teacher who is only supposed to be the lighthouse, not the leader, because of the attitude to the level of challenge. I am in love. Plus, we are almost birthday twins with Leo. Which is random but kinda cool.
There is Yuri Gagarin, too, of course. If you ask me, ideally, there would be Yuri on every wall in every classroom. He is on mine, too. And there is Zima Blue, the creator. If you are not familiar, look up Alastair Reynolds or Life, Death and Robots.

The other side of the coin
The superheros have been on the wall for a few years now. When I first took a photo and showed my friend, she said ‘There are only guys, here. Where are the women?’
At first, I just shrugged it off. I didn’t know why. But the question stayed with me and it was bothering me for days on end. Until I finally figured it out and sighed with relief. The answer is actually quite simple, ridiculously simple. As simple as it is beautiful.
I don’t have any photographs of inspiring women on the wall above my desk because they are all real women that I have a pleasure to know and to have in my life. All the photos are in albums or in folders on the computer. And when I need inspiration, I just talk to them. That’s how blessed I am.
There are a few great mums here, some stars who make the world a better place by helping people, a few teachers, a few translators, a few chefs, a few Leos, a photographer, a biker, and a creator.. All of them are strong, intelligent, funny, beautiful, creative, or, in just one word: amazing.
Also, represented here by some random trinkets. Some of them, at least.
Thank you, thank you, thank you for being in my life.

P.S. It was easy to write these post and it took a lot longer than I had planned. As soon as I finished, I started to be bombarded with thoughts of my teacher trainers, supervisors, colleagues, family members, writers…In one word, enough material for two more posts. I think it is better to post what I have ready now or else this post will never really happen. But, as Terminator used to say: ‘I will be back!’ And on that note…
Happy teaching!