Material design for beginners: The resource as the source of inspiration

(From the series: Try something new today!)

Today I am going to share these idea for YL lessons that started with the teacher (aka yours truly) finding a material that she really (but really) wanted to use in class.

Some of them have already been published here, on this blog, some of them are brand new, right out of the box, right off the production line.

Oh, also, please make sure you have a look at the introduction to the series here!

Oldies but goodies

Silly pictures are a perfect example here because I found them while I was looking for something else entirely and these just popped up. Until then, I hadn’t even known of their existance. Now, we love using them. Make sure you have a look at the original post)

Wordwall activities are all based on the templates provided by the website but they can be used in a variety different ways. The material is there but there is a lot that can be done with that.

Let’s look for pairs is a game that actually started with a visual that included a rather random set of jungle animals and, initially, were not an activity at all. I loved the animals, though, I started to think how I could use it in class. And an activity was created. I cannot find the original source but it was not very much different from this one here.

Dice is also a resource and a tool that was a starting point to a wide range of activities and I have been passionate about using it in the classroom for ages. Some of the ideas can be found here.

And, last but not least, songs can also become games and here some ideas how to do it.

And some latest finds

Two videos

There is very little that can be said about using videos in class because this is one of the hot topics in the EFL. Kieran Donaghy’s website is a great place to start if you are looking for inspiration and ideas. I have already committed a post on this blog here but today I would like to share one more idea and the mechanics of it and the journey that a video took to become an activity and a lesson.

I love running and over the years I have developed a passion and an obsession related to all the amazing people who managed to achieve something amazing in the area. No wonder that my superhero for many years has been Tom Denniss, the Australian who ran around the world. Literally. In 3 years and about 60 marathons. For many years, one of Tom’s photographs taken during that run, was pinned on the door of my fridge. And no metaphors here.

Naturally, that meant that I read and watched everything that was available on the subject, including this video, and from the moment I saw it, I knew that I would use it in class. I have used it many times since, on its own, in the lessons devoted to unusual journeys, special achievements and numbers as there are some impressive statistics related to Tom’s feat but this September I decided to take it to another level, paired up with that of another adventurer, Helen Skelton, who crossed the Amazon in her kayak. Here are the main stages of this lesson:

  • photographs of both heroes and their adventures
  • a discussion on the challenges and dangers of both achievements, choosing the more difficult one
  • a discussion on the first impressions, whether they are important or not, about our personal experience in that area, the misleading first impressions, the correct ones
  • watching the first minute of the interview with Tom and the first minute of the interview with Helen and discussing the impression they made on us
  • watching the rest of both videos to find out more about their adventures and to decide whose was the more impressive and the more dangerous one
  • a comprehension debate together
  • a discussion in groups to compare opinions regarding the challenges
  • the final debate regarding the first impression and the second impression, a discussion on whether the professions of the interviewees (Tom – a scientist and an entrepreneur, Helen – a TV journalist) might have had an impact on the impressions they made on us
  • feedback, error correction and round-up

Speaking YLE

Cambridge Young Learners Exams is definitely one of those topics that have been waiting for its own post here simply forever and I know that its day will eventually come.

Today I would only like to focus on the Movers speaking part 1 and Flyers speaking part 2 resources that have inspired me to come up with an idea for an acitivty for my primary and pre-primary kids.

The resource here is a set of two pictures which have some small differences between them. You can find the samples in the Sample Tests published by Cambridge. I had been preparing my students for YLE for a few years and I had known the visuals very well and there is no other way of putting me: it was bugging me that I could not use these beautiful visuals with my pre-schoolers because this was the material produced for A2 speakers and my students were only pre-A1 and five. Or so I thought until I realised that I can still keep the resource and keep the general idea of the activity (‘looking for differences’) but the thing that needed adaptation was the aim, especially the linguistic one. The set of complex structures had to be replaced with a simple ‘I can see…’. In order to make the task more achievable for my youngest students, I also decided to change the resources, too and to replace them, initially at least, with a much simpler set, limiting the set of vocabulary items to only one topic (ie only toys, only farm animals) and lowering the level of complexity but abandoning, for a while, the almost identical visuals and choosing simpler two pictures of a farm.

These are the two images that were used in a YLE-inpsired ‘Find the difference’ task with a 6 y.o. primary student, in the lesson on toys and with a group of 5-6 y.o. level 3 pre-primary students. The teacher and the students took turns to compare the two pictures using a simple structure (I can see…). The teacher was initially describing the toys in picture 1, the students – in picture 2.

But this idea was developed further by adding two more visuals, a toy room in the kindergarten, and the activity was adapted too. Using the four pictures, the students were looking for the same toys featuring in one, two, three or perhaps even all four rooms, for example: I can see a teddy in picture 1, picture 2 and picture 4. The most fascinating thing about it was that after a very short while we had one student describing the pictures and producing the language but the whole group were listening in order to check that no pictures were ommitted by mistake. And to support their friend, too.

One-sentence phonics stories

This particular one was created on the basis of the short phonics stories that feature in our coursebooks for primary, in this case the Superminds series by Herbert Puchta and Gunter Gerngross published by CUP.

The original material consisted of an illustration, a one-sentence story and an audio track, like the one in unit 1 of level one, focusing on the /a/ phoneme and practising in a story ‘A fat rat in a black back’ (SB p. 15, sample page 6).

Together with the PostIt notes on the MiroBoard, it gave me the idea to put together a game in which the kids could really practise reading the story in a fun way and to practise the key phonics words as well as all the words the kids have learnt so far.

This is a very simple game in which the kids have to read the original sentence, close their eyes and during that time, the teacher replaces one of the cards. The kids open the eyes and read the slightly adapted sentence. Then, step by step, during the following rounds, the original sentence keeps changing and the kids continue reading it out loud. The number of rounds can be adapted to the needs and abilities of the group and the kids can also be involved in adding the words. In the regular classroom, the same game can be played with even less preparation as the only thing you need is a whiteboard and a marker.

The original sentence, based on the task from Superminds 1
One new element
All the variants in this game

I hope you have found something useful here. If so, please come back. There will be two more episodes in this series.

Happy teaching!

Try something new today!* Material design for beginners**

One of my favourite EFL quotes is what Katherine Bilsborough started her presentation at TESOL Greece in 2019 that we, the teachers, we are all material writers. Because we simply are, all of us. Even if we don’t ever produce a coursebook, even if we don’t ever get to share ideas on our Instagram or in our blogs. Even if we never get to be famous and renowned, we produce materials for our students, day in day out.

If you want to read more about creating materials, don’t forget to check Katherine’s blog on material writing here and her interview with some great advice here.

In this post here, I would like to share some ideas from a low-key but an advanced material writer, hoping that my everyday material creation, design and adaptation might help some of my fellow material writers, those with less experience.

Why do teachers adapt, supplement and design?

Methodology aside, the very subjective and personal answer to this question is very easy: the students are boread, the teacher has noticed that something does not go as well as planned, the teacher has found something that they really want to use, the teacher does not like whatever is in the coursebook, the teacher is bored…

The three concepts to take into consideration: the material, the activity, the aim

The material aka the physical resource that we have at hand, the photograph, the drawing, the poster, the puppet, the flashcards, realia, the song.

The activity aka the game, the reading task, the matching activity, the odd one out, in other words – a set of instructions of how to do something.

The aim aka why we bother and what exactly we want to achieve.

The understanding what these three are (and what they are not) is the absolute first step in starting your own blazing career in material design because at the stage of creation these three can be the source of inspiration and, at the later stage of reflection and readjustment, one or two of these three will be the elements that can be tweaked and manipulated in order to perfect the initial desing.

This is why, in this particular post, I am going to share ideas that had their starting point in the material, the activity and the aim.

Example #1: the coursbook

Using the sample of the unit 1 from Superminds 5 published by Cambridge University Press here, page 1 (which is page 10 of the students’ book).

The material here is an illustration, a scene from the Pompeii and three characters from the book, Patrick, Phoebe and Alex, a set of numbers and a set of words as well as the audio track which here is the list of words.

The activity is to listen and to repeat the words and to check with the partner.

The aim is for the students to become familiar with the key vocabulary in the unit and to be able to practise them before they move on to the following exercise which introduces the kids’ first adventure as time travellers.

When we started to use it in class, I kept all of the coursebook material but I decided to adapt and to extend the original activity for my students (A2 level, aged 7-8-9 years old) seemed to be ready for a more challenging task that would involve more communication and language production. One of our favourite activities here is to play riddles in which the kids work in pairs and describe one of the items in the picture either by giving their definition (It is big, it is made of, it is used for) or by providing their location in the picture (It is behind Patrick).

This way the material and the aim stay the same and only the activity is slightly adapted.

Example #2: Own materials on Miro

This is a task that I designed for my 1-1 online student, aged 6 y.o. who cannot read yet.

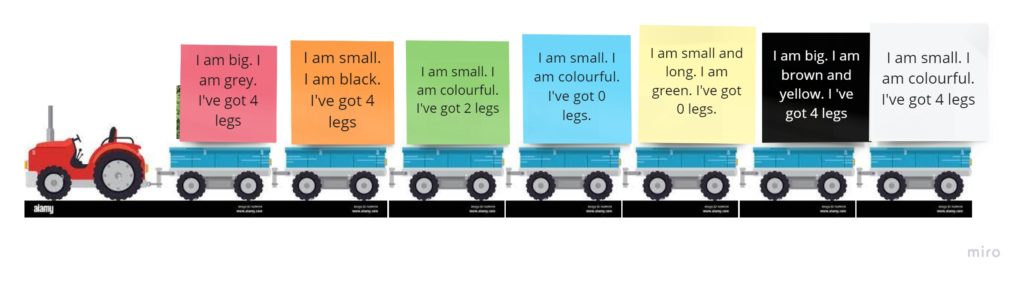
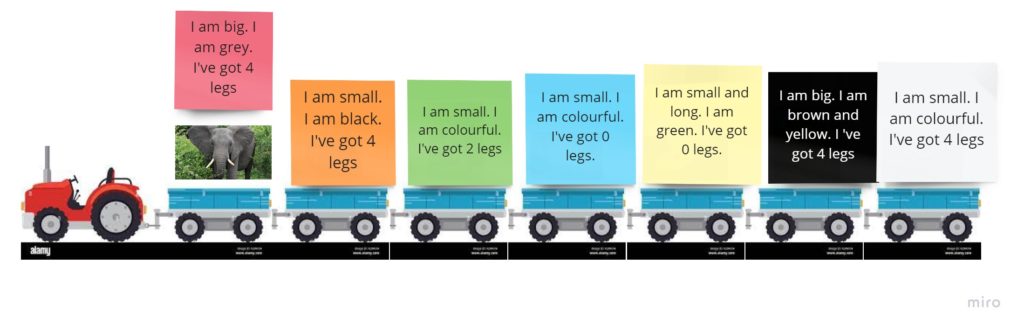
The material here, created using Miro Board, is a picture of a tractor, a set of photos of animals, and a set of colourful cards with simple descriptions of animals.

The activity is a riddles game in which the teacher reads out the definitions of the animals in the order chosen by the student. The student listens and guesses the animals which is later revealed by the teacher.

The aim is to practise listening skills, to develop the ability to focus and to practise the names of animals. In the long run, this activity is used also to prepare the student to start producing similar riddles about a chosen animal.

Now, the next step will be the three follow-up posts devoted to resources whose existance started from finding a new material, coming up with a new game or with a very specific aim for the lesson. Don’t forget to check them out!

Happy teaching!

*) This is one amazing slogan that belongs to Sainsbury’s, the chain of supermarkets in the UK.

**) The material presented here was first a webinar given for teachers from all around the globe, organised by BKC Moscow in September 2022