‘Dear Sasha’ or About journaling with YLs

created with Miro

It is the middle of one heavy-duty reading for the theoretical background for my first classroom research. I am already a bit tired because it takes time for a rookie scholar (if we want to use big words, if not – just a humble MA student). The eyes are struggling, the brain is struggling, even the spine is struggling because it’s been quite a few articles on the Zone of Proximal Development since the day broke. And, sadly, not all of them exciting. Alas.

But then, somehow, I opened a piece by H. Nassaji and A.Cummings from a few years back *) and, all of a sudden, I was wide awake and excited!

Why? The article is an account of a small-scale but very interesting research based on the dialogue journals that a primary school teacher set up for one of her young students – a 6-year-old boy from an immigrant family who already spoke English at the point of their arrival in Canada but he still struggled in comparison with his peers at school. The journals were a supplementary homework task and their main aim was an opportunity to develop the child’s literacy skills, catered to his immediate needs. The article is fascinating account of the nature of the Zone of Proximal Development and how it was changing in relation to the child developing langauge skills. Highly recommened!

This is how my researcher’s brain reacted. My teacher’s brain only sighed ‘I WANT ONE OF THOSE!’

And I got one. It’s been three years now and this is one of my favourite teaching projects. This is how we do it.

Ingredients

The main aim of this project is the development of young learners’ literacy skills, reading and writing. I normally start this project with my Starters students (that is the children who have finished the YLE Starters level and are about to start preparing for Movers, or, in other words, are at the start of the A1 level). The reasoning behind that timing is the fact that, most of the time, children can deal with simple tests, write single words or simple sentences within a specific structure (from among those that they are familiar with such as I like, I’ve got, I can) but cannot be considered to be fluent readers or independent writers. Not yet, anyway, but keeping the journal is definitely going to help them become these.

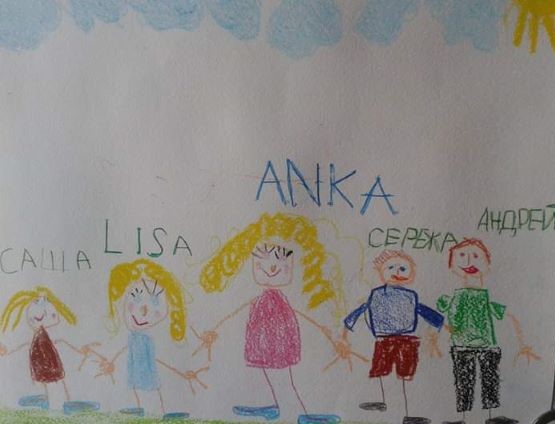
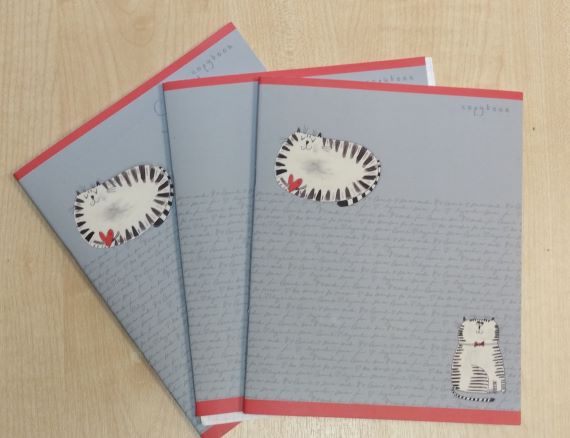
The journals are kept in simple notebooks which I buy for my students. I do not really introduce the idea to the students, apart from a short note, in the kids’ L1, glued into the notebook in which the journal introduces itself. It goes, more or less, like that: Hello! I am your new project – a journal! Please open me, read the notes from Anka and, if you want, write something and bring it back when you are ready! Anka will read it and write something to you!

This time round, since we are all on whatsapp, it was also followed-up by a note to parents which explained in more detail what it is and how I would like to run it.

In each notebook, on the first page, there was the first entry, from me. All of them consisted of only a few lines and said:

Hello student!

How are you? What’s your favourite subject / food / sport / colour / toy?

Write to me!

Anka

Procedures

Everything is super simple and straightforward: I give out notebooks, kids take them home, read, reply and bring them back. Then I take them home, read their notes and reply. Afterwards, I take photos of all the entries to keep the record, to be able to reflect on their progress and to save all the data. After all, travelling notebooks are in a grave danger of getting lost in-between the school and the house.

I do not correct any mistakes in the notebooks themselves, not to discourage the kids and not to destroy their entries with my scribbles. Instead, I focus on the delayed error correction and on the extensive input and additional practice based on the mistakes I spot.

It is very important to highlight that I really do not want the journals to become an additonal homework task. The kids are supposed to take part voluntarily and as frequently as they are ready to. In our everyday lesson procedures, whenever we check our regular homework, I also ask ‘Have you got the addional homework?’. I do not keep track of who brought what and when. There are no marks or points involved.

That means that each child is in charge of the journal and of how involved they want to be, they can write a little or a lot, they can write every week or every two weeks, they can draw or not. And, last but not least, they can opt out of being involved altogether.

Reflection

The journals are an amazing opportunity for the kids to develop literacy skills outside of the classroom. Each entry means additional opportunity to read a bit and to write a bit.

All of the entries are highly personalised and unique. The conversations that started from the same ‘What’s your favourite…?’ have taken different routes and turned into conversations about hobbies, families, books, food, sports and pets. Some of them are accompanied by drawings, some of them turned into scrapbooks that both the teacher and the student contribute to. What is more, although there is some scaffolding (ie the questions asked by the teacher), the students have a lot of freedom as regards the topic, the vocabulary and the structures that they want and will use.

They are perfectly suited to the needs of a mixed ability group. I have students who take time to read and to plan what they want to write and later to produce an entry for two pages. I have students who write only one sentence answer and their own question. I had students in the past from whom, at one point, it was easy to supplement the text with simple drawings in order to limit the number of words that they had to write but I was and I am extremely grateful and excited about any, even the smallest contribution.

Regardless of the volume of the text, it is obvious that the kids also learn from the experience as sometimes they write about the topics that are not included in our course curriculum, such as some unusual hobbies, less common although useful verbs etc, and this makes them look up the words in dictionaries which proves that the project also works towards expanding their vocabulary.

What is more, it has been obvious from the very beginning (with different groups) that the students really do enjoy taking part in this project to the point that at one point it even interrupted our classroom routine. As soon as I would give out the journals back to their owners, the kids would grab them, open them and start reading, completely engrossed in it and not paying attention to what was happening in the classroom. Did it upset me? Of course not! I know the feeling – when the book that you are reading is so interesting and so good that you don’t want to put it away. Only this time, it was not a book but our journal and our conversations. I was happy. But I had play with the routine a little bit – on some days I check the homework at the end of the lesson and on some days, we check the homework in two stages, first the homework for all and the journals at the end of the lesson only, depending on the day.

One more lesson learnt is that Kids Can! I am all for challenging the students and hoovering on the outskirts of the ZPD, stretching it gently and carefully but stretching it nonetheless, but since I started this project I have been surprised, time after time. For me, for a long time the main indicator of the students’ writing skills has been the YLE Cambridge tasks and writing assessment scales. While I still consider these to be relevant and useful, thanks to this experience, I was able to see that children, even at the age of 7 and on the level of A1 are capable of a lot more. If given a chance to produce and if the conditions are perfect.

Sample aka a few quotes

‘I’m happy because big holidays.’

‘My favourite food is pasta. I don’t like pasta’

‘My favourite toy is Lego. I like making cars, houses from Lego. I like teddy bears, too. What’s your hobby?’

‘I like to draw magic animals.’

‘I can cook, a little.’

‘I have got many, many, many toys.’

‘I love sharks because they are big and interesting’.

‘My favourite city is Moscow because Moscow is very good and has a lot of big houses.’

The beginning of a beautiful adventure

As I have mentioned above, I have been journaling for three years now, with groups and with individual students, primary and a bit older, too. It has been so successful that I started to use journals in the other areas of teaching and teacher training. More on that soon!

What about the students who don’t want to take part? Nothing. It is their choice and I have respect it. After all, I am this girl who has kept journals since since she was 13 (yes, there are still a few notebooks in my parents’ house, filled up with words, sketches and memories) but not everyone might like writing. Instead, I will encourage, I will praise and I will be completely over the moon when a journal comes back but that’s it. And I will be happy when they do their regular homework and I will absolutely melt when a five-year-old sister of my student also attempts a letter, inspired by our exchanges.

So, how about a journal for your students?

My youth in journals)

Happy teaching!

*) H. Nassaji and A. Cummings (2000), What’s in a ZPD? A case of a young ESL student and teacher interacting through dialogue journals, Language Teaching Research, 4 (2), p. 95 – 121.

Crumbs #12 In my little house: A craft activity for one hundred occasions.

If I had to choose only one craft activity for all my classes, a proper all-rounder, for the younger and for the older, to serve a hundred purposes – that is the one!

Welcome to my little house!

First of all, I really did try hard, very hard to remember where and when I learnt how to make it and how to use it and who taught me and I can’t. I don’t know. For sure, it was Moscow, definitely my first year here but who and how? No idea. The only thing that I can do now is to say ‘Thank you!’ to this forgotten and now anonymous benefactor. I am, indeed, much obliged. Now, I am sharing.

Instructions

  • Two pieces of paper per student / house. In the samples in the photos I have used A4 but in the classroom, with my kids I tend to use both A3 and A4, depending on the main aim. If we are just glueing things, A4 works just fine. If we draw – A3 is bigger and offers more room for the kids’ drawings.
  • Fold the house. It is pretty easy and you can watch this video here, from Inner Child Fun to see how it is made. Emily is using origami paper but a regular A3 or A4 will work just fine!
  • Important: I normally do it myself, for all my students because even adults (like my trainees) might not be very good at origami-like activities and the house, although it is relatively simple, it does require some precision and if it is not applied, it is not going to look very well, unfortunately. Preschoolers will not be able to fold it and when I once tried with my primary school kids, I immediately began to regret it because some of them took the responsibility of the taks too seriously and were getting very nervous, predicting that they might not be skilled enough to manage the task. They did, in the end, with a lot of encouragement but I think it is just not worth it. We can still teach them how to do it, for them to practise and play at home but if you think of the lesson itself, the timing and the aims – just not worth it.
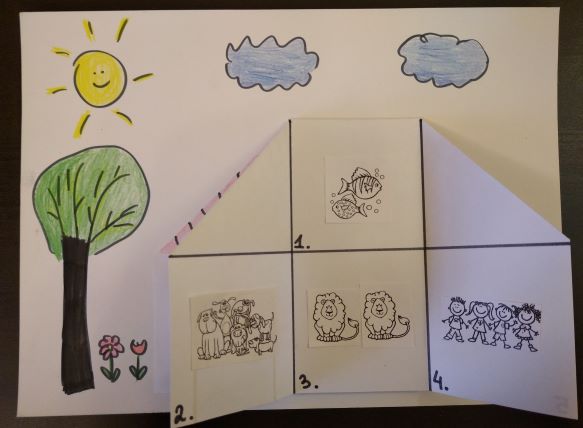
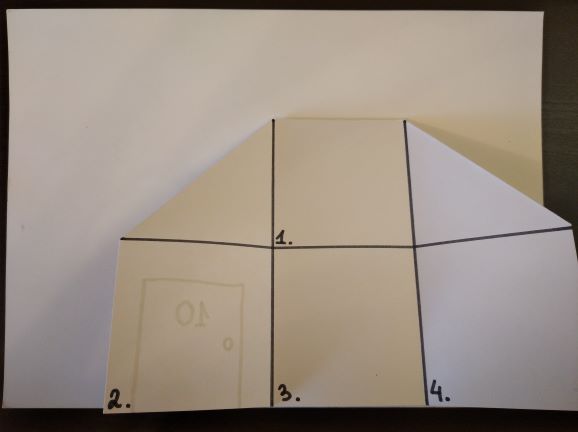
  • In my case, depending on the aim of the particular house (see below, there are plenty of options), I make one house myself, as a template, hand-drawn or using clip art images, and then I photocopy it to fold for each student. The advantage of it is that you can put in your house whatever you want. The basic design involves only the lines inside the house and the division into rooms, with numbers. That helps during the activities because you can ask your students ‘Go to room number 1’ and this way you make sure that everyone is on the ball and that they don’t glue pictures wherever they should not, for example, on the lines as that would get in the way of the house closing and opening.
  • Also, before the lesson, I glue the houses onto the garden page. This is especially useful in the case of the pre-primary students and in the case of those of my primary kids who have not done the activity before. Being glued on, the house is not as easy (although not impossible) to be dismantled and unfolded and it is just easier to manipulate in class.
  • I start with demonstrating my house, with all the theatre that I can muster. We look at it, we knock at the door, we open it and look inside. This can be done on the carpet or with the kids gathered around you so that everyone can see all the details.
  • I give out the houses and we start with drawing the door and writing the number (ask talking about them) and then drawing the windows (and talking about them). Make sure that all the students are more or less in the same place here. I normally only give out one colour per child (although they can ask for a different colour for the door and a different colour for the windows) or, with the older kids, with a pencil only. They will want their houses to be really pretty so erasing might be necessary and I really don’t want to waste time on colouring, this can be done at home.
  • The main task usually involves glueing things in different rooms, for example pets. For that, I prepare small pictures of all the pets, one set per child, on a tray (or whatever works as a tray) and a poster to put up, for everyone to see all the options. We start with room number 1 and I say, ‘Go to room number 1’. ‘I can see a cat (in my room number 1)’ after which I glue there the small picture of a cat. Then, the kids take turns and make similar sentences choosing their own animal from the set. They only receive a picture to glue after they make their sentences. When everyone is ready with room 1, we show our pictures, we say ‘I’m ready’ and move on to room number 2. And so on.
  • In the end, if there is time, we draw the sun, the tree and the flowers in the garden and we colour the house for homework. Also, if there are any leftover animals, these can be given out to glue at home (although, yes, that involves some more complex logistics, paperclips, small envelopes, not impossible though).
  • In the following lesson, we look at our houses and describe the rooms, the colours etc.
  • Variations: there are many of these. The house can be anything you want it to be. Here are some of my favourite ones:
  • Any set of vocabulary and almost any set of stucture, starting with ‘I can see’ and ‘I’ve got’, with some less obvious ones like the pictures of activities to practise Present Continous (‘I’m jumping in the kitchen’) or even words or word cards with the Past Tense forms which can be used later to tell stories for example ‘A strange Sunday’ (‘My brother slept in the garden’, ‘My dad danced in the kitchen’ etc)
  • Halloween or Christmas house – with the characters and symbols of each holiday
  • International House (accidental) – each room is a country represented by its flag and some symbole, these are drawn or glued, for older children
  • Rooms of the house – template is prepared with some furniture typical of each room, students can place pets in rooms (‘Where is the cat?’ ‘It is in the bedroom’) or family members (‘Where is mum?’ ‘She is in the living room’), add small objects to each room (‘Where is the lamp?’ ‘It is in the kitchen’, it is best to choose things that could be in any room such as lamps, pictures, chairs, rugs) and this version can be also further extented (‘Where is the lamp?’ ‘It is in the kitchen. It is on the cupboard’). The older kids can also draw these, making a regular or a silly house, too.
  • Secret Room – this was a follow-up activity in which I used the template which I drew with one empty box (empty, only because I could not, for the life of me, draw anything resembling a dining room). We did one of the activities mentioned above but the last room was to be drawn at home and it could be anything – a space room, a swimming pool, a library, an ocean zoom, a pirate room…
  • Where are you? – a template with the rooms, pre-prepared, each student gets a set of the leftover stickers or small cards, they put them somewhere in the house, in secret and afterwards they guess where their objects are. It can be used to practise simple prepositions and the rooms (‘Is it in the kitchen?’) or more complex ones (‘Is it in the living room?’ ‘Yes’ ‘Is it on the sofa / behind the chair?’etc)
  • Put your penguin in the living room on the sofa – a template with the rooms, pre-prepared and a set of stickers or small cards. The kids dictate to each other where to glue them, again, it can be used for simple or more complex prepositions, to get the kids ready for the Starters speaking exams. Later on, we compare our houses.

Why we love it

  • It is relatively easy to make and the kids love the fact that it is a real house.
  • It can be used with any vocabulary or structures (or almost)
  • It can be used with pre-schoolers and primary
  • It has to be prepared before the lesson for all the students but it is a good time investment
  • It is at the same time a focused task to be done in class and a homework task. The homework can involve only colouring and decorating it, talking about it in class but a writing task can easily be added for the older students (any template to be printed on the back of the garden, for example the focus can be such structures as there is, I can see, colours and furniture, my favourite room etc
  • It encourages the students to produce the langauge and it is easy to stage since you go from room to room
  • Lots of opportunities for adaptation, even if you repeat it with the same group. Every single time, it will be a different house.

Happy teaching!

Epic fail! or We make mistakes to learn #3

The rebellion at the age of 7

There were twelve of them, year one. I would come to their school, to teach them for 30 minutes, four times a week, during their siesta break, after they had had their lunch at the school canteen and while their friends and peers were running wild during the remaining part of the break.

Probably, the problems were partly rooted in that very set-up because sometimes the kids were waiting for me in the classroom but sometimes, I had to take them off the playground, interrupting the game and replacing their doing nothing time with yet another lesson, no matter how good, already in a difficult position. This, of course, was something that I had no impact on and could do nothing about it. That was the set-up and that’s what I did deal with.

And overall, very successfully. I loved working with these kids. We did build the routine, they were responsive and, with time, I did learn how to manage their energy and to make the lessons effective. They were the perfectest kids in the world. All went well. Too well.

The Easter Break disaster

Somehow, when we got back in April, after only a week away, everything changed. Until this day I have no idea what actually did happen and I am none the wiser despite the fact that I spent hours discussing the group with my mentor and trainer on the IH CYLT course, the YL advisor and colleagues. It was, literally, as if someone had snatched my lovely students and replaced them with a bunch of wild, rebellious kids that behaved as if the previous seven months had not happened. They just snapped. It was or it felt like a proper rebellion. Imagine a pirate ship, in the middle of the ocean, with the whole crew pretending they had never heard about you being their captain.

I mean, it does happen, especially with the younger kids and especially after a longer break. They do forget the language and the routine and you have to invest a little bit more time in re-establishing yourself in the class. Whatever did happen that year, was a complete disaster, a capital D: D-I-S-A-S-T-E-R.

The recovery

The first lesson, well, it almost did not happen, not according to the definitions of ‘a lesson’ in my dictionary. I focused on surviving. The number of students involved? Two (2): most of the time and zero (0): at times.

Getting ready for the second lesson was like preparing for a battle. I prepared a super cool craft activity, a monkey that could move legs and arms and that we would use to learn and to practice I can with different verbs. The monkey was my ferret. It got some of the kids’ attention and at that point, half of them participated and we had a better (but far from good) lesson.

Over the next few lessons, I had to bend over backwards to come up with more and more supercool-OMG-I-got-to-have-it activities and slowly, over the next two weeks, I got all the kids on board. Back on board. And we did plough through and I was lucky as there were only a few weeks left until the end of the year. Survivable. But we never got back to the state of bliss we had achieved before Easter.

As I have said already, I did discuss this case with many people and no one could offer any solutions and ideas why it would have even taken place. I still do not understand what I had done wrong and really cannot see what I could or would have done differently in the classroom in order to make it better.

But there were things that I could have done outside of the classroom. It was years ago so I am going to presume that this is why I did not think of that back then. I was at the state school, my group was in fact only a half of a class that had studied together, a class that had their own parents and a class that had their own form tutor. Today, I would have asked to talk to their class teacher to find out if there was anything at all that did happen at school but outside of the English hours that could have affected the atmosphere and the behaviour in my classes. Or, I would have asked for her or for the parents’ help to help me resolve that problem.

Lessons to take out of this nightmare?

  • You are not alone. Talk to your boss, mentor, supervisor and collagues. The kids may have other teachers, too and it is a good idea to talk to them. The kids do have parents or carers, too! You are not alone.
  • Don’t give up! It is always easier to start off the right foot than to reintroduce the law and order.

Happy teaching!

And don’t forget to read about the other epic fail stories, for example this one, here.

ALL the reasons to use a song

This post started with a line, one of those things that one says, casually, in a conversation with a teacher or at a conference. ‘There are many reasons to use a song…’ , I said and my brain, always ready for this kind of a challenge, took over. ‘How many? Can you count?’

I accepted the challenge. I have found sixty. For now:-). Not all of them are mine, of course but since this post is meant for teachers, not researchers and since I am on some kind of an academic holiday, no proper referencing. This time. All the inspiration sources and the follow-up reading below.

Now, fasten your seatbelts and let’s go! 3…2…1…

We are using songs with the primary and pre-primary EFL learners because:

  • Kids like them
  • They are a part of the kids’ world, regardless of the language.
  • They help to reduce stress.
  • Songs create a positive atmosphere.
  • They can help set the context of the lesson.
  • The kids don’t care if the teacher does not have a really beautiful voice but they care about a teacher who does not really sing.
  • Singing and music are present in many areas of our everyday life.
  • They can be used differently, depending on the day and how the children feel – to calm them down, to cheer them up, to wake them up.
  • They can be used to develop motor skills, gross motor skills (jumping, dancing, skipping) and fine motor skills (finger play).
  • They lead to personalisation for example by choosing favourite songs and expressing opinion on songs.

  • Using different types of music develops children’s musical taste.
  • They provide the exposure to the target language.
  • They help to remember the vocabulary and structures
  • They help with pronunciation, rhythm and intonation.
  • And with the early literacy development, by developing the ear, rhymes recognition.
  • They use a natural language
  • The traditional rhymes, chants and songs carry the culture of the country.
  • Songs are an opportunity for expression.
  • They help memory development.
  • Singing games usually involve a group or a team and so they help to develop social skills.

  • They can be used to develop turn-taking and other social skills.
  • They can help the kids to settle in the lesson and in the L2 environment.
  • It is something that we do together, it helps to unite the kids after they have taken part in pair-work, team work or individual activities.
  • They are a nice change of pace in the lesson, a punctuation mark.
  • They are an easy-to-use stirrer.
  • They are an easy-to-use settler.
  • They give the lesson a frame (Hello song, How are you chant, Did you do your homework chant, storytime song, table time).
  • They help the kids to move from one stage of the lesson to the other.
  • They help to create a community.
  • They help to take the language out of the classroom. The kids can sing the songs at home, in the car, on holiday.

  • They are one of the few tools that help to involve a variety of learning channels: auditory (because we listen and we say), visual (because we can use flashcards to help kids remember the lyrics) and kinesthetic (because every song can be and should be accompanied by gestures)
  • Thanks to music they remember the language better
  • They are the first step language production; a song is basically a lot of discourse with some music.
  • They are great for beginners, children can participate in a song, even if only through the gestures.
  • They are great for shy students; singing is not scary if you do it in a crowd.
  • They help to create routine and balance the ration of the new (material, songs, activities) and the familiar (all the favourite songs).
  • Kids learn how to make decisions – choosing which song to sing next.
  • They can be used as an activity timer (you have one song to finish colouring)
  • Songs often tell a story this way creating the context for the language.
  • They can be used to introduce new vocabulary and structures.

  • They are great for recycling vocabulary.
  • They can be used as background music during craft activities, to encourage the kids to sing rather than just chat in L1.
  • Songs and chants can be used to give instructions.
  • They can be used during any stage of the lesson.
  • They can be used to get the students’ attention.
  • They are easy to use and do not require a lot of preparation.
  • There are plenty of songs to choose from.
  • It is easy to make up your song or chant that can be used for one specific reason.
  • They contribute to the variety of resources used in the lesson.
  • They can contribute to the development of the cognitive skills, such as attention and focus.

  • Children learn to take responsibility for the lesson and to lead by choosing the songs to sing.
  • Songs can lead to creativity in the language. Once the song become familiar, they can be the stepping stone to creating own versions of them.
  • They can ‘just be sung’ or they can become the theme of the lesson, if accompanied by the vocabulary introduction, craft, story.
  • Singing a song can be a reward for good behaviour or special achievement.
  • Some songs can contribute to learning other subjects such as art, maths, science etc.
  • Parents like when their children sing so songs might be used during parents’ days, end-of-year performances.
  • They help to motivate the kids to learn the language.
  • They give the kids the sense of achievement, as even after a few lessons, they can feel like the speak the language, because they can sing the songs or recite a rhyme.
  • Learning through songs is fun and memorable.
  • Because, finally, adults, also get an excuse to sing!

It looks like, for now at least, all the reasons to use a song = 60 reasons to use a song. If you have any more ideas to add to this list, please let me know in the comments!

And may the VYL and YL classrooms be alive with the sound of music, like this or like this!

If you want to learn how to move from singing a song to a discourse, have a look at the earlier article on How to un-sing a song.

If you are new to teaching and you are not sure where to start

Happy teaching!

#*#*#*#*#*#*#*#*#*#*#*#*#*#

References

Jo Budden, 2009, British Council Blog, Using music and songs

Alex Case (2019) Why and how to use songs with young children,

Alex Case (2008) 15 Criteria for a good kindergarten English song

Children and music: Benefits of Music in Child Development, Bright Horizons,

Sue Clarke, Kids and songs,

Yvette Coyle and Remei Gomez Garcia (2014), Using songs to enhance L2 vocabulary acquisition in preschool children, ELT Journal, 68/3

Nihada Delibelovic Dzanic, Alisa Peijic, The effect of using songs on young learners and their motivation for learning English, 2016, NETSOL, An Interdisciplinary Journal, 1 (2),

Dovlatova, M. 2015, the role of songs in learning English, Young Scientist, 10 (90),

ESL songs for kids and teens (2019),

Opal Dunn (2012), Introducing English to Young Children: Spoken Language, Harper Collins Publications

Larry M Lynch, 9 reasons why you should use songs to teach EFL

Lin Marsh, Why song and dance are essential for children’s development, 2015

Carmen Fonseca Mora (2000), Foreign Language Acquisition and memory singing, ELT Journal, 54/2, p. 146 – 152

Sandie Mourao, Gail Ellis, Teaching English To pre-primary children, Delta Publishing

Carol Read (2007), 500 Activities for the primary classroom, Macmillan books for teachers.

Devon Thagard, 2011, Why the songs should be used more in the Young Learners classroom

Elaine Winter, Why Music Matters in the early childhood classroom, 2017

Crumbs #7: Line up, everybody!

Today about a little and very un-revolutionary change in the routine that has, nonetheless, made a huge difference to my VYL and YL classes.

Instructions

  • Make sure the door to your classroom is closed and that the children wait for the lesson outside.
  • When it is the time to start, come out and line them up, perhaps with the parents’ help in the beginning, until they get used to the new routine
  • Wait for them to be ready, say hello to everyone and count together how many students are present
  • Say hello to the first student, ask how they are, let them into the classroom, wait until they book the books and bags away, choose their seat and sit down.
  • Let the second student in.
  • If setting homework is a part of your routine and programme, this is when you can check the homework, asking each student a few questions about it.
  • If there is no homework, this time can be devoted to a short individual conversation with each student. It can be a short revision of the vocabulary, talking about a picture or, if the students are already in one of the primary levels – some reading practice with flashcards or a few questions about any material covered in class. We often use it for practice with ‘Tell me about…’ with the use of a picture.
  • When the students get used to the first part (entering the room), you can add the second element and make sure that the students already sitting in the classroom are occupied, too. They can either play a simple guessing game if this game has been practised in class and if they have been given a set of flashcards. They can also play some games on the phone or the tablet, for example to practise reading with phonics. Again, they have to first to try it under your close supervision, to get used to taking turns etc.

Why we love it

  • It helps to introduce the order from the very start of the lesson since the kids are not waiting in the classroom and the teacher’s arrival is not an interruption of something that they are doing.
  • It is obvious who is responsible for the students during that time, the teacher’s take-over is clearly marked. It might not be as obvious if the kids enter the room during the break or before the teacher, especially if the teacher wants or has to spend the break time outside of the classroom, for whatever the reason.
  • The parents are of a great help in the beginning of the course, they can help explain what the kids are supposed to do, they can help with the name etc.
  • This part of the lesson is a fantastic opportunity for the 1-1 conversation with each child. Regardless of whether the teacher uses this time to check the homework or to ask and answer questions or to read, they are giving each child all their attention (almost all, the eyes at the back of the teacher’s head are watching the kids already in the room, of course:-) and they can check the progress and language use.
  • For the parents, this is a wonderful opportunity to find out how their children are interacting in English, without the parents’ supervision and this is how they can, indirectly find out about their child’s progress, before every single lesson if they wish to do so.
  • For the parents, this is also a chance to find out how the homework handouts or materials are used, what questions the teacher asks and how much language can be generated out of a page that, to the untrained eye, looks like a simple colouring page. If they want to and they have have the time, they can later use this knowledge to practise English at home.
  • In the beginning, when the children are just getting used to the new routine or if they are really young, this part of the lesson can be kept short, later it can be made longer. Similarly, in the begining, the T leads the activity but, later on, the kids can ask each other at least some of the questions, too.
  • I have been using this technique for about six years now. My first ever group for which this has been created (because there were ten of them and we hardly ever got to talk 1-1 in class), now in the third year of primary, still line up to chat with me on entering the room. I have been using it with my pre-primary students, too, groups and individuals, too. The parents always wait in the hallway, at the back of the line and they always wait to hear how their children talk to me. If they leave the school, it is only after their kids have walked into the classroom. They always wait and not because they don’t trust us/me but because they are curious and want to know how it goes.

Happy teaching!