I am begging you, please! Introducing pairwork in YL groups

Introduction

Can you hear some desperation, dear reader, in the title of this post? Rightly so. I started to write this post after one of the sessions of the summer camp that I took part in. My kids were amazing, of course, clever and eager to learn and, really, we did have a lot of fun. At the same time, looking at how they interact with each other, I could not believe my eyes and my ears. Despite the fact that many of them were already eight and nine, their social skills were on a disastrously low level. Practically anything that involved taking the other humans in the classroom into equation was a huge challenge for way too many of them. I did sigh with desperation, once and twice, and then I rolled up my sleeves and started to introduce pairwork, even though these were not my permanent students.

You may wonder why it shook me so much and why I decided to fix it. One reason is, naturally, my professional obsession with maximising production in kids and, really, I cannot imagine teaching a group of primary school children with the teacher at the centre, all the time. It is a waste of time and a waste of opportunities because kids of that age are capable of working in pairs without constant supervision. And if they do, they automatically produce more language.

However, there is more to it, of course because kids who work in pairs are more independent and more autonomous as learners and they have an opportunity to work with a variety of partners and to make friends and to bond with the group. This, in turns, is a better prognosis for the general classroom and behaviour management because you are less likely to get into trouble and to disrespect someone that you actually like and respect. If only you had a chance to get to know them and to like something about them.

Pairwork, yes or no? YES. One, big, decisive YES.

Where the angels don’t fear to tread. Pair-work in pre-school?

Yes, absolutely yes! I have been introducing pairwork in my pre-school groups first intuitively, simply because I had a very big group of children and we never got to produce any language apart from choral, whole class production and that simply was annoying for me, as the teacher. My students had a lot of potential and I did not want to waste an opportunity. Not quite knowing what to do and how to do it, I started to move towards working in pairs. It worked and by the end of the second year of pre-school, my group was ready and I was able to do what I do with my teens or adults: ‘Together, together, together’ while pointing at pairs of students. By the time we got to primary, this was a natural part of our lessons and some of the children were not even seven at this point. It is possible.

Then, naturally, I decided to do it again, with a new year 1 group, but this time, in a more conscious way, in order to be able to share it with my teachers. We started the course in September, we started to shape the group and the routine and we started to introduce pair-work. I kept my eyes open, I kept our class journal and we did it. It took 13 weeks of a course, with classes that took place only once a week. I presented the results of this research at our BKC Conference in 2020. and you can read more about it in a post here.

How to do it: The choice of the activity

The choice of the activity is one of the most important elements contributing to the success of the whole process. I got a heads-up here only because I have been teaching for many years and I had a chance to bump into one of the older coursebooks for kids which, although it had a few disadvantage and which does not even come close to the level of the currently used coursebooks for children, it did include a few ingenious solutions and, among them, the one I am going to describe below.

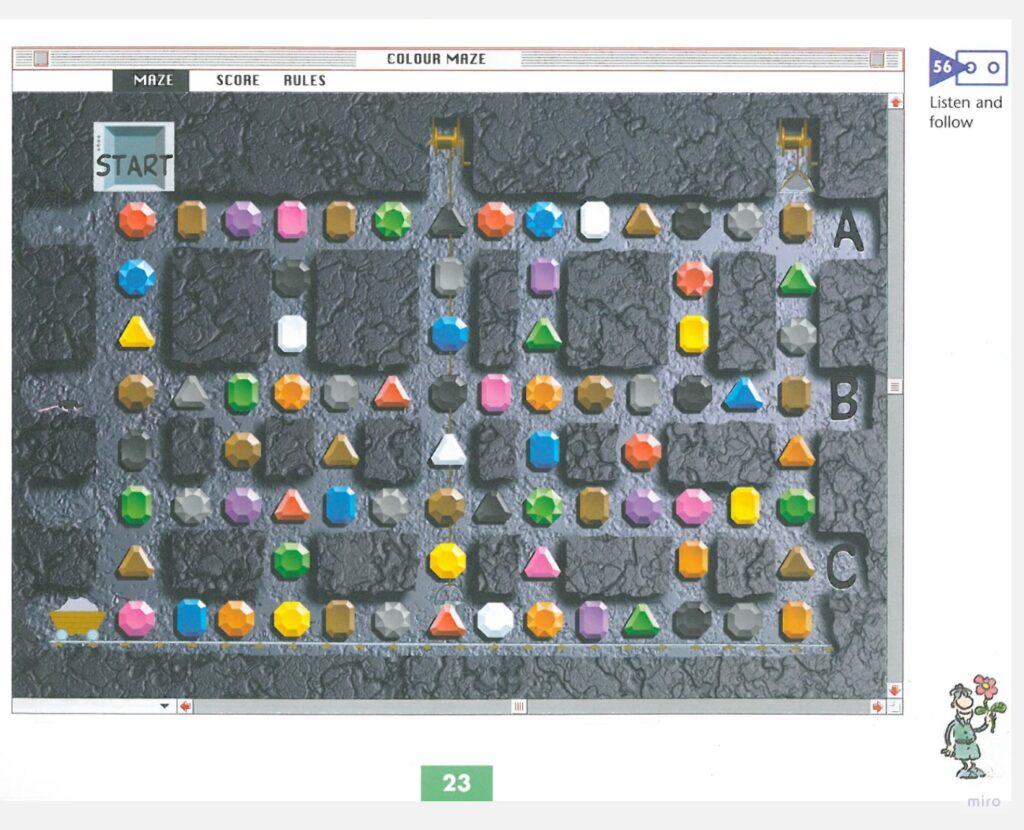
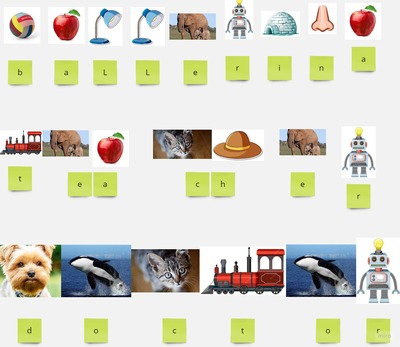
The one that featured in every unit of the coursebook was the maze the example of which you can see below. Initially, it was a simple but effective listening game, to practise the target language, especially vocabulary. Kids would listen to a robot dictating the path through the maze, for example: START: red…blue…yellow…brown…grey…etc until one of the exits, A, B or C. The words were separated by a funny sound, something that I would describe as ‘stomping by a robot, marching’ that the kids absolutely LOVED but it also gave them a great advantage of getting enough time to prepare for the following step. In every activity there were about 6 or 7 rounds of the game.

This game can be easily turned into a speaking – listening game and, eventually, into a pairwork.

It starts with the teacher NOT using the audio and dictating the route through the maze, with the kids following it and reaching the final destination. Naturally, the following step is the teacher nominating the students to decide on the following step, one word per child. This stage can go on for as long as it is necessary for the kids to become familiar with the format.

Afterwards, either still in the same unit and with the same maze or in the following unit with the new vocabulary, kids are put into small teams and they lead each other, in teams, through the maze. Eventually, they are put into pairs and they do it with only one partner, with one student speaking and the other student listening and following from the start to the exits.

In order to make it more monitorable, for the teacher and for the students and, also, to make it more achievable, we started to trace the route with coloured pencils or markers, each round with a different colour. This way, the children could always go back in case they got lost and the children can also monitor each other, the student dictating could potentially see where their friends were going.

This way, in a relatively short period of time, the kids got used to the new format, to working together, with only a partial monitoring and support from the teacher. It definitely helped that the vocabulary range in each case was quite limited, namely, only single words, from the obligatory set of words introduced and practised before. The students were not overwhelmed and could focus only on the format of the game. At the same time, however, in the later units of level 2, there were also more complex mazes, for example one in which the kids had to listen to a brief description of an animal for example: it has got stripes, it is big, it can run (zebra). Obviously, that means that the level of challenge can be raised when the children are ready for it.

Julie Ashworth and John Clarke, I Spy 1, SB, p. 23, OUP

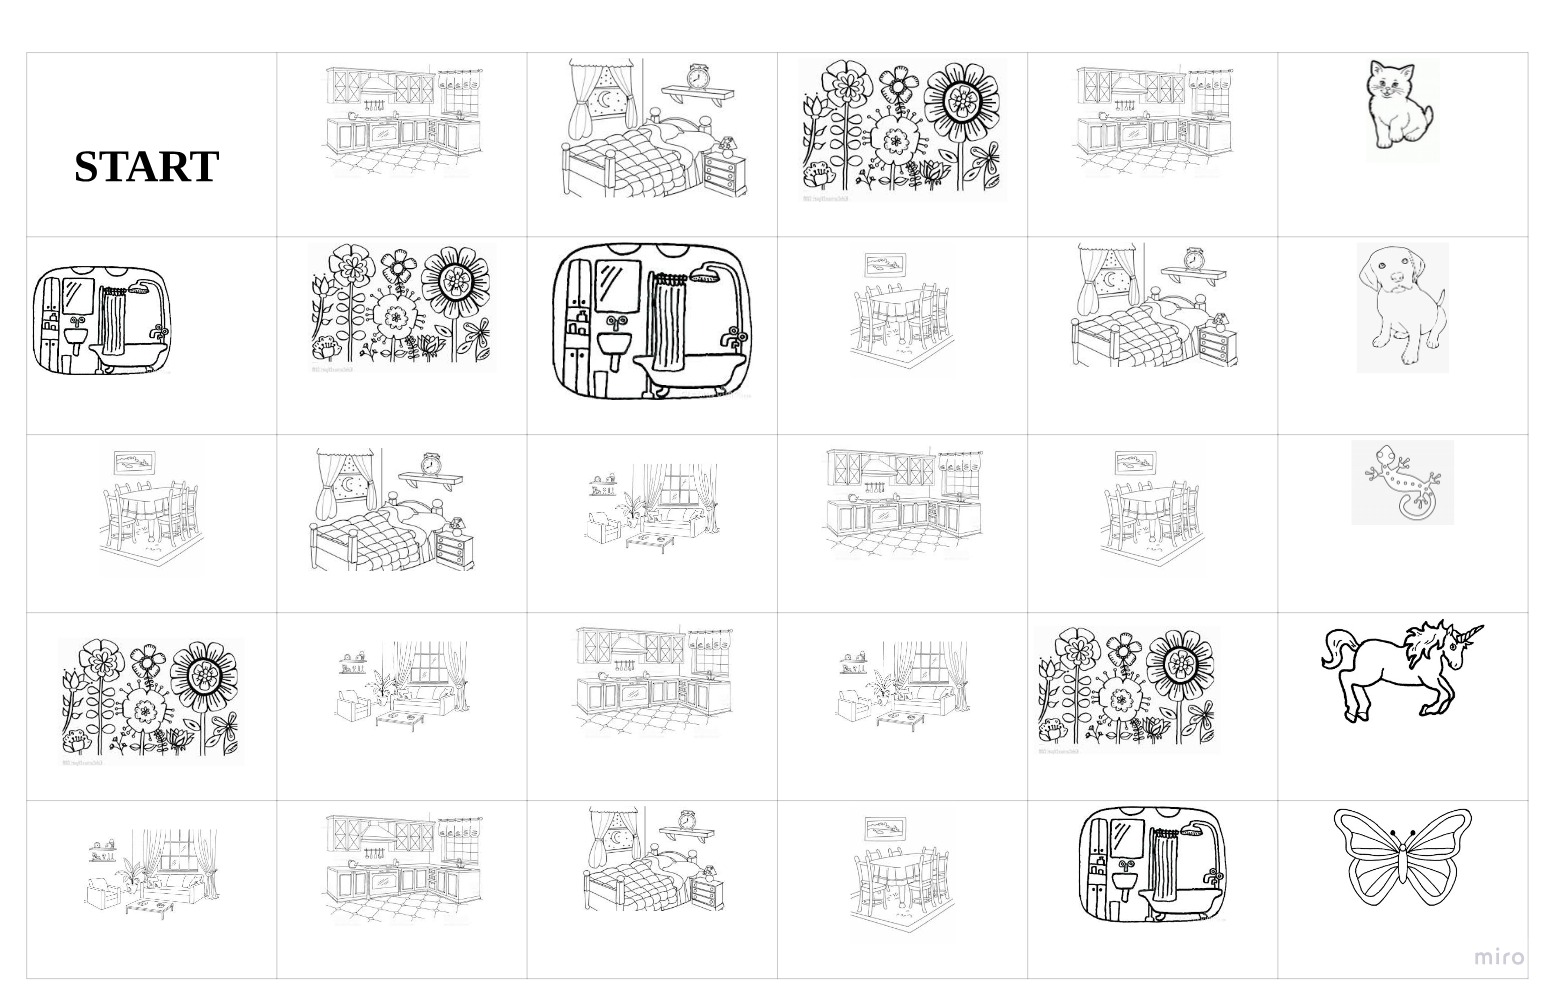
It is very easy to recreate the idea using only the black and white clipart visuals and a grid of the required size. Here you see a maze that I created for my preschoolers (rooms).

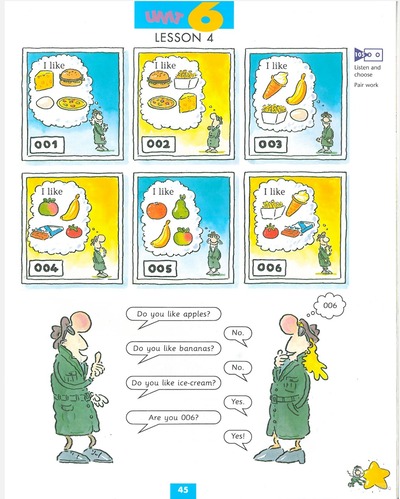
Below you can see one more type of an activity that features almost in every unit of the coursebook and this one is specifically designed for pairwork for the young students. It was always some kind of a guessing game, with the two spies (the theme of the book, duh:-) trying to guess what the other one is thinking about. I really liked it for the visuals specifically designed for that purpose and the target langauge beautifully displayed on the page to support the students’ production. Using these was a lot of fun and it was effective but I still think that the previous one, the maze, worked better as regards the first steps in working in pairs.

Julie Ashworth and John Clarke, I Spy 1, SB, p. 45, OUP

Contributing factors

There is a whole lot of things that a teacher can do in class in order to facilitate the whole process. They can be implemented throughout the course, little by little, bit by bit.

  • Seating: make sure that the kids are sitting in a way that faciliates pair-work, in some sort of separation from the other pairs, for example by pairing up the tables and chairs, putting the chairs and kids facing each other.
  • Resources: these need to be prepared with a lot of care and attention. Apart from the example based on the activity that features in the I Spy coursebooks, described above, the teacher can also use a set of mini-flashcards, as described in my post about pair-work for preschoolers. These cards are used in a game of simple riddles but the cards themselves are small (eight or six or four that fit on an A4 piece of paper) in order for the kids to be able to manipulate them with ease. What is more, a set comprises of an envelope, too that holds all the cards. This way, there is no danger of kids dropping the cards (or if they do, these will fall back into the envelope) and the secret, very necessary in that game, is easily kept throughout the game. Even if the cards are printed on a regular photocopying paper, they are not see-through, being in the envelope.
  • Roles and turn-taking: Another thing is that the teacher only needs one envelope per pair. This helps a lot with assigning the role. It is crystal clear to the kids who is speaking (the child with the envelope) and who is listening (the child without the envelope). Turn-taking is also more obvious since the kids are literally passing the baton here, the envelope or whatever is the set of materials.
  • Signals: Introducing the pairwork is a part of the routine and, naturally, it will take some time. To facilitate it, like with the other elements of the class routine in primary and pre-primary, it would be good to include some visual representation of the pairwork, such as gestures or chants, anything that will signal to the students what is about to be the following stage of the lesson. It can be for example a simple flashcard. I love to use a flashcard with a pair of socks for the younger kids and a two pears for the older kids who can get this pronunciation joke but a picture of two kids talking will do, too. Some more modern coursebooks have started to introduce those and that is great). Another solution can be a simple chant, for example ‘Let’s play together! Let’s play in pairs! 3…2…1’. As with all the chants, this will introduce the next stage and it will give the kids a chance to get ready or maybe even to organise themselves. The same applies to the end of the pairwork stage.
  • Pairing-up: In the early stages, I would recommend a teacher-led pairing up. It is perfectly natural that in a group of children, there will be some students who will be better prepared to work in pairs early and some who will need to more time, even if all the students are of the same age or level. Based on the knowledge of the group and the individual children to end up with the most efficient pairing. This might be necessary to do over a few first lessons, later starting to experiment with some variations. I like to use a set of cards with all the kids’ names and we have a pairwork (or project) draft when we need it. The cards can be taken out of a box or a bag by the teacher or by students, too.
  • Time: Thil will of course, depend on an activity but choosing an open-ended game, without an obvious grand-finale gives the teacher more freedom and flexibility to finish the game when it is best for the class, rather than having to go until the very end when some of the kids might already be getting tired and bore and when they can start losing their focus. It might be a good idea to set a timer on the phone or to choose a song as a timing tool. It is very necessary to tell the kids how long they will play for.

Happy teaching!!!

Bibliography

The Power of Play: How Fun and Games Help Children Thrive – HealthyChildren.org

3 Ways Your Child Builds Important Life Skills Through Play – HealthyChildren.org

Why children need to play with their friends as soon as they can (theconversation.com)

Playing Well with Peers Means Better Mental Health (verywellmind.com)

What a difference a teacher makes! A post for all the novice teachers

The beautiful tiles shown to us by engineer-history.ru

We are approaching a new academic year, new groups, new kids, new beginnings. What a happy coincidence that it is right now that I found this particular report and got to reminisce about this particular lesson that I observed many (many) years ago. Here is my start-of-the-new-academic-year post!

A quote from the report

‘It was a pleasure to watch you with that class and you have no idea what difference it makes to have a teacher who actually feels at ease in a PW class and who wants to be there. The kids can sense it and respond to it. There were many great activities and clear evidence of routine and good classroom management. Well done!’

And it was a memorable lesson for a number of reasons…

The were two teachers working at one of the branches of my school. One of them got in touch asking for help. One of her groups was a group of pre-schoolers and it wasn’t going very well. She went through the initial orientation and lesson planning with a senior teacher but, somehow, as it sometimes happens, it was not coming together. She requested to be taken off the group. It was an option that was being considered but, we wanted to see first if there was anything to be done and I went to observe the group.

Admittedly, it was not the easiest group. It was quite big, by our standards, filled up to the maximum (we had 8 as the maximum number), the kids were beginners but as it sometimes happens in language schools there were of different ages, there was a four-year-old and two six-year-olds and one of the children was also dealing with some attention disorder (according to what I could observe in one lesson).

It was not the best lesson. The teacher was trying, doing her best but, at heart, she must have already decided that this is not something that she wants to do and it was obvious, to the observer and, apparently, to the kids, too.

Two weeks and three lessons later, this group had a different teacher…

And that’s because we were lucky. During one of our training sessions, I literally bumped into the teacher and, in the hallway, in-between the training sessions, snacks and coffee, she asked me if I know of any ‘homeless’ group of pre-schoolers because she said, she would really really start teaching one. She had never done that.

And although I try to avoid doing it, this one time, I found myself observing the teacher in her first lesson with a group. I was sitting at the back of the classroom, with a piece of paper, taking notes and I could not believe my own eyes. Literally.

There must have been some magic done, some spells cast or, during these few days between the two lessons and the two teachers, these kids were tranformed into focused, well-behaved, engaged pre-schoolers! There were a different group of kids.

Everyone came, the older and the younger and the suspected ADHD, a full house! The teacher got some information about the group and the course from the previous teacher, she had some time to prepare. The teacher did her best to follow the routine of the pre-school groups that we had at the school and to manage the class. Nonetheless, it was her first lesson ever, with this group and with this age group.

Great teachers are made, not born and it was not her best lesson and it could not have been. She was just starting with the group, she was still at the stage of memorising the kids’ names and faces and yet, it was a good lesson. Not so much because of the appropriate tasks, instructions, staging and materials but because the teacher wanted to be in the classroom and, somehow, the kids knew it and they appreciated that and, as a result, they responded well to whatever it was that she brought with her. Everything else, the great results, the pleasure and the Above Standard lessons came later.

Why it is good news for all the teachers starting with a new group / level / age group / coursebook

  • Great teachers are made, not born. Even if the beginnings are complicated, stressful and scary, things are going to get better and they are going to get better thanks to the number of minutes, hours, weeks, months and years clocked in in front of a group of students. These number of minutes has its beginnings in the very first lesson.
  • You as a teacher, you can really (really) make a difference by planning the lesson and by preparing for who and what you might encounter in the lesson. By choosing the appropriate activities, by considering the things that can go wrong, by writing the lesson plan for your primary or pre-primary students, with a lot of variety, by reading about the first primary lesson survival kit and about the first pre-primary lesson survival kit, or about all the things that I wish I had known before my first lesson in pre-primary.
  • You, as a teacher, you can really (really!) make a difference by preparing yourself mentally for the first lessons and by believing in yourself! The one piece of advice that I always give my teachers about to step into the pre-school or primary classrooms is this: SMILE! That is because a smile can get us far and further! It is not so much about maintaining your muscles pulled into a shape of a croissant but about remaining cheerful. Things might not go to plan in this first lesson but it is absolutely necessary to remember that they will get better in lesson 2, 3, 4 and 5. As it is necessary to remember that we are great teachers and we love what we do. And that we do our best. When we do our best, of course, although, I personally think that most of the teacher try to do their best, on daily basis.
  • We are all a little bit stressed and feeling uneasy before the first lessons, all of us. Even those who are experienced teachers and trainers. Sorry! It is true the levels of confidence go up and the levels of stress go down with time but it is never completely relaxed. The only difference now is that at this point I am aware of the fact that things might not be perfect but I will know how to handle it. It is not ‘Oh, no! What if…’ and more like ‘Oh, ok, bring it on.’
  • Power to you, dear teacher!

What other advice would you give to a teacher who is about to start teaching Young Learners? Leave a comment in the comments box!

Happy teaching!

Crumbs # 65 Monster Bookmarks

Ingredients

  • Colourful cardboard, some white paper, markers, scissors and glue
  • An idea to inspire you. I got mine from I Heart Crafty Things and if you are interested you can even find a template there for a small price although, I, personally, did not find it necessary.

Procedures

  • Before the lesson, I prepared the paper: small pieces of paper for the eyes, a large rectangle of cardboard (for example, an A4 sheet makes 2) folded in half, smaller rectangles (aka strips of paper) cut up for the nose.
  • We had two full lessons on the topic of body parts, monsters, health problems and going to the doctor. By the time we started the craft activity, the kids had already practised using the body parts in a sentence, they had described countless monsters, they had also created a monster with in a dice drawing activity.
  • I showed the children the ready product and we described it together.
  • We started with the kids choosing the colour of the big rectangle (the body of the monster) and so did I, in order to be able to demonstrate every step.
  • We cut up one of the longer edges, 5 – 10 mm, along the whole age (the hair). Afterwards, we applied the glue inside the folded rectangle and glued the two halves together.
  • We decided how many eyes we want our monsters to have. We drew these eyes, cut them out and glued them on the monster.
  • The kids chose the colour of the paper for the nose. We drew the nose on the back and we cut it out. On the back on the nose I drew three short lines at the top, to mark the place where to apply the glue. The kids do the same and we glued the nose on the monster.
  • We finished with drawing the smile and adding some decorations.
  • We finished with introducing the monster (name, age, boy / girl, what he/she likes).

Why we like it

  • This craft was a part of the lesson that in itself was very generative, productive and creative. That is why, for the main craft activity, I wanted something that the kids could use not only to produce the language but to use outside of the lesson. That is why I started to look for ideas for bookmarks.
  • When I showed my monster in the beginning of the lesson, some of my kids went ‘Oh, monsters, I don’t like monsters’ but, somehow, they all wanted to make theirs and they got really involved, boys, girls, the younger, the older. I was happy and not so surprised (because it did happen before) that they all left the classroom almost hugging their big-nosed creations. And, once out, I heard them report to the parents, in a very animated way, what it was that we did in class.
  • The craft is relatively easy, with some simple materials, especially that the cardboard can be easily replaced with the regular paper. It did involve some before-the-lesson preparations but nothing very time-consuming and, again, the templates were not necessary at all.
  • I have already started to think of adaptations and of replacing the monster with other ideas and shapes. I have not done these yet, but I am thinking a lot about elephants and, inspired by my friend’s son, LEGO people…Once they are ready, I will definitely share here:-)

Happy teaching!

A balancing act. Non-competitive EFL games for kids

It happened way too many times…

Here is a situation that I witnessed many times during an observed lesson with young learners: a teacher and a group of kids start playing a game, for example riddles. The teacher models, then the kids take over. One student sits in front of everyone, chooses a card for the other students to guess or to identify. Kids start shouting out words, one of them gets it and the teacher takes the flashcard and hands it over to the student who shouted the correct word. The game goes on and it takes about three rounds more for one of the students to get offended / upset / angry / sad about not winning. More often or not, someone starts crying. Oups.

It is not only about losing, although, to be honest, this is a serious problem, too. Here, however, the ‘failure‘ of some kids is clearly visualised with a flashcard. Frequently, it is also very unfair because it is the faster and louder kids that get the point and these are not necessarily the kids who really know the answer. Also, there is another dilemma in a situation when two students shout out the correct answer at exactly the same point. Will the teacher tear the card into halves? No, of course not. Sigh.

That issue, frequent as it was, was always addressed during the feedback session and I am pretty sure every session on games for VYL and YL included the commandment compressed down to ‘Don’t use flashcards as reward points’. This was the bread and butter of a trainer / VYL ados.

My real shock to the system was an invitation to volunteer at Sheredar, our rehabilitation camp for children who went through serious diseases a few years back. I had a chance to go there a few times and teaching kids was an amazing experience. However, before I went, our contact and coordinator, Ksenia, said: ‘They will be one big mixed ability group but you can choose any topic you want. Actually, do whatever, just don’t play any competitive games. These kids have fought enough’. It took me about a minute to understand that I have no games to play. All my favourite activities, those that I frequently used in my lessons, with kids, juniors and teens, all of those favourite ones were competitive. ALL OF THEM.

Should kids even be playing competitive games?

I have been looking for sources on competition in the EFL classroom and I have found…nothing. I started to look around for any texts on kids and competition and it turns out that getting engaged in competitive activities such as sports, for example, can be very beneficial for children.

  • competitive activities can be motivating and encourage kids to improve their skills
  • playing and losing and winning helps children to learn how to deal with competition and with the fear of losing
  • they are also an opportunity to learn how to deal with pressure and how to win and how to lose
  • they are good for building self-confidence
  • they teach kids about the existence of the rules that need to be obeyed
  • they can help form friendships and relationships, with peers and adults
  • and, also, even if they are sports, they can lead to improving academic performance in children

Although, of course, they can also have some drawbacks, such as too much pressure, negative feelings in children and for their self-esteem.

On the whole, competition is a good thing, although it is not a given that all the children take to it naturally. Some of them might struggle, which is natural, bearing in mind that not all the adults have learnt to deal with it successfully, and they should be given help and support.

EFL and competition

As regards our EFL classes, especially those with the younger learners, primary and pre-primary, it would be just reasonable not to abandon all the competitive games althogether but to keep an eye on the balance and on avoiding a situation when all the games and activities that comprise a lesson have promote competition. Apart from competition, there are the other beautiful C-words such as: cooperation, colaboration, cognitive skills development that can and should be the foundations for our classroom life.

Not to mention that everything that we do in our lessons, namely learning a language, is against the very idea of competition. All the kids learn for themselves and although they have the same linguistic aims, their overall results or results in certain areas of language learning do not depend on the results of the other participants. What is more, their progress is measured against their previous results and achievement, although, admittedly, the situation is slightly different when it comes to learning a langauge in the context of a state school where kids’ progress is graded at every step of the way.

Things to consider

The most important thing to remember seems to be the fact that we, as teachers, should not take things for granted and assume that all the kids in our group like competition and competitive activities and that all of them are equally prepared to win and lose with grace.

The other factor to take into consideration is the age of the students. The younger the students, the less likely it is that they have already had a chance to participate in those kind of activities and acquire these skills and that they have enough life experience to be mature about it. It is a combination of their age, cognitive and social development as well as life circumstances such as having a chance to attend kindergarten, playing at home with parents and relatives, having older siblings and so on.

Equally important is the bond between the students. A group of children starting to learn together in September is a completely from the same group in January or even in October, especially in the context of after school groups or afternoon language schools where children might land in a group of complete strangers with whom the only thing they have in common is the age and the level of English, not the family ties, the address or the school. The more they get to know each other, the more they bond, the easier it will be for the teacher to set up activities, including competitive games, and for the kids to handle ‘failure‘. After all, it is easier to lose and get over it when you play with friends.

What it comes down to in real life, with real children, is keeping an eye on the kids, checking how they react to different stimuli and then introducing some competitive games, carefully, step by step. However, with my youngest students, this non-competitive period may span over the entire length of the pre-school EFL. With the most recent group, we started to play only half-way through our third year together and even then it was the whole group vs the teacher (who always lost).

Every little helps

Here are some of the tricks and techniques that a teacher can use in the classroom while introducing competitive games or taming of the competitive games we often include in our lessons (tired and tested):

  • Playing the familiar games such as riddles or pelmanism in a less competitive way. First of all, we do not award points for the boardrush OR we award points to both teams for competing the task, not only to the team who is faster (especially that with boardrush at least it is sometimes very tricky to establish who really was the first one to touch the board). Points here can be pluses or hearts on the board or flashcards given out to the winner in a particular round. Instead, we finish the round, the praise everyone and we simply move on. The game itself (the fun of participating, the language produced or used) is the reward itself.
  • We do not determine the order of participation based on the successful participation, for example in riddles, when the student who guesses the word is the next one to play. Instead, all students take turns, one by one to make a riddle for the whole class, regardless of how good they are at guessing.
  • Playing ‘Simon Says’ without excluding the losers by asking them to sit down after they make a mistake, especially that a growing number of non-participating students is very bad for the overall classroom and behaviour management. Or, in the same way, playing the Treasure Hunt without establishing who the winner is. We all look for clues around the classroom or the school, we all participate for ten minutes and in the end all check our answers, without counting the points or the number of the elements or stages completed.
  • With pelmanism, instead of playing 1-1, with kids uncovering two cards at a time, the whole group can do it in pairs, with two kids always participating, ideally in different combinations. As soon as a pair is found, the teacher and the kids cheer for everyone, and the cards are put aside or given back to the teacher.
  • Play the game in the format of the teacher vs the whole group, to create the support for the individual child. If they win or if they lose, they will do it together, with all their friends, nobody will be singled out. Ideally, in such a situation, the teacher loses and has a chance to model the mature behaviour and how ‘a failure’ can be handled, but, of course, bending the rules in order to ensure that might not always be easy to do. If you are looking for ideas, I would recommend pelmanism. It is very easy to get distracted and to forget (or ‘to forget’) where the other card from the pair is located.
  • Any game can be played in teams, a team vs a team, instead of individuals competing with each other. This way, again, the support, the safety net or the safety blanket is created. Enjoying the victory or handing the loss is easier with your team. Even if there is one child who does not handle ‘the failure’ very well, there will be other children in this situation, too. They will serve as role models.
  • Having the teacher participate, as one of the teams, can also help soften the blow of the defeat. Again, the teacher will be the one to model the langauge use, the game rules application and the player’s behaviour, too.
  • If possible, talk to the parents whose children struggle with controlling their emotions while losing the game. If nothing else, it would be great to find out whether there have been any factors that could have played a part, whether the child reacts this way in other situations and to simply inform them what happened in class. Perhaps parents will be willing to discuss this topic at home, to reinforce what the teacher does at school and, perhaps, to also play games at home, to help the child tame that beast.
  • In one of the posts (see bibliography), I found another great tip. What is necessary is a quick game that can be played a few times, in a quick succession, in the same lesson. Some of these will be won, some will be lost, but the quick pace and the repetition will make either of the results, the victory or the defeat, not so relevant anymore and easier to deal with and to even forget.
  • Another approach that I have been using in some of my summer camp groups was the Points Poster that we used throughout the entire camp. It was very simple, only an A3 piece of paper, with the team’s name, displayed on the wall. Every time we played a competitive game, there were points, for example two or three stickers for the winners, a star for everyone else. All the kids took very well to it because winning the stickers was great but the joy lasted a brief moment only and very quickly the stickers won today would quickly get lost among all the other stickers won on all the other days. The defeat, on the other hand, was perhaps not the most pleasant thing in the world but it didn’t matter much because the students knew that they would be another game on the same or on the following day. What is more, because I was using some leftover stickers, of all kinds, sometimes it was more fun to choose one huge sticker for your team rather then three little ones…
  • Finishing each game with the teacher and the kids thanking each other for the game, with a simple handshake and ‘Good game‘, just like all the football or volleyball players do at the end of the match.
  • Any activity that can work towards bonding and building a community is also welcome
  • If there is the students who struggle with dealing with their own emotions while playing games, I have so far tried two things. One of them was pairing this student up with myself, in 1-1 games, in order to be better able to model, to monitor and to help the child control their emotions during the game. I have also experimented with pairing up with this child in the games that we played in teams because, again, losing (or winning) in one team with the teacher was easier to deal with.

Non-competitive EFL games

First, an anecdote. The heading of this paragraph is what I put into my google. Would you like to guess what the amazing Uncle Google came up with? Nothing.

‘Fun games’ – yes, ‘no prep games’ – yes, ‘exciting games’ – yes, sure. There was random post but nothing for kids and not many are actual games. And one article about an activity that still has winners and losers…Nada, nada, nada.

Here are some suggestions from the non-competitive games that I have played

  • Musical flashcards: a simple movement game, an adaptation of the musical chairs game, only without any kids dropping out. The teacher puts out all the relevant flashcards on the floor, kids move around with some music playing. When it stops, every child picks up a card and makes a sentence for example: I like bananas (topic: food), I haven’t got a cat (topic: food), I am wearing a blue t-shirt (topic: clothes) etc. Afterwards, the flashcards go back onto the floor, the teacher puts the music on for another round of the game.
  • All the logical games such as Find the difference (for example those that we have in the YLE Movers and Flyers) or Odd one out (for example YLE Movers) that can be easily adapted to any topic. A similar activity will be also based on the silly picture scenes that I described in an earlier post here.
  • I Spy: a variation of the game with a set of visuals such as a poster or an illustration from the coursebook. Kids work together as a group (in the early stages) or in pairs, they describe something in the picture, with the relevant sentences, depending on the age and level (I spy with my little eye something. It is big, it is green. It is next to the cat. etc). The student or the students who listen find the relevant object. This game is not competitive because there are no winners / losers and the game goes on until the child / children guess. As the game proceeds, the kids can offer more information and support to help their partner, for example the first letter / sound, the gestures etc.
  • Riddles: the same principle and procedure as above but it can be played with flashcards or a set of word cards or a set of words prepared by the kids.
  • Back to the board: it is a very popular game that can easily be played in a non-competitive way and this way it can go help build and develop a sense of community and give the whole group a chance to work together. One of the students sits on a chair in the centre, facing the group. The teacher writes a word or a simple sentence on the board and signals how many words it includes. The group work together to help the one student guess and recreate the word on the board. With the lower level kids, flashcards can be used instead of words although using simple sentences works wonders for the students to learn and to work better with the grammar, the sentence structure and, progressively, with the meta language.
  • Monster game aka Hangman aka Let’s save the little human: I love playing Monster Game with the lower levels because it helps the students work with literacy, spelling and blending and we always play it as a whole group with all the students contributing and working together to guess the letters and the words and to help the little human who is slowly losing parts of the ladder, the boat or the hotair balloon. To make the game less cruel, the element of getting points can be added (i.e. when the kids guess a part of the word or when they guess the most common letter or when they get all the vowels etc) and with my summer camp group the game finished with the kids drawing some food for the hungry monster because they developed empathy for someone hungry, even though it was a monster.
  • Telephone: this game is a variation of something known as ‘Whispers’, with the whole group sitting together and passing a word or a simple phrase, from the end to the beginning of the chain. This is not a very generative game or a very communicative one but it helps the kids work together towards one goal and it is easy enough even for the youngest kids.
  • Stations in the classroom: this is not really an activity but a format of completing tasks with kids. The teacher sets up a few stations in the classrom, for example in the four corners of the room. Kids move from one station to the other and complete the task such as unscrambling words, completing a simple handout, matching words and pictures, playing a round of pelmanims and many more. Kids complete a few tasks during the lesson and their job is done when they complete a full circle but they do not compete with everyone else in the group. It is up to the teacher to decide when then task is done and they can move on and in this way, even the ‘weaker’ students can play and participate without any pressure from the group.
  • Community building games: on of the 30 Creative Team Building Activities. I haven’t tried these yet but these definitely caught my eye: Cross the Line (22), Paper Chain Race (30), Shrinking Classroom (18), Building a tower (6 and 10). Or 22 Fun Team Building Games and Activities for Kids. Here I really liked: Forehead Dots (4), Some of them have the ‘choose the best / fastest team’ element which works to some extent as it helps the kids to bond within their team but I would still skip this element altogether.
  • Last but not least, among the things that has been on my wishlist of the things to try out in the classroom is the parachute and all the parachute games. Some ideas can be found here.

Coda

But, perhaps, the situation is a little bit better than it seems. While working on this post, I asked my audience on the social media about their opinion and I was very happy to find that those who responded use a mix of competitive and non-competitive games. At the same time, the teachers admitted that they have to deal with the competition-related stress in the EFL classroom, although not all the time and ‘some games, some days, some kids’ was the most popular answer.

What about you, dear reader? Do you play any non-competitive games with your YL students?

If you are interested in the topic (and a subscribed reader of the Modern English teacher), I do recommend reading my article from Nov – Dec 2024 that is the continuation of that post. You can find it here.

Happy teaching!

Bibliography

Teaching children to lose gracefully so they can lose with dignity as adults (oregonstate.edu)

Pros and Cons of Competition Among Kids and Teens (verywellfamily.com)

The pros and cons of competition | BabyCenter

How To Teach Children To Cope With Losing | Casa de Corazón (casaearlylearning.com)

6 Tips for Teaching Children How to Lose — Better Kids

australiansportscamps.com.au/blog/benefits-children-playing-competitive-sports/#:~:text=Competition Can Improve your Child%27s,high school and tertiary studies.

ETF 57/3 pg14-23 (ed.gov)

Problems with Games in ESL/EFL Classrooms (and Solutions) – BINGOBONGO (bingobongokids.com)

Teaching English Through Art. Jeff Koons and his rabbit

The language

  • The activities mentioned here were a part of the final lesson of the month and in the unit on animals. We practised the names of animals and we tried to make very simple riddles about animals (‘It is big. It is green. It can swim’). In this particular lesson, for the first time ever, I invited the children to make their own riddles and, with the help of the teacher, they managed.
  • I also introduced the forest version of ‘Walking in the jungle’, which very conveniently, includes a rabbit.
  • We used the finished product for practising the target langauge (Rabbit, can you jump? Yes, I can). We created a few questions (and I say ‘we’ because I only needed to start and the kids took over), answered them and then followed that with singing the song that we learnt in this unit (Little bird, can you clap, from Super Simple Songs) which turned into our own conversation and / or a version of a song (‘Anka, Anka, can you dance?’) which is now one of our favourite parts of the lesson. Kids took a lot of pleasure in answering the questions about themselves.

The artist

  • Jeff Koons was chosen to be the artist of the day only because he was what came up as a result of the google search along the lines of ‘modern artists who drew animals’. His most famous animal is, of course, the balloon dog but I really could not think of a way of turning it into a fun craft activity in the online environment, without asking parents to purchase some unique resources. Plus, we made a puppy craft only a few weeks earlier and I wanted something else. Luckily, Jeff Koons created more than just one dog and a balloon rabbit was one of his creations.
  • We introduced the artist (name, country, favourite things) and we looked at his animals and tried to guess what they are.

The art

  • We started with checking all the materials: an A4 piece of paper (either the drawing album paper or just regular photocopying paper), scissors, glue and marker. I also sent the photo of the finished product to the parents so that they could help, if necessary.
  • As usual, I was modelling every step, then waiting for the kids to complete the action before moving on to the following stage.
  • First we drew two lines along the long side of the piece of paper and we cut along them.
  • Then I put the two strips together into a letter L (although in class I used the references from Russian and we made a capital letter G) and glued the ends together. Then came the time for the most challenging step, making the harmonica (or the spring (the reference that came from the student who had a slinky and called it a spring). I used the phrase ‘on the top, on the top’ while demonstrating how I was folding the paper. We glued the ends, too.
  • On the remaning piece of paper we drew a circle and drew the face of the rabbit on it. Afterwards we drew ‘two letters A’ for the ears and cut them out. We glued them together and then we glued them on the top of the spring.
  • Next, we drew ‘4 zeros’ for the paws and we also cut them out and glued them on the pieces of spring, two at the base and two somewhere in the middle. The glue here can be applied on the top or at the bottom of the piece and glued on, it does not really matter.
  • The rabbit was adapted from the original version from DIYArtPins to make it feasible in an online class but, still, it is the most complex and the most challenging craft that we have done in our online class. I had experiemented with it before the lesson, making my own copy, checking whether the quality of paper will or will not have an impact on the final product, visualising the stages and instructions. I was ready but I still got cold feel once we started to make it. However, my amazing kids who have been creative for two years and who have been creative online for one year managed. The youngest artist was supported by her mum and she managed, too. I would not recommend this activity for beginner online artists of beginner offline artists, either.
  • Without doubt, the rabbit is just cool. It is a real toy, made of paper and when you press it, it springs back or, we could and we did say, ‘the rabbit can jump’.

Happy teaching!

Crumbs #59 Hello Elephant!

Ingredients

  • One piece of A4 paper per child. It can be the regular photocopying paper or a sheet of the drawing paper, of regular texture, from a drawing album that kids use at school.
  • Markers or pencils, scissors and glue.
  • My elephant was inspired by the design I found at Creative Family Fun website, which I adapted to the needs to my group.

Procedures

  • Show the kids the finished product. I do not always do it but in case of this craft it seemed important to help the kids see the final product and to visualise how they are going to proceed during the entire activity.
  • Check that everyone has all the materials by going through the list, picking the items up and showing them to the camera, asking ‘Have you got…?’
  • Fold the A4 paper into halves, crosswise. Open the paper and draw the line in / along the fold. Cut into two.
  • Put one of these halves aside. It will be used later for the trunk and the ears.
  • Take the other piece of paper, hold it lengthways (with the longer edge on the top), draw a line along one of the shorter edges
  • Closer to the top edge draw two eyes. It might be a good time to decide if the elephant is a boy or a girl and add eyelashes and / or a bow on the forehead.
  • Open the glue and apply some glue along the line that has just been drawn along one of the shorter edges. Roll and glue into a tube. Put it on the side.
  • Take the other piece of paper. Draw a circle. Cut it out. It is ok if it is not a perfect circle.
  • Fold the circle into half and draw the line in / along the fold. Cut into two semi-circles.
  • Draw the line along the diameter of the circle, on both semi-circles.
  • Apply the glue on the line, on one of the semi-circle and attach it to the side of the head of the elephant. Press. It might be a good idea to show the kids how to press it here – with the fingers inside the tube and the fingers outside of it.
  • Repeat with the other one.
  • Prepare the strip of paper that will be used as the trunk. It will be glued under the eyes and it might be a good idea to check its length and perhaps cut off a bit.
  • Roll one of the ends of the strip around a marker or a pencil. It will twist it a little bit and it will make it look a little bit more like a trunk. Apply the glue under the eyes of the elephant, attach the top of the trunk and press.

Why we like it

  • This is a relatively easy craft that can be completed by children online, although I would not choose this particular activity as the first craft of the year. However, it is appropriate for five-year-old children, half-way through the academic year or the children who have taken part in some craft activities before.
  • It is a simplified version of the original craft and it requires less preparation on the part of the teacher. It was ‘designed’ and tested with regular A4 photocopying or drawing paper, without any real templates or special resources such as the cardboard tubes and goggly eyes.
  • If the students are younger, the teacher might choose to cut up the paper before the lesson (one big rectangle for the body, one small rectangle for the trunk and a circle for the ears).
  • It is an online-friendly activity.
  • The finished product can be easily used as a puppet (if it is put on the two or three fingers of a hand). One of my students also turned it into a bracelet, only because she chose to use a bigger square and, in the end, it was big enough to be worn on the wrist. As such, it can be used in simple role-plays.
  • It definitely has the WOW element and kids get very excited to be able to make a real toy out of a piece of paper.
  • It can be used to accompany a story, for example ‘Elmer’ or ‘Dear Zoo’ as one of the animals.
  • Our elephants were very simple and white but they can be made colourful, very much in the theme of the elephant party we know from Elmer in which all the grey elephants ‘get dressed’ for the occasion. The teacher can use the colourful paper or the kids can decorate their squares before glueing them together into a tube. If there are some leftover stickers available, these can be used to decorate the elephants in the end.
  • We used the elephant as a part of our unit Animals in Art and English classes and apart from making the elephant we also looked and talked about different elephants created by Salvador Dali, Pablo Picasso and Henri Rousseau, among others.
  • We also had a lot of fun playing with the semi-circles. We used them as our mouse’s ears, cat’s ears, sunglasses, monkey’s ears and wings. ‘I am a butterfly’ as a lot of fun!

Happy teaching!

Craft #58 Baby shark craft

Ingredients

  • One A4 piece of cardboard paper, ideally in colour but if that is not available, the while cardboard will do, too.
  • Markers, scissors, glue
  • Something to use as a template for a circle i.e. a small plate for the bigger circle and a small glass for the smaller circles
  • A link to inspire you. Mine came from supersimple.com, after some adaptations for our online classes.
  • A link to the song which this craft usually accompanies. This is my favourite rendition of the song.

Procedures

  • The teacher starts by demonstrating the finished product to facilitate the whole process. I do not use this kind of an approach but it might come in really handy with this particular craft activity.
  • The teacher and the class go over the all the resources necessary for the lesson. The teacher calls them out and shows them to the camera. The kids do the same.
  • The teacher demonstrates how to draw a big circle on the piece of cardboard. If the kids are ready, they can draw a circle themselves. If not, the teacher shows them how to draw around a plate. It is a good idea to use the paper economically, in order to ensure that there will be enough paper left for the small circles. The kids do the same and show their circles to the camera.
  • The teacher cuts out the circle. The kids follow suit.
  • We fold the circle into half and we draw the eyes and a smile at the front.
  • The teacher demonstrates how to draw two small circles (or how to circle the smaller object twice). Afterwards, these are cut out, too. They are folded into halves and cut into halves, too.
  • Two of these half-circles are used as fins. They are glued to the side of the shark. The teacher demonstrates that, step by step.
  • The third half-circle is to become the frontal dorsal fin. It is glued to the top of the shark, at the back.
  • The remining half a circle is cut into two pieces (in any way) and these are are the tail (or the caudal fin, what a pretty name!). Their ends are glued together to form something resembling the letter V and they are glued inside the folded circle.

Why we like it

  • It is a perfect craft to accompany the song or to be included as a part of the life aquatic-themed unit.
  • It is easy enough to make, even online. It works well in the offline classroom, too and the teacher can adapt it to the younger students by preparing the circles before the lesson or even by folding them beforehand.
  • Even if the circles are drawn by the kids themselves and they do not turn out perfect, the sharks will look good.
  • The sharks are 3D and are a lot of fun.
  • They can be used as a puppet and they can be used in role-plays.
  • The kids can decide if they make a baby shark or a mummy or daddy shark and they can decorate the sharks accordingly.

Happy teaching!

English on the carpet: The 5 milestones

Writing one of the previous posts, on creating the curriculum for pre-schoolers, and I compared the pre-school EFL on the pre-A level to an ocean. It is huge, it is surprising and it is uncharted. It is!

At the same time, while travelling across it, to the first beacons of the A1 level, you can and you will come across those buoys that help you understand that yes, you are making progress and moving forward.

Today, I would like to look at these five important posts that we arrive at in our journey across the curriculum of the VYL English learning. Disclaimer: it is a very personal list and it might be getting extended, changed or removed with time.

One: We start producing sentences

All the learning in pre-school starts with single words, our first hello (although this is a proper sentence), our first blue, green, yellow and pink and our one, two, three, four, five. When that happens, it is Christmas, Easter and birthday put together. I love the start of the course and I spend these first few weeks in awe, observing how my little students venture out into a new territory and how they learn how to navigate it and how to enjoy it. Some of them run into it and embrace it from the word go, some of them are a bit apprehensive and they slowly warm up to it. I take a lot of pleasure in helping them do it and in supporting them on the way.

However, that is just the first step, something that needs to happen and something that the course needs to move on from, to the real first aim and that is: phrases and sentences! These can be very simple and their range might remain narrow for a long time, limited to ‘it is’, ‘I like’, ‘I can’, ‘I’ve got’ but they can be introduced, developed, practised and used from early on. Among all the contributing factors there are: the teacher creating the appropriate exposure by using full sentences while introducing and drilling new vocabulary (‘It’s a dog’, instead of ‘a dog’), introducing structures, supporting the use of the structures with gestures or visuals, encouraging the kids to use full sentences, introducing and using the functional language chunks.

Sooner or later, the kids will develop the habit of using full sentences and they will be doing it more frequently, although, of course, that does not mean that they will only use full sentences because, in their real, L1 life, kids also respond in single words sometimes!

Two: We start producing langauge spontaneously

Let’s imagine this moment: you have covered a few units or modules, your little students already have some vocabulary, they feel comfortable in the classroom and they have even started to use some simple structures. It is going well. The next step might be to focus on creating conditions that would favour some spontaneous language production in order to ensure that children communicate not only with the teacher and not only when prompted by the teacher but when they have something to say and something to share.

The activities that foster this freer communication include: letting children lead activities, setting up pairwork and allowing students communicate to other students, not only the teacher, showing children that the language can be played with and creating opportunities for that with, for example changing and creating own versions of stories or songs and, in general, being creative in English, for example our own version of ‘Do you like broccoli ice-cream?’, deciding what five questions thay may want to ask starting with ‘What’s your favourite…?’ or even by giving commands to the class during the Abracadabra game (‘Abracadabra, 1, 2, 3. You are…’). One of the most powerful questions that can be used in class is ‘Who’s got an idea?’ this way inviting students to take part in shaping up the games and, effectively, the lesson.

Three: We start using a variety of communication strategies

This is the one that I was unaware of for a very very long time and only during the first term of my MA programme, while going through piles of articles and publications in search of something that I might get interested in, I found the idea of communication strategies. This is a fascinating topic anyway, for me as a teacher and for me as a speaker of foreign languages but it turned out to be even more amazing because I decided to check whether my little students use any of those or, more specifically, any more than initially claimed, namely – do the little kids do something else than just refering to their first langauage. And yes, they do!

I still need to publish the outcomes of this research in any way but here I would like to highlight only all these instances of the pre-school students trying to deal with the communication breakdowns and in the way they do it because, in my opinion, it does show that kids become language learners and langauge users, taking control and trying to deal with the situation. The most common go-to solution is falling back on their L1 but there are many many more such as approximation (using a word that is similar enough and may do the job effectively), repeating, self-correction, using gestures to clarify. According to the findings of my small scale research done as part of the MA programme mentioned above (small scale as it was), even those very young beginner students are capable of using some of those strategies, showing that they are becoming aware of the learning process and their place in it.

Among the activities that can help foster and promote the use of communication strategies, there are the use of gesture as part of instructions and new language presentation and practice (to include some alternative, easier communication channels), using riddles in class (to get the kids used to describing objects) as well as modelling repetition or self-correction, to name a few.

Four: We start reading

A large part of the story in the EFL pre-school happens without any written word, unless you count the random words of instructions in the coursebook or the words at the back of some of the flashcards or the letters in the storybooks that we do not really pay any attention to in any active way. Many of the preschool EFL students are too young to start learning to read and write in English as the instruction can start as early as 3. What is more, the curriculum in some of the countries is organised in such a way that the literacy component is purposefully excluded from pre-school and the early years of primary in order to interfere with the literacy skills development in the kids’ L1 and not to overburden the students.

However, since the EFL world encompasses many countries and many teaching contexts and formats, there are out there the pre-primary that include some literacy skills development and there are some pre-school kids who start reading and writing in English.

In the context in which I am working at the moment (pre-primary EFL, 2 academic hours per week or 2 real hours a week), we start introducing some elements of literacy in the second year of the EFL instruction and / or when the kids are older than 5. The first steps involve: introduction of the alphabet, revising the vocabulary according to the alphabet / phonics, simple blending and the CVC words as well as some elements of the sight words and creating the written English exposure in the classroom.

Five: We start learning grammar

The pre-primary EFL world is a fascinating place to be and the element of grammar (or structure) in it is one more piece of evidence.

Traditionally, the pre-primary coursebooks focus on the introduction and practice of vocabulary and not structure. On the one hand, such an approach seems to be justified – the students are very young and the explicit grammar presentations are the last thing that they need or are able to deal with. On the other hand, however, learning a language is not about reproducing lists of words, organised thematically into colours, pets and fruit and ‘structure’ must be introduced in order to enable the kids to communicate in a natural way, even if only as the beginner learners.

It does not require any serious change of materials or any extensive supplementing because even if the coursebook itself does not include any structures, these can easily be added, practised and used. Naturally, the way in this is done needs to be different from the traditional explicit grammar presentation. Other methods have to be found and I have already written about my favourite in an article for the Modern English Teacher in May 2022. The article is only available if you have a subscription but MET recorded two related videos which have been made public and can be found on youtube. Make sure you check out one of the earlier posts here.

Coda

These are my five milestones in the pre-primary EFL world and, at the same time, my top 5 favourite moments to be a part of. There are no certain times or days schedules for them, they happen when the kids are ready

So far, there are five. If you have anything to add to that list, please do so in the comments section below!

Happy teaching!

Crumbs #57 Early reading: Secret words

Ingredients

  • The most important thing is a set of words to represent each letter / sound of the alphabet. Some teachers like to use the set from a song to make it possible to use and reuse the same set of words and to help the students memorise and practise them in an easy way, in class and outside of class. One of these more popular songs is this one from Kids TV 123, Phonics Song 2. I use the song, too, although I created a different set of words for myself and for our teachers with b is boy, g is for girl etc. What is more, in our exercises we use a wider range, too, as an opportunity to revise all the words that the kids already know. Sometimes b is for boy and sometimes b is for banana, ball, blue or black.
  • The other thing that is necessary is a place to display the words. It can be a whiteboard, a noticeboard, a powerpoint or, as in the case of my online classes, a miro board. All the photos presented here are the screenshots from my miro board from the past two weeks.
  • Depending on the type of display, a different set of resources will be necessary. In the classroom, I simply draw and write on the whiteboard. As regards miro, I duplicate pictures and post-it notes. It would be possible to do the same using a set of specific flashcards and letter cards. In this case, the words could even be displayed on the carpet or on the table.

Procedures

  • The teacher chooses the word(s) for the lesson and prepares the visuals to represent them.
  • The pictures are drawn on the board or arranged on the miro board.
  • In class, the students, aided by the teacher, sound out all the pictures (‘What’s this?’ ‘Apple’ ‘Ok. Apple starts with …aaa or ooo’ ‘A’).
  • The teacher writes the letters as the kids call them out.
  • When all the letters of the words are on the board, the students try to read them as one word, supported by the teacher.

Why we like it

  • This game is introduced as a part of every lesson, as a starter or as a final game and normally two or three words are used.
  • We start playing the game only when the kids are familiar with all the letters / sounds of the alphabet and alongside the traditional phonics and sight words work, not instead of it. It is a way of encouraging kids to read the familiar words that might not and do not fall into all the patterns of the phonics system and which are not going to be as frequently used as the sight words.
  • In a way, it is a decoding activity that is made fun and achievable with the use of the familiar visuals and it has worked well as a transition from sounds to letters through an intermediary of the carefully chosen images, before we are ready to decode words using only letters.
  • Kids enjoy this activity and they quickly improve their skills. In our lesson yesterday, my student Sasha started to call out the sounds in the sequence of the pictures so fast that I could not catch up with typing the letters. Recently, we made even more progress. She just looked at a series of pictures and called out the hidden word out loud, not even bothering to wait for me. I guess that means that we are ready for the next step.
  • The next step and the development of the activity will be decoding secret words with a mix of letters and visuals before we finally move to reading only letters.
  • The choice of words used is up to the teacher. It makes sense to start with the easy, short words, the students’ names, the familiar cvc words or the frequently used words such as sight words or the functional words (‘Hello’, ‘Bye’, ‘Thank you’ etc). The decisions made here are in no connection with the phonics or the sight words that we currently work on. Most frequently, these represent some of the target vocabulary or the words that are interesting for the student (hence all the Frozen characters here).

Happy teaching!

Crumbs #56: VYL Miming Upgraded

Ingredients

  • Any set of new vocabulary, at the stage when it is introduced or when it is practised.
  • A set of flashcards, electronic or paper, to support the clarification and building the connection between the word, its visual representation, its meaning and the gestures and phrases chosen to represent it
  • The teachers and their face, hands and voice

Procedures

  • The teacher introduces the vocabulary, as usual, with a set of flashcards or realia
  • What follows is a set of practice activities appropriate for the students’ level, age and interests
  • The teachers add miming but apart from gestures accompanying the key words, there are also simple phrases for each of those i.e. ‘a doctor’ represented by a flashcard, a gesture (for example, putting on the stetoscope) and a phrase (‘Open your mouth and say ‘aaaa’).
  • Students look, listen and say the words.
  • In the later stages, students also mime and produce the language for the teacher or the other students to guess.

Why we like it

  • First of all, this particular trick (I would not dare to use the term ‘an activity’ here) was simply a coincidence. We were practising the vocabulary in the unit of professions and, as part of the revision stage of the lesson, I was miming jobs for my student to guess, just like we had done many times before, with other sets of vocabulary. It was then that I realised that there are certain limitations and that miming some of the jobs might be confusing for the students. ‘A ballerina’, ‘a singer’, ‘a photographer’ were easy enough but I got stuck with ‘a firefighter’, ‘a doctor’ and ‘a teacher’. Until I realised that to my miming and gestures, I can add a word or two.
  • The main aim here is still the same – the gestures, the TPR, the miming are supposed to help the children understand the target vocabulary better and remember it better, for example, while miming the word ‘firefighter’ the teacher can pretend to be directing the hose and the stream of water at the invisible fire but, to make it more obvious and visual and rich, the teacher can also say a simple phrase, for example ‘Look! A fire!’, to illustrate the word and to create associations with it. All in all, the combination of different learning channels is beneficial for the language learning.
  • This added linguistic element to our TPR means an extended exposure to the target language and an opportunity for more listening practice.
  • The set of phrases used with the specific vocabulary should be kept the same in the beginning, not to overcomplicate and to overburden the children, but, naturally, there is a lot of potential here for a wider range of the structures later on.
  • Initially, it is the teacher who is going to be producing the language here, however, with time, the students can also be encouraged to take over. We have only been doing it for about two weeks at this point but I have already noticed that my students started to pick on the language and start using it. And that means a lot more potential for maximising language production.
  • So far we have been using this approach in two different activities: Guess my word (miming, as a revision of the target language in the beginning of the lesson) and Abracadabra (setting a word for the other students / teacher to mime, with a wider range of vocabulary).

Happy teaching!