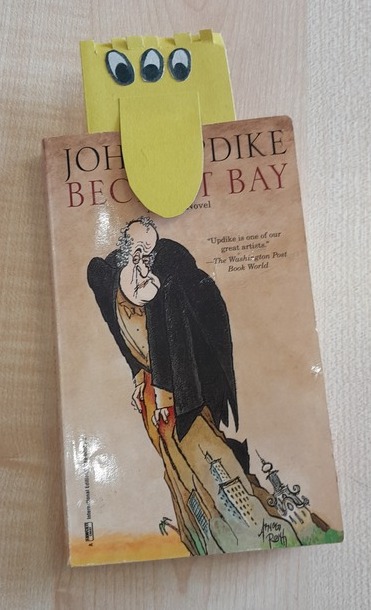
Colourful cardboard, some white paper, markers, scissors and glue
An idea to inspire you. I got mine from I Heart Crafty Things and if you are interested you can even find a template there for a small price although, I, personally, did not find it necessary.
Procedures
Before the lesson, I prepared the paper: small pieces of paper for the eyes, a large rectangle of cardboard (for example, an A4 sheet makes 2) folded in half, smaller rectangles (aka strips of paper) cut up for the nose.
We had two full lessons on the topic of body parts, monsters, health problems and going to the doctor. By the time we started the craft activity, the kids had already practised using the body parts in a sentence, they had described countless monsters, they had also created a monster with in a dice drawing activity.
I showed the children the ready product and we described it together.
We started with the kids choosing the colour of the big rectangle (the body of the monster) and so did I, in order to be able to demonstrate every step.
We cut up one of the longer edges, 5 – 10 mm, along the whole age (the hair). Afterwards, we applied the glue inside the folded rectangle and glued the two halves together.
We decided how many eyes we want our monsters to have. We drew these eyes, cut them out and glued them on the monster.
The kids chose the colour of the paper for the nose. We drew the nose on the back and we cut it out. On the back on the nose I drew three short lines at the top, to mark the place where to apply the glue. The kids do the same and we glued the nose on the monster.
We finished with drawing the smile and adding some decorations.
We finished with introducing the monster (name, age, boy / girl, what he/she likes).
Why we like it
This craft was a part of the lesson that in itself was very generative, productive and creative. That is why, for the main craft activity, I wanted something that the kids could use not only to produce the language but to use outside of the lesson. That is why I started to look for ideas for bookmarks.
When I showed my monster in the beginning of the lesson, some of my kids went ‘Oh, monsters, I don’t like monsters’ but, somehow, they all wanted to make theirs and they got really involved, boys, girls, the younger, the older. I was happy and not so surprised (because it did happen before) that they all left the classroom almost hugging their big-nosed creations. And, once out, I heard them report to the parents, in a very animated way, what it was that we did in class.
The craft is relatively easy, with some simple materials, especially that the cardboard can be easily replaced with the regular paper. It did involve some before-the-lesson preparations but nothing very time-consuming and, again, the templates were not necessary at all.
I have already started to think of adaptations and of replacing the monster with other ideas and shapes. I have not done these yet, but I am thinking a lot about elephants and, inspired by my friend’s son, LEGO people…Once they are ready, I will definitely share here:-)
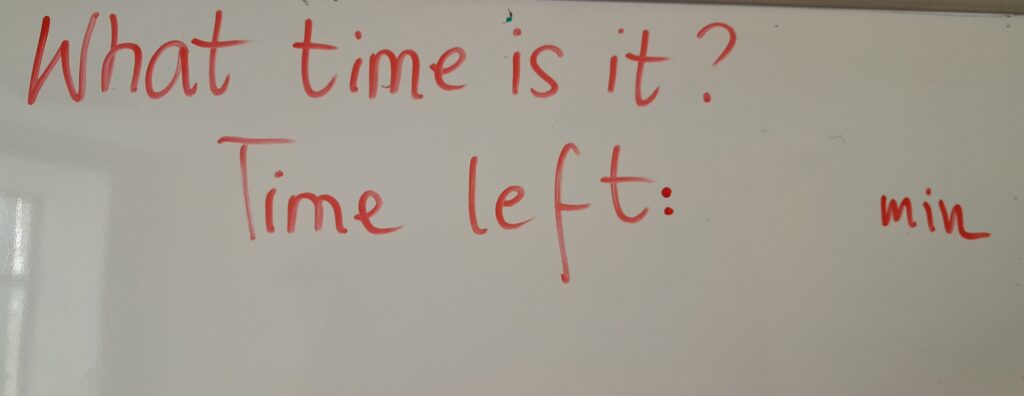
A board and a marker, with two phrases written on the top: ‘What time is it?’ and ‘Time left:….min’
A watch for the teacher.
Procedures
Drill the question with all the kids (‘What time is it?’)
Every time you hear from the classroom the same or similar question, most probably in the kids’ L1 (‘What time is it?’, ‘When is the break?’, ‘How much time we’ve got left?’) etc, point to the question on the board and elicit it from the group or from one student and only when they do, check the time and write the number of minutes left until the end of the lesson.
Repeat every time someone asks the question but insist on them asking the question in English.
Why we like it?
First of all, this trick gives kids an opportunity to learn to control their behaviour in class. I use it with my pre-primary and primary students in a situation in which they cannot tell the time using the clock and they do not have their mobiles to do this using their digital clocks. Not to mention that at the moment we work in an unusual context and each part of the 4-academic hours-long day has a different length. If the kids understand better how much time is left or, in other words, for how many more minutes they are required to ‘work hard’, they are better prepared to manage their behaviour in the time left. Also, it is of a great psychological help to see the minutes disappear and then even if the day is long, even if the weather has an impact on the kids’ energy levels, even if the activities today are not amazingly exciting for everyone, there are fewer and fewer minutes to go through until the next break time, snack break, the walk, the playground and so on. It has been of a great help in all the summer classes.
The kids are likely to ask this question anyway, directing it at their teacher or their peers so giving them a chance to do it in English is an opportunity to learn and to practise some useful language in a natural context.
To be perfectly honest, it is a tiny little bit irritating to hear this question and to have to answer it a few times during the lesson BUT the very fact that the question is asked and the frequency with which it is asked is a great source of immediate feedback for the teacher and a signal that, perhaps, some changes need to be introduced in the original lesson plan. Maybe an activity took too long, maybe on that particular day the kids are too energetic or too sleepy for whatever is going on and they need a settler or a stirrer. Perhaps even an activity needs to be abandoned asap, for whatever the reason…Knowing is is much better than not knowing it and proceeding when your audience is not ready for it. That also means that on some days and with some activities, the kids will completely forget to ask the question and that is for the best reason of it. They will be so involved in the activities that the lesson length and the clock will not matter at all.
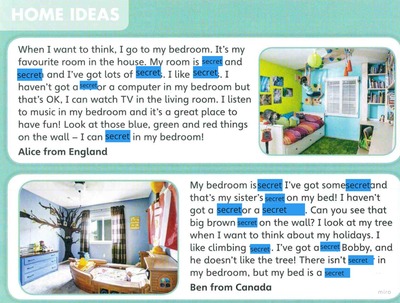
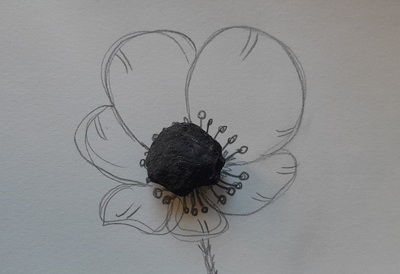
A text written for the lower levels learners, pre-A – A1 level, preferably accompanied by some visuals. The one pictured above which was the inspiration for this kind of an activity was taken from Super Grammar 2 by Emma Szlachta, CUP, p. 38
A set of blue cards to cover some of the key words in the coursebook. It is much easier to manage if the text is displayed on the screen. The SECRET cards can be easily adjusted and moved around during the lesson.
Procedures
In the first stage, the kids look at the illustrations and describe them. If you are looking for the ideas how to use with illustrations in the EFL classroom, make sure you check out these posts, here and here. There are lots and lots of ideas. This stage will give the kids an opportunity to produce some language and also to get ready for the reading.
Kids read the text in silence, individually and, afterwards, in pairs, trying to guess what words are hidden under the cards. At this point all ideas are good ideas but the teacher should point out that there are some hints in the illustrations.
The class read out loud together, led by the teacher or the students, and each pair proposes their ideas. The teacher is revealing the real words. It is not a competitive activity so no points are awarded.
The following stage is the reading comprehension task, such as the one in the coursebook.
The follow-up productive task can be a text interpretation: the teacher covers all the secret words again. Kids work in pairs, they read a text (one text per child). In step A: they try to remember what the original words are, in step B: the kids read the text again with their own ideas for all the secret words.
Why we liked it
The activity is easy to prepare, especially with the use of the electronic devices.
The activity can be used with practically any text and it is easy to adjust the level of development by limiting or extending the number of words, by focusing on some specific words ie only colours, only verbs or only a specific grammar word ie a structure or a part of speech, depending on the level of the students.
This is one of the ways of breaking up the text and making it more manageable for the early readers.
It is also a way of making it more interesting as it changes the reading task into something resembling a guessing game.
It can be made productive and generative by the illustrations-based activities or by the creative reading (the final stage) which can also lead to a writing task ie describing your own room or your own dream room.
Here is a situation that I witnessed many times during an observed lesson with young learners: a teacher and a group of kids start playing a game, for example riddles. The teacher models, then the kids take over. One student sits in front of everyone, chooses a card for the other students to guess or to identify. Kids start shouting out words, one of them gets it and the teacher takes the flashcard and hands it over to the student who shouted the correct word. The game goes on and it takes about three rounds more for one of the students to get offended / upset / angry / sad about not winning. More often or not, someone starts crying. Oups.
It is not only about losing, although, to be honest, this is a serious problem, too. Here, however, the ‘failure‘ of some kids is clearly visualised with a flashcard. Frequently, it is also very unfair because it is the faster and louder kids that get the point and these are not necessarily the kids who really know the answer. Also, there is another dilemma in a situation when two students shout out the correct answer at exactly the same point. Will the teacher tear the card into halves? No, of course not. Sigh.
That issue, frequent as it was, was always addressed during the feedback session and I am pretty sure every session on games for VYL and YL included the commandment compressed down to ‘Don’t use flashcards as reward points’. This was the bread and butter of a trainer / VYL ados.
My real shock to the system was an invitation to volunteer at Sheredar, our rehabilitation camp for children who went through serious diseases a few years back. I had a chance to go there a few times and teaching kids was an amazing experience. However, before I went, our contact and coordinator, Ksenia, said: ‘They will be one big mixed ability group but you can choose any topic you want. Actually, do whatever, just don’t play any competitive games. These kids have fought enough’. It took me about a minute to understand that I have no games to play. All my favourite activities, those that I frequently used in my lessons, with kids, juniors and teens, all of those favourite ones were competitive. ALL OF THEM.
Should kids even be playing competitive games?
I have been looking for sources on competition in the EFL classroom and I have found…nothing. I started to look around for any texts on kids and competition and it turns out that getting engaged in competitive activities such as sports, for example, can be very beneficial for children.
competitive activities can be motivating and encourage kids to improve their skills
playing and losing and winning helps children to learn how to deal with competition and with the fear of losing
they are also an opportunity to learn how to deal with pressure and how to win and how to lose
they are good for building self-confidence
they teach kids about the existence of the rules that need to be obeyed
they can help form friendships and relationships, with peers and adults
and, also, even if they are sports, they can lead to improving academic performance in children
Although, of course, they can also have some drawbacks, such as too much pressure, negative feelings in children and for their self-esteem.
On the whole, competition is a good thing, although it is not a given that all the children take to it naturally. Some of them might struggle, which is natural, bearing in mind that not all the adults have learnt to deal with it successfully, and they should be given help and support.
EFL and competition
As regards our EFL classes, especially those with the younger learners, primary and pre-primary, it would be just reasonable not to abandon all the competitive games althogether but to keep an eye on the balance and on avoiding a situation when all the games and activities that comprise a lesson have promote competition. Apart from competition, there are the other beautiful C-words such as: cooperation, colaboration, cognitive skills development that can and should be the foundations for our classroom life.
Not to mention that everything that we do in our lessons, namely learning a language, is against the very idea of competition. All the kids learn for themselves and although they have the same linguistic aims, their overall results or results in certain areas of language learning do not depend on the results of the other participants. What is more, their progress is measured against their previous results and achievement, although, admittedly, the situation is slightly different when it comes to learning a langauge in the context of a state school where kids’ progress is graded at every step of the way.
Things to consider
The most important thing to remember seems to be the fact that we, as teachers, should not take things for granted and assume that all the kids in our group like competition and competitive activities and that all of them are equally prepared to win and lose with grace.
The other factor to take into consideration is the age of the students. The younger the students, the less likely it is that they have already had a chance to participate in those kind of activities and acquire these skills and that they have enough life experience to be mature about it. It is a combination of their age, cognitive and social development as well as life circumstances such as having a chance to attend kindergarten, playing at home with parents and relatives, having older siblings and so on.
Equally important is the bond between the students. A group of children starting to learn together in September is a completely from the same group in January or even in October, especially in the context of after school groups or afternoon language schools where children might land in a group of complete strangers with whom the only thing they have in common is the age and the level of English, not the family ties, the address or the school. The more they get to know each other, the more they bond, the easier it will be for the teacher to set up activities, including competitive games, and for the kids to handle ‘failure‘. After all, it is easier to lose and get over it when you play with friends.
What it comes down to in real life, with real children, is keeping an eye on the kids, checking how they react to different stimuli and then introducing some competitive games, carefully, step by step. However, with my youngest students, this non-competitive period may span over the entire length of the pre-school EFL. With the most recent group, we started to play only half-way through our third year together and even then it was the whole group vs the teacher (who always lost).
Every little helps
Here are some of the tricks and techniques that a teacher can use in the classroom while introducing competitive games or taming of the competitive games we often include in our lessons (tired and tested):
Playing the familiar games such as riddles or pelmanism in a less competitive way. First of all, we do not award points for the boardrush OR we award points to both teams for competing the task, not only to the team who is faster (especially that with boardrush at least it is sometimes very tricky to establish who really was the first one to touch the board). Points here can be pluses or hearts on the board or flashcards given out to the winner in a particular round. Instead, we finish the round, the praise everyone and we simply move on. The game itself (the fun of participating, the language produced or used) is the reward itself.
We do not determine the order of participation based on the successful participation, for example in riddles, when the student who guesses the word is the next one to play. Instead, all students take turns, one by one to make a riddle for the whole class, regardless of how good they are at guessing.
Playing ‘Simon Says’ without excluding the losers by asking them to sit down after they make a mistake, especially that a growing number of non-participating students is very bad for the overall classroom and behaviour management. Or, in the same way, playing the Treasure Hunt without establishing who the winner is. We all look for clues around the classroom or the school, we all participate for ten minutes and in the end all check our answers, without counting the points or the number of the elements or stages completed.
With pelmanism, instead of playing 1-1, with kids uncovering two cards at a time, the whole group can do it in pairs, with two kids always participating, ideally in different combinations. As soon as a pair is found, the teacher and the kids cheer for everyone, and the cards are put aside or given back to the teacher.
Play the game in the format of the teacher vs the whole group, to create the support for the individual child. If they win or if they lose, they will do it together, with all their friends, nobody will be singled out. Ideally, in such a situation, the teacher loses and has a chance to model the mature behaviour and how ‘a failure’ can be handled, but, of course, bending the rules in order to ensure that might not always be easy to do. If you are looking for ideas, I would recommend pelmanism. It is very easy to get distracted and to forget (or ‘to forget’) where the other card from the pair is located.
Any game can be played in teams, a team vs a team, instead of individuals competing with each other. This way, again, the support, the safety net or the safety blanket is created. Enjoying the victory or handing the loss is easier with your team. Even if there is one child who does not handle ‘the failure’ very well, there will be other children in this situation, too. They will serve as role models.
Having the teacher participate, as one of the teams, can also help soften the blow of the defeat. Again, the teacher will be the one to model the langauge use, the game rules application and the player’s behaviour, too.
If possible, talk to the parents whose children struggle with controlling their emotions while losing the game. If nothing else, it would be great to find out whether there have been any factors that could have played a part, whether the child reacts this way in other situations and to simply inform them what happened in class. Perhaps parents will be willing to discuss this topic at home, to reinforce what the teacher does at school and, perhaps, to also play games at home, to help the child tame that beast.
In one of the posts (see bibliography), I found another great tip. What is necessary is a quick game that can be played a few times, in a quick succession, in the same lesson. Some of these will be won, some will be lost, but the quick pace and the repetition will make either of the results, the victory or the defeat, not so relevant anymore and easier to deal with and to even forget.
Another approach that I have been using in some of my summer camp groups was the Points Poster that we used throughout the entire camp. It was very simple, only an A3 piece of paper, with the team’s name, displayed on the wall. Every time we played a competitive game, there were points, for example two or three stickers for the winners, a star for everyone else. All the kids took very well to it because winning the stickers was great but the joy lasted a brief moment only and very quickly the stickers won today would quickly get lost among all the other stickers won on all the other days. The defeat, on the other hand, was perhaps not the most pleasant thing in the world but it didn’t matter much because the students knew that they would be another game on the same or on the following day. What is more, because I was using some leftover stickers, of all kinds, sometimes it was more fun to choose one huge sticker for your team rather then three little ones…
Finishing each game with the teacher and the kids thanking each other for the game, with a simple handshake and ‘Good game‘, just like all the football or volleyball players do at the end of the match.
Any activity that can work towards bonding and building a community is also welcome
If there is the students who struggle with dealing with their own emotions while playing games, I have so far tried two things. One of them was pairing this student up with myself, in 1-1 games, in order to be better able to model, to monitor and to help the child control their emotions during the game. I have also experimented with pairing up with this child in the games that we played in teams because, again, losing (or winning) in one team with the teacher was easier to deal with.
Non-competitive EFL games
First, an anecdote. The heading of this paragraph is what I put into my google. Would you like to guess what the amazing Uncle Google came up with? Nothing.
‘Fun games’ – yes, ‘no prep games’ – yes, ‘exciting games’ – yes, sure. There was random post but nothing for kids and not many are actual games. And one article about an activity that still has winners and losers…Nada, nada, nada.
Here are some suggestions from the non-competitive games that I have played
Musical flashcards: a simple movement game, an adaptation of the musical chairs game, only without any kids dropping out. The teacher puts out all the relevant flashcards on the floor, kids move around with some music playing. When it stops, every child picks up a card and makes a sentence for example: I like bananas (topic: food), I haven’t got a cat (topic: food), I am wearing a blue t-shirt (topic: clothes) etc. Afterwards, the flashcards go back onto the floor, the teacher puts the music on for another round of the game.
All the logical games such as Find the difference (for example those that we have in the YLE Movers and Flyers) or Odd one out (for example YLE Movers) that can be easily adapted to any topic. A similar activity will be also based on the silly picture scenes that I described in an earlier post here.
I Spy: a variation of the game with a set of visuals such as a poster or an illustration from the coursebook. Kids work together as a group (in the early stages) or in pairs, they describe something in the picture, with the relevant sentences, depending on the age and level (I spy with my little eye something. It is big, it is green. It is next to the cat. etc). The student or the students who listen find the relevant object. This game is not competitive because there are no winners / losers and the game goes on until the child / children guess. As the game proceeds, the kids can offer more information and support to help their partner, for example the first letter / sound, the gestures etc.
Riddles: the same principle and procedure as above but it can be played with flashcards or a set of word cards or a set of words prepared by the kids.
Back to the board: it is a very popular game that can easily be played in a non-competitive way and this way it can go help build and develop a sense of community and give the whole group a chance to work together. One of the students sits on a chair in the centre, facing the group. The teacher writes a word or a simple sentence on the board and signals how many words it includes. The group work together to help the one student guess and recreate the word on the board. With the lower level kids, flashcards can be used instead of words although using simple sentences works wonders for the students to learn and to work better with the grammar, the sentence structure and, progressively, with the meta language.
Monster game aka Hangman aka Let’s save the little human: I love playing Monster Game with the lower levels because it helps the students work with literacy, spelling and blending and we always play it as a whole group with all the students contributing and working together to guess the letters and the words and to help the little human who is slowly losing parts of the ladder, the boat or the hotair balloon. To make the game less cruel, the element of getting points can be added (i.e. when the kids guess a part of the word or when they guess the most common letter or when they get all the vowels etc) and with my summer camp group the game finished with the kids drawing some food for the hungry monster because they developed empathy for someone hungry, even though it was a monster.
Telephone: this game is a variation of something known as ‘Whispers’, with the whole group sitting together and passing a word or a simple phrase, from the end to the beginning of the chain. This is not a very generative game or a very communicative one but it helps the kids work together towards one goal and it is easy enough even for the youngest kids.
Stations in the classroom: this is not really an activity but a format of completing tasks with kids. The teacher sets up a few stations in the classrom, for example in the four corners of the room. Kids move from one station to the other and complete the task such as unscrambling words, completing a simple handout, matching words and pictures, playing a round of pelmanims and many more. Kids complete a few tasks during the lesson and their job is done when they complete a full circle but they do not compete with everyone else in the group. It is up to the teacher to decide when then task is done and they can move on and in this way, even the ‘weaker’ students can play and participate without any pressure from the group.
Community building games: on of the 30 Creative Team Building Activities. I haven’t tried these yet but these definitely caught my eye: Cross the Line (22), Paper Chain Race (30), Shrinking Classroom (18), Building a tower (6 and 10). Or 22 Fun Team Building Games and Activities for Kids. Here I really liked: Forehead Dots (4), Some of them have the ‘choose the best / fastest team’ element which works to some extent as it helps the kids to bond within their team but I would still skip this element altogether.
Last but not least, among the things that has been on my wishlist of the things to try out in the classroom is the parachute and all the parachute games. Some ideas can be found here.
Coda
But, perhaps, the situation is a little bit better than it seems. While working on this post, I asked my audience on the social media about their opinion and I was very happy to find that those who responded use a mix of competitive and non-competitive games. At the same time, the teachers admitted that they have to deal with the competition-related stress in the EFL classroom, although not all the time and ‘some games, some days, some kids’ was the most popular answer.
What about you, dear reader? Do you play any non-competitive games with your YL students?
If you are interested in the topic (and a subscribed reader of the Modern English teacher), I do recommend reading my article from Nov – Dec 2024 that is the continuation of that post. You can find it here.
This is the second chapter of the post devoted to lesson planning habits worth developing in a teacher of a YL teacher. Here you can find the first part of it: Variety and it is all about looking back at a lesson already planned to check that includes the necessary variety of interaction patterns, materials, settlers and stirrers and learning styles.
One more item that needs to be added to the list of Things To Think About while planning for young learners are all the potential problems and solutions. It is an indispensable element of the formal written plan for any kids’ lesson (or at least it should be). It is also a habit that a teacher needs to develop for the every teaching when no plans are written.
Here is why:
Looking at the lesson from the perspective of all the potential disasters and (‘disasters’) to happen can help troubleshoot
Problems and solutions can and should be applied to the instructions, interaction patterns, materials, activities, learning styles, behaviour, participation, time, seating arrangements and the amount of language produced.
Coming up with the list of everything that can go wrong helps to generate at least some of the solutions for them and get the teacher better prepared for the lesson and, ultimately, fewer surprises in the classroom.
This is especially important if the teacher is doing the activity for the first time ever or if it is a new approach or technique never used with a particular group of students.
Analysing the problems and solutions can result in the teacher having to adapt the original lesson arrangements, in order to improve the lesson.
Predicting what can go pear-shaped and then comparing it with a list of the things that worked out or that didn’t is another fascinating exercise that a teacher can do as part of the post-lesson reflection. How many of my predictions were true? How many of them were not? Was I overly optimistic or overly pessimistic? What were the biggest surprises?
Writing these down is an option but, most likely, in there everyday teaching life, with 20+ lessons to teach a week, there won’t be any time for that. It is a lot more important to allocate time for that, though, and, although it might take a bit longer in the beginning, it is definitely one of the teaching skills that become automatic and, with time, require less and less time committment. Speaking from experience here:-) Over the years, it turns you into a teacher who takes literally a second to look at a handout or a game or a coursebook page and who can see a list of its benefits and pitfalls. Upon which a decision can be made whether to use it in class or not.
This is the week of the summer teacher training and may it be the first of many. I love being a trainer for many reasons and one of them is the fact that just as many ideas come are born in the classroom, in the presence of kids, in the same way, many are born in the classroom in the presence of trainees. Being, talking, observing and reflecting and, ta-dam, you find yourself talking and making mental notes for all the posts to add to this blog.
Here is the first post dedicated to my summer trainees from the June 2023 group.
Lesson planning process in three easy steps
Check the coursebook content, choose the lesson aims and the main activity
Plan the whole lesson (in the way you prefer to do it, with taking notes, without taking notes, with colours like I love to do or just on a set of post-it notes, like my teacher-friend Irina likes to do.
Once it is all done and ready, take another look at it and assess it, analysing it from the point of view of variety. If something is missing and/or is in excess, adapt the lesson plan
Here comes the variety…
Settlers and stirrers
This is probably the one that I would recommend starting. First of all, because it is quite straighforward and easy to spot, even for a newly qualified teacher. Young learners accumulate energy fast and they need to be given an opportunity to release it in order to be able to concentrate on those tasks that require focus. If they don’t, they will become distracted and wriggling in their chairs. In such a situation no teaching or learning is taking place.
Second of all, it is a good one to start with because it is just very easy to deal with and to fix, without any major effort. Most of the time, what it takes is to shift stages around the lesson. If a lesson is too active, a stage in which students work on their own on a task can be added. If, on the contrary, the lesson is too calm, too still, too book-bound, all you need is a song or, even better, a few songs, to punctuate the whole lesson and to give it a proper rhythm.
Materials
This one is quite easy to take care of as there will always be the board and the markers, the coursebook and the workbook, all the flashcards and a set of markers or pencils. Throw in a puppet, a soft ball, a few die, perhaps a few storybooks and some magnets and a blob of blutack and your basic set is ready. Then, to make all the dreams come true, I would add a beautiful multifunctional box, some coloured paper, a few pairs of kids scissorss and a few gluesticks, some trinkets to be the checkers, a bag of stickers, painter’s scotch and a homemade magic wand.
The computer and the screen, with the Internet access and the cornucopia of goods available online is already in the classroom.
The only thing is to make combine all the elements in a clever way and make sure that the set changes a bit, from lesson from lesson, and that some occasional pretty pieces such as playdough, watercolours or food.
Learning styles
On the one hand, ‘learning styles’ is one of the terms that features in many (if not all books) on teaching young learners. On the other hand, it is one of the most frequently mocked concepts at many (if not all) conferences, workshops and lectures on teaching English.
But, as I have been telling my trainees over the years, those who say anything about learning styles with the tiniest even traces of derision are, quite likely, the people who have never worked with children. If they had, they would have embraced any movement, action, songs, music, chants, colourful flashcards, realia, blocks and posters, not because they would lend themselves to be neatly labelled as kinesthetic, auditory and visual but because variety of learning channels means less boredom in the YL classroom and, even if only for that one reason, better results.
And it’s not that the song in the classroom is only going to be sung only by those kids who actually like singing. Quite the contrary, the song is there for all of the kids to participate only some will enjoy it more than the others. So will the flashcards, posters and realia or boardgames.
I got to this paragraph in the post and I smiled. And it’s because, as soon as we get to this point in our coversations with teachers or trainees, there is always somebody who raises up a hand to say that ‘Primary school children don’t know to work in pairs’. I smile.
It is true, that on entering a classroom with a bunch of primary school kids, you cannot just assume that you will be able to go ‘Together, together, together. Work in pairs. Here is the handout’ and it will just happen. It will not but it is not because the kids, developmentally, are unable to work in pairs. It is because it is a new environment, a new teacher, a new group of peers, a new classroom and, in our case, a new language.
Pairwork is possible in primary. Pairwork is absolutely necessary in primary and it can be done. It can be done even with much younger students and here you can read about how to go about it. For that reason, and taking full responsibility for my words, I can say that in a lesson with primary students, as a trainer, an observer, a mentor, an educator and an ados, I would expect to see some whole class work, some indivdual work, some teamwork AND some pairwork.
Practical notes
I like to colour-code different areas to better see the balance or the lack of it.
I sometimes use it as a reflection task before teaching the lesson, sometimes it is a post-teaching entertainment.
Most of the time, I use it in my everyday lesson planning, and then I only focus on one or two areas here and that is usually when the lesson plan just ‘doesn’t feel right‘ and I am trying to identify why I am not happy with it.
This is also a technique that I have used in teacher training, with evaluating the lesson plans of my trainees, while preparing an observation report and, naturally, also during the lesson planning sessions of all kinds. Because of that, the main objective would be different, either to identify the weaker areas and to create the connection between the lesson planning process and the lesson itself or while lesson planning to problem shoot and to ensure that the lesson is balanced, at least on paper.
A4 pieces of cardboard, one per child. I have used just regular craft cardboard, sold in sets. I had the colourful one but I needed the back side of it, in order to decorate it so white carboard will be even better.
Glue, to be used before the lesson
Markers to decorate
Scotch and scissors or a very good stapler
Something to put inside, for example buckwheat (raw).
Procedures
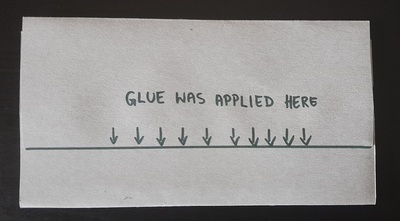
Partially, the materials had to be prepared before the lesson. I folded and glued the A4 pieces of cardboard into envelopes a few hours before the lesson, to give them a chance to dry completely. Each cardboard sheet was folded into three and glue was applied along the shorter edge.
One model shaker was also prepared before the lesson and then presented in class. We learned the word and we passed it around for all the kids to touch it and to try to use it.
The envelopes templates were given out, we wrote our names on them and we took about 5 minutes to decorate them.
I set up the assembly table with all the other resources and as soon as the kids were ready, they were coming up one by one to the teacher to finish the shaker.
The final stages completed by the teacher went as follows: 1. close one end of the envelope with three layers of scotch. 2. fill the envelope with buckwheat, to about 1/3 of the envelope 3. fold the other edge of the envelope and close it with three layers of scotch 4. try it with the kid
The most important part was our attempt to use the shakers. We tried out two activities. The first one was a simple Listen and Repeat with different rhythms ‘dictated’ by the teacher and, possibly, also by the children. The other one was singing of a song that we all know very well with the instruments. We chose ‘If you happy and you know it’ by Super Simple Songs. For one song we all became an orchestra and we agreed to shake twice (after the words ‘clap your hands’ because, indeed, there are two claps) and once (on the words ‘clap your hands’ because, again, there is one clap there). The same patterned followed in the other verses, with stomping, oh no and take a nap.
Why we like it
First and foremost, I am excitingly happy with the design of this shaker which I came up with myself. The topic of the lesson was Music and one of the activities suggested was making some easy intruments. There are lots and lots of amazing designs that I found on Zing Instruments’ website and I want to make so many of them but, last week was very busy and I simply had no time to collect plastic bottles or to ask parents to give their kids one. I did not want to use plastic cups because I did not have the right kind of glue and I have always had some reservations about collecting toilet rolls that frequently feature in these activities. I spent the whole evening breaking my head over that dilemma, getting angry by the minute because the ideas were not coming. Until I finally gave up and went to sleep. My last conscious thought that day was the answer to my question. This design works. The materials are easy to get, the task is feasible for everyone and it has a universal appeal, too. All my kids were equally excited and involved in the task, the one aged 4 and the one aged 10.
I was a bit dubious about the durability of the shaker but it did last a whole full day of extensive use. We made it in the first lesson of the day but the kids were carrying around and using it throughout the entire day. I cannot guarantee, of course, how many days they would last afterwards but, even if they break later on, they can be easily fixed with a piece of scotch and some buckwheat or remade and although I do not wish it on my educational parents, the worst case scenario will not be a real disaster. The raw buckwheat can be easily cleaned up and I don’t imagine, kids would want to eat it, because it is just not tasty or pleasant to eat.
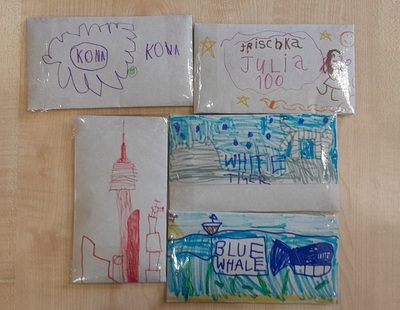
The cardboard envelope was very easy to decorate, easier than a roll or a plastic cup and we could use regular markers instead of all the other materials featuring on the designs I found on the website, such as the painter’s scotch, decorative scotch, permanent markers or acrylic paints. The kids could draw anything they wanted, either very simple patterns such as stars or hearts or something that was very special to them, for example a blue whale, a white tiger or a skyscraper.
As I have already mentioned above, the shakers became the real treasures almost instantly, to all the kids. ‘Are we going to take them home?’ was, naturally, one of the questions that every single child asked while we were producing them, just to make sure. And yes, we did take them home but the kids agreed for me to take a photo of all the beautiful shakers. Mine does not even feature in the photos, it was definitely the least interesting:-)
The finished product helped us in developing social skills. In the final stages of the lesson we became an orchestra and we worked on doing something together, listening to the teacher to repeat the rhythm and, even more importantly, listening to the song and shaking our shakers to the rhythm of the song. This particular group really really needed this kind of an exercise and I was very happy that we managed to become an orchestra for a few minutes. If it had been my regular, long-term group, I would produce some of these shakers to keep in the classroom and to repeat this kind of an exercise more regularly.
I was a little bit worried about me having to deal with sealing the envelopes but I could not delegate this task to kids as it is quite tricky, for any young learner hands. However, because there were only five children present and of different ages and of different levels of interest in drawing, it all came together. My youngest Sasha completed the task of decoration first and his shaker was the first ready. But then, having had a look at what everyone else created, he went back to his table to add some elements and afterwards he started to play with the shaker. A similar thing happened to all the other students and there was no dead time. However, if we make the shakers again, I will start playing our favourite songs during the time when we all decorate our shakers. This way the kids can start using the shakers with the music as soon as they ready. And, even if they are still working, they can still sing along.
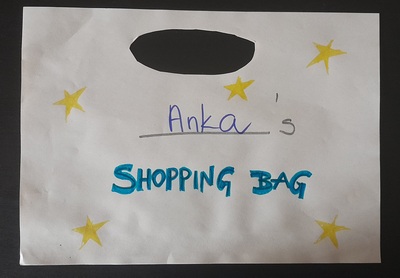
A lot of paper, in general, in the form of a shopping bag (see photos), cut-outs of food items to be used, one of each per child and a small cardboard rectangle per child for the credit card
Some furniture for the shop, possibly a poster to put up on the board
Markers and glue for the group, for colouring and decorating the shopping and the bag
The video to set the context. I used the cartoon from Playway to English which is available on youtube.
Procedures
Introduce and practise the vocabulary. I have used it with different groups, ages and topics such as: food, fruit and vegetables, toys, big numbers, with pre-schoolers and primary.
During the city camp, this was the final part of the day (project), in our regular classes this was usually the last lesson of the unit.
We started with watching the cartoon and showing the kids our ‘shop’, which is usually just a table with a chair, in front of the board which is also also as the display for all the products available.
I showed the kids my shopping bag and gave out the templates for them to write their names and decorate it in any way they wanted. The kids glued the sides of their bags together.
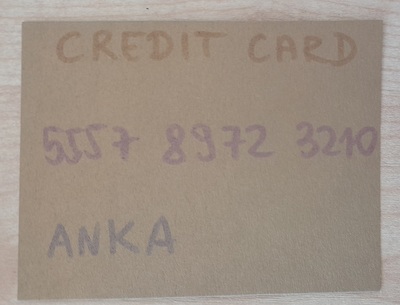
Afterwards, I gave out the small cardboard rectangles and we prepared our credit cards. I cut them up before the lesson and wrote ‘credit card’ on each. We looked at my credit cards and tried to make sure ours include the same information, namely the name and the number.
Afterwards, all the students were taking turns to come to the shop to do their shopping, to pay, They they went back to their tables to colour the cards. We repeated this stage a few times.
This time round, I did not include any special preparation as regards the functional language because we were only using the basic forms that we use everyday (Hello, How can I help you, I want / Please, can I have…, That will be, Thank you).
Why we like it
This was a lovely, communicative lesson. All my students produced a lot of langauge, both as regards the key vocabulary and the functional language. The kids were involved, they kept coming to the shop until they bought absolutely everything.
The best thing about this activity set up in this way is that despite very moderate resources (only paper, only black and white copies), they kids were fully engage. They took it seriously, they stood in line, they were taking time to make a real decision what to buy. They were also very serious about the payment. I did not want to include any real counting and prices but we did have the moment of the payment being completed, every time the teacher said ‘beep’. And all of it was real despite the fact that our credit cards were made of cardboard and that our terminal was simply my computer mouse. It didn’t matter. The magic did happen with some paper and the careful set up. One of my students commented ‘This is the first time I have gone shopping’. She did not talk about ‘playing shopping’, or ‘pretend play’, she used the verb ‘go shopping’ and she was really serious about it. Looking back, I actually do think that although I had done this activity before, only now, it was especially successful and I believe it was due to the introduction of the credit cards.
There is a lot ofpotential for extending the activity, with more complex structures if possible and with elements of maths if we add prices, for older kids. With some groups, I also managed to make it more SS-centred because I was involved only in the first round, for everyone to do their shopping once. In later stages, that is the kids were taking turns. Student A was the shop assistant and student B was the customer. Afterwards, student B would sit down and student A would become the customer, with student C taking over as the shop assistant.
A lesson of this type can also be used in a variety of lessons: with different topics (clothes, toys, food, furniture), to introduce the idea of money, to teach the kids about the value of coins and notes, although, actually, at this point, the majority of transactions are done via credit cards.
This was my first reaction to the context I had a chance to teach in last week. To be honest, I am still sighing because an experience like that does not wear off too easily. Yes, it was not a positive experience.
Now, even being just dead inside and very very angry (not a contradiction) at the time it was taking place, I was still a devoted teacher and, even more importantly from the point of view of this post, I was a trainer, reflecting and assessing. So here we are. For you, what not to do and why.
What happened
Last week I had a chance to teach an extremely mixed ability group. I am an experienced teacher and an experienced trainer and, over the years, I have had an opportunity to work in a variety of contexts with different students and mixed ability groups in all shapes and forms and types of a mixture. Last Wednesday I reached a new level.
There were nine kids in the classroom. Three of them – real beginners who should be learning colours and their first hellos. Seven of them – pre-literate students who would require an alternative set of materials. Two kids – of a higher than ‘just pre-A1’ who should be in a more advanced group. One child, aged 5 (according to the information from the admin) and aged 4 (according to what he told me) – a pre-schooler who should not be spending in the classroom more than 30 minutes. Three kids, aged 10 – who should be in a completely different group where they are given a task on a higher cognitive level of challenge than just a picture to colour. And yet, there we were, myself and all nine kids (all of them called Sasha, traditionally), in the same classroom, for 4 academic hours of a lesson.
We all survived. Here are some notes from this memorable day.
The youngest Sasha…
The youngest Sasha was completely out of place. He did not understand what we were doing and the only reason why he even stayed in the classroom was that his older sister was present and involved. He was trying to join in, though, and the result of it was a little boy babbling in some kind of a newspeak, that was neither pidgin, nor Sasha’s L1 and not any langauge known to mankind. Albeit, to be honest, it to someone who did not know English, it might have sounded like English, from afar. My heart was literally aching at his efforts.
The youngest Sasha had no idea of the way you interact in the classroom. On countless of occasions, he would get up, come to the board, pick up markers to draw on the board (since the classroom was not baby-proof, I did not expect a pre-schooler), to try to nick a few post-it notes. He did not understand why he did not get a set of mini-cards (and some kids did, the leaders of all the small teams) and when he got a small heart for the other activity, he did not want to give it back. Because why would he? At one point, I felt like being on the playground and ‘fighting’ over toys.
It was beyond the little Sasha’s understanding why we would even dictate the colours for each other to use in a colouring dictation. ‘But I want to colour it blue and green!’, he said, already on the verge of tears and, later on, naturally, he was thoroughly confused that his picture was different from the teacher’s, his sister’s, all the other kids’ and he kept asking if he did a good job and if he completed the task well.
The Sashas in the middle…
Generally, these Sashas were under control. After all, they are the kids who have spent the longest period of time in the classroom and they are the kids who have had a chance to experience and to benefit from the routine of the previous two weeks. High five to the teacher who made an effort to build this routine. It was worth it. These are also the children who constitue the biggest group and the activities were generally designed for them and graded to their linguistic, cognitive and social skills. They did participate, they did produce, they did work well in pairs and, unknowingly, they were the kids that the teacher was looking at and sighing with relief. ‘Not all is lost’, thought the teacher. ‘I have not run in vain’, thought the teacher, quoting her favourite quote from the Bible, albeit a very un-religious one.
But, still, the atmosphere of the lesson, chaotic and messy, unravelling and tense (my bad, I know that) also took its toll even on them. My amazing twins were on the edge and, at one point, a heated debate broke out because one of them wanted to play a simple gussing game (as intented and as they were instructed to) whereas the other wanted some hints and suggestions (because that is how we played in the previous weeks). ‘Why aren’t you miming? Why aren’t you telling me if it is big or small and if you like it?’, he was asking. They ended up getting upset with each other and breaking up for a minute. The other pair, Sasha girls were sleepy and tired and on the verge of tears and even though they did play, they also spent a moment discussing whether they should just divide the cards into two piles or take them from the same pile and how much time is necessary to make a decision which word you want to use to talk about (Answer: not too much, the sooner, the better).
The day is quite long and the kids like to ask how much time is left. We have established a routine that when they want to know, they should ask (‘What time is it?’) and the teacher checks the watch and writes how many minutes are left until the nearest break. I don’t quite like it but they are quite young, they cannot tell the time using the clock and, still, they need something to understand and to manage the lesson time. We have drilled the question, it is always on the board and, although it is slightly annoying to hear the same question over and over again, it gives me an idea of how involved the group are. The more frequent the questions, the more ‘trouble’ we are in. Unsurprisingly, in that particular lesson, this question was popping up again and again and again.
The oldest Sashas…
The oldest Sashas finished the task way too quickly for teacher’s liking and we all had to wrap up a bit faster, although, indeed, they got convinced into taking part in some kind of an extension and it did buy the rest of us some time.
The oldest Sashas, because there were more than one, spent the lesson being on the brink of getting involved in some alternative, mostly illicit activities. In the end, they did not, with an experienced teacher present, but, oh Lord, there was so much potential for it. If there had been only one older Sasha, they would have been more easily contained. With two or three, at times, they could bounce their exciting ideas off each other, fueling the behaviour that were not quite welcome.
It was almost a miracle that the older Sashas enjoy colouring and that they got midly interested in completing the task. They were most engaged than I would have expected from children of their age. I can safely say that, yes, I did get away with it.
In an ideal world, these Sashas would be getting a much closer monitoring from the teacher to ensure that they are using the same material but producing a lot more langauge than the average student. Unfortunately, with the kind of mix that I actually had to deal with, it was not possible. Apart from the storybird activity that involved a 1-1 interaction with the teacher, closely supervised. Overall, the teacher was not happy at all.
I have also noticed that one of my older Sashas has got a very strong inclination for bullying. Nothing happened but I do not like the vibe and the way he behaves around the younger children (aka all the other children in the group). He is naturally a leader without any skill to be one and he has absolutely no one to look up to and to be inspired by. He would benefit more from being in a group of older children in order to develop his social skills and to learn from the other kids.
If I could think of a metaphor for that day…
A sweater that is fraying uncontrollably, at three different ends.
Washing the windows in a flat ont the top floor, in a blocks of flats. Standing on the chair and reaching out to this little piece in the corner, thinking that this may all end up in a very, very bad place.
A flooded kitchen, with you trying to make decisions quickly and to save something, to wipe the floor and not to let the flood spread to the neighbours below you.
A three-course dinner for ten, prepared by one relatively skilled chef, on one hob, with a pot and a pan.
A herd of cows that your grandma asked you to bring back from the pasture, walking them on the main village road, with all the tractors and all the combine harvester coming back from the fields and using the same road AND all the neighbours and villagers standing by the fences of their houses, watching the god-damn show because a city teenager trying to manage a task she had no preparation or knowledge of. Speaking from experience, in case you are wondering.
Any of the experiences that you spend hating every second of and yet you go on and you survive. Exhausted. And then you just sigh and vent in a post on your blog.
Coda
There is not much to say here apart from this one thing: all these kids should not be learning English together. There are too many factors that come into the picture that make it an almost impossible task for the teacher. It is true that English language groups are rarely homogenous and it is especially true in case of young learners groups and, especially especially, in case of primary school students. Teachers are simply obliged to deal with that issue on daily basis. Managing a group of kids who are on the same level of English but who are of different ages – it is possible. Managing a group of kids who are of the same age but have different levels of English – it is manageable. However, this kind of a mix, different age groups, different levels of English, different levels of literacy skills, cognitive skills and social skills development with such a number of kids is simply not a good idea. If you have a choice, please, DO NOT DO IT.
The EFL classroom, just like the Mary Poppins’ bag, is full of the little pieces that to other people might be just random junk but to the teachers of young learners, they are the true gems and the amazing, life-saving fireworks. This post today includes only 5 of them, something old, something blue, something borrowed, something blue or, in the EFL words, something for production, something for games, something for classroom management…Because sharing is caring.
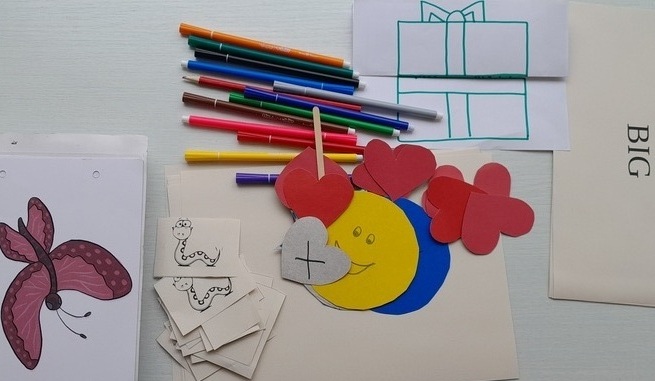
One: paper hearts
You need: a set of small colourful cardboard cards, which stand for ‘I like’ (the colour side) and ‘I don’t like’ (the side with a small cross).
You will need these to encourage the kids to start expressing opinions. The hearts are used as a symbolic representation of the structure when it is introduced, they are used in all the handouts, even with the youngest kids, but they really start working when the students can physically hold them and use them to react to express opinions by showing the appropriate side of the heart, depending on their opinion. First come the gestures and the symbols, then the language itself and then the hearts become unnecessary because the kids are ready to just talk about the things they like and those that they don’t. It works amazingly well with small groups and it works even better with the bigger groups because all the kids can talk at the same time and the teacher gets the immediate group feedback with all the hearts up into the air.
Two: Little random word cards
You need: a set of regular small cards with the key vocabulary from the unit. They can be handwritten or printed. For the younger kids these are replaced with a set of mini-flashcards, with the images and the text or only the images.
You can: use them in a variety of games to practise vocabulary such as: riddles (make a definition to guess the word), questions (ask a question with the word for your partner to answer), similar or different (taking two words at a time to look for similarities between them), categories (with students grouping the words in any way they want), random stories (telling stories with the words taken out of the pile in a random order) or testing each other (to check the meaning or spelling of certain words) or pelmanism if there are two sets of words per group or pair. Anything for more vocabulary practice and use.
Three: Faces
You need: a set of cardboard circles with emoticons for them. The disposable paper plates work amazingly well here, too.
You can use them during the hello circle to help the kids answer the question ‘How are you today?’ as they are allowed to manipulate the cards while talking to the teacher. We also use them all the time while telling stories to help illustrate all the emotions involved and while working with any visuals that accompany listening or reading activities in the coursebook. The emotion flashcards can also come in handy with different behaviour issues. Knowing the words such as ‘angry’, ‘sad’ or ‘ill’ can really come in handy in many class situations.
Four: Stars
You need: a set of cardboard stars, cut out of regular or, if you are really fancy, out of some colourful cardboard paper, and some blutack or magnets. In a super upgraded version these cardboard stars can have a piece of magnetic sheet glued to them (aka this is how we recycle the merch magnets given out at out local pizza place, cut them up and glue them to things we want to use on the board).
Why? These have become my go-to, clutching-at-straws solution to motivate my kids to speak more English in class at the point when my sweet primary kids grew up and became more talkative and they were more likely to choose their first language to chat away. The stars, given out demonstratively with an excited ‘Oh, what beautiful English!’ worked in two ways. On the one hand, they made them focused on using the target language, on the other hand, somehow, magically almost, it got them to use the target langaguage from the higher shelf. Once they got into the habit of communicating mostly in English, we could stop using the stars in every lesson.
Five: Names Cards
You need: a set of small cardboard rectangles, with each of the students’ names on them, one per card, possibly laminated, to make them year-long-lasting.
You can: use them for any pairwork or group forming activity without getting personal. The cards can be kept in a box or a bag and drawn out by the teacher to organise the kids in a fun way. Even more so, the students can be involved in the draft. This way the grouping and pairing will be the most impersonal, the most random and the most genuine ever. It might also make it easier for the students to accept the outcome, even if they end up working with the classmates whom they might not like very much. After all, it will be due to luck, good or bad, not due to some very arbitrary decision of the teacher.