Two circles cut out of cardboard (regular photocopying paper is too thin and flimsy), with the two holes for fingers also cut out before the lesson.
Glue to glue these together
Crayons, pencils or markers to draw the appropriate body parts
Procedures
Show the kids the finished product, introduce the frog, chat with the kids
Show the kids the smaller circle, show how you decorated it.
Give out the pencils / markers.
Give out the small circles, decorate it with the kids.
Give out the bigger circle, decorate it, if appropriate.
Collect the pencils.
Show the kids how to glue one on top of the other. For the younger kids, it might be a good idea to draw a small cross on the top of the bigger circle, to signal where the kids should put the glue.
Give out the glue sticks. Kids glue their circles together.
Glue the additional body parts, when appropriate.
Collect the glue sticks.
Play
@ Magdalena
Why we like it
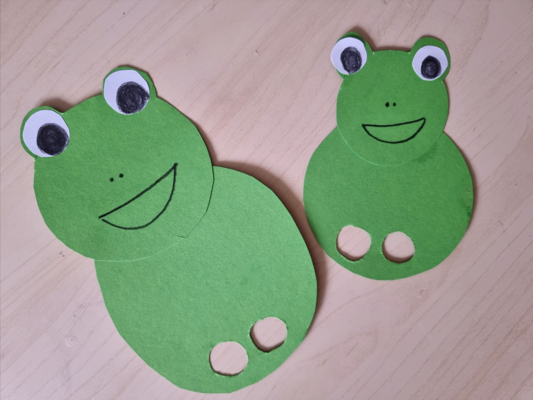
It is super easy! These frogs here, in the picture, were produced for a child (a huge Frog Fan), rather than with a child, and that is why I went a bit crazy with the eyes but there are the simpler versions of it)
These two circles can become many many things: a frog, a bear, a cat, a dog, a monkey, a rabbit or a snowman, with little adaptations.
The task does involve a lot of pre-cutting but the rest can be done by the kids during the lesson.
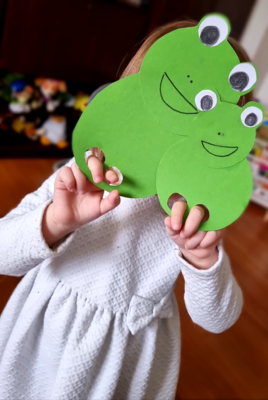
Once the toys are ready, they can be used to play, as any other puppets with all the structures that the kids are familiar with and with those that match the topic of the lesson, at the very least, ‘Hello’, ‘My name is’, ‘I like…and you?’ and it is always great when you can maximise production.
It was a typical day in the life of a small scale Mary Poppins. I set out for a shift at the volunteering centre and, as an experienced one, I could not imagine to go unprepared, even if minimally. I thought that, at the very least, we can do some circle magic. I could not take everything but I had a big pocket and so it got filled in with three glue sticks, an envelope full of circles, a small packet of colourful feathers (that was a nice coincidence that I had it). A4 paper and a box of markers did not fit in one hoodie pocket.
When I arrived and started the shift, it became obvious very very quickly that the place is not ready for any craft activities because, apart from one small table and a few little stools and a box of coloured pencils, there was nothing. Or, rather, there was only me and my pocket.
There is some beauty in that, really, when you get to see how your brain starts to get involved in order to think of a solution. Sure, THAT was not about sending a man to the moon or putting together a new recipe, but, still. I was building a grid for our version of hop-scotch and sorting out toys, and the brain was trying to imagine what I can make out of the contents of my pocket. A little chick, that’s what.
Ingredients
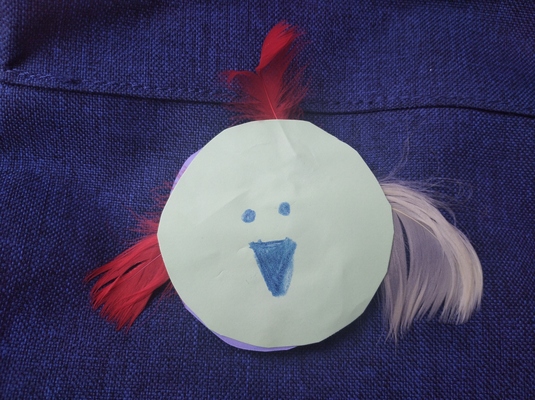
lots of circles, cut out before the lesson out of colour paper, regular type, cardboard might be too thick. As for the size, this time it is officially: the Size of the Bottom of a Mug, colourful, for the kids to choose from, two pieces per child
glue
something to draw (markers, pencils, crayons)
colourful feathers (I got them in the stationery section of a regular supermarket, you can buy them in any craft activities), but they can be replaced by strips of colorful tissue paper (also those unevenly torn), three per child, if you use the feathers or as many as you want, if you use the strips of the tissue paper
Procedure
ideally, for the smaller children especially, it would be a good idea to put a cross on one side of each circle, so that it is absolutely clear on which side children should put the glue
each child chooses two circles
choose the circle that will be your front, draw the eyes (two small circles in the most basic version), and a beak (a small triangle)
take the other circle, cover the cross side with the glue
place one of the feathers on the top, for the little ‘fringe’, on top of the glue, so that a part of it is on the cirlce and a part of it stands out of it
repeat the same with the other feathers, by putting each of them on two sides, for the wings
take the front circle, put it face down, cover the cross side with a lot of glue
place it (more or less carefully), on the top of the back circle and the feathers, press
use the birdies to play, the kids can use them as puppets, say hello, introduce themselves, ask how they are, and use any other structures that they already know
Why welike it
is very, very easy, I have done it with two-year-olds (with a tiny bit of help) and with eight-year-olds
there is more potential for decoration (a more complex bird’s face, legs, tail etc)
the main focus of this lesson (or activity) can be playing with the chicks as making them will take only a few minutes
despite being very easy to produce, this craft has a lovely ‘wow’ moment and it lies in the fact that such simple elements put together can gives a lovely little bird.
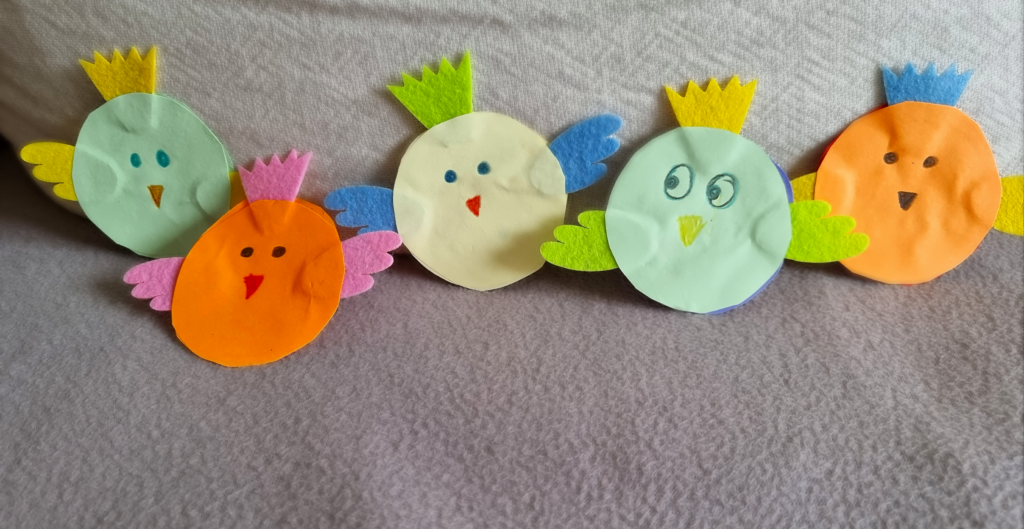
below, you can also see the ‘proper Easter, made with mum and aunt’ version, with professional wings, made of felt. They look pretty and we made them only because I found this set in a shop. Here, it might be a good idea to let the chicks spend the night in the middle of the book, to make sure that they stick properly (felt is a bit thicker and it will need more encouragement, especially if you are using just the regular glue)
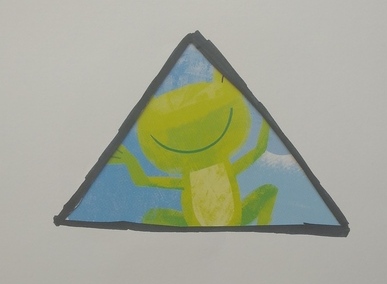
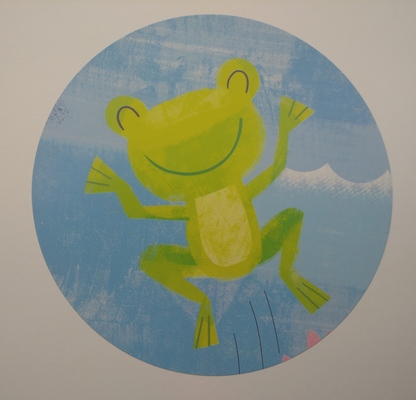
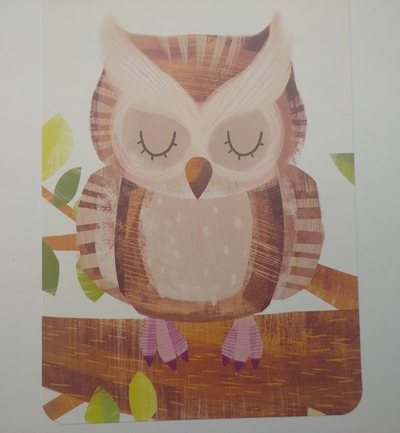
Flashcards created with the illustrations from Bystry Maluszek @Zielona Sowa Publishing House
Ingredients
a set of flashcards
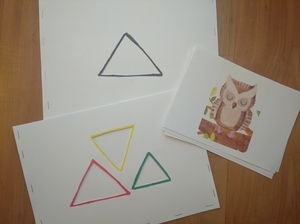
two pieces of cardboard stapled together on three sides
shapes cut out on the front page (cut out before stapling)
Procedures
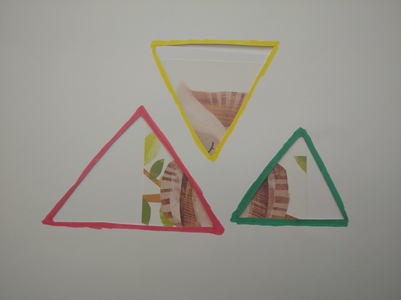
hide the flashcards inside
show the students only a part of the card on the top, through the cut-outs, ask the kids ‘What is it?’
take out the card and proceed with the rest of them
hide the flashcards inside
show the students only a part of the card on the top, through the cut-outs, ask the kids ‘What is it?’
take out the card and proceed with the rest of them
Why welike it
this is a variation of the Through the Keyhole activity that I once saw in the I Spy coursebook. However, this original version included an A4 sheet of paper with a keyhole that the teacher needed to cut out and then move the card over the flashcard. I found this tool a very interesting one but, at the same time, a bit awkward to use as the teacher needed two hands to manipulate the cards, there was a chance that the children could still see bits of the card apart from the keyhole bit and the activity involved a lot of picking up and putting down the cards. All in all, too clumsy to handle.
to make a funky envelope you need only simple materials (A4 cardboard or simple photocopying A4 paper although it will not be as durable, white, colourful or recycled), a pair of scissors and a stapler or glue. As soon as one envelope gets destroyed, you can easily replace it with a new one.
you can have one simple cut-out shape or a selection of different shapes all over the envelope.
all the flashcards fit in nicely inside, the teacher can manipulate them more easily. I sometimes turn the envelope over, to change the cards inside and to add to the whole ritual.
I normally use when the kids are already familiar with the images on the flashcards not to make the task too challenging, in lesson two or three of the unit. However, there were also cases when I used the envelope to introduce a brand new topic and to raise the level of challenge.
a very detailed plan and careful staging (see below)
post-it notes (two different colours)
the materials to set the context based on the material from Superminds 5 by Herbert Puchta and Gunter Gerngross from CUP
Procedures
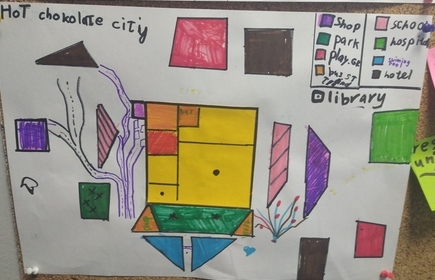
The introduction to the project was based on the material in the coursebook.
Afterwards we made a list of places in the city (I was taking notes on the board). Then, the kids were chatting in pairs, creating questions for each other: Which one is more important in a city, X or Y? Why? This was a fun activity, the kids were coming up with sometimes impossible pairs and providing justification for their choices.
I divided the kids into pairs and explained that we were going to design a good city. Each pair got a set of questions about their city and they were to discuss these with their partner. The handout was cut up into three pieces and they were given out, bit by bit (or rather, that was the plan. In the end, I only gave out the first part, the other phrases and questions were simply written on the board for everyone to see). I was only monitoring and asking follow-up questions. We did not have a whole class feedback.
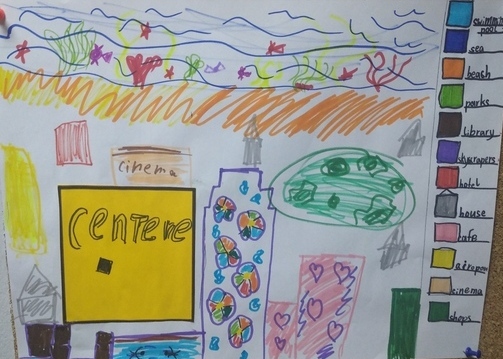
I gave out the A3 sheets and the yellow square. I explained that it is the city centre and I asked the students to decide where it is in their town and to glue it on. I did it on my model. I drew the map legend box and I drew two items on my plan. Afterwards, I gave out materials and the students started to work.
The negotiation language and the steps (stage 2 of the handout) was displayed on the board. I planned it differently but, in the end, I decided not to give this part of the handout out. There was no room for it on the tables anyway.
The kids were working on the project for about 10 – 15 minutes, until the end of the lesson.
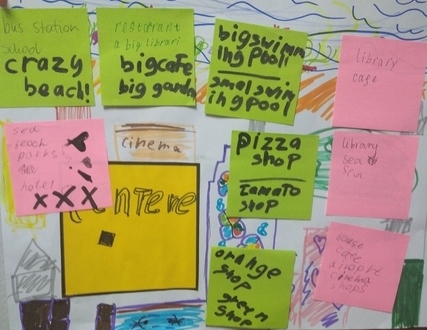
At the beginning of the following lesson, the kids sat down with the same partner and each pair got a set of post-it notes, pink to write what they like about the city and green to write about the things that the city should have. We circulated the projects, kids worked in pairs, looked at the plans, talked and made their notes on the post-it notes, discussed what they liked about each city. They also made suggestions and all their ideas were written down on the post-it notes which they attached to the plans. Each pair had a chance to talk about all of the other posters.
In the end, the posters returned to their owners and the designers had a few minutes to look through the comments.
In the very last stage, each pair of designers was asked to provide feedback on the feedback they received. They did that by answering the following questions: Which are the favourite places in your city? What should your city have? Do you agree? Why? This was the only part of the project that was done in front of the whole group.
In the end, the posters were displayed on the walls.
Why we like it
I personally really liked this project because it was a diversion from a traditional approach to a project in which the students work in pairs or teams to produce something and then present it to the rest of the class and in which a creative stage is followed by a productive stage. I have decided to give up on this format almost entirely and, instead, to minimise the creative stage and to maximise the production without limiting it to the post-project phase.
Throughout the entire project, the kids produced lots and lots of language, they were making suggestions, expressing views and commenting on the other students’ suggestions. There were at least three layers of material created by the students, in one format or another.
In hindsight, I do believe that there were even more opportunities for the further extension of the project by comparing the real cities the kids know and whether they would be a good place to live, by making suggestions how the city they live in can be made better or by ‘visiting’ one of the other cities and writing letters or postcards from their visit…
I was glad that I decided to keep the creative part of the project, even if in a limited format. They students really did enjoy designing their cities, drawing and colouring, even though in my eyes (a boring teacher here) they should be the first to go as not very generative.
It looks like my kids also enjoyed the project. They were asking after the lesson whether I would put the posters up (I did!) and, a few days later, whether we are going to have any more project lessons (we will!)
Here is a pumpkin flower: simple and unexpectedly beautiful, just like this game.
Ingredients
A piece of paper and something to write with
For younger students – somewhere to keep the paper safe and secret i.e. inside a coursebook
Imagination
The whiteboard to put the target language on
Procedures
Kids work individually, keeping their cards secret from their friends but if the game is played for the first time, they can work in pairs, this will be their natural support and the source of creativity because two heads are better than one.
Teacher ask the students to write numbers from 1 to 5, in a column. When they are ready, teacher asks the kids to write 5 words, one at number 1, one at number 2, etc. Teacher monitors and prepares her/his own set to use in modelling. It might be also a good idea to write a few examples on the board although these are just for modelling and they will not be used in the real game. The target structures should also be displayed on the board.
Teacher demonstrates how to play the game – she / he describes the first word on her / his list for the whole class to guess. It might be necessary to play a few rounds with the whole class, with the teacher leading the game or with one of the strongest students leading the game.
The game can be played until all the words are described and guess OR for as long as there is time.
Important: It is absolutely necessary to carefully combine the vocabulary and the target structure to make sure that the set is used naturally and that it matches the context, too. Some of the examples of the activities we used below
Places in the city (ie bank, post office, school) + I can see…I can hear…I can smell…Where am I?
Professions + I am going to work, I am going to do…Who am I?
Animals + It is big / small, It can run / fly / swim, It has got…
Body parts + I need it / them when I write, swim, play
Objects + passive voice ie It is made of…, It is used for…
Personal characteristics + Present Simple, 3rd singular, This person always does something, This person never does something
Why we like it
The biggest advantage of the game is that it can be adapted to almost any set of vocabulary and any structure.
It can be used with the lower-level and the higher-level groups, with the younger and the older students.
The game requires no preparation for the teacher and it is SS-generated which means that it is personalised and motivating for the kids to play.
It is a perfect controlled practice activity as the kids are using the target langauge and the target vocabulary.
It is a guessing game and because of that it is both achievable and challenging.
With the younger kids we play the game of 5, with the older ones we usually prepare 10 words.
This started as an activity for the CLIL lesson devoted to space and Yuri Gagarin but after I published it on Instagram, one of my friends suggested that it might be a great idea for the end-of-year revision activity. And it is that, indeed. Thank you, Rory!:-) Hence this post.
Ingredients
An A1 piece of paper although, to be perfectly honest with you, it never is that. Every time I have made any murals (and that’s what this activity really is), the preparations started with a pile of A3 sheets of paper, a roll of scotch or a glue stick. It is easier and faster (no shopping trips) and more adaptable (because the teacher is in charge and the poster can be made bigger or smaller, depending on the size of the group or the theme of the project).
Creative materials of your choice – pencils, markers, finger paints or watercolours. This time we used markers, in my opinion better suited to the age of the kids and the task.
A place where all the students can draw simultaneously. In my classroom, we use the space in which we normally do the movement activities because we have a big carpet there and it is always a lovely variation to our everyday routine, both for the little kids or the teenagers that like visiting another classroom from time to time. A big conference table or a set of desks put together will be a great solution, too.
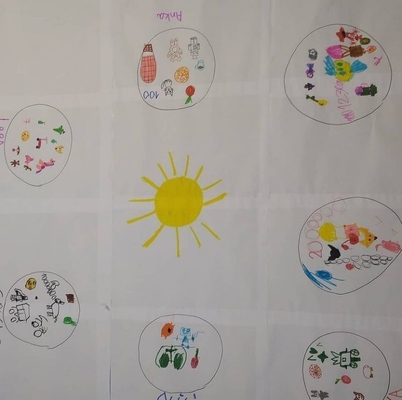
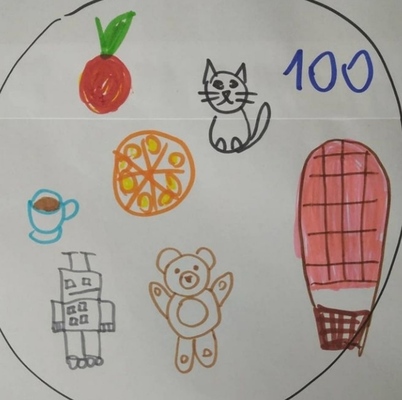
A decision as regards what language, vocabulary and structures, you are going to focus on in the task. In the original task, we created our planets with all our favourite things, our favourite number, colour, food, drink, animal, transport etc.
It is necessary to stage the activity carefully. The kids sit down on the floor around the poster, the teacher draws the sun in the centre and counts the kids and then draws one planet for each child around the sun. In the first step, each child chooses a marker and writes their name. Then the teacher ‘dictates’ the first topic and the kids draw it and say what they are drawing. In my classes, we use the song for that ‘What’s your favourite colour?‘ by Super Simple Songs and its variations because it offers the question – answer set (‘What’s your favourite…?’ ‘I like….‘). For some kids it is necessary to sing, some are better prepared to respond to questions without the support of the music. The teacher waits for everyone to finish each stage and the fast finishers can be encouraged to draw more than one item, to look at other students’ drawing, react to them (‘Do you like…?’) etc.
Round-up: If there is time, the students stand in a circle around the poster, first at their own planet and then, on ‘1..2..3! Let’s fly!‘, they move one planet to the left. Everyone reacts to what they can see on the new planet, for example ‘I like…‘ This stage can be repeated a few times, depending on the time available. Afterwards, the poster is displayed on the wall. It can also be used as part of the presentation for the parents in the following lesson.
Why we love it
First and foremost, it is a great project for the whole group and it really does contribute to building the community and that is because of the fact that we all sit around one big piece of paper and because of the concept of this activity – a solar system of which all the students and the teacher are a part.
It might be especially suited as the first project work for a pre-school group as everyone has a chance to contribute to the project but it is automatically clear that no one can take the final product home, as first of all, from the very beginning it is obvious that there is only one copy, that it is too big and that all the planets stay a part of the system and cannot be separated. Frequently, this issue can be the biggest problem with the project work for the youngest of students as they become attached to their creations and the first question they ask is ‘Anka, but can we take it home?’. Not this time.
The activity itself in its original version is very flexible as its timing will depend on how long the children are interested. Perhaps only three elements will be included, perhaps ten. The format of the activity also helps with staging as the children do not know what is to come and will not start going ahead of the group.
The song format helps to encourage the kids to actually produce the language, especially that in our case we used this question-answer set beforehand so at the time of this particular lesson, the children were already used to it and used to responding to it.
It can be used with all age groups and levels as the language content can easily be adapted either to more complex ways of discussing favourite things, drawing their own planets to practise the vocabulary of the natural world (with a more extensive presentation at the end of the project), creating a planet which is a symbolic representation of each student. For the older students, the planets can be filled in with words, rather than with images.
They are growing up. My students are no longer the little babies they were when we said our first ‘Hello!’. Six years is a long time, after all. And because they are changing, the lesson is changing, too. I like to think that, in a way, we are growing together.
An example? For five years and five months my students would wait for me outside of the classroom, in a neat line and we would check the homework and have a little chat, 1-1, with them slowly entering the classroom (more about it here). Well, not anymore. Two months ago we stopped. For good.
Because it turned out that, all of a sudden, the kids like to be in the classroom before the lesson. The choose their seats, take out their books, draw on the board or show each what they do in Maths classes at school. They also like to hide to surprise me (if I happen to leave to get some water or flashcards), walk around to inspect what I prepared for the day or just sit down and read they books.
And because over those six years we have managed to establish what’s OK and what’s not OK in terms of behaviour and because they have grown up and become more mature, I just let them do it and take over the classroom during the break. Plus, let’s be honest, they seem to be enjoying it a lot and I just don’t have the heart to forbid them and to continue to impose lining up.
Instead, I had an idea: how about a before-the-lesson activity for the early comers? It turned to be a very good idea indeed!
Ingredients
A whiteboard and a set of markers.
An activity that can be prepared on the board before the lesson for the students to work on potentially unsupervised (although in real life it differs, depending on whether I can be in the classroom during the break or not)
A set of easy instructions written on the board and an example
A longer break before the lesson – not obligatory but highly recommended
It might be necessary for the teacher to hint that there is something on the board that needs dealing with, at least when this part of the routine is introduced. It is quite likely that the kids would just not approach the board if there are any notes on it.
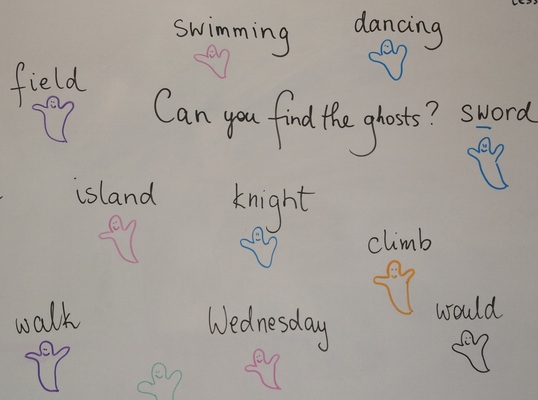
Ghost letters, focus: pronunciation. Students underline the silent letters in the words written on the board
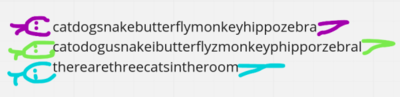
Letter snake, focus: reading / writing. Students divide the chain (or a snake of letters) into words. Each snake can be made as challenging as necessary ie only the words themselves, the words with letters-distractors, the words in a sentence.
Letter stories, focus: reading/ writing. Students divide the very long chain (or a snake of letters) into words and sentences. I used a different colour for each line of the story and neat breaks between the lines, too, not to overwhelm the kids. Forgot to take a photo:-(
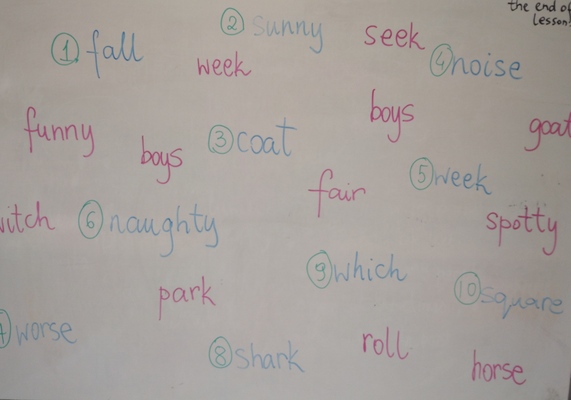
To rhyme or not to rhyme, focus: phonemic awareness. Students put the rhyming words into pairs. Again, colour-coding is supposed to be make is a bit more achievable and visually appealing.
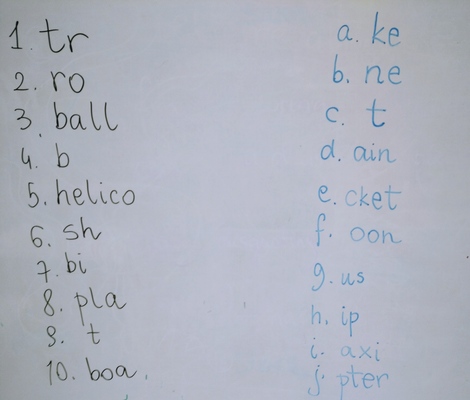
Messed-up, focus: vocabulary revision. Students put the halves of words together.
Angrams (and Secret Messages): These are just silly anagrams which are a nice task, more necessary for the Starters students but fun for everyone. It can be a set of random words, connected by the topic (or not) or sentences, especially if there is an especially important message that the teacher needs to pass on to the students. The message below appeared on the board before the second lesson with the mock Movers test, in an attempt to praise the kids and to motivate them. It worked!
Why we like it
Those who come early can wait for the lesson doing something in English.
They provide additional practice and revision in different areas and skills: reading, writing, vocabulary, pronunciation
Different kids come early on different days so they get to work in different pairs and teams which seems to strengthen the sense of community in the group
It seems to have become ‘fashionable’ to arrive early for class (not that it has even been a problem) but it is obvious that they have already developed the habit of walking in and checking what’s on the board
The teacher is applying all her creative powers to come up with more and more pre-lesson activities
Today about an activity that requires almost no preparation and is a nice break from the coursebook and from the everyday. Plus – you can draw. Ready? Let’s start the Musical Challenge!
Ingredients
A piece of paper, some drawing tool and a few tracks.
The choice of the tracks will depend on the teacher but it is good to include a variety of genres, songs or music with different tempo and instruments. I like to pick songs with a long intro and in a language that the students do not speak, not to let them be influenced by the lyrics.
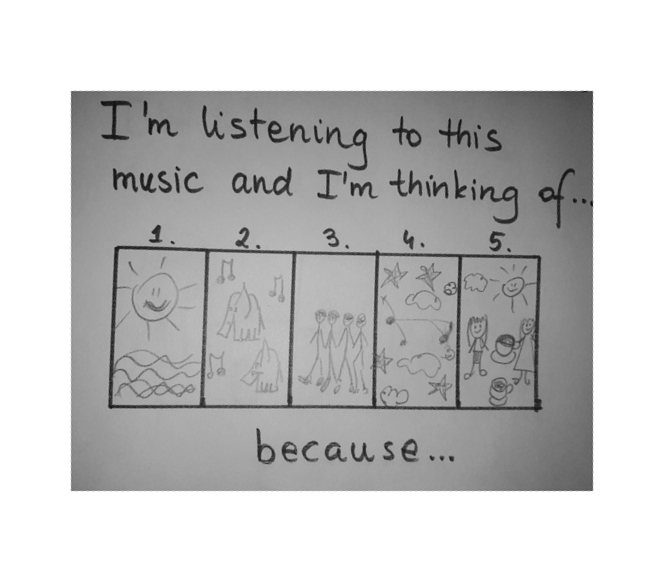
Tell the students that you are going to play a short piece of music and they have to draw what they are thinking about when they hear this music. Highlight that all ideas are good ideas. Give the students an opportunity to include words, for example is some concept are difficult to draw.
Model, with a sample track.
Play about 30 – 60 seconds of a track and give the students up to a minute to finish drawing after the track stops. However, this is a fast-paced activity and its main aim is to provide material for speaking, not the drawing itself. Some students might want to make their drawings too pretty and too detailed and that will take time.
Put the students in pairs, let them discuss the songs. If possible, it might be a good idea to play the track they are discussing in the background to create the appropriate atmosphere.
Remember to put the questions / structures you want the students to answer / to use on the board. It will help them produce and stay on the ball.
Final feeback can include choosing the favourite and least favourite song.
Why we like it
It is very easy for the teacher to set up. It is enough to play the audio from the phone or even from youtube, pratically no preparation is necessary. It is possible to prepare a grid with numbers but it is much easier to give out an A4 or an A5 piece of paper that the students are asked to fold into halves until you get eight or six boxes. It works well, too. Because of that, it can easily become your go-to last minute, no-prep activity that can be added to any lesson.
It works well with different ages, not only with higher-level students, although, obiously, they will be able to produce more langauge and to discuss their own associations, metaphors, using more advanced language such as modal verbs for deduction. At the same time, even the younger and lower level students can describe their illustrations using simpler structures (I can see, he is wearing, he is happy) and to express their views (I like this song, I don’t like this song because…). The youngest students that I have done this activity with were about eight years old and studying in the A1 level.
The teacher has a lot of flexibility, this activity can be stopped whenever it is necessary, after four, five or eight tracks. The activity does not really have an end so it does not matter when it is stopped, for example when the students are not quite interested.
It can be further extended into a homework task. The students can be asked to choose a song, prepare their drawing at home and then play the song for everyone in class and either draw or just talk about their associations before presenting their original picture. If the songs are played in other than L1 or English (or if the beginning of the song does not include any text), the discussion can go in the direction of the story that the song is telling, based on the title, the summary or the single quotes.
It gives the students a chance to express themselves through drawing. We do a lot of that with the younger students but as we go, higher (level) and older (age), drawing and colours do disappear from our lessons, sadly. It is good to bring these moments back. They students do enjoy these.
It is a fascinating opportunity to see how music can be seen by a group of people and how different these associations can be.
It is highly personalised and open-ended, all ideas are good ideas
As a result, that kind of an activity generates a lot language.
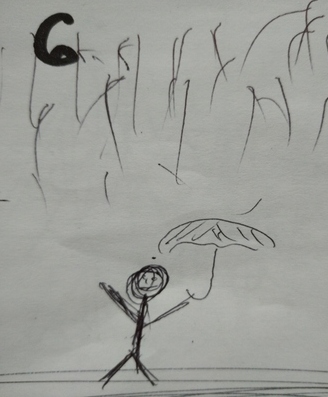
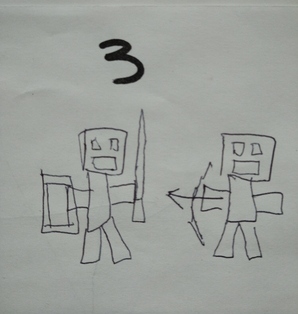
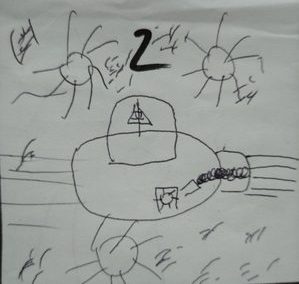
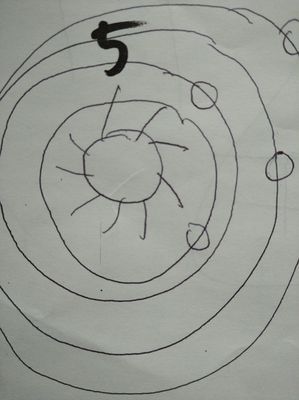
The last time we did it a few week ago, we used the following tracks (we also read a text in our coursebook on music and fashion in the last 70 years, this is how all of the songs appeared here and how I listened to Ed Sheeran for the first time in my life:). Now, have a look at the pictures illustrating this post and have fun guessing which song inspired them. The Joni Mitchell, River