Materials May and Mandalas!

Mandala, Mandala!

I was looking for the inspration for our final month of Art. I did not start this year with a curriculum for all nine months, although probably, that would have been the recommended and adult course of action. Instead, I spent all these months just getting a theme for September, October, November…

Then came May and I needed something different, something interesting and something that starts with the letter M, just like this month.

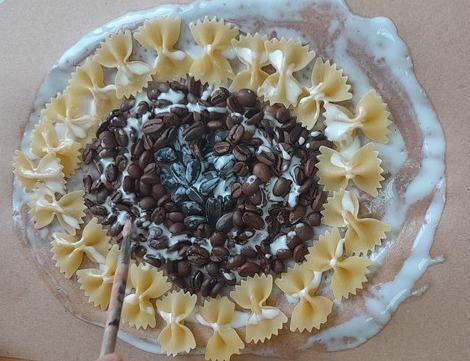
Sunflower Mandala

The artists

This was an important part of the lesson to give the kids a chance to understand what a mandala is and many different techniques there are to create it. I focused on the simplest and the most basic and straighforward meaning of a mandala representing the Earth.

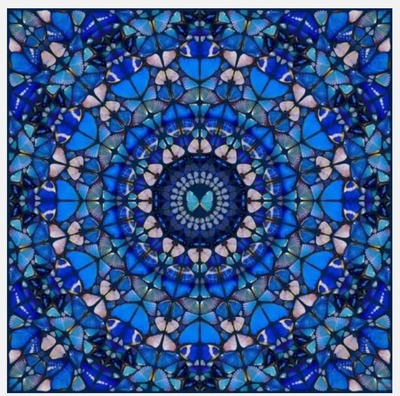
We looked at three different artists who are famous for their mandalas and the materials they used because I also wanted to have a representation of a variety of tools. That is why we looked at Jamie Locke who carves her mandalas, Damien Hirst who composes his out of butterflies (I still cannot get over the fact that these are real butterflies) and Stephen Meakin who painted his.

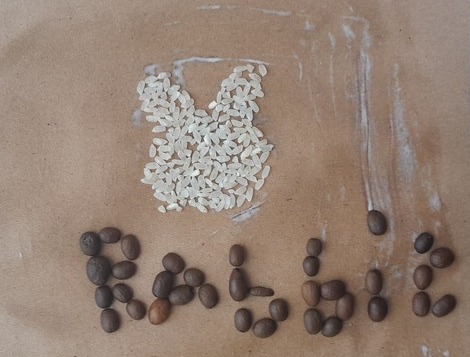
Rabbit ‘Mandala’

The language

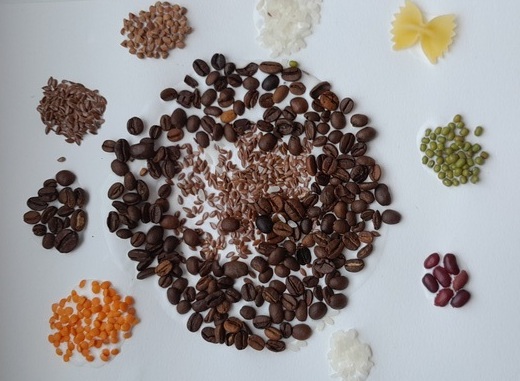
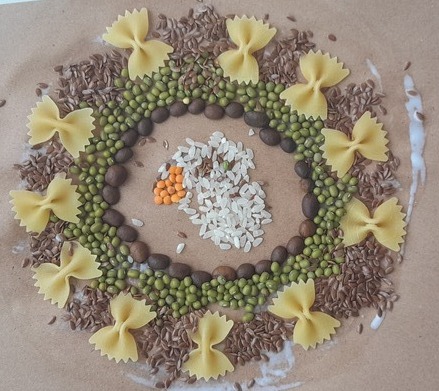
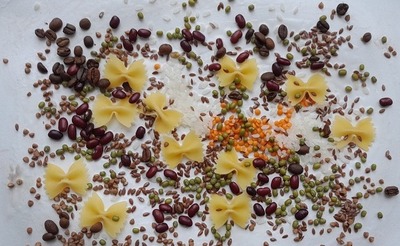
Only after we looked at the artists, did we go through the language for the day, namely all of the materials to be used in class and, as usual, we used the wordwall cards. The cards and the vocabulary have been consistent with what I found at home and in my local supermarket and consistent with all the materials that I wanted to use. That is why have here beautifully green mungo beans and orange lentils.

I am aware of the fact that these are not the most commonly used words, especially by beginners but I did not want to extend the langauge slot because making a mandala takes time and we have only 45 minutes at our disposal.

Goose Mandala

The art

Mandalas are beyond beautiful and, esentially, very easy to make, albeit time-consuming. As regards materials, you only need a lot of PVA kids glue (I tried to use the regular glue stick but it is not that effective), cardboard (as the regular paper will not be able to keep up with the large amount of glue) and the seeds of your choice.

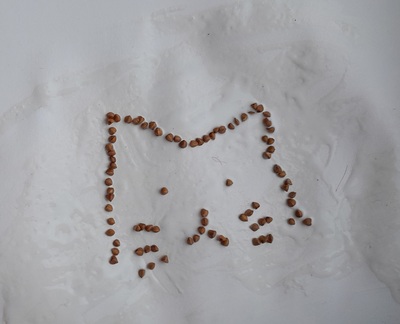
Cat Mandala

As usual, we prepared the working stations on kids’ separate desks and all of the materials were placed in boxes and in bags on the table at the front of the classroom. I also had a few separated containters (deep lids from plastic boxes). The students were told to come up, choose their material, one at a time, and either take the chosen box to their table or to take some of the material into a separate lid to move them around the room. We put on our aprons and I gave our small paintbrushes in order to move the pieces around to avoid touching the glue, as much as possible. I also gave a long, serious and boring speech in both languages about not eating anything on the table. ‘This is not food, these are materials right now. We don’t eat the materials’ could be the summary.

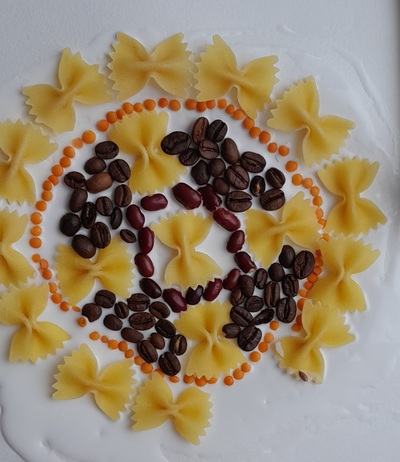
One missing pasta piece Mandala

The actual making of the mandala is super easy and, apart from showing the children the one I made at home, I also started another one in the classroom. There are three easy steps: attaching the paper to the table with painter’s scotch, squeezing out a large blob of glue and smearing it in a circle and starting the mandala from the centre, going out and around. If necessary, another layer of glue might be added as it dries out and another layer might be added at the end of the of the process, especially for the big bits, such as the pasta pieces. The PVA glue dries beautifully and it becomes transparent, without destroying the picture.

We left ours to dry on the window sill and on the following day, I put them up in the polly pockets and kids took them home.

Why we loved it?

  • Just like the tiny pictures, this activity does wonders for developing focus and concentration. Everyone stayed focused, everyone stayed silent and they were just working beautifully.
  • It is also a lovely task to develop cooperation skills because even though we had a selection of materials and boxes, the kids still had to wait, to share, to negotiate and I am very happy to say it went well.
  • The task involves a lot of self-control as, despite the fact that all of these were hard, raw and not very tasty grains, some of my students were still asking for the permission to eat them, just to try. One of the boys even left the room because he knew he wouldn’t be able to resist but then he came back and worked well, only talking about eating our materials. I am trying to say that I was happy that I waited with such a task until the end of the year, when we had already our routines and rules developed and in place. I would not recommend doing it in September or until the group is ready for it.
  • The kids loved the work, too and, as you can see in the photos, the majority of them went for a traditional mandala, some decided to create chaos which is also beautifully represented in the world. Some of my Super Artistic Stars went for their signature items such as the rabbit and the goose or the cat which Alex, laboriously, constructed out of the buckwheat pieces. We had a few flowers, too.
  • This was one of the rare cases when I did not plan on displaying the art on the wall and all kids took their pieces home. I was worried that on the wall, unsupervised, the pieces might be picked up by some of the students and consumed. I really didn’t want to risk that and we do not have closed cases in our school in which the mandalas could be safely displayed. Plus, of course, everyone wanted to take their creations home, as soon as possible.
  • I was thinking of the ESL / EFL classes in which this kind of craft could be used and here are some of the ideas (although I feel obliged to mention that I have not used them in class myself, not in that format): a lesson on the natural world, a space lesson craft, with everyone creating their own planet, a lesson on big numbers in which we could count all the pieces used and, in a Science lesson – on grains and seeds.
The realistic representation of the world in a mandala

P.S. A request!

It is very simple.

I would like to know a tiny little bit more about my readers. There are so many of you, popping in here, again and again, and the numbers of visitors and visits are going up and make my heart sweel with joy. But I realised I don’t know anything about my readers and I would love to know, a tiny little bit more.

Hence the survey.

Crumbs #72 Teaching design to kids aka some magic with a paper towel and water

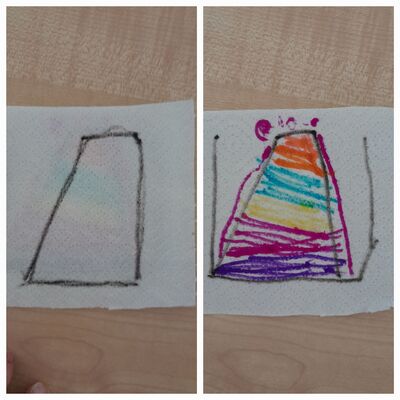
Page 1 and Page 2 of the Rainbow Volcano

Ingredients

  • Paper kitchen towels, cut up into rectangles. It might be a good idea to test and trial, always, but especially here, not all the kitchen towels have the appropriate density. They cannot be too thin or too thick, for the kids to be able to draw with markers and for the water to wet them fast and efficiently enough.
  • Markers. I am using the thick ones but their tip is not to thick. Roller pens might be too thin.
  • Some water. In order to be able to use it in the classroom, we used a big plastic box. Ours is not very deep and it does not have to be. At home kids can use the washbasin, the sink or even the soup plate.

Procedures

  • This was one of the three experiments I planned for our Science lesson devoted to water.
  • Apart from everything else that we did on the day (which you can read about in an earlier post here), this part of the experiment was called the Surprise Experiment. We started with looking at the materials which I demonstrated and we watched a short but very informative video from the Messy Little Monster that I found on youtube.
  • While in our lab (aka the dining room), I showed the kids the box filled with water and, together, we looked at the pictures I prepared and tried to guess what we might see once they land in the water. These included: Hello – kids! (the visible part – the part that appeared while in the water), a simple sun – a smiling, yellow sun, my name is – miss Anka, you are – fantastic.
  • Then we were dropping cards into the water one by one and checking the full picture.
  • Afterwards we went back into the classroom and started to create our own pictures. I showed the kids two cards and drew one picture with everyone looking, as a model. It was absolutely important that they understand that page 1 is only a part of the picture and that page 2 is going to be more detailed. While we were working on the pictures, we developed a few useful techniques: checking the design against the light, drawing with the picture on the window pane, tracing the lines twice or three times (on page 1) to ensure that they seep through onto the page 2, to facilitate making sure that the pictures match. I was also showing the kids’ ideas to the room as soon as I spotted something interesting, for example the use of the words, the use of the colours or the elements.
  • We established in the beginning that in class we are only going to watch a few examples and create our own, to take home and to surprise the parents.
  • After the lesson, I sent a message to the parents in the messenger to tell them about the surprise coming from school and how they can use it, where they can pour water etc.

Why we like it

  • Apart from the fact that this activity was a great puzzle piece in the lesson and on the Blue / Water day, I loved the fact how it worked.
  • The activity itself is very simple and requires only the minimal resources.
  • All the kids, our preschoolers and primary students, could create it, with varying degrees of detail and complexity. It worked very well with a mixed ability group. Although, of course, I can be further adapted with the teacher starting the activity i.e. drawing circles on both pages or other shapes to which the kids could only add the detail on page 2.
  • It gave everyone an opportunity to design something and I was really impressed that they got the idea of how this simple toy works and what is required to make it. To be honest, I was truly impressed with the kids took to it and how creative they became in the process. The first designs were very simple, a circle that turns into a smiley and so on but, as the time went on, their creativity was simply snowballing and more and more amazing ideas started to pop up, also because everyone was observing everyone else and sharing ideas. The mountain that turns into a volcano (in the photo), a girl that turns into a princess, cards to say hello to mum, dad, grandma, the house that gets all its details…It was amazing and I am just sorry I did not take more photos. And I did not take more photos because I was busy cutting up more and more pieces of the paper towels. I planned to give everyone three bits for three mini-projects but I underestimated my kids, their creativity and the speed with which they started to draw.
  • I was also very happy with my being clever and announcing that all the kids’ experiments will be carried out at home only. Doing it in class could become very messy, especially with the big groups because the pictures need to be taken out of the water as the colours start to run, they get the water dirty. Taking the pictures out means that there are wet balls of paper around…I decided that the kids would enjoy it a lot more at home, especially that they could also take pleasure in showing off what they have learnt at school.
  • The langauge production was a bit limited but, to be fair, for us, it was spread throughout the day. We talked about the pictures while they were being designed and there was a lot of focus on instruction and the functional langauge. There was also some opportunity for the language of prediction / guessing and I would definitely like to explore it more in the future.
  • This experiment can be a part of a lesson on the colour blue, on the topic of water or perhaps also in a lesson on conditional and the langauge of prediction with the older kids. It can be also a very simple craft activity with all age groups.

Happy teaching!

Crumbs #66 Shapes Project for Primary

Ingredients

  • A set of shapes of your choice, cut out of paper before the lesson
  • An A4 piece of paper with the list of figures that will be included in the activity.
  • A glue stick for every child, a pencil to take notes

Procedures

  • Naturally, this project involved some pre-lesson preparation: the handout, the glue and, most of all, all the shapes which needed to be cut up and sorted out. I used 5 separate boxes to make sure that they don’t mixed and are easy to select and to abandon.
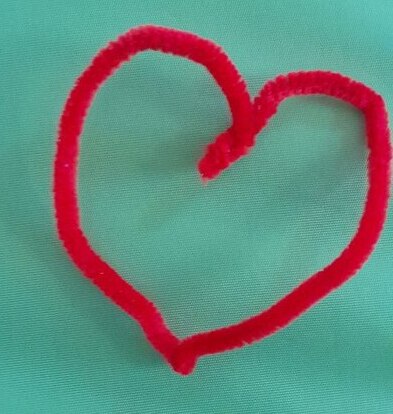
  • We had two lessons devoted to shapes and so we could do all of the following as a preparation for the project: introducing the shapes, looking for the shapes in the classroom, song Can you see a circle? from Super Simple Songs, looking at Shapes Monsters from Twinkl, to recognise and to count them, making shapes from pipe cleaners (the example of which you can see above), working on the sequence (‘circle, square, circle, square’) and, as a direct example for our creativity, looking at some transport made of shapes (also found on Twinkl).
  • The next step was a set of instructions. At the moment I work with a teacher assistant and I saw it as an opportunity to use this resource in setting up the project. I prepared my instructions to use the simplest language possible but I still asked my TA to translate sentence by sentence. The main elements were these: We are doing a project. We have five shapes (displayed on the board). You can make something for yourself. Maybe a flower, maybe a car, maybe a monster (referring to everything that we saw in class). All ideas are good ideas. You can use 10 shapes (gesture). Please sit down and think. I will call one student to come here and choose shapes. Sasha, come here, choose 10 shapes. etc.
  • Afterwards, with Sasha choosing her shapes, two students helped with giving out the handouts and the glue.
  • Everyone kept working on their shapes, I was walking among them, helping and monitoring and as soon as they were finishing, I would come up and ask them to count all the shapes they have used.
  • In the end, the kids were showing their projects to each other but it was not a formal stage of the lesson. Ideally, we should have finished with everyone showing their work and presenting ti with a simple ‘I’ve got…’ but, unfortunately, in our case, we ran out of time.

Why we like it

  • In general, it is a simple project with a lot of potential and it can be used in a variety of lessons.
  • In a Maths lesson, like ours, it is a an opportunity to see the practical use of shapes and to balance the serious studying with a more creative task. It also involves shapes recognition and counting. It was also an interesting follow-up and development on the previous lessons in yet another way: we looked at shapes, we counted shapes in shapes pictures, we looked for shapes in the classroom and we made shapes out of pipe cleaners. These last two activities were especially exciting for the kids and that was my cue for a more hands-on activities.
  • In an English lesson on shapes, this activity could also work very well, especially that there is the early literacy activity which, potentially, can be extended. The kids can be asked to copy the words from the board and, in this case, the ‘handout’ will not be necessary. The kids can also be asked to write the name of the picture they created, especially if they work within a vocabulary framework, for example toys, pets, animals or transport, although, admittedly, this would put a kind of a harness on the creative thinking here.
  • In an Art lesson, this activity can be connected with any artist who liked shapes for example Kandinsky, Malevich, Mondrian, El Lissitzky or even Picasso. Apart from the main art project, there would also be an input session devoted to the Artist of the Day. If you are looking for ideas, please have a look here, at Teaching English Through Art.
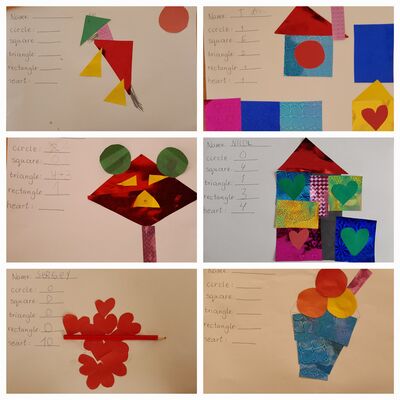
  • As a first project, this lesson was a wonder (and please forgive me blowing my own trumpet here!). The kids got the idea and they really took to it. Everyone interpreted the task in their own way and created some lovely pictures, some of which are an inspiration for me as a teacher, for example to draw the shape first and use the shapes to create a proper collage or to make a list of all the shapes necessary beforehand, in order to facilitate and to promite the Thinking Time stage of the project. Please make sure you have a look at the examples below.
  • The kids got involved in the project, even though there were a few who were slightly reluctant in the beginning. However, as soon as it became obvious that, really, all ideas are good ideas, they started to work on their projects.
  • The next time I do this project, I will make sure I prepare my own model. I was planning to do it but then the teaching day started and I simply forgot. It would have helped with the instructions and the whole project, including the counting of the numbers and the final presentation.
  • As regards the choice of the resources, it seems that it was also a good idea to go for a more exciting type of craft paper, as regards the gloss, the texture, the print or a mixture of these. It really adds up to the success of the project. It might be also a good idea to consider an A3 paper for the base, the A4 might be a bit limiting, although A3 is definitely a more tricky size to carry around, to take home or, even, to put up on the wall.
  • It really was a way for all the kids to exercise their creativity and I am very proud of my students. Some of the creations are simply brilliant and they helped me learn something new about my students. It is also a signal for me to use more of these activities.

Some noteworthy examples of creativity from my kids

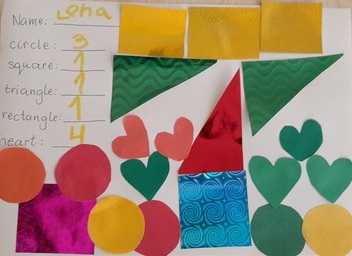
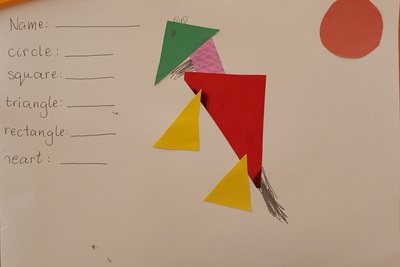
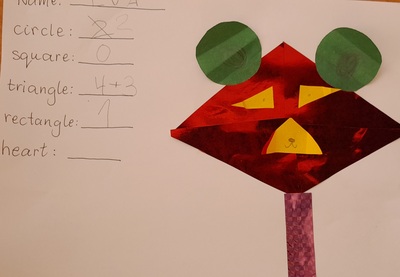
This is Lena who was the student to plan her project properly, out of her own accord. She prepared a list of ingredients necessary and, as you can see it does not quite match the number of the shapes used. We fixed it later, after the photo was taken, by writing: circles: 3 + 3 etc.

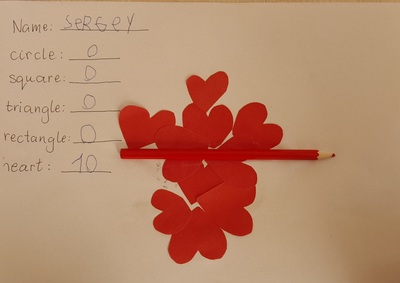
This is Sergey who decided to take a completely different route and to create a proper work of art, made of hearts only and with a red pencil which is also glued to the paper.

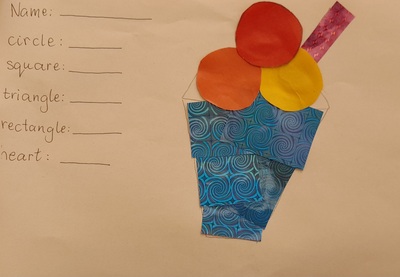
This is Sasha, who was initially very uninspired by the task as he prefers listening. However, after a while, he figured out how to combine the two. He drew an ice-cream cone and then, once it was ready, he came to choose his shapes. This is a lovely approach and I will definitely be using it in the future!

This is a beautiful example of how creative kids can get. Sasha, whose most favourite thing in the world are horses, found a way of creating a horse with the shapes we had. It shows a high level of development of symbolic representation as well as creativity. We see a horse in it hence it is a horse.

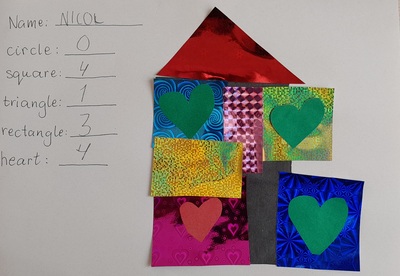
This is a picture by Nicol, quite simple one, just a house, we might say, but it is just wonderful because of the paper used and because of the consistent use of hears as windows.

And another wonderful picture, a bear, in which Sasha, decided to use a variety of techniques, including drawing and elements of origami to create a 3D eyes and muzzle for the bear.

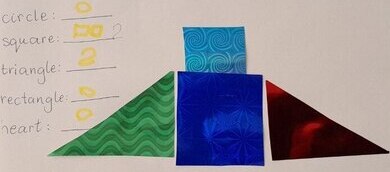
This example comes from Sasha, who decided to go for a seemingly simple design of a structure, made of only four shapes. However, it was nothing but simple! The big blue square is in fact glued expertly along three edges to create a pocket into which the small blue rectangle could be put in and taken out. Sasha was extremely proud of his example and I was proud of him.

Happy teaching!

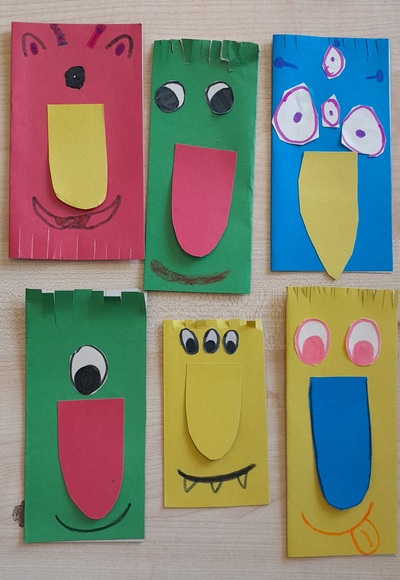
Crumbs # 65 Monster Bookmarks

Ingredients

  • Colourful cardboard, some white paper, markers, scissors and glue
  • An idea to inspire you. I got mine from I Heart Crafty Things and if you are interested you can even find a template there for a small price although, I, personally, did not find it necessary.

Procedures

  • Before the lesson, I prepared the paper: small pieces of paper for the eyes, a large rectangle of cardboard (for example, an A4 sheet makes 2) folded in half, smaller rectangles (aka strips of paper) cut up for the nose.
  • We had two full lessons on the topic of body parts, monsters, health problems and going to the doctor. By the time we started the craft activity, the kids had already practised using the body parts in a sentence, they had described countless monsters, they had also created a monster with in a dice drawing activity.
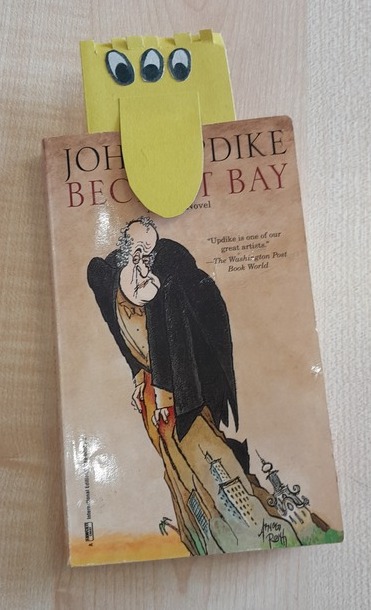
  • I showed the children the ready product and we described it together.
  • We started with the kids choosing the colour of the big rectangle (the body of the monster) and so did I, in order to be able to demonstrate every step.
  • We cut up one of the longer edges, 5 – 10 mm, along the whole age (the hair). Afterwards, we applied the glue inside the folded rectangle and glued the two halves together.
  • We decided how many eyes we want our monsters to have. We drew these eyes, cut them out and glued them on the monster.
  • The kids chose the colour of the paper for the nose. We drew the nose on the back and we cut it out. On the back on the nose I drew three short lines at the top, to mark the place where to apply the glue. The kids do the same and we glued the nose on the monster.
  • We finished with drawing the smile and adding some decorations.
  • We finished with introducing the monster (name, age, boy / girl, what he/she likes).

Why we like it

  • This craft was a part of the lesson that in itself was very generative, productive and creative. That is why, for the main craft activity, I wanted something that the kids could use not only to produce the language but to use outside of the lesson. That is why I started to look for ideas for bookmarks.
  • When I showed my monster in the beginning of the lesson, some of my kids went ‘Oh, monsters, I don’t like monsters’ but, somehow, they all wanted to make theirs and they got really involved, boys, girls, the younger, the older. I was happy and not so surprised (because it did happen before) that they all left the classroom almost hugging their big-nosed creations. And, once out, I heard them report to the parents, in a very animated way, what it was that we did in class.
  • The craft is relatively easy, with some simple materials, especially that the cardboard can be easily replaced with the regular paper. It did involve some before-the-lesson preparations but nothing very time-consuming and, again, the templates were not necessary at all.
  • I have already started to think of adaptations and of replacing the monster with other ideas and shapes. I have not done these yet, but I am thinking a lot about elephants and, inspired by my friend’s son, LEGO people…Once they are ready, I will definitely share here:-)

Happy teaching!

Crumbs #61 How to make a shaker

Ingredients

  • A4 pieces of cardboard, one per child. I have used just regular craft cardboard, sold in sets. I had the colourful one but I needed the back side of it, in order to decorate it so white carboard will be even better.
  • Glue, to be used before the lesson
  • Markers to decorate
  • Scotch and scissors or a very good stapler
  • Something to put inside, for example buckwheat (raw).

Procedures

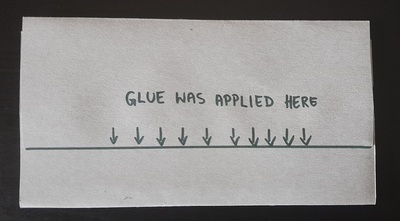
  • Partially, the materials had to be prepared before the lesson. I folded and glued the A4 pieces of cardboard into envelopes a few hours before the lesson, to give them a chance to dry completely. Each cardboard sheet was folded into three and glue was applied along the shorter edge.
  • One model shaker was also prepared before the lesson and then presented in class. We learned the word and we passed it around for all the kids to touch it and to try to use it.
  • The envelopes templates were given out, we wrote our names on them and we took about 5 minutes to decorate them.
  • I set up the assembly table with all the other resources and as soon as the kids were ready, they were coming up one by one to the teacher to finish the shaker.
  • The final stages completed by the teacher went as follows: 1. close one end of the envelope with three layers of scotch. 2. fill the envelope with buckwheat, to about 1/3 of the envelope 3. fold the other edge of the envelope and close it with three layers of scotch 4. try it with the kid
  • The most important part was our attempt to use the shakers. We tried out two activities. The first one was a simple Listen and Repeat with different rhythms ‘dictated’ by the teacher and, possibly, also by the children. The other one was singing of a song that we all know very well with the instruments. We chose ‘If you happy and you know it’ by Super Simple Songs. For one song we all became an orchestra and we agreed to shake twice (after the words ‘clap your hands’ because, indeed, there are two claps) and once (on the words ‘clap your hands’ because, again, there is one clap there). The same patterned followed in the other verses, with stomping, oh no and take a nap.

Why we like it

  • First and foremost, I am excitingly happy with the design of this shaker which I came up with myself. The topic of the lesson was Music and one of the activities suggested was making some easy intruments. There are lots and lots of amazing designs that I found on Zing Instruments’ website and I want to make so many of them but, last week was very busy and I simply had no time to collect plastic bottles or to ask parents to give their kids one. I did not want to use plastic cups because I did not have the right kind of glue and I have always had some reservations about collecting toilet rolls that frequently feature in these activities. I spent the whole evening breaking my head over that dilemma, getting angry by the minute because the ideas were not coming. Until I finally gave up and went to sleep. My last conscious thought that day was the answer to my question. This design works. The materials are easy to get, the task is feasible for everyone and it has a universal appeal, too. All my kids were equally excited and involved in the task, the one aged 4 and the one aged 10.
  • I was a bit dubious about the durability of the shaker but it did last a whole full day of extensive use. We made it in the first lesson of the day but the kids were carrying around and using it throughout the entire day. I cannot guarantee, of course, how many days they would last afterwards but, even if they break later on, they can be easily fixed with a piece of scotch and some buckwheat or remade and although I do not wish it on my educational parents, the worst case scenario will not be a real disaster. The raw buckwheat can be easily cleaned up and I don’t imagine, kids would want to eat it, because it is just not tasty or pleasant to eat.
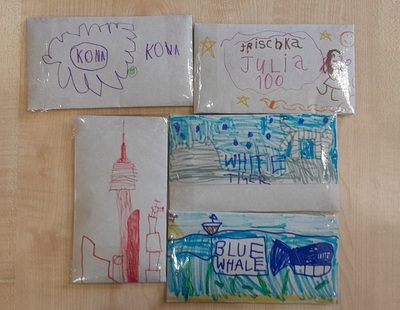
  • The cardboard envelope was very easy to decorate, easier than a roll or a plastic cup and we could use regular markers instead of all the other materials featuring on the designs I found on the website, such as the painter’s scotch, decorative scotch, permanent markers or acrylic paints. The kids could draw anything they wanted, either very simple patterns such as stars or hearts or something that was very special to them, for example a blue whale, a white tiger or a skyscraper.
  • As I have already mentioned above, the shakers became the real treasures almost instantly, to all the kids. ‘Are we going to take them home?’ was, naturally, one of the questions that every single child asked while we were producing them, just to make sure. And yes, we did take them home but the kids agreed for me to take a photo of all the beautiful shakers. Mine does not even feature in the photos, it was definitely the least interesting:-)
  • The finished product helped us in developing social skills. In the final stages of the lesson we became an orchestra and we worked on doing something together, listening to the teacher to repeat the rhythm and, even more importantly, listening to the song and shaking our shakers to the rhythm of the song. This particular group really really needed this kind of an exercise and I was very happy that we managed to become an orchestra for a few minutes. If it had been my regular, long-term group, I would produce some of these shakers to keep in the classroom and to repeat this kind of an exercise more regularly.
  • I was a little bit worried about me having to deal with sealing the envelopes but I could not delegate this task to kids as it is quite tricky, for any young learner hands. However, because there were only five children present and of different ages and of different levels of interest in drawing, it all came together. My youngest Sasha completed the task of decoration first and his shaker was the first ready. But then, having had a look at what everyone else created, he went back to his table to add some elements and afterwards he started to play with the shaker. A similar thing happened to all the other students and there was no dead time. However, if we make the shakers again, I will start playing our favourite songs during the time when we all decorate our shakers. This way the kids can start using the shakers with the music as soon as they ready. And, even if they are still working, they can still sing along.

Happy teaching!

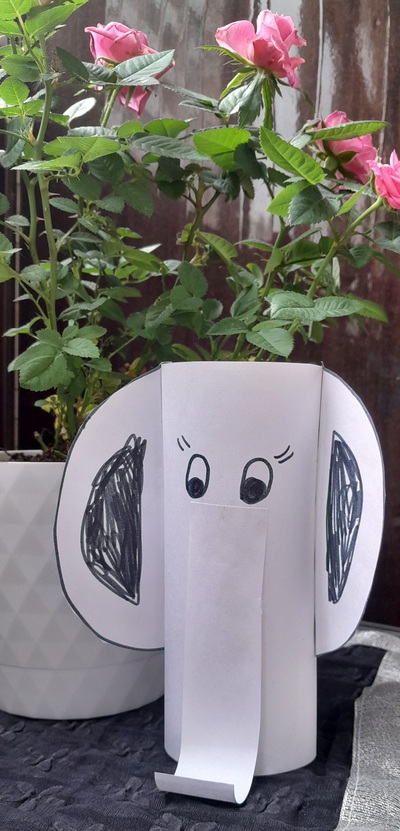
Crumbs #59 Hello Elephant!

Ingredients

  • One piece of A4 paper per child. It can be the regular photocopying paper or a sheet of the drawing paper, of regular texture, from a drawing album that kids use at school.
  • Markers or pencils, scissors and glue.
  • My elephant was inspired by the design I found at Creative Family Fun website, which I adapted to the needs to my group.

Procedures

  • Show the kids the finished product. I do not always do it but in case of this craft it seemed important to help the kids see the final product and to visualise how they are going to proceed during the entire activity.
  • Check that everyone has all the materials by going through the list, picking the items up and showing them to the camera, asking ‘Have you got…?’
  • Fold the A4 paper into halves, crosswise. Open the paper and draw the line in / along the fold. Cut into two.
  • Put one of these halves aside. It will be used later for the trunk and the ears.
  • Take the other piece of paper, hold it lengthways (with the longer edge on the top), draw a line along one of the shorter edges
  • Closer to the top edge draw two eyes. It might be a good time to decide if the elephant is a boy or a girl and add eyelashes and / or a bow on the forehead.
  • Open the glue and apply some glue along the line that has just been drawn along one of the shorter edges. Roll and glue into a tube. Put it on the side.
  • Take the other piece of paper. Draw a circle. Cut it out. It is ok if it is not a perfect circle.
  • Fold the circle into half and draw the line in / along the fold. Cut into two semi-circles.
  • Draw the line along the diameter of the circle, on both semi-circles.
  • Apply the glue on the line, on one of the semi-circle and attach it to the side of the head of the elephant. Press. It might be a good idea to show the kids how to press it here – with the fingers inside the tube and the fingers outside of it.
  • Repeat with the other one.
  • Prepare the strip of paper that will be used as the trunk. It will be glued under the eyes and it might be a good idea to check its length and perhaps cut off a bit.
  • Roll one of the ends of the strip around a marker or a pencil. It will twist it a little bit and it will make it look a little bit more like a trunk. Apply the glue under the eyes of the elephant, attach the top of the trunk and press.

Why we like it

  • This is a relatively easy craft that can be completed by children online, although I would not choose this particular activity as the first craft of the year. However, it is appropriate for five-year-old children, half-way through the academic year or the children who have taken part in some craft activities before.
  • It is a simplified version of the original craft and it requires less preparation on the part of the teacher. It was ‘designed’ and tested with regular A4 photocopying or drawing paper, without any real templates or special resources such as the cardboard tubes and goggly eyes.
  • If the students are younger, the teacher might choose to cut up the paper before the lesson (one big rectangle for the body, one small rectangle for the trunk and a circle for the ears).
  • It is an online-friendly activity.
  • The finished product can be easily used as a puppet (if it is put on the two or three fingers of a hand). One of my students also turned it into a bracelet, only because she chose to use a bigger square and, in the end, it was big enough to be worn on the wrist. As such, it can be used in simple role-plays.
  • It definitely has the WOW element and kids get very excited to be able to make a real toy out of a piece of paper.
  • It can be used to accompany a story, for example ‘Elmer’ or ‘Dear Zoo’ as one of the animals.
  • Our elephants were very simple and white but they can be made colourful, very much in the theme of the elephant party we know from Elmer in which all the grey elephants ‘get dressed’ for the occasion. The teacher can use the colourful paper or the kids can decorate their squares before glueing them together into a tube. If there are some leftover stickers available, these can be used to decorate the elephants in the end.
  • We used the elephant as a part of our unit Animals in Art and English classes and apart from making the elephant we also looked and talked about different elephants created by Salvador Dali, Pablo Picasso and Henri Rousseau, among others.
  • We also had a lot of fun playing with the semi-circles. We used them as our mouse’s ears, cat’s ears, sunglasses, monkey’s ears and wings. ‘I am a butterfly’ as a lot of fun!

Happy teaching!
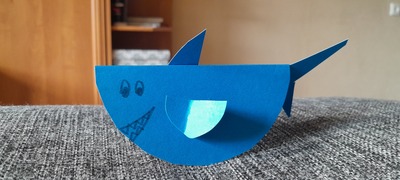
Craft #58 Baby shark craft

Ingredients

  • One A4 piece of cardboard paper, ideally in colour but if that is not available, the while cardboard will do, too.
  • Markers, scissors, glue
  • Something to use as a template for a circle i.e. a small plate for the bigger circle and a small glass for the smaller circles
  • A link to inspire you. Mine came from supersimple.com, after some adaptations for our online classes.
  • A link to the song which this craft usually accompanies. This is my favourite rendition of the song.

Procedures

  • The teacher starts by demonstrating the finished product to facilitate the whole process. I do not use this kind of an approach but it might come in really handy with this particular craft activity.
  • The teacher and the class go over the all the resources necessary for the lesson. The teacher calls them out and shows them to the camera. The kids do the same.
  • The teacher demonstrates how to draw a big circle on the piece of cardboard. If the kids are ready, they can draw a circle themselves. If not, the teacher shows them how to draw around a plate. It is a good idea to use the paper economically, in order to ensure that there will be enough paper left for the small circles. The kids do the same and show their circles to the camera.
  • The teacher cuts out the circle. The kids follow suit.
  • We fold the circle into half and we draw the eyes and a smile at the front.
  • The teacher demonstrates how to draw two small circles (or how to circle the smaller object twice). Afterwards, these are cut out, too. They are folded into halves and cut into halves, too.
  • Two of these half-circles are used as fins. They are glued to the side of the shark. The teacher demonstrates that, step by step.
  • The third half-circle is to become the frontal dorsal fin. It is glued to the top of the shark, at the back.
  • The remining half a circle is cut into two pieces (in any way) and these are are the tail (or the caudal fin, what a pretty name!). Their ends are glued together to form something resembling the letter V and they are glued inside the folded circle.

Why we like it

  • It is a perfect craft to accompany the song or to be included as a part of the life aquatic-themed unit.
  • It is easy enough to make, even online. It works well in the offline classroom, too and the teacher can adapt it to the younger students by preparing the circles before the lesson or even by folding them beforehand.
  • Even if the circles are drawn by the kids themselves and they do not turn out perfect, the sharks will look good.
  • The sharks are 3D and are a lot of fun.
  • They can be used as a puppet and they can be used in role-plays.
  • The kids can decide if they make a baby shark or a mummy or daddy shark and they can decorate the sharks accordingly.

Happy teaching!
Teaching English Through Art: Water! (and the Jellyfish craft!)

The artist

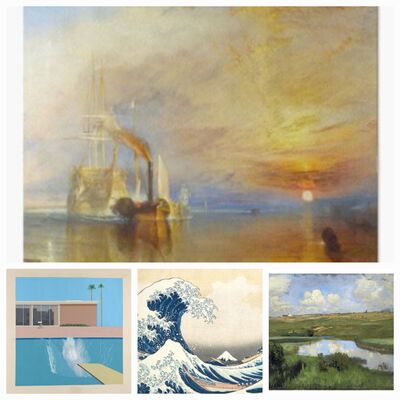
This is an unusual situation for me and for my course designer experience. This time the artist is not one person but a whole bunch and they are only connected by the theme of their paintings and this is water.

In class, I introduced a whole set of all the water words, in photograhps and in paintings, such as Turner, Hokusai, Monet and Levitan. We mimed all the words, we drank the water because when the picture of the bottle came up, we all realised that we were thirsty and we mimed all the words. We also started to talk a little bit about all the pictures i.e. I like it / I don’t like it. It is big and quiet, stormy, beautiful etc. There is definitely more to come here.

The language

There were two language aims in this lesson and, because there two, I am planning on the kids to be able to use them with ease after a series of lessons only.

The more important set were the ocean animals. I am planning to study ocean animals and then take it towards verbs movement and ‘I can’, ‘I can’t’ and ‘it can’, ‘it can’t’. We practised the names of the ocean animals and played different vocabulary games, such as One, Two or Many. We also sang ‘Baby Shark’, how else? We also categorised the animals into big and small on the Miro board.

The other set, for now on the back burner, are all the words related to water, which I described above.

The craft

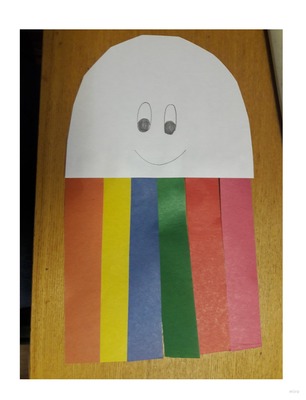
It had to be a jellyfish, as the first of many life aquatic craft activities and the reason for that was the generally low level of challenge. Plus I have done this kind of craft before because it is easy and a great opportunity for the practise of colours and it can be done even with the youngest of students. Frequently, this has been the first craft in many of my year 1 pre-school classes. This is what it looks like.

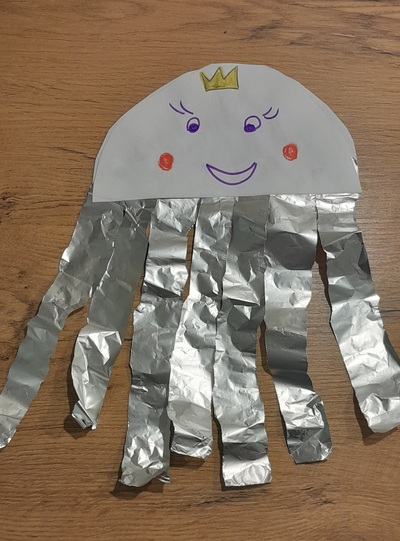
This is a lovely jellyfish but I was worried whether it would be appealing enough for my already craft-advanced kids. I needed something to spice things up although without any fireworks because my lessons are online at the moment and I could not ask my online parents to buy something extremely fancy. I have to admit that I spent the whole morning last Monday, teaching my C1 English and my financial English classes, fully devoted to the lesson in progress minus the 10% of the brain that was trying to come up with ways of making the jellyfish more exciting. Effectively, because I remembered the tinfoil in my drawer. Bingo.

This part of the lesson started with us going over the list of all the materials ready for the activity (white paper, glue, scissors, tinfoil, markers) by showing them to the camera.

First step was to draw a big circle on the A4 paper. I modelled, of course, but the kids were supposed to do it themselves, without any stencil. It can be done this way because even if the circle is not quite perfect, the jellyfish is going to be a success. Afterwards, we cut the circle. Afterwards we fold the circle in half and we draw a line on the fold. In the end, we cut the circle in half, along the line.

The next step was to draw the jellyfish face on one of the halves. We drew the eyes and the smile and then the kids decorated their in any way they wanted. Some jellyfish ended up being princesses. I made sure we put them away, on the side, to make sure that we don’t glue anything on it until it’s time.

Next, we took the roll of the tinfoil and we tore off a sheet. Afterwards I demonstrated how to tear it into strips. It can be done with scissors but I tried before the lesson and it didn’t work very well, actually. Tearing strips off is more fun and, more or less naturally, kids choose how thin or how thick the strips are.

We take the additional half-circle and put the glue all over the half and then arrange the strips along the edge. In the end, we put more glue on the back of the jellyfish princess’s face and we put one on top of the other. Stick and press.

The jellyfish can be hung in the window or anywhere in the sun to let it reflect the sunrays or in the doorway to let it float in the air. If you can permanent markers, the tentacles can be decorated (inspired by Our Beautifully Messy House). My friend Michael also had a nice idea for an adaptation (being in need of a jellyfish carft but with not tinfoil in sight). He prepared a very simple template of a jellyfish (imagine not a half-circle but a half-oval) that the kids can cut out and simply cut the bottom part into strips this way practising their scissors skills.

Finally, and traditionally, we talked a bit as our jellyfish and we sang the final song.

Happy teaching!
Damien Hirst and butterflies! Teaching English through Art

The artist

It was interesting this time. The spring came and I really wanted to a related theme. It is true that at the time the snow was still lying around or still falling but I just wanted bees, butterflies and flowers. And caterpillars, of course. Only later did I start to look for an artist who could help us with it. Believe or not, dear reader, I found one! Just to prove that with this Art and English, if only you try hard enough, you can connect any two dots, even the most random ones.

I have heard about Damien Hirst before. He is, after all, one of the leading British artists and his name pops up here and there. But only now was I able to see his art in all its beauty, the dots that I had seen in so many places without realising what they were and the butterflies!

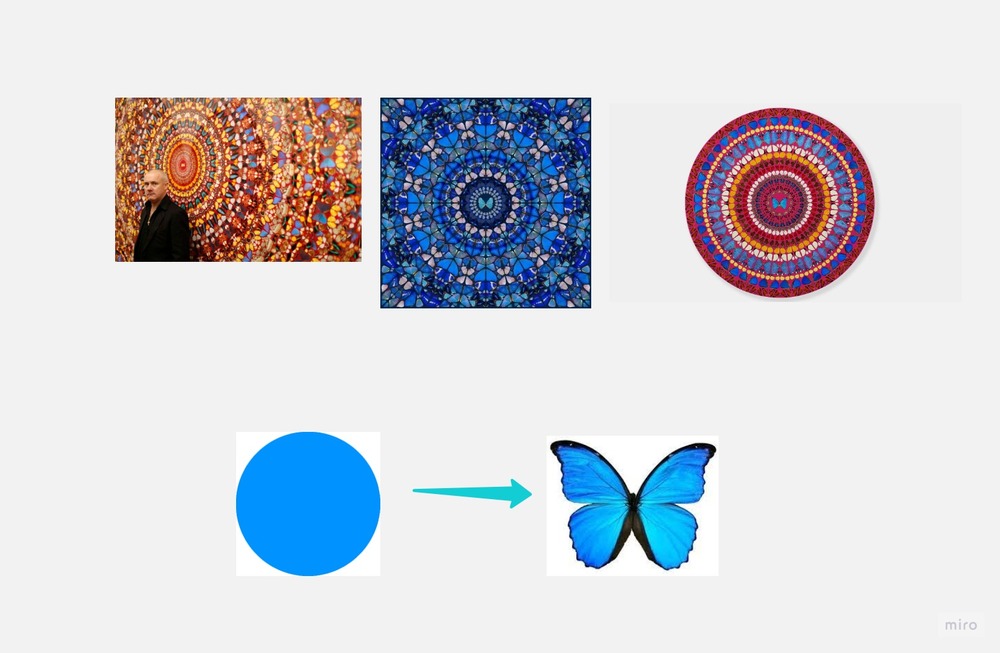
As usual, we introduced the artist, the photogragraph, the country and his two favourite things and we looked at his butterflies. And our Miro board was just perfect for it. We looked at the circles first (‘Can you see the circle?’, ‘Can you see the butterflies?’) and then we zoomed in (‘Can you see the circle?’, ‘Can you see the butterflies?’) as the circle disappeared and a multitude of butterflies emerged. Almost like magic).

Afterwards, I showed them my mini-graph and moved it around to illustrate how Damien turned butterflies into a circle and how we are going to turn circles into butterflies.

The language

This whole unit and the lesson revolved around spring, gardens and all the garden creatures, insects and not only. We have practised our vocabulary, we were describing gardens (‘I can see’), we practised numbers 1 – 20 and we sang a song about gardens, too.

We watched and tried to retell the cartoon about Six Hungry Caterpillars from Playway to English and a series of lessons we made a garden (see the photo below) and our own caterpillars which you can find out about in this post here. We also looked at different gardens in art and we talked about those that we like and don’t like.

The craft

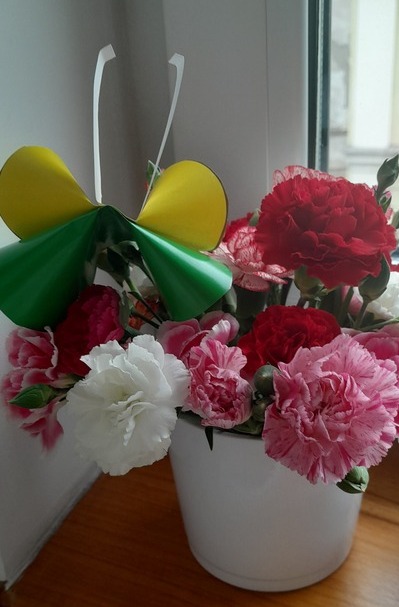
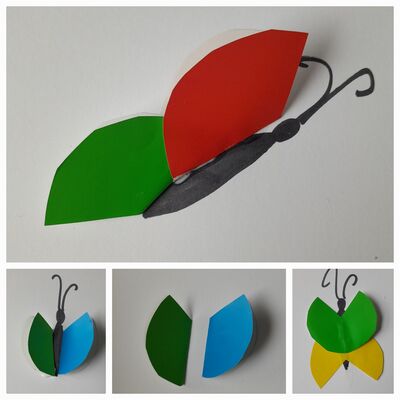
My main inspiration for our butterflies was the video from World of Art and Craft because it is supereasy and very effective. However, because our classes take part online everything has to be made achieveable for the kids to do on their own and on the other side of the screen. For that reason I gave up on the stapler and experimented first with paper and glue. It worked.

As usual we went through the list of all the resources (‘Have you got the glue?’ ‘I’ve got the glue’ with showing it to the camera) to make sure that all the parents prepared what I asked for in a message before the lesson.

We started with choosing the two colours of the coloured paper, drawing the circles (‘not very small, not very big’) and cutting them out. I was a little worried about that bit but the thing is that even if the circles are not very regular and even the butterflies will be pretty. I was using the craft paper (one sided, the white inside), the kids were using some double-sided coloured paper, thinner and thicker, everything worked.

Afterwards we drew a line across each circle (to make sure that we don’t spread the glue all over the circle) and put some glue on the line. We closed folded the circles in half, and pressed in the middle. Afterwards, we fluffed up the sides a little bit. After both parts were ready, we put some glue in the middled and pressed the two halves together.

In the end we cut out a thin strip of paper, folded it in half and glued it as the butterfly’s antennas.

And then the second version of the butterfly appeared. I could not reuse the 3-D butterfly because while making the caterpillar, we had some problems with the glue and the paper which was just too thick and so another butterfly had to appear.

This one started with us going over the resources and choosing two colours of the coloured paper. We drew a circle on each, again, not too small, not too big and we cut them out. Afterwards, we drew the line across each circle, on the B side, and we folded each circle into half. The next step was to cut off a slice of the folded circle (‘Look, it is like cutting off a slice of cake’), to create the edge to shape the wings. Afterwards we drew the body of the butterfly on a piece of A4 paper, and we glued the wings on. We made only one butterfly in class but, of course, depending on the skills of the children, there is definitely a potential for more.

In the photo, you can see the intended butterfly and what happened in the classroom because students started to play with the materials and experiment how you can turn them into a butterfly.

Footnotes

It is only now that I have found out about the many surprises that Damien Hirst has up his sleeve. It turns out that his mandalas are made out of dry butterfly wings from real butterflies and that he himself is the biggest importer of butterflies in the UK. And I have to admit, I feel a little bit less enthusiastic about it all.

Happy teaching!
Crumbs #54 Caterpillars everywhere

Ingredients

  • A4 paper, one sheet (for the leaf) and some coloured paper, I have tried both cardboard and regular craft paper and they both worked very well. The smaller caterpillar in the photo was done with the cut-up cover page of the drawing album and it works well, too. Some of my students were using ultra-thin craft paper and it worked, too so I presume cut up colourful pages of glossy magazines could be recycled this way, too.
  • Glue, scissors, markers and crayons.
  • This lesson was a part of the series of lessons devoted to spring so among all the other materials that can be used there are: The Very Hungry Caterpillar, the book or the video, the story or the video from Playway to English 3 about 6 Hungry Caterpillars, a video about the life cycle of a butterfly, the garden craft and the butterfly craft. It can also be a part of the Art lessons on the topic of weather and seasons. More about it – soon!

Procedures

  • Check that we all have all our resources, one by one showing them to the camera and, more often than not, finding the missing bits.
  • Show the kids the final product. This is not something that I do in every lesson, sometimes this element is left out for the surprise element. This time, however, I wanted the kids to understand exactly what we are doing and why.
  • Draw the leaf on the A4 paper, colour it green and cut it out. Demonstrate each step to the camera and wait for the kids to complete it before moving on to the next one. During this particular lesson I have also came up with a little chant that we started to sing while colouring and cutting (‘It’s a big, big leaf for a very hungry caterpillar’)
  • Ask the kids to prepare the strips of the coloured paper, of any colour they want. The paper can be cut sideways (probably the easier option as it involves less cutting) or lengthways (in this case each strip needs to be cut in half). I didn’t tell the kids how wide the strips should be. We have been doing craft online for a few months now and my kids are now able to make such decisions themselves. I assumed that everyone will choose the width themeselves (as wide as they can handle).
  • We glue the strips into a ring by putting the glue on one end and shaping it into a circle. We glue all the rings first.
  • Glue all the rings together by applying the glue and attaching the rings and pressing them with two fingers.
  • Cut out one circle for the face, draw the eyes and the smile, glue the circle onto the caterpillar. If possible, the little antennas can be added, too.
  • Sit the cateripillar on the leaf, introduce the caterpillars, say hello, use them in a dialogue etc. We sang the song about the garden that we had been practising for a week then.
Here are the caterpillars made by my kids. Courtesy of FunArtKids

Why we love it

  • It is very easy to make.
  • It is beautiful and sweet. Whenver I choose and prepare activities for my groups, I always wonder if my kids will simply approve of it, if they just like it. When I showed them the caterpillar, simple as it is, I got this very special ‘Ahh!’ and big smiles.
  • It can be done in the offline classroom but it is also possible in the online classroom.
  • It gives the kids some opportunities to make decisions about the creative content, the size of the leaf, the colours for the caterpillar etc.
  • It can be easily combined with any spring lesson or with any story lesson.
  • The level of challenge can be adjusted. In the classroom the teacher can prepare the strips of paper or the parents can be asked to pre-cut them if the lesson is taught online. We used five strips / rings but the caterpillar can be made longer or shorter.
  • There is some potential for the literacy skills development – kids could write the key words on the outside or on the inside of all the strips before glueing them together.

Happy teaching!