Five ways of using craft in the pre-primary classroom

Before the craft.
A set of quilling paper strips

This is the second part of the Craft ABC series. You can find the first part here.

The main activity and the target language practice

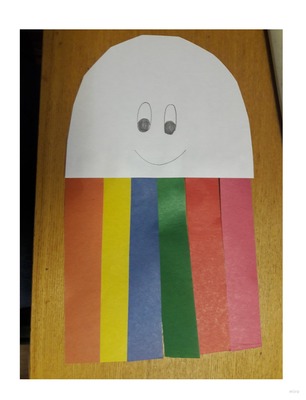
This is a craft activity that features in the lesson to provide opportunities for the target langauge practice. As an example I have decided to choose our beloved jellyfish that is the first craft activity that I do with my first-year students, in one of the first weeks of the course. This is the time when we learn and practise colours with flashcards, colourful blocks and realia in general, with simple stories, videos, wordwall games and songs. A craft activity is yet another way of ‘recycling’ the target vocabulary and of giving the students an opportunity to be exposed to it and to use it.

The jellyfish is a super simple craft and even the youngest kids can draw the eyes and the smile on the head (which can be a semi-circle cut out by the teacher or a half of a paper plate) and then to attach the tentacles to the back of it. Kids are really motivated to make their own jellyfish and to drill and call out the colours and to ask for the following one, in a very simple way (‘Blue, please’). As a result, lots and lots of language is produced and everyone leaves the classroom with a creature they made herself. What’s most important, the jellyfish looks good even with the most crooked smile and the most inexpertly glued tentacles. And even if there are only three or four colours used, with the youngest kids.
The follow-up of a story or a song

Craft in this case is an opportunity to reinforce the ideas, concepts, vocabulary and structures introduced in a song or in a story. Or, to put it differently, a story or a song is not introduced only as a starter or a side dish but it becomes the topic for the entire lesson.

The three examples in the photos come from the lessons taught based on the Playway to English 1 by Cambridge University Press. The first one is a flower we made together while retelling the story from unit 7 (The Little Seed which you can also find here) and although we were not able to use all the original story lines, the kids could use the basic ones such as It’s sunny, It’s raining. The little seed is sleeping (at the beginning), The flower is growing (while making the stem) and so on.

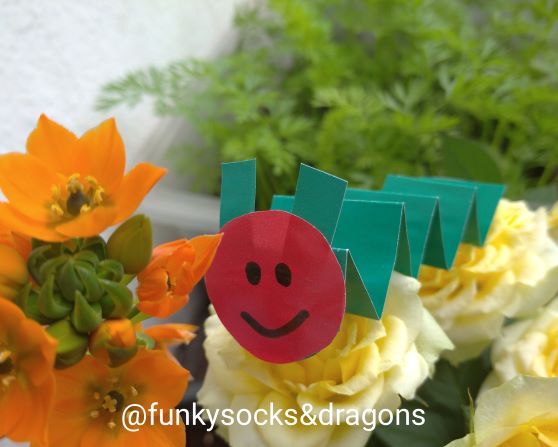
The second example is everyone’s favourite Very Hungry Caterpillar which is a storybook we use in year, to accompany either unit 7 (Weather / Spring) or unit 9 (Food). You can find more information on this version of the caterpillar here.

Last, but definitely not least, is a simple craft that was a follow-up of the amazing Super Simple Song called ‘Are you hungry?‘ and it can be used either with the topic of fruit (Playway to English 1, unit 3) as it goes nicely with the theme of the song of monsters sharing fruit with their hungry friends or, in a wider context, with food in general (Playway to English, unit 9). The craft activity becomes the more palpable and 2-D version of a song and it can be used in a mini-role play, sung or spoken, depending on what the kids are ready for.

Props preparation

This type of a craft activity does not have a lot of potential as regards maximising production although the kids are quite likely to use some functional language, the staples of craft (Are you ready? Let’s sit down, Blue, please etc). This type of a craft activity is also quite short, compared with the ones mentioned so far but that is exactly the point. The craft activity is only a prelude. Everything important is to happen later with the finished product used as a tool.

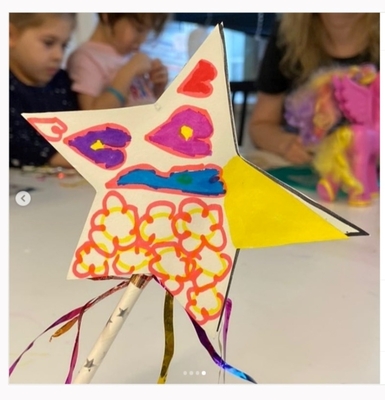
The best example here will be our magic wand. It is simple and easy to make and can be used as a part of a shapes lesson (though, really, there is only one shape involved). The abracadabra TPR activity (Abracadabra, 123, you are…) is a game we play from the very beginning of the course. When the kids are ready to take over, we make a wand for each other and use it in a game and at this point, the kids get to lead the game for real, waving their own, freshly-produced wands and we all mime whatever there is to mime. The langauge is produced and lots of it (Abracadabra, 123, you are…swimming, dancing, flying…OR you are a cat, a happy cat, a hungry dinosaur…) but it is not directly related to the making of the wand.
A part of a Science, Maths or Art lesson

Craft can be also a part of a CLIL lesson or a Maths, Science or Art lesson, depending on whether we are dealing with the EFL or the ESL or bilingual programmes. In this case, the craft activity will create an opportunity for the students to put into practice or to reinforce the real knowledge or skills they have acquired in class, making it more practical, kinesthetic and hands-on.

Below, three examples of such craft activities.

The first one is a Maths lesson in which we were learning about and practising measuring. Apart from working with the rulers and measuring tapes and checking how long our cars, teddy bears, desks, noses and fingers were, the kids also got a simple handout with a section of a certain length and it was their task to measure the strips of paper with rulers, cut of the appropriate piece and glue it underneath.

The second one is one of the lessons devoted to animal habitats which we studied in our Science class. Apart from categorising animals and talking about the habitat, we also did a craft activity in which we created the habitat (here the polar region made of a sheet of blue paper, waves drawn, ice made of cotton pats and the animals glued on). After a series of lessons we had a set of habitats.

The third piece here is one of the activities we made as part of the Kids in the Avangard. In this lesson Paul Klee was our artist of the day and we created our own version of his Cat and Bird.

The non-linguistic aims

Sometimes craft activities have a non-linguistic main aims. Because of their obvious relevance to kids’ lives and the excitement that they generate, they can be used to help kids develop as humans and this can be the reason for their inclusion in a language lesson.

The first activity here is one of my favourite craft activities ever. It can be used in many different thematic lessons but its main advantage is that because, due to its design, it requires a detailed micro-staging and, on the one hand, it can help kids work on their ability to focus and to follow teacher’s instructions in order to be able to turn their circles into cats, dogs, frogs and bees. On the other hand (and it has worked absolutely every single time), it brings an immense sense of achievement and confidence in kids’ own skills since a random circle can become so many things.

The other activity presented here is an example of a festive craft that finds its place in the classroom as part of the seasonal celebrations. Despite the fact that sometimes this vocabulary will be used in class only in a year, when the holiday comes up again, it connects the lesson to the celebrations at home and in kindergarten and it is the easiest way of bringing these festivities into the EFL classroom.

The final activity, our solar system was a wonderful activity that we all enjoyed and one that helped us produce lots and lots of language. However, believe it or not, that was not the reason why we did it. This was our first real whole class project because the kids got an opportunity to work on something together, sharing resources and sharing the space and we produced one huge poster that nobody would be taking home in the end.

Happy teaching!
A word of advice OR All the things I wish I had been told before entering the VYL classroom for the first time

This post is a result of a combination of factors: only a short while ago we started a new IH VYL course, I was talking to a NQT teacher and, last but not least, I have been stuck in quarantine, with a lot of time on my hands, all of a sudden. Writing calms me down and so I am writing.

If you are a novice VYL teacher, don’t forget to check out the first VYL lesson survival kit here. It might help, too! And there is this other one, about landing on Mars and having to teach there.

Now, in a rather random order…

Keep it simple

It is a good idea to stay focused and that means that ‘less is better’ or, in this case, ‘fewer is better’. There is no need for fancy activities, for some intricate craft, amazing toys, multi-item anything or a very complex game. There is no need for the coursebook, either. Everything will be new for you so there is no need to clutter your brain (or your table) and many (or all) things might be new for your students, too, depending on whether they are starting the course or whether you are taking over. In any case, simple resources will make it more maneagable for everyone.

Keep it varied

Simple does not mean monotnounous, though. The younger the children, the shorter their attention span and it is absolutely necessary to be ready to change the activities frequently, ideally when they are still enjoying them (rather than wait until the interest fizzles out and you will have to get them back on track). Luckily, there are quite a few things that can be done only with a set of flashcards, varying the activities slightly without changing the main resource. Although, of course, each lesson with pre-schoolers will need more than just one. If you are teaching colours, for example, you can do it through: flashcards, a song, a video, a wordwall game, realia (kids will be wearing colours on them and there are other colourful things in the room, such as crayons) and a story. This way you will keep things ‘the same but different’.

Keep it coherent

Make sure that you do not overwhelm the kids (and yourself!) by trying to go over too many topics in one lesson. If it is ‘colours’, it is ‘colours’ from the beginning until the end of the lesson. If it is ‘toys’, it is ‘toys’. It is only the first lesson, there will be lessons number 2, 3, 4 and 100.

Keep it interesting

This one will be a question only and a question with more than one correct answer. It has become a kind of a tradition that the first lessons in level 1 for pre-schoolers focus on the introduction of colours. The idea behind that is, I presume, the fact that colours are around us, they are a concept that the kids are already familiar with and that the words themselves are short and easy to learn. But here is a question, is it really the most interesting, child-friendly, fun, engaging, joyful topic that there is? Is it the best invitation to a new story and to a new world that learning English? Toys are colourful, too, they are toys and all the kids are more than familiar with them. Plus you can use the realia from the very first lesson. Pets are cuddly and sweet and all the kids have their favourite ones, even if sometimes less traditional ones, such as a hippo or a frog. The realia can also be found without much trouble and most pets make noises and that is another way of introducing variety in class. Both, toys and pets can be mimed and used in different ‘Guess what’ games in which the kids guess the word by looking at a small cut out of it (aka ‘through the keyhole’ or ‘the funky envelope’). The range of activities gets wider in a blink and the chances that children get interested and stay involved are much higher.

Keep it teacher-centred…

and do not feel guilty about it. Student-centred lessons are the ultimate aim and the dream but in the beginning of the course, it is the teacher and the adult who has to take the full responsibility and the full control of all the activities in the lesson. This is true for both the novice and the experienced VYL teachers as well because they all have to deal with little children who are in a new set-up, in a new situation. Be it either the first ever lesson of English, the first lesson ever in a new group with some new classmates or the first lesson with a new teacher.

Keep it organised

Keep what organised? Everything! Absolutely everything. All the materials in the folders (or with paperclips, in boxes, files) in which they are going to be used. All of the resources in a box or in a basket, in order to be able to carry them around, if needs be. All of the things out of the kids’ reach, on the top of the board, on the top shelves, in the cupboards. All the pencils or crayons, by the colour, in separate plastic cups or boxes (but cups are cheap and easily available) and not on the table. The teacher is supposed to give them out only when they are needed.

What I found really useful in the beginning of my VYL career and something that I still do, for every lesson is a lesson plan on the wall. It is simple, big and colourful, with only the main stages and activities, in a place where I can see it and to refer to it from every corner of the classroom. You can see an example of it here.

Keep calm

Even if you don’t feel very confident. Even if you are worried that you might not manage. Even if you are a tiny bit scared of being left alone with a bunch of kids. Even if the parents are looking at you inquisitively or if they are asking questions. Even if you have forgotten something at home or in the teacher’s room.

Smile, no matter what! Don’t lose your head! You are going to be great. Or almost great!

Happy teaching!

Behaviour management in the VYL classroom. When the world begins to fall apart…

London

I would like to dedicate this post to my trainees on the IH VYL course because it was during the coversations with them, during the session and after the session, during the tutorials and the informal chats on Whatsapp that this article took shape.

The set-up

Imagine: you plan your class, you get the materials ready, you enter your little kingdom and then things happen. They are the things you do not approve of, things you don’t like, things that should not be happening, things that get in the way of learning English. Or, in other words, as Harold Macmillan said ‘Events, my boy, events’, my favourite line of this week or even this whole month (courtesy to Edward).

The number of things that can happen is somewhere around… a few hundred and, naturally, it is simply impossible to put them all into a manual for teacher, with all ‘what to do’s and what not to do’s’. There are too many of these and there are too many variables that will be playing a part and adding the local colouring. Here, it is not the case of ‘one fits all’. Oups.

One thing is certain, the problem is not just going to go away, it is not going sort itself out. Whatever ‘unwanted behaviour’ is taking your lesson apart, it needs to be dealt with.

Here are a few roads to take.

Spinetto, Italy

The worst solution ever? Doing nothing.

Simply because it not a solution at all. The problem (whatever it is) is not going to simply go away, disappear or un-happen. Pretending that it hasn’t happened and moving on, in an attempt to save the activity, the game or the entire lesson, can only lead to even more serious consequences.

The unwanted behaviour needs to be acknowledged and stopped because it can escalate and compromise the well-being and safety of all the people present. So, do something! Perhaps one of these things that you can find below.

Moscow

Signal

The simplest way of doing it will be calling the student’s name but using a voice that is appropriate to signal the unwanted behaviour. The tone of the voice on its own should convey the message that something undesirable is taking place and that it needs to stop. This, of course, does not mean raising the voice or shouting but if the teacher uses the same ‘happy’ voice for praising and for disciplining (or ‘disciplining’), the message will be much more confusing for the kids. Instead of ‘Oups, I’d better stop‘, the child will think ‘Oh, look, my teacher is saying my name in such a nice way. She must really like me‘.

In the same vein, long speeches, in L1 or L2, will be counter-productive in such a situation. It is much better to keep it short, for example ‘No!’ or ‘Stop, please!’, used together with the child’s name and a gesture. And, as soon as the unwanted behaviour finishes, also acknoledge it, perhaps with a smile and a ‘Thank you’.

Very often and with a majority of things that can happen in the VYL classroom, this approach should do, if applied consistently. After all, kids know that we don’t run, we do not push the others, we do not take their toys and so on. In most cases, such a gentle reminder, a speed limiter of sorts, will do the job.

Saint Petersburg

Pause

Sometimes, these kinds of signals are not enough, however and it might be necessary to pause the lesson and deal with the problem in the open, either because more than one student is involved and / or because everyone can learn from it. This might be a situation when more than one child has done something to upset another (ie draw on their work, take their toy, say something) or when there is more than one child involved in any unwanted activity (hiding under the table, pretending to be a very angry dinosaur, hitting the class puppet, drumming with the markers on the table). All these situations do affect everyone present, not only the two students actively involved, and they need to be dealt with in the open.

‘Stop’ is still going to be necessary but it is going to work only as the first step. If there are any resources that contribute to the mayhem, they need to be taken away, for example these markers used to drum on the table. Then, a conversation.

It is very difficult to recommend something that will work in all the situations and all the contexts. Ideally, this part would be done in the children’s L1, but not all the teachers out there speak their little students’ language and not all the schools out there approve of the teachers using the L1 in the classroom.

Now, in Russia, I have the advantage of being able to understand the L1 of my students and what normally happens is we have these conversations in two languages: I speak English and my kids react in Russian, but it was not always the case. Like many of my colleagues in the VYL classrooms around the world, I had to do my magic only in English.

To be perfectly honest, it is not easy to grade the language to the level of pre-A1 and, at the same time, to convey the message in a delicate and sensitive way, but it is not impossible. You can use simple sentences and draw the children’s attention to the fact that their behaviour may make other students unhappy (‘Look, Sasha is sad now’) or that their behaviour is not appropriate (‘Is it a good idea?’). There are some advantages here, as it is almost guaranteed that these conversations will be short and concise and this is how I have dealt with all the issues in my classroom in the past couple of years. Although, to be perfectly honest, sometimes I am sorry that I cannot just sit down and have a real conversation in my students’ L1.

Moscow

Be clever

There are many tricks that the teacher can use in order to manage the behaviour of the group and of the individual students, without interupting the lesson too much but dealing with the problem effectively. Here are some of mine

  • Almost magically remove or stop the catalyst or the distractor, for example, put the hand at the back of the stool to block it and to stop the child from rocking, put the marker on the top of the board or on the top shelf
  • Use the command ‘Freeze’ to physically pause all the class proceedings and in a game-like way stop the unwanted behaviour. Although, of course, the teacher needs to introduce the game first. Once the kids got involved in something else, the disaster has been averted and the teacher is again in charge, the lesson goes on, according to plan. It might be the best solution for all the difficult situations when the world really does begin to fall apart and a quick fix is necessary. Instead of a conversation with the kids, a thorough analysis of the situation and looking for answers and the steps that need to be taken in the future.
  • Create a diversion and draw the kids’ attention to something else – a song (the easiest one to implement), a video, a favourite puppet. Again, as soon as the kids have calmed down, proceed with the lesson. And then take a moment to reflect on what led to the difficult situation.
  • Become the class clown and joke your way out of it. A funny face will do, a silly, clumsy gesture and a well-faked horror at the crayons that spilled out of the box. Then, like in most of the situations above – proceed, reflect and change.
  • Depending on the situation, it might be a good idea to whisper some encouraging message into the student’s ear. It can be in English, it can be in the child’s L1, it might a real whisper or a 5-year-old whisper (a good attempt that everyone present hears anyway). It will help to redirect the emotions, break the spell of sadness or anger, and it will help them to focus on something else and it works really well with the situations in which a child is upset or sad or just withdrawn, for whatever the reason there might be. It might be also a good idea to play a quick round of Broken Telephone with everyone, to involve the whole group in the same activity but it will work only if the kids already know the game.
Vyborg

Praise

There are situations when the best way of dealing with the unwanted behaviour is a complete diversion when instead of addressing the offender (apart from the basic signal and calling to attention), the teacher can choose highlighting the fact that the other children behave well.

Not only will it work well for the behaviour that is aimed at drawing the teacher’s attention (since the teacher is withdrawing this attention) but it will also acknowledge and applaud the behaviour of the class which is something that we often forget to do, taking those ‘angels’ for granted. Although, truth be told, they deserve our recognition.

Praising the students and reinforcing their behaviour will be also a clear message and, short-term, it will create a situation when the ‘offenders’ get a chance to reflect on their actions and to calm down and by the time everyone else has already been praised, they will also be closer to the desired behaviour and the teacher will be able to high-five them, too.

Baikal

Ignore (only not really)

Some disasters are better to be ignored entirely.

Of course, by ‘ignore’ I do not mean here the official Cambridge Dictionary definition of the verb because that is going to get us nowhere good (see above). What I have in mind is a VYL teacher’s (a pre-school teacher’s, a parent’s, a carer’s) definition of ‘ignore’ which, more or less, goes like that: acknowledge that a situation has occurred and, instead of drawing more attention to it, let it sizzle out, while, of course, keeping an eye on the child, paying even more attention than usual, only not openly this time.

Sometimes this will work better than any whole-class conversations or ‘lectures’, especially when we are dealing with a tantrum directed at getting the teacher’s attention hoping for an outcome that will be more favourable (ie we will not sing the song I don’t like, I will get the best sticker, I will be the first one to join the circle) or when two students have had a disagreement (and there are no obvious roles of the offender and the victim or when it is impossible to tell who is who) or when there is obvious resistance from the student and taking the matter further is dragging it into a dead-end street, like in the story here.

It has to be said out loud, it will not always be easy to label a classroom situation as ‘Ignore (only not really)’ because, of course, tens and tens of factors will have to be taken into consideration. Nonetheless, I believe, it is good to remember that this option also exists.

Rybinsk

Ask yourself it is a one-off or a regular feature

Or about working with the events long-term.

It is perfectly natural that all, even the most angelic and most well-behaved children, have a worse day, a crazy day, a tired day or a not-such-a-good day. This is the day when their behaviour might surprise their teacher (or, let’s be honest, completely ruin their teacher’s plans for the lesson). But these are the one-off events and it is not even necessary to analyse them in detail.

If, however, such unwanted behaviour happens regularly and repeatedly, it will be necessary to look into it. Is there a pattern? Is there anything specific that triggers that behaviour, an activity, a person, a stage of the lesson? Analysing all these details will help to choose the right solutions to the problem.

Perhaps it is the time to change the routine? Perhaps some games or activities have to be put on hold for the time being? Perhaps the group needs more settlers? Perhaps they need more stirrers? Perhaps it is time to reconsider the seating arrangement? Perhaps it is the time to talk to the parents?

Find out more

It might happen, too, that the self-reflection of the classroom adventures is not enough and that the teacher will have to reach out to the parents because this background information might help to understand what is happening in the classroom and why and, in turn, lead to finding a solution.

New York

Post-post reflections

Classroom and behaviour management is the theme and the focus of session 3 of the IH VYL course on which I have been a tutor for four years now and that is always the session that, according to our trainees, ‘could last twice as long’, because there are so many issues, so many problems, so many tricky situations that the debate could go on forever…

Unfortunately, that is simply impossible. Fortunately, as another trainee commented, to some extent, we deal with the classroom and behaviour management in every session, while discussing craft, songs, stories and literacy so at the end of the course, our trainees are better prepared to manage a group of the little people. Here is one hoping that this post will be helpful, too!

It is my deeply-held belief that by gaining understanding of all the pre-school brain and heart and by trying to see the world from their perspective, we get better prepared to teach and to bring up very young learners and to deal with the classroom and behaviour management issues that might arise.

For that reason I started a series of posts on the blog, in which I describe the real situations from the classroom and how I dealt with them. The series is called ‘Child development stories’ and you can find it here. While a manual with all the potential situations and all the right answers is never going to happen, we can definitely learn from observing our students and from analysing what happened and get better at managing the pre-primary kingdom, on the good days and on the worse ones.

Happy teaching!

All you need is…a picture!

A post by a lazy teacher who likes to ditch the tasks and the responsibility onto her students, even those little ones.

A post by a greedy teacher who always wants more and whose main aim of every lesson is: language production. And then more language production.

A post by a teacher who first shared these ideas at the Cambridge Back to School webinars in August 2020.

A post by a teacher, about materials management or 00000 different ways to use the same picture.

A post with activities that were inspired by some of the YLE Cambridge exams but approached in an open-minded way…Ready, steady, go!

P.S. Don’t forget to check out of the second part this post.

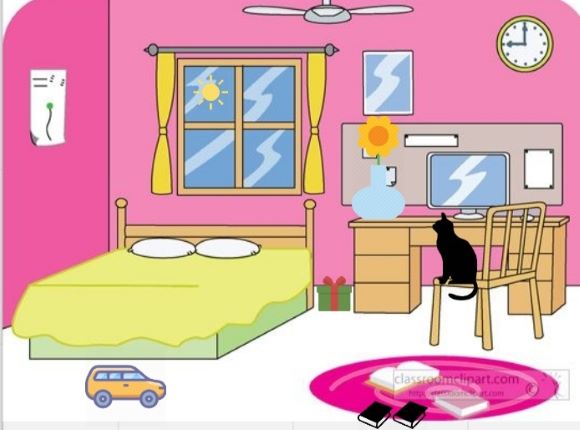
There is only one picture…

created using an image from classroomclipart.com and Miro

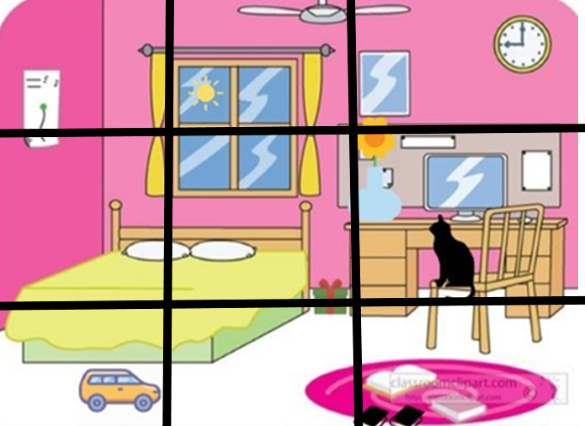
Before you even look: tell the students that it is a picture of a bedroom, have them predict what they might see…Then we look at the real one and check.

Tell me about this room: the students describe the room, using the language that they are familiar with, ‘there is’, ‘I can see’, perhaps only the nouns, perhaps nouns and colours and prepositions.

Riddles: the kids make up simple riddles for their partners to guess. ‘It is black and it is on the chair’.

Stickers dictation: this one is more appropriate for the lower levels and was inspired by the sticker activity in the Superminds coursebooks by CUP. It is also a perfect opportunity to use up all the leftover stickers that no one ever asks for. Students work in pairs and they upgrade the illustrations in their coursebooks (as in: any illustrations) with the stickers. Student A is telling student B where to put the five stickers in one of the coursebooks and then they swap roles.

Teacher = Cheater: the kids open their books and look at the picture. The teacher tells them about her non-existent picture which is, surprisingly, very different from the picture in the coursebook.

Students = Cheaters: the kids describe their made-up rooms, also, very different from the bedroom that they are looking at.

In my real room: particularly appropriate for the online classes since the children will be already sitting in their rooms and can easily compare the illustration with the reality but can be done in the offline lessons, too.

Because: students describe the picture but instead of just focusing on what exactly they can see they try to find the rationale for what they can see. ‘The books are on the floor because….’

The story behind the picture: even such an uninspiring picture in which nothing is happening (really) can be a starting point to writing a story or telling a story. The only thing that you need is a set of questions to get them started, for example: Who lives in this room, a boy or a girl? How old is he/she? What is his / her name? What does he / she like? He / she is not in his/her room. Where is he/she? What is he/she doing? What did he/she do before? What is he / she going to do next?

Dice games: the teacher has to assign the structures to each of the numbers on the dice and these can be easily adapted to the level of the students. The standard set might include: 1 = I can see, 2 = There is, 3 = There are, 4 = It’s on / under / in, 5 = It’s green / red, 6 = It’s big/ small / beautiful. You can also include: I like, I don’t like, …is doing what, is happy/ sad/angry, there aren’t any and so on, depending on the picture. Kids work in pairs, roll the dice and describe the picture using the assigned structures.

Noughts and crosses: It takes three lines to turn any picture into a noughts and crosses game. Students play the game in pairs but before they put their mark in one of the boxes, they have to describe what they can see there in one, two or even three sentences. To keep the kids interests up, a marking scheme can be introduced, a twin grid, with points which is of course kept secret until the end of the round (in Miro – under the noughts and crosses grid, on paper – on the corner that is folded under). This way we always have a winner, the person who collects more points for the boxes that they have described. Sometimes we have two winners, too, the logical one and the mathematical one.

Memory games: first, the students get to look at the picture for a minute or two. The teacher asks them to remember the details, all the colours, actions, number of children and so on. Afterwards, the students are divided into teams. The teacher can use either a set of pre-prepared sentences some of which are true and some of which are false. The teams pick out one of the cards, read the sentence and check how much they remember. This version is more T-centred but it has the advantage of additional reading practice. In another version, the students get to look at the picture again and make up a sentence about it, for the other team to guess. They can also write their own set of sentences which will be later used to test the other team.

There are two pictures…

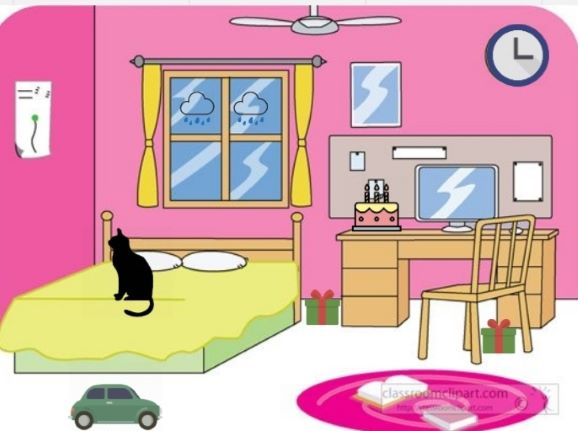
I can make it different: the starting point is a picture and it can be copied and upgraded in any way the teacher sees fit, using all the beautiful tools that the Miro board has to offer (google image search and icons). It will take some time but it means that it can be adapted to the level, skills and interests of a particular group and then saved and recycled forever. Just like these two pictures here…

Predict the Differences: the children can only see one of the pictures and they try to figure out all the ways in which the two pictures can differ. It might be especially effective if they are already familiar with the task format and know that they have to be looking out for different patterns, activities, objects that the people are holding, throwing, the comparisons between two objects, the location on the right or left side of the picture and so on.

Predict the Differences Quiz: the idea is the same but we add the competitive element and another skill as the teams or pairs of students are asked to write ten potential differences between the picture they can see and the other one. The team that manages to better at predicting wins.

Find the difference: we can ask the students to work in pairs but to find all the differences without showing their picture to the partner. This is not going to be a strict Movers or Flyers preparation task but we are going to raise the level of challenge and they students will really have to listen carefully in order to establish how these two pictures are different.

One big and ten small pictures: it is not necessary to kill another tree to ensure that each child has two pictures right in front of their eye. One, enlarged copy of Picture A can be displayed on the board (or on the screen) and compared with the picture B in students’ coursebooks.

Accidental friends: illustrations that were created not as a ‘find the difference’ task but can easily serve the purpose. Examples? Any of the Movers and Starters reading and writing story tasks or any of the Movers or Flyers speaking story tasks…The theme is already there and looking for differences can be a nice warm-up to storytelling or story-writing activities…

Very, very different: the illustrations that can be used in this kind of a task do not even have to be specifically created with that purpose in mind. Any (and I mean it: any) two pictures depicting ‘a bedroom’ can be used to find the differences. The crazily pink exhibit A here and practically any page of the IKEA catalogue…And pronto!

YLE listening task recycled: these can be used as a listening task, to prepare for the format and to develop listening skills but they can be later used again as a colouring dictation activity. Students work in pairs, one is in charge of the coloured pencils and speaking (‘Colour the bird yellow’), the other one – in charge of the colouring page and listening. Half-way through the activity they swap roles.

This is already more productive but the best is yet to come. Since it is a freer practice activity and students make their own decisions regarding the choice of the colours, it is quite likely that all the pictures will be different. And then…Yes, we can compare them, in groups of four.

Actually, even a leftover listening copies can be used in the same way (Saving the planet, remember?). After all, regardless of which exam it is, the students only have to colour five elements of the picture and the rest of them can be used in a speaking task like that.

Colouring printables: can be used in exactly the same way. Not all the pages will do, for example a large drawing of a cat does not really offer too much as an object to be described and I try not to use colouring pictures which are too big as some students like to be precise and colouring those might take too much of the precious time of the lesson. Other than that, just open google and type in: a child’s bedroom colouring page…Ready! And if there are any words that the students don’t know yet, we can always learn them. Even if they are not on the YLE word list and just because ‘a dragonfly’ might be a cool word to know😊

Which one is different?

Which one is different? Why?

Vocabulary practice: we only need four pictures out of is one is different. It might be a set of four objects, three of which are blue and one of which is red and the students do not even need to know the name of all of the objects. They can still complete the task by using the structure ‘It’s blue’ or even ‘blue’. We can create such by using icons or google images on the Miro board or by arranging and re-arranging the flashcards that accompany our books.

Grammar practice: the focus here can be chosen depending on the topic of the lesson and it can be limited to only ‘it has got…legs’ with animal flashcards, ‘it’s big’ with school objects, ‘I like’ with food, prepositions, Present Continuous and what not.

Kids take over: the students can make up their own chains, either with the coursebooks flashcards or the mini-flashcards (always a good idea to have two or three sets of those for each topic, they can be reused throughout the course).

Chant it! This is the only variation here that I have not had a chance to use in the classroom but if you look at it from the right angle, all of a sudden, there is a lot of potential here: each chain has four pictures and each of them can become a separate verse. The kids can clap for the similar concepts and stomp for the odd one out…

It’s a good idea but it’s not my idea: the kids talk about the pictures and describe the odd one out but they have to go on until they guess the teacher’s original idea (probably better to write it down somewhere in order to be able to prove that we have not been cheating this time😊. If the appropriate topic has been chosen (such as, for instance, animals), this activity can go on for almost forever and the students will produce a terrifying amount of language. Once they learn to think outside of the box, this same activity can be used with all the seemingly less ‘appealing’ topics, too.

How many can you think of: a similar idea but realised slightly differently as students work with the exam materials but try to think of as many reasons to odd one of the pictures out…

Well, 27 activities…Not bad, not bad at all. I might be adding to this list in the future.

I hope you have found something useful here! And if you have used it in class, please let me know!

Happy teaching!

P.S. A request!

It is very simple.

I would like to know a tiny little bit more about my readers. There are so many of you, popping in here, again and again, and the numbers of visitors and visits are going up and make my heart sweel with joy. But I realised I don’t know anything about my readers and I would love to know, a tiny little bit more.

Hence the survey.

The first VYL lesson survival kit

My first VYL teaching experience…

…was in Spain. There were eleven kids in the group, we met for two real hours but only once a week. Some of the students were five and some were six and already in school which, of course, made everything a bit easier.

Our classroom was not quite what you would call a VYL teacher’s dream come true. We had huge, wardrobe-size tables that no one, save for Hulk, possibly, would have been able to move and they were so big that when my students sat down, they were barely visible. There were only eleven little heads bobbing above these huge tops…

In terms of the space, we had a tiny strip of the floor in the aisle and another one between the first row and the podium with the teacher’s desk stood because, of course, there had to be a podium. I did not speak my students’ first language and they were beginners in English.

If that had not been enough, just before the first lesson, I was informed that one of my students was allergic to most foods, and the allergy was so strong that we were not allowed to bring anything edible into the classroom, not to put his life at risk. I was also told that, should I notice anything suspicious, any potential symptoms of an allergic reaction, I should immediately leave the classroom with my underage students (one of them unwell) and run about 200 meters along the hallway to fetch the person who was qualified and equipped with the injection that would save his life.

As a result, naturally, I spent the entire academic year stressing out to the maximum of my brain’s capacity. Because something might happen to him, he might try to tell me and I might not understand. And perhaps I don’t run fast enough to get to the office room on time…Or I have to leave all the kids in the classroom and it will be a huge traumatic experience for them…I was dying before, during and after the lesson and perhaps because of that I managed not to focus too much on the potential methodological failings of my first year with the little ones. We had fun, we learnt a lot and my kids were amazing. And, probably, because of that experience, I am what I am today. Alvaro, Jesus, Luz, Uliana, Itziar, Amalia, Oihana, Beatrice, Andre, Eva, Maria. The amazing students.

If you are about to start teaching English to preschoolers…

Let’s start from a happy ending because there will be one: you will start teaching a new group of preschool beginners, they will fall in love with you and with learning English. You will get the access to a source of pure, undiluted life energy twice a week. You will adore teaching the future to speak a foreign language. The parents will be grateful, the kids will start shouting their first words as soon as they enter the school. The songs you teach will stay with them forever and they will sing them while in the car on the way home. And, many many years later, while they are taking their FCE or CAE exam in a few years’ time, they are going to look back and smile thinking of their first English teacher. See? A happy ending.

Before you get there, though, and it is still a long, long way from now, you just have to survive the first 45 minutes of the first lesson.

Surprise!

That is potentially the biggest problem that during that first lesson anything can happen, literally anything. Some kids will have already started kindergarten so they are used to staying on their own, with ‘a stranger’. Some children have started ballet classes or swimming lessons so they know that mum is not always around and, instead, there is another adult and that they will be ‘learning’. Some kids have had a conversation with their parents that prepared them for this new experience and now they know what to expect. Some children may have even learnt a few words, some red, blue, green, pink and onetwthreefourfivesixseveneightnineten, usually like that, as one word. Some are ready.

However, it will be only some of them and this year, due to the pandemic, possibly fewer than in a regular year since for quite a few of them the academic year and the socialising would have been interrupted. The thing is that you really need to meet them in person and then start discovering them all by yourself.

What can go wrong?

Well, let me think and reminisce a little:

  • tears as soon as you enter the room (for the first two weeks straight, actually)
  • running in the hallway screaming (in their L1) ‘I don’t want to learn any English’.
  • lying on the carpet for 40 out of 45 minutes of the lesson time, looking at you but absolutely refusing to interact in any way whatsoever
  • covering their ears when you speak English
  • responding to you in Turkish (the L2), not in Russian (the L1) and not in English (the foreign language, that was a fun one!)
  • leaving the room to bring the nanny in
  • hiding under the table. Standing by the door during the entire lesson
  • speaking very very quietly
  • asking to see mum every ten minutes
  • asking why you don’t speak Russian
  • hugging the bear and not letting go

Just to name a few things.

Ten things that you can do

One. Do not panic.

Being experienced does give you some heads-up, true, but it is a bit nerve-wracking anyway, no matter how many years you have on your resume. It is quite likely that the first lesson will be an awkward one. It’s ok.

Two. The parents are on your side.

It might not always be possible but it would be great to meet the parents and let them know what you are going to do during the first lesson. Ask the parents to stay at the school, close to the classroom. You will be on your own during the lesson but it is good to know that, should it come to the worst, you can just open the door and call Masha’s dad or Tima’s mum to help you deal with the tears or the unwanted behaviour. Keep the doors of the classroom closed and collect the kids in the hallway. Line the kids up and find out what their names are. Say hello and count everyone. Open the door to the classroom and take the kids in, one by one. The parents will help you here, they will wait with their children and keep an eye of them while you are organising the students in the room.

After the lesson, take the kids out and explain the homework to the parents, too.

Three. Get ready.

Prepare a lesson plan, trying to predict what can go wrong, with the classroom management, instructions or materials and to prepare a plan B. I have found it very useful to put up a poster on the wall with a simplified version of your lesson plan, big font and colour-coded, something that you will be able to glance at without turning your back or taking the eyes off your group.

Get all your resources ready and in order. You will have your plate full as it is so you don’t need to wonder where the pencils are or try to reorganize all your papers when the kids are already in the classroom.

Four. Priorities.

One of the most important things during the first lesson and during the first ten or even twenty lessons, is working on the classroom routine. Your students have no previous learning experience of that kind. They don’t know what is expected of them because they literally, have never done that before. Go step by step, especially between the stages or when you are moving between the parts of the room. In a few weeks’ time, yes, you will be able to say ‘Everyone, let’s make a circle’ but for the time being, do get up, stand where the circle is supposed to be and call Petya. Wait for him. Then call Misha, wait for him to come. Then Marusya, wait for her to join the circle…Don’t worry that you are wasting the precious lesson time. No, you are not. You are establishing the routine and investing in the future.

Five. Your basic teaching tools.

Don’t forget that you have the most important teaching tools on you – your face, your hands and your voice. Use them to help you, to show the kids what to do, to praise them or to discipline them. They don’t speak the language, yet. Your face and your voice and gestures must match the message you want to convey, your soft voice and a smile for praising, your other voice and a serious face when you want to tell them that something should not be happening.

Six. Model.

Demonstrate. Model. Show. Always. Verbal instructions and ICQs (instruction checking questions) matter, too but your students will not know any of the words you are using and modelling will be essential. No matter what your activities are, give the instructions and do it first yourself, possibly a few times. If you are going to use a handout, prepare two spare copies for yourself – one to complete before the lesson and to use as the finished product to show the kids what the aim is and another one to be completing with the kids during the lesson.

Seven. Peer observations

Ideally, there would be enough time for you to arrange a live peer observation session with somes more experienced colleagues. Watching real kids during a real lesson can be especially beneficial, and even more so if you can have a look at the lesson plan and to talk to the teacher after the lesson. Arranging peer observations of the online lessons should be even easier to manage. In the school where I work, we also record lessons for teacher training purposes and we keep them on the database. This way, the newly qualified teachers can access them easily and watch them from home.

If none of these is available, there is still youtube and lots and lots of videos of teachers who want to share their activities and favourite tools. Every little does actually help. A lot!

Eight. Do the reading.

There might not always be enough time for the extensive reading and research before the first lesson but you have to start somewhere. Have a look at these two posts, on the methodology videos and the literature devoted to teaching English to very young learners.

Nine. Smile.

No matter what, keep it up. Smile.

Ten. Bring the ferret.

Last but not least, to quote a great mainstream Hollywood manual into the work with the very young learners ‘The kindergarten is like the ocean. You don’t want to turn your back to it’. Kind of.

But, actually, go on and re-watch the Kindergarten Cop with your teacher’s eyes. Especially the ferret bit…

Have a good one! And remember – the second lesson will be better than the first and the third one – better than the second one. I promise!

Happy teaching!

P.S. Here you can read about how I plan my lessons with pre-schoolers and here about our entering the room routine.

There is one more, newer post, with more focus on the teacher during the first VYL lesson.