English on the carpet: The 5 milestones

Writing one of the previous posts, on creating the curriculum for pre-schoolers, and I compared the pre-school EFL on the pre-A level to an ocean. It is huge, it is surprising and it is uncharted. It is!

At the same time, while travelling across it, to the first beacons of the A1 level, you can and you will come across those buoys that help you understand that yes, you are making progress and moving forward.

Today, I would like to look at these five important posts that we arrive at in our journey across the curriculum of the VYL English learning. Disclaimer: it is a very personal list and it might be getting extended, changed or removed with time.

One: We start producing sentences

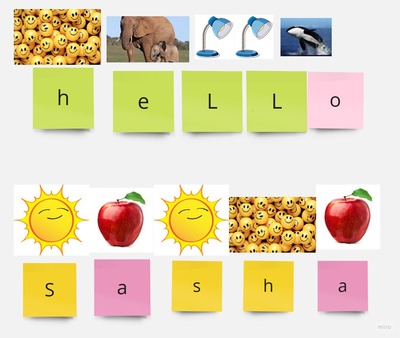
All the learning in pre-school starts with single words, our first hello (although this is a proper sentence), our first blue, green, yellow and pink and our one, two, three, four, five. When that happens, it is Christmas, Easter and birthday put together. I love the start of the course and I spend these first few weeks in awe, observing how my little students venture out into a new territory and how they learn how to navigate it and how to enjoy it. Some of them run into it and embrace it from the word go, some of them are a bit apprehensive and they slowly warm up to it. I take a lot of pleasure in helping them do it and in supporting them on the way.

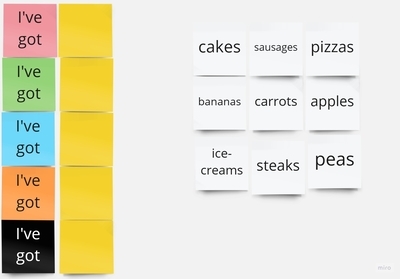
However, that is just the first step, something that needs to happen and something that the course needs to move on from, to the real first aim and that is: phrases and sentences! These can be very simple and their range might remain narrow for a long time, limited to ‘it is’, ‘I like’, ‘I can’, ‘I’ve got’ but they can be introduced, developed, practised and used from early on. Among all the contributing factors there are: the teacher creating the appropriate exposure by using full sentences while introducing and drilling new vocabulary (‘It’s a dog’, instead of ‘a dog’), introducing structures, supporting the use of the structures with gestures or visuals, encouraging the kids to use full sentences, introducing and using the functional language chunks.

Sooner or later, the kids will develop the habit of using full sentences and they will be doing it more frequently, although, of course, that does not mean that they will only use full sentences because, in their real, L1 life, kids also respond in single words sometimes!

Two: We start producing langauge spontaneously

Let’s imagine this moment: you have covered a few units or modules, your little students already have some vocabulary, they feel comfortable in the classroom and they have even started to use some simple structures. It is going well. The next step might be to focus on creating conditions that would favour some spontaneous language production in order to ensure that children communicate not only with the teacher and not only when prompted by the teacher but when they have something to say and something to share.

The activities that foster this freer communication include: letting children lead activities, setting up pairwork and allowing students communicate to other students, not only the teacher, showing children that the language can be played with and creating opportunities for that with, for example changing and creating own versions of stories or songs and, in general, being creative in English, for example our own version of ‘Do you like broccoli ice-cream?’, deciding what five questions thay may want to ask starting with ‘What’s your favourite…?’ or even by giving commands to the class during the Abracadabra game (‘Abracadabra, 1, 2, 3. You are…’). One of the most powerful questions that can be used in class is ‘Who’s got an idea?’ this way inviting students to take part in shaping up the games and, effectively, the lesson.

Three: We start using a variety of communication strategies

This is the one that I was unaware of for a very very long time and only during the first term of my MA programme, while going through piles of articles and publications in search of something that I might get interested in, I found the idea of communication strategies. This is a fascinating topic anyway, for me as a teacher and for me as a speaker of foreign languages but it turned out to be even more amazing because I decided to check whether my little students use any of those or, more specifically, any more than initially claimed, namely – do the little kids do something else than just refering to their first langauage. And yes, they do!

I still need to publish the outcomes of this research in any way but here I would like to highlight only all these instances of the pre-school students trying to deal with the communication breakdowns and in the way they do it because, in my opinion, it does show that kids become language learners and langauge users, taking control and trying to deal with the situation. The most common go-to solution is falling back on their L1 but there are many many more such as approximation (using a word that is similar enough and may do the job effectively), repeating, self-correction, using gestures to clarify. According to the findings of my small scale research done as part of the MA programme mentioned above (small scale as it was), even those very young beginner students are capable of using some of those strategies, showing that they are becoming aware of the learning process and their place in it.

Among the activities that can help foster and promote the use of communication strategies, there are the use of gesture as part of instructions and new language presentation and practice (to include some alternative, easier communication channels), using riddles in class (to get the kids used to describing objects) as well as modelling repetition or self-correction, to name a few.

Four: We start reading

A large part of the story in the EFL pre-school happens without any written word, unless you count the random words of instructions in the coursebook or the words at the back of some of the flashcards or the letters in the storybooks that we do not really pay any attention to in any active way. Many of the preschool EFL students are too young to start learning to read and write in English as the instruction can start as early as 3. What is more, the curriculum in some of the countries is organised in such a way that the literacy component is purposefully excluded from pre-school and the early years of primary in order to interfere with the literacy skills development in the kids’ L1 and not to overburden the students.

However, since the EFL world encompasses many countries and many teaching contexts and formats, there are out there the pre-primary that include some literacy skills development and there are some pre-school kids who start reading and writing in English.

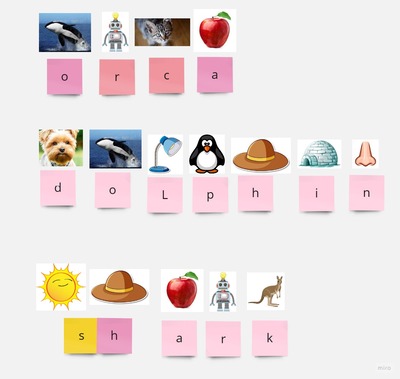
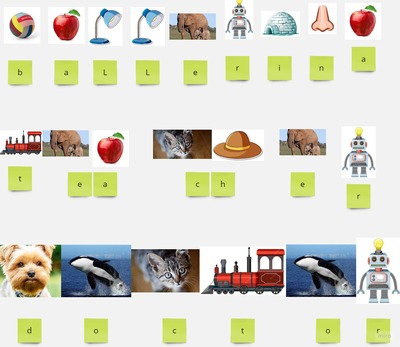
In the context in which I am working at the moment (pre-primary EFL, 2 academic hours per week or 2 real hours a week), we start introducing some elements of literacy in the second year of the EFL instruction and / or when the kids are older than 5. The first steps involve: introduction of the alphabet, revising the vocabulary according to the alphabet / phonics, simple blending and the CVC words as well as some elements of the sight words and creating the written English exposure in the classroom.

Five: We start learning grammar

The pre-primary EFL world is a fascinating place to be and the element of grammar (or structure) in it is one more piece of evidence.

Traditionally, the pre-primary coursebooks focus on the introduction and practice of vocabulary and not structure. On the one hand, such an approach seems to be justified – the students are very young and the explicit grammar presentations are the last thing that they need or are able to deal with. On the other hand, however, learning a language is not about reproducing lists of words, organised thematically into colours, pets and fruit and ‘structure’ must be introduced in order to enable the kids to communicate in a natural way, even if only as the beginner learners.

It does not require any serious change of materials or any extensive supplementing because even if the coursebook itself does not include any structures, these can easily be added, practised and used. Naturally, the way in this is done needs to be different from the traditional explicit grammar presentation. Other methods have to be found and I have already written about my favourite in an article for the Modern English Teacher in May 2022. The article is only available if you have a subscription but MET recorded two related videos which have been made public and can be found on youtube. Make sure you check out one of the earlier posts here.

Coda

These are my five milestones in the pre-primary EFL world and, at the same time, my top 5 favourite moments to be a part of. There are no certain times or days schedules for them, they happen when the kids are ready

So far, there are five. If you have anything to add to that list, please do so in the comments section below!

Happy teaching!

Crumbs #57 Early reading: Secret words

Ingredients

  • The most important thing is a set of words to represent each letter / sound of the alphabet. Some teachers like to use the set from a song to make it possible to use and reuse the same set of words and to help the students memorise and practise them in an easy way, in class and outside of class. One of these more popular songs is this one from Kids TV 123, Phonics Song 2. I use the song, too, although I created a different set of words for myself and for our teachers with b is boy, g is for girl etc. What is more, in our exercises we use a wider range, too, as an opportunity to revise all the words that the kids already know. Sometimes b is for boy and sometimes b is for banana, ball, blue or black.
  • The other thing that is necessary is a place to display the words. It can be a whiteboard, a noticeboard, a powerpoint or, as in the case of my online classes, a miro board. All the photos presented here are the screenshots from my miro board from the past two weeks.
  • Depending on the type of display, a different set of resources will be necessary. In the classroom, I simply draw and write on the whiteboard. As regards miro, I duplicate pictures and post-it notes. It would be possible to do the same using a set of specific flashcards and letter cards. In this case, the words could even be displayed on the carpet or on the table.

Procedures

  • The teacher chooses the word(s) for the lesson and prepares the visuals to represent them.
  • The pictures are drawn on the board or arranged on the miro board.
  • In class, the students, aided by the teacher, sound out all the pictures (‘What’s this?’ ‘Apple’ ‘Ok. Apple starts with …aaa or ooo’ ‘A’).
  • The teacher writes the letters as the kids call them out.
  • When all the letters of the words are on the board, the students try to read them as one word, supported by the teacher.

Why we like it

  • This game is introduced as a part of every lesson, as a starter or as a final game and normally two or three words are used.
  • We start playing the game only when the kids are familiar with all the letters / sounds of the alphabet and alongside the traditional phonics and sight words work, not instead of it. It is a way of encouraging kids to read the familiar words that might not and do not fall into all the patterns of the phonics system and which are not going to be as frequently used as the sight words.
  • In a way, it is a decoding activity that is made fun and achievable with the use of the familiar visuals and it has worked well as a transition from sounds to letters through an intermediary of the carefully chosen images, before we are ready to decode words using only letters.
  • Kids enjoy this activity and they quickly improve their skills. In our lesson yesterday, my student Sasha started to call out the sounds in the sequence of the pictures so fast that I could not catch up with typing the letters. Recently, we made even more progress. She just looked at a series of pictures and called out the hidden word out loud, not even bothering to wait for me. I guess that means that we are ready for the next step.
  • The next step and the development of the activity will be decoding secret words with a mix of letters and visuals before we finally move to reading only letters.
  • The choice of words used is up to the teacher. It makes sense to start with the easy, short words, the students’ names, the familiar cvc words or the frequently used words such as sight words or the functional words (‘Hello’, ‘Bye’, ‘Thank you’ etc). The decisions made here are in no connection with the phonics or the sight words that we currently work on. Most frequently, these represent some of the target vocabulary or the words that are interesting for the student (hence all the Frozen characters here).

Happy teaching!

Crumbs #56: VYL Miming Upgraded

Ingredients

  • Any set of new vocabulary, at the stage when it is introduced or when it is practised.
  • A set of flashcards, electronic or paper, to support the clarification and building the connection between the word, its visual representation, its meaning and the gestures and phrases chosen to represent it
  • The teachers and their face, hands and voice

Procedures

  • The teacher introduces the vocabulary, as usual, with a set of flashcards or realia
  • What follows is a set of practice activities appropriate for the students’ level, age and interests
  • The teachers add miming but apart from gestures accompanying the key words, there are also simple phrases for each of those i.e. ‘a doctor’ represented by a flashcard, a gesture (for example, putting on the stetoscope) and a phrase (‘Open your mouth and say ‘aaaa’).
  • Students look, listen and say the words.
  • In the later stages, students also mime and produce the language for the teacher or the other students to guess.

Why we like it

  • First of all, this particular trick (I would not dare to use the term ‘an activity’ here) was simply a coincidence. We were practising the vocabulary in the unit of professions and, as part of the revision stage of the lesson, I was miming jobs for my student to guess, just like we had done many times before, with other sets of vocabulary. It was then that I realised that there are certain limitations and that miming some of the jobs might be confusing for the students. ‘A ballerina’, ‘a singer’, ‘a photographer’ were easy enough but I got stuck with ‘a firefighter’, ‘a doctor’ and ‘a teacher’. Until I realised that to my miming and gestures, I can add a word or two.
  • The main aim here is still the same – the gestures, the TPR, the miming are supposed to help the children understand the target vocabulary better and remember it better, for example, while miming the word ‘firefighter’ the teacher can pretend to be directing the hose and the stream of water at the invisible fire but, to make it more obvious and visual and rich, the teacher can also say a simple phrase, for example ‘Look! A fire!’, to illustrate the word and to create associations with it. All in all, the combination of different learning channels is beneficial for the language learning.
  • This added linguistic element to our TPR means an extended exposure to the target language and an opportunity for more listening practice.
  • The set of phrases used with the specific vocabulary should be kept the same in the beginning, not to overcomplicate and to overburden the children, but, naturally, there is a lot of potential here for a wider range of the structures later on.
  • Initially, it is the teacher who is going to be producing the language here, however, with time, the students can also be encouraged to take over. We have only been doing it for about two weeks at this point but I have already noticed that my students started to pick on the language and start using it. And that means a lot more potential for maximising language production.
  • So far we have been using this approach in two different activities: Guess my word (miming, as a revision of the target language in the beginning of the lesson) and Abracadabra (setting a word for the other students / teacher to mime, with a wider range of vocabulary).

Happy teaching!

Crumbs #55 Early readers and the sentence building blocks.

‘Pigs might fly’ from Poznan

Ingredients

  • Since I am teaching online at the moment, my main resources are digital. To create this material and this activity, I used my Miro Board although the same could be done using a regular powerpoint. In the classroom, the activity could be recreated with a set of flashcards and wordcards, on the board or on the floor.
  • Three sets of cards are necessary: the key phrase, the numbers, the objects.
Step 1

Procedures

  • We start with revising the key structures and the vocabulary. We read together all the cards.
  • We read the first sentence (I’ve got’) and add one of the food items. Once it is added, the card changes the colour to match the first one. The same activity is repeated with all the cards.
  • We read the sentences again but this time the students choose the number, the teacher add the number and changes the colour to match the colour of the sentence. The same procedure is repeated with all the cards.
  • We read all the sentences together.
  • We play in pairs and we call out the colour of the sentence for the partner to read out loud. The teacher is monitoring and helping.
Step 2

Why we like it

  • This kind of an activity is introduced in the middle of the unit when the students are more familiar with the key structure (I’ve got) and the vocabulary (food and numbers 1 – 20) and its main aims the literacy development.
  • I have only used it with 1-1 online students but there is some potential for adapting this activity for a group of even for pairs (with a multiple set of cards or colour-coded handouts).
  • The activity helps the kids deal with the written form of the vocabulary and structures and to read the words in sentences. In a way, they are also involved in writing because they put the blocks together and make decisions about the numbers, too.
  • The colours help to make the activity more fun and to help them deal with a text that for them will be long and potentially scary. The activity uses only one structure at a time which will be also an early reader-friendly approach.
  • The activity can be made more or less challenging by adding food illustrations to help the kids read, extending the number of sentences or extending the sentences ie I’ve got 4 cakes and 3 apples, etc. When the students are ready, the teacher can also introduce a variety of structures in one set i.e. I’ve got, I like, I can etc.
  • The activity is easy to prepare, it can be recycled and it can be used with a variety of structures.

Step 3

Happy teaching!

Crumbs #54 Caterpillars everywhere

Ingredients

  • A4 paper, one sheet (for the leaf) and some coloured paper, I have tried both cardboard and regular craft paper and they both worked very well. The smaller caterpillar in the photo was done with the cut-up cover page of the drawing album and it works well, too. Some of my students were using ultra-thin craft paper and it worked, too so I presume cut up colourful pages of glossy magazines could be recycled this way, too.
  • Glue, scissors, markers and crayons.
  • This lesson was a part of the series of lessons devoted to spring so among all the other materials that can be used there are: The Very Hungry Caterpillar, the book or the video, the story or the video from Playway to English 3 about 6 Hungry Caterpillars, a video about the life cycle of a butterfly, the garden craft and the butterfly craft. It can also be a part of the Art lessons on the topic of weather and seasons. More about it – soon!

Procedures

  • Check that we all have all our resources, one by one showing them to the camera and, more often than not, finding the missing bits.
  • Show the kids the final product. This is not something that I do in every lesson, sometimes this element is left out for the surprise element. This time, however, I wanted the kids to understand exactly what we are doing and why.
  • Draw the leaf on the A4 paper, colour it green and cut it out. Demonstrate each step to the camera and wait for the kids to complete it before moving on to the next one. During this particular lesson I have also came up with a little chant that we started to sing while colouring and cutting (‘It’s a big, big leaf for a very hungry caterpillar’)
  • Ask the kids to prepare the strips of the coloured paper, of any colour they want. The paper can be cut sideways (probably the easier option as it involves less cutting) or lengthways (in this case each strip needs to be cut in half). I didn’t tell the kids how wide the strips should be. We have been doing craft online for a few months now and my kids are now able to make such decisions themselves. I assumed that everyone will choose the width themeselves (as wide as they can handle).
  • We glue the strips into a ring by putting the glue on one end and shaping it into a circle. We glue all the rings first.
  • Glue all the rings together by applying the glue and attaching the rings and pressing them with two fingers.
  • Cut out one circle for the face, draw the eyes and the smile, glue the circle onto the caterpillar. If possible, the little antennas can be added, too.
  • Sit the cateripillar on the leaf, introduce the caterpillars, say hello, use them in a dialogue etc. We sang the song about the garden that we had been practising for a week then.
Here are the caterpillars made by my kids. Courtesy of FunArtKids

Why we love it

  • It is very easy to make.
  • It is beautiful and sweet. Whenver I choose and prepare activities for my groups, I always wonder if my kids will simply approve of it, if they just like it. When I showed them the caterpillar, simple as it is, I got this very special ‘Ahh!’ and big smiles.
  • It can be done in the offline classroom but it is also possible in the online classroom.
  • It gives the kids some opportunities to make decisions about the creative content, the size of the leaf, the colours for the caterpillar etc.
  • It can be easily combined with any spring lesson or with any story lesson.
  • The level of challenge can be adjusted. In the classroom the teacher can prepare the strips of paper or the parents can be asked to pre-cut them if the lesson is taught online. We used five strips / rings but the caterpillar can be made longer or shorter.
  • There is some potential for the literacy skills development – kids could write the key words on the outside or on the inside of all the strips before glueing them together.

Happy teaching!

All you need is… a picture. Vol. 3

This episode is going to be devoted to the older students, juniors, teenagers and adults and those of the higher levels, from B1 upwards.

All of these activities were inspired by the approach in the visual based speaking tasks of the Cambridge exams. I use these activities frequently at the beginning of the ‘unit’, to introduce a new theme, to ease us into it and to start with some freer speaking activity, that, really, does not have any specific linguistic requirements or a very formal framework. Not to mention that by the way, my students get an opportunity to practise and develop their exam skills, in a slightly more relaxed way.

All of these activites are deeply rooted in my professional laziness because even though I have to devote some time to the picture selection, that is, really, the only time investment beacause the task is usually a one sentence instruction and, to be perfectly honest, most of the ideas listed below were created during the lesson, as a follow-up and an extension of the regular Cambridge ‘similar or different’ task.

Usually, my greatest helper while preparing these activities is google search engine. I type in the key words and I look through the images until I find these four, six or eight that match the idea that I have in mind. They can be saved in a document or displayed on the screen (powerpoint or Miro). I save them and keep them for later because they are always recycled.

Frequently, I start the cycle with the simplest of the activities (‘Choose two to compare’) and I follow-up with a wider discussion (‘Have you ever…?’) or any other combination but, naturally, these can be used on their own. All of the activities can be done with the whole class or in pairs.

  • Talk about your favourite photograph: students choose the photograph that they really like, they describe it and justify their choice
  • Talk about your least favourite photograph: students choose the photograhp that they like the least, they describe it and explain why they don’t like it
  • Choose two pictures for your friend to compare: students choose two of the pictures to compare them, to look for similarities and differences, very much like in the B2 speaking part of the Cambridge exams. The fact that there are more than two pictures allows for the activity to be repeated a few times, over and over, in pairs or with different partners. The longer the activity takes, the more interesting arguments appear and the more creative the answers.
  • Choose two pictures for your friend: students work in pairs but in this case they choose two pictures for their partner to compare. It makes the activity more interesting as it is easier to avoid all the obvious choices and this way more interesting contributions are generated.
  • Have you ever done that? This is the activity in which we use all the pictures at the same time. Students ask each other the question about all pictures, one by one.
  • Would you like to? This is another activity that can be used with all the pictures. Students ask each other questions related to the situations in the pictures, but more focused on the future.
  • The comparatives: Another activity in which students discuss all the pictures, going over the list of questions and choosing the pictures that somehow stand out. The set is closely related to the theme of the photographs. For example, in a lesson devoted to health and health problems we looked at these four pictures and we answered the questions: Choose the most serious problem, the least serious problem, the most common problem, the easiest to deal with, the least unpleasant for the doctor, the least unpleasant for the patient, the most expensive to treat, the least expensive to treat, etc.
  • What happened before? What will happen afterwards? This is a cool actvity that I adapted from the latest editions of New Cutting Edge Advanced. Students choose their favourite pictures and discuss the before and after, almost telling a story.
  • Ask a question: students work in pairs, they ask their friends questions related to the pictures, they have to use different pictures and different question words and they need to a different word each time: What? Why? Who? Where? How many? How much? What kind of? When? How often?
  • It reminds me of: students work in pairs, they talk about all the pictures. The talk about their associations, memories or references. It can be a free activity or it can have a theme of: books, films, songs and personal memories.

Make sure you also have a look at the first two parts of this series. You can find them here and here.

Happy teaching!

Adults learning from kids. Or how I accidentally formulated my teacher beliefs

I have already been writing about ‘the shock’ of a teacher of YL going back into the adult EFL classroom in an earlier post ‘What an old dog learnt?‘.

A message to the parents

Two weeks ago, after one of the lessons, I sat down to write to the parents about the homework, the upcoming test and some feedback. It was just a lesson and a busy one because we were doing a lot of preparation for the test. ‘Nothing special’ you might say because we didn’t have any amazing activities, no ‘fireworks’ or ‘surprises’, only a lot of hard work and practice. And yet, somehow, the lesson was just beautiful, so great, in fact, that I decided to write about it to my educational parents, too. I just wanted to tell them that the kids were amazing (they are!) and that we had a speaking activity and it all went very well. ‘You know, I wish I could show our group to some of my adult students to show them what communication might and should look like‘, I typed, and it was only then that I did sigh, in awe at my own wording and the very idea.

Oh, how I wish I could do just that.

What would my adults see…

First of all, they would see children of different ages, aged 10 in this group, but also 3 or 17 in my other groups, kids studying together, in groups or individually. If they came, they would be surprised at the level of English the kids already have at this point. Or, rather, as a proud teacher of my kids, I hope they would be impressed. Just a little bit.

I would also hope that they could notice how comfortable the kids feel in their other language version. It is not an accessory that you carry around in your hand, a tool that you try to use although you are not quite sure how to. Nor is it a costume that you have to put on and become something else, a dragon, a princess, a cat, something that you are not. On the contrary, I would love them to see how, regardless of the age and the level, English can and does feel like the second skin. Something that is just you, the other version of you but also the very self that you are.

I would love my adults to be inspired by the open-mindedness and the general attitude to anything that is new and out of the box, especially the readiness to see, to try, to experiment. That does not mean that everything that I bring into the lesson and everything that I dump at them, grammar, tests, exam preparation, all the games are welcomed with the open arms and everyone, but absolutely every single person jumps at the opportunity of diving in. It is absolutely not the case. My kids are ‘normal’ kids who get tired, who have lots of homework, who sometimes, I bet you, would be doing something else entirely, not the things we are dealing with in the classroom. And, consequently, they are looking for the ways out, for the ways of cutting the corners, for taking a time out. Which, to be honest, is something that I secretly admire them for, although I will never own up to it. But, even so, overall, they are ready for a challenge.

I would love to the adults to notice the egalite as one of our rules and standards that everyone has the right to and that everyone has to learn to accept, because, indeed, sometimes this is something that we have to work on, although for kids the reasons are slightly different. The younger kids are developing their social skills for the first time, as it were. The adults hide either behind their personality or good manners or, perhaps, the corporate culture that might be developing the habits in some relation to the hierarchy in the company. Although here, I don’t know, I am just guessing.

Last but not least, it would be very interesting to have my adult students see that the teacher is not some kind of an air traffic controller, deciding who goes next but more of a head chef, the individual, who, although fully present and involved, is only keeping an eye on the process and making sure that the food is made and served or, in other words, that the aims are met. What is more, and very closely related, is that everyone gets to execute their freedom of speech, or in simple and less grandiose words: that people talk whenever they have something to say, not only because the teacher asks a question and when she does it.

I have no idea why but with every word typed up here, it started to feel more like typing up a teaching manifesto, my own teaching commandments almost. I can promise that I will leave it here as it is and I will get back to it in a few weeks to see if it still feels like that and if I still believe in it.

As a result…

The truth is that I wouldn’t really do it. The kids’ need to stay protected, in the precious coziness of our online classroom and without any ‘invasions’ from strangers. The adults, on the other hand, might not appreciate having their teacher suggest that their new role models in communication are some ten-year-olds. Everyone will stay in their own classroom and I will just continue doing my job and learning from observing and reflecting on two different environments and types of lessons.

And using them as a source of inspiration for new activities, like this new series on the blog Discourse Development. Here’s to hoping that staging, scaffolding and practising will lead to automacy and to the development of new habits and even my adults, all my adults, will be interacting with more freedom and ease.

So far, there have been four but I got a feeling that there will be more coming up

There is definitely more to come!

Happy teaching!

Crumbs # 50 Vyacheslav or about getting ready to tell a story

Ingredients

  • a group of A2 or A2+ kids preparing for the Cambridge Flyers or the Cambridge KET exam
  • a set of the storytelling pictures from the exam writing materials
  • a piece of paper and a pen

Procedure

  • The teacher displays the visuals on the screen and tells the kids that they will be used to tell a story.
  • The teacher asks the kids to look at the visuals and decide what their character is going to be called. Everyone writes the name down on their piece of paper.
  • The teacher tells the kids to write down ten numbers, 1 – 10, and, when everyone is ready, to write ten things that they can see in all the pictures. These can be only nouns or a selection of nouns, verbs, adjectives etc.
  • The teacher asks the kids to decide what kind of a story they are going to tell: a happy story, a sad story or a scary story. Everyone decides and draws a relevant smiley at the bottom of their list.
  • The teacher divides the kids into pairs and sends them into breakout rooms to tell their stories. They have to use the name, all ten words and they have to make sure that their story has the mood they have chosen for it.
  • Back in the common room, the kids give the group a summary of their story (‘It is a story about a boy who…’)

Why we like it

  • The main aim for me in this particular lesson was to show the kids that even such uninspiring illustrations as the ones we used (and sadly, they were really boring this time) can be a start of a fun storytelling activity and that the final product’s quality depends only on the writers that is us.
  • We are preparing for a progress test and a mock test and I am hoping that an activity of that kind will get the students ready for the independent work during the test itself. Looking at the visuals and making the list helped the students think of the words that they see and it helped to assure that they will be closer to getting to the required wordcount (35 words). If they have ten on their list already 30% of the way there. It also gave them the time necessary to really look at the pictures and to start thinking of what might be happening.
  • From the word ‘Go’ the stories became personalised because the character got a name and became six different boys instantly, Fred, Bob, Tom and Vyacheslav among them. (‘Anka, but why Vyacheslav?‘ ‘I am not sure. I looked at him and I just thought he looks like a Vyacheslav‘).
  • Deciding how the story will end in the beginning also helped to shape it. It was the first time we did it and for that reason I only offered three options: a happy story, a sad story and a scary story but that list can be easily extended. We shared how we were planning to tell the story before we went into the breakout rooms and among our six stories there were three happy stories, one sad story, one scary story (mine) and one ‘ill story’ because one of my students decided that his character is going to catch a cold in the end. Anyway, from the very beginning the kids knew where they were taking their Fred and their Bob. They also knew that their partner’s story will be a bit different so, hopefully, they were more interested in listening to it. There was some variety in the group so I could put them up in a pair whose angle was different.
  • It can be easily done in the classroom but it works amazingly well in the online classes and this is how it came to be. I wanted to avoid sharing the visuals and wasting time on opening them.
  • It is easy and it can be a speaking activity in its own right or it can work as a story-writing preparation task as it was in our case. Consequently, a set of three pictures can be used (Flyers and KET writing tasks) or a set of five pictures (Flyers speaking tasks).
  • As a potential follow-up, the kids can write the story for homework.
  • Next time (and there will defnitely be another round of this activity), I am going to add a more communicative element that will give them a proper listening task and that will give them an opportunity to interact with their partner’s story such as retelling the story they have heard in the breakout rooms, creating a title for their partner’s story or continuing it (‘The next day…’). I know that choosing the best story is sometimes suggested with this kind of an activity but, to be honest, I am not a fan. Not everything needs to be a competition.

I am a lazy teacher and why you should be, too!

Two weeks ago I was invited to present at the monthly meeting of the Teacher – Mentor Learning Community which was founded by Anna Kashcheeva who, over the years, has been my fellow teacher, ADOS, trainer, my trainee and my trainer and supervisor. Oh, what a lovely list))

I prepared a session on laziness, one of my professional passions. The session went well, the audience were amazing and I got a lot of positive feedback. We were not recording but the presentation was followed up by a post on the community’s blog and you can find it here. Once you get there, don’t forget to have a look at all the other posts and materials.

Happy teaching!

Crumbs #49 Linking words and developing discourse

It is actually funny that this particular post makes an appearance as only the third one in the series, although it should definitely be the Number One as I do it with my youngest students and with the lowest levels. That is the Beginning of Discourse.

Ingredients

  • A set of cards with some opinions or statements.
  • With my offline groups we also use a dice with a linker assigned to each number (i.e. 1 = but, 2 = because, 3 = for example, 4 = and, 5 = so, 6 = or)
  • A model sentence for presentation, i.e. It is raining.

Procedure

  • Presentation starts with the model sentence on the board or on the screen and the teacher introducing different linkers with different follow-up sentences, for instance ‘It is raining…’ ‘…because it is November’, ‘…but I am going to the park’, ‘…so I am not going to the park’, ‘…and it is cold’ and so on, for the kids to understand the meaning of the linkers and the differences between them. Depending on the age, the number of linkers can be limited to the most basic ones i.e. because, and, but. The others will be added later.
  • Controlled practice: kids try to come up with their onw follow-up ideas, still working with the same model sentence and different linkers. This is done together, as a whole class, for the teacher to be able to monitor closely.
  • A slightly freer controlled practice activity can go towards students using a selection of other simple sentences.
  • Freer practice is the first activity that is done in pairs or small groups. If this is an online class, one of the students opens the cards, reads one of the sentences. The other student chooses the linker to use and only then the first student continues the sentence. Afterwards they swap. If this is an offline class, the kids work with pairs and with a pile of cards with these sentences and they use the dice to decide which linker to use. The dice is also an opportunity to award points as the number is not only the linker they should use but also the number of points they get in this round.

Why we like it

  • It is definitely one of the activities (or topics) that, for me, personally, are the breakthrough and the first step in the transition from the baby English, pre-A and A1 level towards more linguistic freedom and fluency. Instead of ‘I like apples’, we get ‘I like apples because they are yummy’ or ‘I like apples but I don’t like pears’ or, even the simplest ‘I like apples and bananas’.
  • First of all, it leads to more production since the students are producing two sentences instead of one in the form of a complex sentence and they get more power as regards the profile and the angle of the message. It is not only ‘I like apples’ and it can develop this into ‘I like apples but only fruit. I don’t like the apple pie or the juice’, ‘I like apples so I buy them every week’, ‘I like apples but I didn’t like them when I was a child’ and ‘I like apples but my brother likes watermelon’ taking the entire conversation towards providing details, comparing the present and the past or including other subjects in it.
  • Naturally, sometimes these basic and more complex linkers are included in the coursebooks and they do include great practice activities. However, I like to introduce it early in the game, when the students are ready, regardless of the curriculum. This set of activities allows for a lot of flexibility and it is easy to use with a variety of levels, age groups and topics.
  • I have started including all the key words in the name of the activity for the sake of my online kids working in the breakout rooms, only partially supervised. When we practice in the common room, I leave the key words on the side of the screen or in the chat, for the kids to remember. It is a little bit more challenging in the breakout rooms. But, with the key words in the name, the kids can still see it even in the breakout room. The teacher only need to work a bit on developing the habit on remembering about them and on paying attention to them.
  • The student or the dice making decisions about the linking word to use makes it a bit more challenging but also a bit more fun. It is also a guarantee that a wider range of linkers will be used, rather than ‘but’ or ‘and’ in every single round.
  • The main sentence can be further extended if we ask students to produce not one but two or three sentences or if the other student is required to comment on what they have heard.

Here you can find the two other posts in the series on developing discourse through sentence adverbs and via one-minute essays. There is also one of the older posts on the many ways of developing discourse for the youngest students.

Happy teaching!