Apples and an average Art lesson that sent me directly cloud number 9.

The apples? The apples!

‘What sometimes happens is that an artist, a real and creative person, gets what we call ‘a comission’: someone orders a special piece to be created and the artist agrees although, maybe, they did not really have that in mind. That is exactly what we are going to do today.’

This is how the lesson started. I delivered this little speech and my students were looking at me, puzzled. Apples (thanks to Isaac Newton) are some kind of a symbol of my school and I was asked to prepare some school decorations apple-related. To be perfectly honest, that had nothing to do with anything that I had in mind for February but since that was comissioned I decided to accept the challenge, to look for something and to change the idea for the month to food in art, moving ‘flowers’ to March. Which, actually, might not be such a bad idea altogether, for when we are a bit closer to the real spring. Fine.

Much to my surprise, it turned out that apples are very much present in Art and it is possible to find enough pieces from different centuries, including such gems as Magritte, Cezanne or Raphael and more contemporary pieces from Kusama or the random literal apple carvings. Apple is a symbol and it is a brand, too and we had fun looking at them and talking about them, both with my younger and older group.
The craft

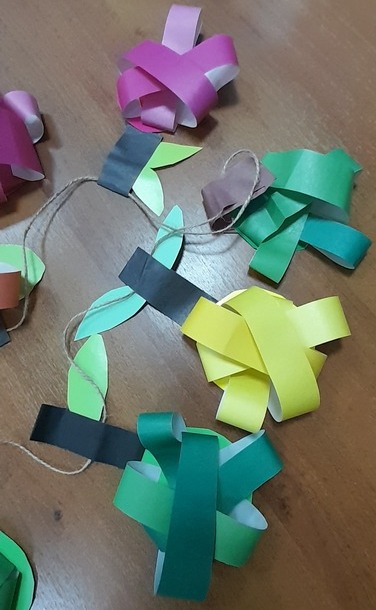
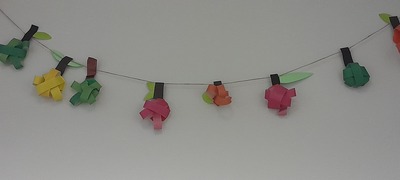
What was comissioned was some kind of a set of apples to put around the school, made of clay or paper mache or plasticine, but I have given myself a permission to interpret it my way, to create a 2D apple garland inspired by these two finds here and here. We used cardboard for the basis and coloured paper for the front and glue, scissors and crayons. The craft is easy and the base of the apple can be a square or a circle, even if it is not very expertly cut out by the students. The little strips can be glued in a few different ways and they are little hands-friendly, too. Kids can use the strips of one colour or they mix them and everyone can make as many as possible, maybe only one, maybe a few, giving us an even longer garland. And, unlike in the case of the Pollock’s lessons, there is a lot less preparation and cleaning. The teacher is relieved to be taking this kind of a time out.

The lesson went smoothly and now we have two garlands hanging over the arches in the main hall of the school, for everyone to admire. It is an easy task and if you need apples or oranges or any other fruit – here is an idea for you.

The lesson was ‘meh’ but I loved it

It was just an OK lesson. ‘Meh’, I’d say if you asked me if I liked it. I’d shrug my shoulders.

Yes, we prepared the garlands, more or less according to the creative brief, we now have something to put up on the wall and, really, it is a pretty garland, it looks good, especially with the multi-colour apples. My kids worked well, everyone made 4 or 5 apples, getting better as they went along and some students even chose to make one for themselves to take home (always a good sign!).

But we were not impressed. I was not and nor were my students. It really did feel like working on a commission that you just cannot say no to. Everyone was involved but the Muses did not enter the room last week. No one was inspired, no one got excited about their task, no one was calling ‘Miss Anka, miss Anka! Look! What do you think?’ from all corners of the classroom…’Meh’.

And yet I loved it. Even though my kids went ‘Meh’, both the younger ones and the older ones.

Why?

This lesson was a fantastic piece of evidence to prove how much we have developed and how much progress we have made since September. Whatever we were five months ago, we are not that anymore. We are artists now.

We have had a chance to work with a variety of techniques (spatter, print, ironed crayons, watercolours, stained glass paints, acrylic paints, guache, markers, crayons, collage, books and surprises) and we have imagined being in the Shoes of the Great (Warhol, Goncharova, Kandinsky, Picasso, Kusama, van Gogh, Malevich, Levitan and Pollock). Could a simple paper apple be of any challenge or interest to us? Debatable.

There was no challenge in the technique itself (because it was easy), there was no suprise of creation (because it is an apple) and there was no inspiration from the Artist of the Day (because there were too many and because we could not really interact with them).

My kids politely did what I asked them to do but there was no spark. They are already much older and more advanced. They need something else now. The teacher has had an OK lesson but the teacher is OVER THE MOON!

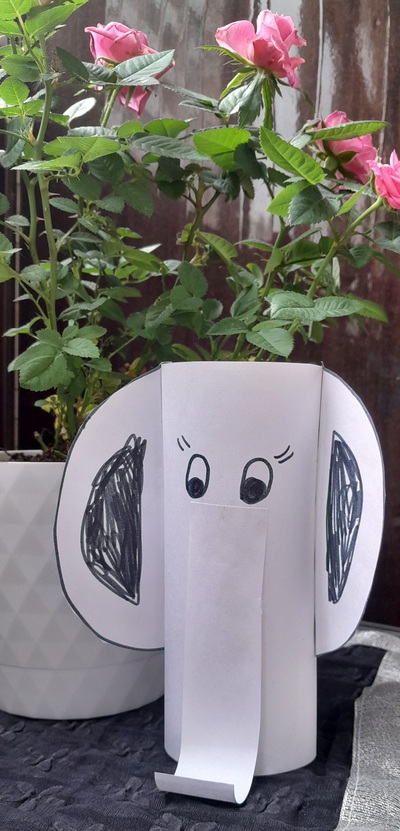
Crumbs #59 Hello Elephant!

Ingredients

  • One piece of A4 paper per child. It can be the regular photocopying paper or a sheet of the drawing paper, of regular texture, from a drawing album that kids use at school.
  • Markers or pencils, scissors and glue.
  • My elephant was inspired by the design I found at Creative Family Fun website, which I adapted to the needs to my group.

Procedures

  • Show the kids the finished product. I do not always do it but in case of this craft it seemed important to help the kids see the final product and to visualise how they are going to proceed during the entire activity.
  • Check that everyone has all the materials by going through the list, picking the items up and showing them to the camera, asking ‘Have you got…?’
  • Fold the A4 paper into halves, crosswise. Open the paper and draw the line in / along the fold. Cut into two.
  • Put one of these halves aside. It will be used later for the trunk and the ears.
  • Take the other piece of paper, hold it lengthways (with the longer edge on the top), draw a line along one of the shorter edges
  • Closer to the top edge draw two eyes. It might be a good time to decide if the elephant is a boy or a girl and add eyelashes and / or a bow on the forehead.
  • Open the glue and apply some glue along the line that has just been drawn along one of the shorter edges. Roll and glue into a tube. Put it on the side.
  • Take the other piece of paper. Draw a circle. Cut it out. It is ok if it is not a perfect circle.
  • Fold the circle into half and draw the line in / along the fold. Cut into two semi-circles.
  • Draw the line along the diameter of the circle, on both semi-circles.
  • Apply the glue on the line, on one of the semi-circle and attach it to the side of the head of the elephant. Press. It might be a good idea to show the kids how to press it here – with the fingers inside the tube and the fingers outside of it.
  • Repeat with the other one.
  • Prepare the strip of paper that will be used as the trunk. It will be glued under the eyes and it might be a good idea to check its length and perhaps cut off a bit.
  • Roll one of the ends of the strip around a marker or a pencil. It will twist it a little bit and it will make it look a little bit more like a trunk. Apply the glue under the eyes of the elephant, attach the top of the trunk and press.

Why we like it

  • This is a relatively easy craft that can be completed by children online, although I would not choose this particular activity as the first craft of the year. However, it is appropriate for five-year-old children, half-way through the academic year or the children who have taken part in some craft activities before.
  • It is a simplified version of the original craft and it requires less preparation on the part of the teacher. It was ‘designed’ and tested with regular A4 photocopying or drawing paper, without any real templates or special resources such as the cardboard tubes and goggly eyes.
  • If the students are younger, the teacher might choose to cut up the paper before the lesson (one big rectangle for the body, one small rectangle for the trunk and a circle for the ears).
  • It is an online-friendly activity.
  • The finished product can be easily used as a puppet (if it is put on the two or three fingers of a hand). One of my students also turned it into a bracelet, only because she chose to use a bigger square and, in the end, it was big enough to be worn on the wrist. As such, it can be used in simple role-plays.
  • It definitely has the WOW element and kids get very excited to be able to make a real toy out of a piece of paper.
  • It can be used to accompany a story, for example ‘Elmer’ or ‘Dear Zoo’ as one of the animals.
  • Our elephants were very simple and white but they can be made colourful, very much in the theme of the elephant party we know from Elmer in which all the grey elephants ‘get dressed’ for the occasion. The teacher can use the colourful paper or the kids can decorate their squares before glueing them together into a tube. If there are some leftover stickers available, these can be used to decorate the elephants in the end.
  • We used the elephant as a part of our unit Animals in Art and English classes and apart from making the elephant we also looked and talked about different elephants created by Salvador Dali, Pablo Picasso and Henri Rousseau, among others.
  • We also had a lot of fun playing with the semi-circles. We used them as our mouse’s ears, cat’s ears, sunglasses, monkey’s ears and wings. ‘I am a butterfly’ as a lot of fun!

Happy teaching!

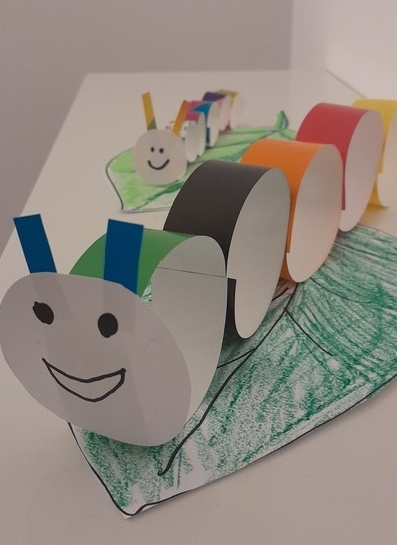
Crumbs #54 Caterpillars everywhere

Ingredients

  • A4 paper, one sheet (for the leaf) and some coloured paper, I have tried both cardboard and regular craft paper and they both worked very well. The smaller caterpillar in the photo was done with the cut-up cover page of the drawing album and it works well, too. Some of my students were using ultra-thin craft paper and it worked, too so I presume cut up colourful pages of glossy magazines could be recycled this way, too.
  • Glue, scissors, markers and crayons.
  • This lesson was a part of the series of lessons devoted to spring so among all the other materials that can be used there are: The Very Hungry Caterpillar, the book or the video, the story or the video from Playway to English 3 about 6 Hungry Caterpillars, a video about the life cycle of a butterfly, the garden craft and the butterfly craft. It can also be a part of the Art lessons on the topic of weather and seasons. More about it – soon!

Procedures

  • Check that we all have all our resources, one by one showing them to the camera and, more often than not, finding the missing bits.
  • Show the kids the final product. This is not something that I do in every lesson, sometimes this element is left out for the surprise element. This time, however, I wanted the kids to understand exactly what we are doing and why.
  • Draw the leaf on the A4 paper, colour it green and cut it out. Demonstrate each step to the camera and wait for the kids to complete it before moving on to the next one. During this particular lesson I have also came up with a little chant that we started to sing while colouring and cutting (‘It’s a big, big leaf for a very hungry caterpillar’)
  • Ask the kids to prepare the strips of the coloured paper, of any colour they want. The paper can be cut sideways (probably the easier option as it involves less cutting) or lengthways (in this case each strip needs to be cut in half). I didn’t tell the kids how wide the strips should be. We have been doing craft online for a few months now and my kids are now able to make such decisions themselves. I assumed that everyone will choose the width themeselves (as wide as they can handle).
  • We glue the strips into a ring by putting the glue on one end and shaping it into a circle. We glue all the rings first.
  • Glue all the rings together by applying the glue and attaching the rings and pressing them with two fingers.
  • Cut out one circle for the face, draw the eyes and the smile, glue the circle onto the caterpillar. If possible, the little antennas can be added, too.
  • Sit the cateripillar on the leaf, introduce the caterpillars, say hello, use them in a dialogue etc. We sang the song about the garden that we had been practising for a week then.
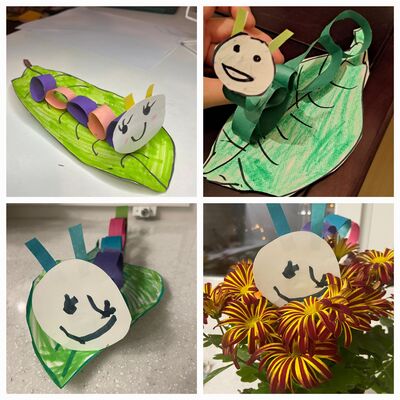
Here are the caterpillars made by my kids. Courtesy of FunArtKids

Why we love it

  • It is very easy to make.
  • It is beautiful and sweet. Whenver I choose and prepare activities for my groups, I always wonder if my kids will simply approve of it, if they just like it. When I showed them the caterpillar, simple as it is, I got this very special ‘Ahh!’ and big smiles.
  • It can be done in the offline classroom but it is also possible in the online classroom.
  • It gives the kids some opportunities to make decisions about the creative content, the size of the leaf, the colours for the caterpillar etc.
  • It can be easily combined with any spring lesson or with any story lesson.
  • The level of challenge can be adjusted. In the classroom the teacher can prepare the strips of paper or the parents can be asked to pre-cut them if the lesson is taught online. We used five strips / rings but the caterpillar can be made longer or shorter.
  • There is some potential for the literacy skills development – kids could write the key words on the outside or on the inside of all the strips before glueing them together.

Happy teaching!

Crumbs #47 Our Weather Book

Ingredients

  • 6 pieces of paper, A5-size aka 3 pages of A4 cut into halves.
  • glue
  • drawing materials: crayons, markers, felt tip pens, coloured pencils

Procedures

  • Introduce and practise the weather vocabulary as usual. This is not our first year of English so we have been using the extended set of words and phrases. Over the series of lessons we have been describing the weather, miming riddles (and yes, I have come up with the gestures for ‘it’s foggy’ and ‘it’s cloudy’, it is not impossible:-) and we have also watched an episode of Peppa Pig, George catches a cold, because it gives us an opportunity to practise the weather, the clothes, some Present Continous and the feelings. Here you can find the set of wordwall cards that we use for the retelling exercises. As you can see, the weather topic became the opportunity to introduce and to revise a whole range of vocabulary sets and structures and it will be reflected in the Weather Book. We are also using the songs and here are our three favourite ones: How is the weather?, What’s your favourite season? and Put on your shoes.
  • First it is necessary to make the book itself. We study online so I asked the parents to prepare the materials before the lesson (six pages, glue, markers), in the offline classroom there is the option of making the book first or the teacher preparing the booklets before the lesson, depending on the age of the students.
  • Making the booklet in class is easy if you follow these few steps: check that everyone has all the necessary materials (‘Have you got the glue? Show me!’), counting all the pieces of paper together etc. Then we draw the line alongside the edge of the paper, page by page and putting the ready pages away. These lines will be help the kids to apply the glue and stick the papers together. The teacher needs to model all the stages and it is absolutely necessary to wait up for the kids, to make sure that everyone is on the same page (no pun intended:-). Afterwards, the teacher shows how to apply the glue (‘Put some glue on the line’) and how to add another page on top, repeating until all pages are glued together into a book (‘Look, we’ve got a book!’)
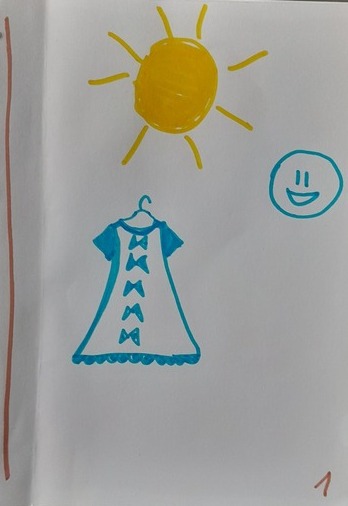
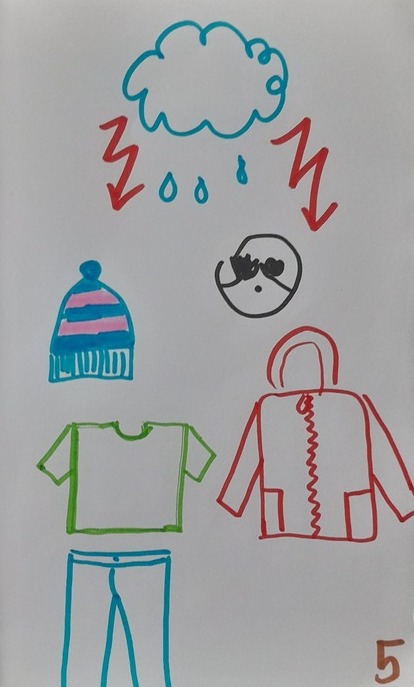
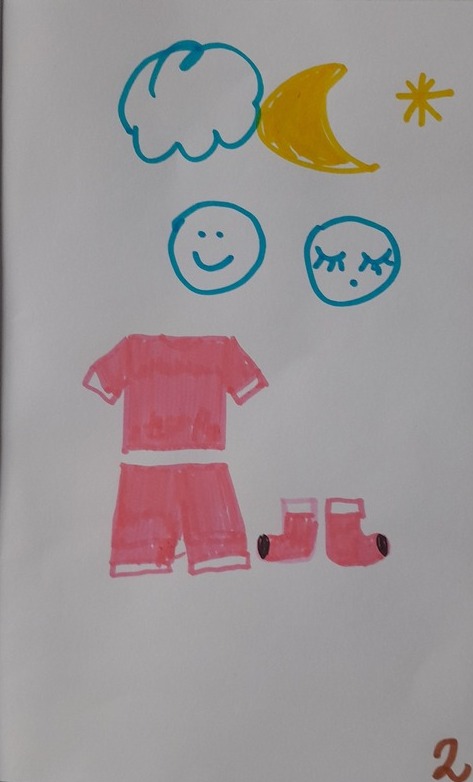
  • Kids, together with the teacher, number the pages. The numbers will help the teacher and the kids to navigate the booklet throughout the activity. We also write our names on the front page.
  • The next step is to start filling the booklet, one topic per lesson. When we are ready, we put the books away until the next lesson. Once there is something in the book, we start the activity with talking about what we already have got.
  • The topics that we have included so far include: the weather, the emotions (‘It is sunny, I am happy’), the clothes (‘It is sunny, I am wearing a dress’). In the future, I would like to add to it some basic accessories (‘It is sunny, I’ve got my sunglasses’) and some basic Present Continous (‘It is sunny, I am riding a bike’).

Why we like it?

  • There is a lot of potential for craft as the book activity can be extended over a series of lessons.
  • The book also allows for personalising the topic of the weather by associating it with emotions, clothes etc.
  • And, last but not least, it gives us a lot of opportunities for producing the language and, since a large part of the content is revised and repeated over and over again, the kids become a lot more confident at producing it and becoming creative with it, too. After a few lessons, we started to make up silly sentences not matching the weather for the other student(s) to correct the information that they have already heard and have become familiar with.
  • It can be used with a variety of topics, not only the weather, for example food (with pages devoted to fruit, vegetables, drinks, lunch and desserts) or animals (with pages devoted to big and small animals, animals which can fly, swim, run etc) although so far, I have been using the weather book only as a long-term project, with my 1-1 online student. We made the food book with my online group, as a one-off project. It was also a success.
  • There is more flexibility as regards the format, too. We made the booklets and starting filling them in in the same lesson because my kids were ready but it is also possible to divide it into two stages: lesson 1: making the book, lesson 2: start filling it in.
  • The same can be done with all the other lessons. The weather words and the emotions are quite easy to write and adding these in is feasible enough, one lesson (or a ten-minute slot) is going to be enough. The clothes or the accessories might take longer and it can be divided into two lessons to avoid the risk of the activity taking too long and the kids getting bored.

Happy teaching!