The unsung heroes of the YL/ VYL classroom. Volume 2

I was there first, dear Balenciaga!

This is the second post in the series and the link between them is the painter’s scotch that already futured in the first post but that is still one of my top 5 things in my bag. And here are some more…

The alphabet

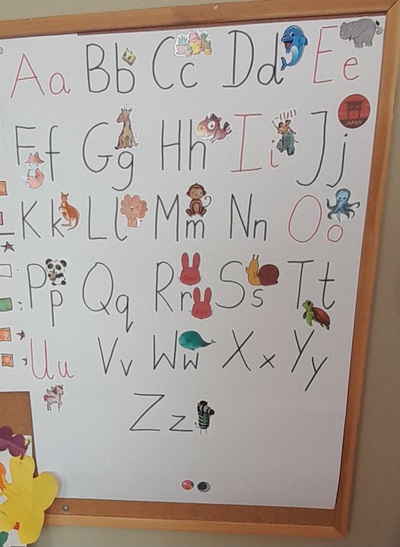
We started the academic year with ‘Aa is for apple’ in our handwriting booklets and we spent the first three months on meticulous handwriting exercises. When we got to Zz and we were more or less familiar with the whole set of letters, I would write all of them on the top of the board for the kids to copy. I know that there are a lot of posters available on the market (and my school prints their own, too), but I just didn’t like them as they did not match my set of requirements: big letters, handwriting, font matching what we have been using and some visual representation, too, to help make them a little bit less abstract. With the visuals that we already know instead of some randomness such as ‘N – nest’, ‘Q – quilt’, ‘S – sparrow’, ‘Y – yak’ or even ‘X – xylopohone’ that are either very rare, well beyond the A1 level, not child-friendly or just vile (yes, I am talking about the xylophone that has the randomest pronunciaction of ‘x’ ever).

I made my own. I made two, one for 1A and one for 1B. The only thing necessary was an A1 piece of cardboard, a marker and a set of stickers.

It has spent the second half of the year on the walls of our classrooms and we used it as a reference point in all our writing exercises. The kids used it on their own and I used it, too, to direct them towards the correct letter. ‘Dd is for dog! Look!’. All in all, it helped us made huge progress with our literacy skills. No more than that but so much!
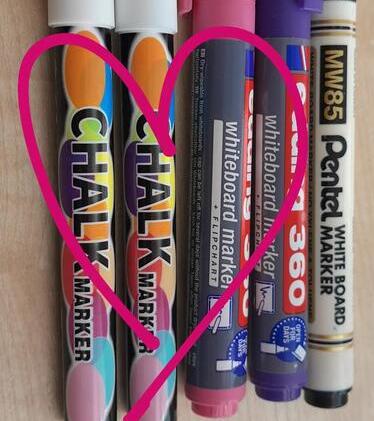
The chalk markers

When I found the Treasure of the Year, I was looking for something else entirely. I was getting ready for the Art classes, White on Black, googling for black drawing paper and white pencils. I found them and the lesson was great (you can read about it here) but what I also found the Solution of the Year and the Teacher’s Love of the Year: the chalk markers.

The thing is for the previous six months I had been forced to use the traditional blackboard and the traditional chalk and I hated every single moment of it, after all my educational like in the Polish state schools, fourteens years as a student and five as a teacher; hatred from the very bottom of my heart, because of the dry hands, because of the chalk dust on your clothes and because of the cloth. And then I found the chalk markers that I had not even known existed!

They are beyond amazing. They last a few weeks, they are just markers and they are quite thin so it is a dream to be writing with them and you can be very accurate and produce intricate letters and drawings. And they erase easily!
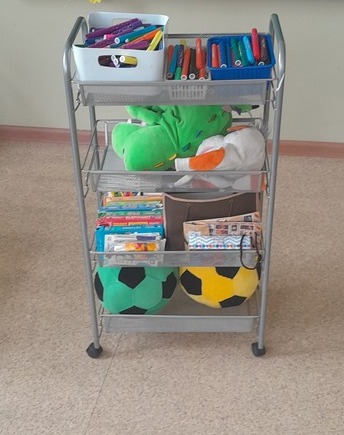
The trolley

I spent about three weeks of the academic year being miserable. I had two groups and two classrooms and the whole day was about moving from one to the other, together with everything that I needed in my teaching life: markers, toys, flashcards, cards, stamps, schoolbag, thermos, notebook, my magic wand, glue, craft paper, pencils…Most of the time wasting on it the entire length of the break. Every single time, every single day. The classrooms are door to door but, still, it meant making a few rounds, a few times a day. It’s not that I did not have a place to keep my things in either of these classrooms, I did, but it was still impossible to have two separate sets of cards, two separate sets of puppets, two separate sets of markers for the whole class.

The misery lasted almost a month until I had enough and I looked for solutions. I used to use boxes and baskets in the past, with my preschoolers but these would not work in these new circumstances. This is how I got my trolley, four metal shelves of happiness on wheels. Each shelf has its own theme and I keep there, going from the top: markers, flashcards and storybooks and puppets, cards, packets small scrap paper cards and handmade cards.

It is super easy to move from one classroom to the other or to roll it around the classroom while handing out boxes with markers. It is light so my students can help with it and they love doing it. They actually love to pretend play being flight attendants and giving out things. It made my life much easier.

One more thing! That trolley is getting me one step closer to becoming a Real Babushka!
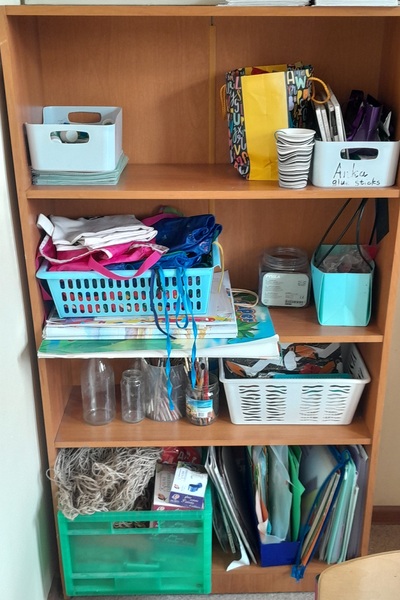
The cupboards

One thing that I definitely had a chance to find out about myself is that I am thoroughly obsessed with order. It might have something to do with some form of OCD because mess and disorder makes me very unhappy. In the past, I must have lived in some kind of an ignorance but that’s because I was not obliged to share the classroom with another teacher on permanent basis. Until September 2023.

This was when I realised that I am deeply unhappy with the disorder on the table, on the cupbards, on the window sills and on the shelves. This was when I understood that I like my classroom near to empty, without all of these toys, games, books and (omg) candy that children have a full and unrestricted access to, which, of course, has a detrimental impact on the general classroom management. Alas, when you have to share, you just share and try to live to tell the story.

The cupboards made it possible and because there are two that I have got, I can be easy-going with how I organise the shelves and what I put things. In one word, I have room for everything. One full cupboard is filled with books, workbooks and notebooks and the other is my beloved Art cupboard, with all my resources, treasures, aprons and jars. They are all located at the back of the classroom and sometimes, when I teach, I like to glance at one or the other and smile. Peace and quiet, law and order in my resources.
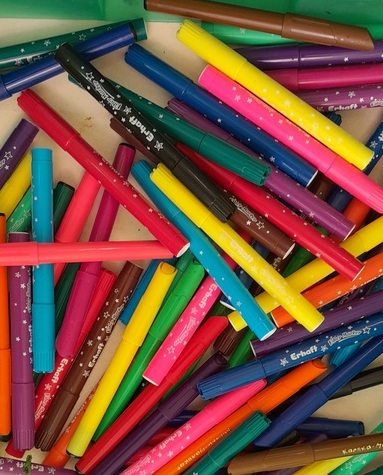
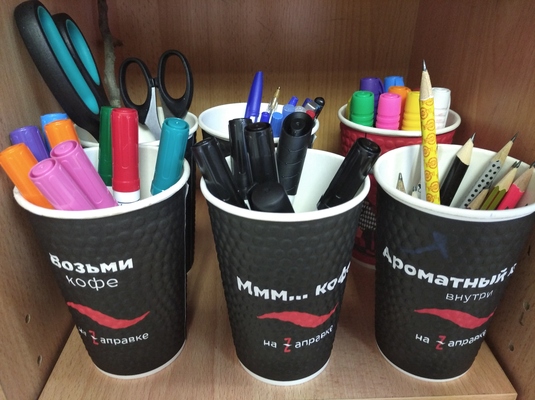
The markers

There are many stationary items in the primary classroom, pencils, pens, crayons, coloured pencils but ‘Nothing compares to you’ is what I would sing to my boxes of markers. I think, perhaps, it might be because of the hours spent in the young learners’ and very young learners’ classroom or, in other words, because of the hours spent with people who are learning to hold a writing tool and people who are learning to use it to write their first words.

On behalf of my students, I prefer them to everything else, because, first of all, they are much easier to handle for an inexperienced hand, much easier to hold, requiring less muscle power to hold and to produce a line, very often much thicker and much lighter than anything else. Not to mention that because of the colours and the excitement of using them, they make the difficult and tiresome task of writing a tiny little bit more appealing and motivating.

We use them throughout the year to colour and, also, in the beginning of the year to write. I cannot really say exactly when we stop and switch to pencils and pens as it varies, from year to year but that is our general procedure.

Crumbs #46. Case studies aka My new favourite thing

Preface

It’s been almost ten months since I took on more adult classes. I still teach my kids but the balance of adult EFL to YL EFL has definitely been tilted towards the adult classes. While I take a lot of pleasure in teaching 18+, I am hoping that this is only a temporary fixture because I miss my classroom and my carpet. At the same time, YL or not YL, I still get ideas and I want to share them. So, here we are – the first post in the Category: Adults.

Case studies in the EFL. A bite of theory

‘Case studies, a form of task based learning (TBL), allow teachers to implement the communicative approach: the central focus is on completing a task, and students use language as a tool to communicate their ideas instead of doing language exercises to practise a grammar point or lexical item’. This definition comes from Christine Roell’s 2019 article (see references) and it is a piece I’d recommend to anyone who is looking for some theoretical input and ideas on creating and using case studies in the EFL.

There are many arguments for including case studies but for me, personally, the priority has to be given to the fact that they create an opportunity for the development of a variety of skills, the language itself but also critical thinking, organising information and team work (Daly, 2002). Among the disadvantages that Roell mentions, the most important one would probably be the time and the effort that needs to be invested in finding, researching and preparing a case study for the class use.

According to Roell, a case study lesson follows the following six stages: introduction of the situation (relevant information, background, the necessary vocabulary), analysis of the additional information, discussion in small teams, presentation of ideas, teacher-led feedback session and reflection, both on the case study itself and the procedures in the lesson. In the article you can also find some valuable notes regarding the creation and implementation of a case study in the lesson.

Case studies in my classes aka the notes from a beginner case study creator’s diary

  • An indispensable connection to reality as all the case studies that I write and use have been taken from the real life, either from the news or from my personal experience. On the one hand that means that the case study is realistic, based on the facts and numbers. On the other hand, that automatically introduces ‘the answer’, which is not only a reward for the students but also allows for another layer of the feedback session: not only the students’ ideas, reflections and solutions but also the opportunity to analyse their ideas against the real life developments. These ‘real’ case studies were definitely a lot more popular among my students than the made-up case studies from the few coursebooks that I have used recently.
  • A more obvious focus on the target language use which I try to create, in order to give the students a chance to practise specific structures or vocabulary. Naturally, he students have a lot of freedom, however, the case studies are introduced in the freer practice part of the lesson and they come with the Structures To Use section.
  • The bare minimum as regards the data to analyse. This, partially at least, has been due to the implications of the lesson format (online, limited lesson time, corporate clients who very rarely have time to do the homework etc). I have been choosing only the case studies that do not require any extensive reading and that can still be effective and generative even with a small number of facts and figures.
  • The element of surprise as the actual details, ie names and brands are kept secret until the very end of the activity, in order to make sure that the students focus on the situation and the processes, rather than on specific names. It is also to ensure that they are motivated to discuss and debate, rather than just look up the events online.
  • The adaptability as an added bonus. So far, as demonstrated below, it has been possible to smuggle particular case studies into different lessons, by changing the angle and the target language to use. This means that the time invested in researching and designing the case study really pays off for the teacher.
  • A wider audience. It has been suggested by Daly (2002) that the most important target customer for the EFL case studies are the advanced Business English students but this has not been my experience. If adapted and staged properly, they can be used with the low B1 students and I have used them successfully with the Business English students, with the general English students with the corporate background and in general English ‘regular’ classes, too. The reason for that is that the students had a lot of background knowledge and could relate to the situation not only as the CEO of a company but also as the film audience members or the pizza restaurant customers.

5 case studies from my classes

Most of the ideas below come from my adult EFL classes in the last two months.

Case study: Kanye West and Addidas

Source: the news and especially the two posts, here and here.

Lessons: We have used it in lessons to discuss risk and risk management, brand image and reputation and general values. The main grammar structure here was the first conditional as the students discussed from the point at which no decision has been made yet.

Case study: Domino’s Pizza

Source: Domino’s Pizza Turnaround available on youtube created with the owners and Domino’s employees and the analysis of a great, albeit risky, marketing campaign in 2009.

Lessons: We have used it in lessons to discuss marketing and advertising (EAP) as well as in the BE and general English students in lessons on: risk, brand image and reputation. As regards grammar, our main focus were modal verbs for deduction, giving advice, conditionals.

Case study: Starbucks and racism

Source: the news such as the Guardian and here

Lessons: This was the main case study we used in the lessons on brand image and reputation and, as regards the language, our main focus was the language of advice.

Case study: The Shawshank Redemption

Source: the wikipedia and the related articles such as this one

Lessons: This is a really fascinating case because, after over thirty years after its release, it is still one of the popular films ever despite the fact that, initially, it was considered to be a flop. We used it in the lesson devoted to risk management and the focus was the first conditional (‘Imagine you are the CEO of the studio. What will you do?’) and the second conditional, with the contemporary twist (‘What would they do today, in 2022?’).

Case study: Famous people

Source: The news, unsourced, google images for the photographs of some famous representatives for the following professions: a chef, a sports coach, a ballerina, a politician, a writer, a CEO. The only trick here is to choose the names that the students in your country are less likely to be familiar with and the photographs that show them in their private life. The real names and professions of all the people involved are kept secret until the very end of the activity.

Lessons: This is one of my favourite activities that I have managed to adapt to the needs of my older YL students. It got inspired by an activity that I saw in one of the Rewards Resource Pack, only the original activity did not include the element of reality. For that reason, I have decided to use my own ‘characters’. With the teens and juniors, the main language focus is the modal verbs for deduction and the vocabulary necessary to describe the character and the personality. With the adults, we extend it towards a discussion on stereotypes and the ways of overcoming them. Here is an example of the set that I have used with my adult students in Poland.

References

Peter Daly, Methodology for using case studies in the Business English classroom, The Internet TESL Journal, III / 11, 2002, available online

Lynne Hand, Using case studies in the ESL classroom, LeoNetwork, available online.

Christine Roell, Using a case study in the EFL Classroom, English Teaching Forum, 2019, available online

Happy teaching!

The Unsung Heroes of the YL classroom

Masking tape aka Painter’s tape

The funny thing is that I cannot remember when I discovered that the painter’s tape existed. Maybe it was Vita, my friend and my colleague who first brought it to school…

What I know is that for the past four years I have always had a roll of two at home and a roll or two at school. Because, right now, there is no classroom without the painter’s tape.

Every single time we do anything in the hallway, any kind of a treasure hunt, any jigsaw puzzle, anything which involves things being put up on the walls, the painters’ tape enters the picture. I prefer it to blutack because I don’t mind just throwing it out (instead of peeling it off carefully from every single scrap of paper) and, even more importantly, my students don’t feel tempted to nick the tiny little bits of the precious resource.

My primary students who are learning to read and write know this resource very very well. We use the tape to write instructions for different activities, especially if they needed to be displayed around the school and all our lessons would start with a fun activity with the little chairs – some of them would have the bits of the tape with funny words on them, for example choosing the place to sit (‘I am sitting on the Happy Octopus’), making sentences with the key word written on the chair (‘dancing’ – ‘Today I am a dancing hippo’) or even writing and creating random combinations of words.

Apart from that, pieces of the tape can be left on each table, one per student. They can be used in any kind of surveys (‘Which game would you like to play?’, ‘What was the most difficult part of the lesson?’) but I also noticed that the students liked to write on them, just to express themselves, to scribble while they were listening or to just to somehow personalise the table where they were sitting.

The tape can also be used to help group and pair the students. There should be a piece of tape on every desk and on these the teacher write the names of different superheroes (a very broad term in my lessons, it can include both Batman and Cheburashka, Harry Potter and Aleksander Sergeevich Pushkin, Lionel Messi and Santa). On entering the classroom at the beginning of the lesson, the students pick out one of the cards with the same name from the teacher and this is how they find out where they are sitting on the day. The same cards can be used later on to mix the students, with the teacher (or one of the students) picking out two cards to decide that in the following activity Superman will be working with Harry Potter and Robinson Cruzoe with Superman etc.

AND, though there are no photos, the painter’s tape was THE LINE on the carpet that helped my little babies sit in a safe and appropriate distance from the big TV on the floor.

Last but not least, we have used it to create a city plan on the floor which we later filled in with flashcards and we used to move around. It is a rather limited use, but, oh what an amazing lesson.

The door

The door is the most underestimated and underloved part of the classroom. And how undeservedly so! Even if you have only the most standard door (not those double door straight from a castle), that is a good two square meters of a notice board, ready to use! It would be recommended to check the material, the surface and the ‘stickability’ and to test different adhesive materials that will not destroy the door itself but there is scotch, there is the painter’s scotch and there is blutack to name at least a few that could be used here.

In my classrooms we have used the door in the following way: putting up the huge posters to use instead of the numbers (The Caterpillar Classroom, The Baby Shark Classroom, The Cookie Monster Classroom), putting up the homework poster (‘Did you do your homework?), putting up the washing line with all the clothes to use during (‘Today I am wearing…’), putting up the classroom rules posters, the library reviews poster (for the kids to leave the reviews after they have read something), the test feedback poster (‘How difficult was the test? 10 – very difficult, 1 – not difficult at all) and any class surveys completed on the way out, the sight words reading practice on the way in, displaying the alphabet poster when we were just starting to read, displaying any of the work that the students produced (when the walls were already taken) and, last but not least, or quite the contrary: the first ever: The Door of Doom aka the poster we created with my FCE students by adding bits and pieces to the poster throughout the course. These bits and pieces were all the things we struggled with: the mean phrasal verbs, the less common suffixes, the collocations that we would always make a mistake with and so on.

Next time you are in the classroom, have a look at the door and at this whole unused space…And what you could do with it. Once you start, you will never stop.

Counting sticks

This entry is perhaps not such a great surprise. After all, all the little people (and their teachers and parents) are very familiar with these colourful plastic sticks. Everything else aside, this should be one reason to be including them in our EFL lessons.

We use them mostly to count, of course, the kids pick two or three or twenty and this helps to make such an abstact idea as numbers a little bit more visual (because three items lying on the table, three sticks, three fingers or three dots on the dice are a better representation of the secret that this symbol ‘3’ stands for) and kinesthetic when we let the kids manipulate the sticks. Luckily, the sticks are cheap and easy to get so having lots and lots of them, enough for everyone, is not a difficult aim to meet.

One of my favourite games to play (perhaps because it is a perfect solution for a lazy teacher) is using these together with the paper plates with numbers. The kids look at the number, count the sticks and add or take them away, in order to make sure that the number matches the number of sticks. Which is also the beginnig of adding and substracting.

By the way, flashcards will do here, too, but the plates have the advantage of having the rim and the sticks do not slide off and you can easily just pile them up on top of each other, put them aside and sort them out after the lesson.

With my ‘adult‘ pre-primary kids, we have used these same counting sticks to help children manage a pair-work activity, to add a visual and kinesthetic element to the verbal exchange. We were practising different varieties of ‘What’s your favourite…’. The kids were sitting in pairs, on the floor, around a set of flashcards that would symbolise the themes (an apple for ‘What’s your favourite fruit?’, a teddy for ‘What’s your favourite toy?’ and so on) and one student in each pair would get a set of five sticks. They were supposed to ask their partner five questions of their choice (we had ten categories) and while doing that, they were supposed to put the stick away, on the relevant card. We used a similiar tool when they were interviewing their partners about things they like (‘Do you like…’ + any words of the kids’ choice) and I guess it can be adopted to pretty much any structure.

Plastic cups

Or any other recycled cups (like those in the photo) which are easily available. They are my favourite resource to sort out materials (pencils, pens, bits and pieces for a craft activity, especially the leftovers, which I hide in the cupboard for later). They also help to organise materials which I give out to the kids, for example we have a set of boxes with crayons organised by the colour, for some, more teacher-centred activities, as here the teacher is the one in charge AND a set of cups organised in sets, one full set per student, which we use in all the SS-centred activities in which the students make decisions which colour to use.

With my older students, I use the plastic cups whenever we use dice in class (and that is often). The dice given to students (kids and teens) ‘just like that’ have the most amazing ability to fall off the tables about once per minute. Plus they make LOTS and LOTS of noise and if you have a group of then and five dice are rattling and rattling…Well, you can imagine. If you put each dice into a plastic cup, you can still shake it and get a number and everything is more manageable. I think I saw it first in Nataliya T’s class and here are my thankyous for this idea!

Paper plates

Oh the paper plates! They are of course used at parties and in craft lessons to make clocks, spinners, plates for all the ‘fruit salad’ craft activities, snowmen, frogs, chicks, rabbits and what not…But there is so much more!

For me it was this one day when I got an idea for a great lesson for which I really needed the number flashcards. These, however, were left behind in the office, so getting them for the lesson that was the first lesson of the day, early in the morning was out of the question. I rushed to the school cupboard in the house, to go over all the treasures there, with the idea of something that could help me replace the flashcards and there they were – a set of colourful cardboard plates from my local supermarket (which I must have bought for some class party earlier). Creating the flashcards took three minutes and a permanent market and it turned out that these particular plates (many of which I bought later on in the same supermarket) were perfect for it: big, durable, colourful but not too colourful since there was a thick colourful rim but the centre was just white and empty aka perfect for writing!

We normally use the number plates like any other flascards, first and foremost but the different shape adds to the variety and makes the topic of numbers a bit more fun. We also use them together with the counting sticks (see above) or with any other bits. We used the numbers 1 – 12 to create a huge clock on the floor and we played some movement games with it.

The plates became the canvas that helped me create my amazing emotions and adjectives cards (sorry about blowing my own trumpet here but there is a lot of love here) which we have been using for more than two years now.

Not to mention that the plates can be a very useful tool to organise all the bits and pieces while getting ready for a craft activity, hats for the snowman on one plate, scarves for the snowman on another, and they all can be stuck on top of each other. And, as you know, every little helps to make the teacher’s life a bit easier.

What are the unsung heroes of your classroom? Please share!

Happy teaching!

Crumbs #20 Тетрадка Love*)

Or about my favourite resource in this academic year, hands down.

Ingredients

  • A notebook for each student and a box to keep all the class notebooks. These notebooks don’t travel home, they live in the classroom.
  • Some writing materials: pencils, markers, crayons.

Why we love it

  • For all of the students in all the groups where I introduced notebooks (and that’s everybody, pre-primary, primary, juniors and teens, apart from my pre-primary level 1 and 2, who are still only 3 and 4 years old, they are going to get theirs a bit later in the year), this has become a surprisingly wonderful way to express their personality and to become even more present in the classroom. When I gave these out, many of my students of all ages were inquiring what they should write on the front page or on the cover page. I suppose it is because there might be some specific regulations at their schools regarding what needs to be and what can be written there. When I just shrugged my arms and said ‘I have no idea. It is your notebook. Write what you want‘, many of them looked at me in disbelief and then started to write some elaborate names in Russian or some made-up names and nicknames or just their names, in a variety of fonts and styles.
  • Equally, the format of the note-taking is highly personalised, too. There are certain activities that we use these notes for (see below) and sometimes they involve a structure or a format which is the same to everyone but, at the same time, the kids are in charge as regards the choice of the writing materials, colours or the ratio between text and the drawings.
  • It is the students’ personal space in the classroom, too. We share what we have written but I hardly ever look into those notes, unless they ask me to or unless they need help with some vocabulary or structures. Since this is a new project and since I am just developing it and discovering its potential and its potholes, I have just realised that I will have to include some kind of delayed error correction in the process, for instance by reading the entries and contributions to fish out some of the spelling or grammar mistakes.
  • It give the students an opportunity to write and to read more.
  • It is an opportunity to keep all the notes and all the ideas in one place and to go back to them, to review, to remember, to reminisce or to recycle.
  • Notebooks for the high level students (C1) are our way of breaking into the least favourite skills ie writing. After we have finished a receptive skill task such as exam reading and exam listening, we follow it up with a 50-word (plus) summary in the notebooks, steering away from any specific genre or format, just simple note-taking that now compliment our regular ‘What do you think?’ speaking sessions. We go back to these notes in the following lessons, to check whether our views have changed in any way, whether they have developed but also, very importantly, to edit and to improve, when possible.
  • Notebooks for juniors (B1) have been used in a variety of ways related to the vocabulary we study. First of all, they are the opportunity for the students to reflect on the vocabulary they have learnt. At the end of the unit, we look at all the phrases, structures and words and categorise them. The categorise we use change all the time and have included the following: easy words and difficult words, useful words and not-so-useful words, interesting words and not-so-interesting words and I am hoping to add more to this list. In the future I would also like the kids to use their own categories in the future. This kind of an activity also involves a discussion and sharing the rationale for our choices (and that is my favourite part of the whole activity). We use the notebooks also to work on the additional vocabulary, not included in the coursebook but still worth knowing. Sometimes we create the lists ourselves (ie while describing the objects, we also revised a list of materials) or we work on the lists that I prepare (ie a few weather idioms that we discussed while going through the topic of ‘extreme weather’). Last but not least, this is also where we take note of the emergent language, in the section at the end of the notebook called ‘Our special words’. I keep track of these on the whiteboard (the left margin) but I encourage the students to take a note of these (or some of these) in their notebooks.
  • Notebooks for primary (A2) are probably the most multi-functional among all the age groups. First of all, we use them to complete our portfolio tasks that are included in our coursebooks, one task for every two units. For these, each student gets a pre-prepared template, a notebook-page size, which they glue in and then use for whichever task we have such as the personal file (used in an interview) or the list of the adjectives to describe animals (used later in Our Big Animal Quiz) and so on. We use it also to personalise the vocabulary that we learn, for example after we have learnt the jungle vocabulary, the kids were asked to arrange all the new words in the order of their own preference, number 1 being their favourite word, number 9 being their least favourite. As with the older students, we later talked about the reasons for our arrangements. Last but not least, we use the notebooks to prepare for any student-generated games that we play. They are especially useful in all the guessing games and are much better than any small cars because the notebooks are not transparent and, because of their format, they help the kids to keep their secret words really secret. You can find out more about this game here.
  • Notebooks for pre-primary (pre-A1) is a serious step towards developing reading and writing skills. Now, I am not sure whether it is going to fit all the pre-primary classes (because some children are not ready and some programme do not even include any literacy elements) but this is what works for us. My students are 5 and 6 at this point and we have been doing a lot of literacy activities for about a year now. We started relatively early simply because the kids showed interest in the written word and I realised they were ready. We went slowly but with great results and I can safely say that now it is their favourite part of the lesson. Last year we did a lot of writing on the laminated erasable pages, with whiteboard markers, this year we moved on to notebooks. We use the notebooks to copy the words that we learn, in two or three batches, with only four or five words per lesson, not to overwhelm the kids. Kids usually choose to add little drawings to these so our notebooks are slowly becoming picture dictionaries. Our notebooks are also used in pairwork, for example in a survey on the food we like and we don’t like in which the students used a pre-prepared chart (printed, cut out and glued in by the teacher) to interview their partners and to ‘take notes’ in the form of pluses and minues. I found out that the notebooks really help to set-up and to run a pair-work activity. The notebooks are also going to help us to maintain continuity with the longer-term projects such as the reading of a phonics story such as ‘A fat cat on the mat’ by Usborne and all the related activities. They will be completed over a series of lessons but thanks to the notebooks we will be able to get back to them and to revise in a more SS-centred way. Or so I am hoping.
  • There is no other way of putting it is: it is a proper Notebook Love (or Тетрадка Love) and it is almost ridiculous that such a tiny and irrelevant thing, at RUB 40 a piece (about 50 cents) could have such an impact on our lessons with its potential for creativity, reflection, personalisation…And, mind you, it’s been only two months. Something tells me, the best is yet to come.

Happy teaching!

P.S. Of course I have forgotten to take proper photos in the classroom, of all the cool things in our notebooks. I will try to make up for it, at one point. For now, just some cool notebooks that are kicking about the house.

I did not ask them to write my name here. I feel honoured they decided to include me here))

*) Тетрадка – a dimunitive of the word тетрадь (notebook)