This week was simply a repeat of the previous week’s class, with the only variation being some new sentences in our game (‘What are you doing?’) and a new set of pictures for the presentation and this time we used the famous paintings and the actions in them. This stage of the lesson was relatively short but that is because the artist would make a proper entrance.
The same artist. Twice.
The artist
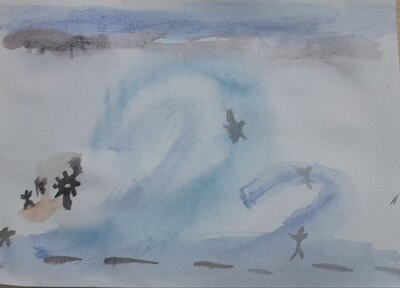
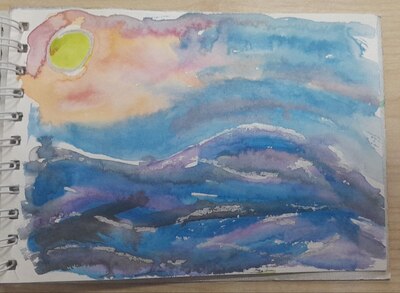
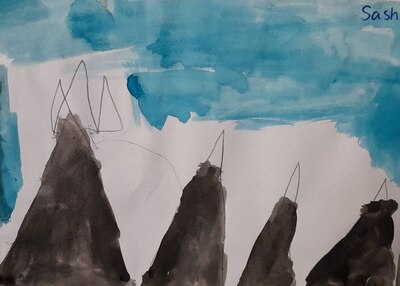
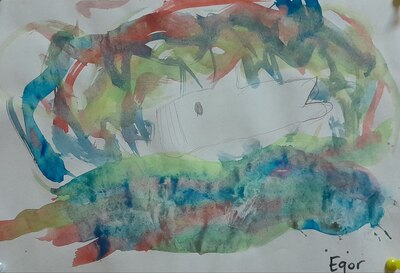
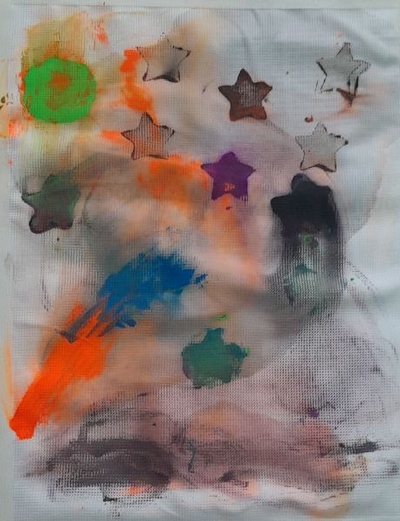
The guest and the Artist of the Day was J.M.W. Turner who visited in the past. I decided to bring him back because he felt perfect as a representation of movement through a very simple medium of the sea and the clouds.
Normally, the stage in which I show the kids my model happens a bit later in the lesson, just before we start creating. In this particular lesson, however, I changed the order and before revealing who the artist was I presented my two paintings: the seascape painted practically with one colour and almost with no lines and the other one with plenty of colours and plenty of lines. This was to demonstrate the difference and to encourage my students to use these two basic tools later on in the lesson. I also asked the kids which one they liked more. (Unsurprisingly, the second one, for the majority of students but there were some who liked the peace and quiet of the first one, too!)
Afterwards, we looked at some of the paintings created by Turner and how he tried to depict the movement in them. It happened almost naturally that they started to express their opinion (‘It is beautiful’, ‘It is scary’, etc).
Here you can find a very interesting article about the movement in art.
Here is a whale jumping out of the water…
The art
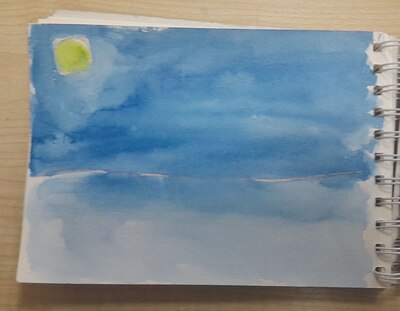
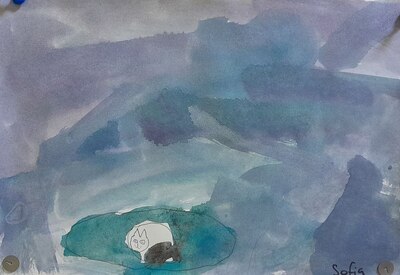
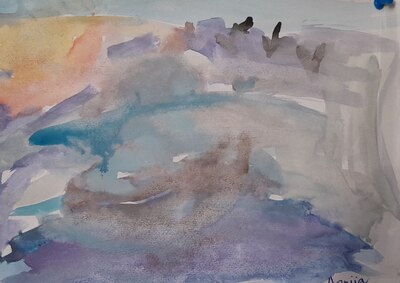
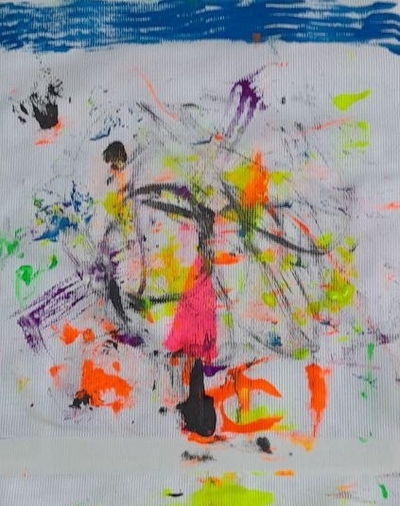
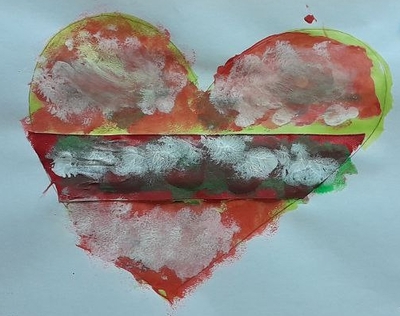
Last week we worked with watercolours and the task was ridiculously simple: draw the sun, the sky and the water (just like Turner did!) and try to show the movement using the colours and the lines.
This was a day of surprises in the classroom and here is the list of the things that surprised me most:
how easy it is to create a beautiful seascape, even for the artists who are only five or six or eight
how touching are all the images the children created
how involved all of my students got into the task despite the fact that we are a mix bunch and there are some who love art and creating and those who don’t really do it very frequently
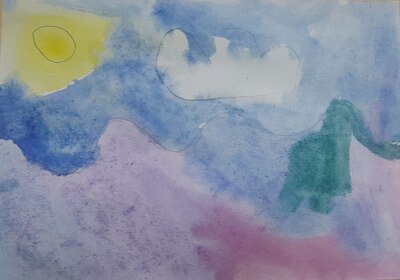
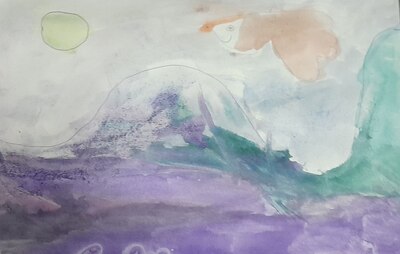
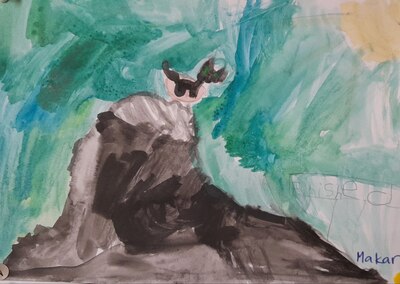
how they approached the task and how they adapted it to their own needs and perspectives, by adding human figures or animals or boats to accentuate the movement, by changing the setting and visualising movement in nature in the mountains or in the fields and how proud they were of their works
how easy it was for them to experiment with the colours, the lines and the settings
how un-coincidental all the decisions were. And I know it because I could hear what they were talking about while they were working.
how they enjoyed the task
how the youngest artist painted a very calm and uneventful sea but then decided to experiment with the materials and his sky was, in fact, created with the wheels of the toy car, resulting in thin black clouds
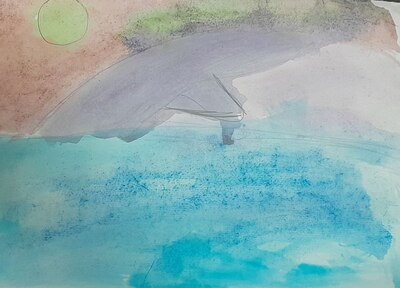
and how the other young artist, almost as young, but attending our classes since September, has shown a lot more maturity and understanding of the task (though I love both pictures!)
how two of them decided to change the settings and go for the mountains instead
how one of my older students found a new passion for colour and for experimenting with mixing different shades and colours
how one of my most talented just went for a huge, uncontrollable cloud, a hurricane almost
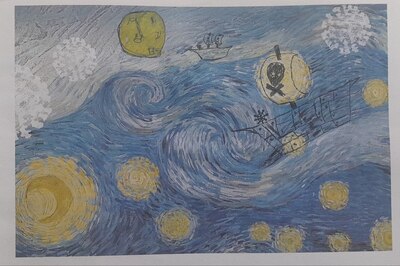
how this most precious picture was created by one of my students, two days after the lesson, just because we have found the van Gogh background in the stack of the recycled paper. How the real artist saw the movement in the clouds and how the transformed the sky into the sea because the idea lingered…
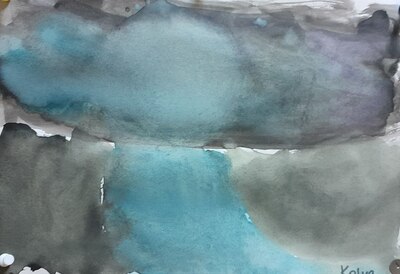
The mountains, just before the movementThe mountainsThe cat under the skyThe sea and the sky
This lesson was a part of our winter camp – a series of lessons devoted to ancient civilisations taught over a week, with each day being devoted to a different country and culture. We had a lot more time than in a regular EFL class because we could spend the entire three lessons focusing on the History, the Art and the Culture each day. Not to mention that each day was packed with the L1 activities in the particular theme, further reinforcing the vocabulary, the concepts and the ideas, turning it into a real experience for the kids.
For that reason, we had a lot more time to explore the language and all our History lessons of this programme followed the same plan: listening to the music of the civilisation to experience the culture, learning the key vocabulary, doing some written work and, the most important part, comparing the life of ancient Greeks, Romans, Aztecs and so on to ours, using Present Simple and Past Simple, which helped us practise a few key verbs throughout the whole week and to really learn some interesting things about a particular culture. It was also a great opportunity for the kids to share their questions and, equally, the knowledge which they already had.
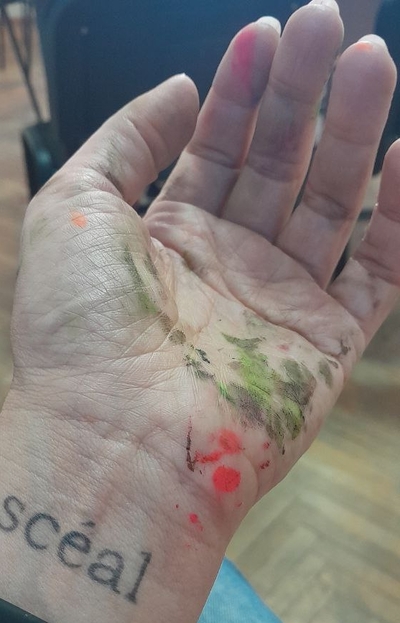
‘Tell me you are the Art teacher without telling me…’ (and the kids left with their hands clean!)
The artist
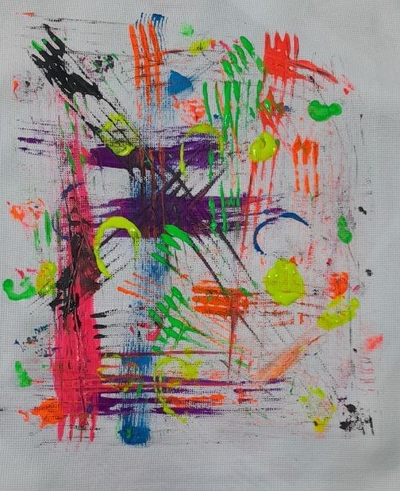
Sadly but not surprisingly, we did not have ‘an artist’, not one with a real name. Instead, just like with many other lessons of this particular week, we invited a whole nation to our classroom. We talked about the beautiful Aztec prints that are still popular today. I showed the kids a few examples and we called out the colours and the types of patterns there. The kids automatically started to share which one was their favourite, too.
My choice of the resources and techniques for this lesson was influenced by a few different factors. I decided to combine the Aztec love of cotton and amazing fabrics and patterns, the Aztec love of printing and the amazing colours. And this is how we ended up with our lesson.
There were so many precautions and instructions that I really ended up giving a step by step lecture and a demo, while at the same time discovering the technique, having never done it in class before. I cannot show you the video but there is a lot of ‘awnnn’ coming from the kids and a lot of ‘I just looove it’ coming from the excited teacher.
This is what we did step by step:
I prepared the fabric (simple cotton, pre-washed, dried and ironed it at home and cut it up at school) and I attached the pieces to the tables. We did not have the frames (which would have been amazing), but I scotched each piece to the table using the thin painter’s scotch, along the four edges, to ensure that it is properly attached but also to make sure that we have the natural frame for each piece. I also put a piece of newspaper or paper underneath to protect our tables and to make sure that the excess paint is soaked up by that, when necessary.
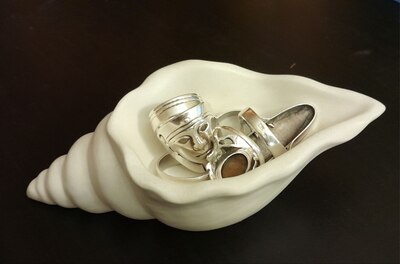
I prepared the tools: plastic forks, knives, spoons, chopsticks, paintbrushes and a few foam stamps I had. Later on we also added a few big shells and some crumpled tinfoil, just because we found it at school.
We also got the aprons ready, the wet tissues and an additional piece of paper per two students.
It is also worth mentioning that we rearranged the tables and put them all together into one big piece in the centre of the room to avoid a situation when the kids need to move around to exchange the colours or tools and spilling the paint all over the room.
I put up another piece on the board, for me to use as a model. Again, I used scotch+fabric+paper underneath and it worked very well.
The next step was a set of my instructions. I had to focus on: not getting up and moving around (the teacher will bring everything), being careful with the paint and wiping it off your hands immediately, wiping off the paint off the tools once you stop using them and sharing the tools and waiting patiently for your turn.
Afterwards, I demonstrated how we work: choose a tool, dip in the paint on the spare piece of paper that we used as a palette (easier to throw out than to wash), print, clean your hands and the tool and repeat.
At the end of the lesson, the kids went to wash their hands and went for a walk, I was cleaning up myself (always the case with the acrylic paints).
We needed the classroom for our lesson #3 so I moved the pictures to dry in peace to another room that was empty at a time.
I don’t really need to tell you that this lesson was a success, you only need to look at the photos that accompany this post. I absolutely loved how it went, how we worked and where we got with it. It was not an easy task, logistically, but it was absolutely and definitely worth it.
I was really impressed with how well my kids worked regarding all the rules, cooperation, sharing and being careful with the materials. True, I have no idea how many times, within those 45 minutes, I said ‘Wash the tools!’, ‘Wash your hands!’, ‘Show me your hands!’ and ‘Who needs blue / a fork / a flower / a heart?’, but they were absolutely amazing. So much more gratifying that these were not my regular Art Explorers kids and, nonetheless, they were great. The hands remained cleaned, the tables were generally clean and no clothes were injured or harmed during all our creative activities. I made sure I told my kids that I was really proud of them.
Now, the printing was one ridiculously enjoyable and one surprisingly innovative process. The children took my model into consideration and they tried to follow in my footsteps in the beginning but every single one of them took their own steps towards experimentation and their own interpretation of the process. And, despite the fact that we were working with the same tools and techniques, we ended up with a set of different pictures.
All the kids were visibly enjoying the process and it was great to see how they were not only sharing resources but also the ideas and the new solutions that they came up. Some of the works were directed by the colours, some by the tools that were used, some just by the silly ideas that we had out of nowhere.
Despite the fact that it all looks random and abstract, the pictures are the outcome of an organised creative process. In one of the cases, one of my students was debating with himself, along the lines of: ‘Something is missing here…Something is missing here…What is it?’ but because he was doing it out loud and a few of us got into a conversation, sharing our suggestions. That was a beautiful moment and the final product is, indeed, fantastic.
The best compliment to the lesson, I think, is one of the comments that my student made. He was peeling off his picture and looking at from all the sides. I asked him what he thought of it and if he liked it. ‘I want to buy a frame for it. Are frames expensive?’, he said and that is just the best thing that I could hear, I guess.
Another quote came from my admin staff. They were very much impressed with what we created and they asked: ‘Miss Anka, can we display them on the wall?’. I didn’t answer, I only started to laugh because all of my students, every single one of them, asked me during the lesson (and sometimes confirmed once or twice): ‘Miss Anka, are we taking it home?’ Too precious to leave behind, even for a day. I didn’t even try to convince them, I just made sure I had photos of all the fabric pictures.
My thoughts were of a slightly different kind. Looking at my students works, I was thinking, again, of a real gallery exhibition…
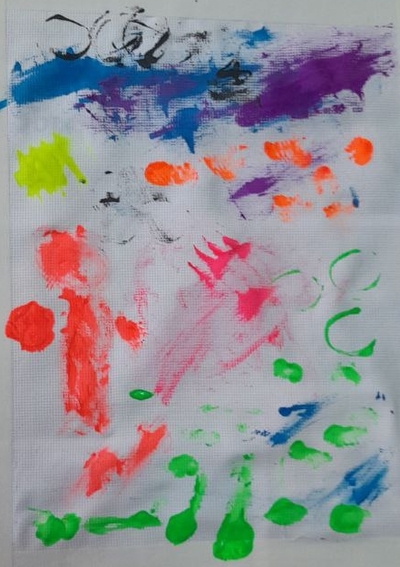
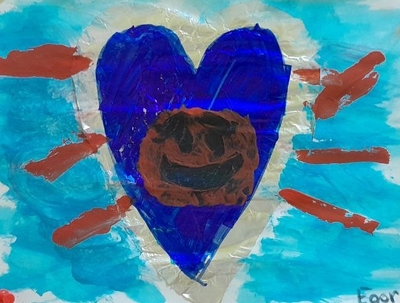
February is our Fun Cartoon February but language-wise I decided to focus on Present Continuous to work on verbs and to get us ready for storytelling later on in the year. This is also a great TPR-friendly structure that comes in very handy and gives us a chance to move a little bit when we meet at around 4 pm, already a bit tired after a whole long day at school. We have a set of basic activities for that, tried and tested, that include making sentences based on stencils, Pete the Cat and his ‘Rocking in my school shoes’ (video and song) and a miming-guessing game (the calss asking:’Sasha, what are you doing?’, Sasha demonstrating and the kids guessing).
The artist
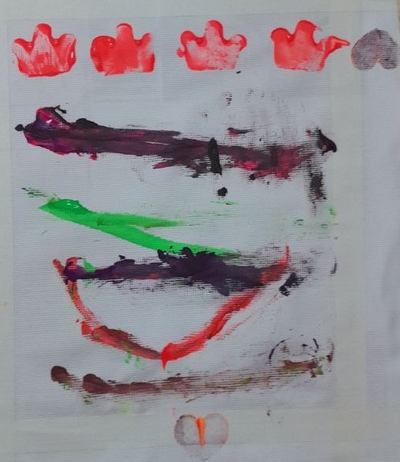
The day has come! Jean-Michel Basquiat is here! It has taken some time for him to arrive (mea culpa!) but it is finally happening. I was racking my brain in order to find a match for February and my own alliteration challenge because I really (really) wanted to deal with Basquiat (and with Roy Lichtenstein and Keith Harring) as soon as possible.
I introduced him to my students in the usual way (name, photo, country, favourite thing) and we looked at a few of his creations, including one of the self-portraits, cats and his ‘Robot man’. Funnily enough, my kids found some of his pictures a bit scary. That is why we didn’t spend a lot of time on that and we moved on to his technique because that was, really, my main aim for this lesson.
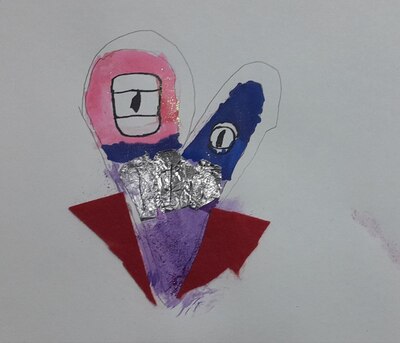
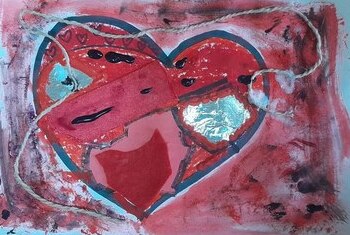
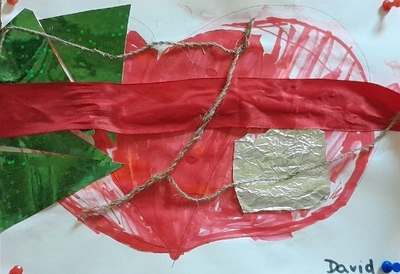
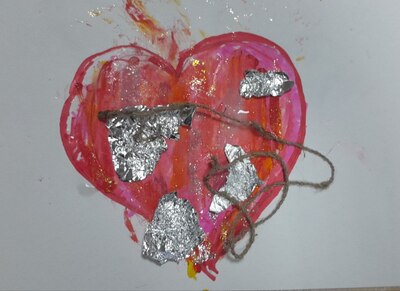
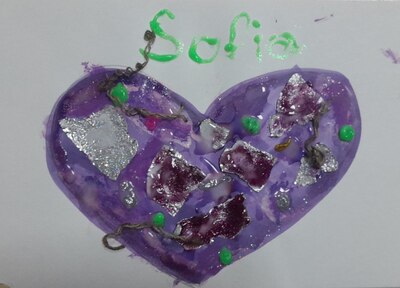
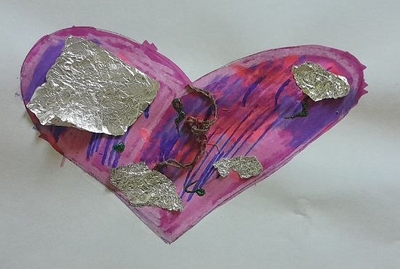
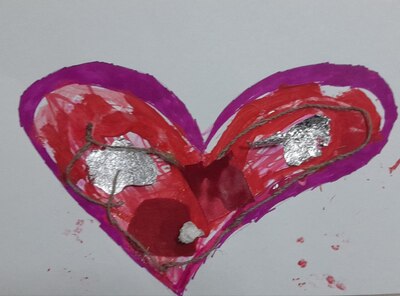
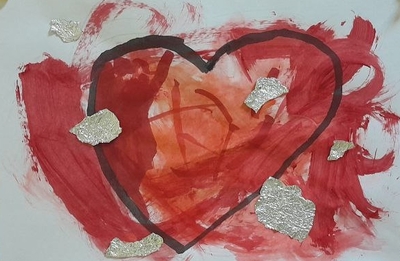
Before the lesson I prepared my own model of the heart because it made it a lot more easier to explain what ‘layering’ is all about. We looked all of the materials I prepared on the table and we tried to count how many I used in my picture and what they were.
My own piece
The art
Apart from the number of layers that my picture helped with, we also made a list of stages that we need to go through and I wrote them on the board: 1. the draft with a pencil, 2. the outline with a marker, 3. and more: all of the other materials, as many as you want and 4. the final one: glitter. The only thing that was obligatory for everyone was the topic, a heart as we had our lesson in the week of St. Valentine’s Day that our school was getting ready for.
This was a great process art lesson, an amazing process art lesson, in fact. I experienced it myself, while creating my own heart. Apart from just having fun, working with all of the materials and resources and experimenting with them brought me a lot of pleasure. Certainly, I was hoping that my students will also be able to experience that. Guess what? They did!
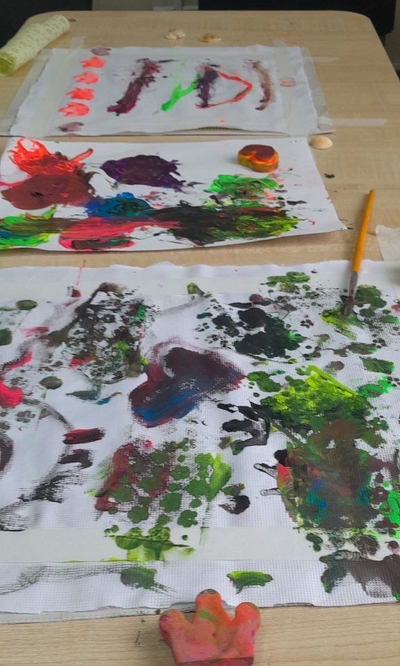
Different children chose their own approach to the resources and the number of different materials and layers to work with. I didn’t want to interfere with that, even though some of them chose only or two resources. I tried to suggest other solutions but I respected their final decisions. This was an interesting balance to those of my students who went over the top and used absolutely every single material that I had prepared. Or more, just because they found some random bits of coloured paper in the glue box.
Two resources onlyOnly markers)
My favourite thing was probably the fact that the kids went into the task with a completely open mind, willing to experiment, to try new resources and the new combinations of resources and to learn from each other, as well. We discovered that tinfoil can be torn and cut, it can be coloured and glued or glued and painted over. I shared with the kids that you can paint with acrylic paints and a wet tissue and I looked at how they liked working with our almost professional acrylic paints and that a piece of string actually makes a difference. I myself added a few more bits to my picture just observing what my students were doing.
One of my students came to our class for the first time ever and it was lovely to see how unexpectedly creative he is and how beautifully he applied the technique to create his heart.
Have a look at the beautiful pieces in our gallery…
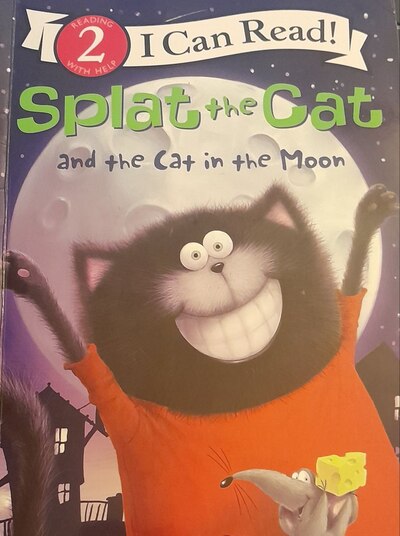
This time we used the story by Rob Scotton published by Harper Collings Publishers in the series Reading With Help. It is one of the stories in the series my kids know already because it has been translated into Russian. I had a copy at home and I really wanted to use it as part of our going back to roots (aka to the procedures from year 1) when we were reading a book every week as part of developing my students’ literacy.
Underneath you can see how we used this particular story, however, these are not the only activities that this book lends itself to. This is how we needed it and how we used it.
The ideas
Concepts: this was, probably, the main aim of this book in our lessons. We have done a series of lessons devoted to development of soft skills in our communication lessons. Splat and Plonk differ in their opinions on what the moon looks like and they sort out this disagreement in a slightly agressive way, teasing and pushing and almost hurting each other. This was a perfect story to bring to class at the end of the whole series.
Another concept that I did not include or even forsee from the very beginning was the different ways that we see the world. Plonk looks at the moon to see the craters, as a great space fan, whereas Splat looks at the moon to see the cat’s face in she shades and spots on the moon surface. Neither is wrong, they only have a different outlook on the world. Plonk represents a realist (or, as we called him, the scientist) and Splat has a more creative way of perceiving the world (for us he was the artist).
Functional language: this was the main aim of the lesson, linguistically, not focused on any specific function or a situation, only a few useful phrases such as ‘These are definitely craters’, ‘I’ll show you’, ‘Are you ok?
Grammar: no obvious structure for us to focus on, since nothing stands out, however, we used it as an additional practice of the past tense. Some of the verbs my students already know (saw, didn’t see, looked) and some were completely new (nudged, hit, aimed).
Vocabulary: no obvious set of vocabulary items but we had to introdudce/ check such as: a notepad, telescope, craters etc,
The lesson
Here is the overview of the main stages of the lesson
the cover page
the vocabulary, I have chosen the words and phrases to introduce and to check, we read them and looked for more examples of use
‘your phrase’: I have prepared a few phrases aka quotes from the story on separate cards to give out to students (one per each) to help them focus on listening. We read them out loud and the students were supposed to listen and to raise a hand when they heard their line in the story
comprehension task: Did Plank and Splat communicated effectively? Who was right? Who was wrong?
reading: I read the story from my copy while changing the visuals on the powerpoint. I created these using A.I. to match the key moments in the story and to boost comprehension
discussing the comprehension questions above.
personalisation: How do you look at the moon, as an artist or as a scientist?
the following lesson: a few chosen words from the story written on the board, the students retell the story (or elements of it)
there are few videos of the read aloud on youtube so these can be used in class, too. I am going to use one of them to share with my kids and I hope that, perhaps, they will read it and watch it again at home.
Reflection and more ideas
I absolutely loved the story. We listened and read, we had a little laugh at the end we had a reall nice discussion about communication and the ways of looking at the world. It even went further because one of my students suggested that the moon can also be a pancake and we agreed that this is how a chef would look at it. I also liked all of the ideas they expressed in their notes and they were definitely not anonimous. Most children liked Splat (but not everyone), most appreciated Plank’s realism (but not everyone, ‘Miss Anka, he is a bore!’) and most children liked Seymour’s trick (but not everyone, ‘Miss Anka, he cheated’).
Absolutely everyone loved the last task in which they had to come up with an idea what to put in front of the telescope lens to play a trick on both cats and this is the only sentence that we read out loud, just to compare ideas.
This lesson and this story is actually going to transform into a lot more because first of all, I got hooded on the visuals created by the A.I. and I want to included it in our Art Explorers and I love the idea of the world seen by different people, the scientists and the artists and this is where we are going to go next week.
This article, just as the earlier post here, has come to be as a result of the many (many!) conversations with my trainees and what I observed in my own classroom. It is fair to say that it has become my latest professional passion / obsession / interest. The post that I have written here (‘A balancing act. Non-competitive EFL games for kids‘) is one of my proudest moments on the blog but was just the beginning of the whole story. And one of the top 10 articles on the blog!
The article that I wrote for the Modern English Teacher (Issue 33.6 Nov-Dec) is a continuation of this research anad the search for solutions. It is, unfortunately, only available to the MET subscribed members but I am really proud of it and I can definitely say that the solutions that I came up with and the ideas that I suggest really do work. After a year and a half pretty much all of my YL are now ready to play competitive games. I do recommend!
Well, miss Anka, you did not do a good job. The classroom management that was supposed to be updated monthly got abandoned. The end of October happened but everything else happened, too so the post didn’t. Here is a two-month reflection then.
Starting the lesson
The start of a lesson has become more SS-centred as I am barely involved. There is now a very interesting role to play, namely the one of the Hello Master. This is the student who takes over the teacher, sits in the centre of the room, starts with ‘5, 4, 3, 2, 1. Hello everyone!’ and asking everyone how they are. In November and December this person is also responsible for changing the numbers on our CountDown to New Year’s Day poster. Apart from that we have two Helpers and two more additional roles, the Game Leader (who helps with choosing the game, divide the class into teams etc) and the Decision Maker (aka the one who helps out with solving any doubts, if we have any). The kids love that and they sometimes ask me to assign a special role to them or they remind me that ‘Miss Anka, I haven’t been the Hello Master for a long time!‘
We still write the lesson plan on the board and the What time is it? and we still sing the Month Song, about how we feel, about the weather and everything related. I started to put up on the board some pieces of language because there is so much language emerging. It is absolutely necessary to keep it in memory, a bit.
It has also become a tradition for us to add a few more names to our list of students on the board. Sometimes our birds feature there (we have a well-frequented bird feeder), sometimes the toys that the kids bring, sometimes even the weird presences i.e. Poor Toe (aka a personalised version of the toe that one of my student hurt). But that means that they kids feel more involved in the lesson and they speak more.
Classroom management and rules
Our rules haven’t changed at all. They are still hanging above the board, we revise them in the beginning of the lesson and we refer to them when necessary but no new rules have been added.
Rewards chart
Our rewards chart is not quite a rewards chart but an activity chart which we use to mark attendance, activity, language production, cases of unwanted behaviour (like before, a simple description) and special rewards for great ideas, fair play, being a good friend and so on. I now simply take a photo of the board at the end of the lesson to use it later on, for assessment or to share with the parents.
We have also started using a greater variety of symbols, stars, suns, flowers, hearts. Yesterday, we managed to get to about a half of the solar system on the board, for different tasks. Basically, one more way to motivate the kids.
Reflection and feedback
These photos and notes are very useful because I have to add marks and note participation in our electronic journal for the parents but I also use them to give feedback to kids.
At the end of every week (which for us is Thursday), I take notes in every student’s notebook, giving them a mark for the week for English, for Maths and for behaviour. This is also my opportunity to thank them and to praise them for something special they did during the week. It is now our tradition to look at these notes in the beginning of the lesson on Monday. I also noticed that I started to comment on these notes during the week, on random lessons for example to praise some students for the behaviour that improved or the behaviour that needs improvement.
I realised that the notes from our tests are too rare and the notes from the electronic journal may not get through to the children as the parents are the main recipients and I needed a direct channel between me and the students. Hence the feedback.
We have been doing it for three weeks now and I know that these notes matter to kids. I keep them secret, written on a page that has been folded etc, but they announce everything to everyone anyway. They do anyway when they have something to be proud about.
Story and songs
To be perfectly honest and depressing as it is, we haven’t had lots of songs recently. We sing the Multiplication Songs from Jack Hartman in every lesson but we haven’t learnt any new songs.
In the same way, we have done lots of reading (fiction and non-fiction) but none of them were real stories. Oh, no! How did it come to that? I have no excuse and I am just deeply unhappy that I let it happen. Sigh.
Socialising
We have been interacting a lot in the classroom:
every English lesson starts with the sight words reading practice which we do in pairs. One student is the teacher, the other is the student and I sometimes ask them to give each other grades.
we did project presentation in pairs and small groups (asking and answering questions about the perfect house)
pairwork games such as riddles
Hello Master is my absolute number 1 when it comes to the favourite parts of the lesson, the one that kids do all by themselves, with the teacher being merely an observer
we have even played some team games and I am really proud of my kids because now they are ready to do it, on most days.
we have also been changing the seating arrangements and pairs since we have had some changes and the group needs a chance to be formed again, from scratch almost.
Creativity
This is the area that I am happy with because we have done enough in that area.
we celebrated the Craft Day (which, apparently, falls on the 16th November, at least here) and that is why we made beautiful monster bookmarks
we celebrated the Thanksgiving Day and we made our Thankful Turkeys, with feathers made of everything that we are grateful for (The list, for my kids, includes: mum, dad, gran, grandpa, brothers, sisters, pets, Adidas and Roblox).
we described and drew our Ideal House and they turned out great, especially that we were getting ready for the project day, reading, looking at photos and talking about all the unusual buildings and rooms from around the world that I could find
we wrote out first article in English about a special place. There wasn’t much creation per se since we wrote about real places but we had so much fun researching that and the final product, our journal, looks amazing.
I have also noticed that more and more of my kids have been wondering into my classroom during the long break in order to do creative things, using all the resources I have in my magic cupboard.
Teacher
Over those last few weeks, I have been a very tired teacher and I did a lot to save the energy and to use it wisely. Listening to music, chocolate and careful choices while lesson planning helped me do that.
At the same time, I have also been a very happy teacher because I could see how much progress my students have made in English and in Maths. This has become especially clear in all the speaking lessons because the unusual houses and rooms really made the children curious and willing to express their views. That, together with all the cool adjectives that we learnt. During our speaking lessons, I would give them stars for participation and beautiful English and it was just beautiful to see how fast my board was filling up stars. They had ideas and they wanted to share them, in English. A truly joyful moment!
I have also been a very happy teacher noticing how my students are growing up and getting better at dealing with their emotions during our competitive games, learning to be in a group, getting over their own insecurities and being proud of their achievements. We are not a perfect group, the picture perfect class (Well, wait, do I even want us to be that?) and we are not even at the OK stage (not consistently, anyway) but we are getting there. I hope.
This is a post dedicated to my trainees and course participants because, as it often happens, good ideas surface while talking to other teachers. Thank you! And I hope you find it useful)
About sight words
If in one line, sight words are those precious bits of the English language that, in a way, are exceptions are they do not follow the rules of phonics and which, at the same time appear in the English language with a high frequency (hence another term used to refer to them ‘high-frequency words’) which makes them very relevant to anyone learning to read and write. ‘Sight words are the glue that holds the sentences together’ (sightwords.com) which makes them a necessary part of literacy development, even if they had to be learnt by heart.
There are two lists of these words, the Dolch Sight Words List and the Fry Sight Words Lists and they are organised either by the year (Dolch’s) or the frequency with which they appear in English (Fry’s).
Available resources
There are lots of resources available for parents and for teachers of the English as L1. Naturally, just like in the case of phonics, we need to proceed with caution as they were created for children who already communicate in the language so the meaning of all of these does not need to presented, clarified and practise. Here are some of the
www.sightwords.com – definitely a place to start reading about sight words and looking for techniques and resources
And, of course, there is twinkl.co.uk with their ideas and handouts.
Sight words in primary EFL (a very objective take)
It is some kind of a paradox that sight words do not make even a cameo appearance in our mainstream coursebooks for primary. Or perhaps it is not, actually. After all, despite all the changes and developments that have taken place over the last two decades (my time in EFL), literacy development over all of the years of primary still falls under the category ‘Areas for improvement’.
Year 1 is usually well-taken care of (or at least it is the year 1 coursebooks that have shown the greatest progress in the area) but the same cannot be said about levels 2 – 4. It seems that once the kids are out of year 1 and once they have gone over the few phonics sets, they are all ready to read and write pretty much everything, as long as it has the appropriate lenght and more or less the vocabulary and grammar that follows the curriculum of the level.
It does not work like that and it is not only my opinion. Every time I run a course for primary teachers and meet teachers from a variety of backgrounds and contexts (bilingual, freelance teachers, state school teachers, private langauge school teachers), they all come with the same problem that could be summarised as: ‘How do we teach the kids to read? My students are in year 3 and they still cannot read. The book does not help. I don’t know what to do.’
Yes, as teachers, we are going to be supplementing, staging and facilitating the process and the kids will eventually learn to read and write but it would be wonderful if this area had more systemic support and attention.
Enough of this whining. Let me tell you how we approach sight words with my students:
Year 1 of instruction is fully devoted to phonics and sight words are put on hold. The reasons for that are simple. First of all, phonics have to have the priority and I don’t want to overload the students who are taking their first steps in English and in literacy. Second of all, I am taking my time to ensure that when we start working on sight words, kids are not complete beginners and may actually know some of the words they are to learn and to practise. This is also the time when we start moving from sentence reading / writing to text reading / writing and these words really do make an appearance. We start learning and practising sight words in year 2.
I divided the words in my own (very subjective) way, according to the categories such as grammar words, adjectives, verbs, etc, to facilitate recognition and memorisation and to enable to come up with meaningful practice activities, something more than just reading. So far I have been using Dolch’s list but I am going to upgrade it, as soon as we get through it. The lists have been colour-coded, printed and laminated and we take one list per week.
Read and put your hand up: the introductory exercise, the children are looking at the list and I read the words, one by one. The kids listen and raise their hands if they know the word. The aim of this activity is for me to understand where we are with the words regarding their meaning. Naturally, if we find something new, we explain them.
You’re the teacher, I am the teacher: kids work in pairs. They take turns to lead the activity. ‘The teacher’ points at the words in the table, ‘the student’ reads them out loud.
Line by line: we work as a team, kids take turns to read one line of the sight words. If the kids are quite strong, they can point at two or three words at the same time.
Knock, knock!: one more copy of the sight words is displayed on the door of the classroom. Kids read a number of words on entering the room (i.e. 3 or 5). The words can also be colourcoded, randomly or by the level of difficulty, i.e. 5 words per colour (depending on the list). Kids choose themselves which colour they want to read.
Bingo!: teacher prepares a set of cards with the words in question and hands them out among students (4 or 5 cards per student). The teacher reads the words in a random order. The child who has the card with a certain word puts it up to signal to the teacher (‘I’ve got it’) and they put the word away. Whoever runs out of their words first is the winner, like in a regular Bingo game.
Make a sentence: this activity requires a bit more than just a list but there is so much potential that I decided to invest time in preparing the resources for it. You will need two sets of cards, one with sentence starters made out of sight words (i.e. I have, I can, I like, I don’t, Do you, I will, I didn’t…etc) and the second set with adjectives (i.e. blue, green, long etc). Kids pick out one card of each and show to their peer for them to make a full sentence made out of these two bits and their own ideas.
Invisible sentence: kids work in pairs, like in ‘You’re the teacher! I’m the teacher!’ but instead of just reading the word, the student who is a student makes up a whole sentence or a question with that word. It takes a few rounds of practising together on the board for the children to get the idea, for example with teacher and one of the students taking turns in choosing the word but once they get it, it is a marvellous activity and, apart from practising reading, the kids also put them into context. If there are still some less familiar words or even the unknown words, this is a perfect opportunity to fish them out and to clarify them.
There are just a few of them but we have just started our adventure with sight words. There is more to come, for sure!
This post here is my response to the challenge set by my teacher-friend Michael. Challenge accepted. Let’s go, 5 steps.
Lesson aim
The first-est step. Always.
The session devoted to lesson planning on our YL course is called ‘What do you want teacher?’ and that is for a reason. Making a decision why we enter the room and what we want to achieve by the end of the lesson is key. Is the vocabulary the focus or is it a grammar point? Or any of the skills? What is the context? Do you want to focus on the language or the most important thing on the day is the work we put in developing social skills or building the routine? It might be something suggested by the book or chosen by the school curriculum but not always. And even it is, there is always room for adjustments and adaptation. At the end of the day, there is the teacher and there are the students in the classroom that matters most. The programme and the coursebooks are to be adapted.
After the aim is selected, there are more follow-up decisions to make, namely the selection of the focused task (aka the main productive activity) of the lesson?
That’s it, done. The main thing is done and it probably took about 5 minutes. The next step will be looking for things that will help make it happen.
Books basics
The coursebook and whatever it contains is already partially included in the previous step. Most of the time, this is what we use, for convenience and just because we can. The coursebook is not the enemy of course and there is a lot of useful material. Though, not all of it.
I presume the main activity has already been chosen and the next decision is regarding all the other exercises, activities, audio and visuals that are there (and in the workbook and teacher resource packs) that either match or don’t our aim and our focused task, or, in other words, our A or the lesson and our Z.
The most important thing to remember and the thing that is on constant repeat during our sessions and in my conversations with teachers is: the book is not there for us to follow to the letter and to cover and to include all the exercises.
Things you can repeat
In every lesson for YL there are certain elements that we can and that we should repeat because they help us construct the framework and the routine. They include either the elements of the routine: the hello song, the how do you feel today, the rules revision, the homework check, the goodbye as well the elements that are short-temporarily fixed: the songs we are singing in September, the games we are playing in the unit of toys, the story we are reading in the chapter on the jungle animals. All of these will feature in the lesson over a month. It is good to included them in the plan, keeping them on the side, in order to be able to use them.
The missing bits
Having got that far in the lesson planning, it might be the time to figure out how much time we have already taken out of the lesson time and how much time we already have left. Then, look at all the activities there are in the coursebook, all ready and waiting to be used, and, only if necessary, to replace them with some other activities, from another sources or self-designed.
Most of the time, the coursebook will do the job just fine.
Something for the balance (bits)
What I like to do at the very end, when the lesson is already ready, to have a quick look at everything, to check it for the contents and for the balance and variety
the ratio of interaction patterns
the ratio of different activities: songs, stories, creative and hard work
the ratio of new and familiar
the ratio of settlers and stirrers
And, when something is off, I fix it. Done!
Instead of a coda
Here are a few words of wisdom from a grandma teacher and trainer / mentor / observer:
we want good lessons to be our everyday but that does not mean that every single lesson needs to be an Oscar-worthy (or a Nobel prize-worthy) unit at the cost of the teacher’s sleep, peace of mind, family life or salary. Yes, I sometimes invest a little bit more into my teaching, in terms of planning, resources and time but, after all these years of experience, I also have lessons that are ‘just regular, no fireworks’.
we sometimes plan lessons and as soon as we get to school, out of the blue, we come up with something entirely different and it is the best lesson ever. Yes, that happens, but (here comes a very subjective line), it is the result of all the brainstorming and thinking that has already taken place. Otherwise, it wouldn’t have happened.
designing your own activites does not have to take ages and it does even require a teacher to be super creative. I personally find it much easier to prepare something for my lesson from scratch, rather than spend hours of looking through materials and resources to match the needs of my group and then, on having found it, still waste time on adapting it to what we (my kids, my course and our lesson) really need (here you can find some of the posts on material design).
our coursebooks have a lot of different resources and pictures among them which can be used in a million different ways with very little effort. A picture is an actitivity and you can read about it here, here and here.
in general, being a lazy teacher has a lot of benefits. You can read about it here.
here you can find another post about the everyday lesson planning
Surprisingly, that is not as random a question as it might seem. Not only because we talk about the adverbs of frequency and my kids ask how often I do mine. I always say ‘Never’, just to make my kids give out the appalled ‘Oh!’ although, really, every day is a homework day because the lessons don’t plan themselves.
But there is more to that. With my older students, I do my homework regulary, especially when it is writing. My letter / story / essay not only serves as a model for my students but it also motivates them to do their homework. We frequently use my writings to learn how to structure the discourse, how to proofread and how to improve it. There is so much to it that I even ran a workshop with the same title a few years ago and, perhaps, a separate post will come out of it, in the future.
I would also like to highlight that, as a teacher, I am all for homework assignments, even with the very young learners, and I have already written about it here. Naturally, if the preschoolers can do their homework, then everyone else can, too and I have just realised that this deserves a post on homework with older learners (mental note #2).
However, today, I would like to write about something else entirely.
Let me tell you about the context
It’s been over a year since I started to work in a slightly different context, a primary school with a bilingual programme (which you can definitely tell just looking at the content here). Last year, in my year 1 group we used to give the kids the homework, once a week, Maths and phonics and we used to keep a journal with my kids, too. I shared the electronic materials with the parents, in order to enable the children to interact witht the content at home. All types of homework were optional, although, of course, I was checking everything that was handed to me and I kept a homework record, just to be able to analyse the situation and to check if there was any connection between the homework done and the progress made. Here is a spoiler: yes, there was.
This year, we decided to change that and to standardise the procedures across all subjects and both departments (English and L1). This year our final, seventh lesson, is a self-study lesson which we devote to additional work in the areas that need that most. I am not sure how the L1 programme teachers make their decisions but I decided to go for flexibility, sometimes it is English, sometimes it is Maths, depending on the day and how the day goes.
Each day we have about 20 minutes (aka one task), the kids work on their own and they are supervised by my T.A. The children work on their own, the task is a written one (at least at this point) and there is always some flexibility and differentation as, naturally, we have a mixed ability group. The task is always an extension of what we have done in class in the morning.
My T.A. always collects the papers and I check and comment on them and give them back on the following day.
What exactly do we do? (aka Examples)
Task type A: Just One More Exercise Like We Did In Class: This is probably the kind of a task that was initially intended for this kind of a lesson. I remember the debates with phrases like ‘what we don’t finish in class’, ‘what we didn’t have time for’ and ‘just some more practice’. This is absolutely very, very useful for the children (more practice!) and for the teacher (easy to prepare) but, admittedly, not the most exciting task type. As I have found out.
Task type B: Find My Mistakes: That is the type of a task that, unlike the one above, I need to write myself. It involves a task that we did in class but there are some mistakes in it. It can be a Maths task (the type we do with Petya and Alisa, our invisible students) that follows on the specific exercise that we already did together with exactly the same procedures and instructions, already completed but with mistakes. The main objective for children is to become a teacher and to check the tasks for potential mistakes. Sometimes all tasks already have a mistake (the easier option), sometimes some items are correct.
It can be an English task, too and in this case the children look for structural mistakes (punctuation or grammar) or factual mistakes, in case the task is based on a song or a story we have covered.
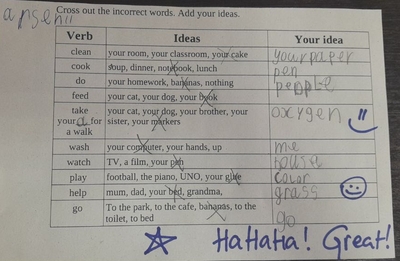
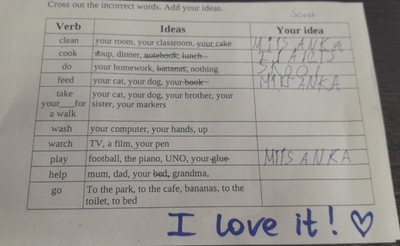
Task type C: Odd One Out or Add Yours: This task type is usually used for English and we used it a lot with vocabulary. So far it has been really handy with all the vocabulary as it allowed for differentation and open-ended exercises or verb phrases or noun phrases as we could practise simple collocations, for example: What goes with this verb: wash: your hands, your face, a book, your shoes. In this particular case, the kids had to find the odd one and, also, add their own option.
Task type D: Make a Task For Miss Anka: This is also a task that is always based on the type of a task we do in class in the morning but in this case, children have to create their own examples for me. It can be a word search or a snake (see photos), it can be their own mini-story or short sentences in English or their own text tasks or examples, for me to solve or to find mistakes. This has become the Number 1 Beloved Task, for all of us. A hit!
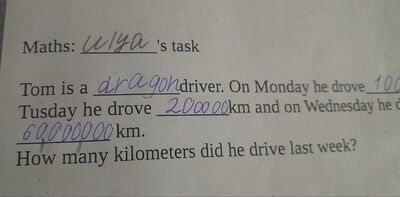
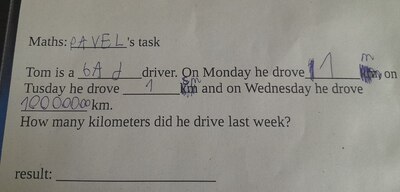
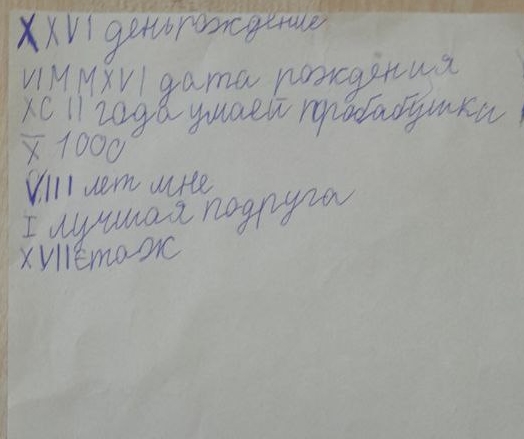
Task type E: Miscellaneous: Guess-Related: This is a mix of all tasks, another one of those that I prepare myself and very personalised. It is usually a task for English although it can be Maths, too. We did one when I wrote random sentences about my students (a set of 7 per child) with the adverbs of frequency (‘Sasha always plays computer games’) and children had to read and correct when necessary or give me points for guessing correctly how often they do things. In the Maths lesson on the Roman numerals, I had a set of numbers ‘about me’ and what they mean and the children had to decipher them and match them i.e. the number of meters I can swim = DC and so on.
Why we all just LOVE it?
First of all, I cannot repeat it enough (and in caps): WE ALL LOVE HOMEWORK. I always have, really, but now I am discovering the new levels and reasons for this love but it is also true that my kids love it, too and, when on an ocassion or two, the homework in English did not happen in lesson 7, my kids were simply disappointed. Not to mention that right now we start the day with ‘Miss Anka, did YOU do the homework?’ (or variations: ‘Miss Anka, did you see the homework?’).
Here are the reasons why I love these homework assignments:
my students have an opportunity to do ‘something more’ in English or in Maths, which is the idea of the homework itself and the most precious benefit.
these tasks were also an opportunity to develop my students’ reading and writing skills and, at this point in the game, these are crucial. We are past the basic phonics stage and the simple sentences stage so whatever they read and write, out of their own accord, is a reason to celebrate.
the kids could work in a more independent format, revising everything that they have learnt in the morning, doing it again, moving it to the ‘freer practice’ level, revisiting the task and, in a way, testing themselves
many of the tasks gave the kids an opportunity to make decisions and even to be creative and, for that reason, I love checking the homework, to see where the course of the day took them. I can tell you, easily, almost every morning, I get a hearty laughter and my comments are some variation of ‘excellent’ and ‘I love it’.
these tasks, by design short, flexible and open-ended, are perfect for mixed-ability groups and very often the students are in charge of how much they choose to do. The instructions include the minimal number of examples or sentences they have to do (adjusted to my ‘weaker’ students) but it is great to see that hardly anyone does just that and many, if not all, complete the entire task prepared. Naturally, ‘every little helps’ and I rejoice every single example completed. This approach, however, takes the pressure off the students and is very motivating in itself.
movitation is a huge factor here, as well, and, I’d risk saying that all of the aspects of the format and the task design contribute to it. Some of the children have to leave early (to attend to whatever errands they need to run) but they take the handouts with them and bring them the following day, although it is not obligatory.
many of the tasks are teacher-friendly. I prepare them daily and it really does not take a lot of time. The task type A requires no preparation, apart from making copies. Task type D is even better because, usually, it requires bringing only a piece of paper for each student. Task type C is also very simple as it can be a copy of the exercise done before, only with wrong answers and that, for a high-level speaker of English and a relatively competent Maths user, also – a piece of cake. The other two, type C and E are, admittedly, a tad bit more involving, especially the highly personalised type E, but, looking back at the results and the outcome, they are just SO worth it!
Instead of the coda
I am aware of the fact that we have some advantages because of the format in which we work at my school but I decided to share these activities and the whole approach because of the benefits it has brought us and because I believe that many of these task types can be adapted to, say, a more traditional EFL classes of a language school. And bring about the same exciting outcomes.
It’s been only two months of this particular experiment so there is definitely more to come!
Here are some tasks we have done already
English: Task type C: odd one out and add yours
Maths: Task type D: created your own task
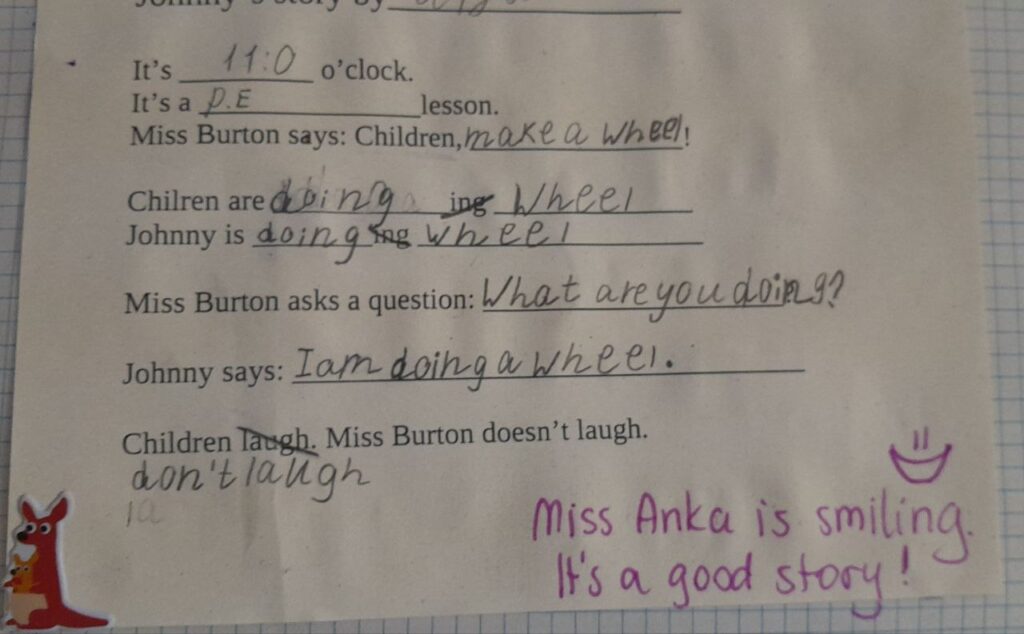
English: Task type D: write your own (based on the story we did in class)
Math: Task type E: Guess (Roman numerals and the notes my student took of her potential guesses)
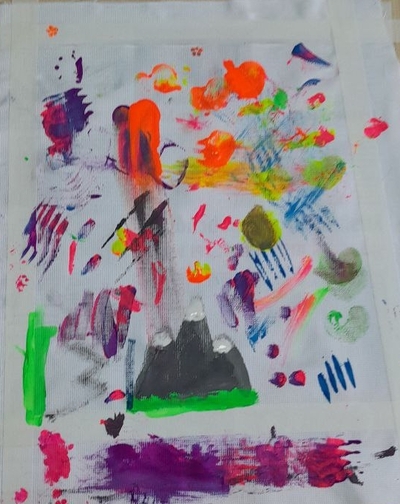
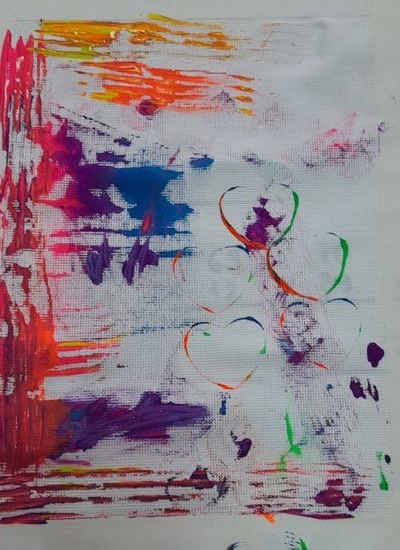
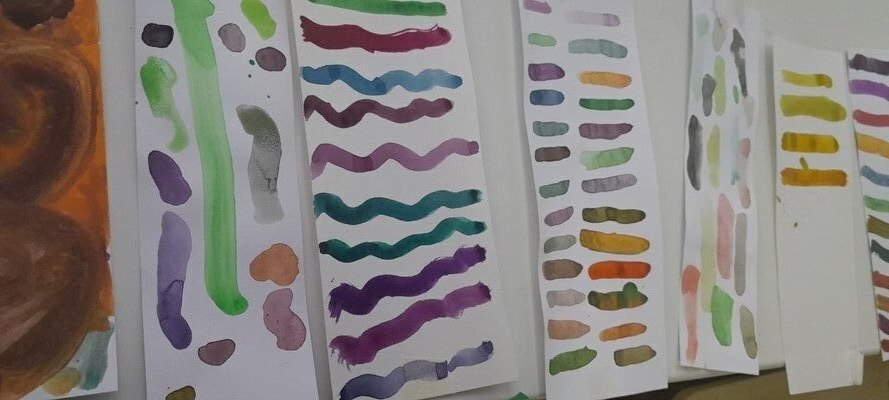
The language in this lesson was not quite our priority. We did not introduce any new language items and I really wanted to focus on working with the colour and help the students see the variety of colours at their disposal. We sang the song, talked about how we are and we revised the colours, briefly.
We looked at different colours and their shades to understand that each colour is, in fact, a number of colours. My younger students counted the shades and the older ones had a lot of fun reading the names of the different shades of blue, red and pink. You can find my presentation here.
The artist
In this particular lesson we had a group of artists, to introduce a range of different paintings with one leading colour. We looked at van Gogh’s Starry Night (blue) and Sunflowers (yellow), we had Kandinsky’s Mit und Gegen (red), Levitan’s Forest Gave (green) and Sue Williams’ Pink Pentagon (pink). We called out the main colours in every painting and we called out the contrasting colours, too.
The art
I taught this lesson twice, with my younger group and my older group, with some differences.
The younger kids, pre-K and year 1, were working at a much slower pace. They needed more revision, they took longer to get into the task and they were
Everyone got a strip of paper, a mixing palette and a box of watercolours. The task was to create ten different shades of different colours. I showed them what I created for red at home and we also sat around my table for a moment to see in real time what happens if you mix yellow with brown and yellow with white or black.
They were involved in the task and they kept coming up with more and more unusual combination. Even those few kids who entered the room with ‘I will not paint today’ (there is always someone!) eventually got down to work and started to create. They kept calling me over and over again, to come over to check out the new shade. And we actually managed to get lots of language out of it. They were either telling me what they had mixed or I was trying to guess, judging by the final product.
The older students managed to complete two tasks: creating ten different shades of their chosen colour and then also creating a picture in their chosen colour. Looking at how it was going on, I decided not to speed them up and to focus and mixing the colours.
I think that next time I teach this particular lesson to the older students, I am going to focus more on the language and after creating our ten shades of X, we are going to come up with some interesting names for them. That will require preparing a slightly different page, with some room to write but it looks like a fun activity with a lot of potential. Especially that they already really enjoyed finding out about the official shades of different colours.
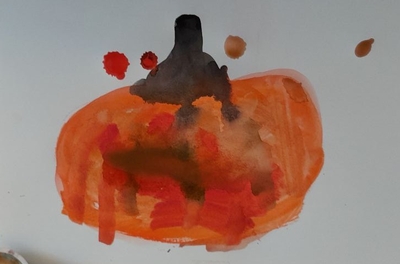
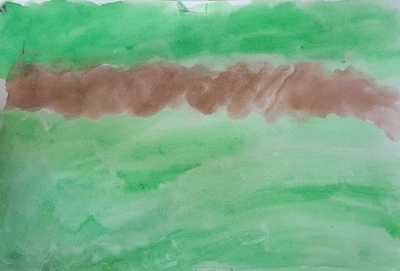
Afterwards, we went on to painting a picture with our chosen colour as the main theme. My model made at home was a picture of rowan, to showcase red. The one I did in class was a sunflower ready to bloom, to showcase green. We also talked about focusing on the main colour and choosing something of a different colour for contrast. My students decided to paint pumpkins (orange) and the forest (green).
The exercise of 10 Shades can be used as a warm-up activity to many other lessons. We used in our Turner lesson and in our green lesson, too. I am planning to do a lesson on red and still-life and I will include that element, too.
The funny thing is the mismatch between the actual lesson and how good it was and the photos and creations that we have to show. In case of my younger group, we ended up only with a few ‘dirty’ pieces of paper and nobody would even be able to guess that they were the result of experimentation and creative discovery. I wanted to display them on our noticeboard but what happened was that they were taken away from me, as soon as possible. Meaning? They were dear to the budding artists. As was the lesson, hopefully.