This is the second chapter of the post devoted to lesson planning habits worth developing in a teacher of a YL teacher. Here you can find the first part of it: Variety and it is all about looking back at a lesson already planned to check that includes the necessary variety of interaction patterns, materials, settlers and stirrers and learning styles.
One more item that needs to be added to the list of Things To Think About while planning for young learners are all the potential problems and solutions. It is an indispensable element of the formal written plan for any kids’ lesson (or at least it should be). It is also a habit that a teacher needs to develop for the every teaching when no plans are written.
Here is why:
Looking at the lesson from the perspective of all the potential disasters and (‘disasters’) to happen can help troubleshoot
Problems and solutions can and should be applied to the instructions, interaction patterns, materials, activities, learning styles, behaviour, participation, time, seating arrangements and the amount of language produced.
Coming up with the list of everything that can go wrong helps to generate at least some of the solutions for them and get the teacher better prepared for the lesson and, ultimately, fewer surprises in the classroom.
This is especially important if the teacher is doing the activity for the first time ever or if it is a new approach or technique never used with a particular group of students.
Analysing the problems and solutions can result in the teacher having to adapt the original lesson arrangements, in order to improve the lesson.
Predicting what can go pear-shaped and then comparing it with a list of the things that worked out or that didn’t is another fascinating exercise that a teacher can do as part of the post-lesson reflection. How many of my predictions were true? How many of them were not? Was I overly optimistic or overly pessimistic? What were the biggest surprises?
Writing these down is an option but, most likely, in there everyday teaching life, with 20+ lessons to teach a week, there won’t be any time for that. It is a lot more important to allocate time for that, though, and, although it might take a bit longer in the beginning, it is definitely one of the teaching skills that become automatic and, with time, require less and less time committment. Speaking from experience here:-) Over the years, it turns you into a teacher who takes literally a second to look at a handout or a game or a coursebook page and who can see a list of its benefits and pitfalls. Upon which a decision can be made whether to use it in class or not.
This is the week of the summer teacher training and may it be the first of many. I love being a trainer for many reasons and one of them is the fact that just as many ideas come are born in the classroom, in the presence of kids, in the same way, many are born in the classroom in the presence of trainees. Being, talking, observing and reflecting and, ta-dam, you find yourself talking and making mental notes for all the posts to add to this blog.
Here is the first post dedicated to my summer trainees from the June 2023 group.
Lesson planning process in three easy steps
Check the coursebook content, choose the lesson aims and the main activity
Plan the whole lesson (in the way you prefer to do it, with taking notes, without taking notes, with colours like I love to do or just on a set of post-it notes, like my teacher-friend Irina likes to do.
Once it is all done and ready, take another look at it and assess it, analysing it from the point of view of variety. If something is missing and/or is in excess, adapt the lesson plan
Here comes the variety…
Settlers and stirrers
This is probably the one that I would recommend starting. First of all, because it is quite straighforward and easy to spot, even for a newly qualified teacher. Young learners accumulate energy fast and they need to be given an opportunity to release it in order to be able to concentrate on those tasks that require focus. If they don’t, they will become distracted and wriggling in their chairs. In such a situation no teaching or learning is taking place.
Second of all, it is a good one to start with because it is just very easy to deal with and to fix, without any major effort. Most of the time, what it takes is to shift stages around the lesson. If a lesson is too active, a stage in which students work on their own on a task can be added. If, on the contrary, the lesson is too calm, too still, too book-bound, all you need is a song or, even better, a few songs, to punctuate the whole lesson and to give it a proper rhythm.
Materials
This one is quite easy to take care of as there will always be the board and the markers, the coursebook and the workbook, all the flashcards and a set of markers or pencils. Throw in a puppet, a soft ball, a few die, perhaps a few storybooks and some magnets and a blob of blutack and your basic set is ready. Then, to make all the dreams come true, I would add a beautiful multifunctional box, some coloured paper, a few pairs of kids scissorss and a few gluesticks, some trinkets to be the checkers, a bag of stickers, painter’s scotch and a homemade magic wand.
The computer and the screen, with the Internet access and the cornucopia of goods available online is already in the classroom.
The only thing is to make combine all the elements in a clever way and make sure that the set changes a bit, from lesson from lesson, and that some occasional pretty pieces such as playdough, watercolours or food.
Learning styles
On the one hand, ‘learning styles’ is one of the terms that features in many (if not all books) on teaching young learners. On the other hand, it is one of the most frequently mocked concepts at many (if not all) conferences, workshops and lectures on teaching English.
But, as I have been telling my trainees over the years, those who say anything about learning styles with the tiniest even traces of derision are, quite likely, the people who have never worked with children. If they had, they would have embraced any movement, action, songs, music, chants, colourful flashcards, realia, blocks and posters, not because they would lend themselves to be neatly labelled as kinesthetic, auditory and visual but because variety of learning channels means less boredom in the YL classroom and, even if only for that one reason, better results.
And it’s not that the song in the classroom is only going to be sung only by those kids who actually like singing. Quite the contrary, the song is there for all of the kids to participate only some will enjoy it more than the others. So will the flashcards, posters and realia or boardgames.
I got to this paragraph in the post and I smiled. And it’s because, as soon as we get to this point in our coversations with teachers or trainees, there is always somebody who raises up a hand to say that ‘Primary school children don’t know to work in pairs’. I smile.
It is true, that on entering a classroom with a bunch of primary school kids, you cannot just assume that you will be able to go ‘Together, together, together. Work in pairs. Here is the handout’ and it will just happen. It will not but it is not because the kids, developmentally, are unable to work in pairs. It is because it is a new environment, a new teacher, a new group of peers, a new classroom and, in our case, a new language.
Pairwork is possible in primary. Pairwork is absolutely necessary in primary and it can be done. It can be done even with much younger students and here you can read about how to go about it. For that reason, and taking full responsibility for my words, I can say that in a lesson with primary students, as a trainer, an observer, a mentor, an educator and an ados, I would expect to see some whole class work, some indivdual work, some teamwork AND some pairwork.
Practical notes
I like to colour-code different areas to better see the balance or the lack of it.
I sometimes use it as a reflection task before teaching the lesson, sometimes it is a post-teaching entertainment.
Most of the time, I use it in my everyday lesson planning, and then I only focus on one or two areas here and that is usually when the lesson plan just ‘doesn’t feel right‘ and I am trying to identify why I am not happy with it.
This is also a technique that I have used in teacher training, with evaluating the lesson plans of my trainees, while preparing an observation report and, naturally, also during the lesson planning sessions of all kinds. Because of that, the main objective would be different, either to identify the weaker areas and to create the connection between the lesson planning process and the lesson itself or while lesson planning to problem shoot and to ensure that the lesson is balanced, at least on paper.
It is not a lesson plan in a traditional meaning of the word, that is, a set of notes, more or less formal, that a teacher writes in order to prepare the activities for the lesson. It is a list of stages of the lesson, displayed on the board, written both for the teacher and for the students.
The photo that you can see above as the illustration to this post is my primary students’ take on the said plan, prepared for me one of these days, before the lesson. With a clear signal as regards the activities that they would really (really) be involved in. No homework whatsoever, no grammar, either, three games and a party…I have absolutely NO idea what this mysterious ’33’ was supposed to be…
Why do we need it?
For the teacher, it is a lesson in a nutshell, always there, always on display, a clear presentation of all the main stages of the lesson.
For the students, it is a lesson in a nutshell, always there, an overview of what to expect on the day. It serves as a classroom management tool as it helps the kids get a better idea of the lesson. This is how we keep track of the lesson proceedings as we go through it. This is how you can reward the students if you include a story or a game in it. Naturally, the game (at number 9) can happen ONLY if we go through numbers 1 through to 8 first.
The lesson plan also contains some opportunities as regards the students’ taking control of the lesson as they can be involved in erasing the stages that have been completed, after having confirmed that with the teacher, and, in some cases and to some extent, also the opportunity to choose the order of activities, when and if that is appropriate.
In case of the longer lessons, those that last two or even three academic hours, it is a great tool that helps the students manage their time, attention and focus throughout the lesson, the number of activities, the break and so on.
How to do it?
There are always ten points, regardless of how long the lesson is and #1 is almost always ‘Hello. Homework’ and #10 is almost always ‘Bye-bye. Homework’. Anything that I plan for the lesson has to fit in, in the remaining eight numbers.
This has got a lot to do with the fact that I personally like the ten sections in a lesson (and 10 is better than 12 and definitely better than 11) but it also helps the kids see the lesson as a whole, divided into the same number of sections, every single day. It also gives me an incentive to pack the lesson nicely into ten sections and, in turn, that means that they all might have a different length. It is never ‘the lesson time divided by ten’. Sometimes, half-way through the lesson we might be done only at number 2, sometimes we go through numbers 1 – 8 very quickly and what is left is only number 9 – a whole project planned for sixty minutes, for example.
As soon as we are done with a stage, we erase it off the board, moving towards number ten as the lesson progresses. Sometimes I do it, sometimes the students help. I noticed that they are paying attention, reminding me to erase a stage, checking whether we have already finished it or not yet, making sure that I have included the break or the game or the homework.
With my older kids, I try to be tricky and the names for the stages are very rarely revealing or direct. The only thing that I am always open about is the grammar introduction and practice and it normally features on the plan as: ‘Grrrr’. Everything else is as vague and random as possible. Another trick that helps the kids to manage the time and the attention. With the older students who take part in the decision making process as regards ‘What’s next?’ (or with the younger ones, when they are invited to choose), the students have to ask about the stages that interest them most and then make a decision.
Who is it for?
I use the plan for most of my classes, including the teacher training sessions for my teachers. With pres-schoolers, we use only elements of it and most of the time it is limited to annoucing ‘a surprise’ which, with time, began to translate ‘anything new’, ‘anything special’, ‘anything out of the ordinary’ and the kids were asking how many of these surprises I had, whether they were big or small and so on. I
I also try to get my youngest students ready for managing the time of the lesson by introducing stages for parts of the lesson. These of course have to be worded in a very careful way, using only the simple and familiar words and I always count the number of these stages on my fingers. This comes in handy at the end of the lesson, when the kids are already a bit more tired and less focused or, also, during the more complex craft activities. For example, at the end of the lesson, I can say: ‘We need to do ‘story’ (the thumb), ‘game’ (the index finger), ‘the homework’ (the middle finger), ‘Bye-bye song’ (the ring finger) and ‘stickers’ (the pinky). Then, we also check how many of these five we have got left. This really helps the kids to focus, even the youngest ones.
With my primary students, as soon as the kids are able to read, I start putting the plan on the board. I do it before the lesson and we read it together. Again, since they are only learning to manage the written word, I put only single words or even symbols. These may become more complex as the kids grow older.
This entry was initially a post on Facebook a year or so ago but the list has got longer and more interesting since. What’s more, what started as ‘a page in the photo album’, almost, with time turned into a reflection on professional life, early years development and its impact on the EFL methodology.
Based on one million true stories. Enjoy?
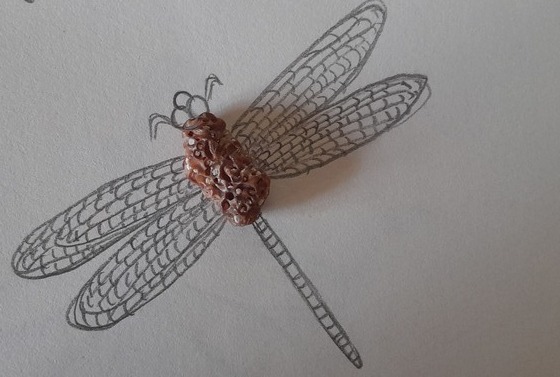
These are the things that my students brought to their offline or online classes:
a dead ladybird, handed to me already in the R.I.P state, as the most precious treasure AND a present
ten plastic jungle animals (all of which participated actively in learning and practising of the new vocabulary)
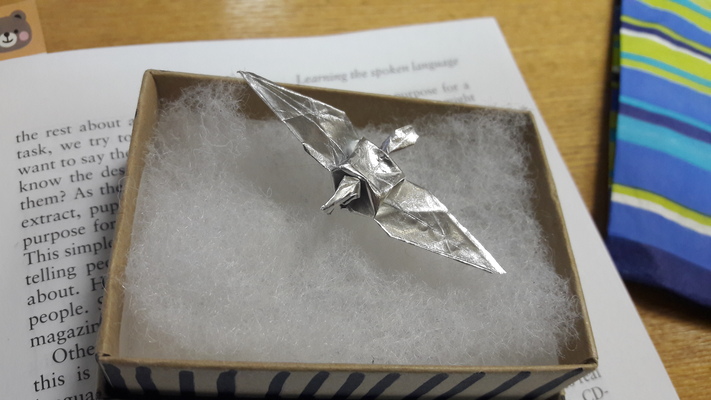
a bunch of toy dragons (which were not ‘angry dragons’, as I was assured)
a toy lion (also very active, answering questions and all that)
a toy parrot, Pepsi (Pepsi always asked for her own homework handout and always did her homework)
baby brothers and sisters who wandered in and stayed
Pasha, the invisible student
a few cats (purring loudly, only online, though, sadly)
a puppy (running in and out)
a hamster
a plastic shotgun (very realistic, online, yay)
a toy hen (came to visit and befriend our puppet Angelina, also a hen)
a broom, Harry Potter-style, wood, twigs and all
a cape, Harry Potter-style
a set of cars from the collection
flowers growing around (online, of course) and, inevitably, …
a cow, grazing around (online, of course)
the entire vegetable garden, toured via laptop
a snail in a jar (online, thank God)
a sling
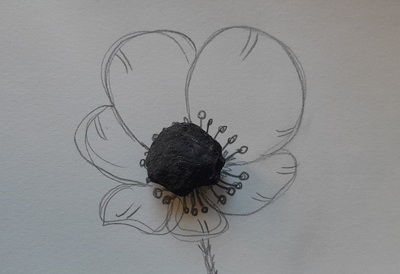
flowers, real, plastic and paper
slime
a turn-on/turn-off blinking tiara
a half-eaten bread roll
a birthday cake with no prior warning
a bag of candy to celebrate birthdays, with no prior warning
a huge alarm clock
a piggy bank
and, to finish on the high note, the Black Sea with ships included (in the background of an online lesson)
Why does it matter?
We could look at all these from the angle of the teacher. This teacher is anxious, because, most likely, all these toys and animals willbe a nuisance….As a source of excitement (for the owner and for everyone who will want to look and touch and play), a source of annoyance (for the owner, because even the well-meant attention might get unbearable after a while), a source of drama (because toys get lost or misplaced, sometimes), or, simply – a source of distraction. And, if anything can be said about a teacher of very young learners is that they do not need any additional elements that might, potentially, tilt the balance or make waves in the classroom. There is enough, as it it, by default. And that does depend on whether the teacher is experienced or not, working with a group or with individual students, online or offline.
That is why, on seeing yet another dinosaur in the doorway, the teacher sighs, trying to go over all the implications and the impact that the dinosaur’s might have event in the following forty-five minutes. However, this is a very quiet sigh, well-hidden behind a smile and another ‘Oh, wow!’ A very quiet sigh, indeed.
But there are also the kids’ angle. There’s been a birthday or a no-occasion present from gran, an item found in the park, a random and unexpected encounter. There is, finally, an opportunity to show the teacher and the rest of the group, all the treasures and ‘treasures’ that normally stay at home and that mum or gran or nanny stubbornly refuse to carry to school and back, just for the display purposes and which, finally, can be presented to the whole world (as one of the very few bonuses of studying online). Because it is important, right here, right now. Even if to the outside world it looks like a piece or unimportant junk.
For that reason, the kids entering the classroom, will be far from sighing. On the contrary, there will be a lot of joyful feet stomping, the pleasant adrenaline rush, excited whispers in the line in front of the classroom door and then, inevitably, a presentation by a proud and triumphant owner who, for the time being and for the next few minutes, is ruling the world.
The title of ‘The Most Dramatic Entry’ …
…and a proper showcase and a case study that I often present to my trainees, belongs to one big birthday cake, full of cream, sugar and chocolate that was grandiosely marched in, at the heels of a Sasha boy who was turning six on the day. Three minutes before the lesson, without any prior warning, agreement, permission.
You know how they say ‘his heart sank‘? Mine really did, no metaphors. Of course, it was a big day for Sasha. Of course, his mum wanted to include us in the celebrations. Of course, she meant well. Of course, Sasha and all the other kids were ecstatic. I am not a robot myself, I like cake! BUT.
I had three minutes to make a decision and here are the three options that I was considering:
a) Ask the mum to take the cake away. Meaning: Sasha is heartbroken (reason: the teacher is a witch who forbids him to enjoy his day), the mum is offended (reason: see above), the kids are upset (reason: see above), the lesson is in shreds (reason: nobody can focus anyway)
b) Put the cake away on the window-sill and celebrate at the end of the lesson. Meaning: Sasha is distracted (reason: the cake is on the window-sill, this is the only thing that he is capable of thinking of, also probably with time, the classroom fills with the smell of cake), the kids are distracted (reason: see above), the teacher is distracted (reason: see above), the lesson is in shreds (reason: nobody can focus anyway).
c) Eat the cake. Meaning: Sasha is happy and way too energetic (reason: sugar levels are through the roof), the kids are happy and way too energetic (reason: see above), the teacher is in trouble (reason: other parents will complain to the school about the stranger feeding their kids random foods, but at this point the teacher doesn’t know that yet, it is all to happen in the evening and on the following day), the lesson is in shreds (reason: too much sugar, too much energy and the festivities taking place in the start of the lesson. No matter what the teacher prepared for the day (Try to predict THIS in your ‘anticipated problems and solutions’), nothing is going to be able to come even close to the cake. Sigh).
Now, dear reader, please, pause for a minute. Faced with that dilemma, what would you do, I wonder?
I guess, I did know straight away what we would do, I went through the hoops of considering all the other options only to be able to say that I did try to be a reasonable and cool-headed professional. We ate the cake and we sang ‘Happy Birthday’ to Sasha.
Then I tried to save what was left of my lesson and in the following week, I kept myself busy sorting out the complaint from the parents.
Not sure what I would do today, and with my current groups and parents. Maybe it would not even be a problem because, by now, we have managed to negotiate an accepted list of potential English lesson snacks and we always celebrate with Kinder, Barnie and this one brand of juice. It is some kind of achievement, too, I suppose, that when the birthday surprise bags were brought into the classroom I did manage to pull off the ‘let’s-put-it-on-the-top-shelf-we’ll-open-the-bag-when-we-say-goodbye‘ stunt. It might be because I am more experienced and because a more effective set of rules and routines is in place. Perhaps, it’s because we have known each other for a bit longer than with the other group. Perhaps all three?
What to do and what not to do?
Luckily, not all the situations are as dramatic as the Dreaded Cake Day but the teacher still sighs when the (plastic) dinosaurs are arriving.
‘No toys in the classroom‘ is one of the options, of course, especially if agreed previously with the parents, carefully discussed and explained. And with time, children get used to the fact that even if the teddy (or the banana) come to school, they stay in the hallway.
‘Bringit on‘ is another. Turning the tendency into a part of the classroom routine might benefit the lesson and the kids. Bringing toys (or else) can be an opportunity to produce the language as even the youngest kids can answer the questions such as ‘What is it?’, ‘What colour is it?’, ‘What can you do with it?’, ‘Why do you like it?’…
‘They are sleeping‘ could also be an approach. If you have a table or a shelf, all the toys could be welcomed, interacted with and then, after having been granted the permission from the owner, left in this one special place. I am sure that they are tiny and very very tired. Ideally this place is out of reach but visible to everyone (especially the owner:-) and this way, the precious things are there, visible but out of the way.
The shameful thing is, perhaps, the fact that I got bored with both of these approaches. We used to have a beautiful poster in the hallway, in English and in Russian about toys staying behind, but to be honest, I was really more interested in all the treasure (and how a piece of real junk can become ‘my precious’). But I am not into cutting a piece of the lesson every single time and devoting it to random guests, either. Instead, we just mix and match. We always inspect the new arrivals and we look at them (in awe). Sometimes we have a little chat, sometimes not. Sometimes we put them away and sometimes they join as in the circle, to sing a song. Sometimes they play the games with us (which means twice as much production, YAY) but sometimes they don’t and they are just picked up later, already half-forgotten, at good-byes. I guess, I might call it the ‘Go with the flow‘ approach. And this what I preach at the moment.
I will happily blame the pandemic for that attitude. I rule in my little kingdom but it is easier said than done in the online classroom. On the one hand, it is a definite advantage that all these distractors do not physically invade the classroom . On the other hand, no physical presence means no actual control and, there is a lot more potential for the unexpected. No matter how good your lesson planning skills are, try predicting that a student of yours will be sitting outside, in the field, and that cows will be walking past and that, they, too, will become a part of your lesson!
Happy teaching!
P.S. Don’t forget to check out the wonderful directory of all the useful things in the VYL world created by Sandy Millin. You can find it here.
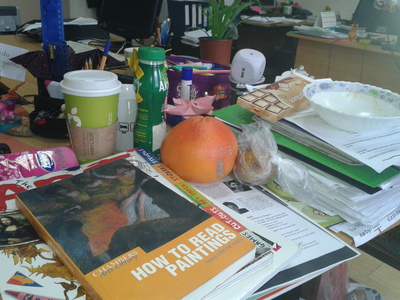
What can you see in the photograph? Oh how I wish I could hear your thoughts and all your ideas, dear reader!
It does look pretty messy, doesn’t it? This is what I call ‘real life’.
Imagine this, I have just come into the office on the day of the training (which is not quite ready yet, not this one, the week must have been a real hell so although the ideas are there, the presentation itself is NOT, not panicking yet, but the adrenaline levels are already up) and I have just taken ‘everything I need’ out of the bag: books, notes, some copies and A LOT OF FOOD (typical). I am about to start planning. Having looked at what my desk has become, I decide to take a photo of this beautiful mess that soon will (I know it now) turn into a great seminar session.
I have decided to use this photo because it is a pretty accurate visualisation of what happens on some days when I plan my classes and to follow it up with a few words on what happens next and how I get from this havoc to the end-of-the-lesson happiness.
Based on the lesson with my ‘adult’ preschoolers a week ago.
The ‘theory’*)…
Step 1: Make a decision what your main aim is. Try to verbalise it and even write it. It really does wonders for the awareness of what you, as a teacher want from the lesson.
Step 2: Make a decision what your focused task is. ‘Focused task’ is the concept that we use at my school (and have used for at least 15 years) and it refers to the main activity of the lesson in which the students get to produce the language and the activity which is the culmination of the entire lesson. All the activities in the lesson lead to it, to some extent, just like all the roads lead to Rome.
A while ago I realised that this is the approach that I am using in all my lesson planning, for all the age groups, levels, for teaching and for teacher training, too.
Step 3: Consider the materials available (mostly by looking at what the coursebook has to offer) and whether they contribute to your aims and your focused task. If not, you will need to adapt them or design new materials.
Step 4: Think of the activity that is going to be most suitable for your materials. It is like differentiating between a tool and how you are going to use it.
After all, there are plenty things that can be done with a hammer (materials), such as putting in a nail to hang a picture, breaking a window, smashing a walnut open, stirring soup (activities) and so on. Some of them are more or less appropriate, of course. The same applies to the flashcards, boardgames, handouts and what we are going to do with them.
Step 5: Take a moment and go over the activity in order to make decisions about staging. What are going to be your baby steps within the activity? whenever we do something for the first time (regardless of whether it is the first time for me or the students), I like to make an effort to actually write the main stages, even if in a very simple form, a sequence of infinitives.
Step 6: An additional step: a homework task. It might not be always possible or, rather, sometimes it might involve a lot of work as regards material design or adaptation. To put it simply, not every teacher will have enough time or energy every single time, with all the lessons taught in a week but a homework task that is an extension of exactly what happens in the lesson and creates an opportunity to continue practising the same language or structures at home, with parents.
….and the practice. Our lesson last week.
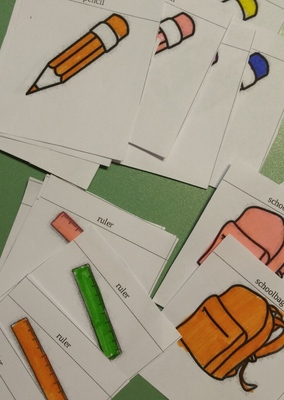
Aim: For the kids to start describing school objects and the objects in the classroom, using full sentences such as ‘It is a blue pencil’, with the focus on colours and some simple adjectives. The kids are 5 and 6 and in the beginning of their third year of EFL.
Focused task: A game in which the kids will be guessing the secret word depicted in the cards, producing full sentences instead of questions as we have done so far. The kids will be saying ‘It is a blue pencil‘, ‘It is a red pencil‘, etc until they produce an accurate description of what is shown in the picture which they cannot see.
Materials: There is nothing in the book that could help to achieve the aim. There is one practice activity but it focuses on reading and the students are only taking their first steps in the world of the early literacy. A decision is made to design the materials. Yay.
The materials are a set of cards, 7×7 cm, with clip art pictures on them, coloured-in by hand. There are three types of cards (a pencil, a schoolbag and a rules) and six variations of each, in six different colours.
The cards must have a specific size for the kids to be able to manipulate them easily. They cannot be too big (the ‘secret’ will be difficult to keep and the regular A5 flashcards might be not comfortable enough for the little hands) and not too small (as they will be too flimsy and are likely to be ‘spilled’). It might be a good idea to keep the cards in an envelope to add one more layer of guarantee that the technical bits don’t get in the way of the successful playing of the game.
There are only three types of cards in order to make it achievable, at least when the game is first introduced. Later on, when the kids feel familiar with the concept of the game, more objects or more colours can be added.
Activity: The activity itself is a simple guessing game of two stages. The teacher chooses one of the cards, keep it secret, say ‘What’s my secret?‘ Stage 1: students guess which of the three objects is depicted on the card. They say ‘It is a ruler’ and so on, until they guess.
Once they do, the teacher confirms and asks the following question ‘What colour is it?‘. Students continue guessing. They produce the sentences such as ‘It’s a blue pencil‘, ‘It’s a green pencil‘, until they guess. To help them remember the full structure, teacher counts the parts of the sentence on her finger.
Staging
revise the vocabulary with the regular flashcards
show the kids the game cards
elicit the full sentences (signal withe the fingers), while flipping through the cards: ‘It is a green schoolbag’, ‘It is a yellow schoolbag’ etc.
mix the cards, to choose one and keep it close to the chest
say ‘What is it?‘ and peek at the cards, secretly and suggest a possible (wrong) answer.
wait for the kids to start guessing.
keep showing the fingers and counting parts of the sentence as the students are producing the language, developing the habit of answering in full sentences.
confirm when the kids guess the object in the picture, praise the student who guess and all the students
say ‘What colour is it?‘, peek at the cards, secretly and suggest a possible (wrong) answer
wait for the kids to start guessing.
after a round of two, the kids take over – call one of them out and ask them to sit on the teacher’s chair, choose the picture for them (to save time, especially in the first lesson) or let them choose the picture they want to play with but operating the cards yourself. The kids might be able to take over in the first lesson, they might be able to take over only in the following lesson, when the game is played for the second time.
encourage the group to make sentences, counting on your fingers, praising the kids, encouraging them to produce full sentences.
Homework
The homework task in this lesson was a simple handout, ‘a sentence maker’ in which the students have to complete the missing parts of the sentences, either by adding the colour (by colouring the box) or the adding the school object (by drawing it). The kids choose their own words. Later on, they ‘read’ their sentences. You can find the basic handout here.
The teacher makes one copy per child and one more to demonstrate the instructions in class. When we did this kind of an activity for the first time, I added the colours myself in line 4 and 5 to make the task straightforward. In the future, they will be given more freedom when they are more familiar with the format and the idea that each part of the sentence is represented by a visual or a symbol.
Did it work? aka ‘Happiness’
You know this moment when you are teaching and you literally want to get up and pat yourself on the shoulder with ‘OMG, you rock’? because you are allowing yourself, simultaneously, to teach and be fully in the lesson but also to be evaluating this lesson as if you had been the observer in the room. And it is actually going on very well?
This was one of these lessons.
The kids loved the guessing game, especially that they were given a chance to lead. The cards and the handout did help me achieve my aims and by the end of the focused task, the kids were producing full sentences, although I had to remind them a lot to use full sentences. It was much better in the second lesson with the same game. The kids were eager to start playing the game and I only had to model once. They were ready to take over and they produced a lot of language.
If you want to read more on the subject, have a look at this post where I share how I approach the everyday lesson planning for preschoolers.
Happy teaching!
*) Inverted commas because it is not a real theory, only a set of daily procedures, verbalised.
Welcome to my classroom. I will take you through the lesson planning for one of my preschool groups. They have just started to learn English, they are four and they come to us only once a week.
This was our lesson number 5 and I taught it last week, just one of the lessons, without any fireworks or magic, just what we do. The only thing that was different was me taking notes and photos every step of the way. The planning took about twenty minutes (plus photocopying and preparing the classroom).
This IS how I plan and it was only a few months ago, while talking to a friend and a colleague (insert virtual hugs to Vita), I realised that if I had to pick up a metaphor for my approach to lesson planning, I would go for a cake: I figure out what I want (the visualisation of the amazing piece of baked goods, just a second before you cut it up to serve) and then I come up with all the ingredients to buy, all the equipment to prepare and all the steps to take to get there. Just like while making a cake.
Welcome to my lesson, step by step. Get ready for a lot of I’s!
Step 1: Getting started
An A4 piece of paper is where I always start. A single piece of paper and a few colourful markers. I use the same approach to planning for all my lessons, regardless of how old the students are or what their level, but for pre-schoolers it is especially important.
Leafing through the pages is not necessary and, let’s be honest, not recommended or even impossible when simultaneously you are managing a group of four- or five-year-olds. The lesson plan is always on the wall. It is relatively simple and thanks to the big font, the structure and the colour-coding, I can read it, even from the other end of the classroom. Sometimes, I take it around with me and pin it in the other corner of the room, all that depending on the activity. If for example we are doing something completely new, for the students or for me, my notes for this particular activity are a lot more detailed.
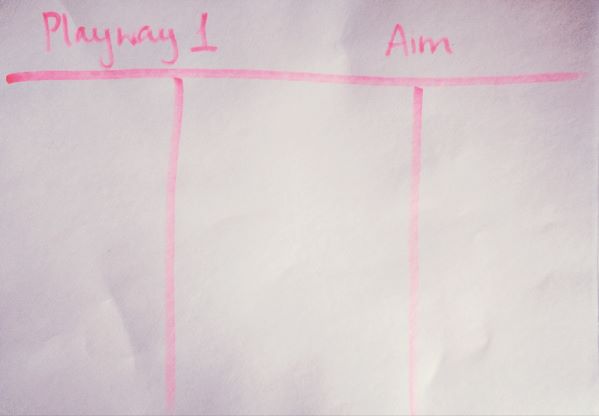
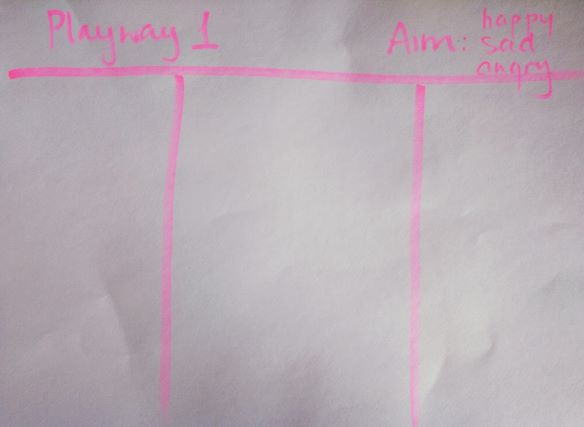
Step 2: The framework
This is the typical framework that I use for all my pre-primary groups and individual students. The lesson is divided into the three main slots, regardless of how long the lesson is. As a result, the length of each third varies and it can last 20 minutes in one real hour class, 15 minutes in one academic hour class or even 10 or 5 minutes in the shorter online classes that lasted 30 or 15 minutes respectively. As with any lesson planning, assigning time slots should be only approximate because a) anything can happen b) we adapt our and the coursebook authors’ ideas to what actually happens in a particular lesson. To be honest, if I were to give up one lesson plan / lesson ingredient / craftsmanship element, timing would be the first one to go.
I start from the scratch in every lesson although I have been playing with the idea of improving the approach – printing the template, half-filled in with all these elements that are constant, then laminating it and using whiteboard markers to plan to minimise the time expenditure and the workload but I have never got round to it. Not yet, anyway.
Step 3: The aim
I start with the lesson aim. I mean, we all do, in a more or less conscious way. Only about a year ago, though, I started to force myself to verbally formulate the aim of each lesson and to write it down. The results of that little, non-time-consuming teaching habit have been nothing short of amazing.
I know most of the coursebooks that I am / we are teaching with very well, I have gone through most of them once at least and I have my favourite activities and solutions and so on and, of course, at the bottom of my brain, I know why I do this or that. But, having to actually think about a particular group and a particular lesson, on a particular day and having to say it out loud has made a bit difference and has made me more aware of what I do and why.
But there is more to it, too. There have been a few occasions over this year when I really wanted to include something to supplement the coursebook, a game, a song you find or an idea you wake up, include it at all cost, just because the idea seemed very appealing. On those few occasions, the lesson aim got skipped or left for the very end of the lesson planning, as if by accident.
Only it was not by accident. Because when I got to the point when I was ‘just’ supposed to summarise it in the lesson plan, I simply could not. It did not come together because the lesson, at this point, was just a collection of activities, without any real focus or an obvious outcome. All these lesson plans were redone and the activities reconsidered.
For that reason, now I always put the lesson aim at the top of the page, as my frame, my spotlight, my runway. A clear lesson aim also helps to reflect on what happened in class afterwards.
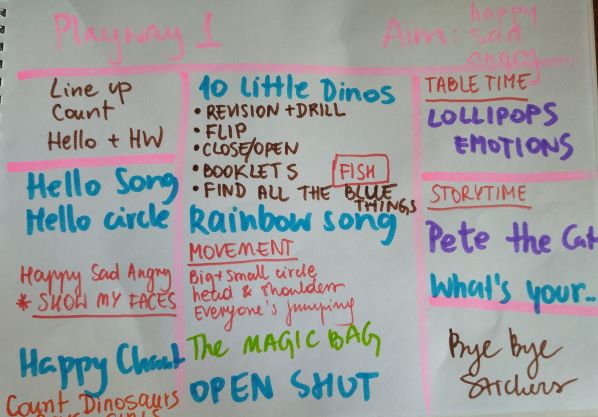
In this particular lesson, I wanted my students to start talking about emotions. They had already been exposed to the three key words (happy, sad, angry) and their symbolic representations but without actually producing much. In this particular lesson, I wanted to try to take it a bit further, to the production stage, ideally in the form of a full sentence ‘I’m happy / I’m sad / I’m angry’.
To be honest, ideally, this is what should have been written on the page ‘I’m happy/ I’m sad / I’m angry’ but it got compressed to only three words, mainly because I have taught the lesson a few times already and it would be a full sentence by default. Just to prove that the lesson plan was for the lesson itself and not for ‘publication’.
Stage 4: I will always love you
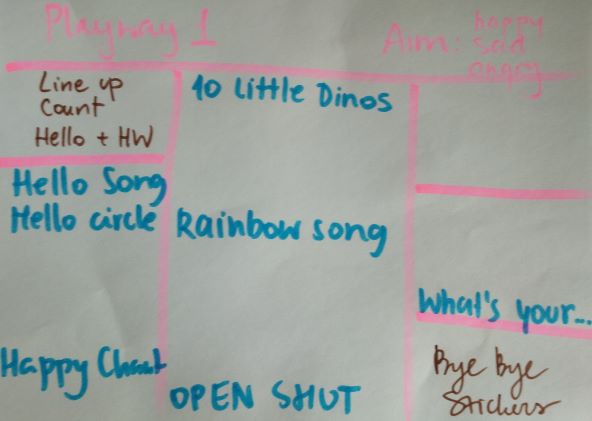
This is the easy thing. The first and the last block, in brown, are the admin bits, with the students entering and leaving the classroom.
We line up in front of the classroom, count how many people are present, we say hello officially and we check the homework (more on that kind of a hello routine soon to come!) and we sing our goodbye song and choose stickers, get homework and choose the stickers before everyone goes home. These never change, although sometimes I only send the homework through the WhatsApp group or explain it directly to the parents. This was a standard lesson, though.
The other element that always appears at that point are all the songs and chants to be sung in class. These depend on the topic of the lesson and later on, the students can sometimes decide which one we are going to sing. This group here is at the very beginning of their English adventure so for the sake of establishing the routine and because we only know a few songs, we sing all of them in every lesson.
Songs work here as some kind of punctuation marks and during the lesson, we basically sail from one song to the other. It helps to ensure the balance between settlers and stirrers or songs offer at least a tiny little bit of a change of a pace and an opportunity to move but they also help to ensure that there are periods of the lesson when we all do something together so it helps to keep the balance of different interaction patterns (whole class vs individual work, pair work or taking turns).
Step 5: The centrepiece
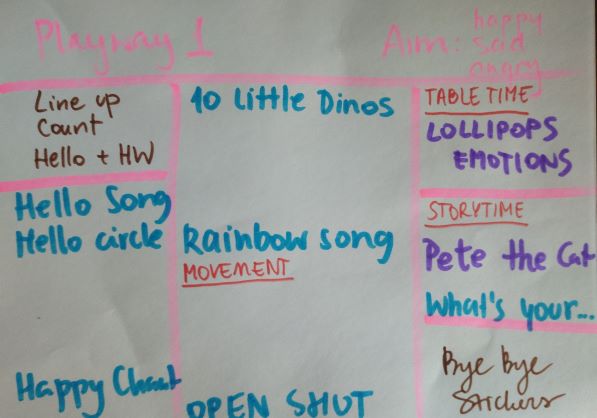
At this point, I am adding the main activity, our focused task during which we are set to make the lollipop puppets with our three emotions (plus colours and some functional language). I have done this activity in that format a few times and for that reason there are no detailed instructions, the staging is already in the blood.
Another thing that appears at the time is the storybook. At this point in the course, we use storybooks only as supplementary material to revise and to reinforce the target language from the lesson and this is how Pete the Cat helped us. We revised the colours and emotions only using a different resource.
Step 6: The familiar
The next step is adding the other elements of our routine. These are not as constant as the hello or goodbye routine but not as changeable as the focused task or the target language practice.
Since it is the beginning of the course, there is not much to pick out from or to revise and since we are still working on building our routines and I try not to add too many new elements, not to overwhelm the kids.
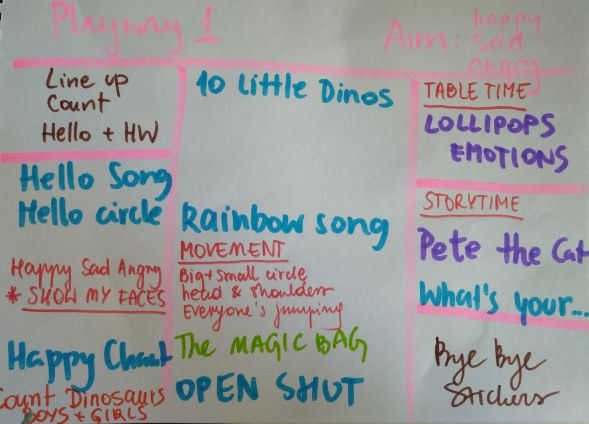
Our revision activity has been the same for all this time: we count up to ten on fingers, we count the people present, boys and girls and teachers and we count other things, in this lesson dinosaurs, in this lesson in a book and our plastic toys.
Our music and movement has been pretty much the same from the beginning of the course and it is only now that the kids are properly enjoying the activities. This applies to the songs and the magic bag game, in which we use plastic fruit. They don’t know the fruit names so at this point we only focus on their colours (‘It’s green’).
As for our How are you today part, the plan was to do it in the traditional way but with the introduction of the finished product. I thought that this might help the kids become aware of what this toy is and how to use it (pick one and place it in front of our face, while saying ‘I’m happy’). By the time we’d get to making our own lollipops, they would already be familiar with them. It would also help with giving the instructions.
Step 7: The key elements
The things to add now, will be the details of working with the target language and with the revised language, in order to ensure that they best contribute to the completion of the focused task.
What I did plan, however, was the colours practice with a variety of activities: not quite in the order in which we did them. The main and the new one here was ‘open/close’ also known as ‘what’s missing’, a memory game and the most challenging activity here (as it involves cognitive skills and language production, focus). Everything else was either a preparation for that or a supplementary game, which can but may not be used, in the end. I like to make a list like that to prepare myself for their different moods, participation and involvement levels, etc. Having a list of potential games which we can play, without any major changes to the materials set or the seating arrangement I found it to be quite useful.
The fish game here acted as my potential plan Z, only if we have time. In the end, I used it later in the lesson, instead of the magic bag activity since they were both quite similar (students taking turn to perform an individual task with a motor skills development focus and colour revision.
In this lesson, the connection between the focused task and the target language practice is not as strong but that is because it is only the lesson 5 in level 1. Thinking about it now, after the lesson, I think that, ideally, I should have included some additional activity to combine numbers and colours, for example in the form of colourful happy, sad and angry faces, that we could categorise by emotion, count etc. So see, there is always a way to improve things)))
Ready!
The lesson plan is ready. Perhaps now, looking at it, in its full, finished glory, it is easier to see why I do not include any timings. The framework itself outlines the time slots for each stage of the lesson, alongside their aims, although they are not articulated clearly and they are the following:
Column A: the introduction to the lesson, hello and revision, the aim: settling in, duration: about 20 minutes.
Column B: working on the target language, the aim: presentation, practice and production, in varying ratios, depending on whether it is the beginning of the ‘unit’ or the end of it, duration: about 20 minutes.
Column C: production, the aim: production, with the hope of more freer practice and spontaneous production, although, of course not during the first few lessons of the level 1 course.
Looking back
The lesson went well and, apart from the few things mentioned already, I did not really have to change anything else. Not that it would be a very bad thing to do. Regardless of what has been planned, the thing that matters most is a group of the little people who are sitting in the classroom, how many of them there are, how advanced they are, how they are feeling on the day. Flexibility, first and foremost. And then – the reflection bit. Because we can always make things better.