flashcards, wordcards, a page of the coursebook with all of the vocabulary to be introduced and practise
a board to display the category or a powerpoint to display them in an online less
Procedures:
Introduce and drill the vocabulary as usual, with flashcards, electronic flashcards or realia
When the kids feel comfortable enough with using and prounucing the word, move on to the second part of the presentation / controlled freer practice that this activity is
Display the question and ask the students to answer it. When we just get started with this activity or if the group is small, we do it together as a class, later on, the kids do it in pairs for a moment or two.
The whole activity is a categorising task, according to the kids’ preferences and opinions.
I started doing it with my online students and the questions were presented in the form of colourful clouds on the slides, hence the name of the activity.
All of the options that I have come up with and used with my kids include: I like / I don’t like, It’s interesting / it’s boring, I’ve got it / I haven’t got it, It’s made of metal / plastic / paper, It’s easy / it’s difficult, I always and I never, It’s big / small, Tell me more about…
Why we like it?
It is a low-key, (almost) no-prep activity.
It gives the kids an opportunity to use the new language together with the familiar structures, in a few different ways.
It is not quite creative but it is personalised because the students categorise the words according to their ideas and preferences.
The lower levels (i.e. pre-A1) can only categorise the words, the higher level kids (from A-1 upwords) can provide a simple justification for their choices.
The most productive of them is ‘Tell me about’ but it might not be feasible with all of the topics and vocabulary sets.
It is not very challenging so all the students can complete it.
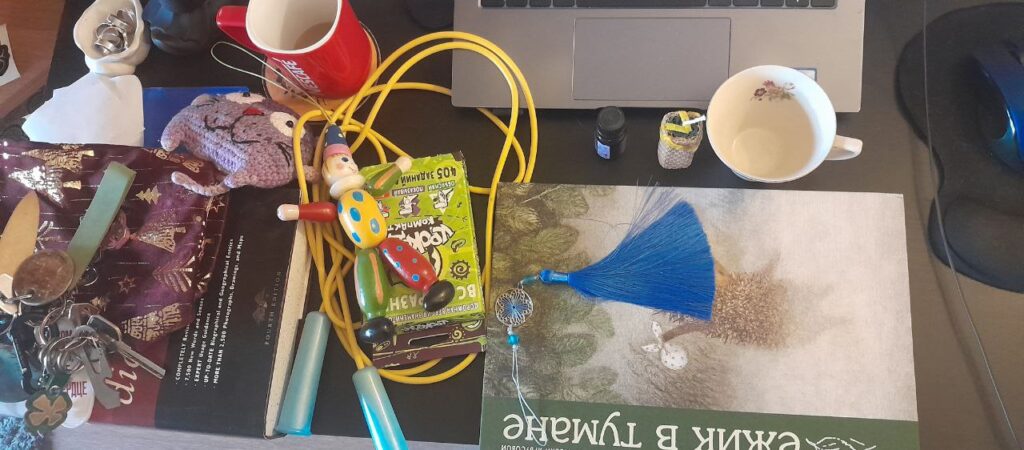
What a teacher’s table looks like after an online lesson in primary…(realia, toys and adjectives)
Instead of a preface
I am writing this post as a response to many of the enquiries that I get from the trainees of the teacher training courses that I have been running for a decade now. Of course, this question rose to popularity with the year 2020, the pandemic and the fact that we have all embraced the online world since.
I have not always been a huge fan of the online education but, like many of my colleagues, I was forced to at least try exisiting in the online classroom over the period of the lockdown in the spring – summer 2020. And, because of how the world has turned to be, since the pandemic I have been spending about one third of my teaching life one: teaching all my young learners online during the pandemic, teaching online and hybrid in the crazy 2020 – 2021 academic year, teaching adults and my teenagers online permanently and teaching pre-schoolers, the regular EFL/ ESL and teaching English through Art, too.
As a result, today, when my teacher trainees ask me about teaching children online, I say: Yes, sure, it is just one of the classrooms that I work in.
This particular post is intended to be a set of ideas and suggestions for teachers who have never worked online and who want to start. These are not all the answers, only how I would get started, with a brand new group of kids. Maybe someone will find it useful)
Before the first lesson
The most important part of the course, before it even starts, would be talking to the parents. What I would like to find out would be:
as much as possible about the children as humans: how old they are and what their interests are, how they spend their time and what they like to do
as much as possible about the children as learners: whether or not they have learnt English before or interacting with English in any capacity and whether they have had a chance to learn anything online
as much as possible about the parents’ expectations regarding learning the language
Depending on the answers to the above questions, the conversation with the parents would have take into consideration to make the lesson successful and effective:
the working space for the child. It might be obvious for the parents that the child needs a special place to sit down, i.e. a table and a chair (not the bed or the carpet in the playroom), but a chair that can be moved aside if the movement stage of the lesson comes up. This should be a place that is quiet, away from the TV or the busy living room or the kitchen where the rest of the family hangs out.
the set of resources that might be necessary. It can be a list of standard resources that you will be using in every lesson, a notebook, a set of markers or crayons and handouts, all depending on the age of the child, as well as some specific resources needed for the particular lessons.
the presence of an adult who will be helping the little student during the lesson and what kind of a support is going to be necessary. With younger children (pre-schoolers), it might be necessary for an adult to be around all the time, although it might be necessary to highlight that the children need to be developing their independence
the length of the lesson that will depend on the child’s age and the previous online learning experience. Even if the optimal length is estimated at 45 minutes, it would be recommended to start with a shorter lesson. If the kids have not studied online before, they will not have enough attention span to participate and to focus to make this lesson effective. It is better to start with 20 or 25 minutes and extend it to one academic hour over a few weeks. And, of course, explain it to the parents.
the potential resources, the most important being the potential for printing resources at home. If the parents can do that – you will be able to use a little bit more, if not – in that case the lesson will be based only on the electronic resources.
The platform
There are a lot of platforms available and, in the end, everyone chooses something that works for them. It has to be the tool that you know very well and the tool that works in the classroom. I personally like to have a platfrom that lets me share the screen and see the students faces at the same time, that is not very tricky with the sound sharing but I don’t really care about the whiteboard option or the drawing on the screen option for the kids. Just a choice and I know that some teachers use these a lot. For the older primary students studying in groups, I like to have the breakout room option for some of the activities (although, again, that is for the groups only and that is not something to do in the very beginning of the course but something to aspire to).
The resources
Please remember that I am myself a dinosaur and I have always been a lazy teacher or a minimalist teacher (save for the special occasions when I splash out). The same applies to the resources in the online lesson. During the early stages of the pandemic, there has been this panic to find and to incorporate as many platforms, games, resources in the lesson as possible. Basically, every week was THIS NEW THING that you had to learn about and to use with your students. That was overwhelming, to say the least, because the most important thing in the lesson is the teacher and the methodology and the tools, no matter how fancy, cannot replace a good structure and a plan.
For that reason, what you see below, is a very basic list, the things that I am using at the moment but that is not everything out there. That said, I am always on the lookout for the new solutions and new things to inspire me, so feel free to use these ideas and keep your eyes open for more!
the coursebook, if applicable, the paper copy for the kids
the self-made handouts that I send to students if the parents can print them
the mini-flashcards that we prepare with the students, if the parents can print them. Usually, there are four per A4 paper, the parents cut them before the lesson, the kids can colour them, I have my own set and we use them for riddles, for testing each other (T: show the card, S: say the word, then swap the roles), substitution drill with the new structures, What’s my secret word? (guessing which card from the set the T / the S is holding) etc.
online games – for the lesson and for the homework or revision.
bamboozle games, although for the younger or new students, I start with one team games (‘we are collecting the points for us’) or with severly adapted power-ups list
some of the Games to learn English. This is a good example of why it is good to continue checking and searching. I have known this resource for ages but I haven’t used it for a year or so but I visited it last week and so much has changed. There are some new games, focused on a specific structure and the past tense or the prepositions. It definitely feels like a new best friend.
traditional (and not so boring) powerpoints which is my homemade online board replacement. I used to use the professional online board but, admittedly, it became simply overwhelming. I use the powerpoints in the same way, T: moves/uncovers the item, S: say things and I like it more because I can organise them by the team, copy them for each student etc.
the realia that you have and that the kids have at home. Luckily, with the online world, we are truly blessed, practically everything that we teach in primary and pre-primary kids have at home, toys, clothes, colours, sport equipment and even the pets or the family member. They should be used in the lesson to make the langauge real. It might be a good idea to inform the parents before the lesson what will be used in class, just to make them aware that the kids might be walking around and bringing things and that it is for a reason.
the craft resources such as plasticine, coloured paper, glue, scissors, crayons or markers or whatever else you want to use. Craft online is a bit more challenging but not impossible. It might be a good idea to leave it for later in the course when you and the students know each other a bit more and when they understand how the lesson works. Again, the parents need to be notified ahead of time, to prepare the materials or even to check and to confirm that they are available. Of course, if a kid is at home, the coloured paper or the glue are lying around at home but it is always better to confirm ahead of the lesson time.
The lesson
Again, this is the lesson format that works for me and it does not really differ much from what we do in the offline classroom with my students.
Regardless of how long the whole lesson is, I divided into three sections: Revision, New Material / presentation, Practice. They are more or less even, without being to strict with the time slots.
A song to get us started, a proper Hello song or just a song that we like.
Revision: saying hello, talking how we feel, what we are wearing etc, depending on the age/ level of the child, actually revising the vocabulary, playing some familar and favourite games.
New material presentation: in the middle of the lesson, when the kids are already warmed-up but still with enough energy and focus for something new, this is when I introduce the new vocabulary or the new material and when we do some controlled practice, too.
Practice: more productive games, more freedom for the kids.
Goodbye: a new song, a video, a story, to finish on a high note.
Coda
If you are just starting in the online world, good luck to you! Remember that in many ways, this is a just a new lesson with student or a new group, doing a new thing and in our early years world, it is very rarely that things work from the word go. It is the routine, the repetition and the familiarity that make things look like we want them. Quite frequently, a new activity done for the first time is just like a preview. If something does it work, reflect on why it didn’t and then try to change some things around and do it again.
Make sure you keep in touch with your students’ parents. Feedback is always necessary but it is crucial during the early stages of the new class because apart from building the routine with the student, you are also building the trust with the parents. And it is a process.
Easily, the emotions (and adjectives) have always been a great passion of my professional life. One reason is that they are a little bit unappreciated in the early years EFL world (a personal opinion) and they can make a huge difference in communication, even for the little speakers. The other reason is that they help the kids describe how they feel and, apart from that making them want to talk because they are sharing something personal, that is a precious something for the teacher to know. Having 9 happy preschoolers and 1 angry preschooler in the classroom or having 5 happy, 3 sleepy and 2 sad preschoolers makes a huge different and, whether you want it or not, it will have an impact on your lesson. Basically, it is better to know than not to know, in order to prepar and to adapt, if needs be.
And then we found the song…
It was only last week that, together with my students, we were trying to remember what was our first Hopscotch song. It was, probably, The Fractions Song. What a hit! Itt really (really) helped us get the concept and to memorise the fraction vocabulary. Not to mention the catchy music and the hilarious plot. And when, after about three weeks of listening the song, we found out that each (more recent) song includes bloopers…we were collectively in love.
I had never heard about that channel before so I got down to researching and I found piles and piles of treasures. Some went into the category ‘subjects’ and some, the really delicious bits, into the category ‘oh, my, the langauge we are going to pick up here!’. One of the latter, was the Feelings Song with as many as 56 beautiful adjectives.
Quite a few words, actually, and some of them from the higher CEFR shelves so I decided that we will just sing the song and aim for picking up a few words, such as hangry, disappointed, overwhelmed or inspired.
It was only much later that I decided that the song will fit perfectly in our end-of-year concert as it has a plot, all the emotions have been neatly divided into groups, like almost 5 acts of the play, there is an introduction and a funny ending, too. And a beautiful message. So, having sung and listened to the song for about two months, we took to staging it and really looking into the other words.
A conversation
At this point in the game, we had been starting every single day with a conversation about our emotions. ‘How do you feel today?’ ‘I am…because…’ and to help us with it, we use about twenty different emotions such as angry, sad, sleepy and confused which we have on posters on the walls of our classroom.
I made into two additional lessons in which we learnt and revised the feelings from the song (or most of them, I still decided to skip a few). We went through all of them, clarified the meaning, practised pronunciation and devoted time to talking about our own examples when people might feel disappointed, overwhelmed, angry or inspired.
A self-reflection
I admit, initially, I only wanted something to write. My kids, now in their year 2, when putting letters in the Latin alphabet is no longer scary or tiresome, take pleasure in writing (insert: a little joyful dance that I can actually say this!) and we are now working on writing neatly, without mistakes, remembering about the punctuation marks and spacing. We write the date and the topic and we sometimes take little notes. This is exactly what I wanted to do last Tuesday, just write something neatly. I figured out that it will be a feasible and open-ended task if we all finish the sentences: I always feel…I never feel…I sometimes feel…I rarely feel…
It was amazing how the kids took time to think and to decide how exactly they feel in certain situations.
Showtime!
Somewhere in April, when we started to discuss our plans for the end of the year concert, I realised that this is the song that I want us to do. Initially, I was even considering turning it into a theatre show, with a few acts (one act = one set of emotions) and some conversations in-between, a musical of sorts. But then, the end of the year itself, the tests, the whirlwind of May took over and I decided to scale down. The plan was as such: we are going to sing the entire song and we will present the emotions to the audience as there will be parents and younger kids.
In order to turn it into ‘a video’, we started to prepare illustrations for an emotion or for a pair of emotions. I prepared the cardboard (A4) and the drawing materials, I also wrote the emotions on them, in big letters and I prepared a few examples, to show the kids that the emotions can be illustrated either by the situation (i.e. our ice-cream drops onto the floor = we are disappointed) or the associations (i.e. the rainy day, colour blue, wilted flowers = we are sad). We got down to work.
I think, in the end, we prepared about 40 illustrations and all of them were absolutely brilliant, either because my kids can really draw well or just because it was a fascinating experience to be going through the creative process and the creative decisions with my students. Some emotions were more difficult to draw (I dealt with them), some were really popular and so we ended up having about four pictures illustrating ‘love’.
I put them into groups, as they are in the song, and put them into a chain with coloured paper that had the text of the relevant verse on the back. Two of my more responsible students were assigned as the holders and as the verse would come up, they would pick up the big and beautiful streamer from the floor to present to the audience. And to peek at the lyrics.
The video finishes with the bloopers in which the emotions (represented by a cookie-like creature) are thrown out and up (Attention: don’t keep them in, don’t bottle them up, deal with them!) and we had a few ridiculously funny conversation how we could illustrate that without frightening the parents or the little kids with the year two kids suddenly making the ‘throwing up’ gestures…But we decided to go for the amazing streamers throws that one of my students suggested.
We rehearsed and rehearsed and rehearsed and my kids actually sang the whole long song, almost entirely from memory and it was a really touching moment, for all of us. Not only because we loved the song and because it was the end of year 2 but also because, while we were singing, it was already obvious that our school was to close down, for ever, and, naturally, we had A LOT OF different emotions to deal with at the time, all of us, kids, teachers and parents.
It was beautiful, it was touching and everyone was amazing. We gave a good show and we created fantastic memories. That is what will matter in the long run.
It has been quite a while since I wrote in the series (the first episode is here, the most recent here). I was travelling in the beginning of March and I couldn’t write and later I just didn’t feel like putting together a piece, just because the schedule said so. I didn’t, I decided to be nice to myself. However, it also made me think that maybe the time has come to change things here a tiny little bit. Even in January and December, half of the post went along the lines of ‘no changes’ and I realised that we (the class) have changed so much that new solutions have to be put into use.
I will still keep notes here, because some of the things we use might be useful for other teachers and I still need this series as a way of reflecting on my teaching and their learning and progress but I will not be on monthly basis.
The routine et al.
All the new tricks I have added and how they work for us:
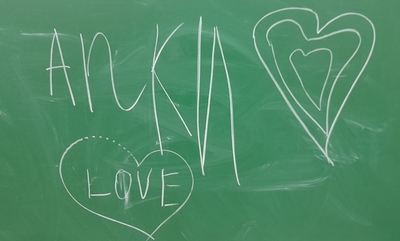
the nicknames we still use although the question I ask now is ‘Am I writing your name or your nickname?’, just to give the students some freedom and flexibility. Those that feel creative on the day can express themselves (and some do a lot of that, our current record is 8 lines of a nickname) and some just use their names, sometimes written in a different colour or with a heart. The other kids are always curious to see who is choosing what each day and sometimes they add detail, help with translation or correct me when I, accidentally, use the wrong nickname or when I use the name instead of the nickname. Which, really, just shows that they are listening and paying attention. And that’s all I want. Plus, it is definitely something that we do together, a feature of our community. When someone comes late to class or when we exchange groups and Class A comes after Class B, they try to guess who chose what as their name.
the improvisation song is still with us (and it has been now a year and three months). Sometimes we sing once, sometimes more than once and I love the kids continue to use it to express themselves in English, to talk about emotions, to experiment with different ways of singing certain words and how we started to use it as call – response song whenever there is a question or whenever they just feel like reacting in their own ways (instead of just repeating the verse). More creativity? Yes, please!
give your teacher a grade: admittedly, it is not something I do every week but I try to included it once in a while, more or less twice a month. I am trying to use different techniques like leaving notes and grades on the board or preparing cards with specific questions (Was it difficult? Was it interesting? etc).
the grades for the week: I still write notes to summarise the performance of the students over the week only now we have a few more categories, although these vary depending on the week. This week, for example, we had: English, Maths, Behaviour, Notebook (we are working on handwriting and neat notes) and Accuracy (a specific task we did in Maths). The kids usually get to see them on Monday and they are still really curious about them. And they care. Sometimes they want to tell everyone what they got, sometimes they check with me or ask additional questions, they always read.
new rules were added, too, based on what we have been going through, emotions and lessons, basically the things that seemed like something that we might use in the future. These include ‘Get it together’ (a nice call to action from a song), ‘My feelings are the message from my brain’ (also from a song) and ‘Wait’ (just because we need it, still and desperately, too!).
Story, Socialising and Creativity
All our English classes have been about stories as the whole unit in our book has been devoted to adventures, superheroes, stories, adjectives to describe heroes and we used that opportunity!
We have already finished but we managed to: introduce and properly practise Past Simple, lots of regular and irregular verbs and questions, talk about our yesterdays, we watched and talked about some clips from ‘How to Tame Your Dragon?, we talked about types of stories and why we have narrative and dialogue, we wrote and talked about our favourite stories, we wrote a short story and we read ‘Splat the Cat. The Name of the Game’ because it seems to be a perfect story for us and all the problems we still deal with while playing.
Our story lesson was particularly memorable because we created a few beautiful pieces, we had a reading session in two language, we praised everyone and I want to type up all the stories and turn them into another issue of our school magazine. I will only have to ask the kids to describe what kind of an illustration they would like to have with their story. We will only have to write some description for the kind A.I. to create them. Next week.
We haven’t done any other creative tasks, not properly, but I noticed that kids expressed a lot of interest in the creations that always dry on the window sill after my Art Explorers and I think it might be a sign that I need to think of something like that.
The teacher
I have been a tired teacher in February. I was busy with all the other project (term break camp, conference and the real life errands) but I have had quite a few good moments like realizing that we have really made progress regarding reading and writing and that we have actually learnt how to understand and use fractions and decimals.
The classroom management and bringing up the kids never stops (never never never) but we have made a lot of progress and I know we are going to be fine. It is great to know that while some of my kids keep repeating ‘I don’t like school’ or ‘I want to go home’, they also add, to each other, mostly, ‘I like English, though’ and ‘I really like Maths in English’ so there is some comfort in it, too.
This article, just as the earlier post here, has come to be as a result of the many (many!) conversations with my trainees and what I observed in my own classroom. It is fair to say that it has become my latest professional passion / obsession / interest. The post that I have written here (‘A balancing act. Non-competitive EFL games for kids‘) is one of my proudest moments on the blog but was just the beginning of the whole story. And one of the top 10 articles on the blog!
The article that I wrote for the Modern English Teacher (Issue 33.6 Nov-Dec) is a continuation of this research anad the search for solutions. It is, unfortunately, only available to the MET subscribed members but I am really proud of it and I can definitely say that the solutions that I came up with and the ideas that I suggest really do work. After a year and a half pretty much all of my YL are now ready to play competitive games. I do recommend!
The summer is not over yet and there will definitely be more experiments but I wanted to collect in one post all of the experiments that we did this summer during our summer camp. Our students were all between 5 and 9 years old and they were a mix bunch not only as regards the age but also in terms of the language, from beginners to a strong B1. Everyone participated, the language was graded but, of course, the older / more advanced could be more involved cognitively and linguistically.
However, these have a lot of potential, not only because they are very engaging and have a strong WOW effect but also they can be adapted to different contexts and levels. I will include their connection in the curriculum for us, at the summer camp and some potential links to a more traditional EFL curriculum.
‘Refraction’
Last year’s fun
First the experiments that have already been described here, in separate posts:
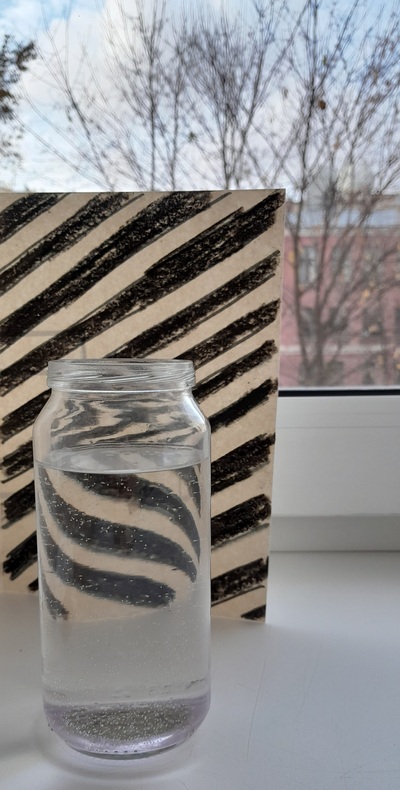
Refraction, the original post is here. Our connection: black and white things. Potential connection: I can see, optical illusions.
Design 101, you can find the original post here. Our connection: things that are blue and water. Potential connection: colours, emotions, toys, pets.
Skittles, the activity has already been described here. Our connection: colours, prism, sugar in our food, hot and cold water. Potential connection: colours.
Volcanoes, the post is here. Our connection: things that are red and fire. Potential connection: colours, natural world.
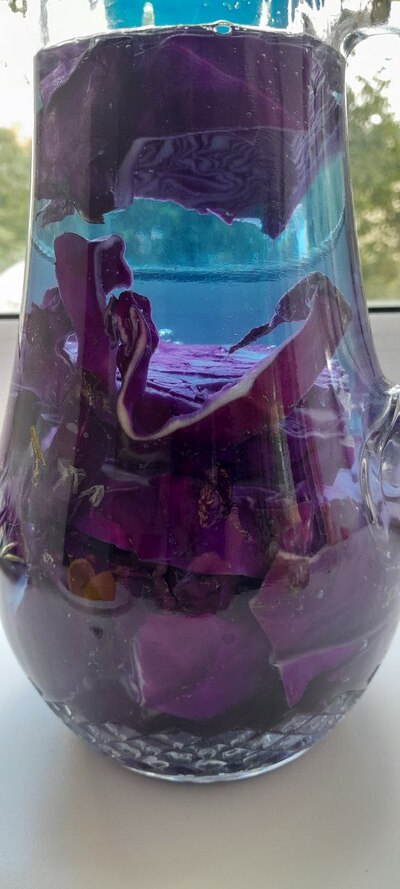
The cabbage ‘juice’
This summer’s fun
Some of those experiments I ran myself, some of them were run by my colleagues, as a part of the programme which I designed and which we taught together at our school.
A floating orange, a perfect experiment for the Orange lesson and a great element of the lesson on objects that float or sink. We watch an episode of Blippi (or this one here) and do exactly the same, collect bits and pieces around the school, predict and then test if they sink or float. The orange, with and without the skin, was the cherry on the cake, so to speak. If you need any inspiration, here is the video to help. Our connection: things that are orange. Potential connection: materials, things around us, passive vice.
What colour is the colour black? This was an absolutely fascinating experiment that I found and ran following the example of The Dad Lab. The only thing you need is a range of black markers, from different sets and different brands, a few jars or glasses with cold water and strips of kitchen towels. The results are almost immediate and it is very obvious to see the great variety that can be combined to create the black ink for the markers, not only the browns, greys and blues but also greens and even yellows and reds, depending on the manufacturer. Our connection: things that are black and white. Potential connection: colours, I can see,
What colour is the colour white? This was the other half of the lesson described above and we also looked at how the colour white is created. We produced our Newton’s disc to see how different colours can mix to become white. There is this video here, in which you can see how a proper spinner is made although we used a simpler version, on a pencil. Our connection: things that are black and white. Potential connection: colours.
Cabbage juice or the ph indicator. This was probably one of the coolest experiments ever. On the one hand, we had a real staging and a real topic (ph indicator of different substances in our life) and a real Chemistry lesson. On the other hand, this was an experiment that most resembled proper magic. There are quite a few things that are necessary, all the substances (see the video here that I used as inspiration), a few jars or bottles and, of course, the cabbage jar. Many videos and manuals suggest using a blender but I didn’t have one so I just chopped the cabbage and threw it into a jug of warm water. This was also an interesting bit as the water started to change the colour within the first minute. Even though my students were quite young and with not a very high level of English, we talked about acids and alkaloids and tried to predict how the cabbage juice will behave. Our connection: things that are purple and pink. Potential connection: food and drink, introduction to Chemistry, future with ‘will’ for prediction.
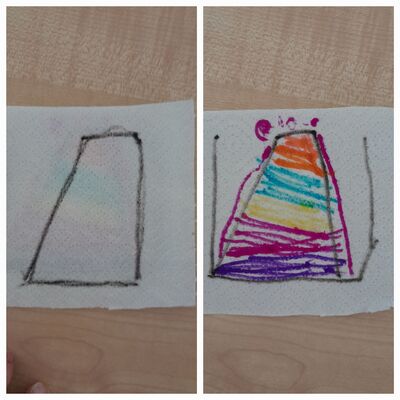
Travelling colours, another very simple craft and very good for the young kids and beginners who have only little langauge but can learn a lot about mixing the primary and secondary colours. Our connection: experiments with water. Potential connection: colours, primary and secondary. The video that I watched to learn about this experiment is here. At first, I used regular paints to colour the water but the dye is not strong enough and although the water wets the strips of paper towel, it does not carry the dye. We repeated the experiment with proper food dyes and that was a lot more successful.
One of the paper towel magic pictures
Why we liked it?
I have to admit, I had so much fun with these lessons! We had a whole day at the camp and we didn’t need to rush anyway. There was time for English vocabulary and grammar, another lesson for the creative activity and then, after the lunch break, one more slot, just for CLIL and Science. It actually helped a lot to put it at the end of the day. The Science lessons were more hands-on and I had a longer break which I could devote to preparations. That came in very handy indeed.
All that meant that preparations were required and, admittedly, not all of the resources necessary are the things that you would just find lying at the school, but, they are definitely materials that can be easily found around the house. That, of course, meant, going to school with a bag packed with the most random selection of things but, hey, it was definitely worth it.
The summer is not over yet and there are still a few lessons to come and a few more experiments. I will be adding to this list but I am already ready to say it out loud: Science is cool!
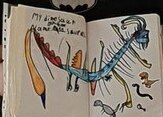
‘Students draw…’ is one of the YL-related lines that is my personal pet peeve…You can see it in coursebooks, teachers’ books, in lesson plans and on the social media. The idea is that a bunch of seven-year-olds (or younger) will have their teacher give out the pencils and they will hear their teacher say ‘draw (insert your word)’ and they will just sit down, get an idea and complete the job in five minutes without any issues and (AND) afterwards they will be ready to talk about their pictures, to present their work or do whatever goes under the productive part of the project.
What a joke! It looks good on paper and in theory and in a real classroom it is going to translate into a neverending, unproductive, very often full of blood, sweat and tears task because the little people simply do not have the drawing skills, the time management, the imagination and the self-control necessary to complete the task that the adults imagine them to do and, more often than not, they will really want to do it well because they care, they love a project and they love drawing and those zoo animals, monsters and princesses that they were told to create. Or, quite possibly, they don’t like drawing, they are into other creative areas and they will devote precisely a total of sixty seconds to that task having then announced ‘I have finished’ and already on the lookout for other things to do. While their more involved peers are still busy and far from finishing, leaving the teacher with a room full of self-induced mixed ability group.
Is there a solution to that? Yes, there is. There must be. This ‘students draw’ has been on my mind for a very long time and there are some ways of handling it, the first of them – taking the coursebook and the ideas with a pinch of salt. Or two. The second of them, working on the staging and the clever way of keeping the activity in shape and everyone on the ball.
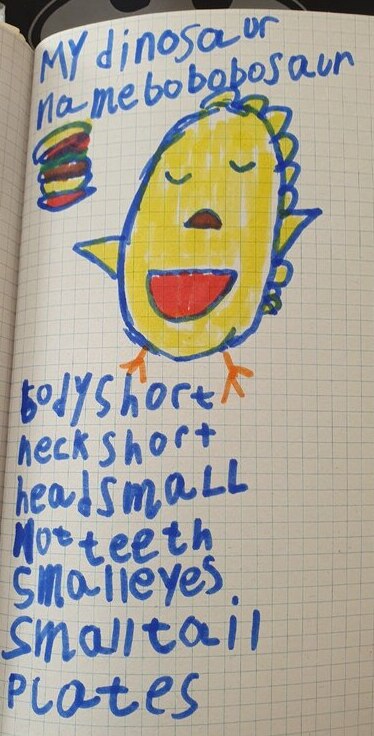
This is one of my solutions. It has worked very well with both groups and I am already thinking how to adapt it to other topics. As soon as I do come up with something and as soon as I trial and test, I will be adding to this post. For now, only one topic: the dinosaur.
Ingredients
Paper and pencils or markers for the children
A set of cards that help to shape up the drawing process, like the one that I used in a lesson in which we created our dinosaurs.
Procedures
It is noteworthy that the lesson in which we actually draw the dinosaur was only one of the series of lessons taught over a period of three weeks and was proceeded by a few lessons in which we introduced and practised new vocabulary, did a mini-research and described the appearance of different dinosaurs. After our dinosaurs were ready, we added a fact file, did lots of quizes on dinosaurs and, eventually, had a role-play aka an interview about a dinosaur. The drawing lesson was just a part of a long chain of activities.
The teacher asks the kids to open their notebooks and get the markers or pencils ready or give out the paper for the drawing, depending on the set-up in your context.
The teacher tells the students that they are going to create a dinosaur, their own dinosaur and that they will listen to the teacher and make decisions. It might be a good idea to show the children the cut-up cards and to tell them that each card is a decision about a dinosaur.
The teacher is supposed to draw their own dinsoaur, either on a piece of paper or on the board.
The activity starts with everyone drawing a circle or an oval for the dinosaur’s body in the middle of the page.
The teacher picks up the first card (i.e. ‘draw a long neck’ OR ‘draw a short neck’), the teacher reads it out loud and makes their own decision, announces it out loud and draws the neck for the dinosaur. The teacher then checks with all the students, in turns, what choice they have made, making sure they say out loud what they have decided to do. The kids draw, the teacher monitors.
The activity goes on, with the teacher doing one more round and then the students taking over and reading and dictating for the class and the teacher.
In the end, the student come up with the name for their dinosaur with the suffix -saurus (although it is, of course, not the only suffix used to created dinosaurs names).
The lesson finishes with all the students introducing their dinosaurs briefly and only in the following lessons do the students proceed with working on their dinosaurs (facts, role-playes etc).
Why we like it?
I loved how this format worked in the classroom. It was well staged and it helped me manage the children and their creativity, without losing control and without anybody finishing ahead of time or going on for too long. It was also a perfect combination of teacher-centred and of individual creative choices for every student.
I had quite a few cards to use but I was prepared to use all or not all of them, depending on how focused or interested my students would have been. In the two lessons / groups I did it with, we managed to go through all the cards (aka decisions).
The kids were prepared for the task, vocabulary-wise and we also could use it to practise it further, through reading, confirming, checking etc. The words were out there, in the air, throughout the entire lesson.
The kids absolutely loved their dinosaurs. Some of them even managed to finish their first dinoasaur, and draw another one.
It worked very well also as the preparation for the more productive part of the project, our interviews – role-plays in the following lessons.
Kids also enjoyed the fact of being responsible for making the decisions, step by step, while creating their dinosaurs.
I will definitely be applying this particular approach to our projects in the future.
This is the second post in the series and the link between them is the painter’s scotch that already futured in the first post but that is still one of my top 5 things in my bag. And here are some more…
The alphabet
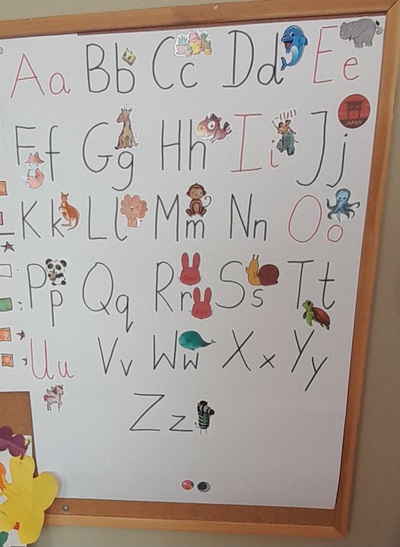
We started the academic year with ‘Aa is for apple’ in our handwriting booklets and we spent the first three months on meticulous handwriting exercises. When we got to Zz and we were more or less familiar with the whole set of letters, I would write all of them on the top of the board for the kids to copy. I know that there are a lot of posters available on the market (and my school prints their own, too), but I just didn’t like them as they did not match my set of requirements: big letters, handwriting, font matching what we have been using and some visual representation, too, to help make them a little bit less abstract. With the visuals that we already know instead of some randomness such as ‘N – nest’, ‘Q – quilt’, ‘S – sparrow’, ‘Y – yak’ or even ‘X – xylopohone’ that are either very rare, well beyond the A1 level, not child-friendly or just vile (yes, I am talking about the xylophone that has the randomest pronunciaction of ‘x’ ever).
I made my own. I made two, one for 1A and one for 1B. The only thing necessary was an A1 piece of cardboard, a marker and a set of stickers.
It has spent the second half of the year on the walls of our classrooms and we used it as a reference point in all our writing exercises. The kids used it on their own and I used it, too, to direct them towards the correct letter. ‘Dd is for dog! Look!’. All in all, it helped us made huge progress with our literacy skills. No more than that but so much!
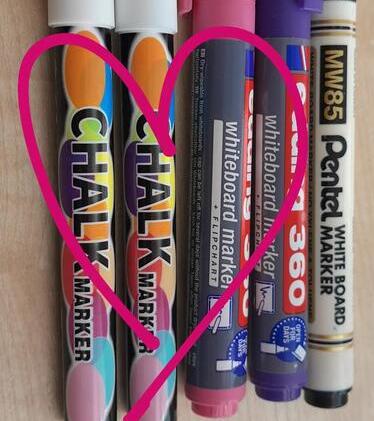
The chalk markers
When I found the Treasure of the Year, I was looking for something else entirely. I was getting ready for the Art classes, White on Black, googling for black drawing paper and white pencils. I found them and the lesson was great (you can read about it here) but what I also found the Solution of the Year and the Teacher’s Love of the Year: the chalk markers.
The thing is for the previous six months I had been forced to use the traditional blackboard and the traditional chalk and I hated every single moment of it, after all my educational like in the Polish state schools, fourteens years as a student and five as a teacher; hatred from the very bottom of my heart, because of the dry hands, because of the chalk dust on your clothes and because of the cloth. And then I found the chalk markers that I had not even known existed!
They are beyond amazing. They last a few weeks, they are just markers and they are quite thin so it is a dream to be writing with them and you can be very accurate and produce intricate letters and drawings. And they erase easily!
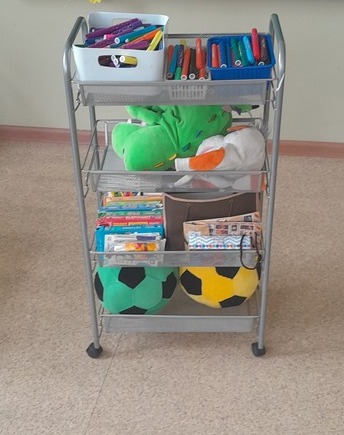
The trolley
I spent about three weeks of the academic year being miserable. I had two groups and two classrooms and the whole day was about moving from one to the other, together with everything that I needed in my teaching life: markers, toys, flashcards, cards, stamps, schoolbag, thermos, notebook, my magic wand, glue, craft paper, pencils…Most of the time wasting on it the entire length of the break. Every single time, every single day. The classrooms are door to door but, still, it meant making a few rounds, a few times a day. It’s not that I did not have a place to keep my things in either of these classrooms, I did, but it was still impossible to have two separate sets of cards, two separate sets of puppets, two separate sets of markers for the whole class.
The misery lasted almost a month until I had enough and I looked for solutions. I used to use boxes and baskets in the past, with my preschoolers but these would not work in these new circumstances. This is how I got my trolley, four metal shelves of happiness on wheels. Each shelf has its own theme and I keep there, going from the top: markers, flashcards and storybooks and puppets, cards, packets small scrap paper cards and handmade cards.
It is super easy to move from one classroom to the other or to roll it around the classroom while handing out boxes with markers. It is light so my students can help with it and they love doing it. They actually love to pretend play being flight attendants and giving out things. It made my life much easier.
One more thing! That trolley is getting me one step closer to becoming a Real Babushka!
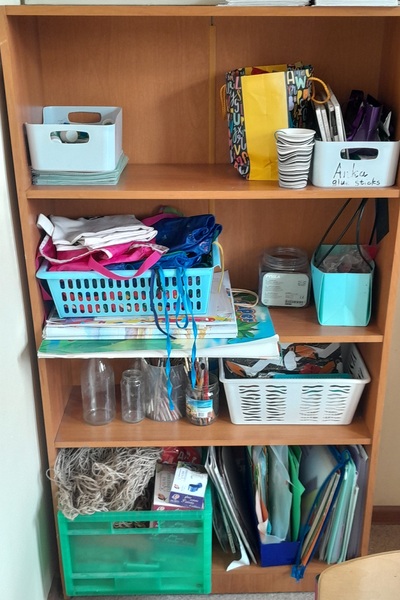
The cupboards
One thing that I definitely had a chance to find out about myself is that I am thoroughly obsessed with order. It might have something to do with some form of OCD because mess and disorder makes me very unhappy. In the past, I must have lived in some kind of an ignorance but that’s because I was not obliged to share the classroom with another teacher on permanent basis. Until September 2023.
This was when I realised that I am deeply unhappy with the disorder on the table, on the cupbards, on the window sills and on the shelves. This was when I understood that I like my classroom near to empty, without all of these toys, games, books and (omg) candy that children have a full and unrestricted access to, which, of course, has a detrimental impact on the general classroom management. Alas, when you have to share, you just share and try to live to tell the story.
The cupboards made it possible and because there are two that I have got, I can be easy-going with how I organise the shelves and what I put things. In one word, I have room for everything. One full cupboard is filled with books, workbooks and notebooks and the other is my beloved Art cupboard, with all my resources, treasures, aprons and jars. They are all located at the back of the classroom and sometimes, when I teach, I like to glance at one or the other and smile. Peace and quiet, law and order in my resources.
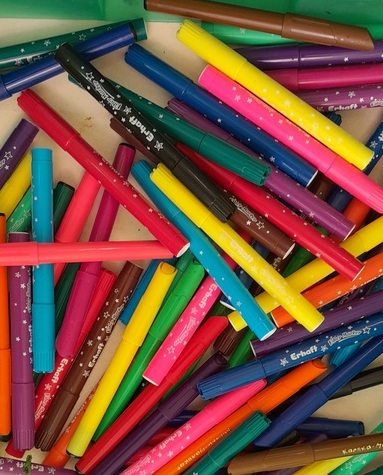
The markers
There are many stationary items in the primary classroom, pencils, pens, crayons, coloured pencils but ‘Nothing compares to you’ is what I would sing to my boxes of markers. I think, perhaps, it might be because of the hours spent in the young learners’ and very young learners’ classroom or, in other words, because of the hours spent with people who are learning to hold a writing tool and people who are learning to use it to write their first words.
On behalf of my students, I prefer them to everything else, because, first of all, they are much easier to handle for an inexperienced hand, much easier to hold, requiring less muscle power to hold and to produce a line, very often much thicker and much lighter than anything else. Not to mention that because of the colours and the excitement of using them, they make the difficult and tiresome task of writing a tiny little bit more appealing and motivating.
We use them throughout the year to colour and, also, in the beginning of the year to write. I cannot really say exactly when we stop and switch to pencils and pens as it varies, from year to year but that is our general procedure.
(Or an English teacher reflects on the academic year that has just finished.)
This is the third of the posts in the series of the Reflective Teacher that I promised myself to celebrate the end of the school year. Here you can find me reminiscing on the life of an Art teacher. Here you will find the unexpected memoirs of a Maths teacher and here (because they also secretly belong in the series) – a whole set of notes of a teacher trying to introduce law and order in Year 1.
But, first and foremost, I am a teacher of English, working hard to give the students in my classroom the tools, the imagination and the courage to speak a language. And from that point of view, this year has been a very interesting experience for an English teacher, too.
Something old…
Well, there is a lot of that!
I have been teaching English to primary for many, many years now. I know how to do it and I love doing it, really. Vocabulary, grammar, communication skills, functional language, reading, writing, a is for apple (a a apple), learning how to be a student, learning how to be a member of a community, routine, pairwork, all of that, all at once. It makes your head spin, a little bit, of coure, but then, all of a sudden, it all starts coming together and it feels great.
Introducing all the letters of the alphabet, staring our handwriting booklet, phonics stage 1, stage 2, stage 3, the first song, the first test, the first spontaneous production case, the first storybook. I have jumped through all these hoops with many generations of my students and successfully so and this year we have done it together once more.
The only thing that was different was the fact that I had a lot more time in a week and we could set aside a lot more time for practice. And that, apart from English and the ESL classes, my kids were getting a lot more exposure and practice from the History lessons, from Maths, Science, PE, Art and the break times, too. Every little helps!
Something new…
Do you still remember the title of this post? If not, please scroll up to refresh. Why? Because this is the image that I have in my head when I think of English in this academic year, here goes:
a beautifully constructed framework of the CEFR, with all the levels and their detailed descriptions, skills, grammar and vocabulary, in a sequence, neat and tidy, like a set of puzzles forming one beautiful picture, now scattered on the floor, all over the place and it is not even possible to understand what it was that they showed in the first place…
That is exactly what happened this year and that is all due to the context in which I was teaching, namely my bilingual primary school, with a group of students who were in their year 1 of education but according to the curriculum and age, in their year 3 of the BNC. And who, naturally, were a very mixed bunch as regards their L2 language skills. A very mixed bunch indeed.
Because of that we made a decision to adapt the programme and the plan and divide the children into level-appropriate ESL groups so that they all could learn and take their English to another level and, alongside that, we would teach the English and develop the skills according to the BNC. All in all, it has worked well. The kids were tested throughout the year, both as regards the reading and writing skills (milestone tests) and speaking (Cambridge YLE) and they all made progress. Hooray.
However, all of that meant that I had to forget about what the basics, the CEFR. First of all, because, from the very beginning I had pre-A1, A1, A2 and A2+ and everyone in-between sitting in my classroom. Outcomes: forget about using one single set of materials.
Second of all, we were to follow the curriculum of the year 3 of the BNC and even if we made amendments (as we did), this was nothing in any way related to the CEFR, as regards the structures or the vocabulary and we had to at least make an attempt at combining the English curriculum with our ESL curriculum. Outcomes: adapt, adjust and do your job, feeling just a little bit anxious, with the safety blanket gone.
Last but not least, I had my bunch in the classroom and in the school, for many hours a day and it was my task to make the most of it and to give them a chance and the tools to communicate in English as much as possible and that means (or it might mean) not going nicely from one level of CEFR to the other. I have already written about it earlier, in my storytelling campaign posts here, and this year I definitely had a chance to research it more and to gain even more experience.
Some of the things that meant for us:
introducing lots and lots of verbs, the everyday verbs (to talk about what we do in the classroom), the story verbs (in order to read and to tell stories), the hobby verbs (to talk about what we like to do)
introducing lots and lots of adjectives, to describe emotions and feelings (to talk about ourselves and to talk about the emotions in stories), to describe objects (all the Maths, History, Science lessons because of the comparatives and superlatives used in all of the subjects)
introducing structures when we needed them: Present Continuous (to describe what we are doing in the classroom, to manage the kids, to tell stories and to describe pictures), comparatives and superlatives (the BNC)
introducing some elements of the word formation (some negative prefixes, gerund, er for jobs) because of the requirements of the BNC
introducing the elements of the three basic tenses (the Present Simple, the Past Simple and will) to give the kids a chance to express themselves, to talk about the weekend on Monday and to talk about the things to do on holiday
learn a huge pile of words from way beyond our A2 level and not in some topical sets but because we either needed them in our phonics practice and it was ok to learn them because they were all 7-year-old-friendly words (with such treasures as: feather, together, trophy, sloth, gate, cube, arrow, pillow among them) or because we needed them for our English, History or Science lessons.
introduce a pile of useful phrases, way beyond our A2 level, through stories, just because we needed them in the everyday. ‘It’s impossible!’, ‘Let’s try!’, ‘You’re too loud!’, ‘Just a little bit more!’, ‘I’ve got an idea!’…
Something borrowed, something blue!
Two things that it led to is that we have actually learnt and we have made huge progress over the year, despite this being the first year of learning English for some of my kids and it meant learning some complicated vocabulary and grammar at the age of seven. The other thing it meant for me only was staying somewhat shell-shocked and puzzled at the fact that I have turned the CEFR upside down and inside out and I lived to tell the story…
I am not sure if, with this post, I really want to promote getting rid of the CEFR. Quite the contrary, I appreciate it being a part of our life, as a teacher and an assessor or an examiner. But it is not the only thing that matters and, sometimes, experimenting and playing with it or just blatantly going around it, that is the best idea EVER! Especially that the CEFR itself is one thing and the way the structures or vocabulary items are included and organised in our coursebooks, that is a completely diferent thing.
It’s been years now since I started to introduce lots of verbs, lots of adjectives and the Present Continuous in my VYL classes. This year was the first one in which I brought some elements of the Past Simple and the future will to my young beginners, just so we could talk about the everyday in a meaningful and natural way. And I am very happy with the results. Hooray to that!
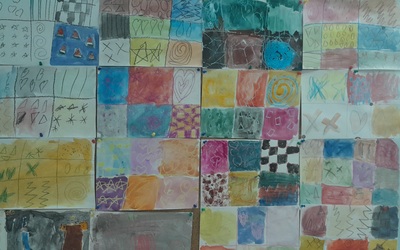
Our beautiful ‘patchwork’, all 20 pieces together (one was immediately stashed in the bag to be taken home)
Last Thursday
Five lessons on a regular Thursday, English, a double Maths with 1B and a double ESL with 1A, a nice, short day, with the cherry on the cake being the fact that for me it is the last day of the week. Rounding up, in a way.
What did I do at work last Thursday? Here is the list:
supported a student and helped him deal with distress related to his inability to deal with a task in a subject that he normally excells at. He got upset, abandoned the task but then he calmed down and he decided to catch up and to finish the task, sacrificing his break and a part of the following lesson but he did complete the task. I told him I was proud of him for not giving up.
went through another refusal to deal with the task with another student. We talked about students making decisions and teachers respecting those decisions but also about the fact that if it refers to a test, the teacher will have to grade the test as it is. The student thought about it and decided to take part after all.
listened to two students who had a disagreement and helped to deal with anger and tears
created opportunities for the students to develop their social skills by sharing resources, waiting for their turn to receive them and to collect them and to learn how to respect the other students’ work, everyone’s right to work in silence and in peace
gave the students an opportunity to express themselves through art (see the photo above) and to be proud of their work
created opportunities to develop cognitive skills and to see the world through shapes and patterns
help to learn to deal with failure during the artistic activity by showing how to solve problems with water, paints, splashes and other artistic disasters
cheered on the growth and developement by listening to at least four stories about the milk teeth falling out, shaking, getting lost and found
took part in rejoicing the fact that the holidays at the dacha, at the seaside and at gran’s are coming
welcomed a child coming back after a long absence (The best entry ever, by the way. No hellos but instead ‘I think I have lost my shoes’) and heard all the stories from the past two weeks.
cheered, sympathised and laughed at everything that three Pikachus did over the previous 24 hours
gave a chance for the students to lead the lesson
witnessed two serious meltdowns that were handled by the children’s personal tutors.
taken care of the fast finishers and started a new procedure of ‘I Have Done Everything Book’
A bit much, no? But wait, I haven’t told you yet ANYTHING about the actual learning that we did that day. English and ESL: it was shapes and patterns, in Maths – division using the bus stop method. And it was not even any special day, just a regular Thursday.
Sigh.
The patchwork did it!
I do sigh a lot, actually. I have no idea what it looks like to the outsiders and the passers-by, but, indeed, it is one of the easiest way of letting at least some of the pressure out of the system. Thursday was no different, I was sighing a lot, especially because of the patchwork.
The kids had left already, the classroom was back to normal, I was just organising the finished pictures on the window sill to dry them in the sun and talking to my T.A. I looked at the pictures, the patterns wonderfully chosen, and the colours to match, the paintings looking just amazing separately and together, as a set, too. I thought that they were beautiful and that they are going to make a beautiful photograph and that I am proud of my kids. And then I realised that nobody, looking at the photograph, here on the blog, on the social media or in the parents’ chat, nobody will be able to tell how much effort went into it, how much drama accompanied it and how much it actually took, this photograph. We will file it under ‘pretty’ (where it does belong!) and we will never talk about the emotional cost of this whole adventure, this whole day.
Absolutely the same can be said about any other handout, activity, test, progress made, painting, lesson and sometimes even a sentence. Guess what, dear reader, I have seen it once and I cannot unsee it!
The emotional burden of the everday teacher’s life
It turns out that teachers are the professional group among the lowest scorers as regards health and well-being (studies by Johnson et al.). We are in good company, of course, together with ambulance workers, social services, customer services and prison and police officers.
On the one hand, there is a tendency to highlight the levels of stress related to the number of years of experience, drawing attention to the fact that newly qualified teachers are at an especially high risk of falling prey to burnout (Linqvist et al.) which is easy to understand as we all, including the human behind the words here, remember the dread and the stress that came together with taking the first step in a completely uncharted territory of the school on our first official contract.
However, according to the study among the Lithuanian teachers, both primary and other specialists, the levels of stress and the issues with mental or physical health were not related to the years of experiences, the location of the school, the marital status or the length of employment at one school. Still, despite a relatively high motivation to work (‘enthusiasm was above average’) and the low levels of indolence, every third teacher ‘showed signs of of high psychological distress’ and 12% were assessed as being at risk of depression (Emeljanovas et al.).
The reasons? Well, there are many (Stefanou et al.) But, to be honest, I would like to leave all of them behind, apart from one. Away goes the personal well-being and health, motivation and classroom effectiveness. Off the list come also social behaviour, learning and performance or the particular school and how it is functioning. Or the students’ motivation and well-being. In the same vein, those ‘rapid social and technological changes and constant monitoring of society’ (Emeljanovas et al) or the parents’ and students’ expectations which have changed in the 21st century are of no interest to me at the moment.
Not because they are not important, quite the contrary. It is all very interesting and very relevant but there almost seems to be too many factors which have an impact and which the teachers are affected by on daily basis. The number and the volume of the issues might lead to a realisation that it is a hopeless task because, indeed, how can you deal simultaneously with all the requirements of the everyday teaching reality and with the 21st century outside of your window? I won’t.
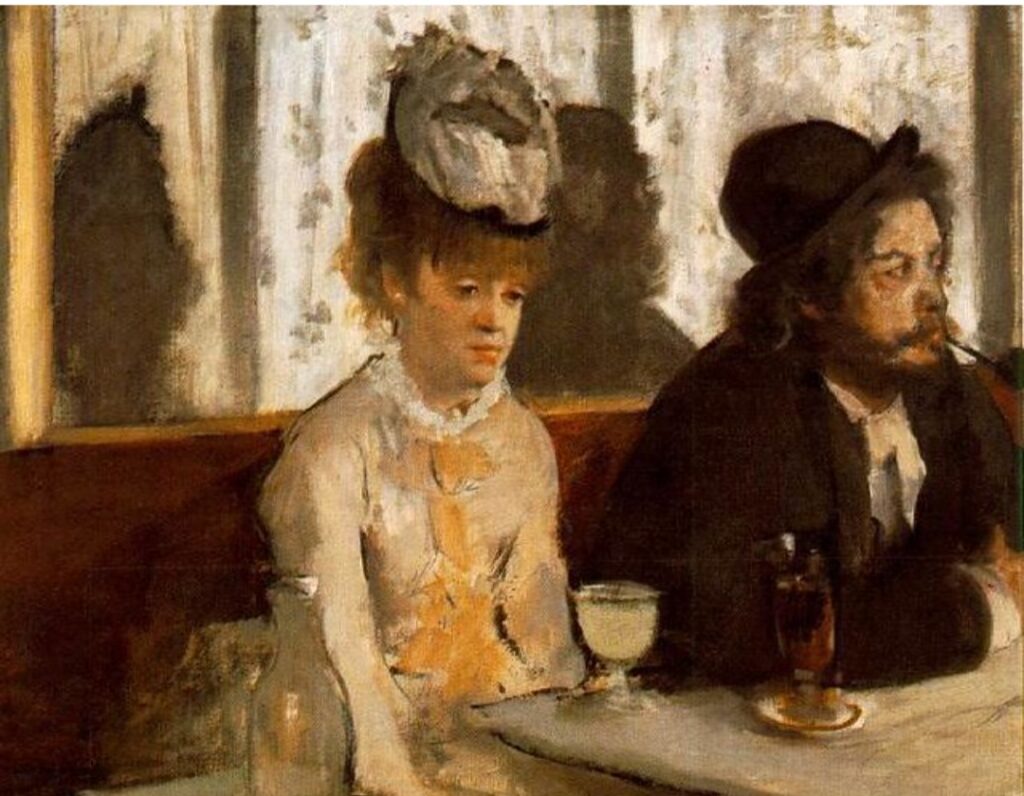
The Absinthe Drinker, Edouard Manet (1875 / 76) Attention: NOT because of the alcohol in front of her, but because of the emptiness in her heart)))
The lucky ones?
Because, let’s imagine a couple of teachers that are just ‘lucky’, for the lack of a better word. They work in a private institution so their working conditions are better than average. They are experienced so they have already developed an immunity towards the pressure from the system, the regular assessment and the need to develop professionally. Over the years, they have also learnt how to work with paretns and to manage the children in class. They work in a small school, with the helpful admin staff and the kids are in year 1 so there is not so much checking, testing and reporting, although there is some. What is more, these teachers, they teach with and out of passion. They even like their students. All 21 one of them. The children are just a group of kids. They are all amazing, no one suffers from any neglect at home, some of them have some special education needs but it is not anything that cannot be dealt with. These teachers are lucky, the conditions are almost ideal.
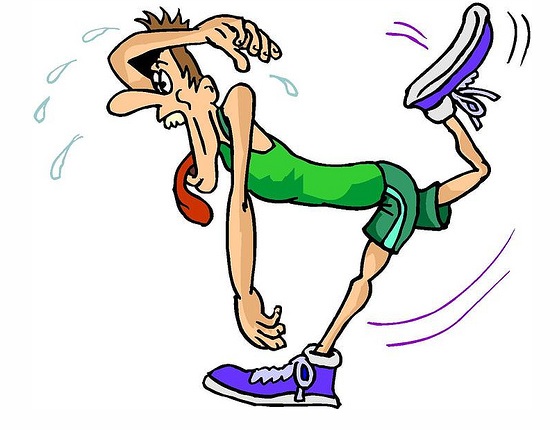
Does it mean, then, that these teachers are not affected by the emotional challenges of the everyday life? Of course not! At the end of a Thursday, like the one described above, they look like some of those characters featured in the illustrations I chose for this post. Sitting in the teachers’ room, recovering, as if, gathering the energy to get up and to put the jacket on and to go home. On some days, walking home, thinking of all the other potential professions out there, of becoming a plumber, a librarian, a chef or a pensioner…
That is the reality and, as they say, ‘there is tired and there is teacher tired‘. It is not sadness, it is not depression, it is not burnout, it is not disillusionment, it is not apathy. Only the unbelievable, unmeasurable, undescribable, infinite exhaustion. And not because you have spent the day ploughing the field or hand-digging foundations for a house but because you have spent 5 or 7 academic hours educating, surrounded by tonnes of emotions coming at you from 21 different sources simultaneously and trying to deal with all of them.
Children are and will be children and dreaming of an ideal lesson, 100% of the time, day in, day out, with everyone listening, following instructions and not getting distracted, not getting into trouble with classmates, and, generally, being ‘little angels’ (or the students that we know from our teachers’ books), that is simply not going to happen. You plan your lesson and then you go into the classroom and life happens.
The good thing is that we learn how to deal with disasters (and ‘disasters’) and with our emotional response to them. The good thing is that, eventually, we get a bit better at it. You can read about it in an earlier post here: The end of the world or Suriviving bad lessons with YL.
The good thing is also that we have lots and lots to look back on, to do the maths and to label the day as ‘good’ and that, frequently, we come home with a joyful ‘Guess what happened at school?’. There are the patchworks that we created and the photos of them that we will share and we will be happy and proud of. And maybe it is the lingering memory of these patchworks that will make us get up the following day and set off to school, one more time, erasing the not-so-good memories of the previous day, in order to try again, to make the children know Math, English or Science and to help them grow and get better and get confident.
The joys and challenges of teaching kids, you know. Which, by the way, and hilariously enough, was the title of one of the first training sessions that I have ever given. The joys and challenges. The patchwork.
Emeljanovas, A., Sabaliauskas, S., Mežienė, B., Istomina, N. (2023), The relationships between teachers’ emotional health and stress coping, Frontiers in Psychology, Vol. 14, https://doi.org/10.3389/fpsyg.2023.1276431
Johnson, S., Cooper, C., Cartwright, S., Donald, I., Taylor, P. & Millet, C. (2005), The experience of work‐related stress across occupation, Journal of Managerial Psychology, Vol. 20 No. 2, pp. 178-187. https://doi.org/10.1108/02683940510579803.
Kariou, A., Koutsimani, P., Montgomery, A. & Lainidi, O. (2021), Emotional Labor and Burnout among Teachers: A Systematic Review, Int. J. Environ. Res. Public Health2021, 18(23), 12760, https://doi.org/10.3390/ijerph182312760
Lindqvist, H., Weurlander, M., Wernerson, A., & Thornberg, R. (2023). The emotional journey of the beginning teacher: Phases and coping strategies. Research Papers in Education, 38(4), 615–635. https://doi.org/10.1080/02671522.2022.2065518
Stephanou, G. & Oikonomou, A. (2018), Teacher Emotions in Primary and Secondary Education: Effects of Self-Efficacy and Collective-Efficay, and Problem-Solving Appraisal as Moderating Mechanism’, Psychology, 9 (4), https://doi.org/10.4236/psych.2018.94053