When you suddenly land on Mars…

What do you mean you can’t suddenly land on Mars? Sure you can! You get ready for something else, as far from space travel as only possible, you arrange all the bits and pieces, you make your copies (because you assume you are preparing for teaching) and then, suddenly, due to a combination of factors (although the Russian phrase стечение обстоятельств somehow fits better here), you open your eyes, you open the door of what turns out to be a rocket and, ta dam, you find yourself on Mars!

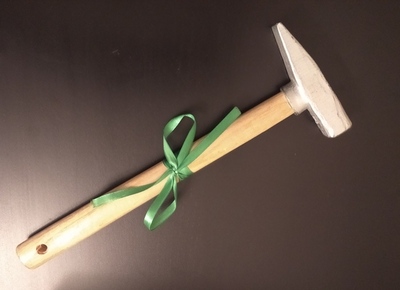
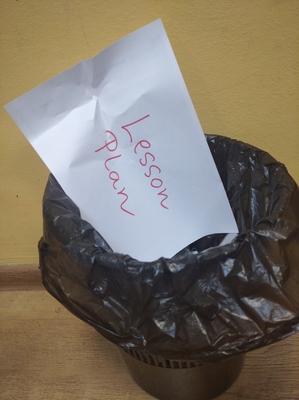
Naturally, everything that you have prepared, on paper or in your head, is, all of a sudden, absolutely useless. The whole lot of it, so, immediately, it lands in the bin or, what we refer to as with my kids, ‘Our Tresure Chest’. Hence the photo.

Congratulations! One of the most amazing adventures of your teaching life (probably) is about to start in…3…2…1…

What really happened?

It was supposed to be a short summer course, for kids, primary, whose main aim was to be a revision and reinforcement of everything that the kids knew, based on games, speaking activities and project. It was a programme I prepared myself, a programme I had run in the past, a programme that had been tried and tested. There are no coursebooks.

However, on the day, due to this amazing combination of factors, all of a sudden, there are four great kids sitting in the classroom, a ten-year-old, a seven-year-old, an almost-seven-year-old and a five-year-old. As regards the levels, one of them is more of less a Starters level and three false-start beginners which means that they know an occasional number, a few colours and a pet or two. Plus, they have had some exposure so, rather than run away, they make an effort to listen and to follow instructions.

Of course, since it is the first day, they trickle into the classroom (a new routine is building up, also for the parents) and the lesson takes off three times in a row. It is an interesting feeling to become aware of the fact that the lesson is 120-minutes long (or very very long), especially when you have nothing ready.

By nothing, I mean ‘literally nothing’. All of the materials and the lesson plans I had prepared were lying on the nearby table, I could see them from the corner of the eye throughout the lesson. I knew that they were entirely irrelevant at the moment and that maybe, if I am lucky, I might use them later on, with some other group. Maybe, not during this particular lesson that I was very much a part of and responsible for.

What I learnt from this experience

Spoiler: Plenty.

First of all, finally, I was able to pinpoint what ‘being experienced‘ means. It’s been a while since I started teaching and another while again since I could label myself as ‘experienced’. At the same time, I have never really thought what exactly it means to me. Because, normally, you don’t think about it, do you? Unless, sometimes, you are asked to add the number of your teaching years while putting together a bio for one conference or another…Or when you bump into ‘a student of yore’ and you notice how much they’ve grown. And how much time has passed.

I was teaching, peaceful and quiet, thinking that ‘It’s ok. Everything is going to be alright. The patient will live’. I was not happy because I really hate coming into the classroom not having planned my classes. I was not excited about the potential challenge and an opportunity to experiemnt and learnt. But I was angry, scared or even stressed out, just teaching. Anyway, the kids were in the classroom already so, if not for anyone else’s sake, it would be recommended that I behave for them. I don’t know if it works for everyone in the exact same way, but for me, yes, the students’ presence (insert here: kids, teens, adults, trainees) has a calming effect on me. All in all, that would be the definition of ‘experienced’ for me.

Then, this particular lesson (or the course) has made me think again about the case when students, who belong to different age groups but study together. Of course, there is a reason why we take these two factors into consideration: the age and the language level and we want to provide the best service, always suited to the individual students’ needs. There is no doubt about that. However, at the same time, over the years, I have been in a situation when the younger were together with the older and it did work. Because it did work in that case, too. It has worked, rather, (we are not done yet) and I am trying to understand why and how.

I don’t fully understand it yet, I am collecting evidence, so to speak, but whenever that happens, I always think of siblings playing together and doing things together, despite the age gap.

The most interesting part of it was the teacher’s brain at work. At one point in the lesson, I realised that it was working on as many as four levels simultaneously. One – because I was actually fully involved in the activity that was taking place at the moment, a game that we were all playing. Two – because I was thinking fast on my feet, trying to plan the next few activities, until the break. Three – because there was also the second half of the lesson after the break and I had to plan this part, too and four – because I was doing all that and also reflecting, on the go.

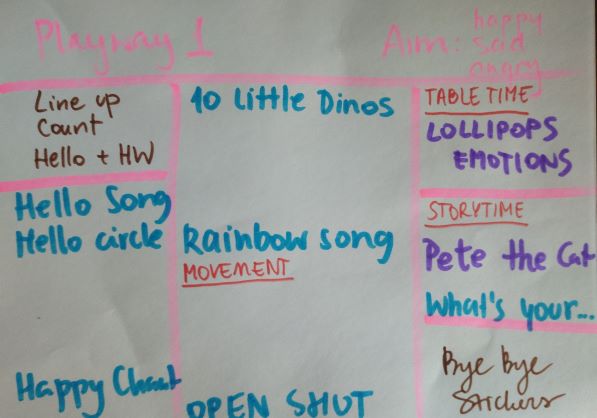
It was not all about killing the time and making sure that the kids leave the classroom alive and kicking, happy and healthy. It was about making sure that the children learn something and that we meet our lesson aims, although, admittedly, these were the aims that were set in the course of the lesson. All in all, it was a successful lesson. We learnt and practised some vocabulary and the kids learnt the room as humans who can use ‘I like’, ‘I don’t like’ and ask the question ‘Have you got?’ because we needed it in a game. If I had been observing this lesson, I would have given myself a ‘To Standard (strong)’ or maybe even ‘Above standard’. What a relief:-)

The only problem with it is that the brain gets really, really tired with such entertainment. As soon as the kids left, I just slumped on the desk and took a 15-min power nap, then lunch. Then, I was good to go, as if nothing ever happened.

Coda and the follow-up

Last but not least, it made me think about all the less experienced teachers and how they might react in such a situation and what I could tell them to help deal with the stress and the students in such a situation.

For that reason, next blog series will be about that, landing on the teaching Mars and surviving. I am planning a post on the top ten resources that might come in handy and that will help to save the world (kind of) and on a three posts in which I am going to share my ideas for the lessons based almost entirely on paper. Soon in cinemas near you!

Happy teaching!

Free yourself! Forget about the coursebook!

It is quite likely that the next few posts to come will be (heavily) influenced by the very intense experience of tutoring on the IH CYLT course. I train up teachers throughout the whole academic year, in one way or another, but that particular course is as engaging and absorbing as it is demanding. And, naturally, inspiring. Hence this post.

First of all, we love our coursebooks. We love our authors. We love our publishers. We would never give up and teach completely without the coursebook because we appreciate the curriculum, the ready-made activities, the photographs, the audio and the ideas. And we are beyond happy to be able to have a coursebook from a recognised publisher who has been in the business for decades and who is putting a lot of effort into putting together a coursebook. We have worked without coursebooks (not fun), we have worked with horrendous coursebooks from aspiring local publishers/writers (not fun) and, having been in business for decades (oh dear), we have experienced the coursebooks of the 70s and 80s (not fun) and it is obvious the coursebooks have become better. Much better, in fact.

But.

My favourite metaphor

A hammer is a very useful thing, no doubt about that, but would any carpenter let the hammer decide what the table should look like? A knife is a wonderful tool, too, but no chef would be asking the knife for advice on how to cook a steak. Scissors, another amazing creation, but no hair stylist would let the scissors take the lead and make decisions about the haircut. They are all tools and what matters here is the human that manipulates them, a human who understands when the tools contribute to the aim that he or she has and then they don’t and have to be put away (fixed, sharpened, and so on, depending on which part of the metaphor you choose).

In the same vein, with all due respect and no offence meant, the coursebook cannot make the decisions about the lesson. It is a tool, a great tool but only a tool that has to be used wisely.

‘Easy for you to say. You don’t have to teach and you won’t be assessed…’

…is actually something that one of my trainees actually said during the lesson planning session when I suggested (yet again) to put the coursebook aside. On a few other occasions not a word was said but I caught a glance or two that did express the same thought. As if I was the meanest creature in the world, asking the drowning man to let go of the swim ring they are desperately holding on to…

It is, of course, true, I am not teaching to be assessed (well, not on the course) and yes, it is easy to (carelessly) suggest putting the book aside. Why would I want to do that? Ok, here are the reasons:

  • The coursebook authors do not know the children (or the students) who sit in your classroom and, try hard as they may, they will never be able to come up with the activities that suit those students’ needs. Only the teacher who works with them can do it.
  • The students for whom the coursebooks are written belong to some non-existant category of children: they never cause any problems, they never misbehave, they always come energetic and motivated, they are always focused, they understand and follow instructions at the first attempt, they always match the coursebook level and the ministry description of what a seven- or ten-year old should be like and they are interested in all the possible subjects in the world. Unlike our Pasha, Sasha and Fedya.
  • The coursebook authors choose the texts or vocabulary or listening or grammar practice activities based on the principles that might not go with the abilities or interests of your students.
  • The summer courses are a perfect opportunity to let the hair down and see what teaching can be like, when the student is at the heart of everything that happens in the classroom
  • The training teaching practice on the course is even a perfect-er opportunity because forgetting the coursebook is done under the supervision and with the help of a tutor who will help to make sure that this grand experiment does not get out of hand and that there is a happy ending to that story. There will be also your peers and, obviously, seven heads thinking together are much better than one.
  • Forgetting the coursebook also means that the teachers set themselves free and start thinking about the lesson (or the course) in a more organic way. What topic do you want to teach? What vocabulary would you like to include? Which grammar structures will go well with that? What can be the main productive activity? What do you need to prepare your students for it? Do you want to include a song, a story, a video? How much time do you have for all that? And when all these questions are answered (and only then!), opening the book to check how many of your personal dreams can come true with whatever is in the coursebook. Not the other way round.
  • Adapting, creating or finding all the missing element will take time but the final product – a lesson that you want to teach, is definitely worth it. Even if it is not the best lesson you ever teach. Learning from mistakes is as important as learning from the great achievements.

The happy ending (because there is one!)

Breathe, dear teacher, it is not forever, of course. Nobody is taking the coursebooks away (we love them, remember?) but I can (almost) guarantee that one summer like that, at a teacher training course, at a summer city camp or at a regular summer camp in a far-away forest can change your approach to teaching forever, with young learners or with adults, with the priorities set right: the teacher and the students, the lesson, the coursebook and lesson planning will never be the same!

Happy teaching!

Instead of a coda, a song by the Chemical Brothers which inspired the title of the blog. I am thinking that I will have to a lot more of the Chemical Brothers’ songs

P.S. My trainees on the course were amazing and I managed to convince them to let go of the coursebook at least once while on the course, partially or fully. With great results. So there.

From ‘havoc’ to ‘happiness’. Lesson planning for YL (part 2)

What can you see in the photograph? Oh how I wish I could hear your thoughts and all your ideas, dear reader!

It does look pretty messy, doesn’t it? This is what I call ‘real life’.

Imagine this, I have just come into the office on the day of the training (which is not quite ready yet, not this one, the week must have been a real hell so although the ideas are there, the presentation itself is NOT, not panicking yet, but the adrenaline levels are already up) and I have just taken ‘everything I need’ out of the bag: books, notes, some copies and A LOT OF FOOD (typical). I am about to start planning. Having looked at what my desk has become, I decide to take a photo of this beautiful mess that soon will (I know it now) turn into a great seminar session.

I have decided to use this photo because it is a pretty accurate visualisation of what happens on some days when I plan my classes and to follow it up with a few words on what happens next and how I get from this havoc to the end-of-the-lesson happiness.

Based on the lesson with my ‘adult’ preschoolers a week ago.

The ‘theory’*)

Step 1: Make a decision what your main aim is. Try to verbalise it and even write it. It really does wonders for the awareness of what you, as a teacher want from the lesson.

Step 2: Make a decision what your focused task is. ‘Focused task’ is the concept that we use at my school (and have used for at least 15 years) and it refers to the main activity of the lesson in which the students get to produce the language and the activity which is the culmination of the entire lesson. All the activities in the lesson lead to it, to some extent, just like all the roads lead to Rome.

A while ago I realised that this is the approach that I am using in all my lesson planning, for all the age groups, levels, for teaching and for teacher training, too.

Step 3: Consider the materials available (mostly by looking at what the coursebook has to offer) and whether they contribute to your aims and your focused task. If not, you will need to adapt them or design new materials.

Step 4: Think of the activity that is going to be most suitable for your materials. It is like differentiating between a tool and how you are going to use it.

After all, there are plenty things that can be done with a hammer (materials), such as putting in a nail to hang a picture, breaking a window, smashing a walnut open, stirring soup (activities) and so on. Some of them are more or less appropriate, of course. The same applies to the flashcards, boardgames, handouts and what we are going to do with them.

Step 5: Take a moment and go over the activity in order to make decisions about staging. What are going to be your baby steps within the activity? whenever we do something for the first time (regardless of whether it is the first time for me or the students), I like to make an effort to actually write the main stages, even if in a very simple form, a sequence of infinitives.

Step 6: An additional step: a homework task. It might not be always possible or, rather, sometimes it might involve a lot of work as regards material design or adaptation. To put it simply, not every teacher will have enough time or energy every single time, with all the lessons taught in a week but a homework task that is an extension of exactly what happens in the lesson and creates an opportunity to continue practising the same language or structures at home, with parents.

….and the practice. Our lesson last week.

Aim: For the kids to start describing school objects and the objects in the classroom, using full sentences such as ‘It is a blue pencil’, with the focus on colours and some simple adjectives. The kids are 5 and 6 and in the beginning of their third year of EFL.

Focused task: A game in which the kids will be guessing the secret word depicted in the cards, producing full sentences instead of questions as we have done so far. The kids will be saying ‘It is a blue pencil‘, ‘It is a red pencil‘, etc until they produce an accurate description of what is shown in the picture which they cannot see.

Materials: There is nothing in the book that could help to achieve the aim. There is one practice activity but it focuses on reading and the students are only taking their first steps in the world of the early literacy. A decision is made to design the materials. Yay.

The materials are a set of cards, 7×7 cm, with clip art pictures on them, coloured-in by hand. There are three types of cards (a pencil, a schoolbag and a rules) and six variations of each, in six different colours.

The cards must have a specific size for the kids to be able to manipulate them easily. They cannot be too big (the ‘secret’ will be difficult to keep and the regular A5 flashcards might be not comfortable enough for the little hands) and not too small (as they will be too flimsy and are likely to be ‘spilled’). It might be a good idea to keep the cards in an envelope to add one more layer of guarantee that the technical bits don’t get in the way of the successful playing of the game.

There are only three types of cards in order to make it achievable, at least when the game is first introduced. Later on, when the kids feel familiar with the concept of the game, more objects or more colours can be added.

Activity: The activity itself is a simple guessing game of two stages. The teacher chooses one of the cards, keep it secret, say ‘What’s my secret?‘ Stage 1: students guess which of the three objects is depicted on the card. They say ‘It is a ruler’ and so on, until they guess.

Once they do, the teacher confirms and asks the following question ‘What colour is it?‘. Students continue guessing. They produce the sentences such as ‘It’s a blue pencil‘, ‘It’s a green pencil‘, until they guess. To help them remember the full structure, teacher counts the parts of the sentence on her finger.

Staging

  • revise the vocabulary with the regular flashcards
  • show the kids the game cards
  • elicit the full sentences (signal withe the fingers), while flipping through the cards: ‘It is a green schoolbag’, ‘It is a yellow schoolbag’ etc.
  • mix the cards, to choose one and keep it close to the chest
  • say ‘What is it?‘ and peek at the cards, secretly and suggest a possible (wrong) answer.
  • wait for the kids to start guessing.
  • keep showing the fingers and counting parts of the sentence as the students are producing the language, developing the habit of answering in full sentences.
  • confirm when the kids guess the object in the picture, praise the student who guess and all the students
  • say ‘What colour is it?‘, peek at the cards, secretly and suggest a possible (wrong) answer
  • wait for the kids to start guessing.
  • after a round of two, the kids take over – call one of them out and ask them to sit on the teacher’s chair, choose the picture for them (to save time, especially in the first lesson) or let them choose the picture they want to play with but operating the cards yourself. The kids might be able to take over in the first lesson, they might be able to take over only in the following lesson, when the game is played for the second time.
  • encourage the group to make sentences, counting on your fingers, praising the kids, encouraging them to produce full sentences.

Homework

The homework task in this lesson was a simple handout, ‘a sentence maker’ in which the students have to complete the missing parts of the sentences, either by adding the colour (by colouring the box) or the adding the school object (by drawing it). The kids choose their own words. Later on, they ‘read’ their sentences. You can find the basic handout here.

The teacher makes one copy per child and one more to demonstrate the instructions in class. When we did this kind of an activity for the first time, I added the colours myself in line 4 and 5 to make the task straightforward. In the future, they will be given more freedom when they are more familiar with the format and the idea that each part of the sentence is represented by a visual or a symbol.

Did it work? aka ‘Happiness’

You know this moment when you are teaching and you literally want to get up and pat yourself on the shoulder with ‘OMG, you rock’? because you are allowing yourself, simultaneously, to teach and be fully in the lesson but also to be evaluating this lesson as if you had been the observer in the room. And it is actually going on very well?

This was one of these lessons.

The kids loved the guessing game, especially that they were given a chance to lead. The cards and the handout did help me achieve my aims and by the end of the focused task, the kids were producing full sentences, although I had to remind them a lot to use full sentences. It was much better in the second lesson with the same game. The kids were eager to start playing the game and I only had to model once. They were ready to take over and they produced a lot of language.

If you want to read more on the subject, have a look at this post where I share how I approach the everyday lesson planning for preschoolers.

Happy teaching!

*) Inverted commas because it is not a real theory, only a set of daily procedures, verbalised.

A piece of cake. The everyday lesson planning: Pre-schoolers

photo courtesy of Юлец

Welcome to my classroom. I will take you through the lesson planning for one of my preschool groups. They have just started to learn English, they are four and they come to us only once a week.

This was our lesson number 5 and I taught it last week, just one of the lessons, without any fireworks or magic, just what we do. The only thing that was different was me taking notes and photos every step of the way. The planning took about twenty minutes (plus photocopying and preparing the classroom).

This IS how I plan and it was only a few months ago, while talking to a friend and a colleague (insert virtual hugs to Vita), I realised that if I had to pick up a metaphor for my approach to lesson planning, I would go for a cake: I figure out what I want (the visualisation of the amazing piece of baked goods, just a second before you cut it up to serve) and then I come up with all the ingredients to buy, all the equipment to prepare and all the steps to take to get there. Just like while making a cake.

Welcome to my lesson, step by step. Get ready for a lot of I’s!

Step 1: Getting started

An A4 piece of paper is where I always start. A single piece of paper and a few colourful markers. I use the same approach to planning for all my lessons, regardless of how old the students are or what their level, but for pre-schoolers it is especially important.

Leafing through the pages is not necessary and, let’s be honest, not recommended or even impossible when simultaneously you are managing a group of four- or five-year-olds. The lesson plan is always on the wall. It is relatively simple and thanks to the big font, the structure and the colour-coding, I can read it, even from the other end of the classroom. Sometimes, I take it around with me and pin it in the other corner of the room, all that depending on the activity. If for example we are doing something completely new, for the students or for me, my notes for this particular activity are a lot more detailed.

Step 2: The framework

This is the typical framework that I use for all my pre-primary groups and individual students. The lesson is divided into the three main slots, regardless of how long the lesson is. As a result, the length of each third varies and it can last 20 minutes in one real hour class, 15 minutes in one academic hour class or even 10 or 5 minutes in the shorter online classes that lasted 30 or 15 minutes respectively. As with any lesson planning, assigning time slots should be only approximate because a) anything can happen b) we adapt our and the coursebook authors’ ideas to what actually happens in a particular lesson. To be honest, if I were to give up one lesson plan / lesson ingredient / craftsmanship element, timing would be the first one to go.

I start from the scratch in every lesson although I have been playing with the idea of improving the approach – printing the template, half-filled in with all these elements that are constant, then laminating it and using whiteboard markers to plan to minimise the time expenditure and the workload but I have never got round to it. Not yet, anyway.

Step 3: The aim

I start with the lesson aim. I mean, we all do, in a more or less conscious way. Only about a year ago, though, I started to force myself to verbally formulate the aim of each lesson and to write it down. The results of that little, non-time-consuming teaching habit have been nothing short of amazing.

I know most of the coursebooks that I am / we are teaching with very well, I have gone through most of them once at least and I have my favourite activities and solutions and so on and, of course, at the bottom of my brain, I know why I do this or that. But, having to actually think about a particular group and a particular lesson, on a particular day and having to say it out loud has made a bit difference and has made me more aware of what I do and why.

But there is more to it, too. There have been a few occasions over this year when I really wanted to include something to supplement the coursebook, a game, a song you find or an idea you wake up, include it at all cost, just because the idea seemed very appealing. On those few occasions, the lesson aim got skipped or left for the very end of the lesson planning, as if by accident.

Only it was not by accident. Because when I got to the point when I was ‘just’ supposed to summarise it in the lesson plan, I simply could not. It did not come together because the lesson, at this point, was just a collection of activities, without any real focus or an obvious outcome. All these lesson plans were redone and the activities reconsidered.

For that reason, now I always put the lesson aim at the top of the page, as my frame, my spotlight, my runway. A clear lesson aim also helps to reflect on what happened in class afterwards.

In this particular lesson, I wanted my students to start talking about emotions. They had already been exposed to the three key words (happy, sad, angry) and their symbolic representations but without actually producing much. In this particular lesson, I wanted to try to take it a bit further, to the production stage, ideally in the form of a full sentence ‘I’m happy / I’m sad / I’m angry’.

To be honest, ideally, this is what should have been written on the page ‘I’m happy/ I’m sad / I’m angry’ but it got compressed to only three words, mainly because I have taught the lesson a few times already and it would be a full sentence by default. Just to prove that the lesson plan was for the lesson itself and not for ‘publication’.

Stage 4: I will always love you

This is the easy thing. The first and the last block, in brown, are the admin bits, with the students entering and leaving the classroom.

We line up in front of the classroom, count how many people are present, we say hello officially and we check the homework (more on that kind of a hello routine soon to come!) and we sing our goodbye song and choose stickers, get homework and choose the stickers before everyone goes home. These never change, although sometimes I only send the homework through the WhatsApp group or explain it directly to the parents. This was a standard lesson, though.

The other element that always appears at that point are all the songs and chants to be sung in class. These depend on the topic of the lesson and later on, the students can sometimes decide which one we are going to sing. This group here is at the very beginning of their English adventure so for the sake of establishing the routine and because we only know a few songs, we sing all of them in every lesson.

Songs work here as some kind of punctuation marks and during the lesson, we basically sail from one song to the other. It helps to ensure the balance between settlers and stirrers or songs offer at least a tiny little bit of a change of a pace and an opportunity to move but they also help to ensure that there are periods of the lesson when we all do something together so it helps to keep the balance of different interaction patterns (whole class vs individual work, pair work or taking turns).

Step 5: The centrepiece

At this point, I am adding the main activity, our focused task during which we are set to make the lollipop puppets with our three emotions (plus colours and some functional language). I have done this activity in that format a few times and for that reason there are no detailed instructions, the staging is already in the blood.

Another thing that appears at the time is the storybook. At this point in the course, we use storybooks only as supplementary material to revise and to reinforce the target language from the lesson and this is how Pete the Cat helped us. We revised the colours and emotions only using a different resource.

Step 6: The familiar

The next step is adding the other elements of our routine. These are not as constant as the hello or goodbye routine but not as changeable as the focused task or the target language practice.

Since it is the beginning of the course, there is not much to pick out from or to revise and since we are still working on building our routines and I try not to add too many new elements, not to overwhelm the kids.

Our revision activity has been the same for all this time: we count up to ten on fingers, we count the people present, boys and girls and teachers and we count other things, in this lesson dinosaurs, in this lesson in a book and our plastic toys.

Our music and movement has been pretty much the same from the beginning of the course and it is only now that the kids are properly enjoying the activities. This applies to the songs and the magic bag game, in which we use plastic fruit. They don’t know the fruit names so at this point we only focus on their colours (‘It’s green’).

As for our How are you today part, the plan was to do it in the traditional way but with the introduction of the finished product. I thought that this might help the kids become aware of what this toy is and how to use it (pick one and place it in front of our face, while saying ‘I’m happy’). By the time we’d get to making our own lollipops, they would already be familiar with them. It would also help with giving the instructions.

Step 7: The key elements

The things to add now, will be the details of working with the target language and with the revised language, in order to ensure that they best contribute to the completion of the focused task.

What I did plan, however, was the colours practice with a variety of activities: not quite in the order in which we did them. The main and the new one here was ‘open/close’ also known as ‘what’s missing’, a memory game and the most challenging activity here (as it involves cognitive skills and language production, focus). Everything else was either a preparation for that or a supplementary game, which can but may not be used, in the end. I like to make a list like that to prepare myself for their different moods, participation and involvement levels, etc. Having a list of potential games which we can play, without any major changes to the materials set or the seating arrangement I found it to be quite useful.

The fish game here acted as my potential plan Z, only if we have time. In the end, I used it later in the lesson, instead of the magic bag activity since they were both quite similar (students taking turn to perform an individual task with a motor skills development focus and colour revision.

In this lesson, the connection between the focused task and the target language practice is not as strong but that is because it is only the lesson 5 in level 1. Thinking about it now, after the lesson, I think that, ideally, I should have included some additional activity to combine numbers and colours, for example in the form of colourful happy, sad and angry faces, that we could categorise by emotion, count etc. So see, there is always a way to improve things)))

Ready!

The lesson plan is ready. Perhaps now, looking at it, in its full, finished glory, it is easier to see why I do not include any timings. The framework itself outlines the time slots for each stage of the lesson, alongside their aims, although they are not articulated clearly and they are the following:

Column A: the introduction to the lesson, hello and revision, the aim: settling in, duration: about 20 minutes.

Column B: working on the target language, the aim: presentation, practice and production, in varying ratios, depending on whether it is the beginning of the ‘unit’ or the end of it, duration: about 20 minutes.

Column C: production, the aim: production, with the hope of more freer practice and spontaneous production, although, of course not during the first few lessons of the level 1 course.

Looking back

The lesson went well and, apart from the few things mentioned already, I did not really have to change anything else. Not that it would be a very bad thing to do. Regardless of what has been planned, the thing that matters most is a group of the little people who are sitting in the classroom, how many of them there are, how advanced they are, how they are feeling on the day. Flexibility, first and foremost. And then – the reflection bit. Because we can always make things better.

If you are new to teaching pre-schoolers, have a look at my post about the first VYL lesson survival kit.

Happy teaching!