The language
This was a part of a wonderful Brazil Day in our summer camp. We started the day with learning how to say hello in Portuguese and looking for Brazil on the map. Afterwards, we looked all the things Brazilian and we expressed our opinion using ‘I like’, ‘I don’t like’, ‘I love’ and ‘I don’t know’. I wanted the beginners to focus on the basic structure but I also have some more advanced kids and I encouraged them to also say why or why not. We used the the wordwall cards, we played pelmanism and a miming game. I found the video about the country, too, but we didn’t even have time for that as we still had to complete our passport page.
The artist
There is a special place in my heart for Romero Britto and his animals and he was a perfect match for this lesson. We talked about colours and which ones are happy or sad for us and then I introduced the artist and his works. I prepared a presentation in which parts of the animals were hidden and the kids had to guess their names.
We talked about the colours that the real animals have and the colours that Romero Britto used. Initially, I was considering extending the ‘analysis’ to shapes, too, but eventually, I decided to keep it simple and focus on the colour only.
The art
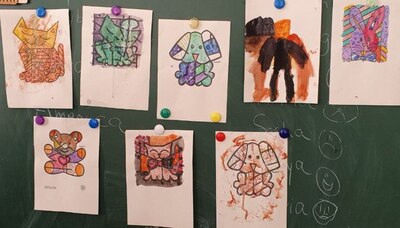
The task was essentially very simple: a colouring picture of one of the Romero Britto animals and working on including happy colours. I showed them a selection of animals (they are available on different sites) and everyone chose one and we printed those.
I decided to use watercolours because they are easy to mix and they dry relatively easy and we could add my secret ingredients: the glitter markers. The kids found some old ones in my box and they got wildly excited about them and that is why I decided to use them properly in class. I am not a huge glitter fan (reads as: I avoid it like the plague) but the marker version, mixed with paints is a bit more manageable and it does not spill as easily, unlike the powder.
We started to paint with the watercolours and as soon as we finished, the kids could pick up the glitter glue. I suggested using it as yet another paint as even a small amount can be spread over an already painted surface (even if it is not entirely dry) and it adds the glow and makes the picture even more beautiful and joyful. We had three different types of those glitter glue markers with different type of a sparkle, everyone got their two in the beginning and then they exchanged and shared.
Some kids worked a bit more slowly and completed only one picture, some others, the older ones, went on a bit faster and managed to finish two or even three of them. And they sparkled so beautifully in the sun!
For some time I thought that perhaps that kind of an activity will be too easy and too boring for the children but there were two elements that helped to prevent it. On the one hand, the complexity of the original picture and all the little shapes and patterns made the kids work in concentration and focused, they really wanted to do a good job. On the other hand, the glitter definitelly did add to the WOW factor.
All in all, I think Romero Britto in that format will be a great choice for one of the first lessons with a new group of young artists.
Happy teaching!