I decided to share this idea here because I love how this whole idea happened, from just one little Maths exercise into a fully-blown, multi-media, multi-subject project. It is not a story of careless teacher who did not plan the lesson properly, rather a story of a lesson that, suddenly, blossomed and a teacher who saw the full potential.
Step 1 or I only wanted to make Maths a bit more exciting
The year 2 in Maths has been, so far, quite an adventure. Especially after we survived addition, subtraction, multiplication, division, fractions and decimals… After those first six heavy duty months of the academic year, the lighthearted Maths came up. I mean, it is still fun, measurements, statistics and geometry, all of that is amazing and we learn a lot but after everything we did before, it is just easy-peasy.
This project happened when we were in the unit of Area and Perimeter and while working on a task from the coursebook ( ) which was pretty easy and straightfoward: ‘to design a garden of the area of 80 m2 and calculate its perimeter’, I realised that my students were really enjoying the task. Truly, madly, deeply. They started to add flowers, trees, huts, colours and some random animals. Maybe it was because while explaining area and perimeter, I drew my own farm and a pig and a chicken…All in all, they got a lot more into it than I expected. There was definitely a lot more potentatial.
That is precisely why for the following lesson I decided to give them a summer hut to design and to draw and to calculate. The main aim here was to follow very specific directions and information and to put together a house in which all the rooms have specific size but they can be of any shape the little architects wanted. It was amazing to see how, again, they got into it but how, at the same time, they already wanted to do more and get more freedom and to add their rooms. Obviously I had to promise that we would design our proper houses when we will have the freedom to do almost whatever we want.
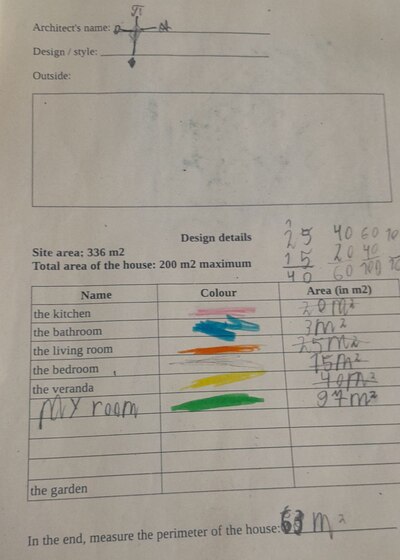
Our project has properly took off in the third lesson. The task my students got was to design a house they wanted: decide which rooms they want to have apart from the main set (the kitchen, the living room, the bedroom, the bathroom and the veranda), make a decision about the area of each of them, to calculate the total area of the house and not have it exceed the allowed area of 200 m2 and use the remaining part of the lot on the garden, the swimming pool or the garage. The main focus here was the Maths and calculations. The follow up task would have to be calculating the perimeter, too.
In order to make the task easier I looked up 200m2 houses with real designs, to understand how big this house can be, how many bedrooms and rooms can be fit in and how it could be organised. The first thing that came up was a lovely website from New Zealand and that is exactly what we used. I printed one of the plans and colour-coded it for the kids to better understand it and we had a look at it during the preparation for the house.
Step 2 Visualisation or ‘Let’s draw it!’
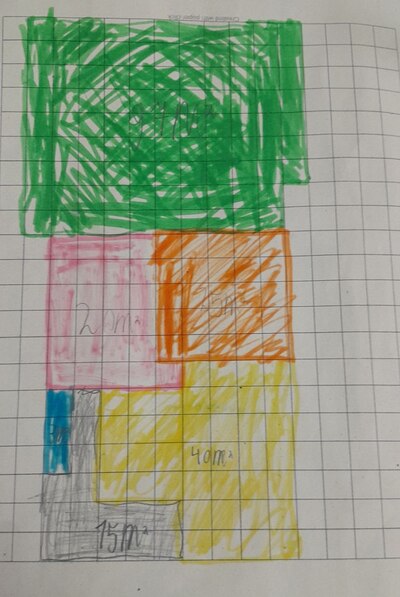
The design could not be done without the floor plan because that is where the real fun starts. I realised it when I was preparing my house plan. Guess what: design is not easy! Putting together all the rooms in some kind of a reasonable shape, the walls adjacent and location of all the rooms…Because I designed my own house, I could prepare the kids better for the task. The following things had to be taken into consideration:
- the area of each room and the total maximum area of the house, the calcuations we had to make on the way
- the colour-coding of the rooms to make the design clear and easy to understand
- the scrap paper to calculate and to draw on not to destroy the actual design
- the pencils, the rules and the erasers for all the kids and to tell the students that it might be necessary to fix their desing as you go along because your ideas can change
- to allow and encourage the kids to check and to compare their projects and to exchange ideas to inspire each other
- to model and to share ideas about the non-standard rooms like the cinema room, the library, the secret room…
This would have already been great because they really got involved in the task and the houses already became precious. And, of course, we met our Maths aims: calculating and measuring. Somehow, during the lesson, we had a student who had already finished and, automatically almost, it turned into a conversation about the house and the student really enjoyed talking about it. I decided on the spot that there must be more lessons and a proper presentation.
Step 3 or ‘Tell me about it…’
Truth be told, I am kind of lucky because I have four lessons of Maths a week and four lessons of English so that gives me quite a lot of flexibility and freedom. I have the time that I can devote to the projects. On Thursday, our final day of the week, we usually have English and Maths and I decided to use both lessons on finishing the project.
In the first lesson, we were finishing our designs and preparing for the presentation. I told the children that we are going to rehearse in the classroom and then, in a separate classroom, my amazing T.A. will make making short videos of the presentations.
I prepared a template for the kids to use and it was both on the board and on the handout that they took into the recording room (‘Hello! My name is…and I am an architect. This is my house. The area of my house is…The perimeter of my house is… In my house I’ve got…My biggest room is…and my favourite room is… The task was easy / difficult and it was interesting / boring because…Thank you).
My more independent students rehearsed together and I helped out some of my less independent students. Then, my T.A. was taking the students into a quiet room and recording the little videos.
While I was preparing this stage of the lesson, I realised that I needed some grand finale and a reward for all this hard work.
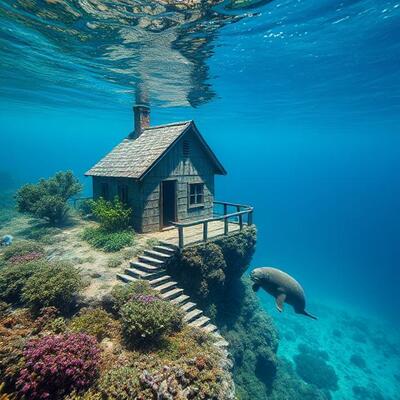
Step 4 or ‘We need a real illustration’
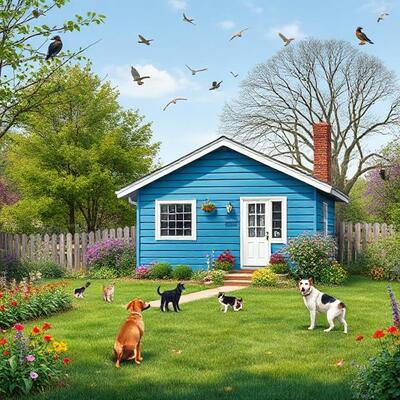
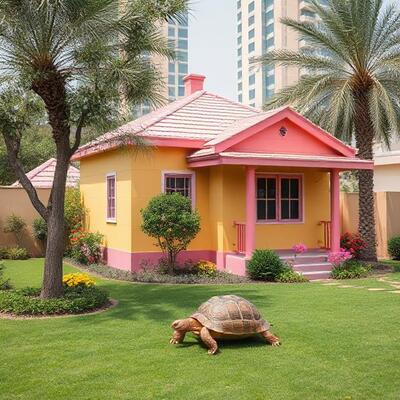
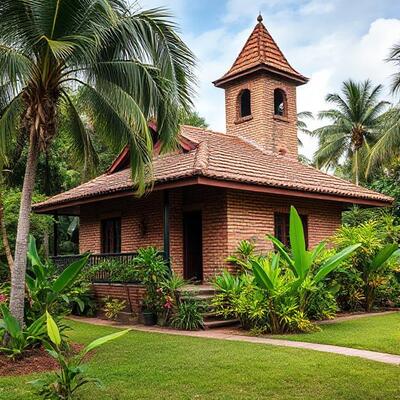
As you can see from the photos, the drawing of the outside of the house was a part of this project as, initially, I wanted the kids to simply create it themselves. However, they got so involved in the design and creating of the floor plan that asking them to draw another picture would be too repetitive. What is more, it is not so easy to draw the house in the time we had left for this lesson and ‘just drawing’ does not lead to any language production. And using the A.I. certainly does!
Now, I know that there are many disadvantages of using A.I. and there has been a lot of talk in the recent weeks of how it abuses the copyright and how environment-unfriendly it is but it is a perfect solution for the young writers and so I decided to use it again in my lessons*).
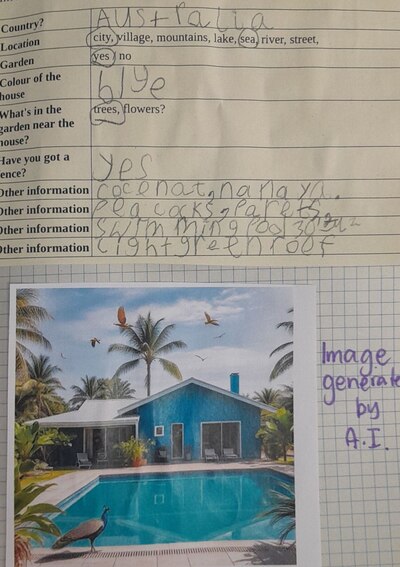
I explained for the kids that an A.I. engine would create the images of the outside of the house if we prepare detailed descriptions for it. Everyone got a small handout and they had to make more decisions about their design: the location of the house (country, city, etc), the colour of the house, the surroundings, the garden, the fence etc. I took their notes home and typed them up and then brought the pictures to class. We had a lot of fun looking at all the photos and trying to guess which house was whose. Indeed, this worked very, very well.
Instead of a coda
We had a great time with the project and I am very happy with how it turned out
- My students drew, calculated, read, wrote and spoke a lot.
- We managed to include almost all language skills and at least three different subjects.
- The kids had a chance to express themselves creatively and to make independent decisions but also to be the real scientists, to follow instructions and the rules, to be accurate.
- It was important to add the last bit, the outside of the house because this was where my students really let themselves be creative. As can be seen in the photographs, the gardens filled with flowers, trees, dugongs, peacocks and dogs and the kids were really specific about the location of their houses, too.
- I could not watch the videos being made, I only watched the final product and it was a real pleasure to see the kids speak freely and independently, adding some details and getting into a real conversation. I was really proud of them and, in a way, this project was their end-of-year project and I can say they all learned a lot.
- We shared the videos with the parents so I hope it will also help everyone remember this year and the progress we made.
- For me, as a teacher, this project will be a memory of how a real, fully-fledged project developed in the making and that the most important thing is to keep my teaching eyes open for new options and for all of the potential that it may hold. Knowing everything from the beginning is not always an advantage. There might always be more that is possible.
- The basis for the project were very simple handouts that you can see in the photographs. We kept them all in our portfolios (aka the notebooks). The videos were shared with the parents digitally.
- All of the activities described here took a total of 5 lessons. I am not sure if this is everything that a teacher can set aside for a project but I decided to keep everything in and, as always, we adapt to everything that is possible in a specific context and with a specific timetable and a number of hours a week available.

Happy teaching!
*) Do I feel guilty? No, not really. My A.I. footprint is minimal – all my words come right from my brain, I only use the visual creations and very, very rarely. The total of times I have used A.I. for my projects is still under ten. I think I am fine, for now.
**) Deepai.org can be used for commercial purposes.