Last year, the month of May was one crazy ride. We made madalas, we made dreamcatchers, we used salt dough and it very messy and it was lots of fun. Naturally, May 2025 also became the Materials May.
We started with clay. And with portraits.
The language
Actually, the language was not the main priority this time. Just like in our materials lessons last year, the absolute leader in the lesson, the first place, the right of way, all of that was the material, the medium. The language was just something I picked up because we needed it for this particular lesson. This time it was the body parts, especially the parts of the face. We revised them, made up a new chant and played a bit with tell me about your person / monster using a set of pictures.
The artist
The artist of the day was not the most important stage, either, but I am very happy with the idea I had for this lesson and how it worked out. Instead of one particular artist, I prepared a whole collection of portraits for all of us to understand how diferent they can be. We looked at them, one by one, and tried to look at what the focus was: the face, the body, the place, the colours or the technique. I was hoping that it would help the children see many various styles in which they could execute their own portraits.
The art
The main idea for the creative part came from Princess Artypants – a face made of clay. I told the kids that they could choose to create a face, any face they wanted, their face or someone else’s, in a style of their choice.
I showed the kids a face I made before the lesson and I outlined the steps (1. clay (form, roll, shape) 2. draw (with sticks and plasticine knives), 3. paint (acrylic paints).
Before the lesson, I prepared the tables and all the resources and I was handing them out and picking them up as we went through the task. I was also making one more piece of mine to better illustrate the instructions.
In terms of the resources we used: a large sheet of paper, fitted with the scotch as the main workplace, a rolling pin to prepare our circles, clay (self-drying, ochra colour), sticks, chopsticks and small plastic knives, paintbrushes and wet tissues, acrylic paints in tubs (everyone got their personal blob of the chosen colours on their A3 piece of paper aka workplace), pieces of cardboard to transfer the faces onto and as their frames.
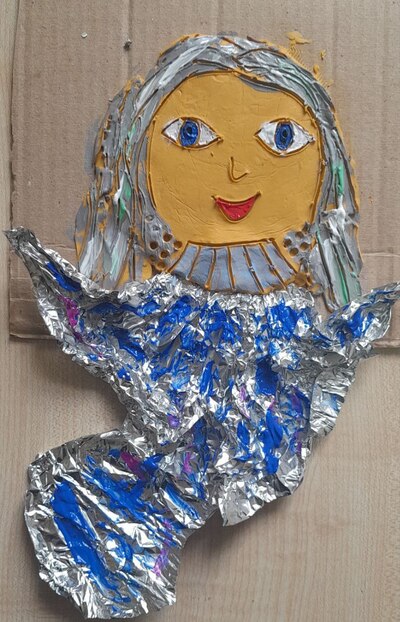
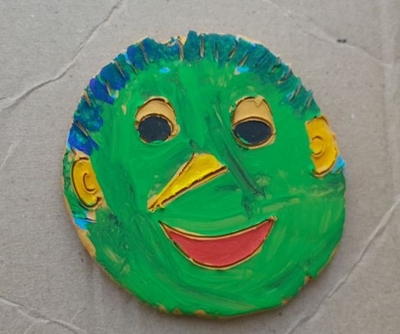
As can be seen in the photos, we created lots of different types of clay faces and, as usual, it was a joy to see how quickly everyone started to make their own decisions and to develop their own style. One of my students opted for creating the face of a cat, one made an absolutely beautiful abstract Pinocchio. One focused on the colours and one, completely out of the blue, asked for tinfoil because ‘I’ve got an idea, miss Anka!’
To be honest, the idea (for the dress aka the body made out of tinfoil) was so good that I wanted to make my own and this is how his ‘Mona Miss Anka’ was created and how my ‘Angel / Mermaid’ came to be, too.
I really liked the clay as the material because it is extremely flexible and user-friendly. It did require warming it up in the tub of hot water (I did it before the lesson, warmed it up and broke it up into blobs) but later on it was relatively easy to work with it. And it was easy to fix the mistakes in case they occured. We also did not have to wait for it to dry, we started to paint straight away.
It was definitely one of those lessons that finished with me, cleaning up the tables with a huge smile on my face. I loved it.
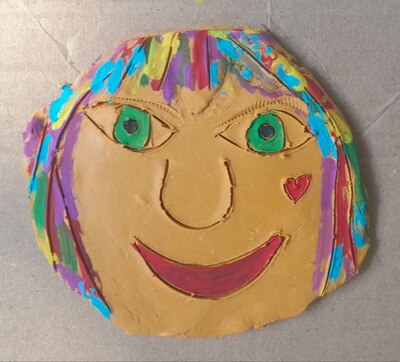
The pictures that were especially touching include the very basic Pinocchio. It was created by my youngest student and it was the first time this year that he prepared one piece and immediately asked for another piece of clay, to create more. I also love the coloured faced because it was created during a long process of collecting and combining different colours and shades. The outcome is the result of a lot of work and reflection. And, of course, the title piece here, that was a result of experimentation with tools and their opptions and the lovely print that came out of it.
I have already started to think about the adaptations and creating anything in clay, to use it with any EFL topic, fruit, food or animals. Body parts and faces, too, of course! Since it is so easy to create pictures with a stick, I was also thinking of a picture scene, a house, a Christmas tree or a dress. I am already looking forward to it!
Happy teaching!